Have you ever wondered how to make the checkout process on your online store quick, easy, and secure for your customers? Having a reliable payment system is important for any ecommerce store, and the WooCommerce Stripe payment gateway stands out as an effective solution. This article will discuss how the WooCommerce Stripe payment gateway integrates into online stores, detailing its benefits, key features, setup process, security measures, and ways to enhance the customer experience.
The WooCommerce Stripe gateway offers exciting opportunities for businesses to expand their reach by accepting multiple payment methods and currencies, ensuring secure transactions, and providing an optimized checkout experience that can boost conversion rates and customer satisfaction.
FAQ
How to set up Stripe payment gateway in WooCommerce?
How much does WooCommerce Stripe payment gateway charge?
What is the difference between Stripe and WooCommerce payment gateway?
Which payment gateway is best for WooCommerce?
Where to download the Stripe plugin?
What are the transaction fees for Stripe?
Understanding the WooCommerce Stripe payment gateway
The WooCommerce Stripe payment gateway lets you accept various payment types on your online store, simplifying the checkout process for customers. With Stripe’s integration, you can accept credit cards, debit cards, and other payment methods on your site, allowing you to focus on selling while Stripe manages financial transactions.
Stripe supports worldwide payments and works with local payment options in different countries, broadening your reach and enabling more customers to buy from you. Stripe offers extra tools to benefit your business, such as subscription management, fraud prevention, and detailed sales reports.
Benefits of integrating Stripe with WooCommerce
Integrating Stripe with your WooCommerce store offers multiple advantages that improve both your business operations and customer experience. Here are the key benefits:
- Simple setup and no monthly fees: Stripe is easy to integrate with WooCommerce, and there are no recurring monthly costs, making it a cost-effective solution.
- Wide range of payment options: Accept payments through various methods, including credit and debit cards, Apple Pay, Google Pay, and more, giving customers flexibility.
- Simple checkout process: Stripe’s autofill feature speeds up the checkout experience, which can lead to higher conversion rates and increased sales.
- High security standards: Stripe follows strict security protocols to keep payment data safe, providing peace of mind for both you and your customers.
- Global reach: With Stripe, you can accept payments from customers around the world, expanding your potential market.
These benefits make Stripe a great option for WooCommerce store owners to improve payments and customer satisfaction.
Key features of the WooCommerce Stripe payment gateway
The WooCommerce Stripe payment gateway lets you take payments right on your website. You don’t need to pay setup costs or monthly fees to use it.
With this plugin, you can accept many types of payments:
- Credit and debit cards
- Apple Pay
- Google Pay
- WeChat Pay
- Cash App Pay
You can also take local payments like Alipay and Boleto. This helps you sell to customers in different countries. The plugin gives you a smooth checkout process. It works well on phones, tablets, and computers. This makes it easy for people to buy from you.
Stripe’s checkout can boost your sales by almost 12%. It lets customers save their payment information, so they can check out faster next time.
You get 23 payment methods with this plugin. This includes “buy now, pay later” options. These choices help more people complete their purchases.
The plugin is safe and follows rules to protect customer data. It also works well with other WooCommerce features. This makes it simple to set up and use on your online store.
Looking to sell online? Develop and launch your store with 10Web AI Ecommerce Website Builder.
Create your online store in minutes!
Setting up Stripe for WooCommerce
Stripe makes it easy to accept payments on your WooCommerce store. You can set it up quickly by creating an account, installing the plugin, and connecting it to your site. Let’s go through the steps to get Stripe working with your WooCommerce store.
Create a Stripe account
To use Stripe with WooCommerce, you need a Stripe account.
- Go to the Stripe website and click Sign up.
- Enter your email, full name, and create a strong password.
- Pick your country and click Create account.

Stripe will ask for more details about your business.
- Fill in information like your business name, address, and what you sell.
- Add your bank account to get paid.
- Have a government ID ready to upload. Once done, your account will be ready to use.
Install and activate the Stripe plugin
With your Stripe account set up, it’s time to add it to WooCommerce.
- Log in to your WordPress dashboard.
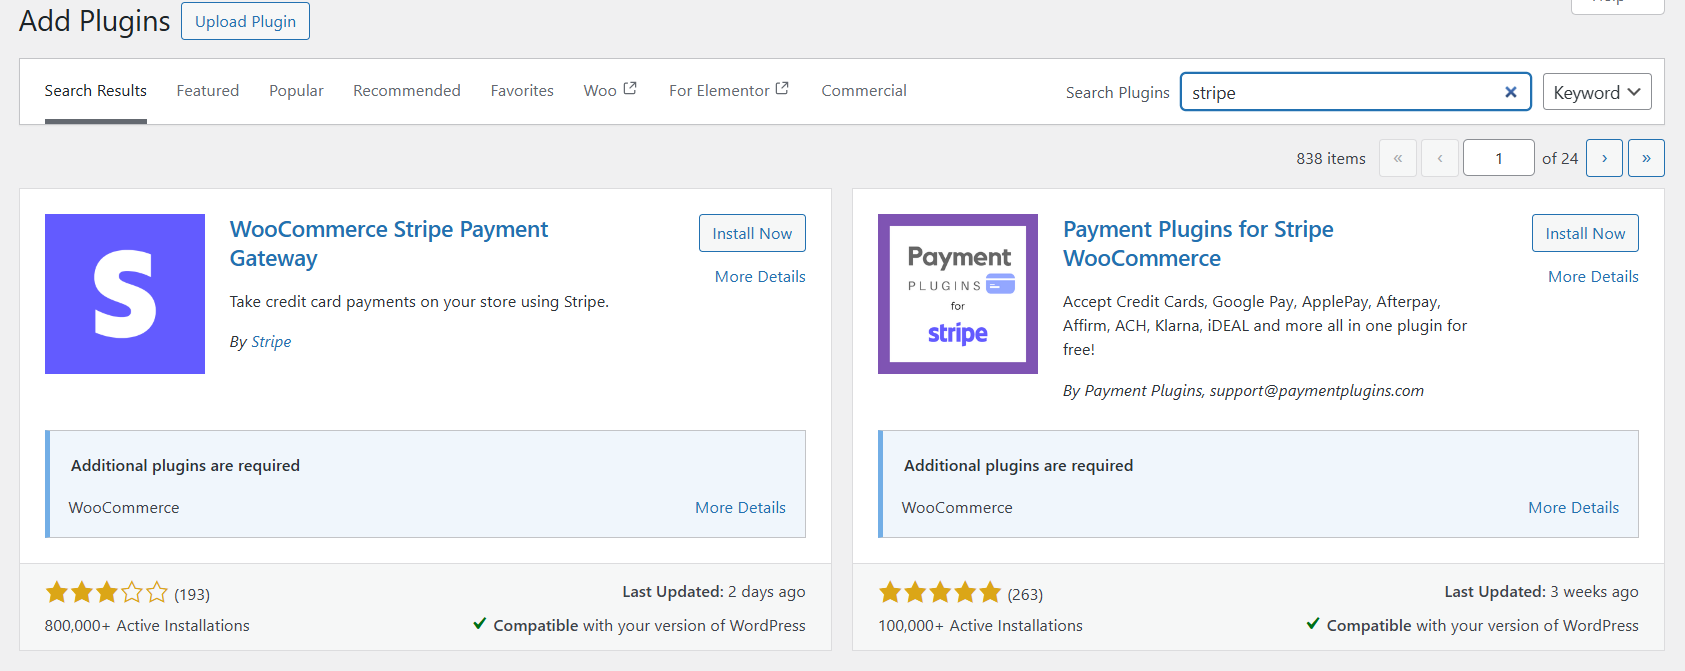
- Go to Plugins > Add New.
- Search for WooCommerce Stripe Payment Gateway.

- Find the official WooCommerce Stripe plugin and click Install Now.
- After it installs, click Activate. The plugin is now ready to set up.
If you can’t find it in the WordPress plugin directory, you can download it from the WooCommerce website. Then upload it through the WordPress dashboard or via FTP.
Connect Stripe with WooCommerce
Now that the plugin is active, you need to link it to your Stripe account.
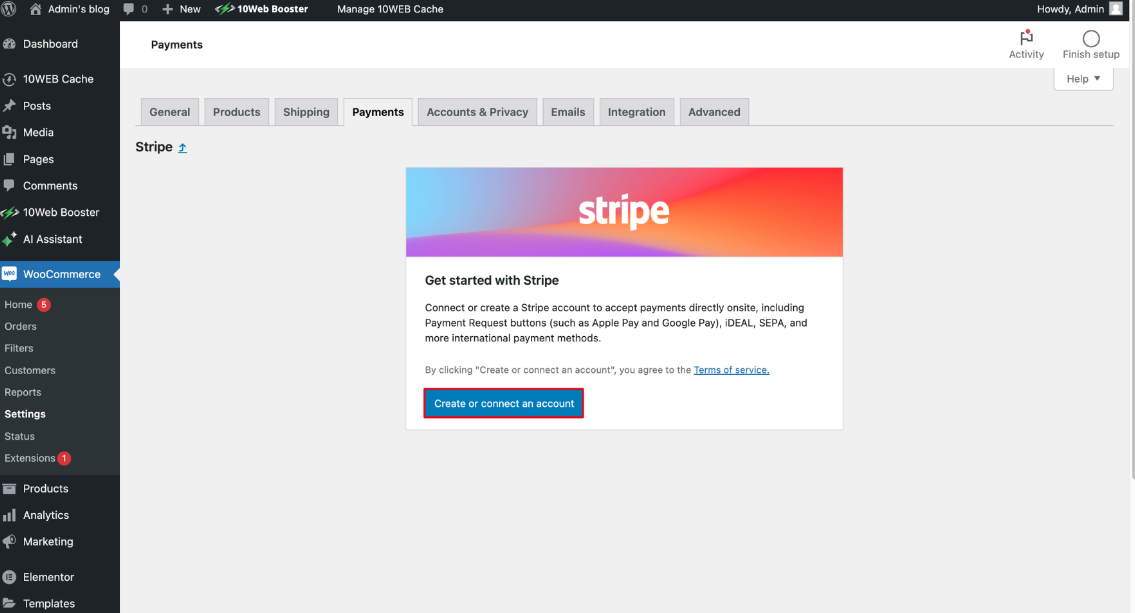
- In your WordPress dashboard, go to WooCommerce > Settings > Payments.
- Find Stripe in the list and click Set up.
- You’ll see a button to connect your Stripe account. Click it and log in to Stripe when prompted.

- Give WooCommerce permission to connect to your Stripe account.
Back in WooCommerce, you can now set up how Stripe looks on your checkout. You can change the title customers see and add a description. You can also choose which credit cards to accept.
It’s important to test your setup before going live. Use Stripe’s test mode to make sure everything works without real money.
Set currency options
- Go to the WooCommerce settings page and click on the General tab.
- Find the Currency options section, and pick your store’s main currency from the dropdown list. You can also set how prices will display, like where the currency symbol goes.
- Set your decimal and thousand separators. These small details help customers understand prices clearly.
- If you want to accept payments in other currencies, you’ll need to set that up separately in your Stripe account.
Changing your currency after you start taking orders can cause issues. It’s best to set this up right from the start.
Customize payment methods
Stripe lets you accept many types of payments. To set these up, follow these steps:
- Go to WooCommerce > Settings > Payments > Stripe. You’ll see a list of payment methods you can turn on or off. Credit cards are on by default.
- For other options like Apple Pay or Google Pay, just click the checkbox to turn them on. Some payment types might need extra setup steps.
You can also change how these payment options look at checkout. You might want to add logos or change the order they appear in. This can help make checkout faster and easier for your customers.
Understanding Stripe fees and payouts
Stripe’s fee structure and payout system are key parts of using their payment gateway. Let’s look at how Stripe charges for transactions and sends money to your bank account.
Fee structure explained
Stripe takes a small cut of each payment you receive. For US businesses, they charge 2.9% plus 30 cents per successful card transaction. This means if someone buys a $100 item, you’d get $96.80 after Stripe’s fees.
For sales outside the US, Stripe adds a 1% fee on top of the base rate. So international payments cost 3.9% plus 30 cents total.
In-person sales using Stripe have lower fees. You pay 2.7% plus 5 cents per swipe, tap, or dip.
Stripe doesn’t charge extra for most payouts to your bank. But there may be a small fee for instant transfers or payouts to non-US banks.
Schedule of payouts
Stripe sends your money to your bank account on a set schedule. For most US businesses, payouts happen daily. This means today’s sales hit your bank in 2 business days. You can check your next payout date in your Stripe dashboard. The Balance page shows when money will arrive.
Some new Stripe accounts start with weekly payouts. As you process more payments, you may qualify for faster schedules.
You can also set up manual payouts if you want more control. This lets you choose when to move money from Stripe to your bank.
Stripe payment processing
Stripe handles credit card payments securely for WooCommerce stores. It processes transactions and moves money to your bank account.
How payments are processed
When a customer buys something, Stripe checks if their card is valid. It asks the bank if there’s enough money. If approved, Stripe takes the funds from the customer’s account.
The money goes to your Stripe account first. Stripe keeps a small fee for each sale. The rest moves to your bank account on a set schedule, like weekly.
Stripe uses encryption to protect card details. It follows rules to keep payments safe and prevent fraud. This helps both you and your customers feel secure when buying from your store.
Handling failed payments
Sometimes payments don’t go through. This can happen if a card expires or has no funds. When this occurs, Stripe sends an error message to your site.
You can set up automatic emails to tell customers about failed payments. These emails can ask them to try again with a different card.
For subscriptions, Stripe can try the payment again later. You choose how many times it retries and how often. If it still fails, the subscription may be paused or canceled. You can see failed payments in your Stripe dashboard. This lets you reach out to customers or fix issues yourself if needed.
Troubleshooting common issues
When using the WooCommerce Stripe payment gateway, you may run into some problems. These can affect payments and cause frustration. Let’s look at two common issues and how to fix them.
Connectivity problems
If your site can’t connect to Stripe, payments won’t go through. Check your internet connection first. Make sure it’s stable and working well. Next, look at your Stripe API keys. Go to WooCommerce > Settings > Payments > Stripe. Check that you entered the right keys. If they’re wrong, payments will fail.
Sometimes, your site’s security settings can block Stripe. Check with your web host about firewall rules. They may need to allow Stripe’s IP addresses. You can find these on Stripe’s website.
If the problem continues, try clearing your site’s cache. Also, update WooCommerce and the Stripe plugin. Old versions can cause connection issues.
Unexpected declines or errors
Customers may see their payments declined for no clear reason. First, check the error message in your Stripe dashboard. It often gives clues about what went wrong.
Common reasons for declines include:
- Wrong card information
- Not enough funds
- Expired card
- Bank blocks
To fix these, ask customers to double-check their information. They may need to use a different card or contact their bank. If any payments fail, look at your Stripe settings. Make sure you set the right currency and payment methods. Also, check that your account is fully verified with Stripe.
For specific error codes, use Stripe’s error code list. It explains what each code means and how to fix it.
Stripe’s dashboard features
Stripe’s dashboard gives you tools to manage payments and see how your business is doing. It shows you important details about money coming in and lets you handle refunds easily. Let’s look at the features that Stripe has:
Reporting and analytics
The Stripe dashboard gives you a clear picture of your sales. You can see how much money you’ve made each day, week, or month. The dashboard shows you which products are selling best. You can also track where your customers are from.
Stripe lets you make custom reports. You can pick the data you want to see. This helps you spot trends in your business. The dashboard also shows you info about failed payments. This can help you fix problems and get more sales.
Refund handling
Stripe makes it easy to give refunds. You can refund the whole payment or just part of it. The dashboard shows you all the details of each refund. You can see when it was made and how much was refunded.
You can set rules for refunds. This helps keep your refund process fair. The dashboard also lets you add notes to refunds. This is helpful if you need to remember why you gave a refund. Stripe keeps track of all your refunds. You can see how many refunds you’ve given and how much money you’ve refunded. This helps you understand how refunds affect your business.
Conclusion
Integrating the WooCommerce Stripe payment gateway makes your store’s checkout process simpler, more secure, and better for your customers. This integration lets you accept various payment methods like credit cards, debit cards, and digital wallets such as Apple Pay and Google Pay. It’s simple to set up, reliable, and has strong security, making it perfect for businesses.
With WooCommerce Stripe, you can offer a quick and easy checkout experience that helps boost sales and keep customers coming back. Supporting multiple currencies and local payment options expands your reach, while features like saved card details and customizable payment methods, add convenience.
Whether you want to simplify payments, grow your business, or improve security, WooCommerce Stripe has the tools to meet your needs and keep your customers happy.
Looking to sell online? Develop and launch your store with 10Web AI Ecommerce Website Builder.
Create your online store in minutes!


