Changing the currency in WooCommerce is crucial for managing a versatile online store that appeals to a global audience. This guide will explain how to change currency in WooCommerce dashboard to better match the geographic and economic contexts of your customers. From setting up the default currency to implementing multi-currency support, this article offers a comprehensive walkthrough to help you tailor your store’s financial interactions to meet diverse customer needs effectively.
FAQ
How do I show different currencies in WooCommerce?
How do I change the currency language in WooCommerce?
How do I change the currency format in WordPress?
Overview of WooCommerce currency settings
When managing your WooCommerce store, it’s essential to set up the currency options properly to reflect the correct pricing for your customers. WooCommerce provides a straightforward approach to configure these settings.
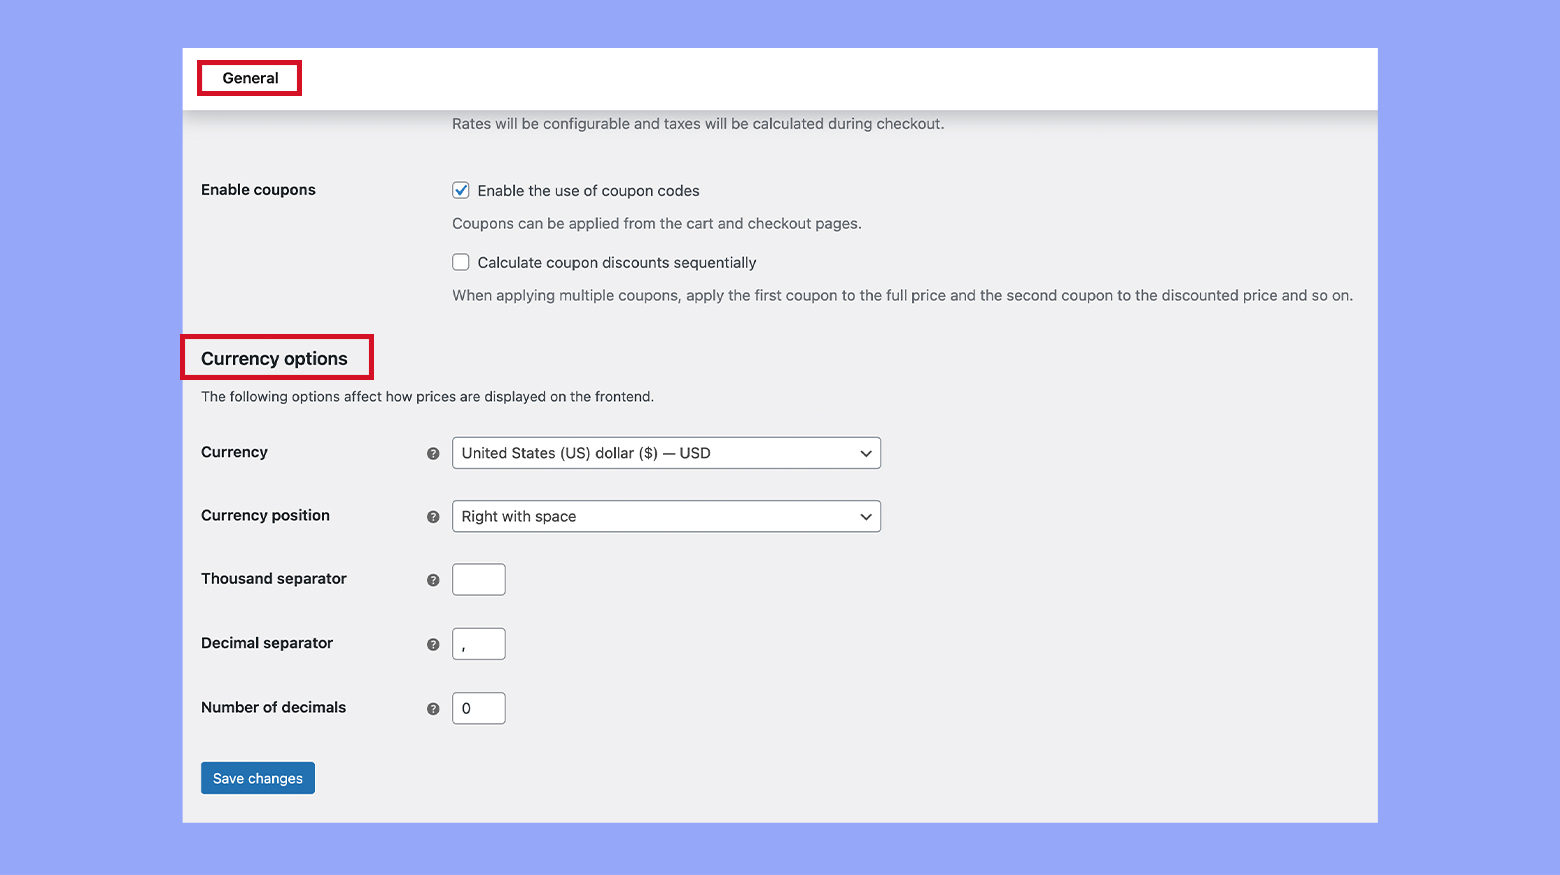
Firstly, access your currency settings by navigating to WooCommerce > Settings > General. Here, among various configurations, currency settings play a vital role in how your online store presents and handles monetary values.
Default currency: Your WooCommerce store’s default currency is crucial, as it is the currency in which you will list your product prices. Choose it wisely to align with your target market.
Currency options:
- Currency position: Determine where the currency symbol appears in relation to the price, whether it’s to the left, the right, or with space on either side.
- Thousand separator: Select the character that separates thousands in your prices, ensuring that the customer reads the prices clearly.
- Decimal separator: Similar to the thousand separator, this character clarifies the division of whole numbers and fractional amounts.
- Number of decimals: Define how many decimal points you wish to show for your prices; important for precision in cost representation.
These settings ensure consistency and clarity in how prices are displayed across your ecommerce store. Here are the steps to adjust these settings:
- Log in to your WordPress dashboard.
- Go to WooCommerce and select Settings.
- Click on the General tab.
- Scroll down to find the Currency options section.

- Here, you can customize how the currency will be displayed in your store.
Remember to save your changes, and you’re all set for a tailored currency setup in your WooCommerce store. Create your custom online store in minutes with 10Web AI Ecommerce Website Builder and take your business online.

Looking to sell online?
How to change currency in WooCommerce
Step 1: Setting up custom currencies
To enhance your WooCommerce store’s global reach, you might want to add custom currencies that aren’t available by default. This involves adding custom code to your store’s functions.
Adding a custom currency code
- Access your WordPress site’s files through Appearance > Theme file editor and look for the functions.php file within your theme’s folder.
- Create a new custom function that will add your custom currency to the existing list of WooCommerce currencies.
- Use the add_filter function to hook into woocommerce_currencies.
- Define your custom currency by adding a new element to the currencies array within your function. Assign it a currency code and name.
- Here’s an example you can adapt, ensuring to replace “ABC” with your custom currency code and “Your Currency” with its name:

function add_my_currency( $currencies ) {

 $currencies['ABC'] = __( 'Your Currency', 'woocommerce' );

 return $currencies;

}

add_filter( 'woocommerce_currencies', 'add_my_currency' );
- Save the file and upload it to your server if you’re editing it locally.
Defining custom currency symbol
- Within the functions.php file, you will create another custom function to define the symbol for your new currency.
- Again, use the add_filter function, but this time hook into woocommerce_currency_symbol.
- Assign the custom currency symbol to the code you have previously added by keying it with the same code within your custom function.
- Below is an example of the code snippet to add the custom symbol “$$” to your new currency “ABC”:
function add_my_currency_symbol( $currency_symbol, $currency ) {

 switch( $currency ) {

 case 'ABC': $currency_symbol = '$$'; break;

 }

 return $currency_symbol;

}

add_filter( 'woocommerce_currency_symbol', 'add_my_currency_symbol', 10, 2 );
- Save your changes and ensure the functions are properly hooked into your WooCommerce store, so the custom currency and symbol appear on your site.
Step 2: Configuring currency options
When managing an online store with WooCommerce, tailoring your currency settings is essential for providing a seamless shopping experience that fits your business location and customer base.
Decimal and thousand separators
You can customize how your store displays prices by setting the Decimal separator and the Thousand separator. These minor details are crucial for accurate price representation and to avoid customer confusion.
- Navigate to WooCommerce > Settings > General.
- Scroll to the Currency options section.
- In the Thousand separator field, enter the character you want to use to distinguish thousands. Commonly used separators include commas (,) or periods (.).
- In the Decimal separator field, input the character that you prefer for separating decimals, often a period (.) or a comma (,).

By adjusting these settings, your product prices will be displayed in a format that’s clear and familiar to your customers.
Setting number of decimals
Determining the Number of decimals you want to display is important for the precision of your product pricing.
- Stay in the Currency options section of the General settings page.
- Locate the Number of decimals field.
- Enter the number that represents how many decimal places you want prices to show after the separator. Many stores choose to display two decimal places for standard currency format.
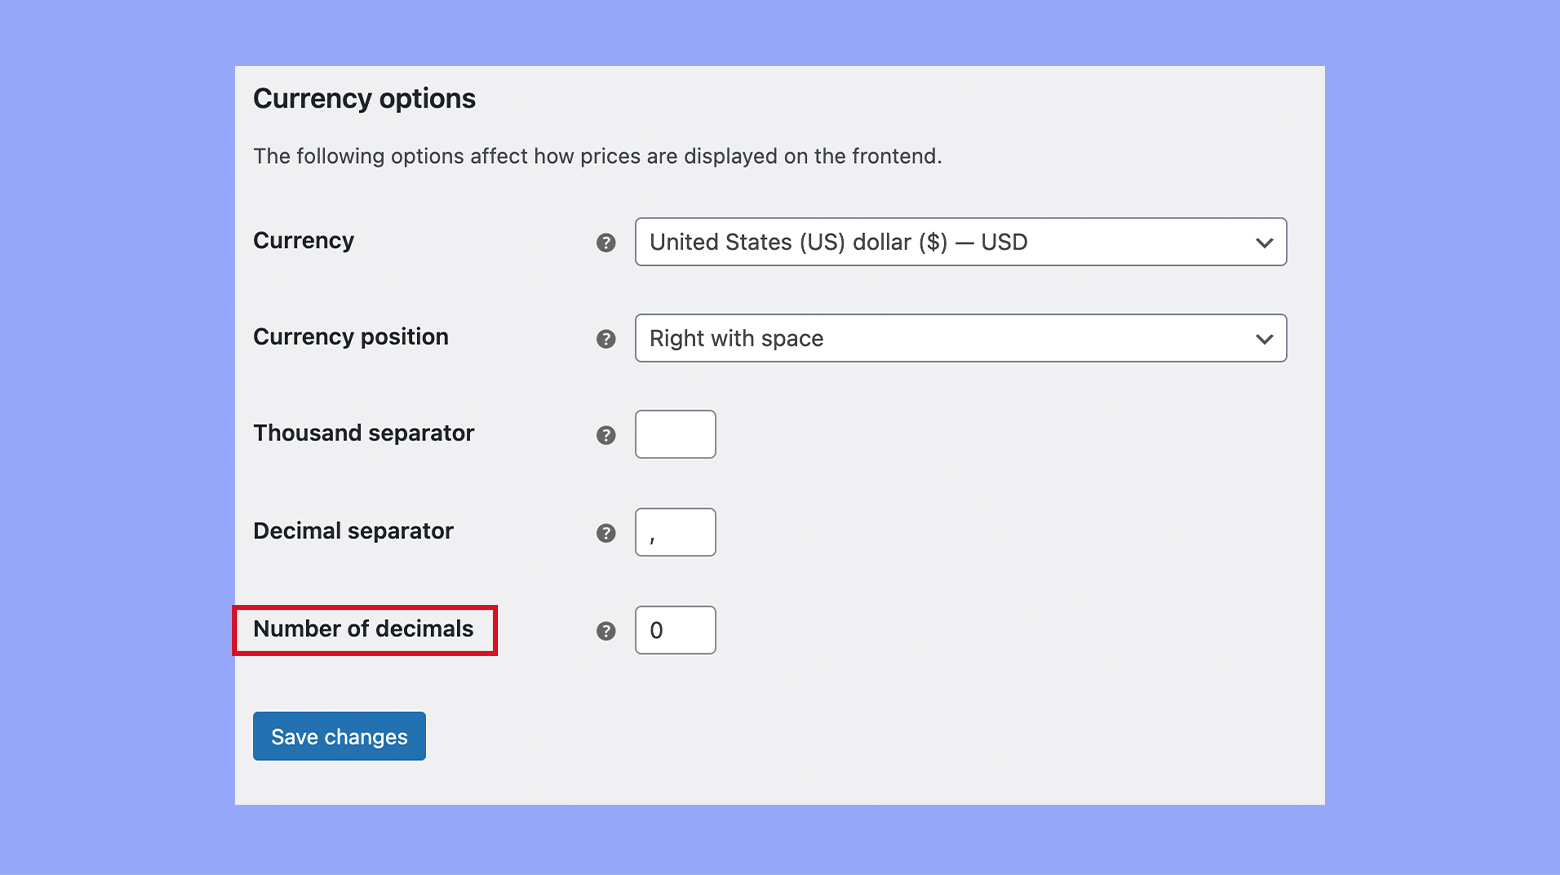
By configuring the Number of decimals, you ensure the prices in your store are both clear and accurate down to the last cent, aligning with typical currency formatting standards.
When you decide to sell globally, it’s crucial to provide customers the convenience of shopping in their local currency. Below are specific steps to help you add multi-currency support to your WooCommerce store.
Choosing the right multi-currency plugin
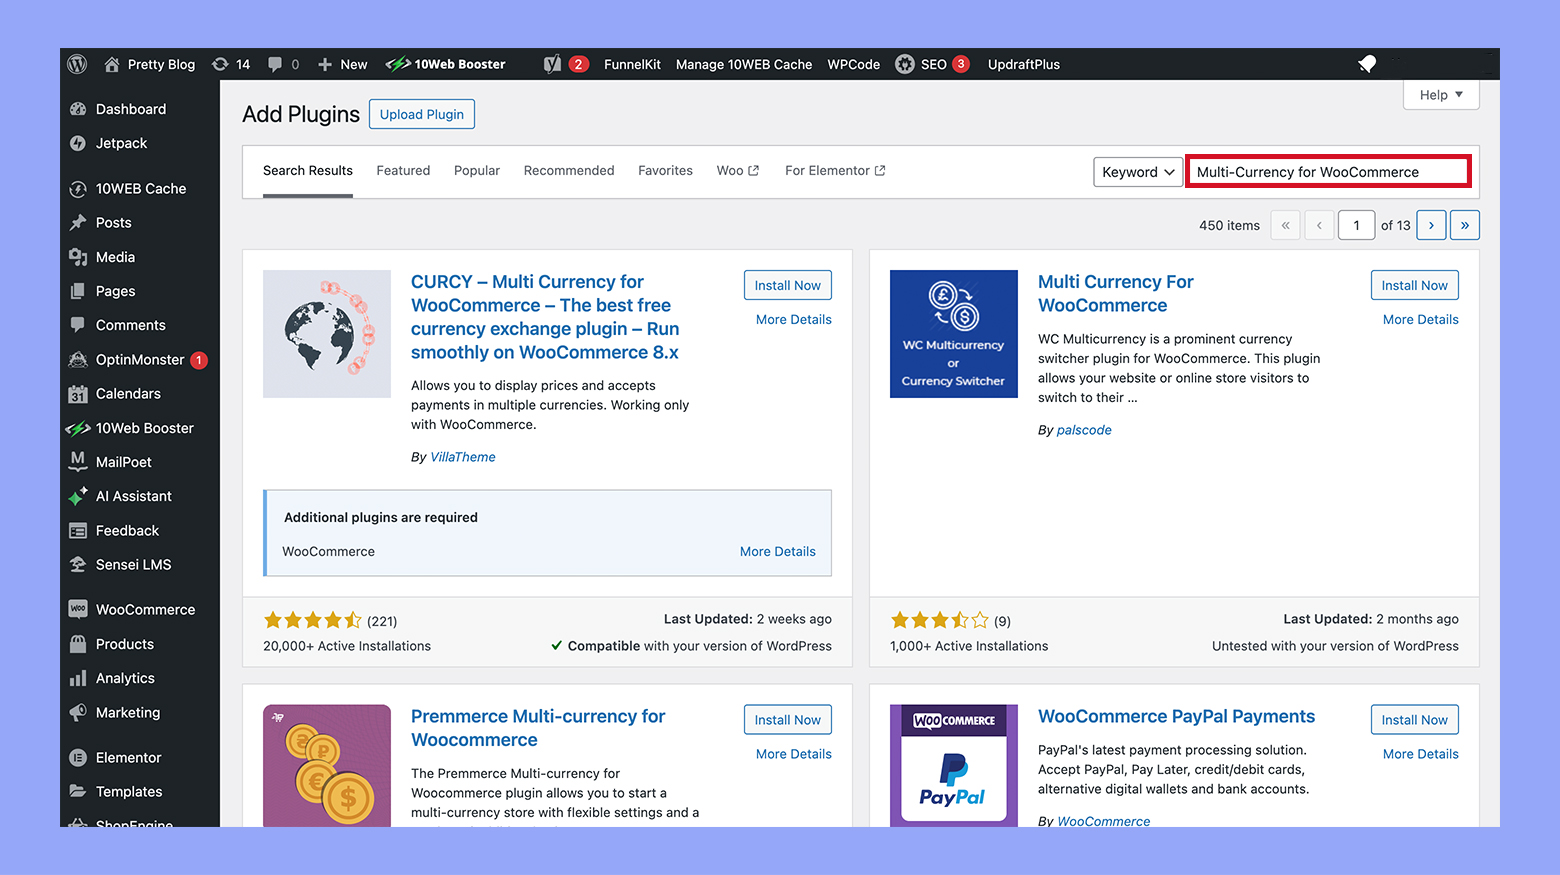
To get started, identify a multi-currency plugin that suits your WooCommerce store’s needs. Look for features such as automatic exchange rate updates and seamless integration with WooCommerce. Plugins like WooCommerce Multi-Currency allow customers to shop in their preferred currency, reducing cart abandonment rates.
- Visit the Plugins section in your WordPress dashboard.
- Click on Add New and search for Multi-Currency for WooCommerce.
- Install and activate the plugin following the instructions.
With the right plugin, you can enable features such as geo-targeting, which automatically selects the currency based on the customer’s location.
Managing exchange rates
A critical aspect of offering multiple currencies is managing exchange rates effectively. Your currency switcher plugin should support automatic updates of exchange rates to reflect the current market.
- Go to the plugin’s settings typically found under WooCommerce > Settings.
- Locate a section labeled Exchange Rates.
- Choose the option to automatically update rates or manually set them as required.
By managing exchange rates accurately, you provide a reliable shopping experience, allowing customers to know exactly how much they are spending in their own currency.
Step 3: Customization of currency display
Customizing your store’s currency display enhances the shopping experience by making pricing clear and user-friendly. Here’s how you can modify currency symbol placement and tailor the currency display to your store’s needs.
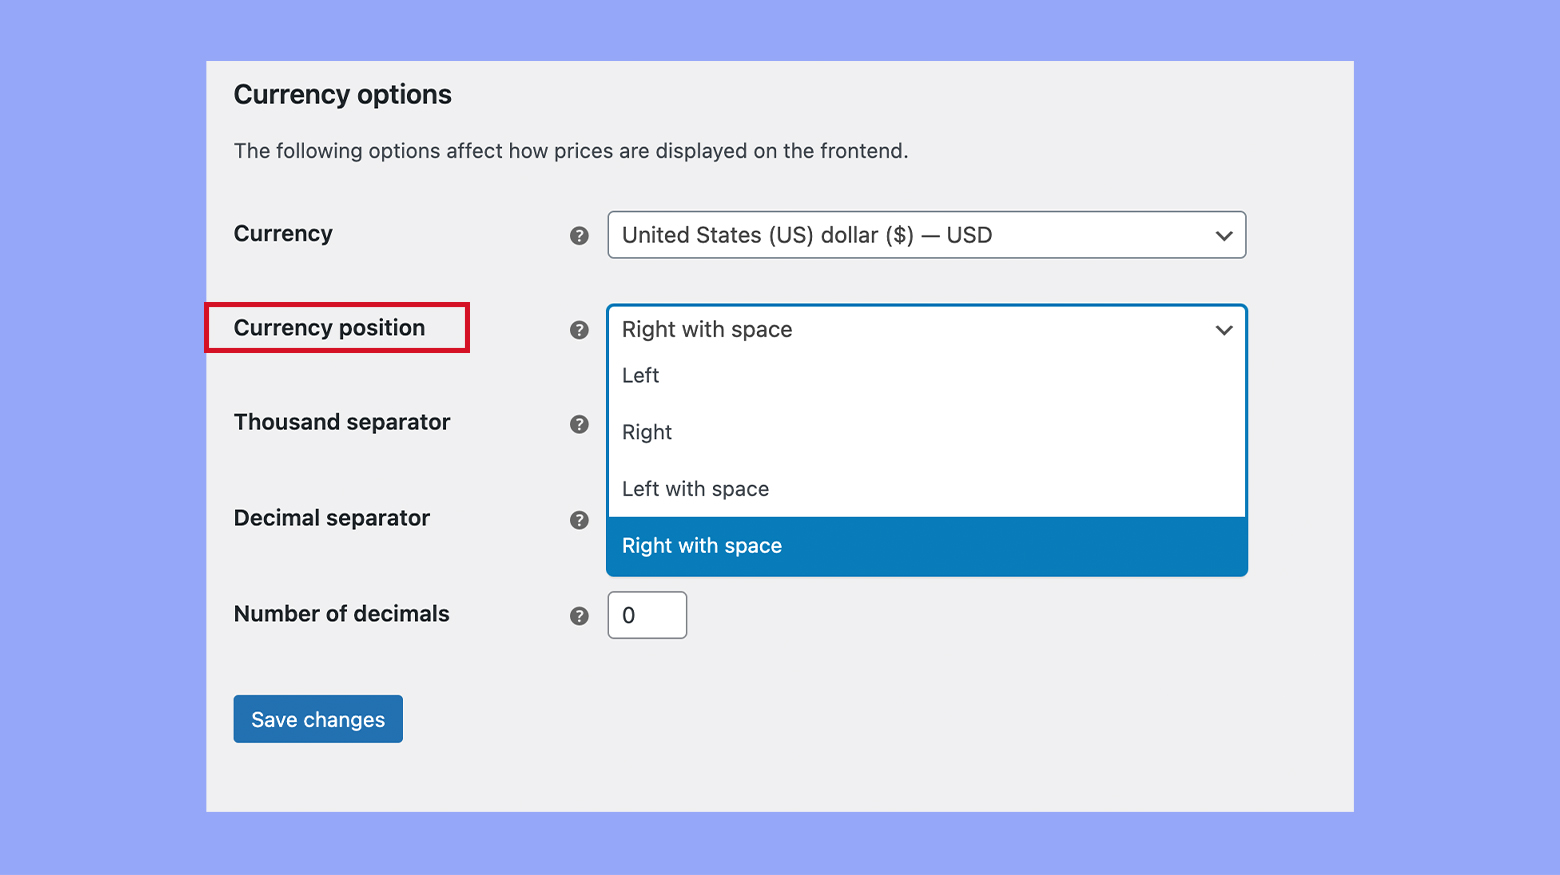
Changing the currency symbol position
- Go to your WooCommerce > Settings > General tab in your WordPress dashboard.
- Scroll down to the Currency options section.
- Use the Currency position dropdown to select your preferred position.
- The currency symbol can be placed to the left or right of the price, depending on what’s customary for your currency.
For more specialized placements or changes, like adding space between the currency symbol and the price, you can use custom code snippets. Make sure you’re comfortable editing your theme’s functions.php file or using a child theme before you proceed.
Customizing currency display on front-end
- Access the WooCommerce plugin options on your storefront.
- Customize the appearance of the currency symbol using WooCommerce currency symbol filters.
- For a visual change, consider using currency switcher widgets that allow customers to select their preferred currency.
- Implement code to change how currency is displayed across different parts of your website’s frontend. Keep the updates consistent with your brand’s appearance.
Remember, changes made directly affect how customers view and understand pricing in your online store.
Handling multi-currency checkout
When you’re expanding your WooCommerce store to serve international customers, you’ll want to facilitate a smooth checkout experience that includes currency conversion and allows payment in a preferred currency. This isn’t just about displaying prices in, say, American dollars; it’s about the actual transaction process. Here’s how to handle it:
- Ensure that your WooCommerce store is equipped with a multi-currency plugin that automatically calculates the exchange rate at checkout.
- Configure your payment processor to accept various currencies. This will likely involve setting up multiple accounts or finding a processor capable of handling various currencies without hefty fees.
- Give your customers the option to select their preferred currency from a dropdown list on the product page or at checkout. This enhances user experience and trust.
- Be transparent and display the most current exchange rate next to the product price in the selected currency.
- Clearly communicate any currency conversion fees that may apply, so your customers know exactly what they’re paying.
- Test the checkout process. Go through the checkout process yourself to ensure that all steps, from selection to transaction, are functioning as intended for multiple currencies.
Remember, the key is in minimizing surprises for your customers and making payment as effortless as possible, regardless of their currency.
Step 4: Enhancing user experience with currency options
Introducing versatile currency options in your online shop can significantly improve international customers’ shopping experience by tailoring to their local currency preferences.
Currency switcher widgets and shortcodes
You can elevate user experience by adding Currency Switcher Widgets to your WooCommerce store. These widgets enable your customers to easily select their preferred currency from a dropdown menu. To do so, drag the Currency Switcher widget to your sidebar where it’s most visible. Moreover, you can implement a shortcode in your posts or pages that allows a currency switcher to appear exactly where you find it most beneficial for your customers.
Auto-detecting customer’s local currency
For enhancing convenience, consider configuring a currency converter widget that auto-detects your shopper’s country and displays prices in their local currency. This feature utilizes the customer’s IP address to determine their location and automatically selects the relevant currency, often signaled by a corresponding flag. Your international customers will appreciate the tailored experience without the extra step of manually selecting their currency.
Step 5: Currency switching for global stores
Integrating a WooCommerce currency switcher into your online store enhances the shopping experience for your international customers. As ecommerce becomes increasingly global, it’s essential to provide multiple currency options to customers. This lets them browse and shop in their local currencies, providing a seamless international shopping experience.
To get started with currency switching in WooCommerce, follow these steps:
- Choose a currency switcher for WooCommerce plugin that suits your needs. This will allow your store to handle multi-currency transactions.
- After installation, configure the plugin through the WooCommerce settings. Typically, you’ll find these under a dedicated tab like WCCS Settings. Here, you can add new currencies and set exchange rates.
- Decide where you want the currency switcher to appear on your website. Common locations include widget areas or product pages to ensure visibility for visitors.
- Ensure that the currency switcher works correctly and that prices convert accurately across the selected currencies.
- By enabling customers to view prices and make purchases in their preferred currency, you’re not only improving user experience but also increasing the likelihood of international sales. Remember that maintaining accurate and up-to-date currency conversions is crucial for customer trust and compliance with economic regulations.
Best practices for currency conversion
When you’re managing an online store with WooCommerce, staying on top of currency conversion is crucial for a global customer base. Here’s a guide to help you update and maintain accurate exchange rates.
- Set up automatic updates: Ensure that your currency conversion rates are updated daily to reflect the current market. Most currency switcher plugins offer the option to enable automatic updates.
- Regular price checks: Keep an eye on both regular price and sale price settings in different currencies to avoid unexpected changes due to fluctuation in exchange rates.
- Multiple currencies: If you sell in multiple currencies, use a currency switcher plugin to define conversion rules, thus giving customers the convenience of shopping in their local currency.
- Conversion fees: Consider adding a small conversion fee to cover any costs associated with currency conversion that your bank may charge.
- Rounding rules: Implement rounding rules for pricing to ensure that the final price in different currencies appears professional and is easy to read.
- Testing: Regularly test the currency conversion process to ensure that the exchange rate applied is accurate and the final price displayed is correct.
- Backup: Always have a backup solution in manual settings to prevent any sales disruption if the automatic update fails.
By following these best practices, you can provide a seamless shopping experience for your customers, no matter where they are in the world.
Conclusion
Configuring the correct currency settings in WooCommerce is a straightforward but impactful way to enhance the global appeal of your online store. By following this guide on how to change currency in WooCommerce, you can ensure that your store accurately reflects the preferred currencies of your customers, improving their shopping experience and potentially increasing your sales. Create your online store in minutes with 10Web AI Ecommerce Website Builder.
Looking to sell online?
Create your online store in minutes


![]()