Typography plays a critical role in the design and usability of your WordPress site. Changing fonts can help you improve readability, mood, and the overall aesthetic appeal of your site.
It also can reinforce your brand identity, engage users, and make your content more digestible. Whether you’re looking to refresh your site’s look or optimize the user experience, altering your site’s fonts can be a great place to start.
FAQ
How do I change the font style on my website?
How do I add a specific font to WordPress?
How do you change the font in WordPress forms?
What are web fonts?
Web fonts are fonts that are used on websites and are not installed on the user’s device. Instead, they are downloaded from the internet when a webpage is loaded. This allows web designers to use custom fonts that are not limited by the fonts installed on a user’s computer, ensuring consistent typography across different platforms and devices.
The 4 web font types
- TrueType fonts (TTF): These are versatile font files used both in desktop and web contexts. They are widely supported across various devices and operating systems.
- OpenType fonts (OTF): Similar to TrueType but with more advanced typographic capabilities, such as ligature and alternate character support, making them suitable for complex text layouts.
- Web open font format (WOFF): Specifically designed for use on the web, these fonts are compressed and optimized for quick loading times. WOFF is considered the standard web font format because of its wide compatibility and performance.
- Embedded OpenType fonts (EOT): Developed by Microsoft, these fonts are used primarily in older versions of Internet Explorer and are less common today.
How to change font in WordPress?
Method 1: Using the Theme customizer to change font in WordPress
When adjusting fonts using the WordPress theme customizer, particularly with the North Shore theme, you can follow these numbered steps:
- Log into your WordPress dashboard.
- Navigate to Appearance > Customize to open the theme customizer.
- Once in the customizer, click on Fonts.

- You can separately set the fonts for the site title, navigation menu, heading, and body text.
- After selecting the fonts, click Publish or Update to add it to your site.


These steps will help you effectively manage and change font in WordPress using the theme customizer.
Automate manual work with 10Web Managed WordPress Hosting and 10Web AI Website Builder. Optimize your WordPress website effortlessly. ![]()
Simplify WordPress with 10Web
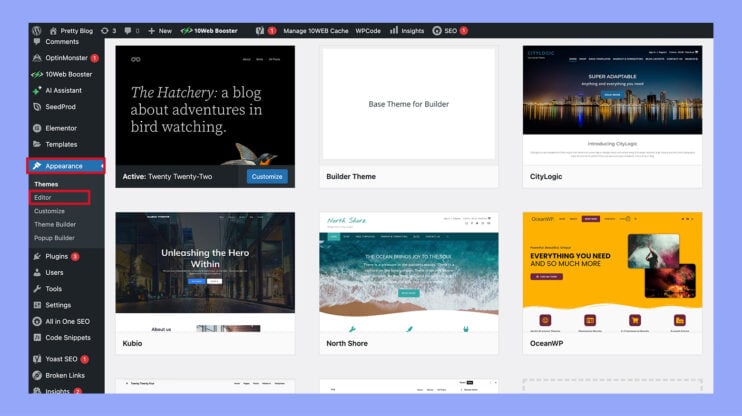
Method 2: Using full site editing to change font in WordPress
Many full-site editor (FSE) themes come equipped with a selection of fonts. In this example, we use the Twenty Twenty-Two theme, which allows you to modify fonts directly within the theme’s editor. Here’s how you can change fonts:
- Navigate to Appearance > Editor on your WordPress dashboard.
- Click on the Style icon located on the left side of your screen to access style settings and select the Pen icon to edit.
- Select the Typography section to open the font settings for your theme.
- Within the typography settings, choose the text element you want to modify, such as site text or link text.
- Click on the Font family dropdown menu to view and select from the available fonts or upload new ones.
- Optionally, adjust the font size, line height, and overall appearance to suit your needs.
- Once you’ve made your selections, click the Save button at the top right of the page to apply your changes.


This process allows you to customize the typography of your site easily within the FSE environment, enhancing both aesthetics and user experience.
Method 3: Using the Block editor to change font in WordPress
- Select the Block editor from Settings > Writing. Start by editing a post or page where you want to change the font.
- Modify text and background colors. Select the text block where you want to apply changes.
- Adjust font size and appearance. In the same sidebar, set the desired font size.
- Enhance text styling and add text features. If needed, add subscript or superscript characters to your text.
- After making your adjustments, ensure you Save or Update the post to apply the changes.
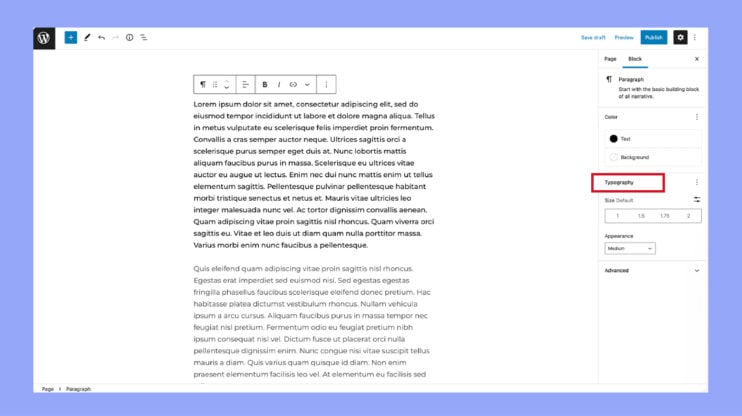
These steps will help you effectively use the block editor to customize the typography and style of your WordPress content.
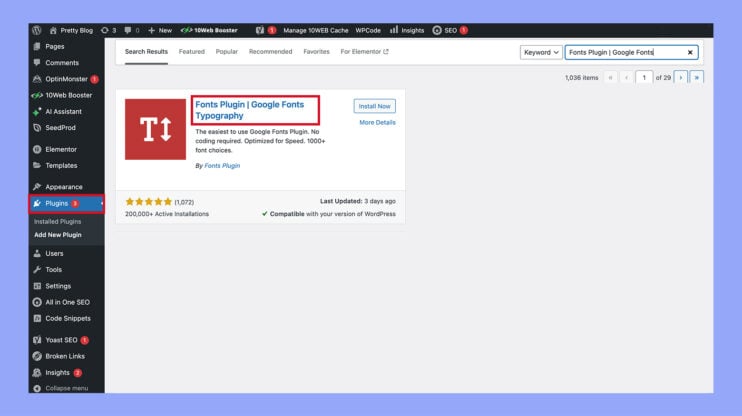
Method 4: Using a plugin to change font in WordPress
If you’re using a generic WordPress theme and want to change fonts, you might need to use a plugin like Fonts plugin | Google fonts typography. Here’s how to get started with it:
- Go to Plugins > Add new in your WordPress dashboard and install Fonts Plugin | Google Fonts Typography.
- Navigate to Appearance > Customize. Upon loading, you’ll find a new section titled Fonts plugin. Within this section, there are several tabs including Basic Settings, Advanced Settings, Font Loading, and Debugging.
- In Basic settings, select a default font family from over 1400 Google font options. Specify fonts for headings, buttons, and inputs. Advanced Settings allow you to adjust fonts for your site title, tagline, and navigation menus.
- Now you can modify the base typography, headings typography, and buttons and inputs typography.
- The Pro version lets you unlock font size and color, host fonts locally, optimize the font loading, and upload custom fonts
- And do not forget to Publish or Update to save the changes.
- If needed, use the Reset button to revert all changes made to the plugin.
These steps will help you effectively customize and manage fonts on your WordPress site using the Fonts Plugin.
Automate manual work with 10Web Managed WordPress Hosting and 10Web AI Website Builder. Optimize your WordPress website effortlessly. ![]()
Simplify WordPress with 10Web
Method 5: Adding a custom font in WordPress manually
If you’re interested in manually adding a custom font like Google’s Roboto to your WordPress site, the process is quite straightforward, although it does require some familiarity with editing theme files. It’s recommended to use a child theme to avoid issues since even a small mistake could cause major problems for your site. Here’s how you can do it:
- Visit Google fonts and select the Roboto font. Choose the styles you want to include.
- Copy the link provided in the embed code from Google Fonts. It will look something like this:
https://fonts.googleapis.com/css2?family=Roboto:wght@100;300;400;500;700;900&display=swap
- Use an FTP client like FileZilla to connect to your site. Navigate to /public_html/wp-content/themes/yourthemechild/functions.php (replace yourthemechild with the name of your child theme).
- Open the functions.php file and append the following code at the end:
function add_my_font() {

wp_enqueue_style( 'add_my_font', 'https://fonts.googleapis.com/css2?family=Roboto:wght@100;300;400;500;700;900&display=swap', false );

}

add_action( 'wp_enqueue_scripts', 'add_my_font' );
- Apply the font to your site:
- Locate your child theme’s style.css file in the same directory.
- Add the following CSS to dictate where Roboto should be applied:
.body, .h1, .h2, .h3, .h4, .h5, .h6 {

font-family: 'Roboto', sans-serif;

}
- This CSS will apply the Roboto font to all body text and headings across your site.
Remember, each theme may have specific nuances, so if the provided code doesn’t work as expected, consult your theme’s developer or use your browser’s inspection tool to identify the correct CSS selectors for your site’s fonts.
Additional tips when changing fonts in WordPress
- Select fonts that are easy to read for body text, such as sans-serif fonts for digital screens. Consider your audience and the overall readability of text on various devices.
- Using too many different fonts can make your site look cluttered and decrease readability. A good rule of thumb is to use a maximum of two to three fonts: one for headings, one for body text, and optionally one for accents.
- Each font adds to the loading time of your site. Choose fonts wisely and limit the number of font weights and styles you use to keep your site performance optimized.
- If you need a font that will work across all platforms and devices without requiring a download, consider using web-safe fonts that are pre-installed on most devices.
- Ensure that the fonts you choose display correctly across all major browsers and devices. Some fonts may render differently on different platforms.
- The fonts you choose should complement and reinforce your brand identity. Make sure they align with the tone and purpose of your website.
- Choose fonts and sizes that are accessible to all users, including those with visual impairments. Avoid fonts that are overly decorative for critical text elements.
- Plugins like Easy Google Fonts allow for easy integration and customization of fonts without needing to edit CSS files directly. This can be a straightforward option for those less comfortable with code.
- Make sure that the fonts look good not only on desktops but also on tablets and smartphones. Adjust sizes and line heights to improve readability and appearance on smaller screens.
- Only use fonts that you have the rights to use. Some fonts require licensing, especially for commercial use, so check the terms of use before integration.
Conclusion
Changing fonts in WordPress can dramatically affect your site’s appearance and user experience. By understanding the available methods and best practices, you can effectively implement font changes that enhance your site’s aesthetic and functionality.
Whether through theme customizer, full site editing, plugins, or manual methods, the possibilities are vast and flexible. Choose the method that best fits your needs and start experimenting to find the perfect typography for your WordPress site.
Skip and automate manual work with 10Web Managed WordPress Hosting and the 10Web AI Website Builder.Simplify WordPress with 10Web
Simplify WordPress with 10Web

![]()
![]()