Changing your WordPress theme is crucial for improving aesthetics, incorporating new features, enhancing performance, and staying up-to-date with current web standards. This blog post highlights the importance of updating your theme to reflect the latest branding and technological advances. It provides clear advice on how to change WordPress theme and make the transition smooth. If you aim to increase user engagement or refresh your site’s functionality, switching your theme could be an essential move.
FAQ
Can I change WordPress themes without losing content?
How do I manually change the theme in WordPress?
Can I reinstall WordPress theme without losing content?
Why should you change your theme
Switching your WordPress theme is not just about updating your site’s look—it’s a strategic decision that can greatly improve its functionality and attractiveness. Changing your WordPress theme can refresh your website in a number of ways:
- Visual appeal: Your website’s design is the first thing visitors notice. A fresh look can impress returning users and attract new ones.
- New features: Themes often come with new features and functionality that enhance your site’s capabilities.
- Performance: Upgrading to a better-optimized theme can improve your site’s speed and responsiveness.
- Compatibility: To stay up-to-date with the latest web technologies and standards, including mobile-friendliness, it’s important to switch to a theme that’s compliant.
- Branding: As your brand evolves, your site should reflect these changes. A new theme can align your site with your current branding strategy.
Before you change your theme, make sure to:
- Backup: Ensure that you have a full site backup.
- Test: Preview the new theme and test all functionalities.
- Review: Check your widgets and plugins for compatibility.
Remember, a new theme can propel your website toward your goals – be it better user experience, improved performance, or a stronger brand presence.
Preparing to switch themes
When you’re ready to change your WordPress theme, it’s important to prepare to avoid any disruptions to your site. Careful preparation includes backing up your content, setting up an environment where you can test the new theme, and ensuring that your plugins will work seamlessly with the new design.
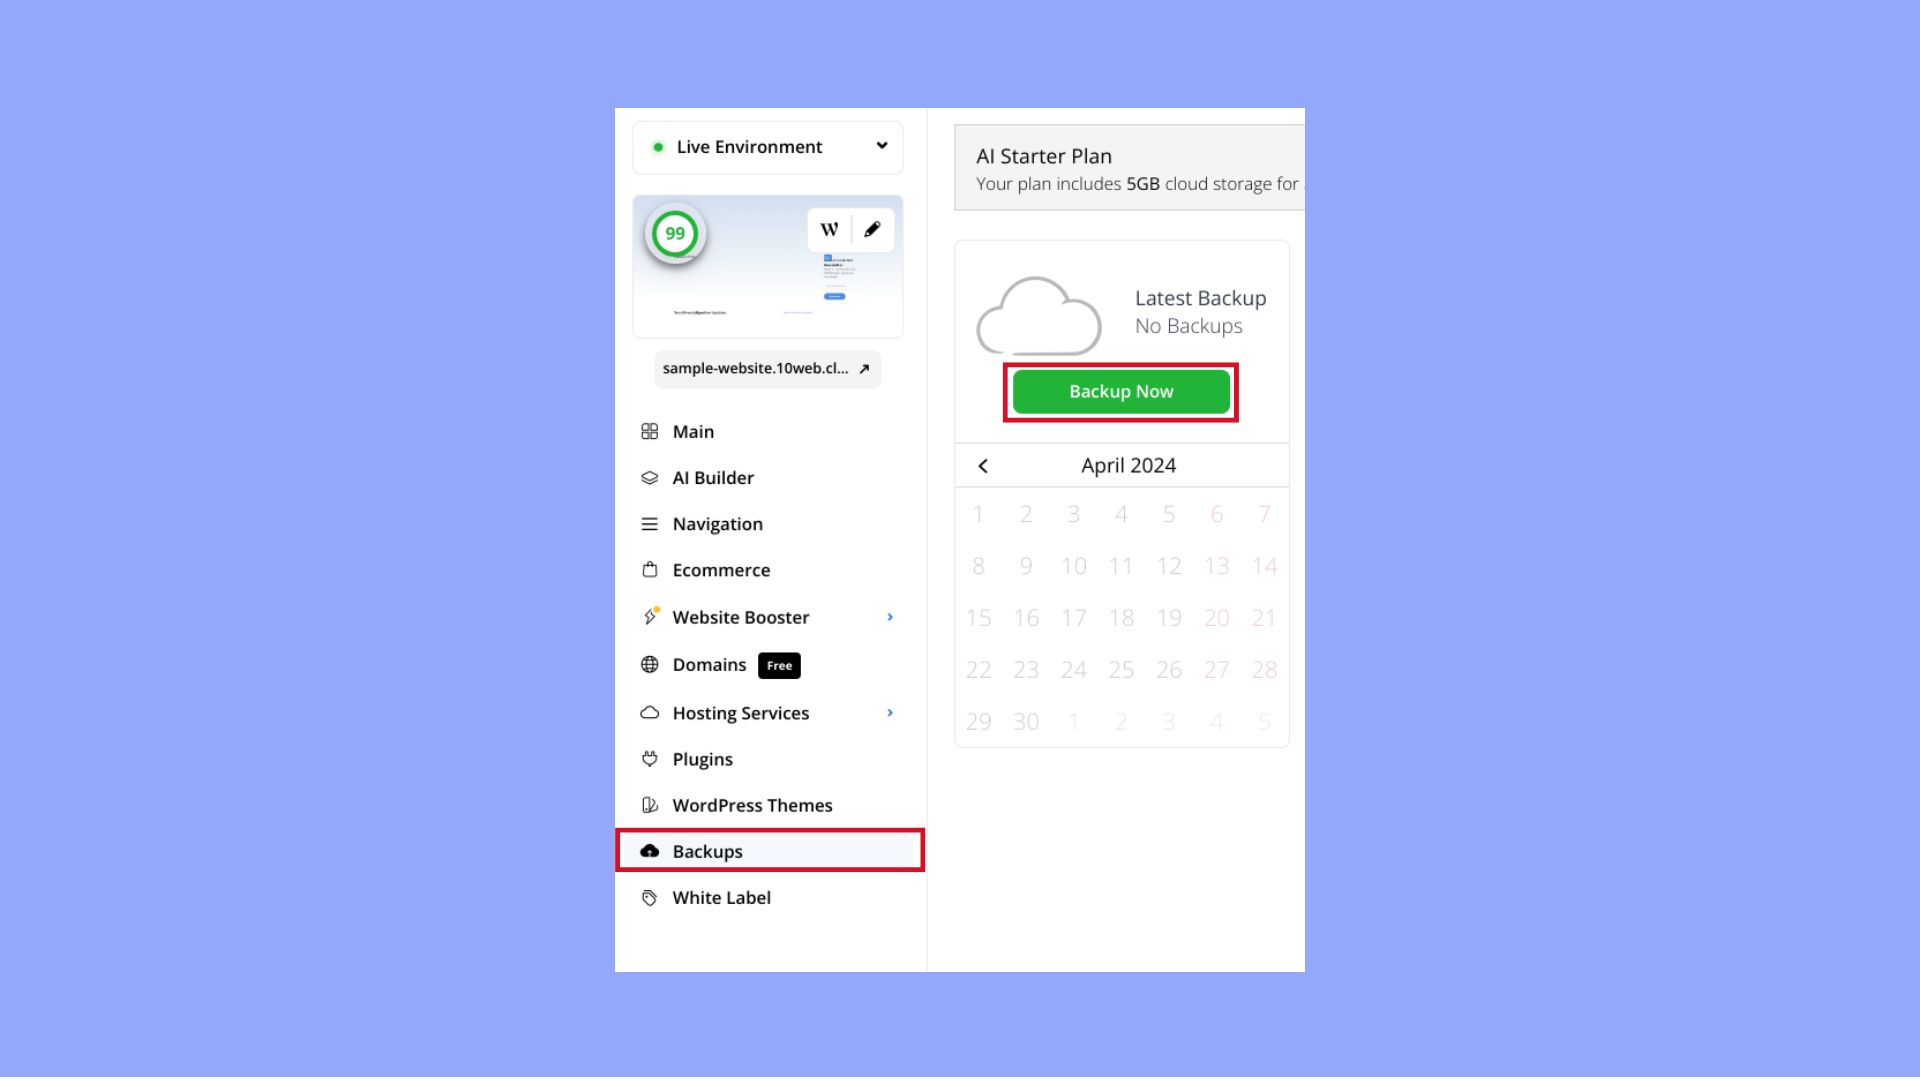
Create a full backup
Before you do anything, it’s crucial to create a full backup of your WordPress site. This backup should include your database, WordPress files, themes, plugins, and media. You can use a plugin like Duplicator to handle this process easily. Follow these steps:
- Install the Duplicator plugin.
- Navigate to Duplicator in your WordPress dashboard and click on
Create New. - Follow the instructions to build a full backup package.
- Once the package is built, download both the archive file and the installer script to your computer.
Remember, always store your backup in a safe location such as cloud storage or your local device.
Alternatively, you can also use hosting providers like 10Web, which provides you with the advantage of real-time backups.
Simplify WordPress with 10Web
Automate manual work with 10Web Managed WordPress Hosting and 10Web AI Website Builder. Optimize your WordPress website effortlessly.
Set up a staging site
Before applying a new theme to your live site, set up a staging site. Think of this as a sandbox where you can play around without affecting your live site. Some WordPress hosting services offer easy staging, allowing you to create a copy of your site with a single click. Here’s a brief rundown on setting up a staging site:
- Check if your WordPress hosting offers staging facilities.
- If available, use the hosting dashboard to create a staging site.
- Alternatively, manually create a subdomain and use the Duplicator plugin to clone your live site onto the staging environment.
Utilize this staging site to test the new theme and make necessary adjustments before going live.
Ensure plugin compatibility
Lastly, check for plugin compatibility with your new theme. Since plugins add functionality to your site, you want them to work flawlessly with your new theme. Follow these steps:
- Make a list of your current plugins, noting their functions and importance.
- Activate your new theme on the staging site.
- Test each plugin one by one, checking for errors or issues.
- If you encounter problems, you may need to find alternatives or adjust settings accordingly.
This step will help you ensure a smooth transition and functionality once the new theme is live on your site.
Choosing your new WordPress theme
When selecting a new theme for your WordPress site, it’s crucial to consider both the feature set and whether to go for a free or premium option. Your choice will impact your site’s functionality, aesthetics, and user experience.
Assessing theme features
When browsing through WordPress themes, your primary focus should be on the features that cater to your needs. Start by using the WordPress theme search option to filter themes based on specific features. Here’s what to look out for:
- Responsiveness: Ensure the theme looks great on all devices.
- Browser compatibility: Check if the theme works well across different web browsers.
- Plugin support: Your new theme must support essential WordPress plugins.
- SEO friendliness: Look for themes that are optimized for search engines.
- Page builders: Themes that integrate with drag-and-drop page builders can make customization easier.
- Speed: A lightweight theme contributes to faster page load times.
Exploring free vs. premium themes
Free WordPress themes are a great starting point, especially if you’re on a budget. They can be found directly from your WordPress dashboard under the Add New theme option. Remember to:
- Review user ratings and comments for quality insights.
- Ensure the theme is regularly updated and well-supported.
Premium themes, while requiring an investment, typically offer:
- Advanced features and customization options.
- Priority support and regular updates.
To sum up, the right WordPress theme should align with your site’s goals, offer the necessary feature set, and stay within your budget, whether free or premium. Choose wisely to give your site a fresh look and feel.
Simplify WordPress with 10Web
Automate manual work with 10Web Managed WordPress Hosting and 10Web AI Website Builder. Optimize your WordPress website effortlessly.
How to change WordPress theme
Changing your WordPress theme can refresh your website’s appearance and functionality. Here’s a step-by-step guide to help you switch themes smoothly.
Installing and previewing your new theme
Before diving into the specifics, it’s important to understand that installing and customizing a new theme in WordPress can be both exciting and crucial for your website’s aesthetics and functionality. Here’s how you can do it through the admin dashboard and the live preview option.
Using the WordPress Admin Dashboard
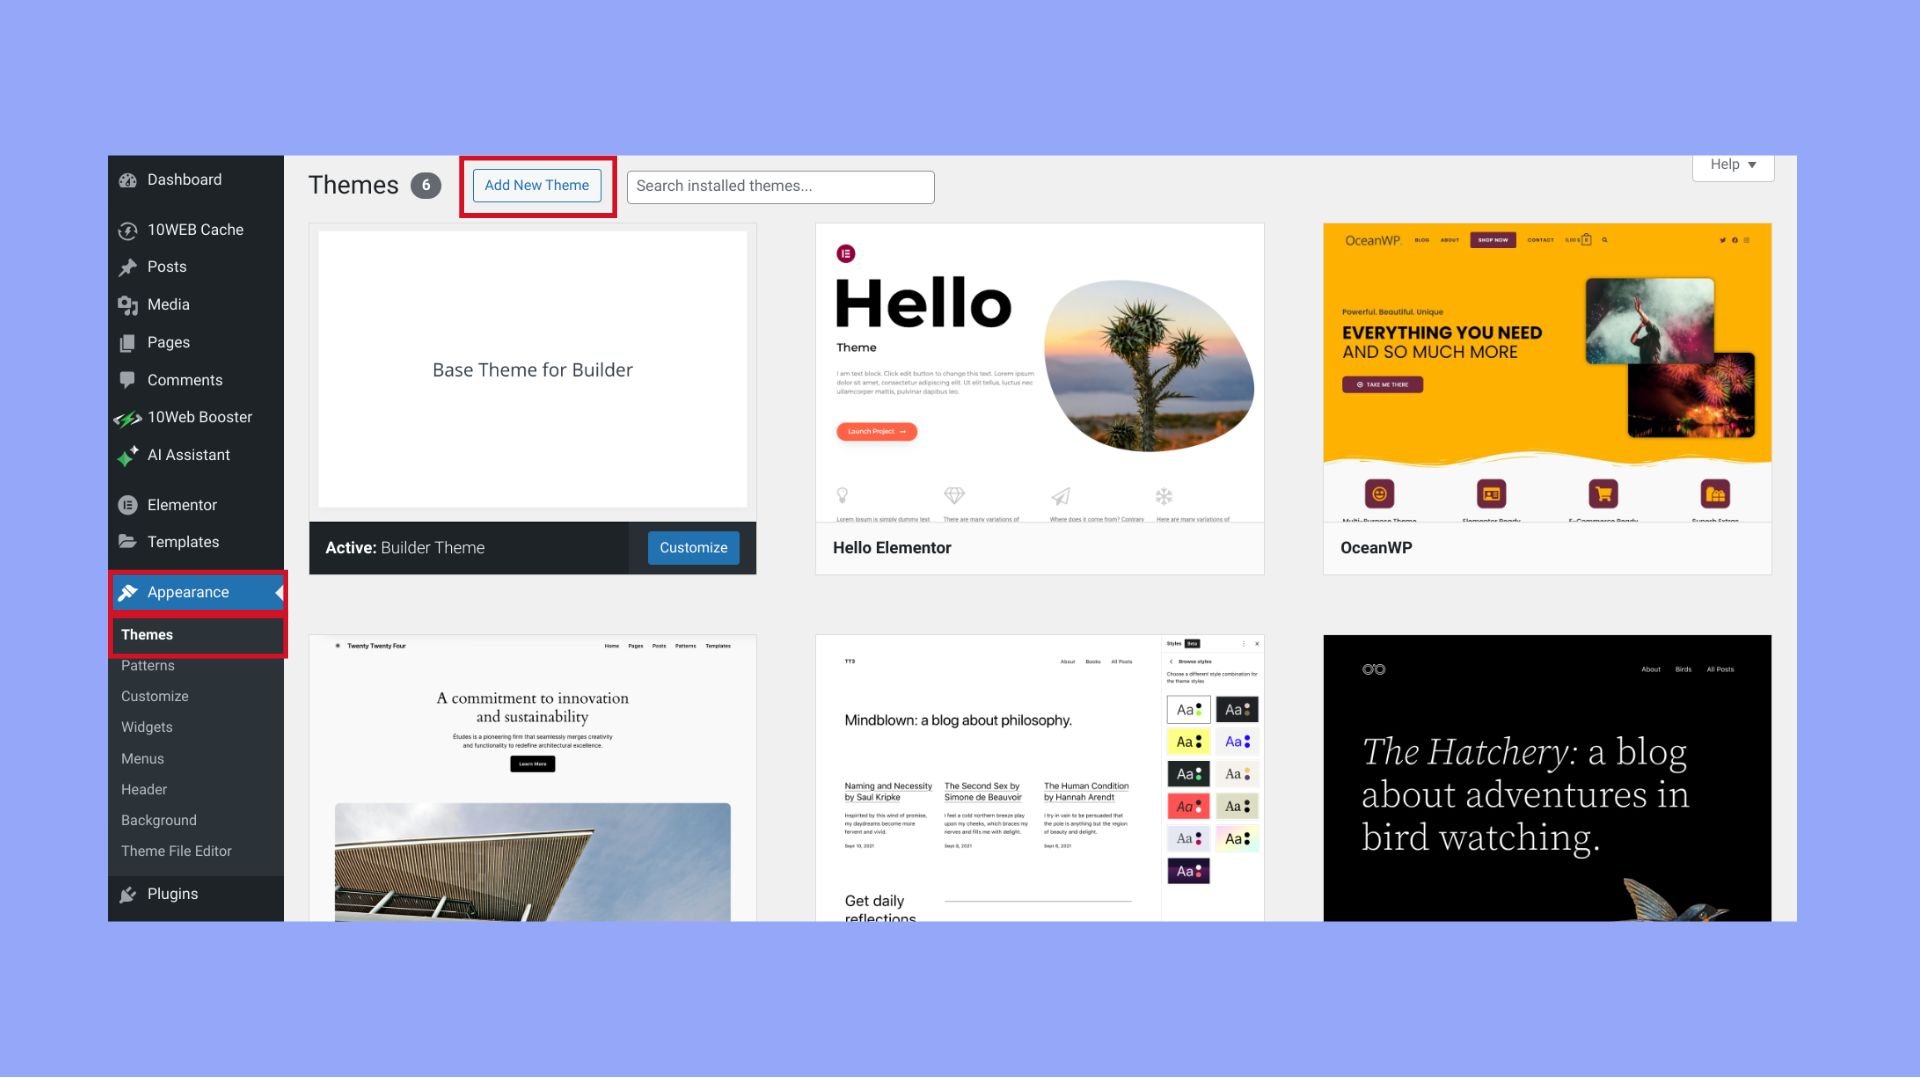
To install a new theme using the WordPress admin dashboard, first navigate to the Appearance section and select Themes. Here’s a simple guide:
- Click on Add New at the top of the page.

- If you’re choosing a free theme from WordPress.org, use the search box to find it by name. Once located, click Install.
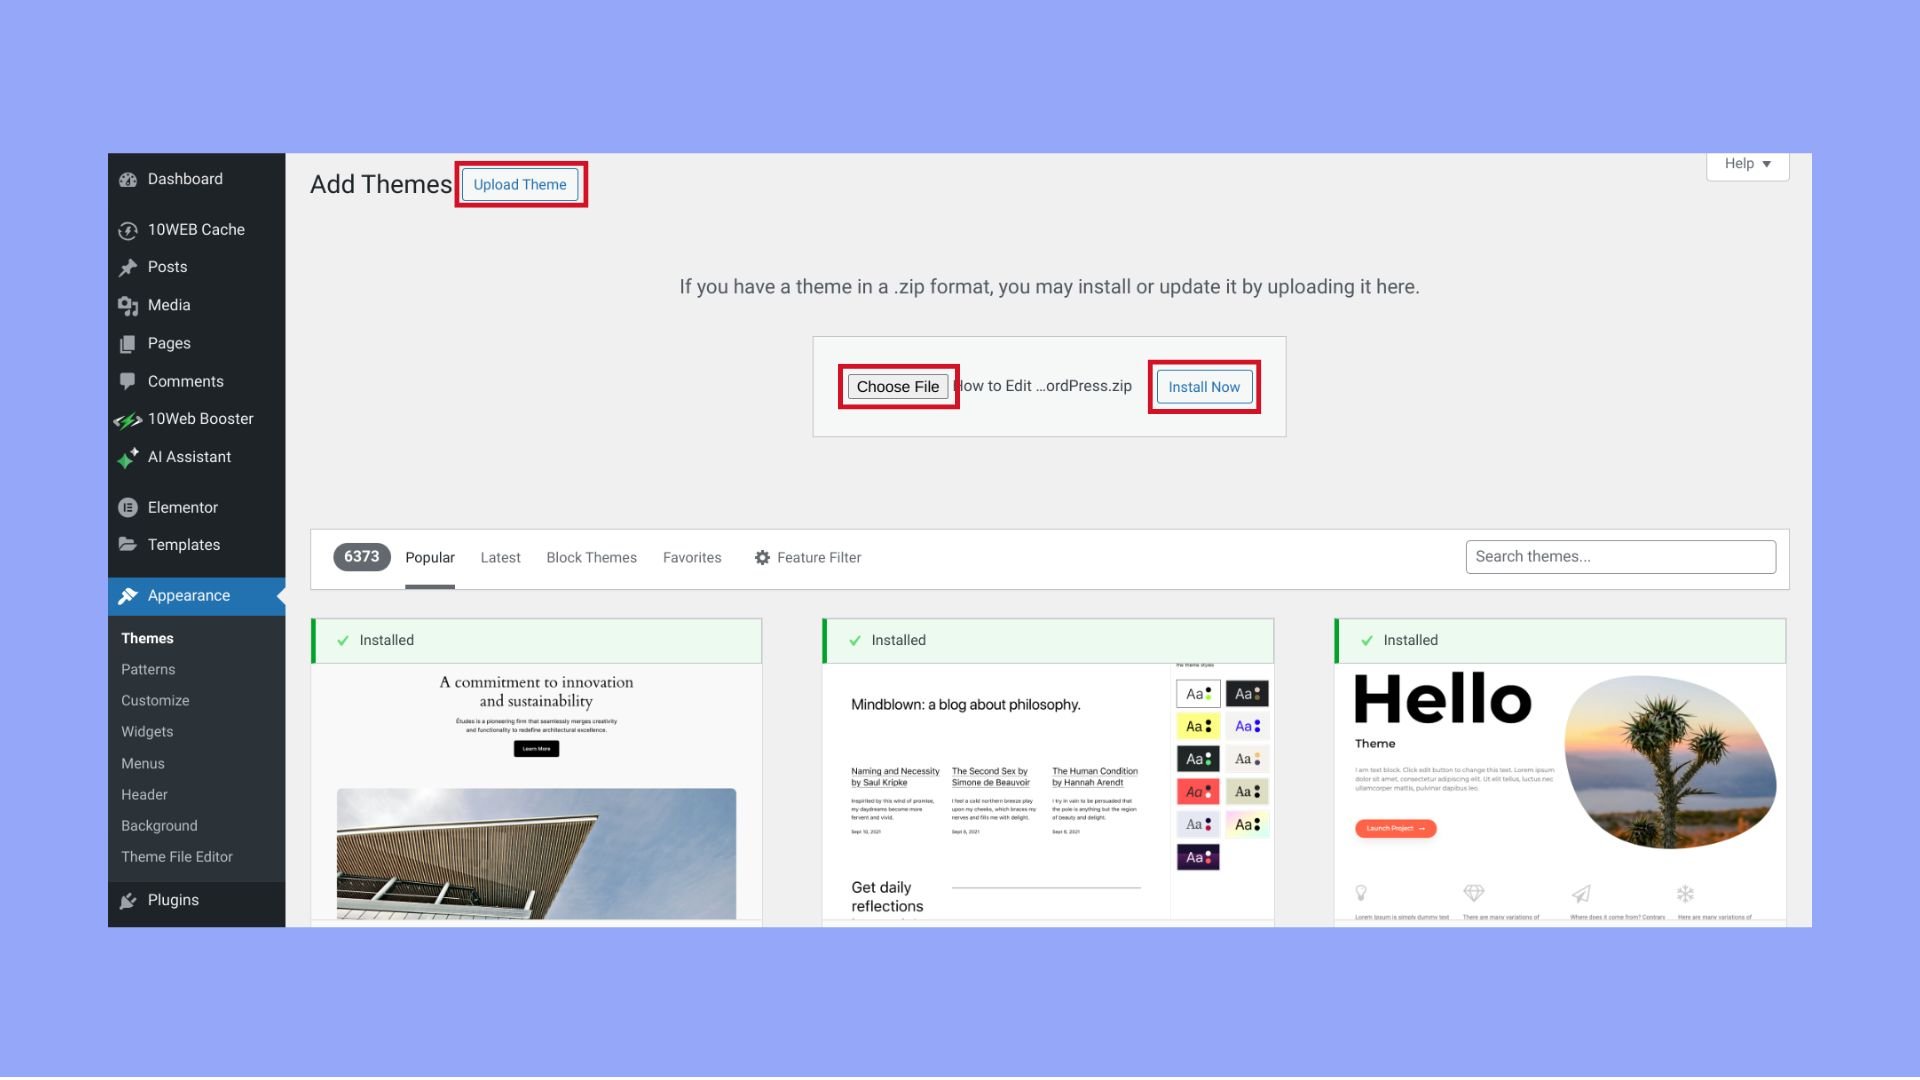
- For a premium theme or one you’ve downloaded elsewhere, click on Upload Theme and then choose the
.zipfile of your new theme to upload. - Once the installation process is complete, click Activate to apply the theme to your site.
Remember, before activation, ensure you have a backup of your site in case you need to revert to the old theme.
Live preview and customization
Before making any permanent changes, WordPress provides a safe way to preview your new theme through the WordPress Theme Customizer. This is how you can use it:
- Navigate to Appearance > Customize in your WordPress admin dashboard.
- From here, you’ll see a list of available themes and an option to live preview your active or newly installed theme.
- By clicking the Live Preview button next to the theme, you’ll enter the theme customizer.

Within the theme customizer, you can make adjustments to various aspects of your theme and immediately see those changes in real-time. Once you are satisfied with the customizations, click Save & Publish to make those changes permanent. This allows you to experiment with layouts, colors, fonts, and other settings without affecting the live site until you’re ready.
Applying the theme to your live site
When your already know how to change WordPress theme and you’re ready to take the plunge, applying your new WordPress theme to your live site is an exciting moment. With a few careful steps, you can ensure that your website looks fresh without skipping a beat in performance or user experience.
Activation and configuration
Before activating the new theme, ensure you have backed up your live site. Activate the new theme by going to the Appearance > Themes tab in your WordPress dashboard and click on Activate for your chosen theme. Immediately after activation, you should check for any compatibility issues with your plugins and content. Inspect your site’s pages for proper schema markup and functionality of contact forms.
Checklist for activation:
- Backup your site.
- Navigate to Appearance > Themes.
- Click Activate.
- Verify plugin compatibility.
- Test schema markup and contact forms.
Finalizing widgets and menus
Once activated, you’ll notice that your widgets and menus may not automatically fall into place. Navigate to Appearance > Widgets and Appearance > Menus to arrange your widgets and menus to match the layout of your new theme. This may involve re-assigning widgets to the appropriate widget areas and ensuring that menus are displayed as expected.
Widgets and Menus setup:
- Re-assign widgets to areas in the Appearance > Widgets.
- Ensure menus appear correctly under Appearance > Menus.
Adding custom code and CSS
Should you need to add custom code, such as PHP, this would typically be done by editing your child theme’s functions.php file—never edit the main theme files. For small CSS changes, use the Appearance > Customize > Additional CSS section. This keeps your changes separate from the theme files and prevents loss during updates.
Customization guidelines:
- Edit functions.php in child theme for PHP code.
- Add custom CSS in Customize > Additional CSS.
Remember, each step you take to personalize your theme should be done with consideration for future updates and maintenance. Keep things organized and enjoy the process of making your live site uniquely yours.
Post-change considerations
Once you’ve successfully changed your WordPress theme, it’s important to address potential issues and optimizations. This ensures your site remains user-friendly and performs well in search engine rankings.
Addressing any errors
After switching themes, check your site for any errors. This can range from broken links to missing images. Use WordPress tools or plugins to scan your site and fix these issues promptly. If you encounter layout or styling problems, you can usually resolve them by adjusting your theme settings or adding custom CSS.
Optimizing for SEO and analytics
Your new theme may affect your SEO rankings if not properly optimized. Ensure your meta tags and headings are correctly used and verify that your Google Analytics or any other tracking codes are still in place. Consider using plugins like Yoast SEO for SEO optimization or MonsterInsights for managing Google Analytics directly from your WordPress dashboard.
Update and test contact forms
After theme change, check all your contact forms to ensure they’re functioning correctly. Fill out the forms yourself to test if the submissions are going through and are being properly recorded or emailed. If you’re facing issues, updating the plugin that manages your forms or checking for conflicts with your new theme might be necessary.
Conclusion
Changing your WordPress theme goes beyond a visual update; it’s a strategic move that improves your site’s performance and branding. By following key steps such as backing up your site, testing on a staging site, checking plugin compatibility, and optimizing for SEO, you can ensure a smooth transition.
Knowing how to change WordPress theme and mastering the change process is essential to fully leverage WordPress and enhance your site’s functionality and user experience. Keep these practices in mind to confidently transform your site.
Simplify WordPress with 10Web
Simplify WordPress with 10Web
Skip and automate manual work with 10Web Managed WordPress Hosting and the 10Web AI Website Builder.