

Creating a subdomain in WordPress helps organize distinct sections of your website, such as a blog or store, without impacting the main site. This process includes setting up the subdomain via your host’s control panel, installing WordPress on it, and customizing the settings to meet your needs. This article will guide you through each of these steps to ensure you successfully establish a functional and integrated subdomain on your WordPress site.
FAQ
How do I set up a subdomain in WordPress?
To set up a subdomain in WordPress, first create the subdomain through your hosting provider’s control panel. Then, add it as an addon domain or subdomain and point it to a specific directory where WordPress is installed. Finally, install WordPress for the subdomain if needed or direct it to an existing WordPress installation.
Is WordPress subdomain free?
Creating a subdomain itself is usually free, as most hosting services include this feature in their basic hosting packages. However, the cost may vary depending on your hosting provider and the specifics of your hosting plan.
How do I create my own subdomain?
To create your own subdomain, log in to your hosting account’s control panel, navigate to the domain management section, and look for an option to create a subdomain. Enter the desired subdomain name and direct it to a directory where you want the subdomain content to be stored.
What is the difference between a domain and a subdomain in WordPress?
A domain is the primary address of your website, such as `example.com`. A subdomain is a secondary address that uses the main domain as a base, such as `blog.example.com`. In WordPress, both domains and subdomains can host a WordPress site independently, but they are managed as separate entities.
Simplify WordPress with 10Web
Automate manual work with 10Web Managed WordPress Hosting and 10Web AI Website Builder. Optimize your WordPress website effortlessly.
Understanding subdomains
Subdomains can be a strategic addition to your main website, often serving specific functions or objectives. They play significant roles in structuring your content, improving user experience, and even influencing your SEO efforts.
A subdomain is a subset of your main domain that allows you to create a separate but related web space. For example, if your main site is yoursite.com, a subdomain might be blog.yoursite.com. The purpose of a subdomain is to organize your website’s content and present it in a clear and accessible way, which can be an effective tool for branding and streamlining your online presence.
Subdomains vs subdirectories
Subdomains (info.yoursite.com) and subdirectories (yoursite.com/info/) are both methods of organizing content within a website. While subdomains stand as separate entities under the main domain, subdirectories exist as folders within the primary domain structure. Here’s a comparison:
| Subdomains | Subdirectories |
| Regarded as separate but related websites by search engines | Treated as part of the main site |
| Can have separate SEO strategies from the main domain | Contribute directly to the main domain’s SEO authority |
| Useful for brand segmentation or different language versions | Easier to maintain since they reside within the main domain’s infrastructure |
SEO implications
Using subdomains can impact your search engine optimization (SEO) efforts. Google sees subdomains as individual entities, which means they have the potential to rank independently in search engine results. However, this can also dilute your main domain’s authority if not managed properly. Accordingly, your SEO strategy should be tailored specifically for each subdomain, considering that your main domain’s reputation doesn’t automatically transfer to its subdomains. On the positive side, this gives you the flexibility to target niche markets or cater to specific segments of your audience without compromising the branding or authority of your main website.
Planning your subdomain structure
Before you create subdomains for your WordPress site, it’s crucial to consider their purpose and organization. They should align with your site’s content strategy and technical needs.
If you’re managing a business site, using subdomains can help segregate your online presence into distinct categories. For instance, shop.yourbusiness.com could be the home to your online store, while support.yourbusiness.com can direct users to your helpdesk or customer service hub.
- Customer-centric design: Ensure each subdomain meets specific customer needs.
- Traffic flow: Strategically route traffic to enhance user experience.
For blogs and portfolios, subdomains can represent different areas of specific content or showcase diverse skills sets. Examples could be tech.yourblog.com for tech-related articles or photography.yourportfolio.com to display your photography work.
- Content categorization: Clearly define what each subdomain represents.
- Design consistency: Keep a cohesive design that complements the main domain.
Employing subdomains can give your site a cleaner, more organized look and feel, serving precise content to your users efficiently.
Accessing your hosting dashboard
Your hosting dashboard is the control center for managing your website’s hosting environment. Whether you use cPanel or hPanel, accessing the right sections is essential for creating a subdomain.
To begin, you’ll need to log in to your hosting account. This is typically done by entering your credentials on your hosting provider’s website. Once logged in, look for a section labeled Dashboard or Control Panel. In most cases, you will find either cPanel or hPanel, which are popular hosting management panels.
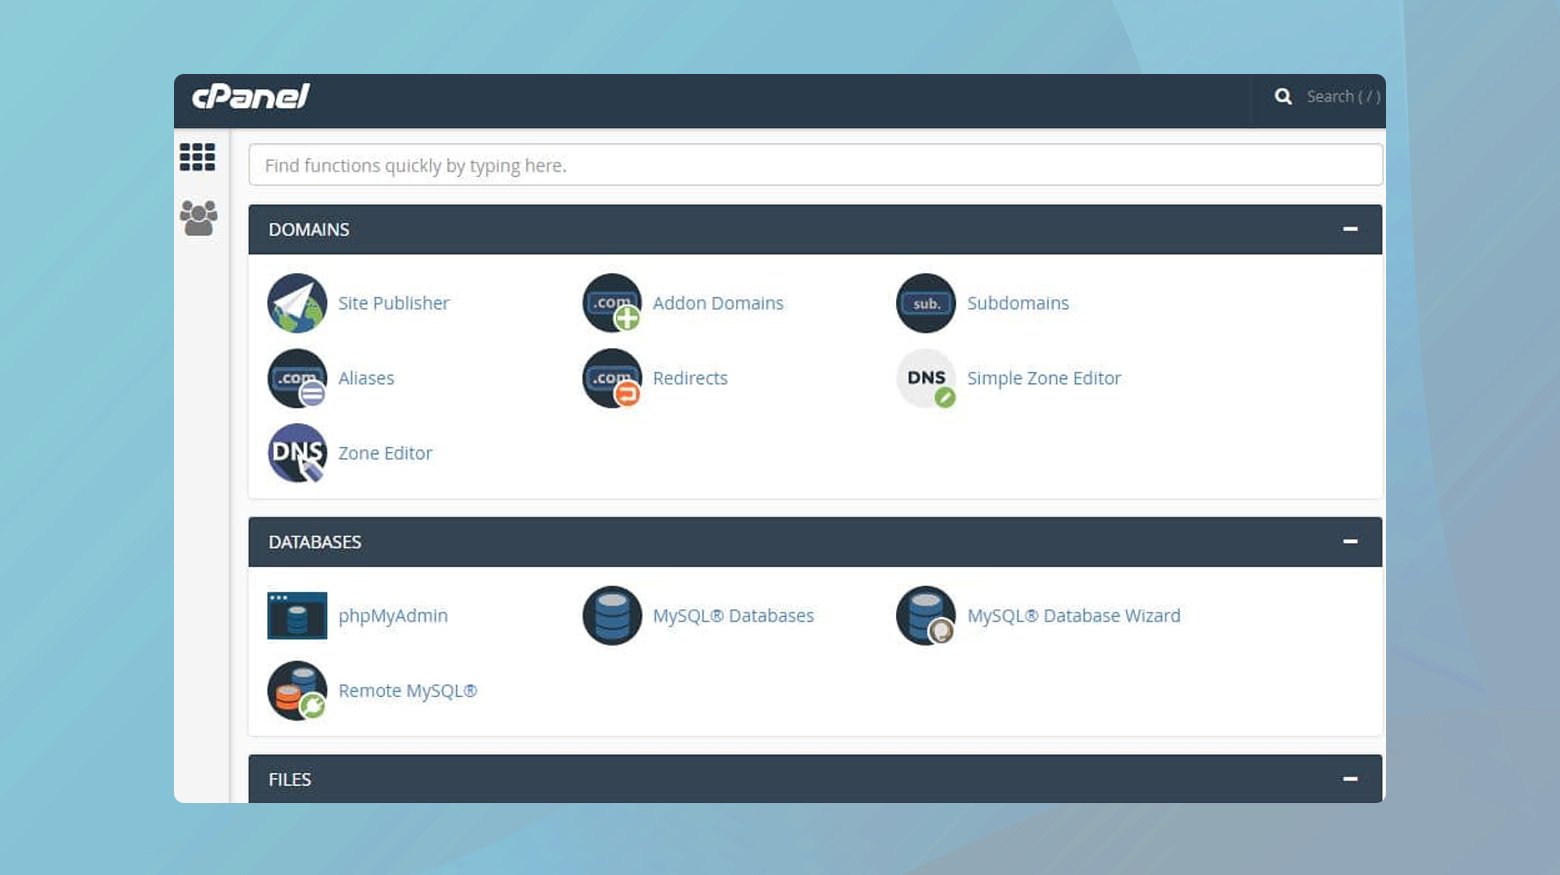
- cPanel: You may see a button or link directly to cPanel from your hosting provider’s main page.
- hPanel: Some hosts use a custom panel, hPanel, which can be accessed similarly.

These panels serve as the gateway to your website’s backend, where you can configure various settings, including subdomains.
Creating a subdomain in WordPress
Creating a subdomain for your WordPress site can help you organize your content and can be used for various purposes like setting up a blog or a mobile version of your site. You can create a subdomain using WordPress tools provided by your hosting service or set it up manually.
Using tools provided by your host
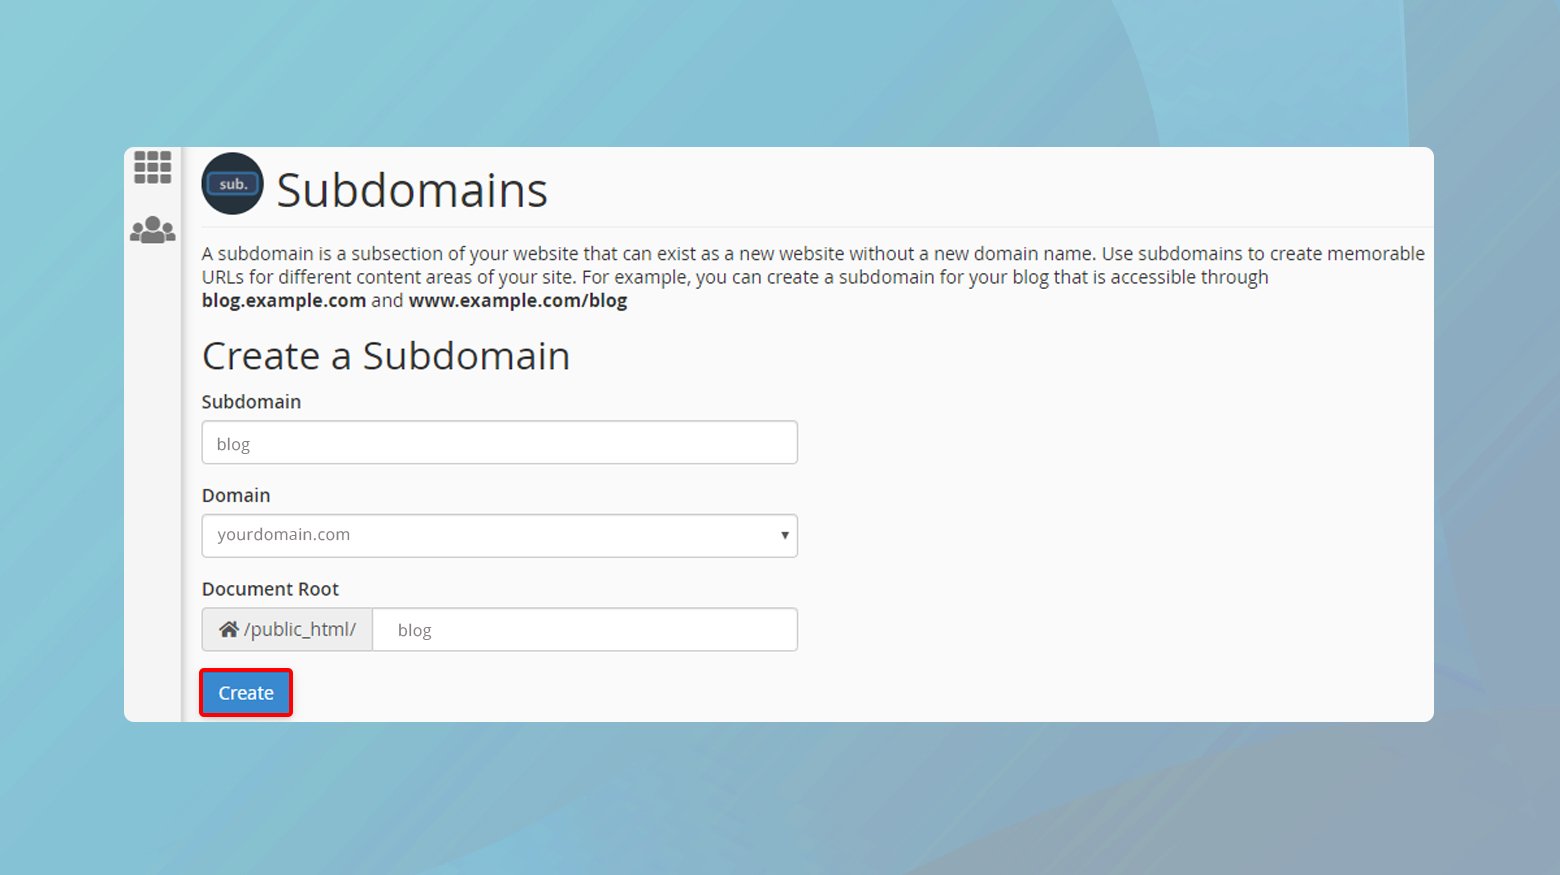
Access the dashboard of your hosting provider and open the Subdomains or the Domain Management section. Here, you can use the subdomain creation tool provided by your host. Most hosts offer an auto installer to streamline the process.
- Type in your desired subdomain in the provided field.
- Select your main domain name from the drop-down list.
These tools often update your DNS settings automatically, so there’s no need for manual configuration.
Manual subdomain setup
If you prefer to have more control or your hosting provider does not offer such tools, you can manually create a subdomain.
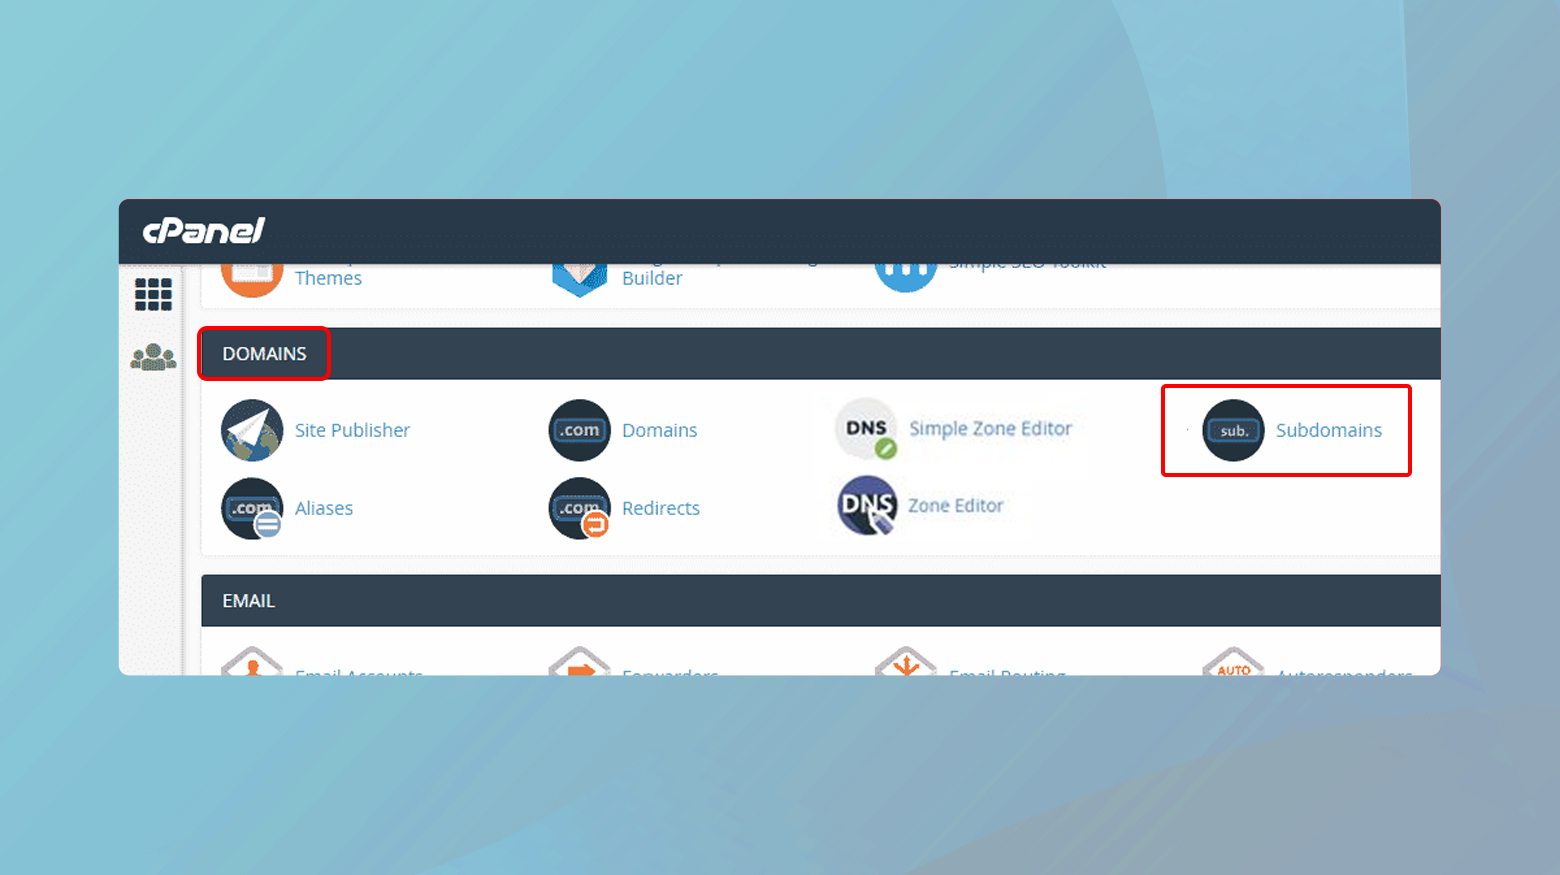
- Log into the cPanel or equivalent control panel provided by your web host.
- Find the Subdomains configuration option.
- Enter your chosen subdomain in the appropriate field and make sure it’s associated with the correct domain name.
- Create the subdomain, and then configure the DNS settings to point to your hosting account.
Once your subdomain is active, install WordPress either through an auto installer like Softaculous or download WordPress from wordpress.com and upload it via FTP. Afterward, complete the installation by navigating to your subdomain URL and entering the required information through the WordPress wp-admin setup page.
Simplify WordPress with 10Web
Automate manual work with 10Web Managed WordPress Hosting and 10Web AI Website Builder. Optimize your WordPress website effortlessly.
Modifying DNS records for subdomain
When you create a subdomain, it’s essential to configure the DNS records properly to ensure it points to the correct server. A subdomain can efficiently work as a separate website within your main domain.
Adding A records
An A Record (Address Record) links your subdomain to an IP address. When setting up an A Record for your subdomain, you’ll need to:

- Navigate to your DNS management interface.
- Choose to Add a new DNS record.
- Select the A Record type from the options.
- In the Name field, enter the name of your subdomain (e.g., blog if your subdomain is blog.yourdomain.com).
- In the Address field, input the IP address where the subdomain content is hosted.
- Set the TTL (Time to Live), which indicates how long the record is cached by a DNS server. The lower the value, the faster changes propagate.
If your website is hosted on 10Web, an A record will automatically be added to your subdomain.
Setting up CNAME records
The CNAME record, or Canonical Name record, is used to associate your subdomain with another domain name (an alias). This is useful if you’re pointing your subdomain to a service or a hosting provider. To configure a CNAME Record for your subdomain:
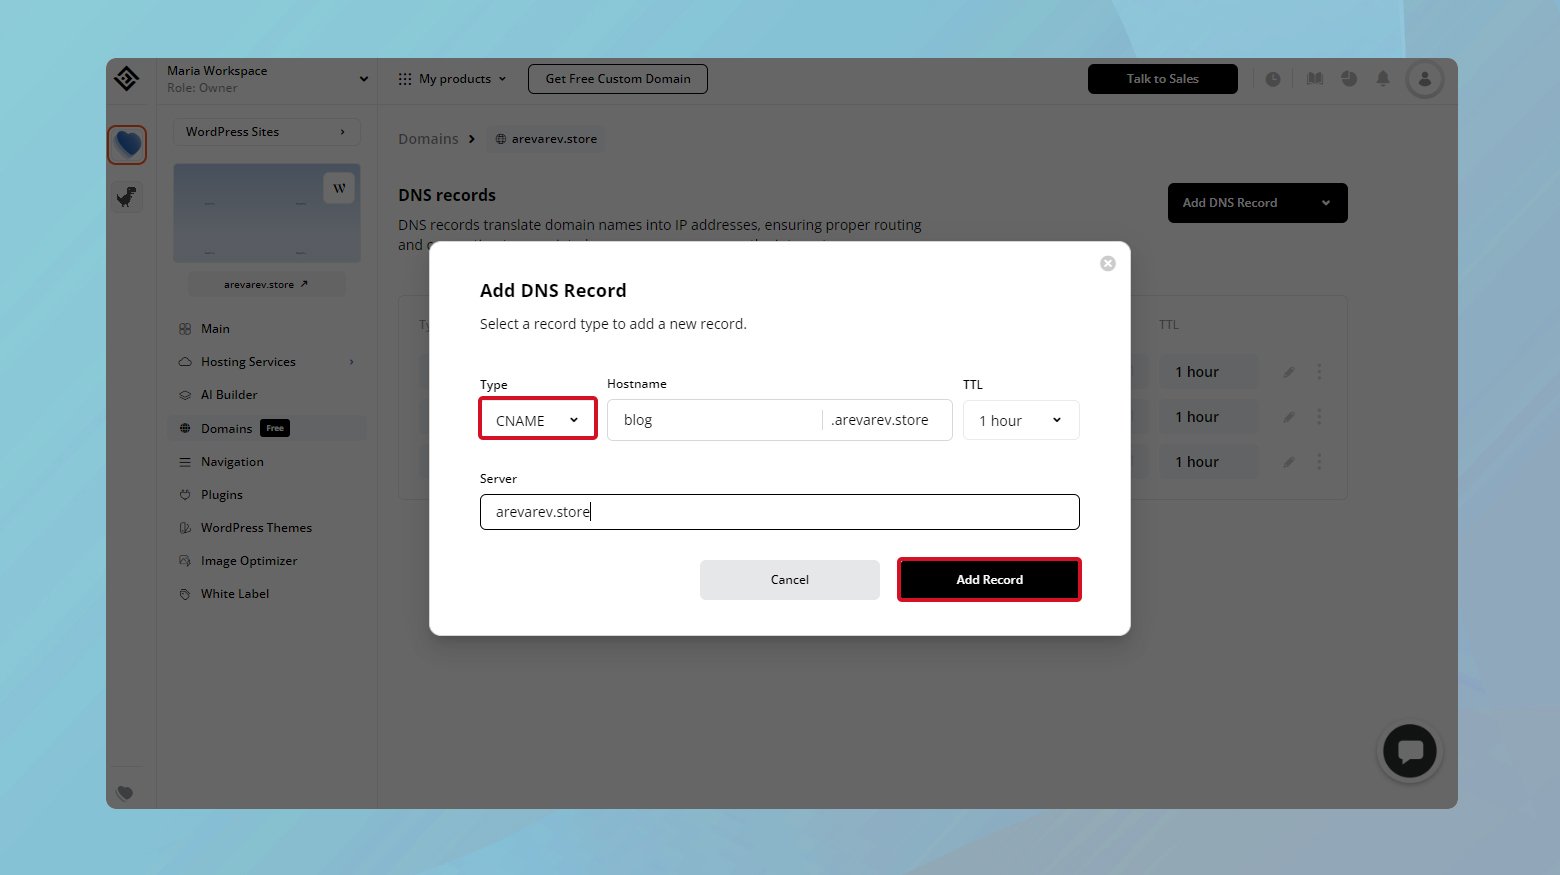
- Access the DNS settings of your WordPress site.
- Press the Add button to create a new record.
- Choose CNAME as the record type.
- For the Name, input your subdomain prefix (like store for store.yourdomain.com).
- The CNAME field should contain the target domain you’re pointing to (such as targetdomain.com).
- Adjust the TTL to your preference, noting that a lower TTL allows for quicker updates.
Remember to save your DNS changes before exiting. It can take up to 24 hours for DNS changes to propagate across the internet, so your subdomain might not be immediately accessible.
Verifying domain ownership in Google Search Console
To finalize your setup, it’s wise to verify your new subdomain with Google Search Console, confirming your ownership. Visit the Google Search Console and add your subdomain as a new property. Choose a verification method, such as HTML file upload, DNS record, or others provided. Follow the instructions, and upon successful verification, your subdomain will be recognized in Google’s systems.
Integrating subdomains with WordPress
Creating subdomains can help manage various sections of your WordPress site, such as a blog or a store, as independent entities. The process involves specific steps in WordPress, and it’s essential to follow them correctly for a seamless integration.
Using WordPress multisite
WordPress Multisite is a feature that allows you to run multiple WordPress sites from a single WordPress installation. When you enable Multisite, you can add new sites as subdomains. Here’s how to get started:
- Backup your WordPress site. Always ensure you have a complete backup before making significant changes.
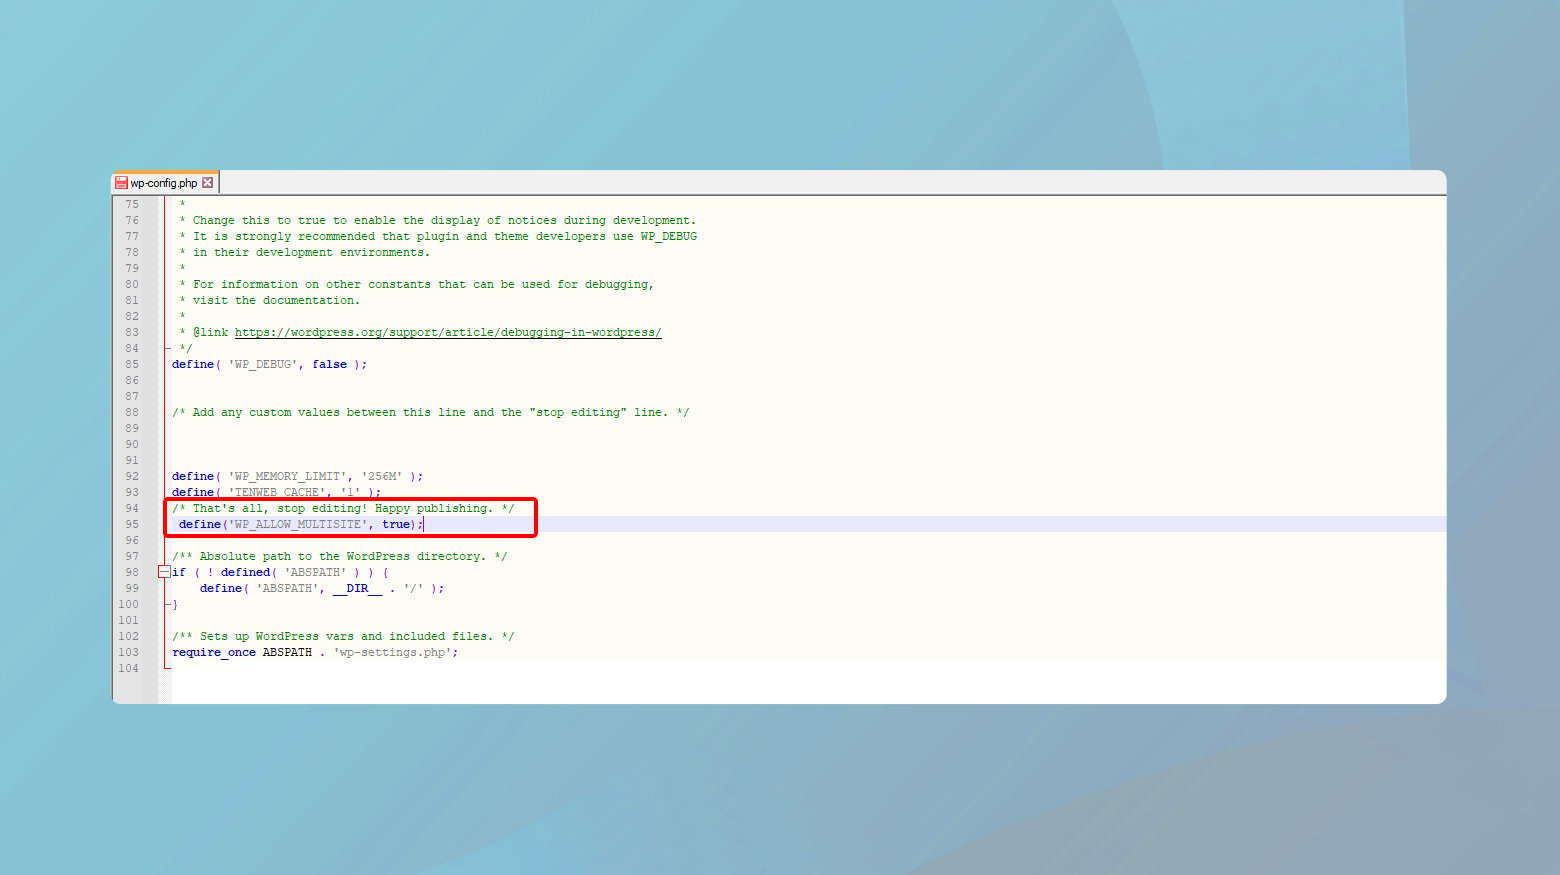
- Enable multisite. To activate Multisite, you’ll need to access your wp-config.php file and add the line just above /* That’s all, stop editing! Happy publishing. */.
define('WP_ALLOW_MULTISITE', true);
- Set up the network. After adding the code, you’ll see a new menu item Network Setup under the Tools menu in your wp-admin. Follow the step-by-step guide to configure your network settings.
Creating a multisite on 10Web
10Web offers multisite support which allows you to create multiple subdomains on your main WordPress website right from the 10Web dashboard. To get started:
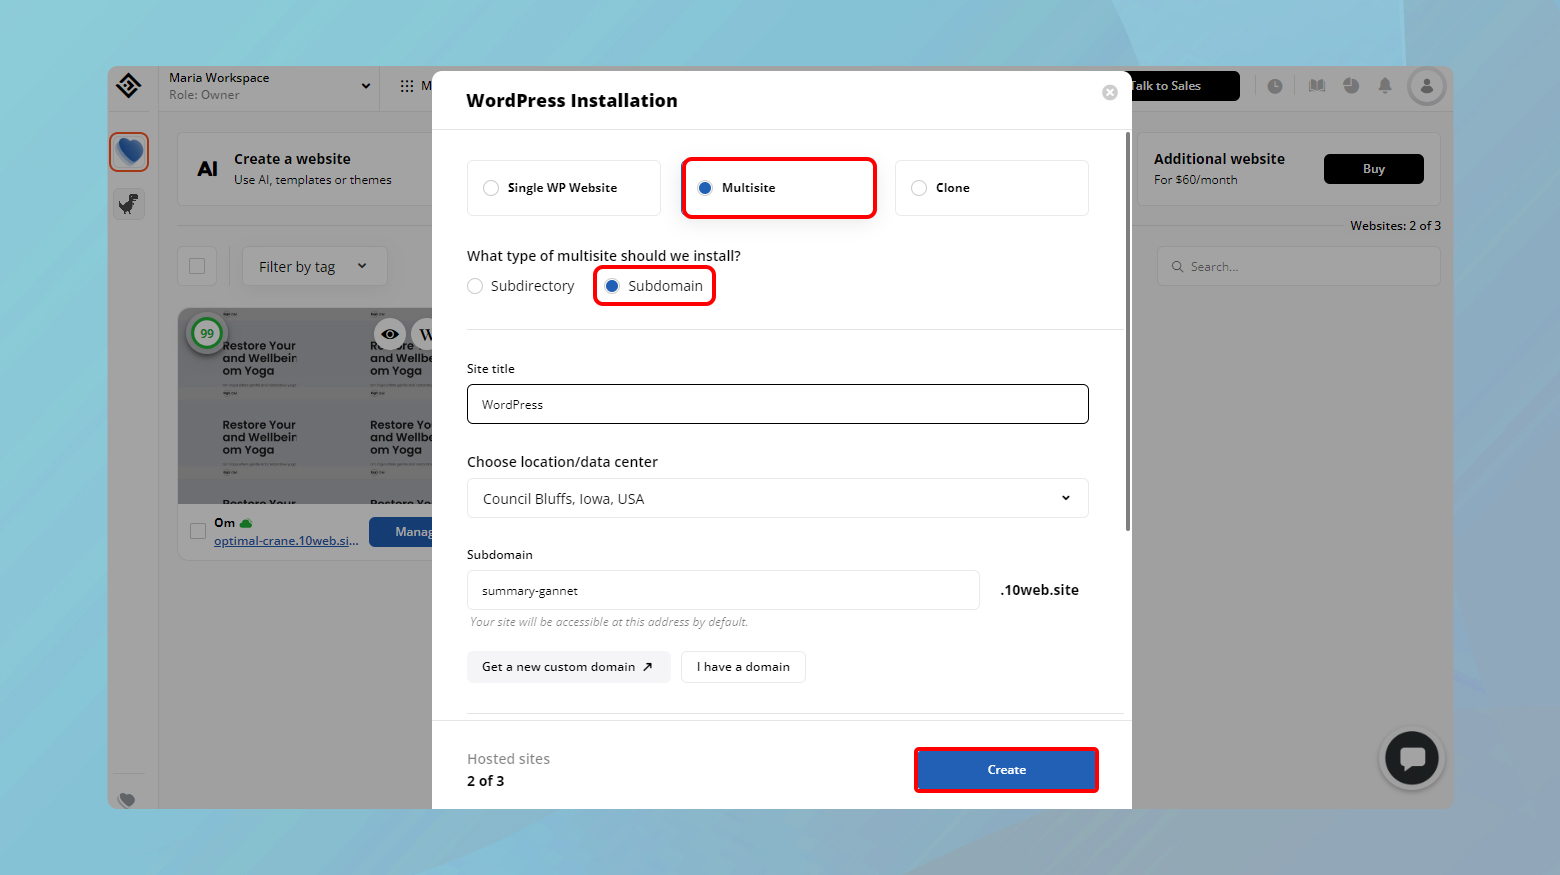
- Log in to your 10Web account
- Click on Create a Website.
- In the window for WordPress installation, choose Multisite > Subdomain.
- Fill in the rest of the information and click Create.
Once your multisite WordPress installation is ready, you can start adding subdomains to your main website.
To do so:
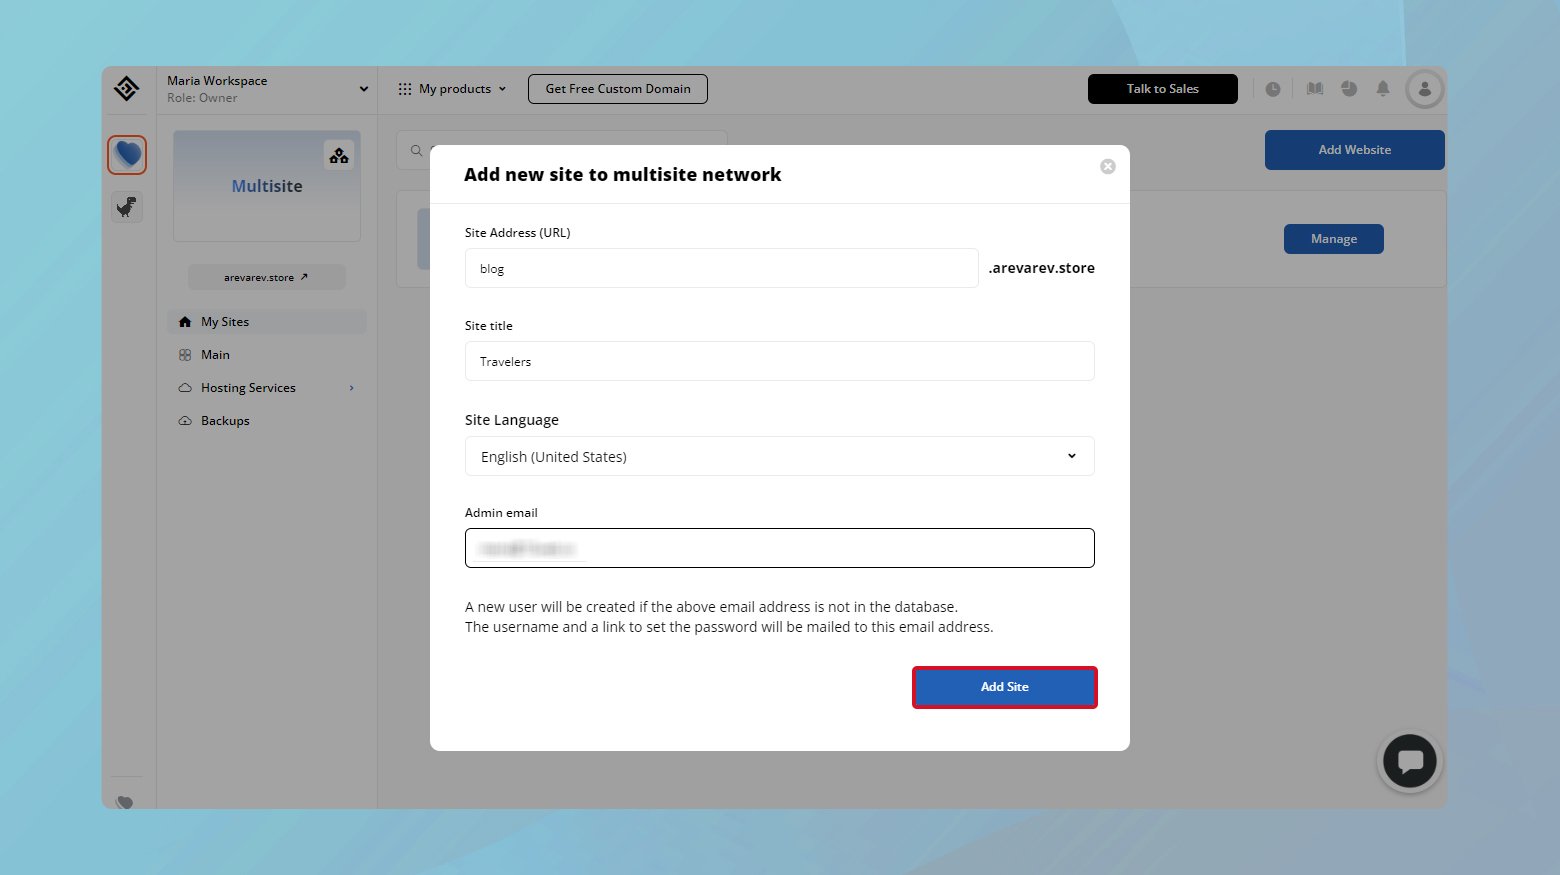
- Click on your multisite.
- Click on Add Website.
- Enter your subdomain name.
- Fill in the rest of the information for your subdomain and click Add Site.
Your subdomain will automatically use the same WordPress installation as your main domain. You will not need a new WordPress installation. However, once your subdomain is created, you can manage it like a separate website.
Simplify WordPress with 10Web
Automate manual work with 10Web Managed WordPress Hosting and 10Web AI Website Builder. Optimize your WordPress website effortlessly.
Installing WordPress on a subdomain
If you’re looking to install WordPress on a subdomain, it means creating a completely separate WordPress installation that is not part of your main site. Let’s go through the process:
- Create a subdomain. Use your hosting dashboard to create a new subdomain. You usually will find this option under Domains or Subdomains section.
- Install WordPress. You have two main options to install WordPress on your newly created subdomain:
- Via auto installer: Hosting services often provide an easy Auto Installer for WordPress in their control panel.
- Manual installation: If you prefer, or if your host doesn’t offer an Auto Installer, you can download WordPress from WordPress.org and upload it to your subdomain’s directory via FTP.
For both Multisite and individual subdomain installations, it’s critical to follow the instructions provided by your hosting provider and the WordPress.org documentation to avoid potential issues.
Optimizing subdomains for SEO and user experience
Creating a subdomain can be a strategic move for your WordPress site, especially when it comes to organizing specific content and targeting different audiences. It’s crucial to balance search engine optimization (SEO) practices with a fine-tuned user experience to ensure that your subdomains not only attract visitors but also keep them engaged.
SEO best practices for Subdomains
Choose a relevant subdomain name: Your subdomain name should clearly reflect the content or service it provides. For example, using shop.yourmaindomain.com for your ecommerce platform helps Google and users understand the purpose of your subdomain.
Consistent branding and navigation: Maintain consistent branding across subdomains to ensure that users recognize they’re still within your site’s ecosystem. Clear and uniform navigation aids both user experience and search engine crawling, which impacts your SEO positively.
- Use canonical tags: To avoid content duplication issues, implement canonical tags where necessary. This tells Google which version of the content is the main one to index.
- Secure your subdomains: Google gives a slight ranking boost to secure sites. So, ensure your subdomains are using HTTPS.
- Internal linking: Use internal links to connect your subdomains with the main domain. This helps distribute link equity and can improve the overall visibility of your site.
Enhancing user engagement on your subdomain
Responsive design: Ensure your subdomain is mobile-friendly. Most users access the internet through mobile devices, and Google uses mobile-first indexing. A responsive design provides a seamless experience across all devices.
Quality content: Your subdomain should house high-quality, engaging content. Understand your audience and offer valuable, relevant information or services. High user engagement signals to Google that your subdomain is a trustworthy source of information.
- Fast load times: Users expect quick access to content. Optimize your subdomain’s load speed to reduce bounce rates and keep users happy.
- Clear call-to-action: Guide your visitors with clear calls-to-action (CTAs), whether it’s to read more, sign up, or make a purchase. Strong CTAs can significantly improve user engagement on your subdomain.
By focusing on both SEO and user experience, your subdomain has a better chance of succeeding in both visitor satisfaction and search engine rankings.
Conclusion
Creating subdomains for a WordPress site can significantly enhance its structure and SEO by allowing tailored content and user experiences under a unified brand. Subdomains, treated as separate entities by search engines, require distinct SEO strategies but offer the flexibility to target niche markets effectively. The setup process is straightforward, manageable through common hosting dashboards with both automated and manual options. Thoughtfully planned and implemented, subdomains improve site organization, accessibility, and relevance, benefiting overall user engagement and site performance.
Simplify WordPress with 10Web
Simplify WordPress with 10Web
Skip and automate manual work with 10Web Managed WordPress Hosting and the 10Web AI Website Builder.


