Changing your WordPress domain name may seem like a dreadful task, but it’s a straightforward process. Whether you’re rebranding or simply found a better domain name, updating your WordPress site to a new domain can help maintain your online presence’s consistency and relevance.
It’s important to address this process with precision to ensure a seamless transition that doesn’t affect your site’s existing traffic and search engine rankings.
Before you start the domain change process, it’s essential to have your new domain name registered and accessible. The steps involve adjustments in your WordPress settings, possibly updating your database, and ensuring that all references to the old domain are correctly pointed to the new one. This ensures that your visitors and search engines are directed to your site without interruption.
FAQ
Can I transfer my WordPress site to a different domain?
Yes, transferring your WordPress site to a different domain is possible. You’ll need to update the domain in your WordPress settings, move all website files, and ensure that the new domain points to your host’s servers.
How can I modify the WordPress database for a new domain?
To modify the WordPress database for a new domain, use phpMyAdmin in your hosting control panel. Navigate to the ‘wp_options’ table and update the ‘siteurl’ and ‘home’ rows to the new domain. You may also need to run a search and replace for any hardcoded URLs in the database.
How can I adjust the domain settings from the WordPress admin panel?
From your WordPress admin panel, go to ‘Settings’ > ‘General’. Here, you’ll find the ‘WordPress Address (URL)’ and ‘Site Address (URL)’. Change these fields to your new domain and save the changes to update your site’s domain settings.
How can I change the WordPress address URL through a plugin?
Changing the WordPress address URL can also be done with a plugin. The ‘Better Search Replace‘ plugin, for example, allows you to perform a search and replace operation for the old domain name directly within your WordPress dashboard, automating the update process across your entire site.
Preparing for domain change
When you’re ready to change your WordPress domain, it’s essential to take preliminary steps to secure your data and ensure your new domain is all set. A well-prepared transition protects your business’s brand and minimizes downtime. Here are some steps to take in preparation for domain change.
Backup your WordPress site
Before making any changes, it’s critical to backup your entire WordPress site. This includes your website’s database, themes, plugins, and media files. You can use a plugin or manually backup your files and database.
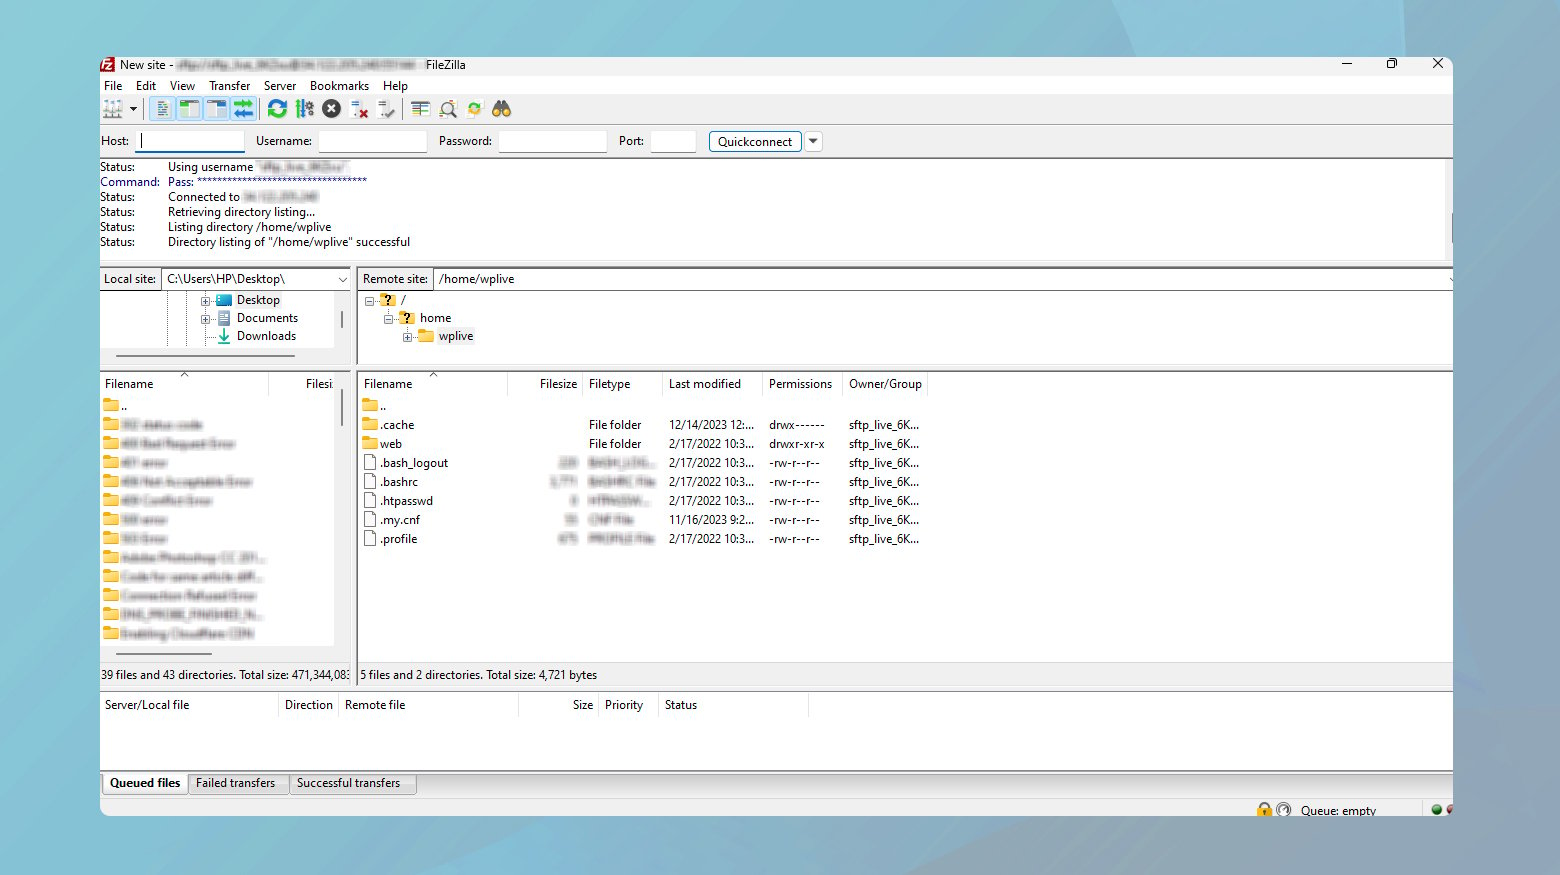
- Files: Connect to your server using FTP, navigate to your WordPress site’s root directory, and download all your website files.
- Database: Access your hosting account’s cPanel, find the phpMyAdmin tool, and export your WordPress database.
Backing up ensures that if anything goes wrong, you can restore your site to its original state.
If you’re a 10Web user, you can backup your entire website through your 10Web dashboard. Take a look at the comprehensive guide on the 10Web backup service.
Simplify WordPress with 10Web
Automate manual work with 10Web Managed WordPress Hosting and 10Web AI Website Builder. Optimize your WordPress website effortlessly.
Ensure domain availability
You’ll need to purchase and verify access to your new domain before initiating a change:
- Use a trusted registrar to search for your desired domain name.
- Once found, proceed with the purchase.
- Verify that you have full access to the new domain’s DNS settings—it’s where you’ll point your domain to your hosting server.
After purchasing, update your wp-config.php file, which contains your site’s base configuration details, with the new domain information to avoid potential conflicts during the changeover.
If you are a 10Web user, you can purchase a domain right from your dashboard by navigating to the Domains page. Click on the Add new domain drop down menu and select Get new domain. See if your domain is available and what 10Web has to offer.
Updating WordPress settings
Before updating your domain in WordPress, you’ll need to make a few changes in the WordPress settings. Specifically, you will edit the WordPress Address (URL) and Site Address (URL) found within the General settings section.
Change WordPress address & site address (URLs)
WordPress address (URL) is the address where your WordPress core files reside. To change it:
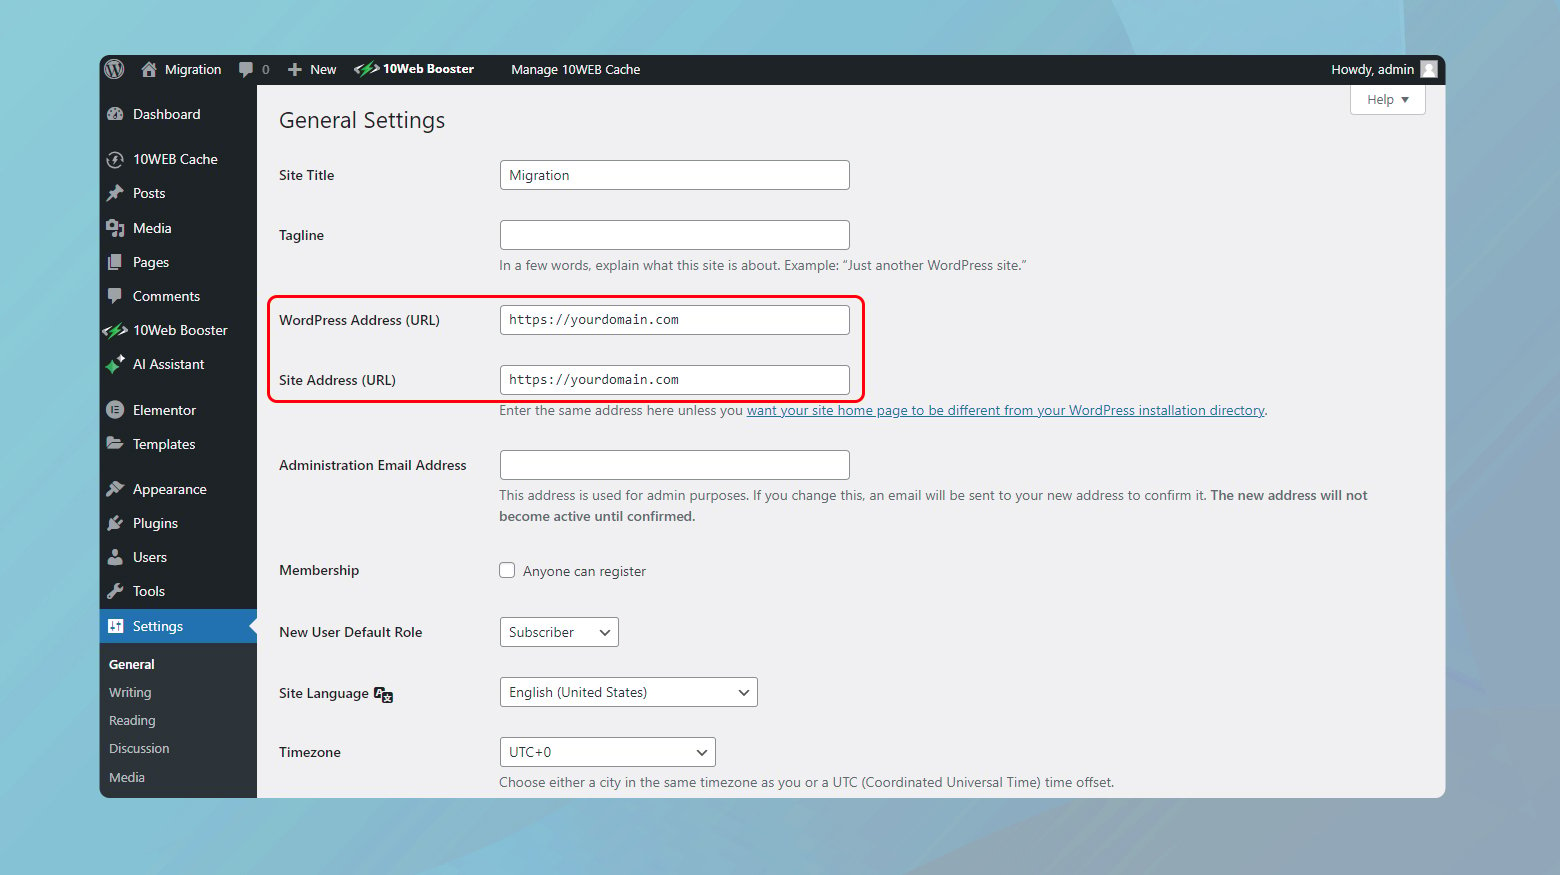
- Log in to your WordPress dashboard.
- Navigate to Settings > General.
- Locate the WordPress Address (URL) field.
- Enter your new WordPress URL.
Make sure that the URL you enter here is correct as it determines where your WordPress files are located. Do not include a trailing slash at the end of the URL.
Site Address (URL) is the address that your visitors will use to access your website. To update it:
- Still under Settings > General, find the Site Address (URL) field.
- Type in your new domain where your website will be publicly accessed.
After saving the changes, your site will now be accessible at the new domain. However, if you cannot access your WordPress dashboard to make these changes, you may use FTP to modify the wp-config.php file. Add the following code to the file:
define('WP_HOME','http://example.com');

define('WP_SITEURL','http://example.com');
Replace http://example.com with your actual domain name. This method directly sets the URLs but it’s recommended to change them from the WordPress dashboard if possible.
Simplify WordPress with 10Web
Automate manual work with 10Web Managed WordPress Hosting and 10Web AI Website Builder. Optimize your WordPress website effortlessly.
Modifying the database
When it comes to changing your WordPress domain, editing the relevant entries in your WordPress database is crucial. This ensures your site’s content and settings correspond to the new domain.
Edit database entries
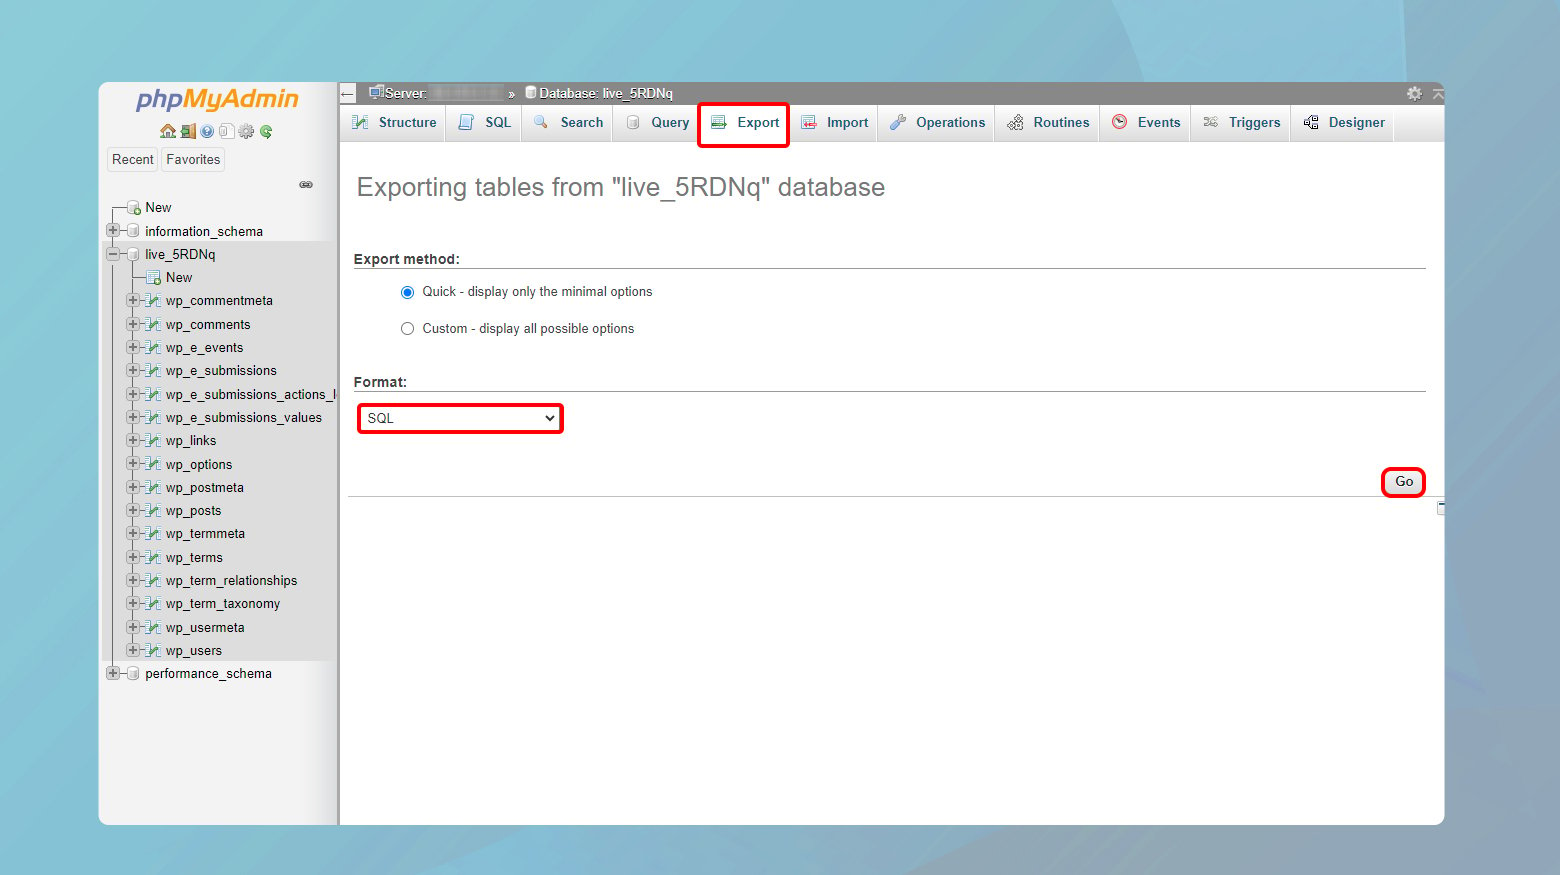
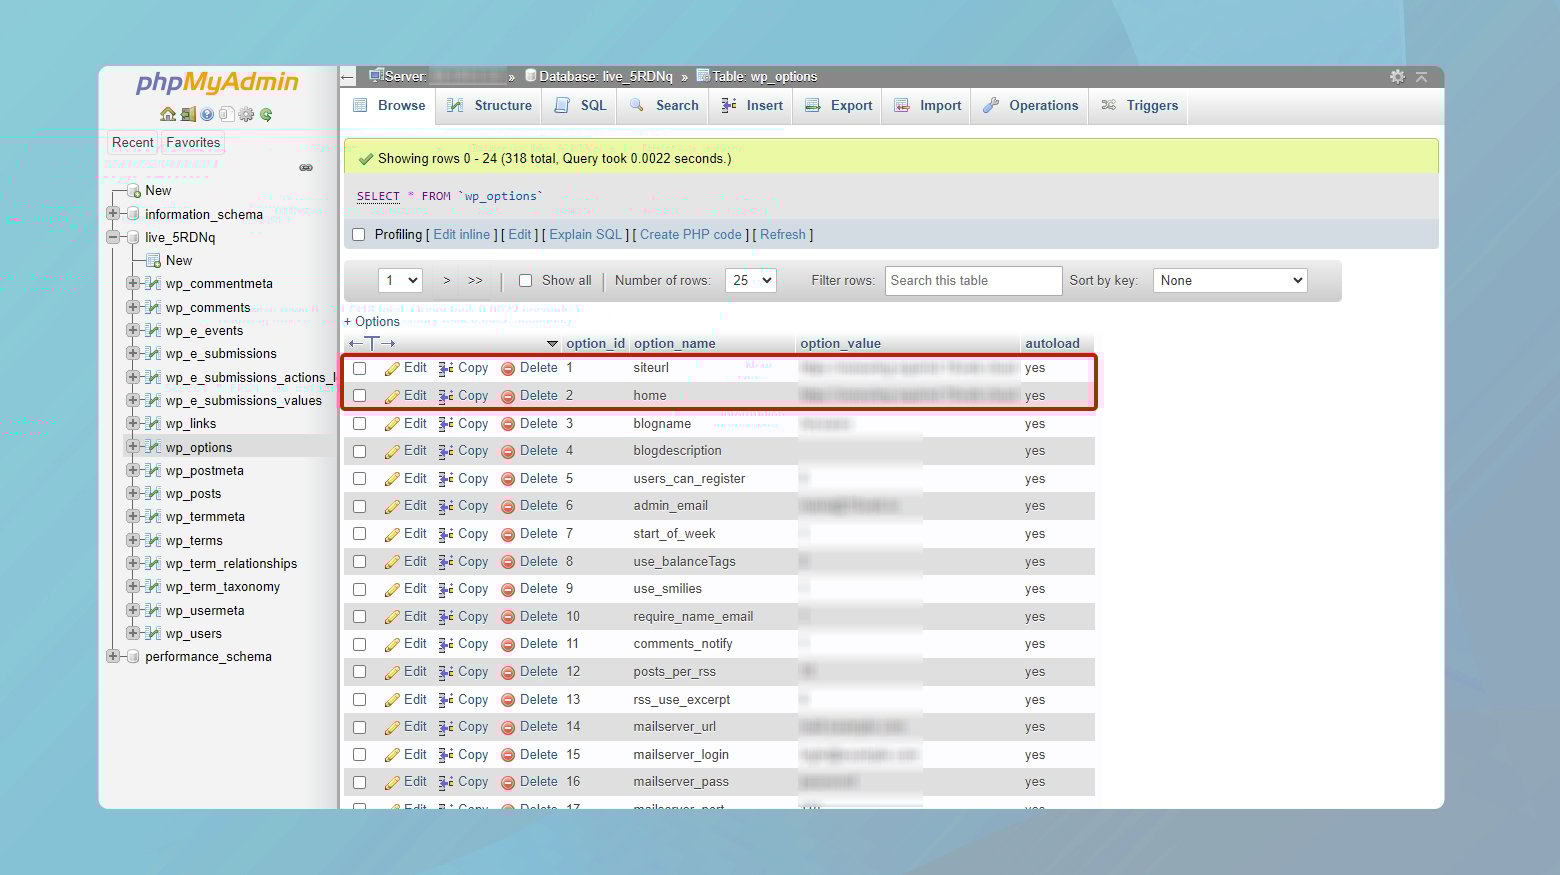
To update the domain within your WordPress database, you will usually use phpMyAdmin, a popular tool for managing SQL databases. Here’s what you need to do:
- Login to phpMyAdmin.
- In the left panel, click on the database associated with your WordPress site.
- This is crucial, you should back up your database before making any changes to avoid potential data loss.
- The wp_options table stores site URLs. Find the siteurl and home rows and change the option_value field to your new domain name.
- Use the SQL tab to run a search and replace for any other instances of your old domain name:
UPDATE wp_posts SET post_content = REPLACE(post_content, 'oldurl.com', 'newurl.com');
UPDATE wp_postmeta SET meta_value = REPLACE(meta_value,'oldurl.com','newurl.com');
![]()
Update DNS settings
After you’ve changed the domain in your database, the next step is to update your DNS settings.
- Login to the account where your new domain is registered.
- Look for the DNS configuration page, which may be labeled DNS Management or Name Server Management.
- Update the A record to point to the IP address of your hosting provider where your WordPress site is hosted.
![]()
If your website is hosted on 10Web, and your domain is with another registrar, here is an in depth guide on how to point your domain to 10Web.
Simplify WordPress with 10Web
Automate manual work with 10Web Managed WordPress Hosting and 10Web AI Website Builder. Optimize your WordPress website effortlessly.
Handling redirects and traffic
When you change your WordPress domain, you need to ensure that your traffic doesn’t get lost. Properly handling redirects maintains your SEO rankings and makes sure your visitors find where you’ve moved.
Implement 301 redirects
301 redirects are your best friends during a domain change. They tell browsers that your content has permanently moved to a new location. Here’s how to set them up effectively:
- Always back up your site before making changes.
- Update all internal links to reflect the new domain.
- Add redirect rules for your old domain to the .htaccess file like this:
Redirect 301 /old-page http://www.yournewdomain.com/new-page
If editing code isn’t your thing, use a redirection plugin to handle the process. After implementing, check all old URLs to ensure they redirect correctly.
![]()
Update google search console
After redirects are in place, update Google to help maintain your search traffic:
- Remove the old domain from your Google Search Console account.
- Add the new domain as a new property.
- Upload a sitemap for your new domain to help Google index your site.
- Regularly check Google Search Console for crawl errors or indexing issues to react promptly.
Finalizing the migration
With your WordPress site successfully moved to a new domain, it’s time to ensure everything is running smoothly. This final phase is critical for maintaining your brand’s user experience and retaining SEO benefits.
Testing the new domain
To begin, navigate to your new domain name in a web browser and meticulously check all pages and posts to confirm they load correctly. It’s essential to:
- Inspect all internal links to ensure they point to the new domain.
- Verify that images and media content are displaying as intended.
- Test contact forms, login functionalities, and other interactive elements.
- Look for any errors in the browser console that might indicate issues with scripts or stylesheets.
Consider using tools or plugins that can automate the process of checking links and other elements across your site.
Communicate the change
Informing your audience about the change is crucial for a seamless transition. You should:
- Send out notifications via email, social media, and other channels to alert users to your rebranding and new domain.
- Update all marketing materials, business cards, and email signatures to reflect the new domain name.
- Reach out to any partners or affiliates to inform them of your new web address.
It’s also beneficial to keep your old domain active for a while with 301 redirects to your new domain to maintain SEO ranking and guide visitors to your new site.
Conclusion
Changing your WordPress domain name is a critical step in evolving your website to match your brand’s growth and directional shifts. While it may seem complex, the process is manageable with careful planning and execution.
From securing a new domain to adjusting WordPress settings, updating the database, and ensuring seamless redirects, each step plays a pivotal role in maintaining your site’s functionality and search engine presence. It’s essential to back up your site, communicate changes to your audience, and monitor the transition closely to address any issues promptly.
By following these guidelines, you can achieve a successful domain change, ensuring that your website continues to thrive and reach its intended audience under its new name.
Simplify WordPress with 10Web
Simplify WordPress with 10Web
Skip and automate manual work with 10Web Managed WordPress Hosting and the 10Web AI Website Builder.