Plugins extend the functionality of WordPress, allowing you to add new features and improve your site’s performance. Updating WordPress plugins is crucial to keep your website running smoothly and securely. Over time, developers release updates to their plugins to patch security vulnerabilities, fix bugs, and add new features.
While WordPress offers automatic updates for many plugins, you might sometimes need to update them manually. This could be due to various reasons, such as if you’re working in a controlled environment where automatic updates aren’t ideal, or if a specific update needs to be reviewed before deployment.
In this detailed guide, you will learn how to manually update WordPress plugin and keep up with the new features.
Why you should update plugins
A few core reasons lie behind keeping your WordPress plugins updated. Let’s discuss those before we jump ahead.
- Security: Updates often address vulnerabilities. Failing to update can make your website exposed to attackers.
- Features: Updates can add new features and enhancements, keeping your site current and functional.
- Compatibility: WordPress is constantly evolving. Updates ensure plugins work with the latest version of WordPress.
- Performance: Updated plugins can improve speed and efficiency, making your site run smoothly.
Remember, an outdated plugin can be a security risk, cause conflicts with other plugins or themes and even lead to poor website performance, which can negatively impact user experience and SEO. Regularly checking for updates and applying them is a smart maintenance practice that benefits both you as a website manager and the visitor as a website consumer.
Preparing for a manual plugin update
Before you begin learning how to manually update WordPress plugins and get into the process, it’s important to verify the compatibility of the new plugin version and ensure that you have a recent backup of your website. These two steps keep against any potential issues that could affect your site’s performance and security.
Verify compatibility
First, check the changelog of the plugin for the latest version compatibility information. This is usually found on the plugin’s page in the WordPress Plugin Directory or the readme.txt file included with the plugin. Ensure that the new version is compatible with your current version of WordPress and other installed plugins. Incompatibilities could lead to performance issues or even security vulnerabilities.
Create a backup
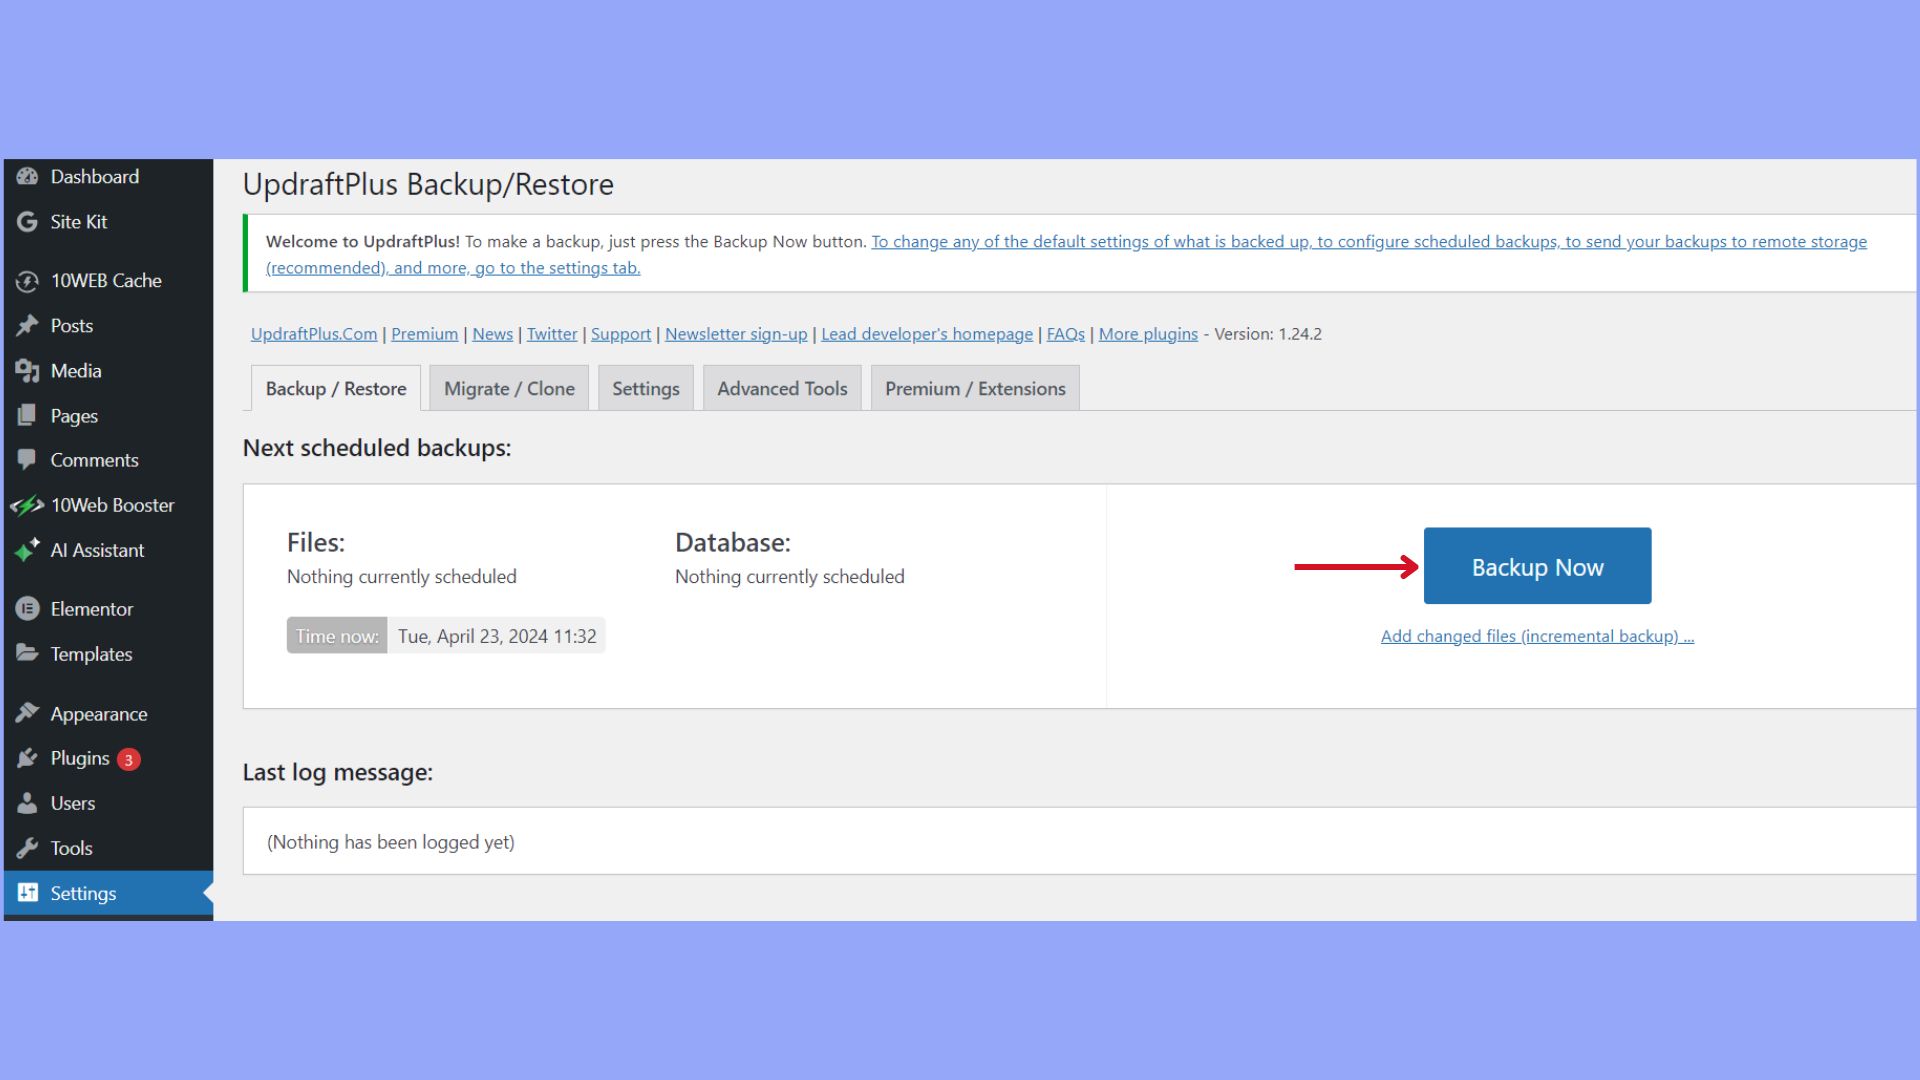
Before updating, create a full backup of your website. This includes your database, WordPress files, plugins, themes, and uploads. There are several plugins like UpdraftPlus that can assist you with this process directly from your WordPress dashboard.
- Go to your WordPress dashboard.
- Navigate to the plugins section and select Add New.
- Search for UpdraftPlus, install, and activate it.
- Once activated, go to the UpdraftPlus settings and choose the Backup Now option.

If you are a 10Web user, you can easily create a website backup by visiting your 10Web dashboard > Backups on the left-hand side > backup now.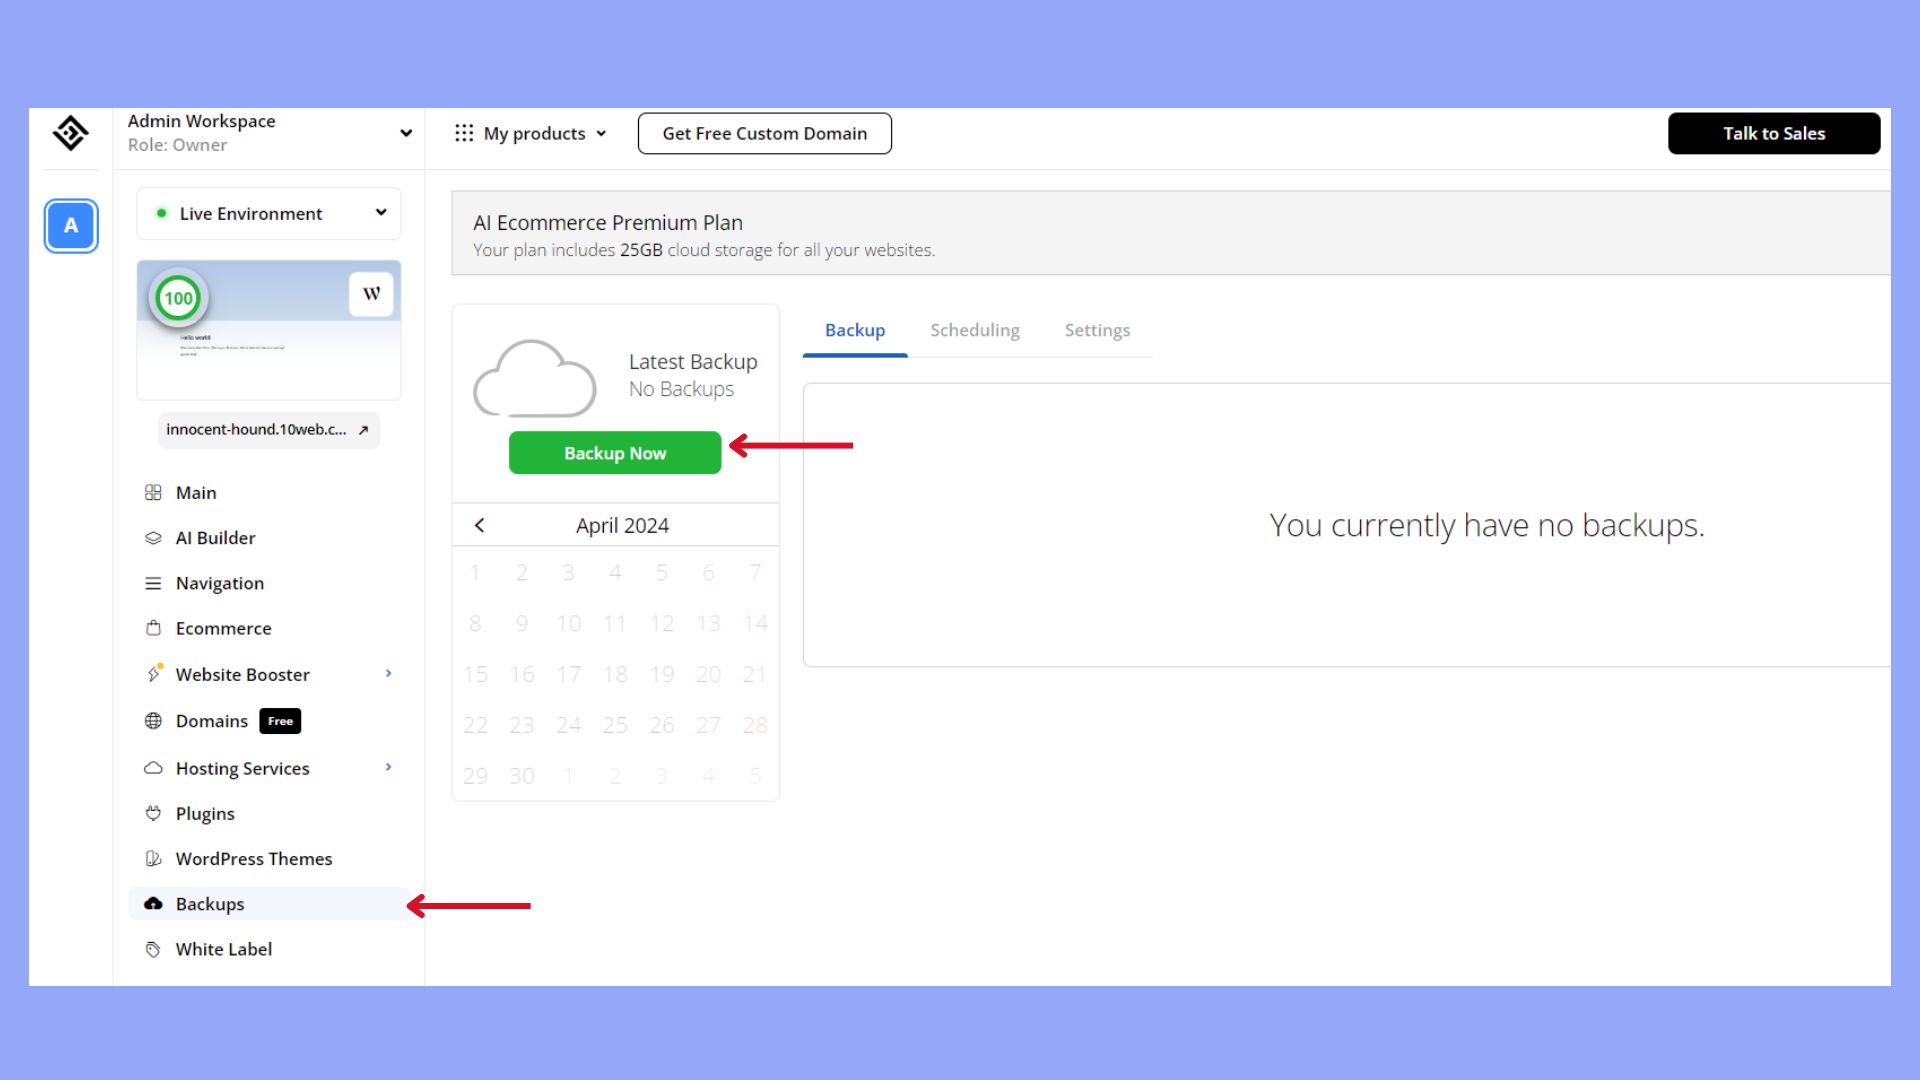
How to manually update WordPress plugins via SFTP or FTP
When updating WordPress plugins manually, using SFTP (Secure File Transfer Protocol) or FTP (File Transfer Protocol) is a reliable method. Before you start, ensure you have an FTP client like FileZilla and your FTP credentials, which you can get from your hosting provider’s dashboard.
Step 1: Backup your site
Always create a backup of your website. Should anything go wrong during the update, you’ll have a restore point. Above we learned two methods for creating a backup.
Step 2: Download the latest plugin version
Download the latest version of the plugin from the WordPress repository or the plugin vendor’s site. This will be a zip file.
Step 3: Access your site via FTP
Open your FTP client and connect to your server using the credentials provided by your hosting service.
Step 4: Go to the plugins directory
Within the FTP client, go to the following path: yourwebsite.com/wp-content/plugins/. Here you will find all your installed plugins.
Step 5: Delete the old plugin folder
Locate the folder of the plugin you wish to update and delete it. Do not worry; your settings are saved in the database, not the plugin folder.
Step 6: Upload the new plugin
Extract the plugin zip file on your computer. Upload the extracted folder to the wp-content/plugins/ directory on your server.
Step 7: Verify the update
Log in to your WordPress dashboard and go to the Plugins section to check if the plugin is updated and functioning correctly.
After completing all these steps, verify that your website is operating as expected after the update. If issues arise, restore your site from the backup or consult a professional.
How to manually update WordPress plugins via WP-CLI
Let’s discuss the steps for manually updating WordPress plugin using WP-CLI, you should have WP-CLI installed on your server and be comfortable using a command-line interface. Begin by connecting to your server using SSH.
Step 1: Check for update availability
Before updating, check if updates are available for your plugins:
wp plugin list --update=available
This command displays a list of plugins that have updates available.
Step 2: Update a specific plugin
To update a specific plugin, use the following command and replace plugin-slug with the actual slug of the plugin:
wp plugin update plugin-slug
For example, if you want to update a plugin with the slug hello-dolly, the command would be:
wp plugin update hello-dolly
If you’d like to update all the plugins that have available updates, use this command:
wp plugin update --all
You can also exclude certain plugins from being updated in the bulk process, for this purpose use the following command:
wp plugin update --all --exclude=plugin-slug1,plugin-slug2
Replace plugin-slug1,plugin-slug2 with the slugs of the plugins you wish to exclude.
For more controlled updates, you can limit the update process to minor or patch releases using these flags:
- Minor releases: –minor
- Patch releases: –patch
An example for updating all plugins to only minor releases:
wp plugin update --all --minor
This helps to reduce the risk of compatibility issues with major updates. After running the update command, WP-CLI will execute the process and display the outcome. Make sure to test your website after the updates to ensure everything is functioning properly.
Automate manual work with 10Web Managed WordPress Hosting and 10Web AI Website Builder. Optimize your WordPress website effortlessly. ![]()
Simplify WordPress with 10Web
How to manually update WordPress plugin through the WordPress dashboard
The WordPress Dashboard is your control hub for managing plugins. You can seamlessly deactivate plugins and perform updates without the need for external software or technical expertise. Follow these steps if you want to know how to manually update WordPress plugin right through your WordPress dashboard.
Step 1: Deactivate plugins
Before updating, it’s essential to deactivate the plugin to prevent any conflicts. Go to the Plugins tab in your admin area. Here, you’ll find a list of installed plugins. Find the plugin you wish to update, and click on Deactivate. This action won’t erase any of your settings or data associated with the plugin.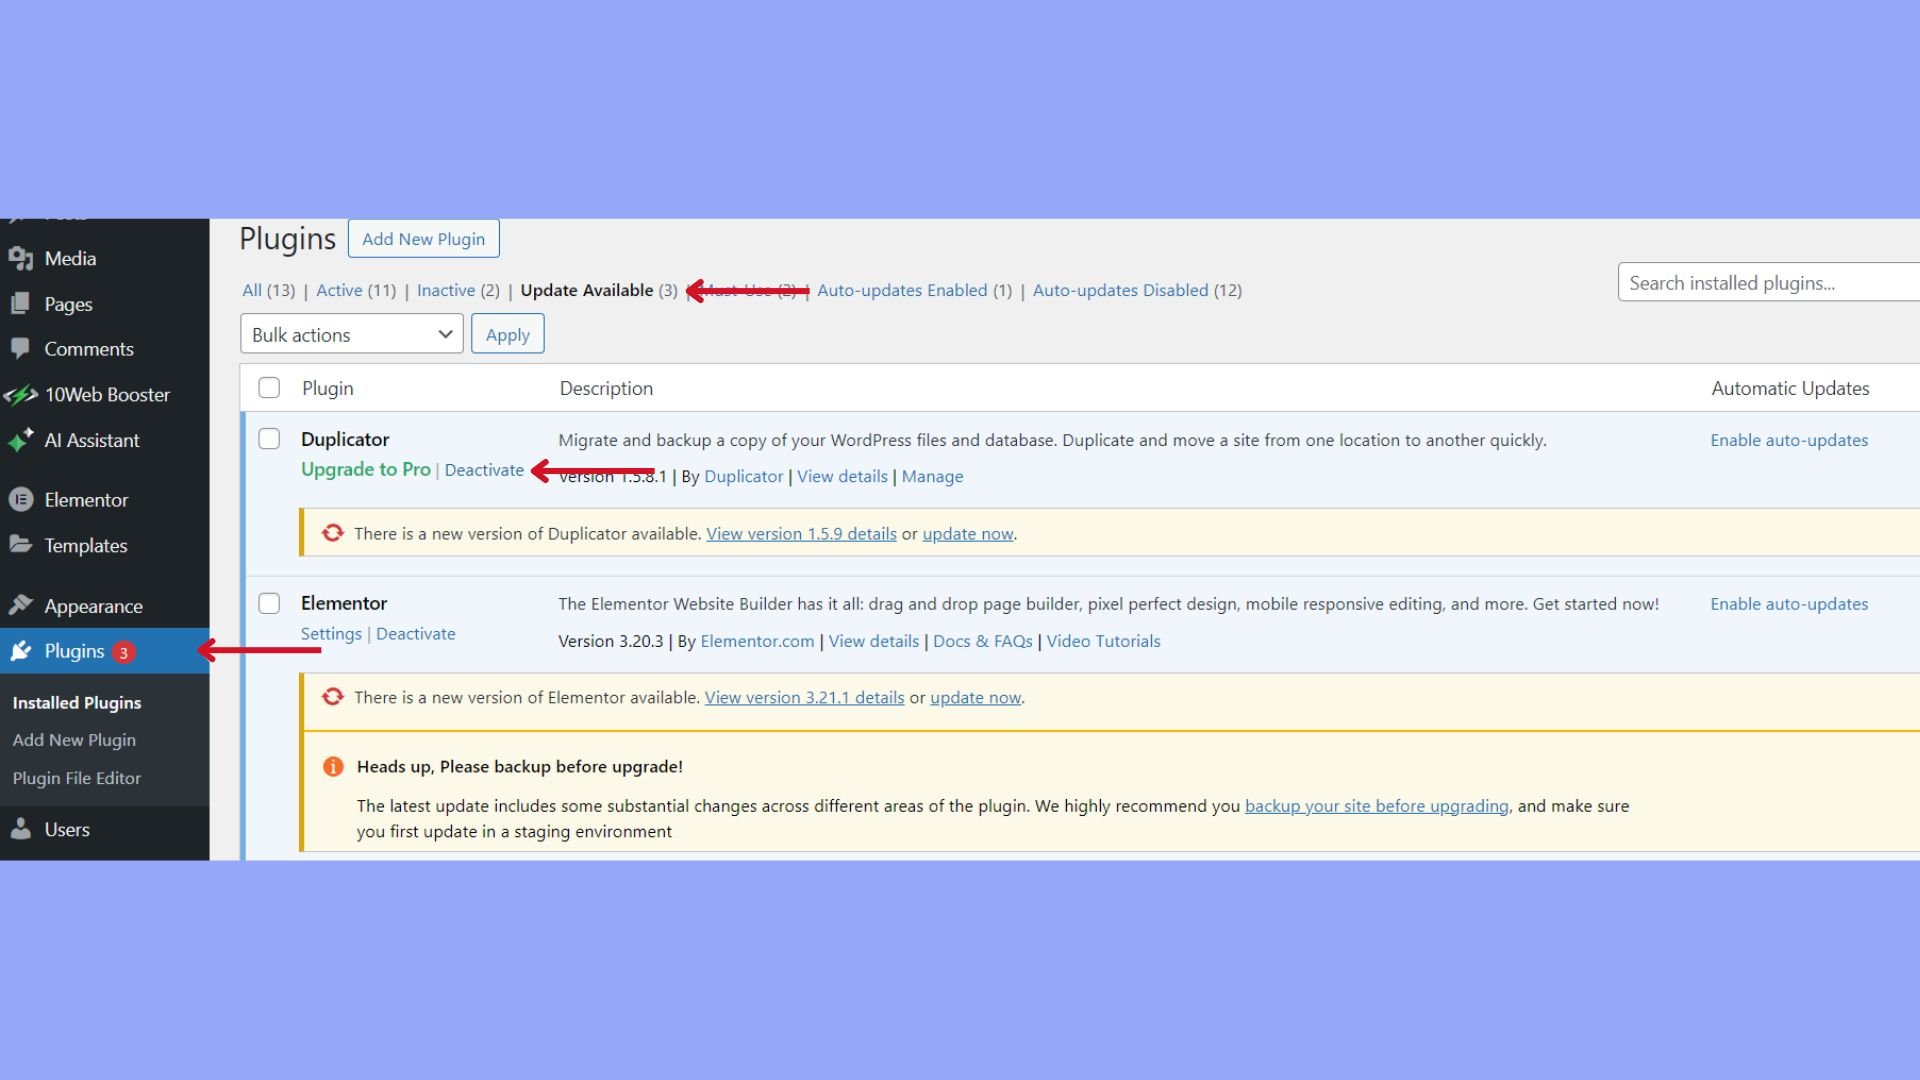
Step 2: Perform the update
Once deactivated, you can proceed with the update. Still within the Plugins tab, there should now be an update available notification next to the plugin. Click on Update now to start the process. If you need to update multiple plugins, select them and choose Bulk Update from the dropdown menu. After the update, ensure to activate the plugin again to continue using it. Always check your site to confirm that the plugin is working as expected.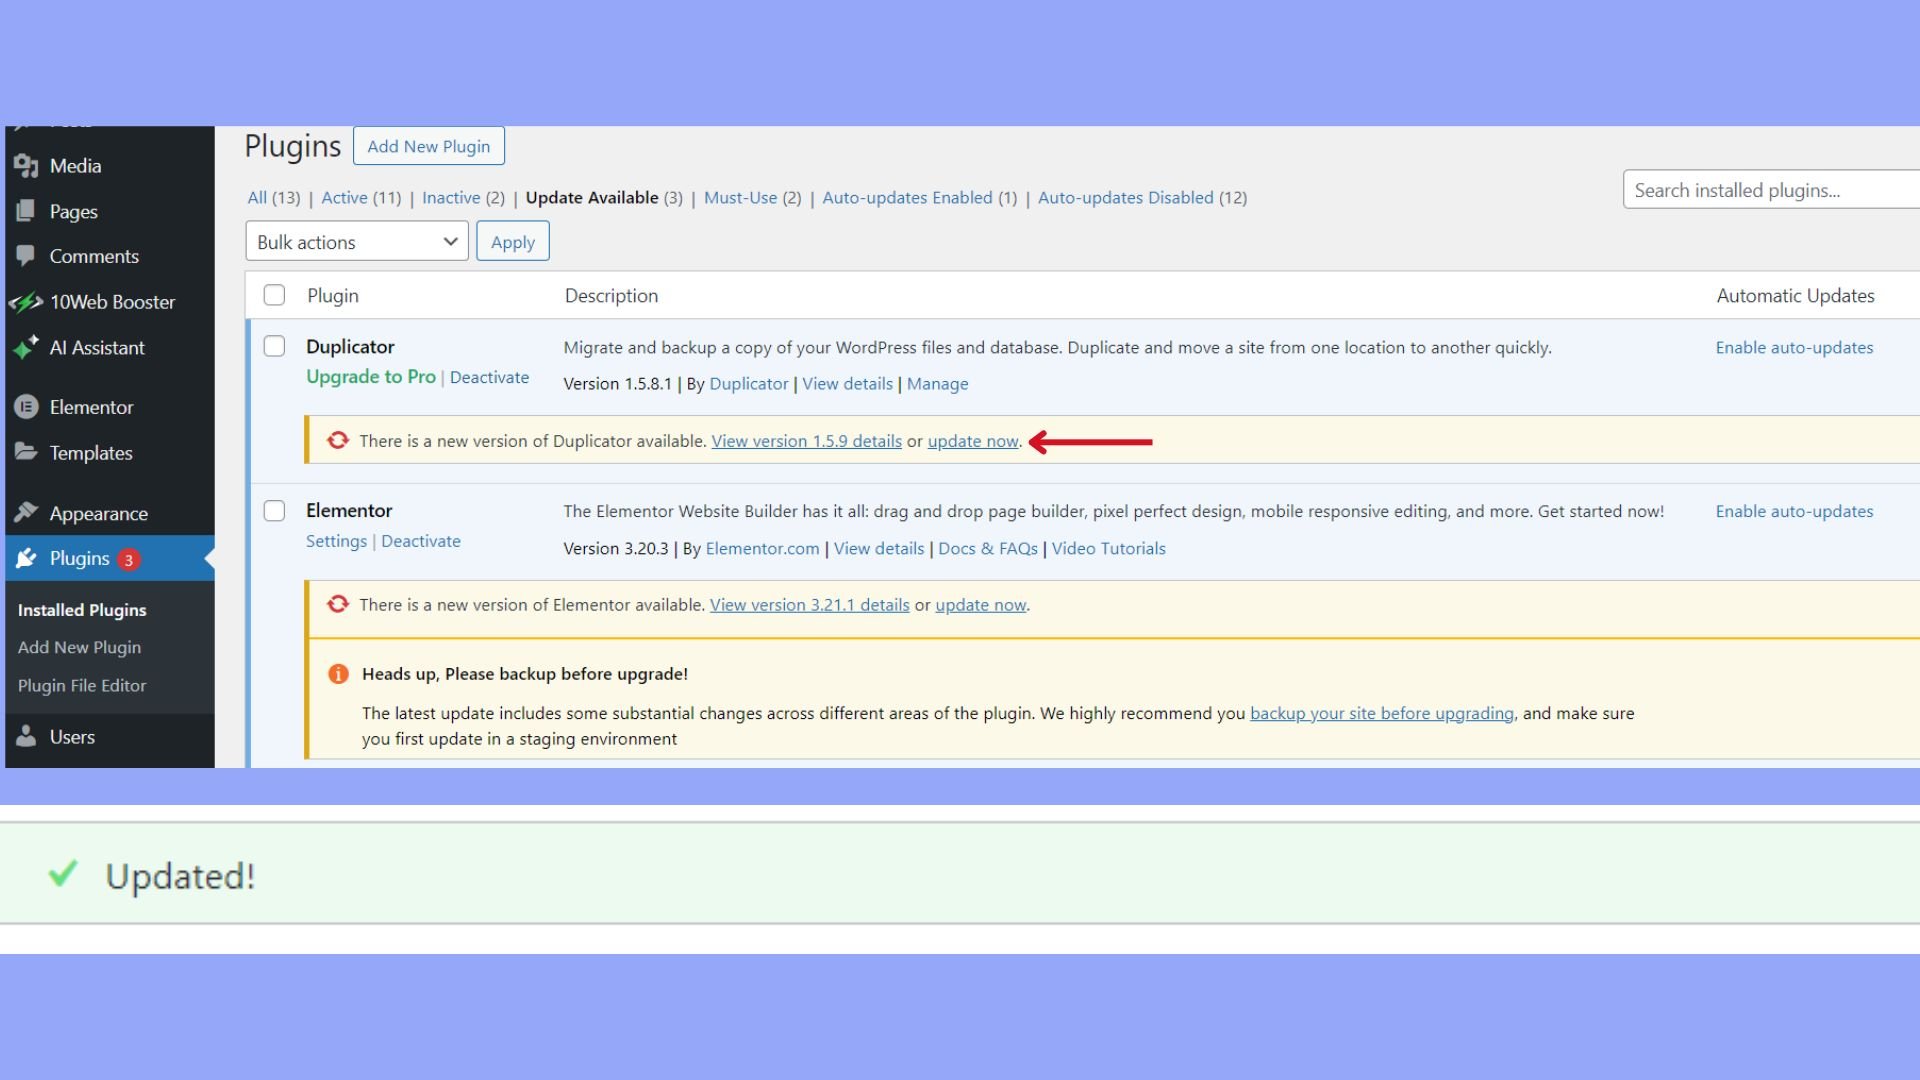
Automate manual work with 10Web Managed WordPress Hosting and 10Web AI Website Builder. Optimize your WordPress website effortlessly. ![]()
Simplify WordPress with 10Web
Post-update actions
Once you have successfully updated your WordPress plugin, it’s imperative to take the following actions to ensure everything is functioning correctly and maintaining the integrity and performance of your website.
Activating plugin
After updating, you must reactivate the plugin if WordPress has deactivated it during the update process. Navigate to your WordPress dashboard and click on Plugins. Find the updated plugin in the list and click Activate. Reactivating is crucial as it often triggers any new scripts or database updates that the plugin may require to function properly.
Test plugin functionality
With the plugin activated, it’s time to thoroughly test all functionalities. Ensure that features such as contact forms, custom post types, or widgets are functioning as expected. Check also for compatibility with other plugins and themes. If you encounter issues, you may need to roll back to a previous version using a WP Rollback plugin, or enter troubleshooting mode:
- Verify that the plugin’s settings were retained or update them accordingly.
- Test the plugin on different browsers and devices to confirm performance and compatibility.
- If you notice any errors, contact the plugin developer or consult support forums for assistance.
Understanding plugin updates
You have learned how to manually update WordPress plugin using three main methods. It’s also worth understanding plugin updates and the update types.
Identify update triggers
An update for a plugin becomes available when the developers have made improvement changes, fixed bugs, or patched security vulnerabilities. You can identify that an update is needed when you see a notification within your WordPress dashboard, often on the Plugins page.
These updates sometimes include important changes to PHP requirements, version details, and other compatibility information. Always review the changelog provided by the developers to understand what the update entails.
- Notifications: Look for update alerts in your WordPress dashboard.
- Changelog: Always check the changelog for information on what the update includes.

Automatic updates vs manual updates
WordPress offers the convenience of automatic updates for plugins, which can be enabled or disabled per plugin. This feature is especially useful for critical security patches. However, some updates might require your supervision, especially if there are compatibility issues or significant changes to the plugins’ features.
For manual updates, you will have to download the updated plugin as a .zip file from the WordPress Plugin Directory or a trusted third-party source. Other steps of manual plugin updates were discussed above for each method. Opposite to automatic updates, manual updates give you control over when and how an update is applied.
Automatic updates, in their turn, can be toggled from the plugin settings right from the WordPress dashboard by going to the Plugins section and selecting Enable auto-updates for the plugins you want to update automatically.
Final thoughts
Updating your WordPress plugins manually allows you to control the update process, which can significantly reduce risks associated with automatic updates.
Three major methods to update plugins manually are via the WordPress dashboard, using an FTP client, or utilizing WP-CLI. Each method caters to different skill levels and preferences. For beginners, the dashboard approach is most accessible, while advanced users may prefer the control and efficiency of WP-CLI or FTP. In this guide, we discussed how to manually update WordPress plugin via each of the three methods.
Regardless of your chosen method, always verify that the plugin is functioning correctly post-update by visiting your website and performing a spot check on the updated plugin’s features.
Skip and automate manual work with 10Web Managed WordPress Hosting and the 10Web AI Website Builder.Simplify WordPress with 10Web
Simplify WordPress with 10Web

![]()
![]()