When browsing the web, you’ve probably noticed those tiny images that appear next to the webpage’s title on your browser tab. Those are favicons, and they play a crucial role in branding and user recognition across web browsers and tabs.
A well-designed favicon makes your site stand out, helping users quickly identify it among a sea of other tabs. Let’s dive in and understand how to change favicon in WordPress.
Understanding favicons
Favicons are small, iconic images that represent a website’s brand and identity. They’re what you see in browser tabs, bookmark lists, and even mobile home screens when you add a site to your favorites. Favicons reinforce your online branding by providing a visual reminder of your website, making it instantly recognizable to visitors.
Favicons come in various formats and sizes, but the most commonly used format is the PNG or ICO file, with sizes ranging from 16×16 pixels to 32×32 pixels for standard display. However, for modern web standards, using a favicon size of 512×512 pixels is recommended, especially for ensuring clarity on all devices, including high-resolution displays. The versatility in size ensures that your favicon looks sharp on any device, from desktop browsers to smartphones.
Why change your favicon in WordPress?
Updating your favicon might seem like a minor task, but it can have a significant impact on your site’s branding and user recognition. Here are a few key reasons why you might consider making a change:
- Rebranding efforts: When your site undergoes a rebranding, ensuring that your favicon matches the new logo and color scheme is essential for visual consistency across all user touchpoints.
- Standing out in a crowded space: In a sea of browser tabs, a unique and distinctive favicon helps your site pop, making it easier for users to find and return to your page.
- Refreshing your site’s look: Just like refreshing your website’s design can attract more visitors, updating your favicon can contribute to a fresher, more modern appearance.
- Boosting brand recognition: A memorable favicon can significantly enhance your brand’s visibility and recognition, making a lasting impression on your audience.
By focusing on these aspects, you ensure that every detail of your site contributes to a cohesive and recognizable brand identity.
Simplify WordPress with 10Web
Automate manual work with 10Web Managed WordPress Hosting and 10Web AI Website Builder. Optimize your WordPress website effortlessly.
Ways to change your favicon
We’ll cover three ways to update your favicon, suited for easy to advanced levels.
Method 1: Using WordPress Customizer
Changing your favicon through the WordPress Customizer is a straightforward process. Here’s how you can do it:
Step 1. Access the WordPress Customizer
- Begin by logging into your WordPress dashboard using your username and password.
- Once logged in, find the Appearance option on the left-hand side menu. Hover over it, and then click on Customize.
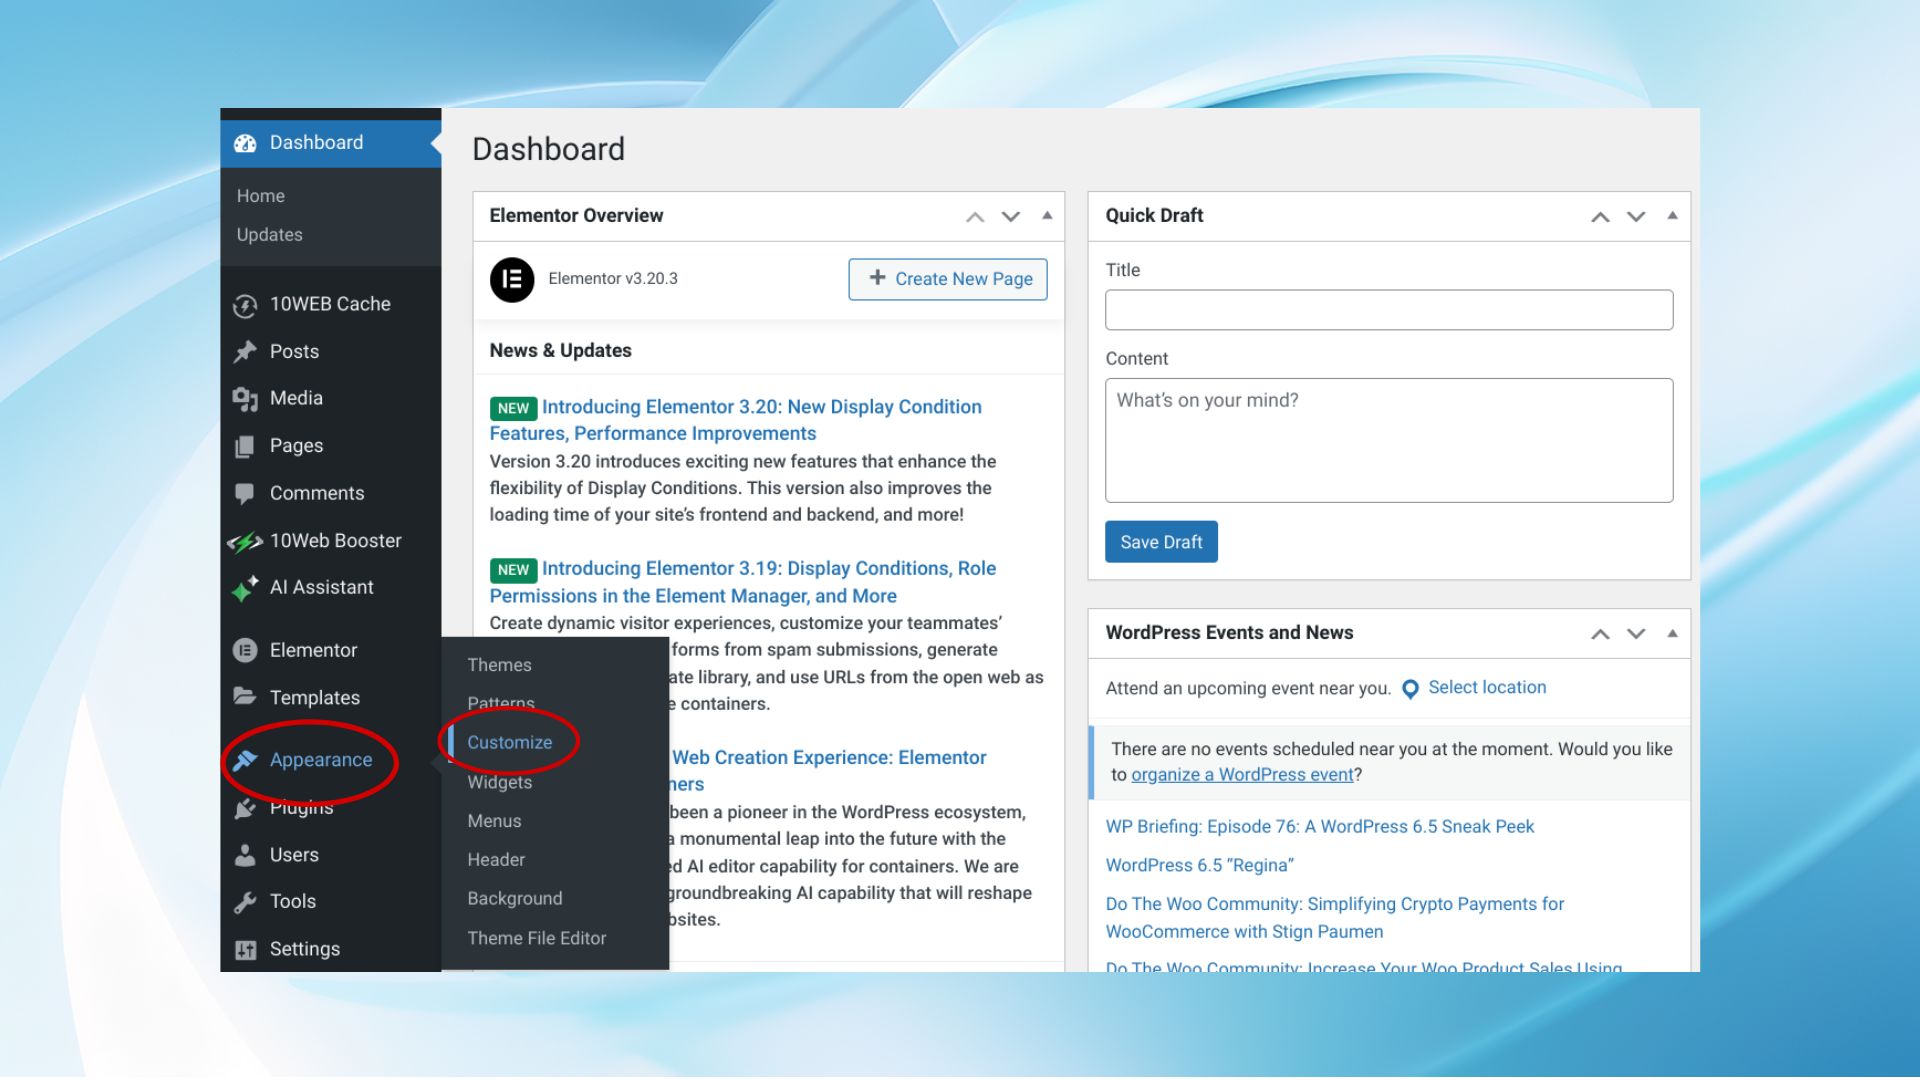
This action will take you to the WordPress Customizer, a powerful tool that allows you to make live edits to your site.
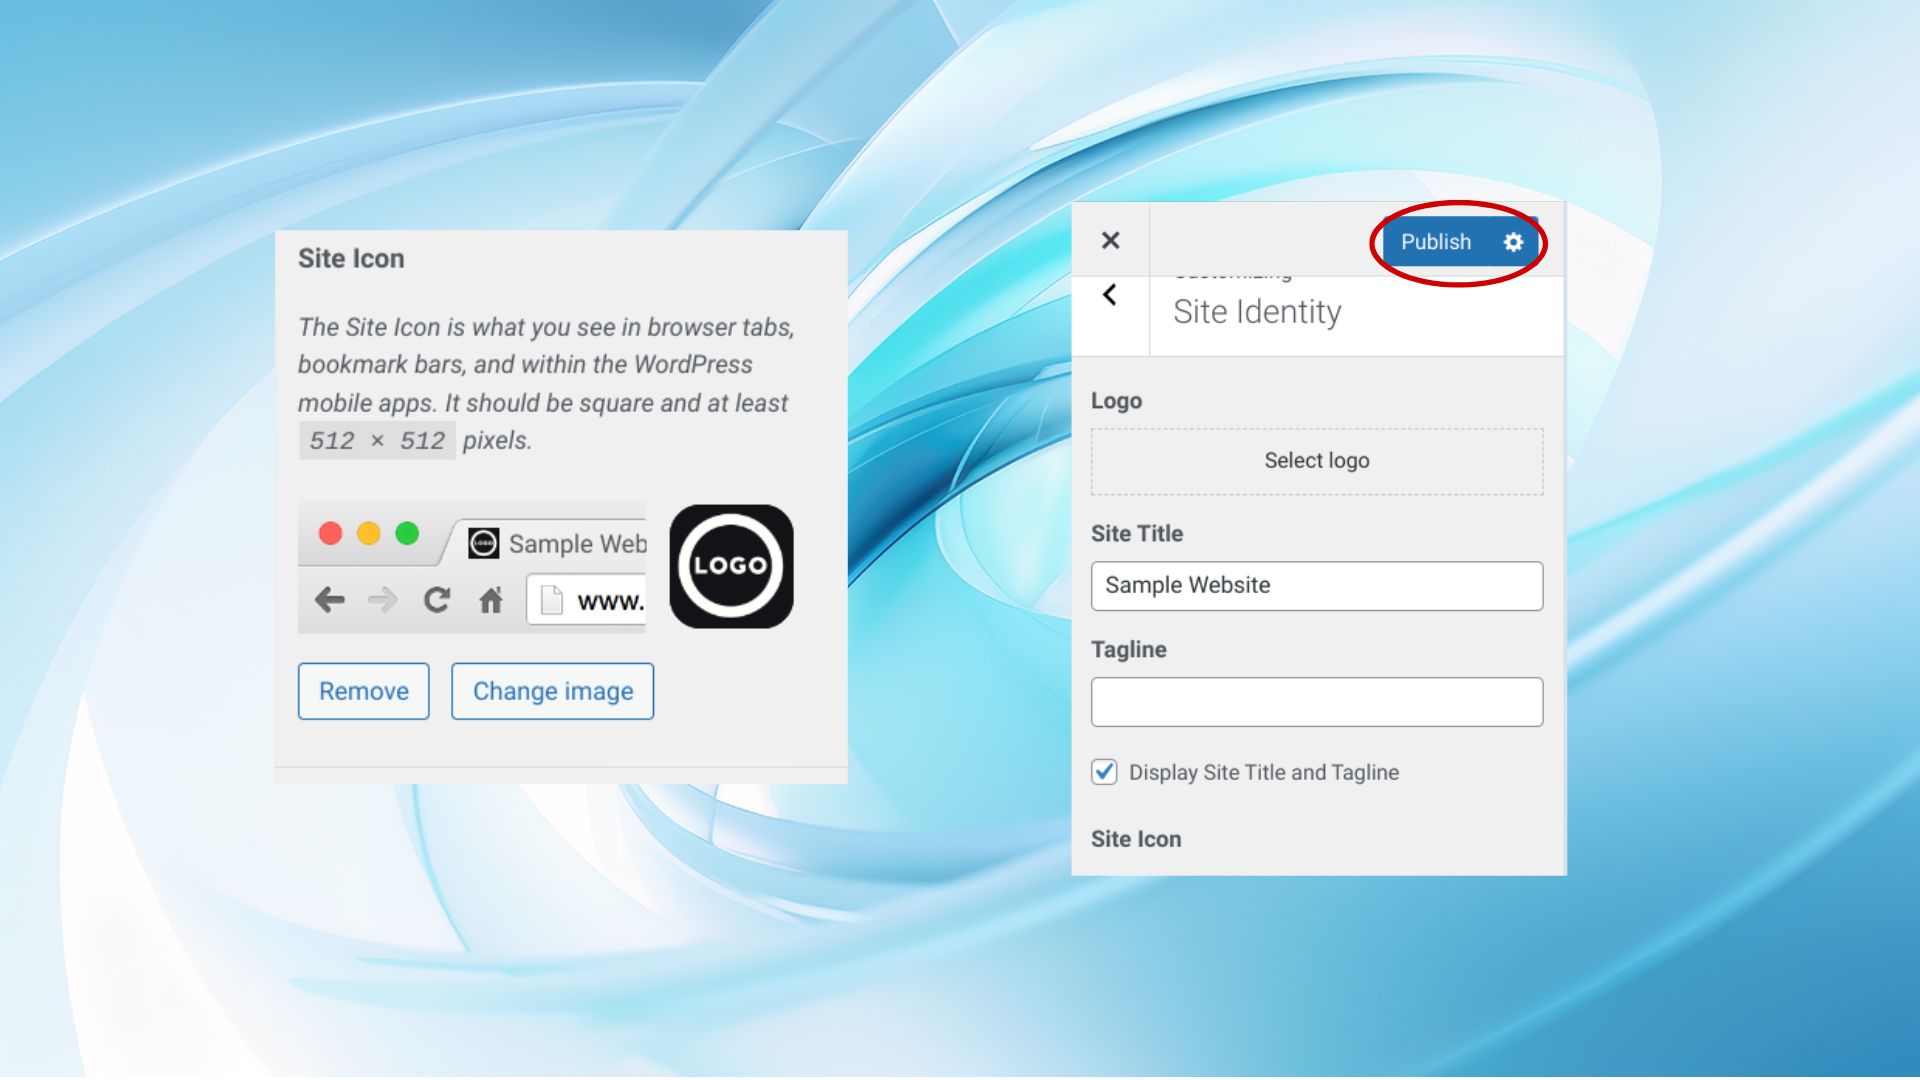
Step 2. Locate Site Identity and select Site Icon
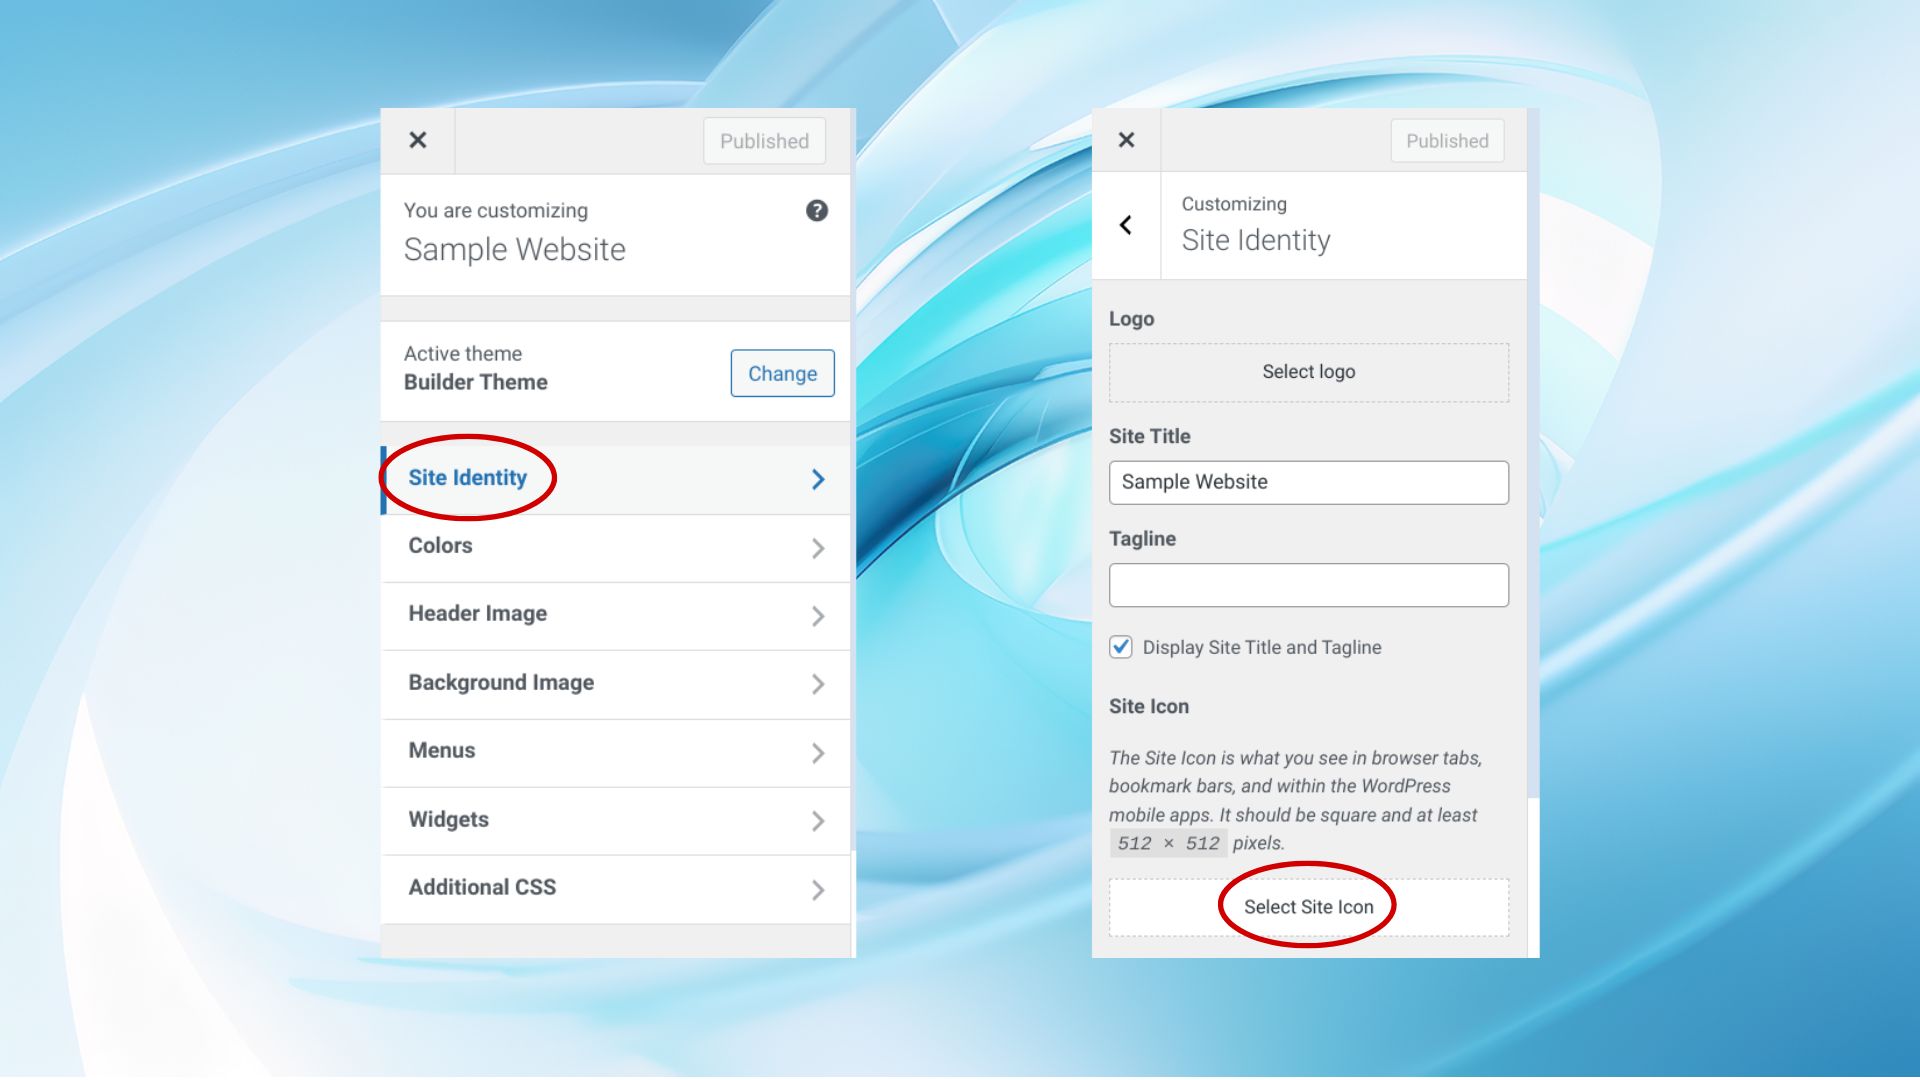
- Inside the WordPress Customizer select Site Identity option and click on it. This section is dedicated to managing key identity elements of your site, such as the title, tagline, and, importantly, the favicon.
- Go to the Site Icon area, and click on the Select Site Icon button to proceed with uploading your new favicon file.
If you’re updating an existing favicon, this process will replace the old one. Click on the “Select Site Icon” button to proceed with uploading your new favicon file.
Step 3. Upload and crop your favicon
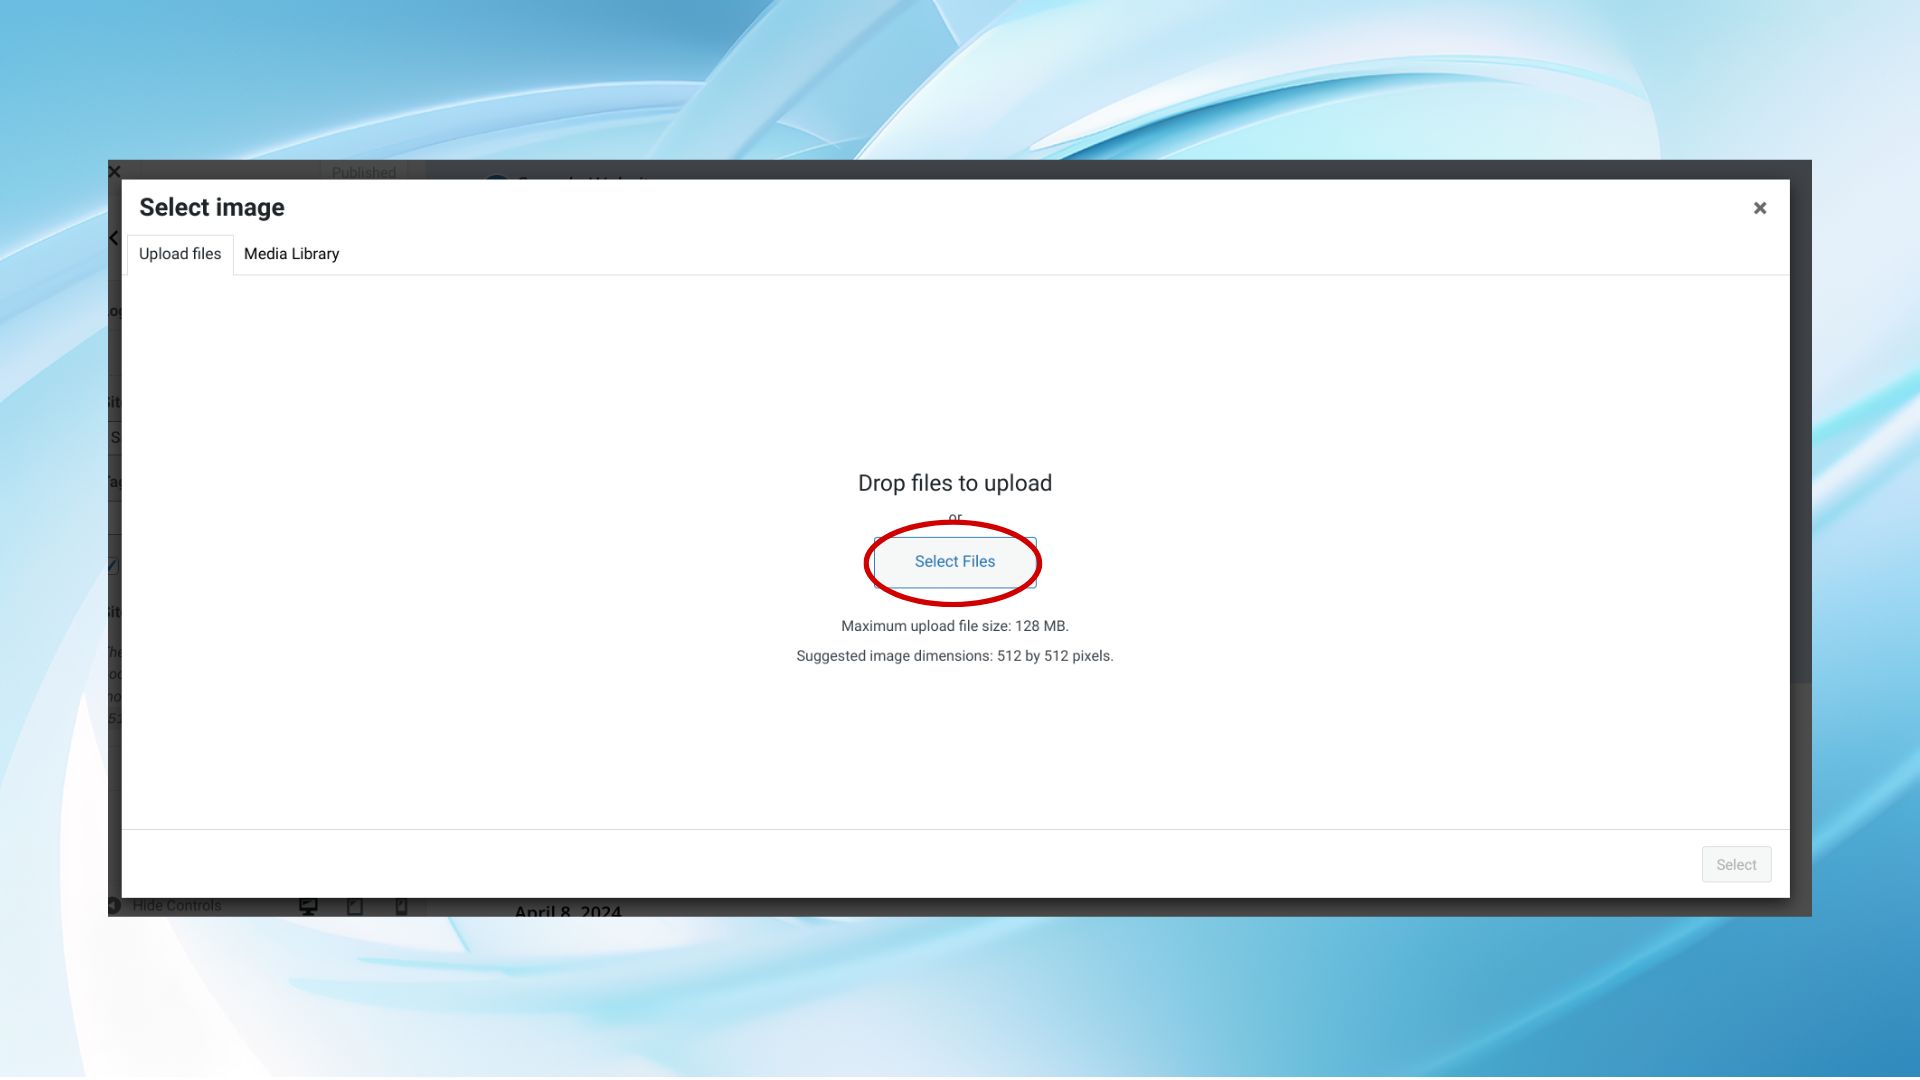
- Ensure your favicon image is at least 512×512 pixels for clarity on all devices.
- Click the Select Files button in WordPress to select your favicon file.

- Allow WordPress to upload and then present the cropping tool.
- Adjust the cropping area if necessary to fit your favicon’s design, and then click on Crop Image.
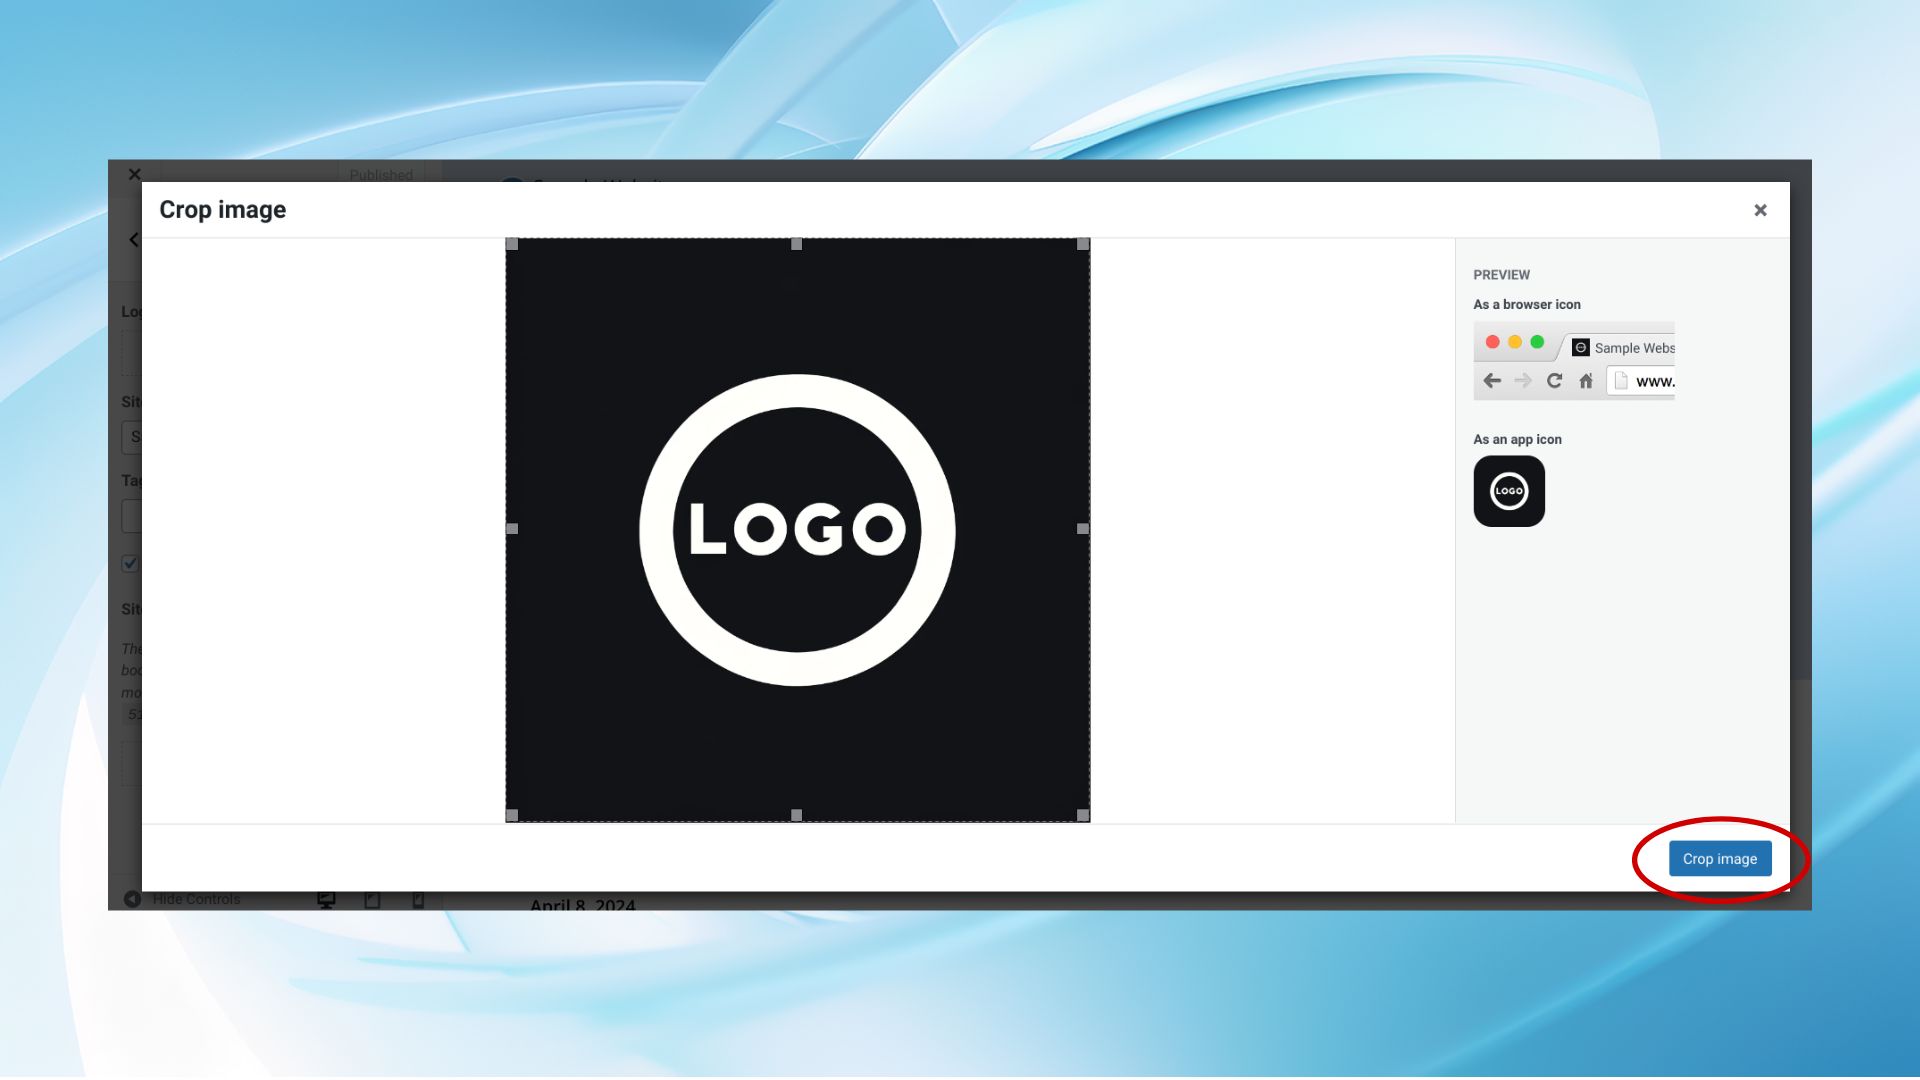
Step 4. Publish your changes
- Preview your favicon in the Customizer’s live preview screen after uploading and cropping.
- Click Publish in the Customizer to apply your new favicon to your live site.
- Open your site in a new browser tab to check the updated favicon.
- Clear your browser cache if the new favicon doesn’t appear immediately.
Simplify WordPress with 10Web
Automate manual work with 10Web Managed WordPress Hosting and 10Web AI Website Builder. Optimize your WordPress website effortlessly.
Method 2: Using plugins
For those who prefer a bit more functionality, WordPress plugins like “Favicon by RealFaviconGenerator” offer a more comprehensive approach to managing favicons. Here’s how to change favicon in WordPress by using plugins.
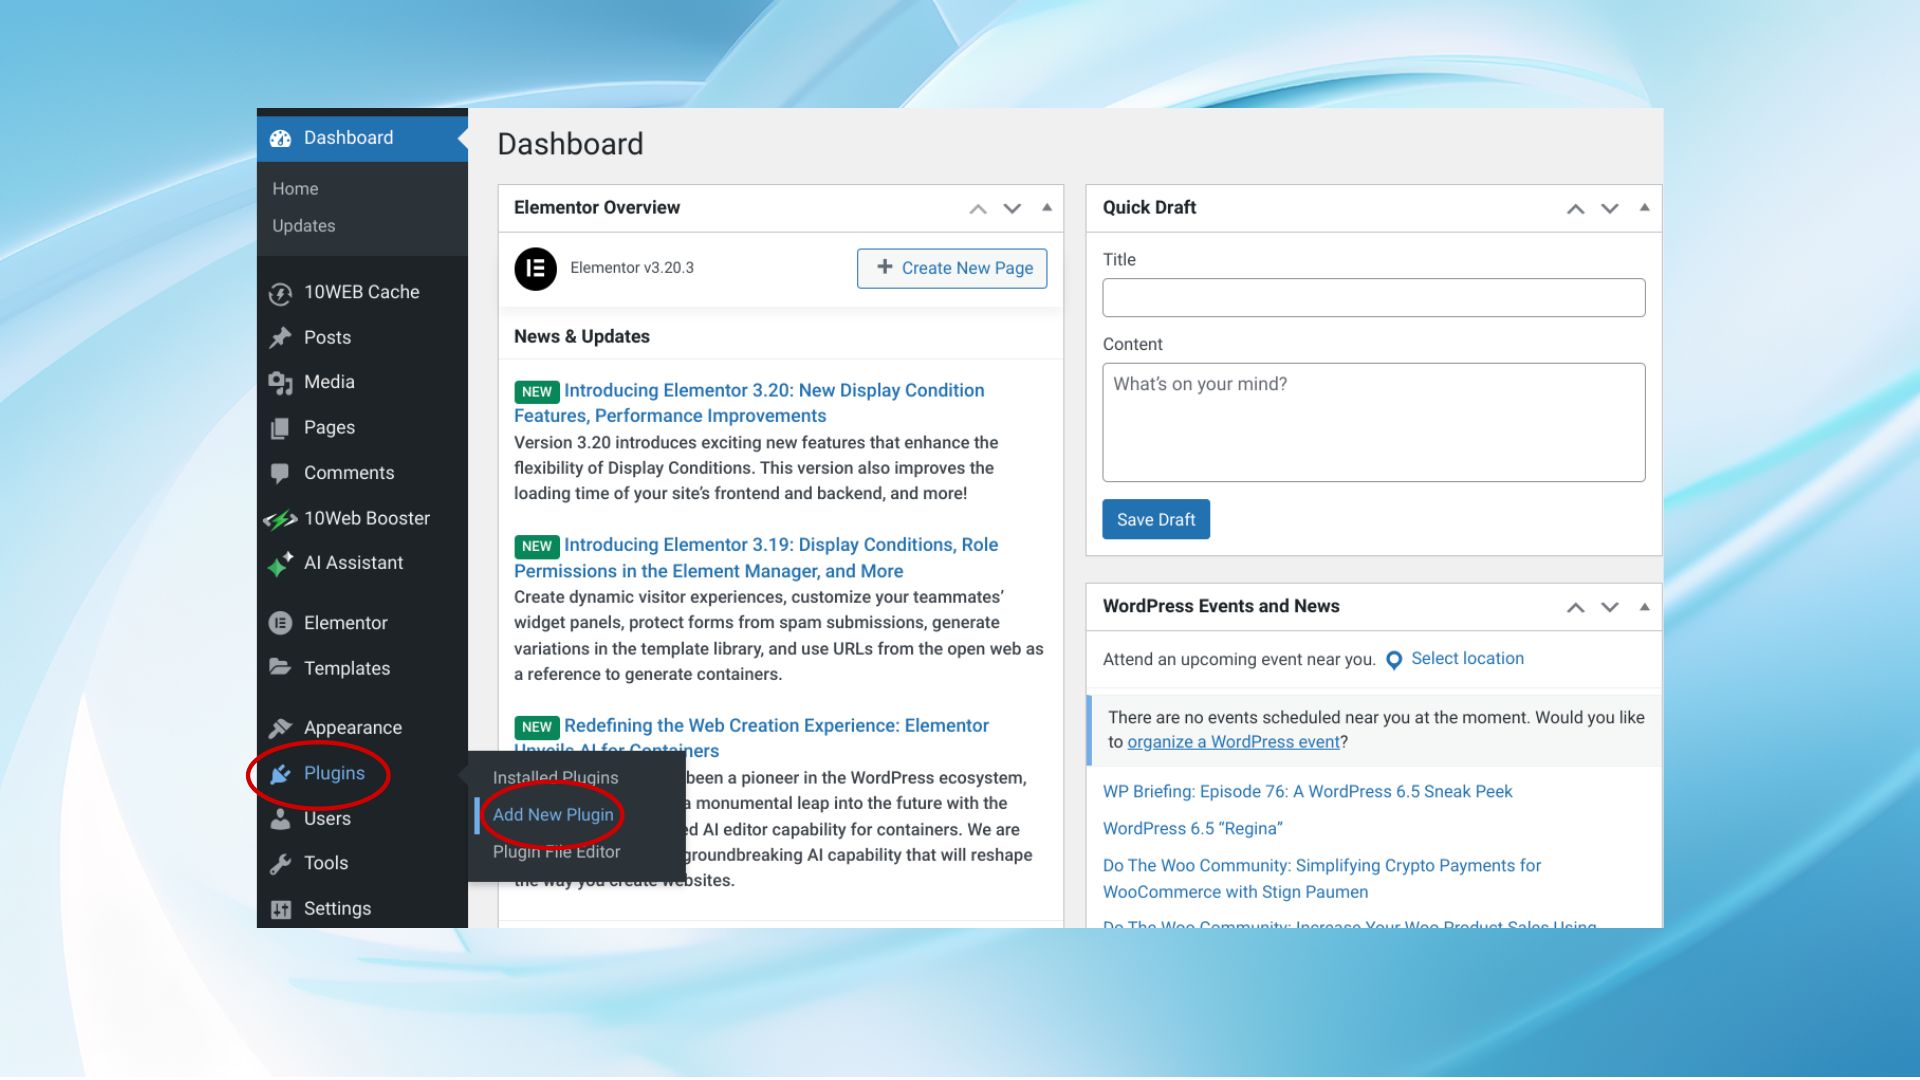
Step 1. Install a plugin
- Log into your WordPress dashboard and go to Plugins > Add New.
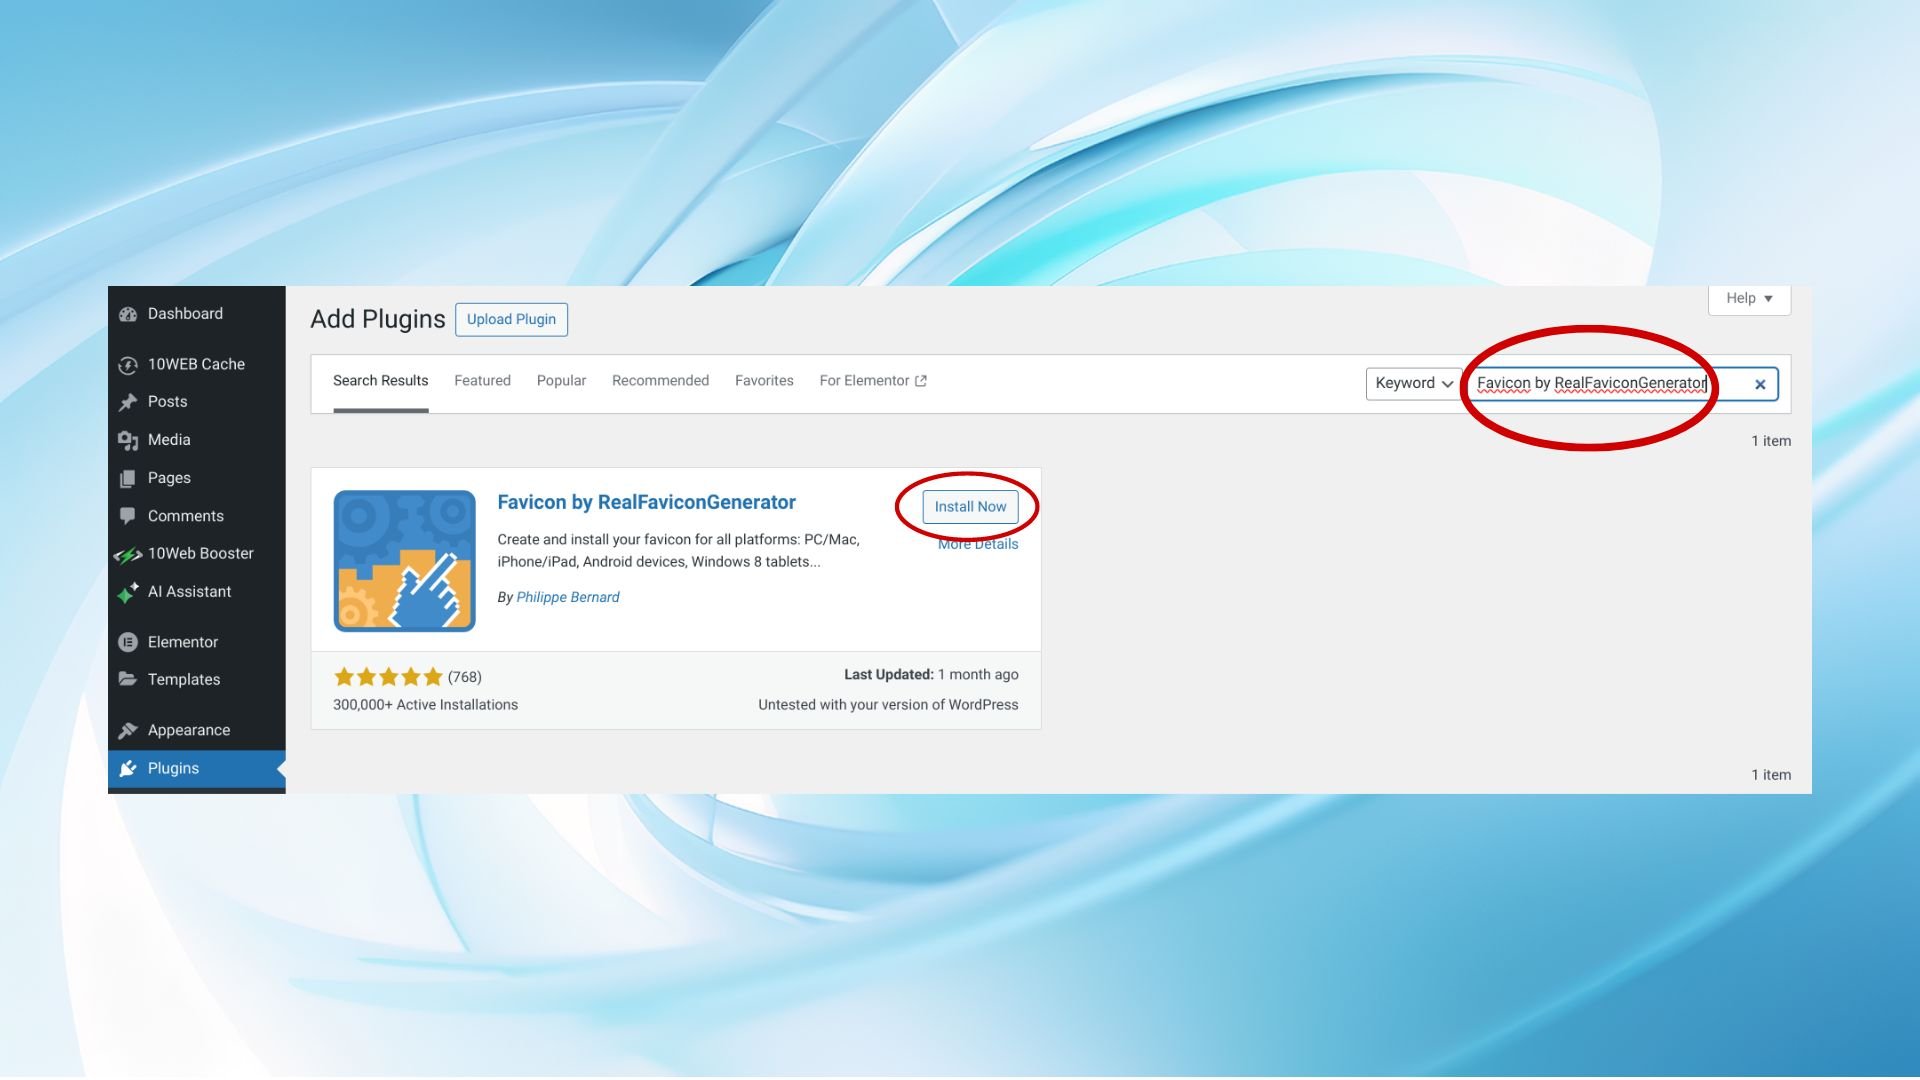
- Type “Favicon by RealFaviconGenerator” or “favicon” in the search bar.
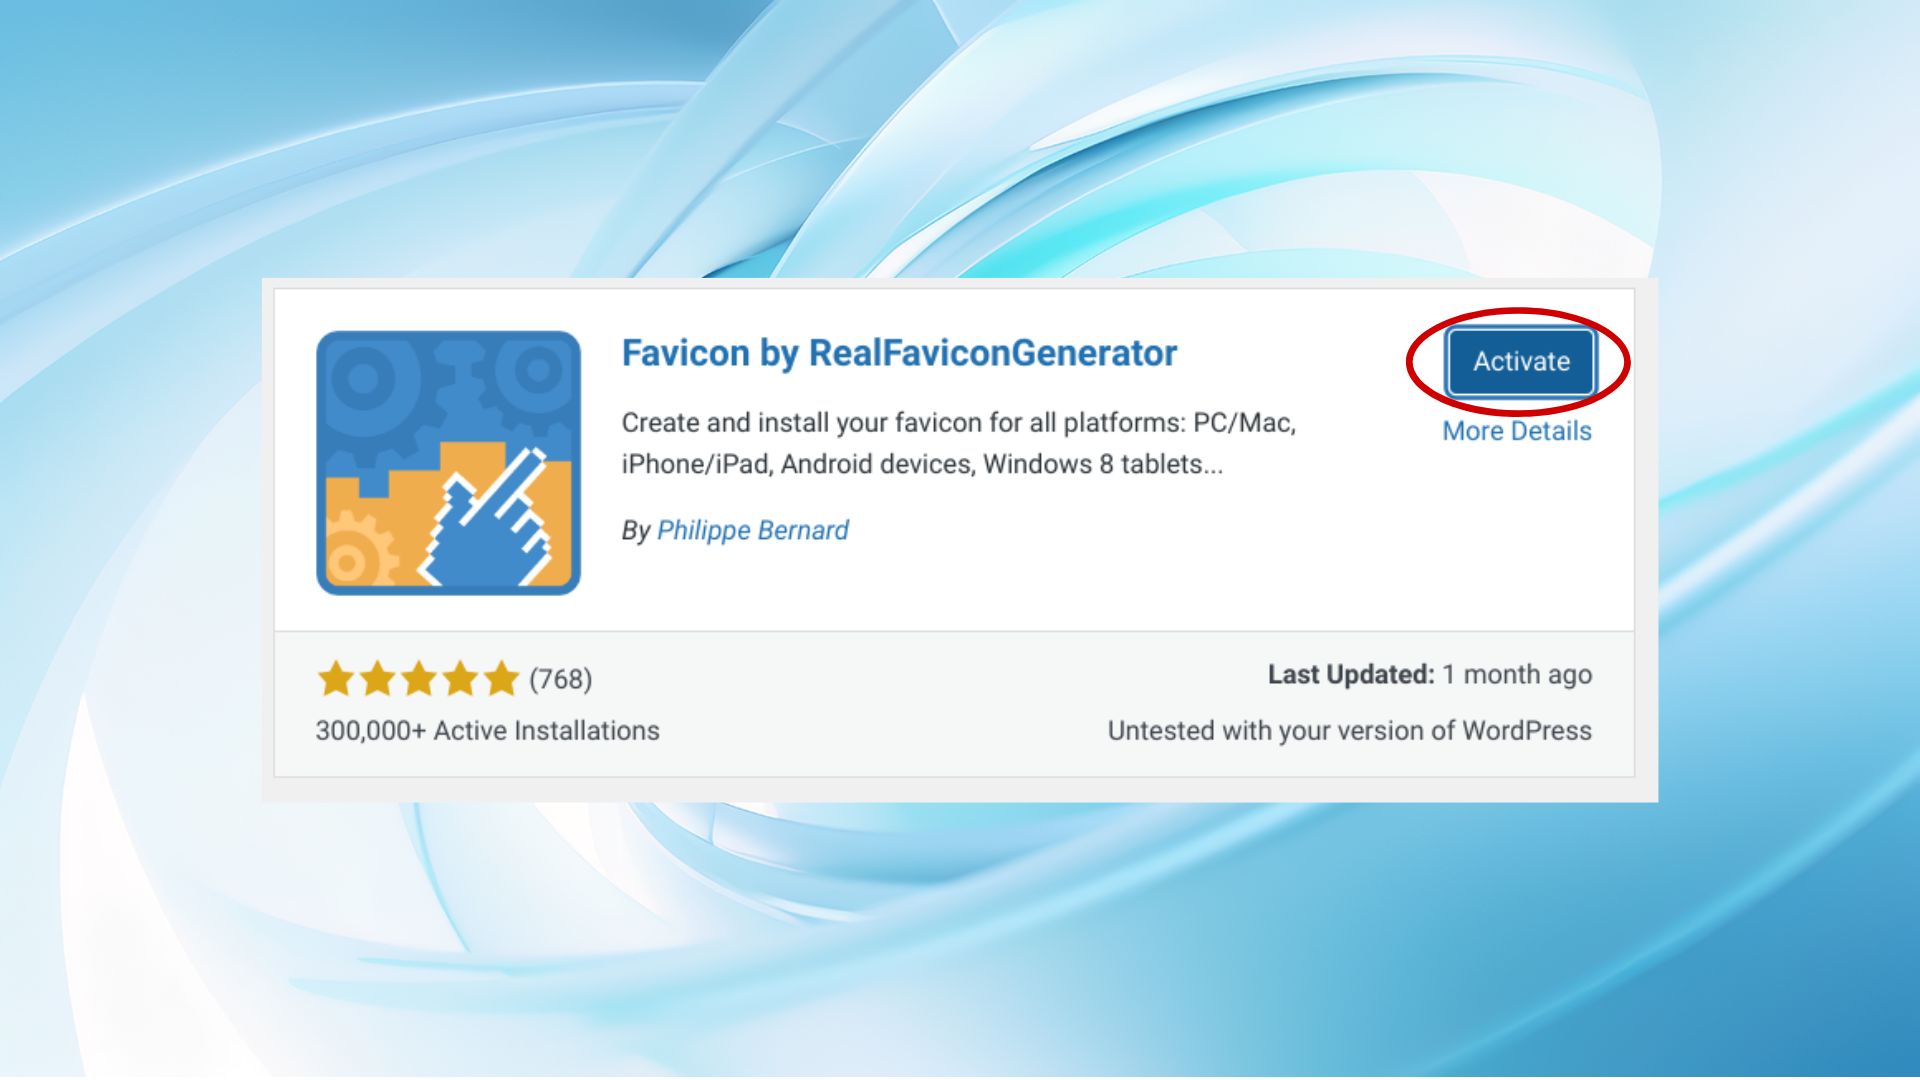
- Click Install Now next to the “Favicon by RealFaviconGenerator” plugin.
- After installation, click Activate to enable the plugin on your site.
Step 2. Configure and generate your favicon
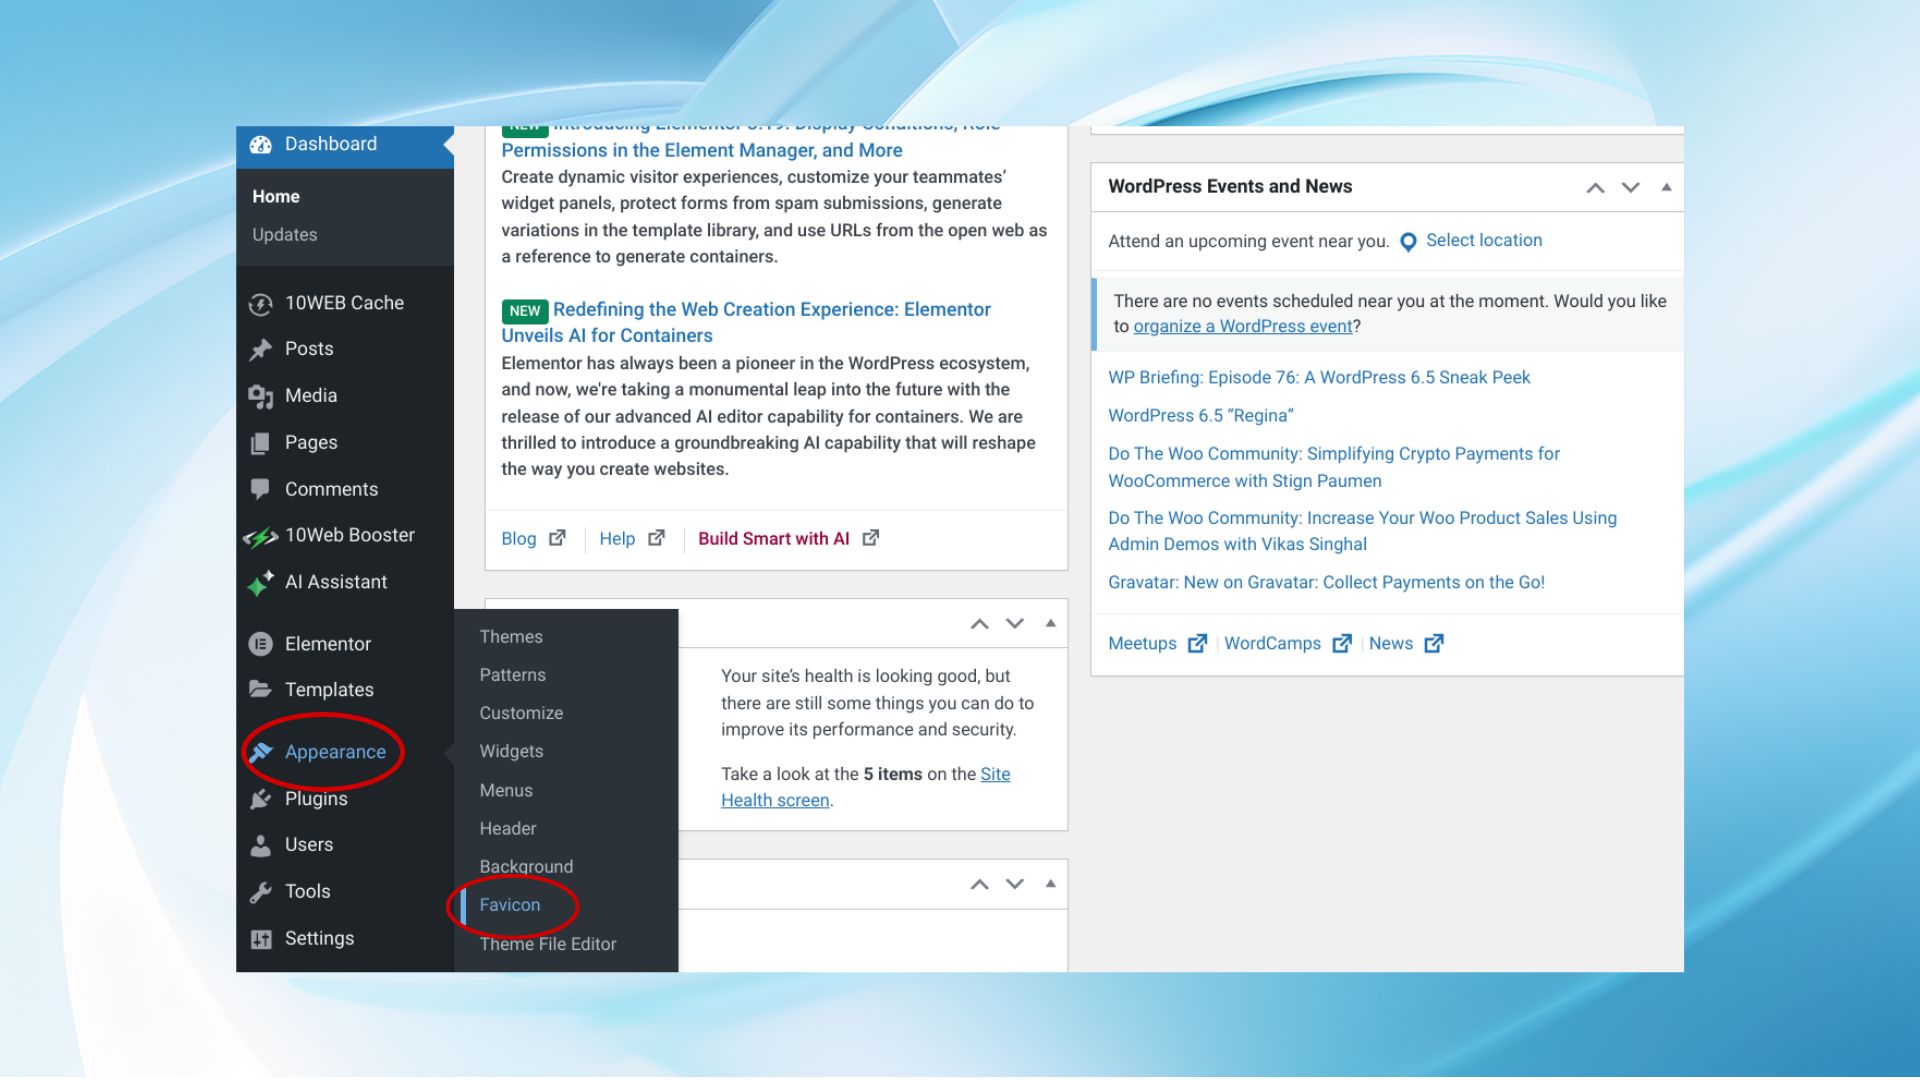
- Find the plugin’s settings page, typically under Appearance or Settings in your dashboard.
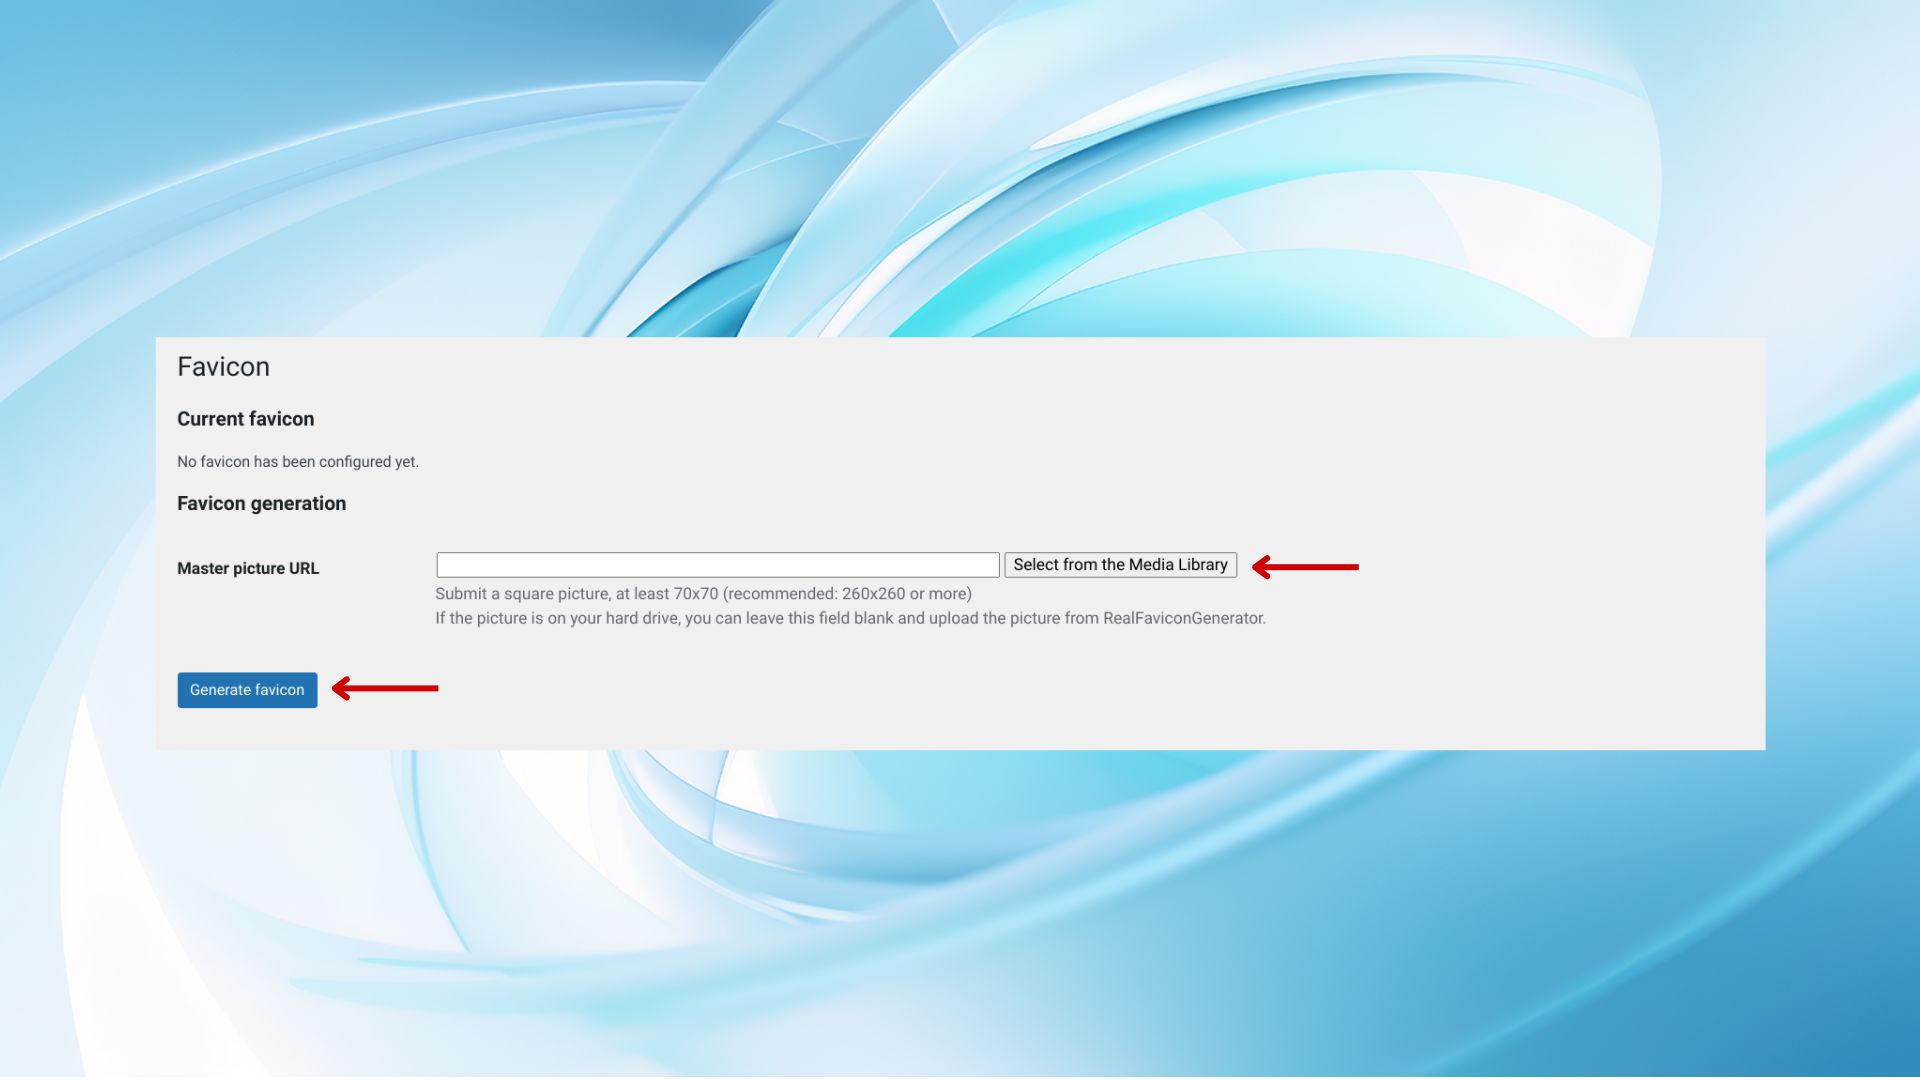
- Use the plugin’s settings to upload or select your favicon image, and click on Generate favicon.
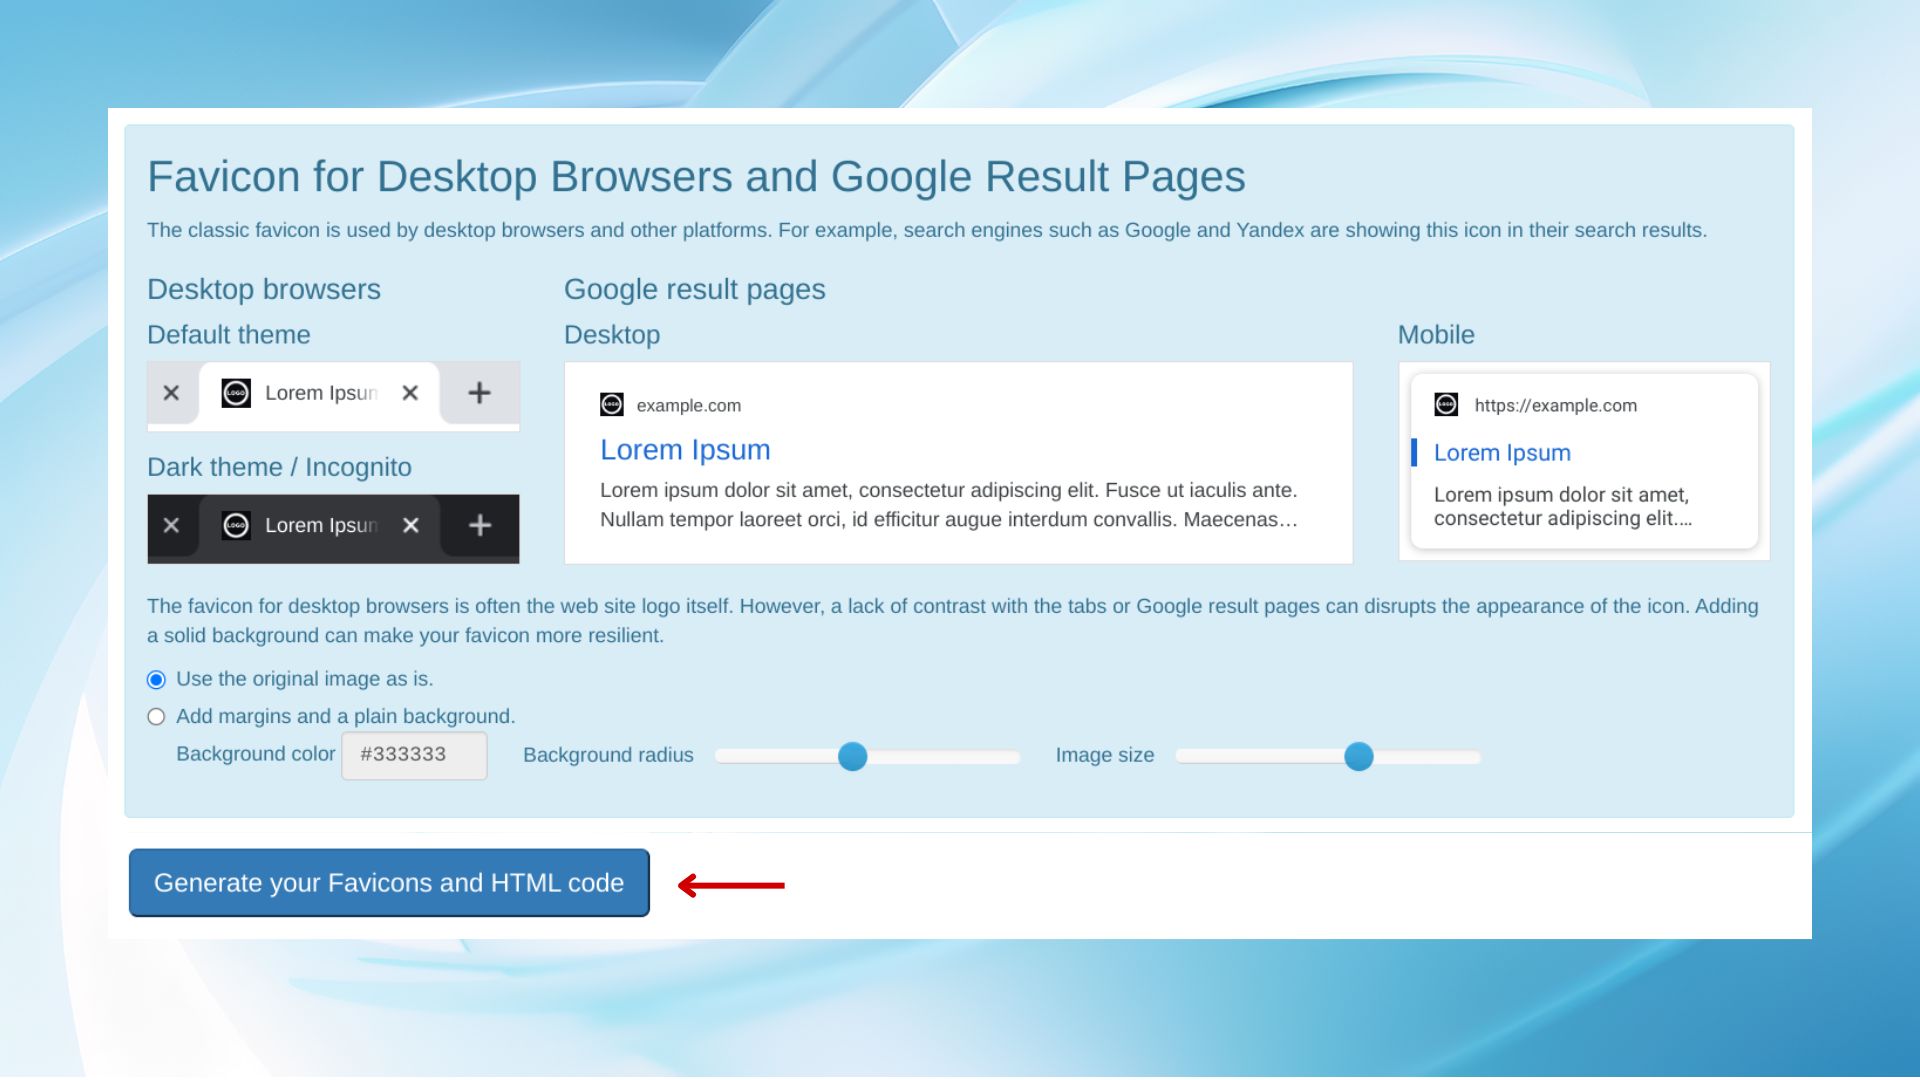
- Adjust additional settings for device specificity, background color, or splash screens as available.
- Preview how your favicon looks on various devices and browsers using the plugin’s preview feature.
- Click on “Generate your Favicons and HTML code” or a similar button for other plugins.
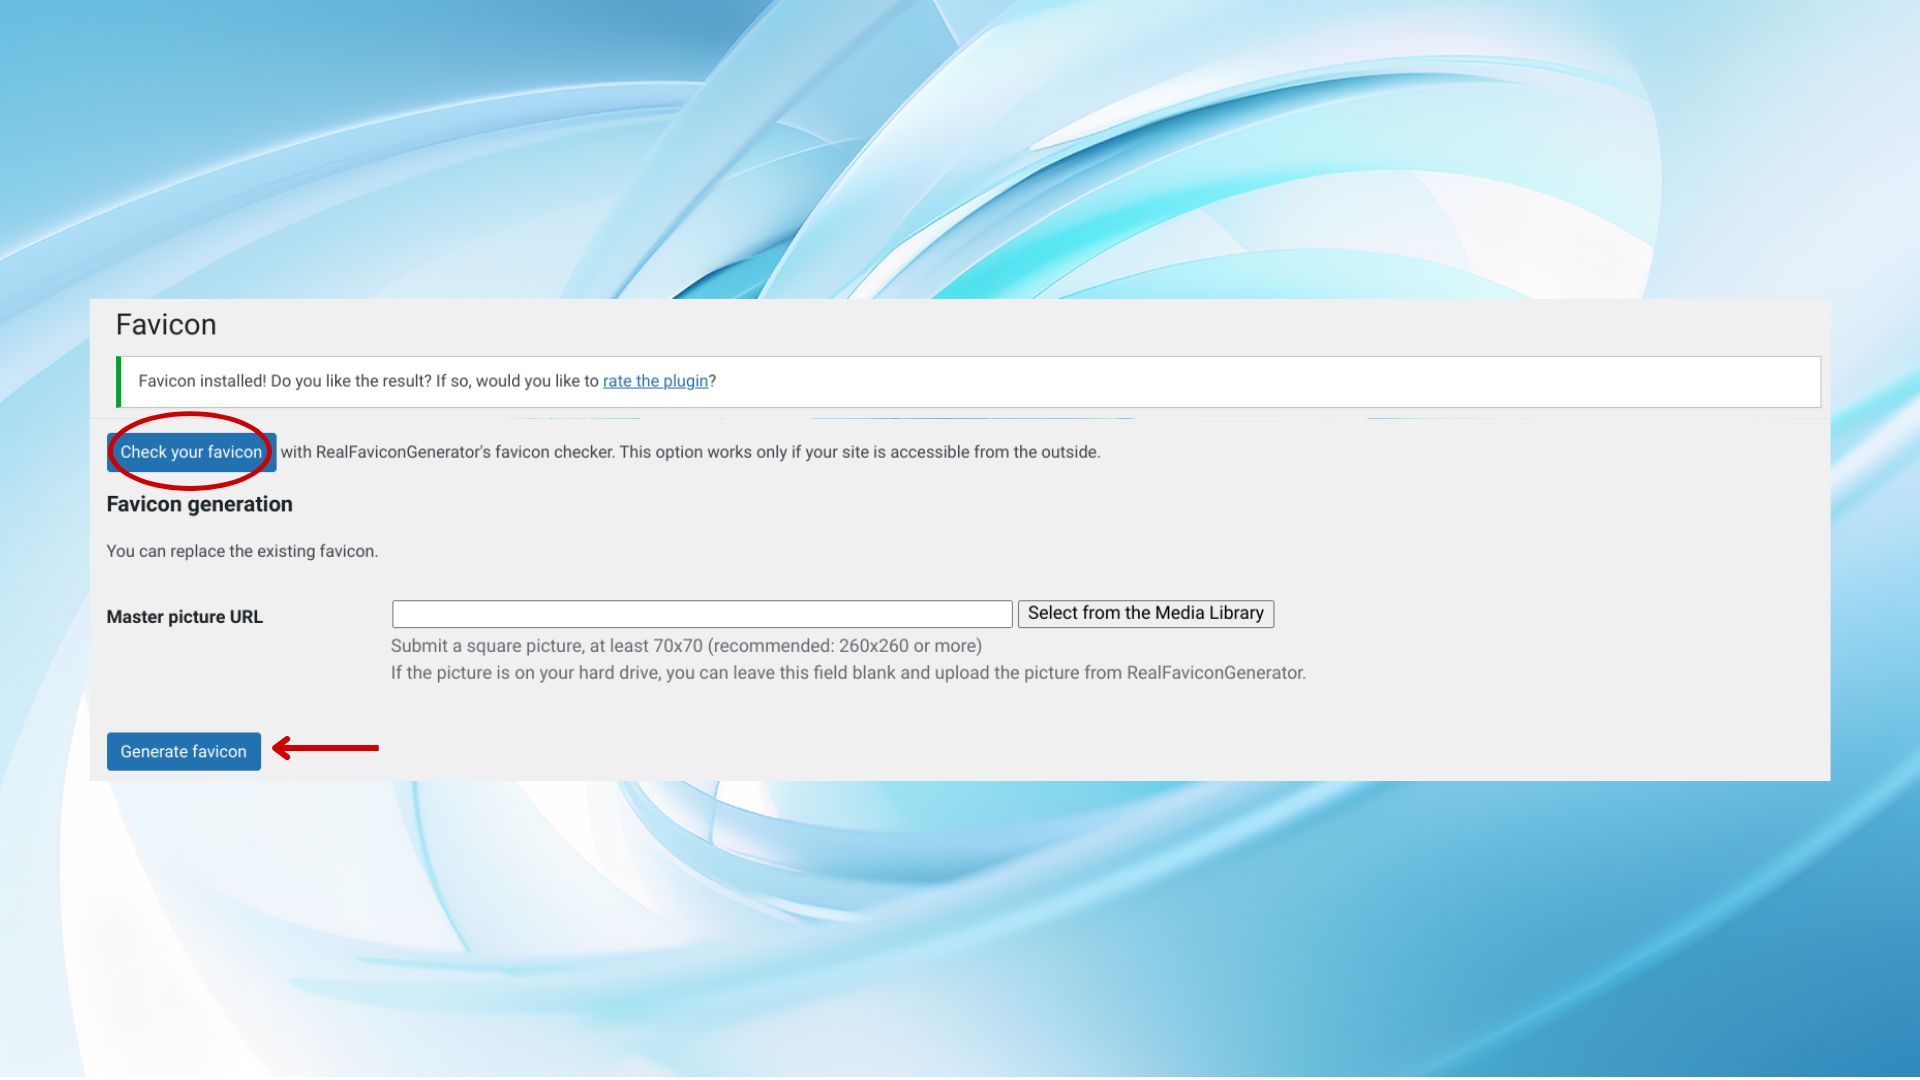
Step 3. Check and regenerate if needed
- Click Check your favicon if you want to preview how it looks for different devices and environments.
- Open a new browser tab and navigate to your site to check the new favicon.
- Clear your browser’s cache or use a private window if the favicon isn’t visible immediately.
- If you want to change the favicon, upload a new favicon and click Generate favicon.
Simplify WordPress with 10Web
Automate manual work with 10Web Managed WordPress Hosting and 10Web AI Website Builder. Optimize your WordPress website effortlessly.
Method 3: Manual upload via FTP
In some cases, you might need to manually upload your favicon directly to your website’s root directory. This method is a bit more technical and is usually necessary when dealing with caching issues or specific server configurations. Here’s a more detailed, step-by-step guide on how to change favicon in WordPress using manual upload via FTP:
Step 1. Prepare your favicon
- Ensure your favicon is in ICO format and named “favicon.ico” for universal browser support.
- Design your favicon to be at least 16×16 or 32×32 pixels; consider 48×48 or 64×64 pixels for high-resolution displays.
- Use online tools to convert your image to the ICO format if needed.
Step 2. Access your site via FTP
- Download and install an FTP client like FileZilla, Cyberduck, or WinSCP.
- Obtain your FTP username and password from your hosting provider or web hosting control panel.
- Use the FTP client to connect to your server using your host, username, password, and possibly a port number (typically 21).
Step 3. Upload your favicon and clear cache
- After connecting via FTP, navigate to the “public_html” or “www” directory, which is the root of your WordPress installation.
- Drag and drop the “favicon.ico” file into the root directory and wait for the transfer to complete.
- Clear your web browser’s cache after uploading the favicon to ensure the new one is displayed.
- Also, clear your WordPress site’s cache or your hosting provider’s server-side cache for immediate favicon update visibility.
Additional tips
- Check across browsers: After completing these steps, visit your website in different browsers to ensure that the new favicon is displayed correctly.
- Troubleshooting: If your favicon doesn’t appear, double-check that the file was uploaded to the correct directory and that it’s named “favicon.ico”. Additionally, some hosting services might require a server restart for changes to take effect, although this is rare.
By following these steps, you can manually change your favicon in WordPress via FTP, giving you direct control over this small but significant aspect of your site’s branding and user experience.
Simplify WordPress with 10Web
Automate manual work with 10Web Managed WordPress Hosting and 10Web AI Website Builder. Optimize your WordPress website effortlessly.
Best practices for creating and uploading favicons
In WordPress branding, the favicon is highly impactful. This small icon, visible in browser tabs and bookmarks, acts as your site’s visual identifier. Aim for simplicity and clarity in your design. A favicon should be recognizable at a glance, even at sizes as tiny as 16×16 pixels.
When thinking about how to change favicon in WordPress, start from design. Use bold, geometric shapes and limit your color palette. This approach not only boosts legibility but also aligns with your brand. Incorporating logo elements or brand colors enhances recognition. Your site will stand out in a crowded tab bar. Additionally, ensure your favicon is visible against different backgrounds and in dark mode.
When uploading, the format and size of your favicon are key. ICO is the ideal format for wide browser compatibility. PNG or SVG formats work for modern browsers too. Offering a range of sizes ensures clarity on all devices, from desktops to mobile screens.
After uploading, test your favicon across different platforms. Use online tools for objective analysis. As your website evolves, update your favicon too. Regular refreshes keep your branding consistent and fresh. Feedback from your audience is invaluable for refinement. Following these practices enhances your site’s professional look and brand presence.
Troubleshooting common issues
Understanding how to change favicon in WordPress without running into common issues is another challenge. Here are some common problems and how to troubleshoot them:
Favicon not updating
When your favicon isn’t updating on your WordPress site, start by clearing your browser’s cache, as browsers tend to cache favicons heavily. Next, clear your site’s cache, especially if you’re using caching plugins or your hosting provider implements server-side caching, which can delay your new favicon’s visibility. Also, ensure that your favicon file is correctly named (usually “favicon.ico”) and placed in the appropriate directory, especially if you’re manually uploading via FTP. These steps can effectively resolve issues with a favicon that won’t update, ensuring your site reflects the most current icon.
Incorrect favicon displaying
If you’re facing the issue of an incorrect favicon displaying on your WordPress site, first ensure you’ve uploaded the correct favicon file – mistakes can happen easily if you’re changing multiple versions. Additionally, examine your theme settings; some themes possess their own favicon configurations that could override settings from the WordPress Customizer or any favicon plugins you might be using. Setting the correct favicon within your theme’s options can rectify this issue and ensure your chosen favicon is the one that appears to your site’s visitors.
Simplify WordPress with 10Web
Automate manual work with 10Web Managed WordPress Hosting and 10Web AI Website Builder. Optimize your WordPress website effortlessly.
Favicon appears in some browsers but not others
If your favicon displays correctly in some browsers but not others, first verify that your favicon’s format is compatible across all your target browsers; while ICO files are widely accepted, formats like PNG or SVG may not be supported everywhere. Additionally, different browsers and devices may require favicons in various sizes, so ensure your favicon file includes a range of sizes to accommodate all potential needs. Addressing these two factors can significantly improve the consistency of your favicon’s appearance across the web.
Favicon not visible on mobile devices
If your favicon isn’t visible on mobile devices, particularly when users add your site to their home screen, it’s crucial to ensure full mobile compatibility by including specific link tags in your site’s head section for Apple and Android devices. This adjustment may necessitate manual coding or the use of a plugin designed to facilitate these features, effectively ensuring your favicon appears as intended on smartphones and tablets.
By systematically addressing these common issues, you can ensure your WordPress site’s favicon displays correctly across all devices and browsers, maintaining your brand’s visibility and consistency.
Conclusion
Favicons are critical for branding and recognition, so knowing how to change favicon in WordPress is crucial. Choose between using the WordPress Customizer, a plugin, or FTP for updates.
Ensure your favicon’s design is simple and recognizable. Tackle common issues like caching and compatibility promptly. An updated favicon keeps your site’s appearance fresh and aligned with your branding. Follow these straightforward steps and tips to enhance your site’s identity efficiently.
Simplify WordPress with 10Web
Simplify WordPress with 10Web
Skip and automate manual work with 10Web Managed WordPress Hosting and the 10Web AI Website Builder.