
When you’re managing a WordPress site, encountering errors like “Updating Failed” or “Publishing Failed” can throw a wrench into your day. These errors not only stall your content management efforts but can also impede your audience’s access to new and updated information. This guide aims to shed light on these common WordPress challenges and offer practical solutions.
Understanding the “Updating Failed” and “Publishing Failed errors
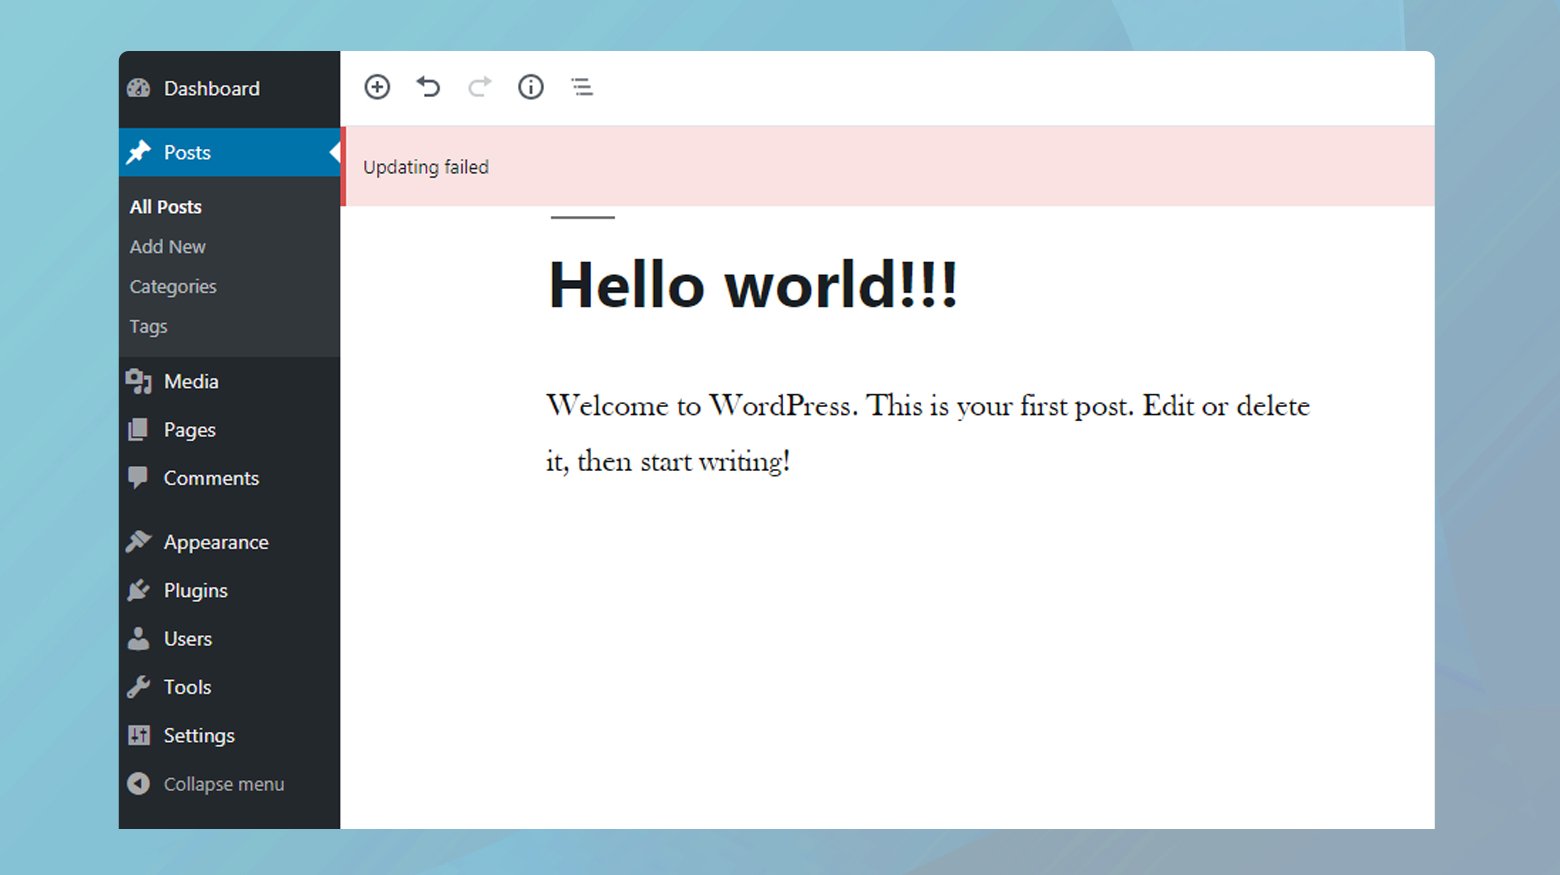
The WordPress ecosystem is dynamic, with the introduction of the Block Editor marking a significant shift in how users create content. Despite its innovative approach to content management, the Block Editor sometimes becomes a source of frustration due to errors such as Publishing Failed and Updating Failed. These messages typically appear when you’re trying to publish new content or update existing pages or posts.
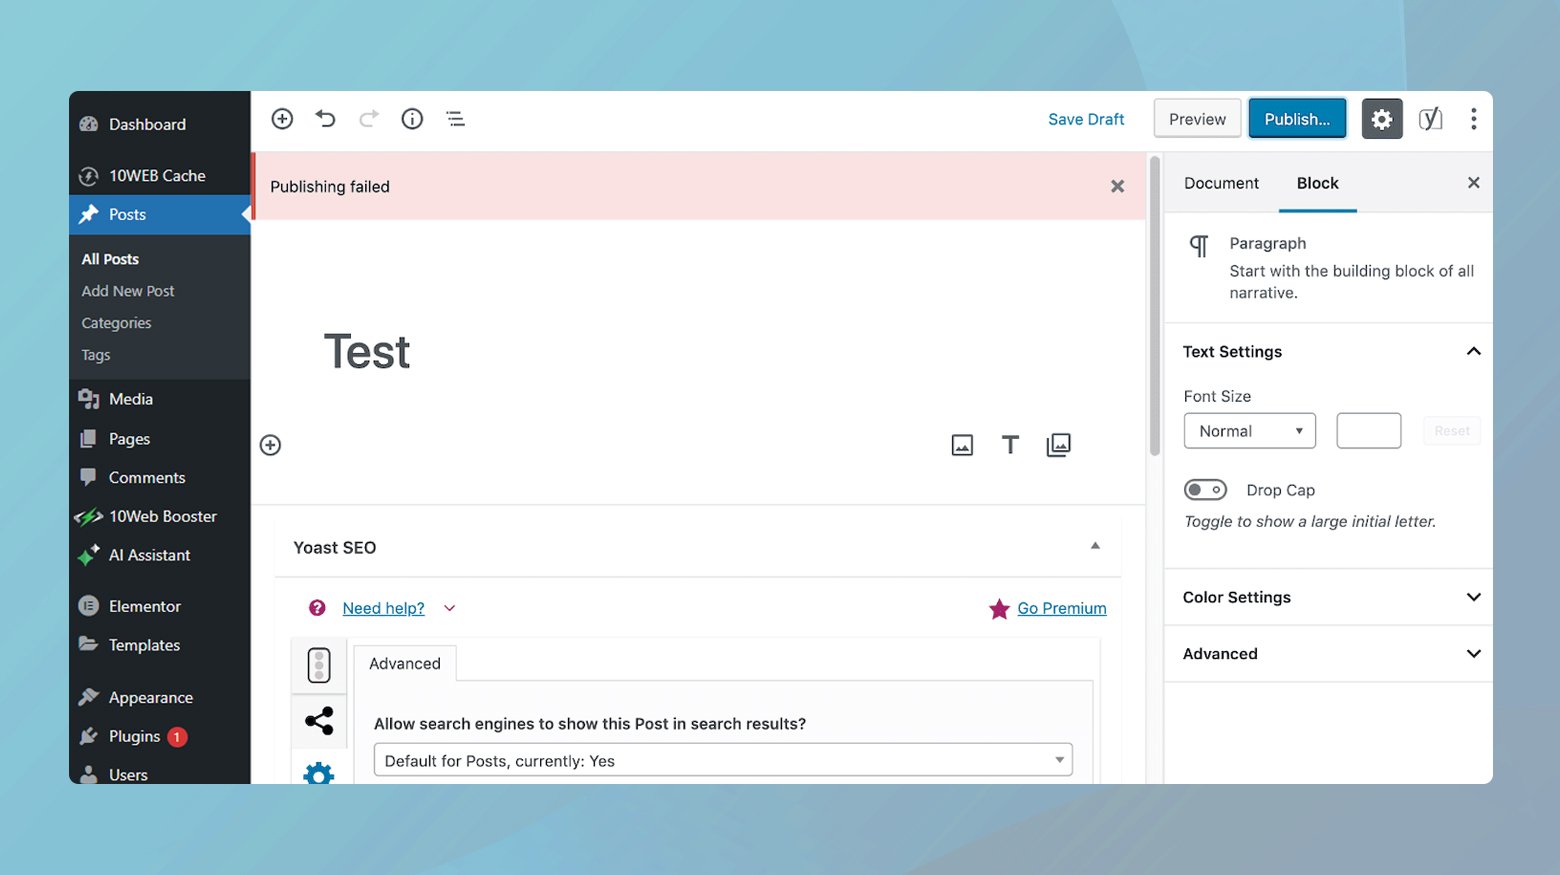
The root of these errors often lies in the Block Editor’s reliance on the REST API for the creation, saving, and publishing of posts. If for any reason the REST API encounters issues, whether it’s being blocked or disabled, the communication between the Block Editor and WordPress breaks down. This interruption is what leads to these errors. REST API is essentially the bridge that allows the Block Editor to communicate with the rest of WordPress. If this bridge is out of commission, your ability to publish or update content is compromised.
Reasons why these errors occur
Several factors can cause these errors, including but not limited to:
REST API issues: As previously mentioned, problems with the REST API can disrupt the Block Editor’s functionality.
Connectivity problems: Sometimes, a simple internet connection hiccup can cause these errors.
Plugin conflicts: Occasionally, a plugin might interfere with the Block Editor’s operations.
Permission issues: Incorrect file permissions on your server can prevent the Block Editor from functioning correctly.
Fixing the Updating Failed and Publishing Failed errors
Resolving the Updating Failed and Publishing Failed errors involves a small variety of strategies. Let’s go through them.
Test the REST API using the Site Health Tool
A good starting point is to employ the Site Health tool within WordPress to check the status of the REST API. Here’s how you can access this tool and interpret its findings:
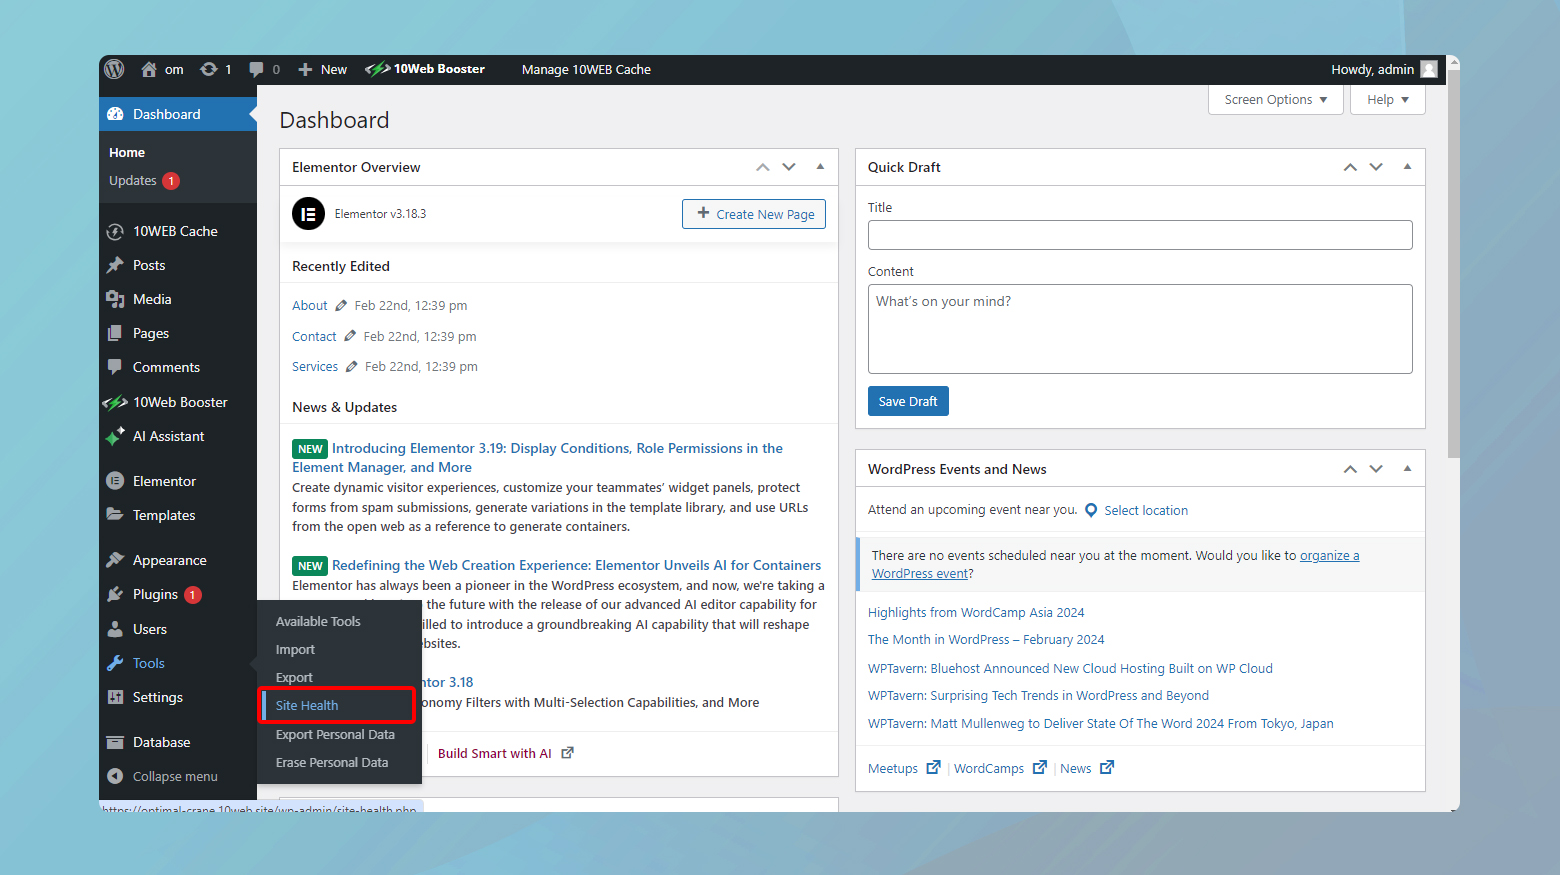
- Navigate to your WordPress dashboard.
- Go to Tools > Site Health.
- Select the Status tab to view any problems with your WordPress installation.
If the REST API is being blocked, the Site Health tool will alert you with a message stating, “The REST API encountered an unexpected result.” This message indicates that there’s a glitch in how WordPress communicates with your server, affecting functionalities like the block editor.
Understand the specific error
The tool will display a specific error leading to the unexpected result. This could range from a “401 Not Authorized” response, indicating permission issues, to a “403 Cookie Nonce Is Invalid” message, suggesting problems with cookies or nonce validation, among others.
The approach to fixing the REST API problem depends on the specific error identified. Here’s a breakdown of common errors and how to tackle them:
401 Not Authorized Error
This error implies that authentication has failed or is not provided. Check if any security plugins are mistakenly blocking the REST API or if there are misconfigurations in your .htaccess file that could be restricting access.
403 Cookie Nonce Is Invalid
A nonce is a security token used to verify that the request made to the server comes from a legitimate source. This error suggests the token is invalid or expired.
Clear your browser cache and cookies. If the issue persists, disable plugins temporarily to see if a plugin conflict might be the cause.
Operation timeout
This indicates that the server took too long to respond, possibly due to heavy load or resource limitations.
Increase the PHP execution time limit in your php.ini file, or contact your hosting provider for assistance in managing server resources.
Other errors
If the error doesn’t fit the above categories, it may be due to plugin or theme conflicts, server configuration issues, or incorrect file permissions.
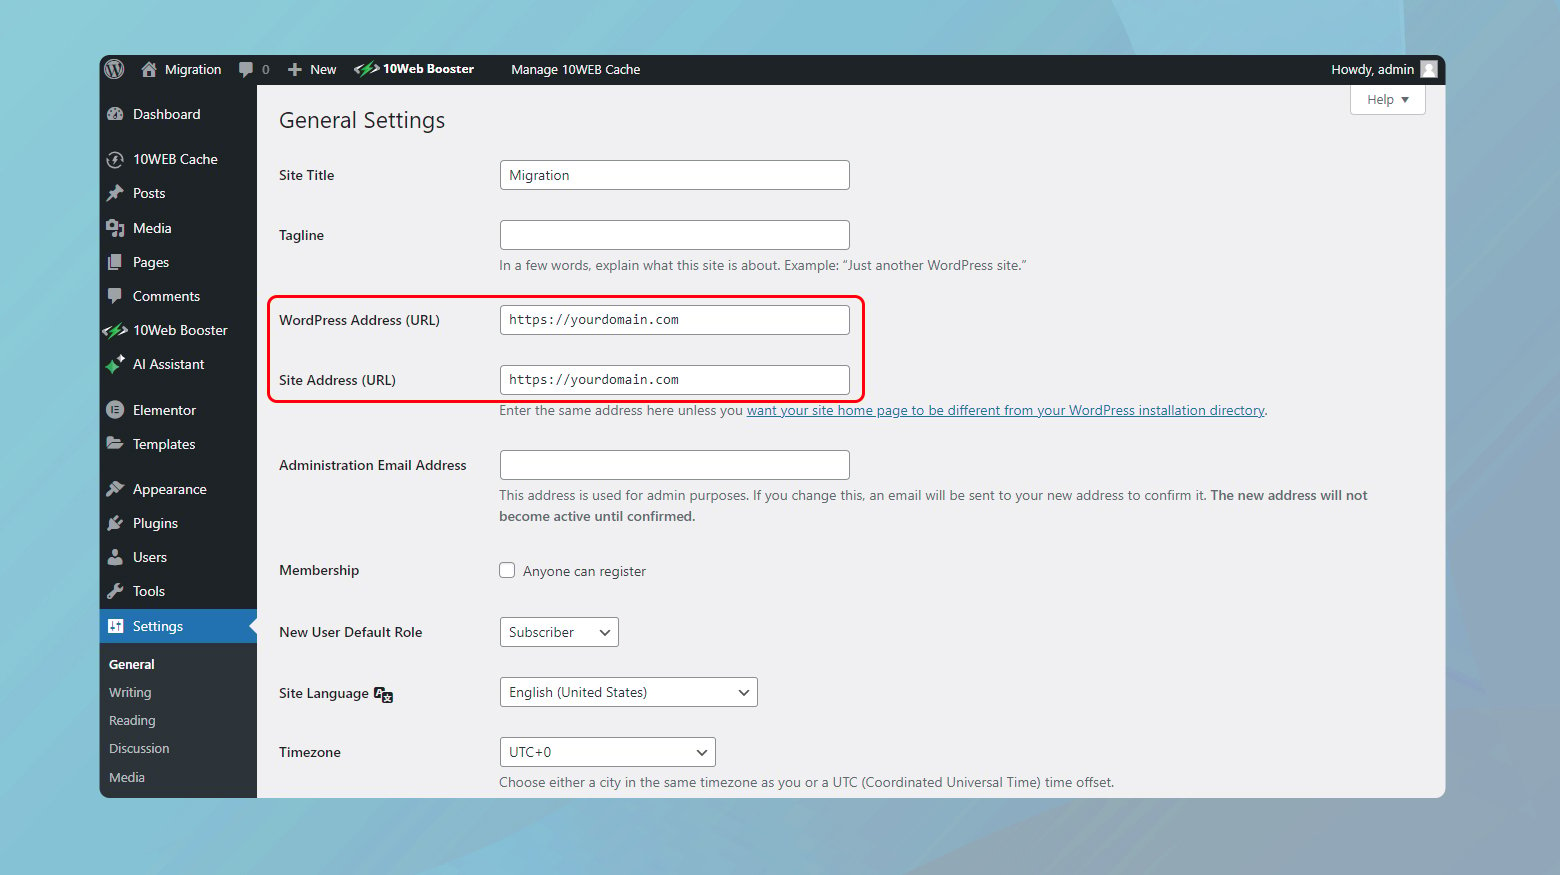
General solutions
- Switch to a default WordPress theme to rule out theme-related issues.
- Check your WordPress and site URLs in Settings > General to ensure they’re correct.
Re-Enable the REST API in WordPress to fix the errors
Troubleshooting these errors often leads to the REST API. Whether it’s being blocked by Cloudflare, disabled by a plugin, or facing authentication issues, there are several paths you can take to solve the problem. Let’s walk through some of the most effective solutions to re-enable the REST API and get your WordPress site back on track.
Check Cloudflare settings
If you’re using Cloudflare, it’s possible that its firewall is blocking legitimate REST API requests, mistaking them for potential threats. Here’s how to tackle this:
- Navigate to your Cloudflare dashboard to review your security settings.
- Look for any rule that might be blocking access to the REST API. This could be identified by paths that include `/wp-json/`, which is part of the REST API’s URL structure.
- If you find a rule that’s blocking the REST API, try adjusting its settings or disable it temporarily to see if that resolves the issue.
Disable plugins sequentially
Plugins, especially those related to security and optimization, can sometimes block the REST API. Here’s a systematic approach to identifying if a plugin is the culprit:
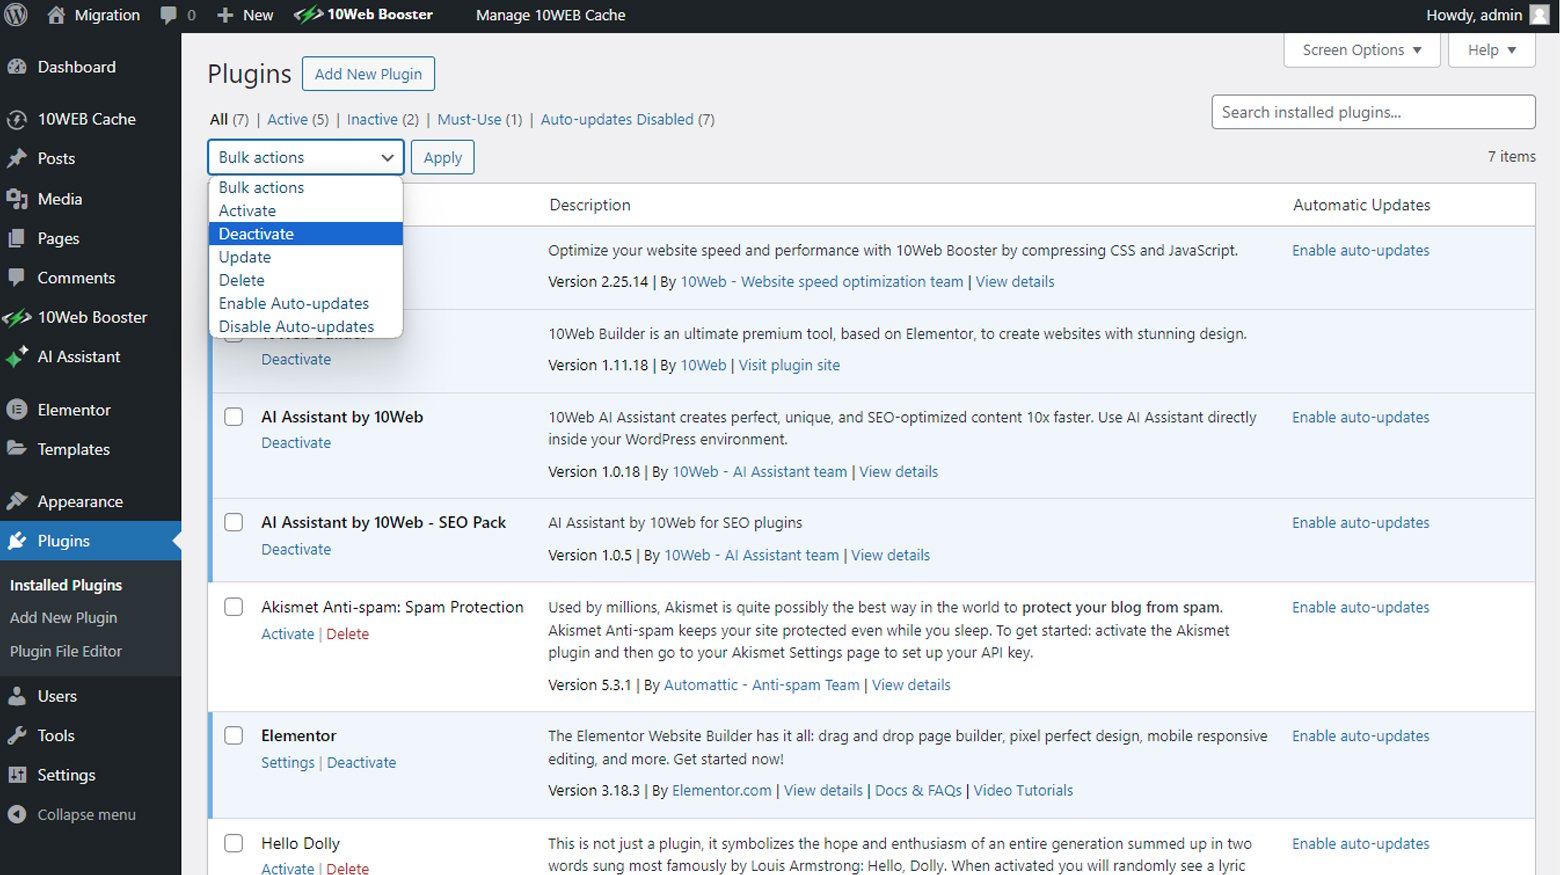
- From the WordPress dashboard, go to the Plugins section and deactivate all your plugins.
- After deactivating, check if the REST API issue persists. If it’s resolved, one of the plugins was likely causing the problem.
- Reactivate your plugins one by one, checking the REST API’s functionality after each activation. Once the error reappears, you’ve found the problematic plugin.
- Once identified, either adjust the plugin’s settings to allow REST API requests, seek an alternative plugin, or reach out to the plugin’s support for guidance.
Authenticate via .htaccess file
For sites having trouble with REST API authentication, a tweak in the .htaccess file might be necessary. Here’s a careful way to proceed:
-
- Before making any changes, ensure you have a backup of your .htaccess file.
- Add the following line to your .htaccess file to facilitate REST API authentication:
RewriteRule .* - [E=REMOTE_USER:%{HTTP:Authorization}]
- This line passes the Authorization header to WordPress.
After saving the changes, check if the REST API is functioning properly.
Address Windows server issues
Running WordPress on a Windows server can introduce unique challenges. If this is your setup and you’re facing REST API issues, editing your web.config file might be the solution:
- This file should be in the root directory of your WordPress installation. If it’s not there, you’ll need to create one.
- Ensure that the file allows for the handling of WordPress’s pretty permalinks and the REST API. Microsoft provides guidance on web.config configurations for URL rewrite rules.
Utilize WordPress debug mode
When the usual fixes don’t seem to re-enable the REST API in WordPress, turning on WordPress’ debug mode can shine a light on elusive issues. This powerful tool is designed for developers and administrators to diagnose and resolve problems by providing a behind-the-scenes look at what’s happening within your WordPress installation. Let’s walk through how to activate debug mode and use it effectively to pinpoint and address issues preventing you from connecting to the REST API.
Activating WordPress debug mode
Debug mode will log detailed error messages and PHP warnings to a file, offering insights into what might be causing your “Publishing Failed” or “Updating Failed” errors. Here’s how to enable it:
The wp-config.php file is located in the root directory of your WordPress site. Access it using an FTP client or through your hosting provider’s file manager.
-
- Open the file using a text editor.
- Find the line that reads: /* That’s all, stop editing! Happy blogging. */
- Just before this line, insert the following code:
 // Enable WP_DEBUG mode
 define( 'WP_DEBUG', true );
 // Enable Debug logging to the /wp-content/debug.log file
 define( 'WP_DEBUG_LOG', true );
- After adding the code, save your changes and re-upload the file to your server if you’re using an FTP client.
Use debug mode to identify issues
With debug mode activated, WordPress will start logging errors to a file named debug.log in the wp-content directory. Here’s how to use this file to troubleshoot:
- Navigate to the wp-content directory on your server. You’ll find the debug.log file here.
- Open debug.log and look for errors related to the REST API or any other issues that could interfere with publishing or updating posts.
- Based on the errors logged, take the necessary steps to resolve the underlying problems. This may involve updating plugins, themes, or making other configuration changes.
Once you’ve resolved the issue, it’s important to disable debug mode to prevent the log file from growing excessively large and potentially exposing sensitive information.
Return to your wp-config.php file and either set WP_DEBUG and WP_DEBUG_LOG to false or remove the lines you added.
Alternative for 10Web customers
If you’re hosting your site with 10Web, you can access your error logs through the 10Web dashboard.
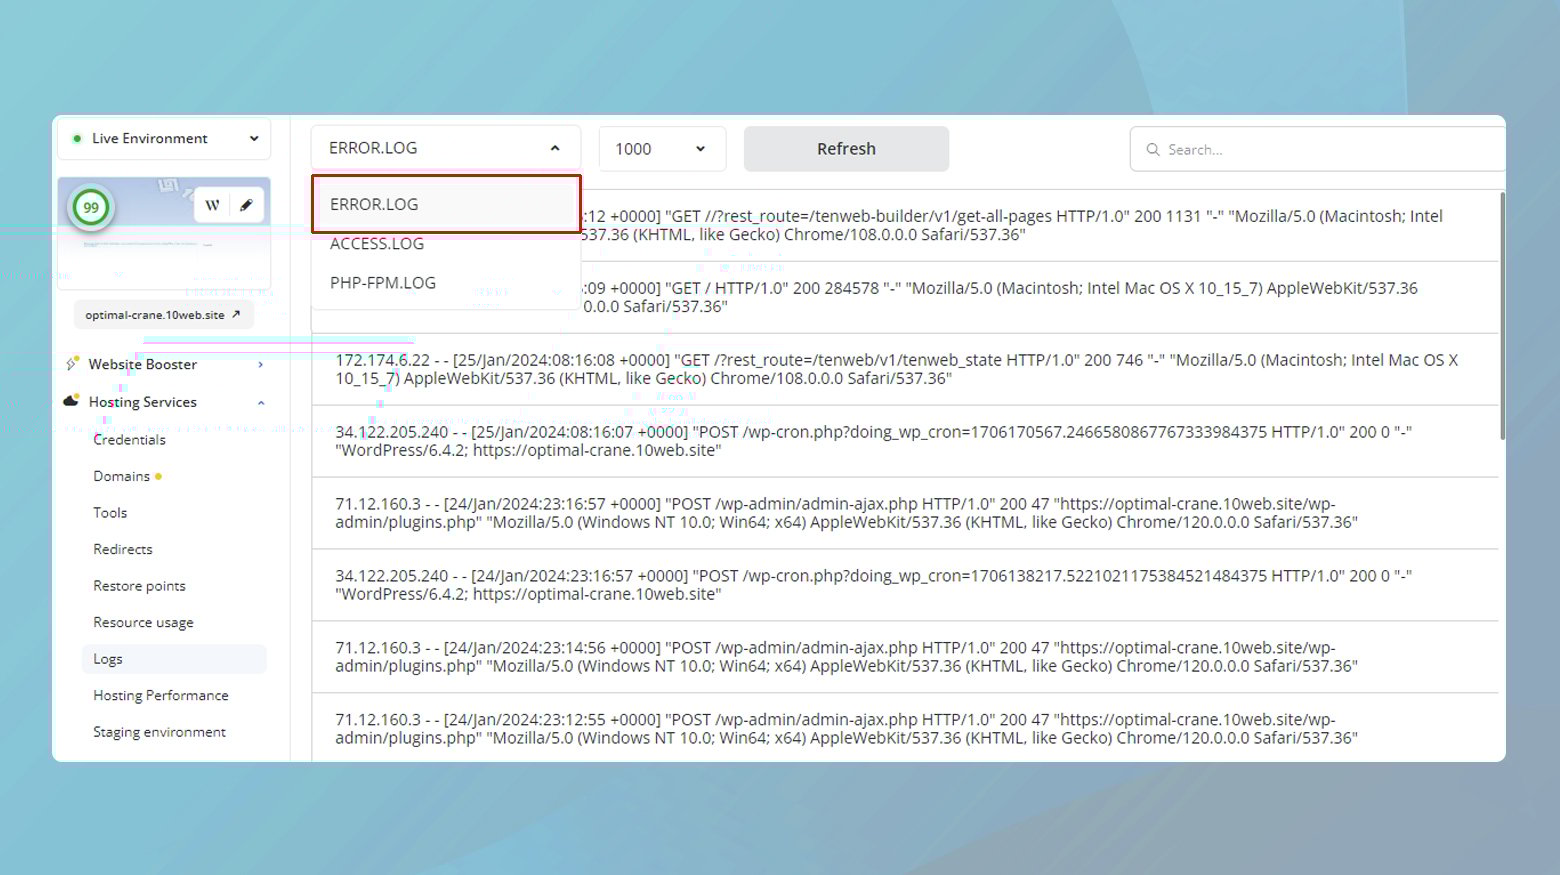
- Log in to your 10Web dashboard.
- Click on the website of which you want to view the logs.
- Navigate to Hosting Services > Logs.
Read the article on accessing your logs for more detailed instructions.
If you’ve walked through all the troubleshooting steps and still face the “Publishing Failed” error in WordPress, it’s time to look beyond DIY fixes. Sometimes, the issue could be more complex, relating to server settings, security measures, or deep-rooted plugin conflicts that aren’t easily identifiable. In such cases, reaching out for professional support can provide the breakthrough you need. Here’s how to approach this:
Contact your hosting provider
Often, the root of WordPress issues lies within server configurations or limitations. If you suspect this might be the case or if your hosting provider offers WordPress-specific support, they should be your first call.
Consult with plugin or firewall providers
If you’re using tools like Cloudflare or specific WordPress plugins that might be interfering with the REST API, getting in touch with their support teams can be invaluable. Here’s how:
Identify the tool: Pinpoint which tool or service you suspect is causing the issue.
Look for documentation: Before contacting support, check the provider’s help documentation. The solution might already be there.
Contact support:If documentation doesn’t solve your problem, reach out to the tool’s support team with detailed information about the issue and your setup.
Utilize the WordPress support forums
For issues that aren’t related to third-party services or hosting, the WordPress Support Forums are a treasure trove of knowledge and expertise. Whether it’s a free plugin causing trouble or a quirky WordPress behavior, the community might have answers:
- Many questions have already been answered, so search the forums for your issue.
- If you don’t find a solution, post your question. Be as detailed as possible, mentioning the error, your current WordPress version, and any troubleshooting steps you’ve already attempted.
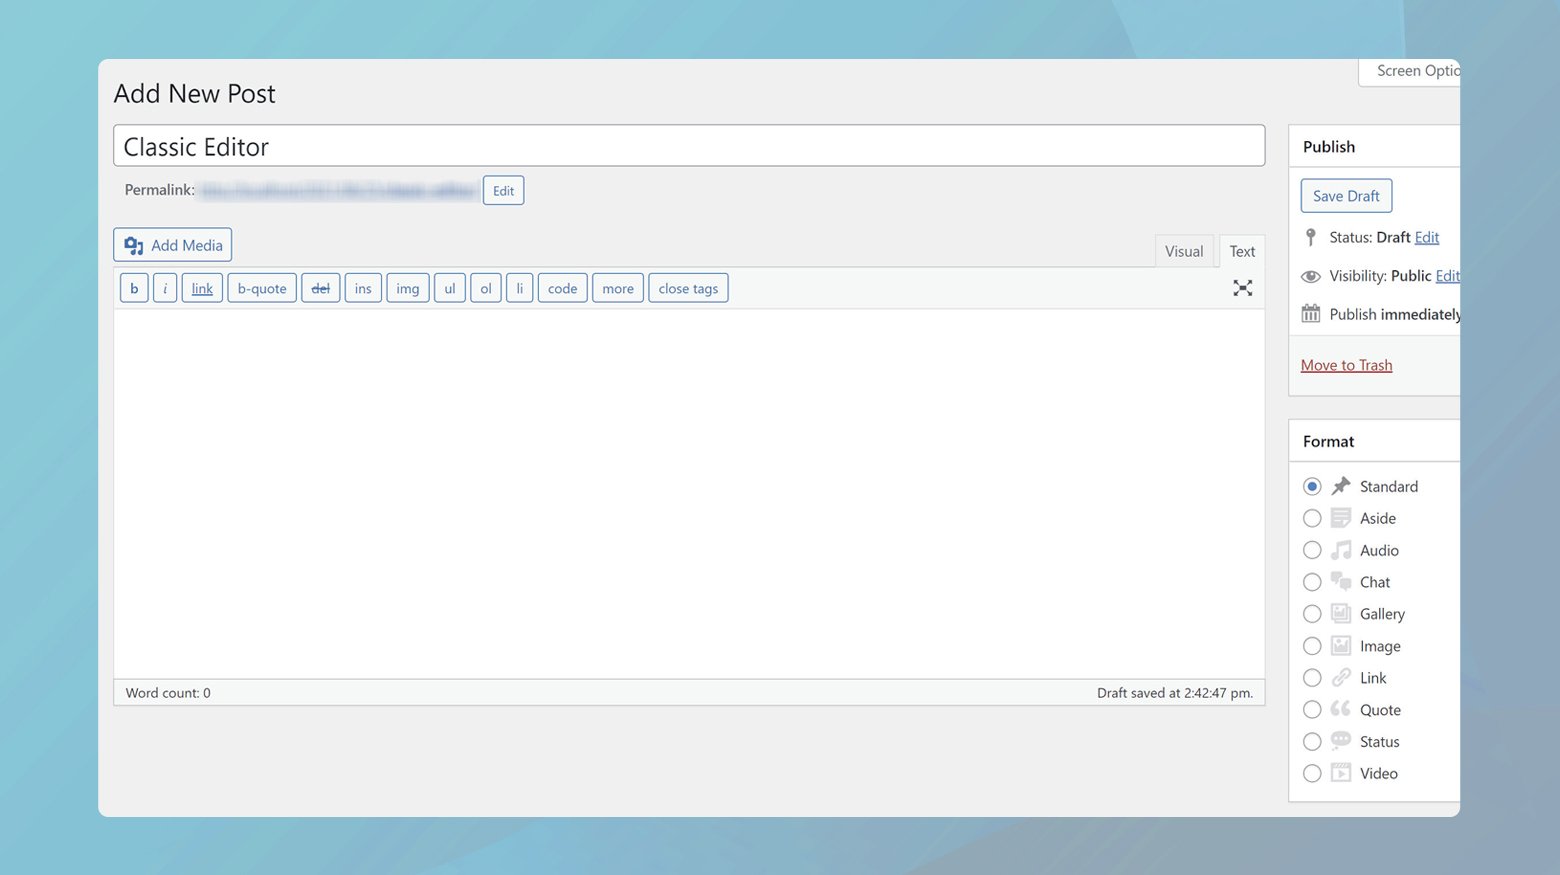
Temporary workaround: Install the Classic Editor plugin
While you’re sorting out the “Publishing Failed” error, consider installing the Classic Editor plugin as a temporary fix. This plugin utilizes the TinyMCE editor, which doesn’t rely on the REST API for publishing or updating posts, allowing you to bypass the issue temporarily. Here’s how to install it:
- In your WordPress dashboard, navigate to the Plugins section.
- Click on Add New and search for the Classic Editor plugin.
- Find the plugin in the search results, click Install Now, then Activate.
Remember, while the Classic Editor can help you manage content updates in the short term, it’s essential to address the underlying issue affecting the Block Editor. This ensures you can fully leverage WordPress’s modern editing capabilities once the problem is resolved.
Closing thoughts
Throughout this blog, we’ve tackled the “Publishing Failed” and “Updating Failed” errors in WordPress, exploring a variety of strategies to diagnose and resolve these issues. Starting with checking the REST API’s functionality, adjusting settings in Cloudflare, disabling conflicting plugins, and modifying server or WordPress configurations, we’ve covered comprehensive steps to address potential causes. When these measures fall short, seeking support from hosting providers, plugin or firewall services, or the WordPress community remains a reliable fallback. As a temporary workaround, the Classic Editor plugin offers an immediate, albeit short-term, solution. This journey underscores the importance of methodical troubleshooting and utilizing available resources to maintain a smooth WordPress publishing experience.
Accelerate your WordPress website creation with AI
Create a custom WordPress website tailored to your business needs 10X faster with 10Web AI Website Builder.
Say goodbye to website errors
Fix all the website errors in one click
Migrate your website to the world's best Managed WordPress Hosting.