Seeing a big red warning like “The site ahead contains malware” or “The site ahead contains harmful programs” when you or your visitors attempt to access your website can be a real heart-stopper. This kind of alert is typically displayed by Google Chrome or through Google Search results when Google’s algorithms have identified that a site may be harmful. If you’re encountering this on your website, it’s a signal that something’s wrong—often indicating that your site may have been compromised by hackers or infected with malware.
Understanding the gravity of this situation is crucial, as it not only affects user trust but can also have a significant impact on your site’s traffic and search engine rankings. However, you’re not without recourse. In this blog, we’re going to walk you through what needs to be done to get your website back to a safe state, reassure your visitors, and mitigate any negative impacts on your SEO efforts.
What does the error mean?
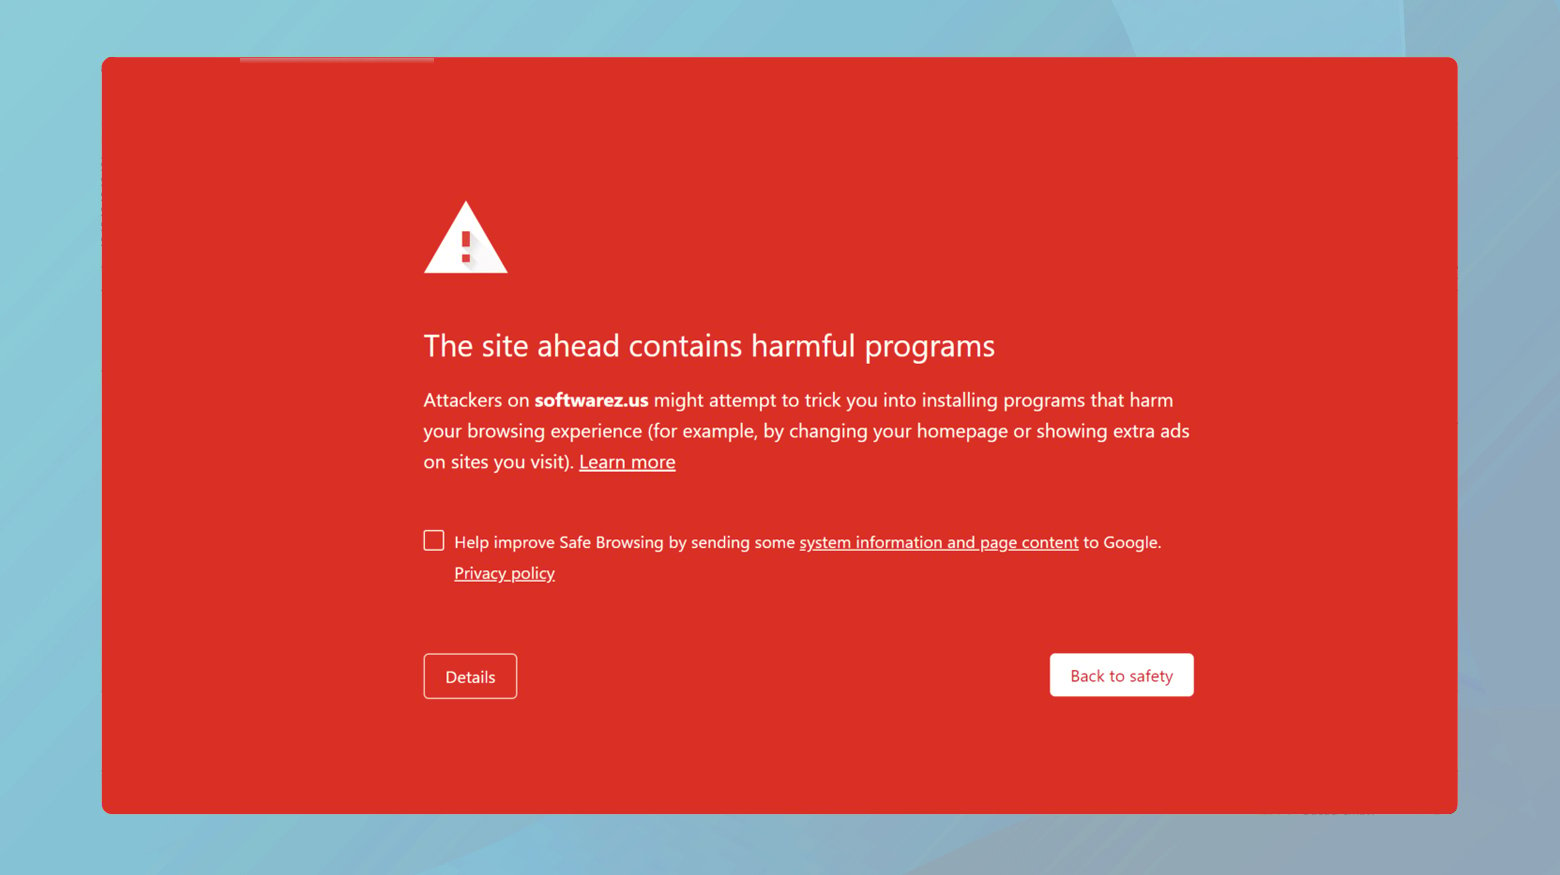
Firstly, it’s important to understand the role of Google’s Safe Browsing tool. This service is designed to protect users from malicious sites that could harm their computers. When Google flags a site, it essentially puts up a digital stop sign—the aforementioned big red warning—to caution users. While it’s possible for users to ignore this warning and proceed to the site, the reality is that most will heed Google’s advice and steer clear.
The types of warnings can vary, including but not limited to:
- The site ahead contains malware
- Deceptive site ahead
- The site ahead contains harmful programs
- This page is trying to load scripts from unauthenticated sources
- Continue to [site name]?
Encountering one of these warnings on your own site means it’s time to take immediate action.
Why does this error occur
The error message “The site ahead contains malware” or any variation indicating a site contains harmful programs occurs for several reasons, all of which signal that the website in question poses a potential security threat to visitors. Here’s a deeper dive into the reasons why this error might occur.
Malicious software presence
The most straightforward reason for this warning is the actual presence of malware on the site. Malware can take various forms, including viruses, worms, spyware, ransomware, and more. These malicious programs can harm users by stealing personal information, hijacking computer resources, or redirecting users to phishing sites.
Compromised website
Often, the site owner might not be aware that their site has been compromised. Hackers exploit vulnerabilities in website software to inject malicious code or content. This could be due to outdated software, weak passwords, or security flaws in plugins or themes. Once compromised, the site can be used to distribute malware to unsuspecting visitors.
Deceptive practices
Some websites are designed to deceive visitors, engaging in phishing attempts or pretending to be legitimate entities to collect sensitive information like login credentials or financial details. Google flags such sites as dangerous.
Harmful third-party content
Websites often include content from third-party sources, such as ads, widgets, or plugins. If any of these third-party elements are compromised or designed to distribute malware, the entire site can be flagged, even if the primary site content is harmless.
False positives
In some cases, a site may be mistakenly flagged due to a false positive. This can happen when Google’s algorithms misinterpret the site’s behavior or content as malicious when it’s actually benign. These situations are less common but can be rectified through a review process with Google.
Check if your site has been compromised
Before jumping into troubleshooting, it’s important to verify whether your site has been compromised or falsely flagged. Google offers two primary methods for this:
Manual testing with Google Safe Browsing tool
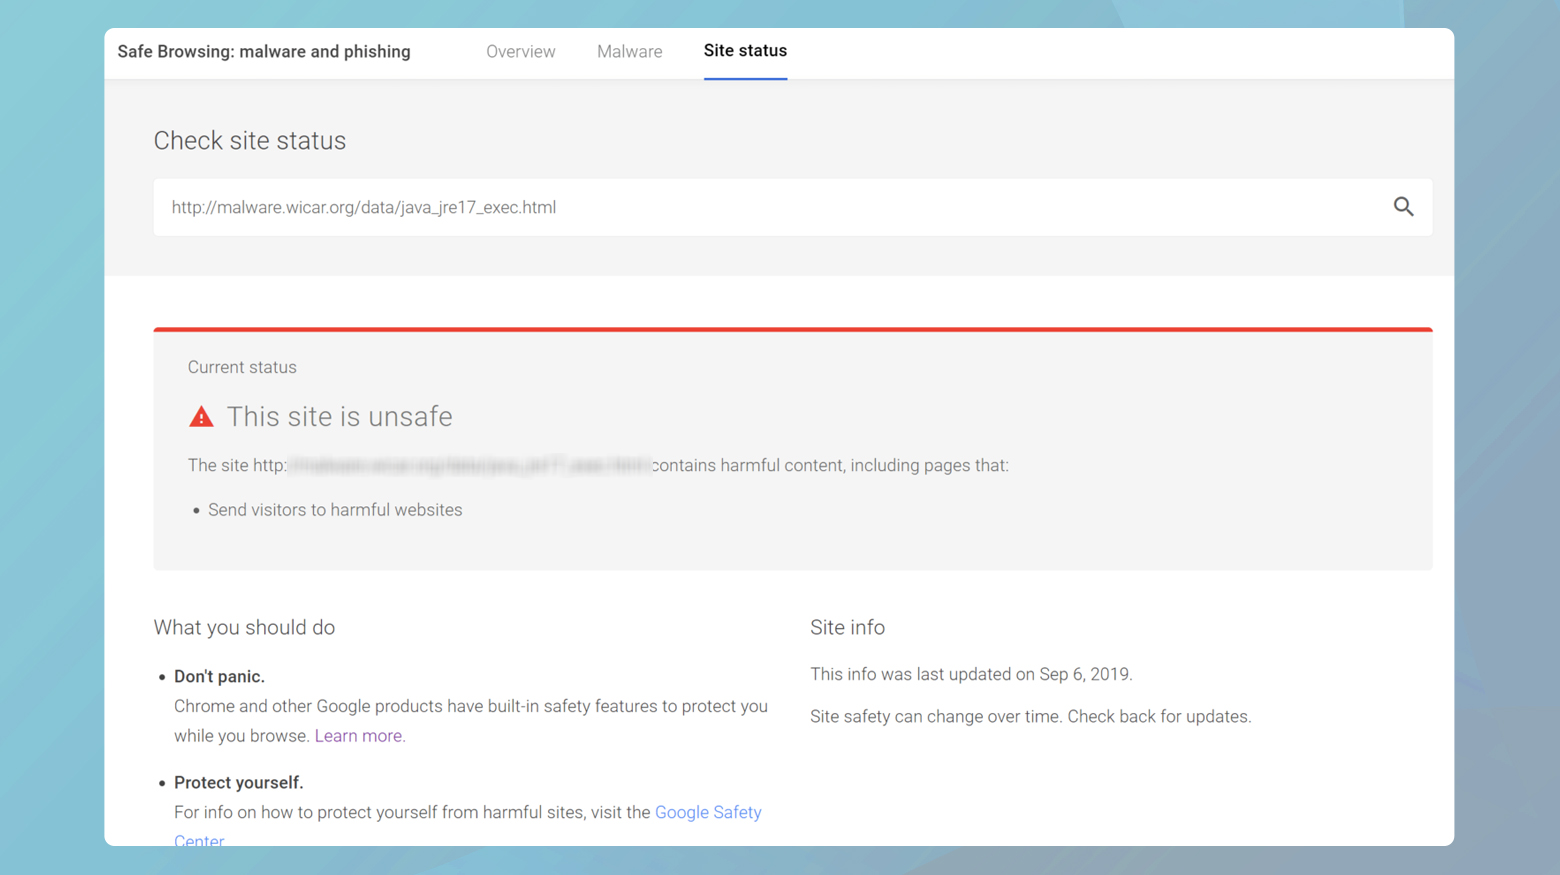
- Navigate to the Google Safe Browsing site status page.
- Enter your website’s URL into the provided field and submit.
The results will indicate if any unsafe content has been detected on your site. This tool not only confirms the presence of malware but also provides a snapshot of the recent site safety analysis conducted by Google.
If you have Google Search Console set up for your website, Google will automatically notify you if your site is listed on the Safe Browsing list.
Scan your website for malware
There are numerous online tools and plugins available that can scan your website for malware. Look for one that is reputable and provides detailed reports of its findings. These tools can detect malicious code, infected files, and unauthorized changes to your site. Identifying the exact nature and location of the threat is the first step in addressing the problem.
Google Search Console
Google Search Console (GSC) is not just the bearer of bad news—it’s also your guide to pinpointing and fixing the problem. If Google Search Console sends you a notice about malicious code on your site, it’s crucial to carefully review the information provided. This notice is your starting point for remediation:
Insights provided by the notice: Google is pretty good at giving you a head’s up on what went wrong. The notice might list specific URLs affected by malicious code or even identify the types of malware or security issues detected.
Finding detailed security issues: Within your Google Search Console account, navigate to the Security issues section under Security & Manual Actions. Here, you’ll find a more detailed breakdown of the security problems identified by Google, including the affected URLs and the type of malicious code.
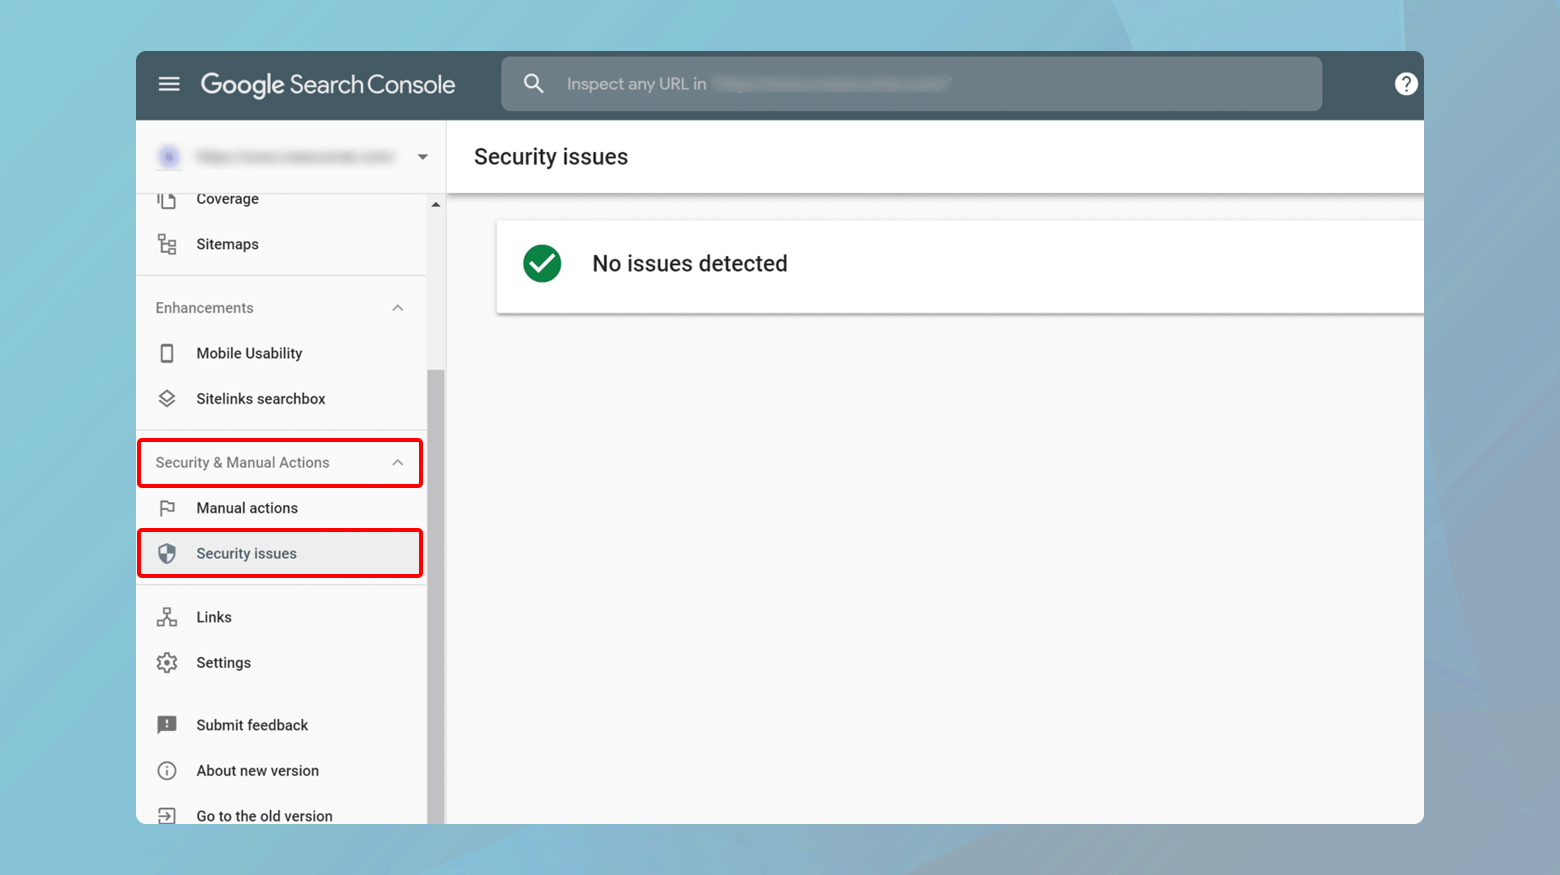
Verifying your site with Google Search Console
If you haven’t already verified your site with Google Search Console, now is the time. Verification is a prerequisite for accessing detailed security issue reports and submitting your site for review after you’ve addressed the issues.
Google offers straightforward tutorials on site verification. You can verify your ownership through several methods, such as adding a meta tag to your site’s homepage, using your Google Analytics or Google Tag Manager account, or uploading a specific file to your server.
Verifying your site not only allows you to access detailed reports on security issues but also enables you to communicate directly with Google about the steps you’ve taken to clean up your site. This is critical for getting the malware warning removed promptly.
Using Sucuri SiteCheck
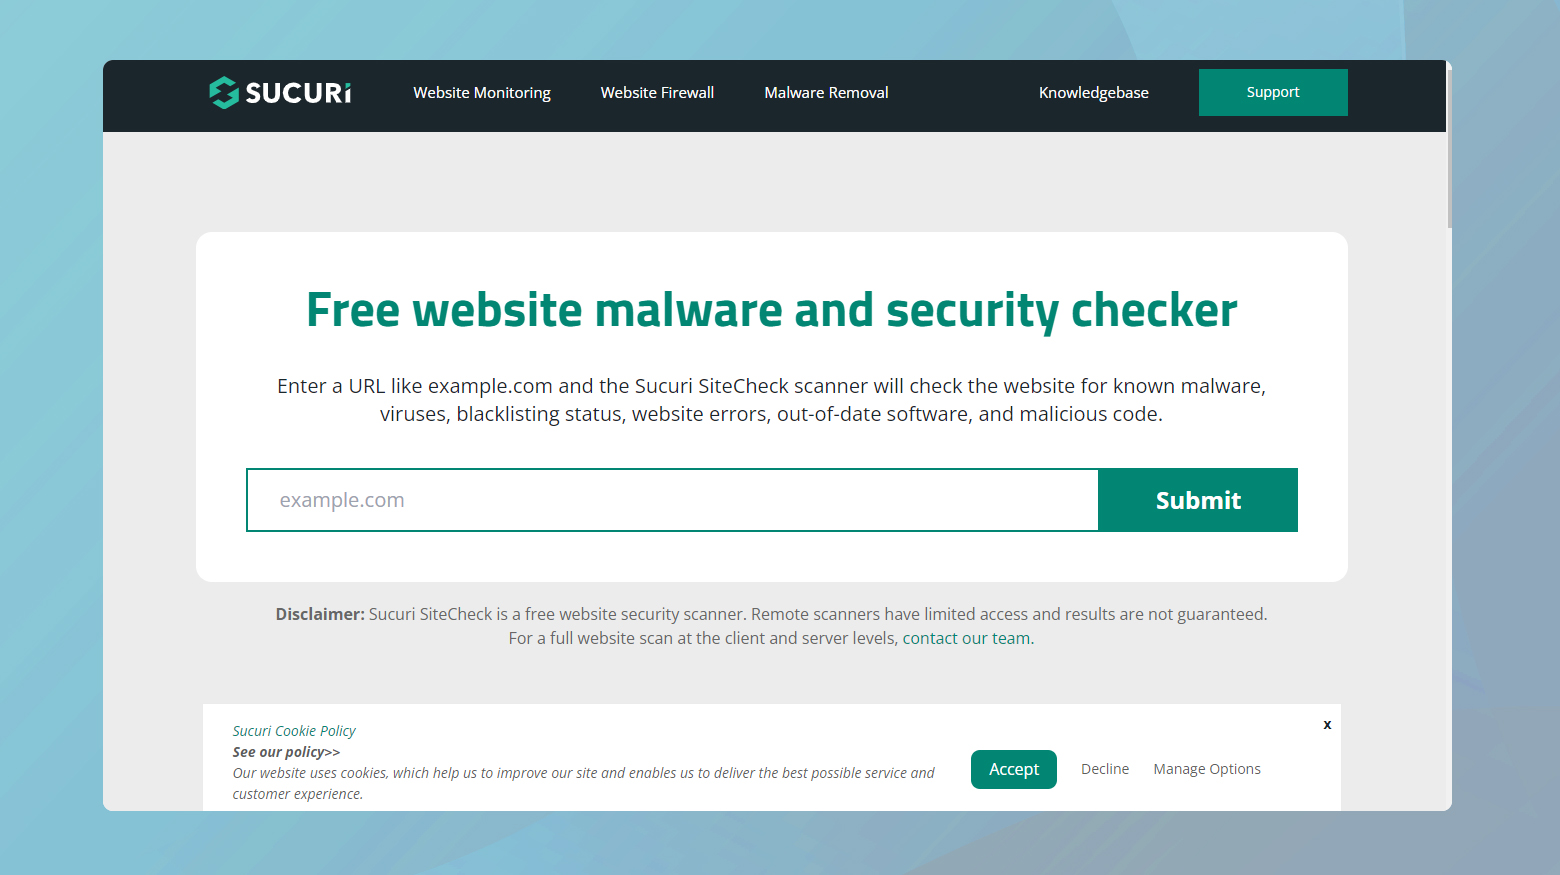
Sucuri’s SiteCheck is designed to be user-friendly, requiring minimal effort on your part to get started with scanning your website for malware:
Scan your website
Navigate to the Sucuri SiteCheck webpage. Here, you’ll find a simple input field where you can enter your website’s URL. Once you’ve entered your site’s address, initiate the scan. Sucuri will then meticulously comb through your site, employing various checks to identify any security issues or malware infections.
Interpreting the results
After the scan completes, you’ll be presented with a report detailing the findings. This report includes a list of any identified security issues, malware infections, blacklisting statuses, and website errors. One of the key strengths of Sucuri SiteCheck is its comprehensive approach to security analysis, ensuring you’re well-informed about your website’s health.
Delving into the details
Sucuri SiteCheck does more than just notify you of potential security threats; it offers valuable insights into the specific issues detected:
Accessing more details: Within the report, look for the More Details link associated with each listed issue. Clicking on this link will expand the section, revealing in-depth information about the specific malicious code or security problem identified on your website. This level of detail is instrumental in understanding the nature and severity of the threats facing your site.
Preparation for removal: Armed with detailed information about the malicious code, you can take informed steps to address and remove these threats from your server. Knowing exactly what you’re dealing with streamlines the process of cleaning your site, whether you’re tackling the issue yourself or enlisting the help of a security professional.
Wordfence
Wordfence offers an extensive suite of tools designed to protect your website from malware, brute force attacks, and a plethora of other security threats. Its popularity stems from a robust free version that caters to a wide array of security needs, making it an excellent choice for website owners seeking to bolster their site’s defenses. Here’s how you can use Wordfence, particularly its malware scanning feature, to identify and mitigate threats on your WordPress site.
To install and activate Wordfence:
- Log in to your WordPress dashboard.
- Go to the Plugins section, and click Add New.
- Search for Wordfence Security.
- Install and then activate the plugin.
Once activated, Wordfence will add a new menu item to your WordPress dashboard, centralizing its features for easy access.
To initiate a malware scan:
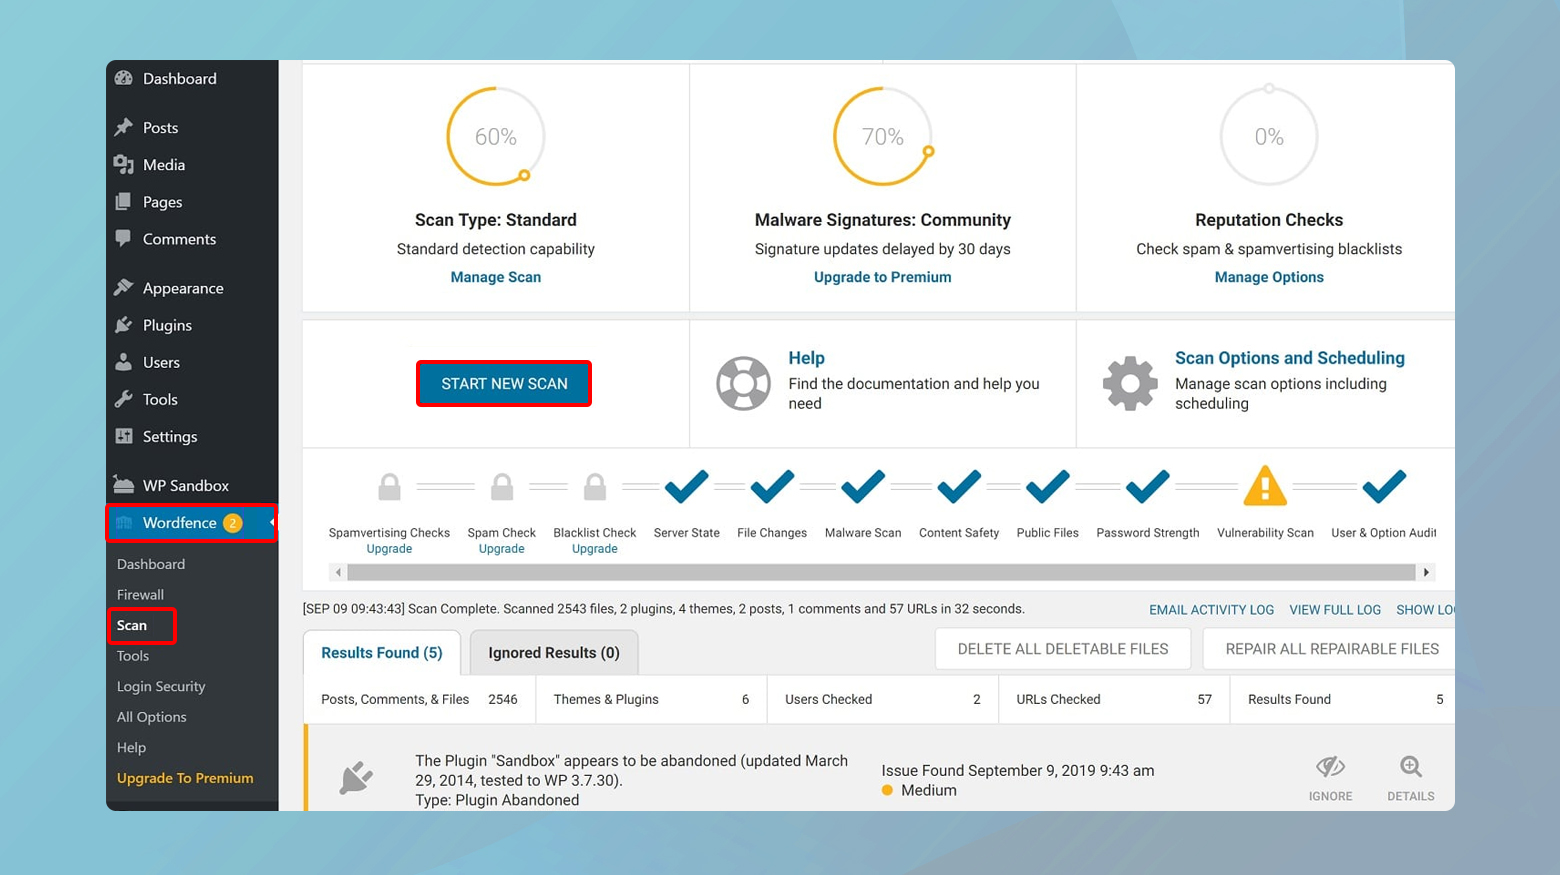
- Click on Wordfence in your dashboard menu and then select Scan.
- Press the Start a Wordfence Scan button. Wordfence will begin to meticulously analyze your website for malware, outdated plugins or themes, and other vulnerabilities.
Scan results
Wordfence’s scan results are comprehensive, providing detailed insights into any issues discovered during the scan:
Threat identification: The scan results will categorize threats by their severity, offering clear descriptions of each issue. This could range from malicious code embedded in your site’s files to vulnerabilities in plugins or themes that need updating.
Actionable steps: Alongside each identified threat, Wordfence provides recommendations or actions that you can take directly within the dashboard. This might include deleting malicious files, updating vulnerable software, or strengthening security settings.
- For identified malware, Wordfence offers automated options to repair or delete infected files. Always ensure you have a recent backup before removing or altering files.
- If automatic repair is not available or advisable, you may need to manually replace the infected files with clean versions or remove the malicious code. This might require some technical knowledge or assistance from a professional.
MalCare
MalCare is a robust solution, offering both scanning and cleaning services to protect your website from malware. Its dual-version approach—featuring a free scan-focused version and a premium version with automatic cleanup capabilities—ensures flexibility depending on your needs and resources.
Installing MalCare:
- Log in to your WordPress dashboard.
- Go to the Plugins section, and click Add New.
- Search for MalCare Security.
- Install and then activate the plugin.
Upon activation, a new MalCare tab will appear on your dashboard, indicating the plugin is ready for configuration.
Click on the newly appeared MalCare tab in your WordPress dashboard. This action will prompt you to sync your site with the MalCare service, a necessary step for the scanning process.
Follow the on-screen instructions to complete the syncing process. Once your site is connected, you can initiate the malware scan directly from your dashboard.
Start the scan and wait for MalCare to analyze your website. This might take some time, depending on the size and complexity of your site.
After the scan is complete, MalCare will present you with the results, outlining any detected malware or security concerns:
Understanding the report: The scan results will detail any malicious files or vulnerabilities found on your site. Each issue is typically accompanied by information about the potential impact and suggested steps for remediation.
Free version limitations: Remember, the free version of MalCare is designed to detect malware and provide notifications. However, for automated cleanup options, you’ll need to consider upgrading to the premium version.
Considering cleanup options: If malware is detected, and you’re using the free version, you’ll need to address the cleanup manually or opt for the premium version for access to one-click automatic cleanup features. The automatic cleanup is a significant time-saver and reduces the technical burden on website owners, making it a worthy investment for many.
Resolving “The site ahead contains malware” error
If after having scanned your website, you discover that your site has been compromised, the next step is to remove the malware and return your site to health and full functionality.
How to remove malware from your site
Discovering malware on your website can be a distressing experience, especially when considering the potential impact on your reputation and user trust. Whether you’re hosted on a platform like 10Web, which offers robust security measures and malware removal services, or managing your website independently, addressing and removing malware promptly is critical. Let’s explore the various pathways to effectively eradicate malware from your site.
10Web users
10Web, known for its high-performance hosting solutions, also emphasizes security. Should your site fall prey to malware under their watch, 10Web extends a complimentary malware removal service to its users:
10Web implements 24/7 advanced security protocols to safeguard your site. Despite these precautions, the web’s inherently open nature means vulnerabilities can still be exploited.
As part of 10Webs hosting plans, customers benefit from a free malware removal service. Should you notice suspicious activity on your website or need malware removal services, you should reach out to 10Web’s support team via the chat widget in your dashboard, ensuring prompt and professional assistance.
Websites hosted elsewhere
There are several effective solutions at your disposal for removing malware from your site:
Restoring from a clean backup
- Restoring your site from a clean backup is one of the quickest ways to remove malware, provided the backup predates the infection.
- This method risks losing recent content or changes made post-backup. Always ensure your backups are up-to-date and free from infections.
Using malware removal services and plugins
Sucuri: Offers a comprehensive malware removal and hack cleanup service starting at $199.99 per year. Ideal for websites requiring ongoing security monitoring and professional cleanup services.
MalCare: The premium version, starting at $99 per year, features one-click malware removal, simplifying the cleanup process for website owners.
Wordfence:Known for its popular security plugin, Wordfence also offers a site cleaning service for $179. This service includes a one-year subscription to the premium plugin, providing a dual benefit of cleanup and future protection.
Post-removal steps
Re-scan your site: Utilize tools like Sucuri’s SiteCheck to confirm the absence of malware. This ensures that the cleanup was thorough and that no remnants of the infection remain.
Implement stronger security measures: Enhance your site’s security posture by updating all software, using strong passwords, and considering a Web Application Firewall (WAF) to prevent future attacks.
Monitor regularly: Continuous monitoring can help detect and prevent future infections. Consider using a security plugin or service that offers ongoing scans and real-time protection.
Notifying Google
After cleansing your site of malware and reinforcing its defenses, the final step in fully restoring your website’s health and reputation involves notifying Google. This step is crucial as it prompts Google to re-evaluate your website, ensuring that any security warnings displayed in search results or browsers are promptly removed.
Verifying your site with Google Search Console
Before you can request a review from Google, your site must be verified within Google Search Console (GSC). If you haven’t completed this process yet, it’s a necessary step that grants you access to a suite of tools and reports to manage your website’s presence in Google search results.
Requesting a review after malware removal
Once your site is clean and verified within Google Search Console, the next step is to officially request a review. This tells Google that you’ve addressed the issue, and your site is ready for a fresh evaluation.
Within Google Search Console, locate the Security & Manual Actions section on the dashboard, then click on Security Issues. This report will show you any security issues Google has found with your site, including the malware issues that were originally detected.
Within the Security Issues section, you’ll find an option to select or check a box indicating I have fixed these issues. By marking this, you’re formally telling Google that you’ve taken the necessary steps to clean your website.
Submit a review request
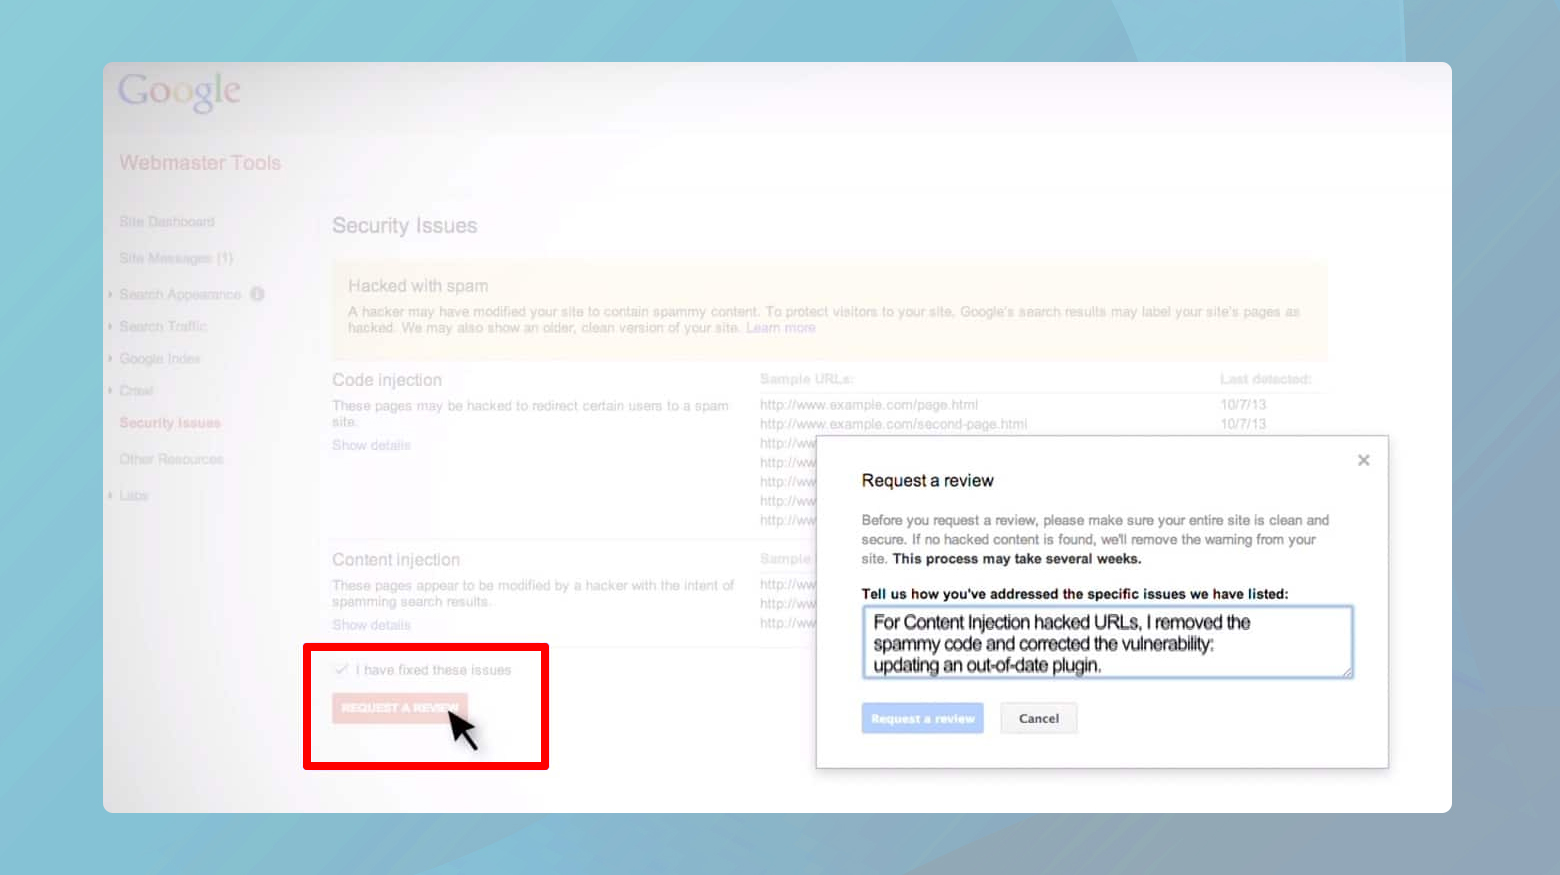
After indicating that the issues have been addressed, click on Request a Review. In your review request, it’s helpful to provide specific details about the actions you took to remove the malware and secure your site. This could include the cleaning process, any security enhancements implemented, and measures taken to prevent future infections.
Submitting a thorough and detailed review request can expedite the review process and increase the likelihood of a favorable outcome.
Closing thoughts
In this blog, we navigated through the process of detecting, addressing, and resolving website malware issues, with a focus on WordPress platforms. We highlighted the significance of using Google’s Safe Browsing and Google Search Console for identifying malware and emphasized the crucial step of verifying your site with Google Search Console to facilitate the review process post-cleanup. Key tools such as Sucuri SiteCheck, Wordfence, and MalCare were mentioned for their effectiveness in scanning and removing malware. Additionally, we touched on the advantage of hosting services like 10Web, which offer malware removal services, underscoring the importance of thorough malware elimination, software updates, and security enhancements. The blog aimed to equip website owners with the knowledge to restore their site’s security and trustworthiness after a malware attack, culminating in the step of requesting Google to reevaluate the site to lift any imposed warnings.


