To enhance the security of your WooCommerce site, understanding how to add CAPTCHA in WooCommerce registration form is crucial. CAPTCHA, a tool designed to differentiate between humans and bots, protects against fraudulent activities and spam. This guide explores various CAPTCHA versions, selecting suitable plugins, and detailed setup instructions, ensuring your WooCommerce registration form remains secure and user-friendly.

Looking to sell online?
Create your custom online store in minutes with 10Web AI Ecommerce Website Builder and take your business online.
FAQ
How to add reCAPTCHA in WooCommerce registration form?
How do I add CAPTCHA to my registration form?
How do I customize my registration form in WooCommerce?
Introduction to CAPTCHA in WooCommerce
As you look into enhancing the security of your WooCommerce site, understanding and implementing CAPTCHA is paramount to protecting your registration forms from bots and spammers.
The role of CAPTCHA in security
CAPTCHA stands for Completely Automated Public Turing test to tell Computers and Humans Apart. It’s a tool designed to determine whether the user is a real person or a bot.
This is crucial for your WooCommerce site because it helps to prevent fraudulent activities by bots and hackers. By knowing how to add CAPTCHA in WooCommerce registration form, you can add an essential layer of defense that filters out automated abuse and spam submissions.
Understanding different CAPTCHA versions
There are several versions of CAPTCHA, each providing a different level of security and user experience:
- reCAPTCHA v2: Users are asked to confirm they are not robots by clicking on a checkbox. Sometimes, it requires them to select images matching a specific description.
- Invisible reCAPTCHA: Works in the background to detect whether a user is real without any user interaction.
- reCAPTCHA v3: Measures user interactions with the website to give scores that help you determine whether the user might be a bot.
Integrating CAPTCHA into your WooCommerce registration form enhances the site’s security. You may also want to know how to add extra fields in WooCommerce registration form for more customized user experiences, which, when paired with CAPTCHA, greatly elevates both security and functionality.
Selecting the right CAPTCHA plugin
When adding CAPTCHA to your WooCommerce registration form, it’s important to choose a plugin that’s both user-friendly and secure. Let’s take a look at how to compare CAPTCHA plugins and dig in the specifics of Google reCAPTCHA vs hCaptcha.
Comparing CAPTCHA plugins
When browsing plugins:
- Check plugin ratings and reviews: Look for plugins with high ratings and positive reviews, which often indicate a reliable and user-friendly experience.
- Update frequency: Ensure the plugin is updated regularly to maintain security and compatibility with the latest versions of WooCommerce.
- Support for reCAPTCHA and hCaptcha: Some plugins only support one, so choose one that offers your preferred CAPTCHA service.
- Ease of integration: The plugin should integrate seamlessly with WooCommerce, allowing you to add CAPTCHA without extensive configuration.
Consider plugins like reCAPTCHA for WooCommerce and Captcha 4WP as starting points due to their specific integration with WooCommerce.
Google reCAPTCHA vs hCaptcha
Google reCAPTCHA:
- Known for its “I’m not a robot” checkbox and invisible reCAPTCHA, which don’t interrupt user flow.
- Offers a version that provides Advanced Risk Analysis to identify bots without any user interaction.
hCaptcha:
- Prioritizes user privacy and provides website owners with a way to earn money by showing this CAPTCHA.
- Comes as a good alternative to Google’s service, especially if you are looking for something that isn’t tied to Google’s ecosystem.
When learning how to add CAPTCHA in WooCommerce registration form, ensure that the plugin you select supports the version of CAPTCHA you prefer and aligns with your privacy standards and user experience goals.

Looking to sell online?
Create your custom online store in minutes with 10Web AI Ecommerce Website Builder and take your business online.
Setting up CAPTCHA on registration forms
When you run an online store using WooCommerce, it’s crucial to protect your site from spam and bots. Let’s get started on how to add CAPTCHA in WooCommerce registration form to ensure security.
Installing the plugin
- Log in to your WordPress admin panel.
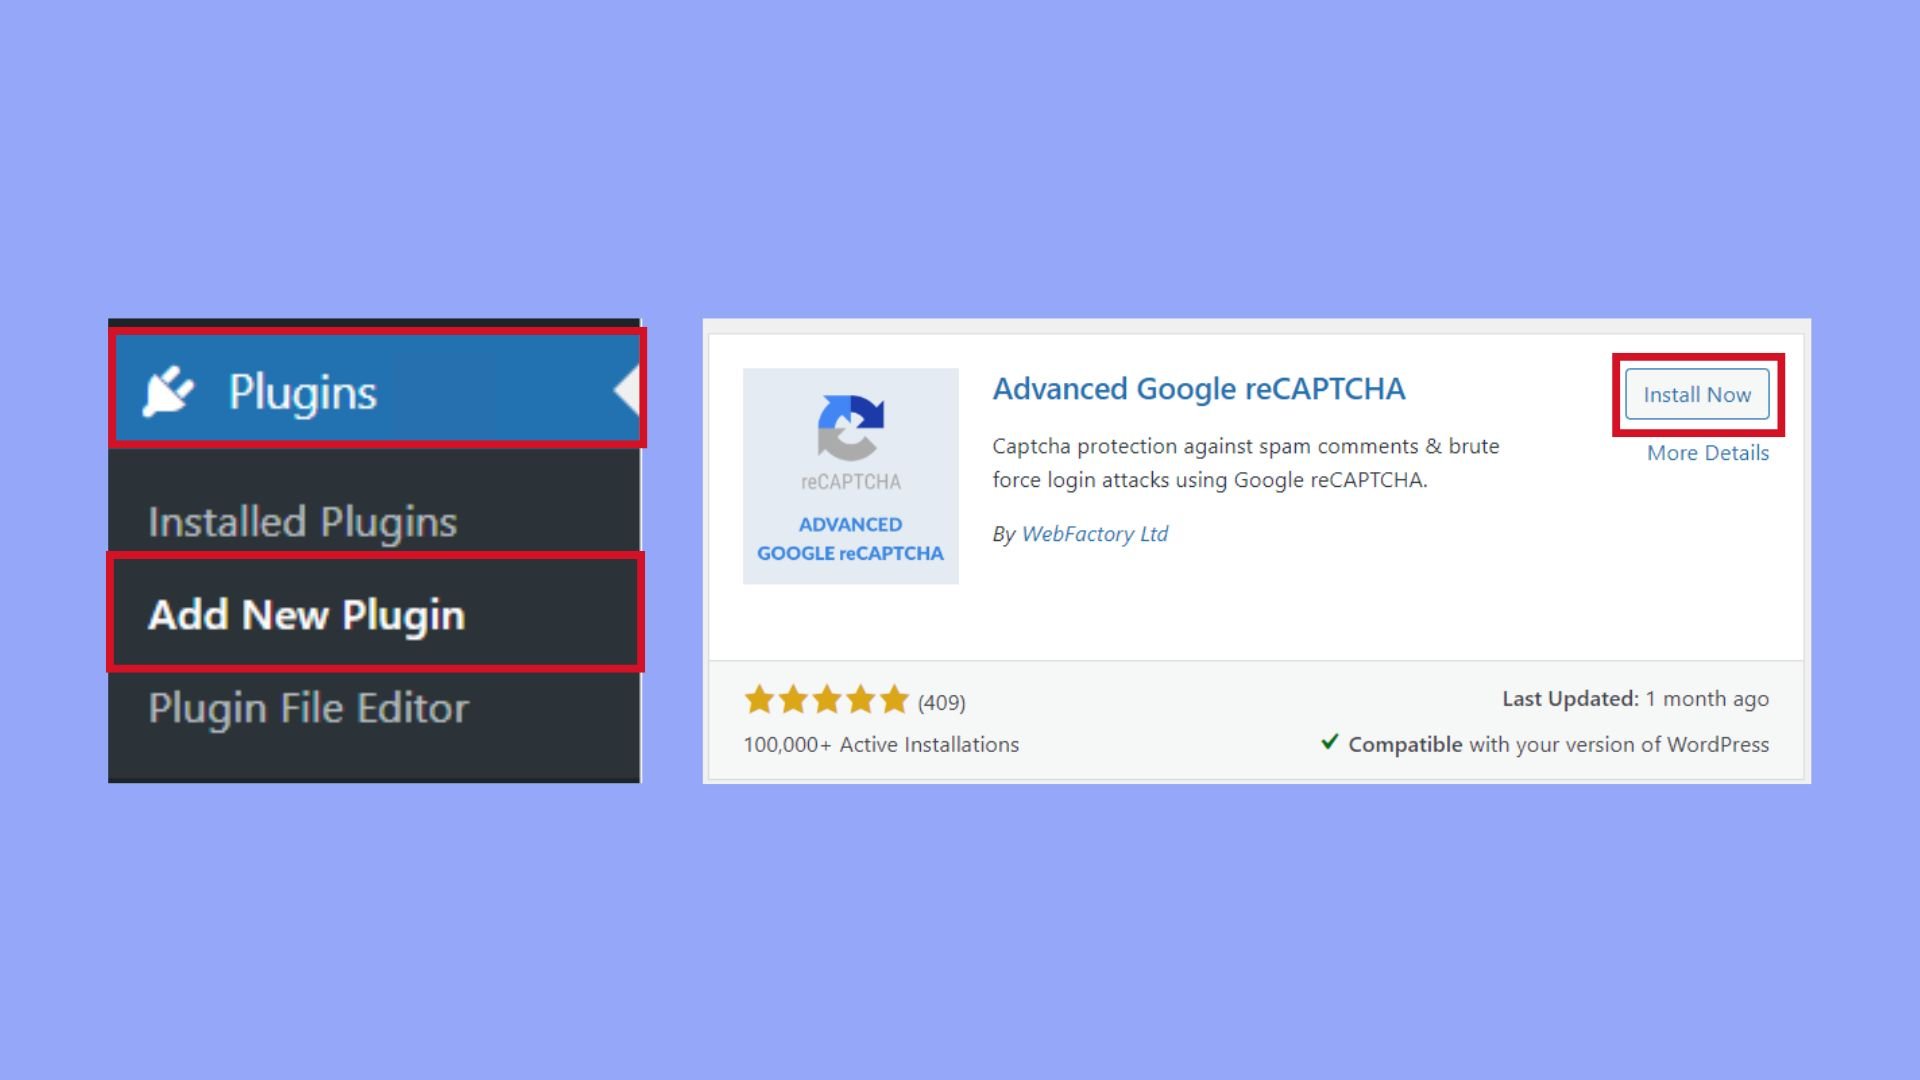
- Navigate to Plugins and click on Add New.
- Search for a CAPTCHA plugin that is compatible with WooCommerce, such as Advanced Google reCAPTCHA.
- Click Install Now for the plugin you choose.
- Once the installation is complete, click Activate to enable the plugin on your site.

Gathering required API keys
The next step is to obtain the API keys that will merge your site with the CAPTCHA service. Here’s how to do it:
- Visit the reCAPTCHA website and sign up using your Google account.
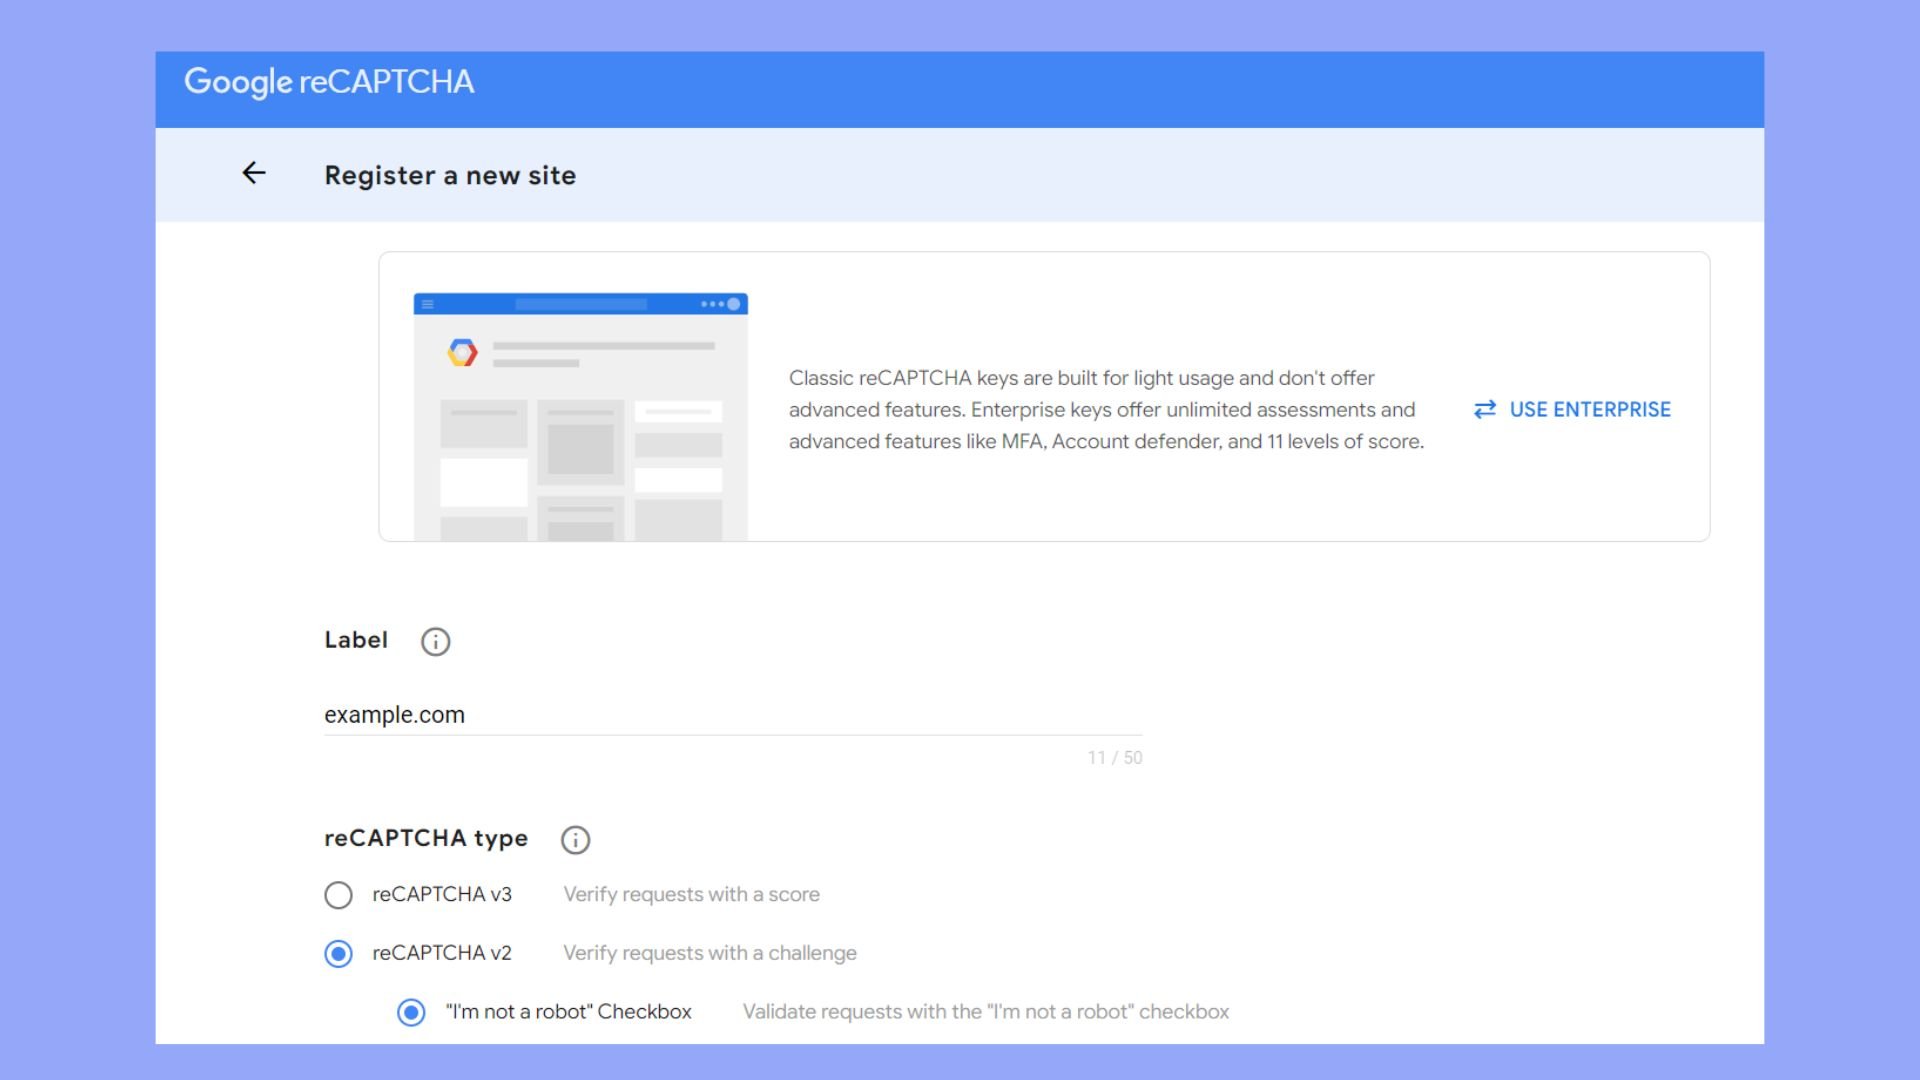
- Register a new site to obtain your CAPTCHA keys.
- Select the CAPTCHA version you prefer, such as reCAPTCHA v2 or invisible reCAPTCHA.

- Click the Submit button.
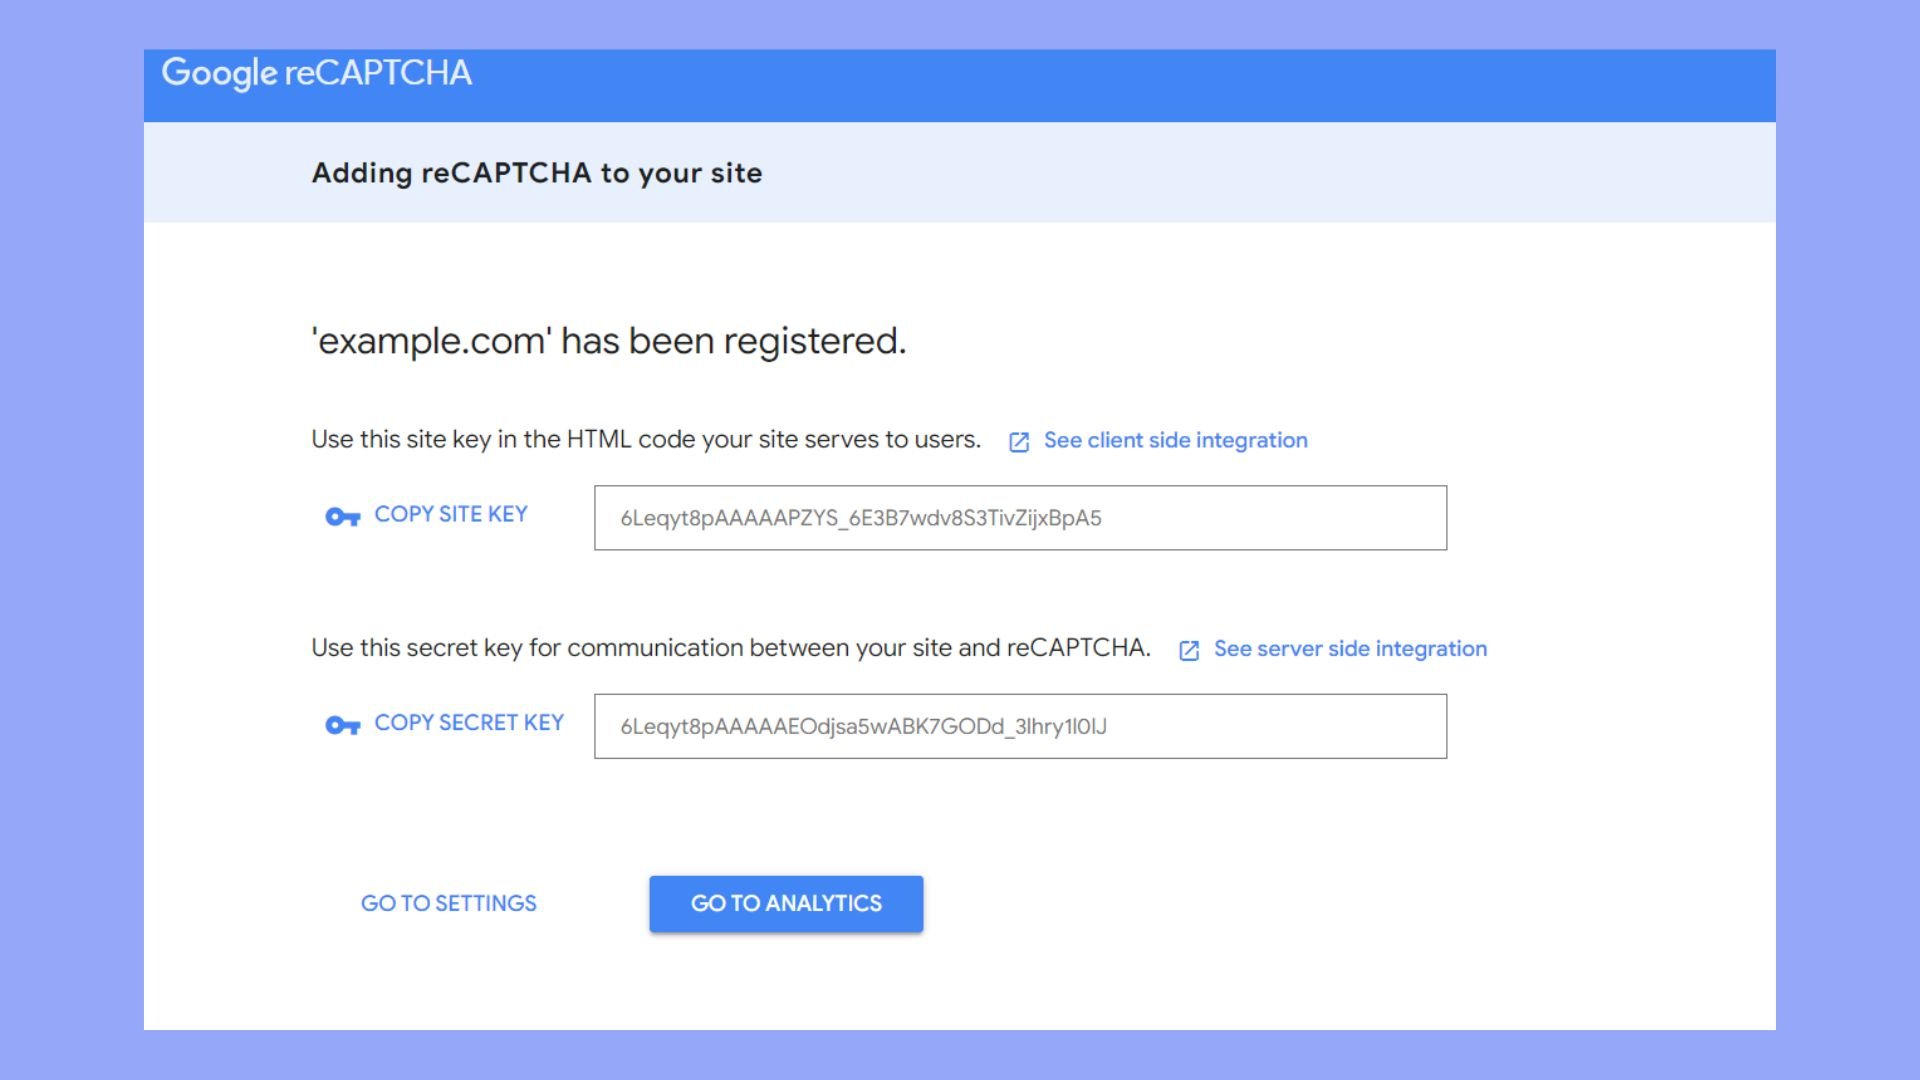
- After registration, you will receive two essential pieces of information: the Site key and the Secret key.

Configuring CAPTCHA settings
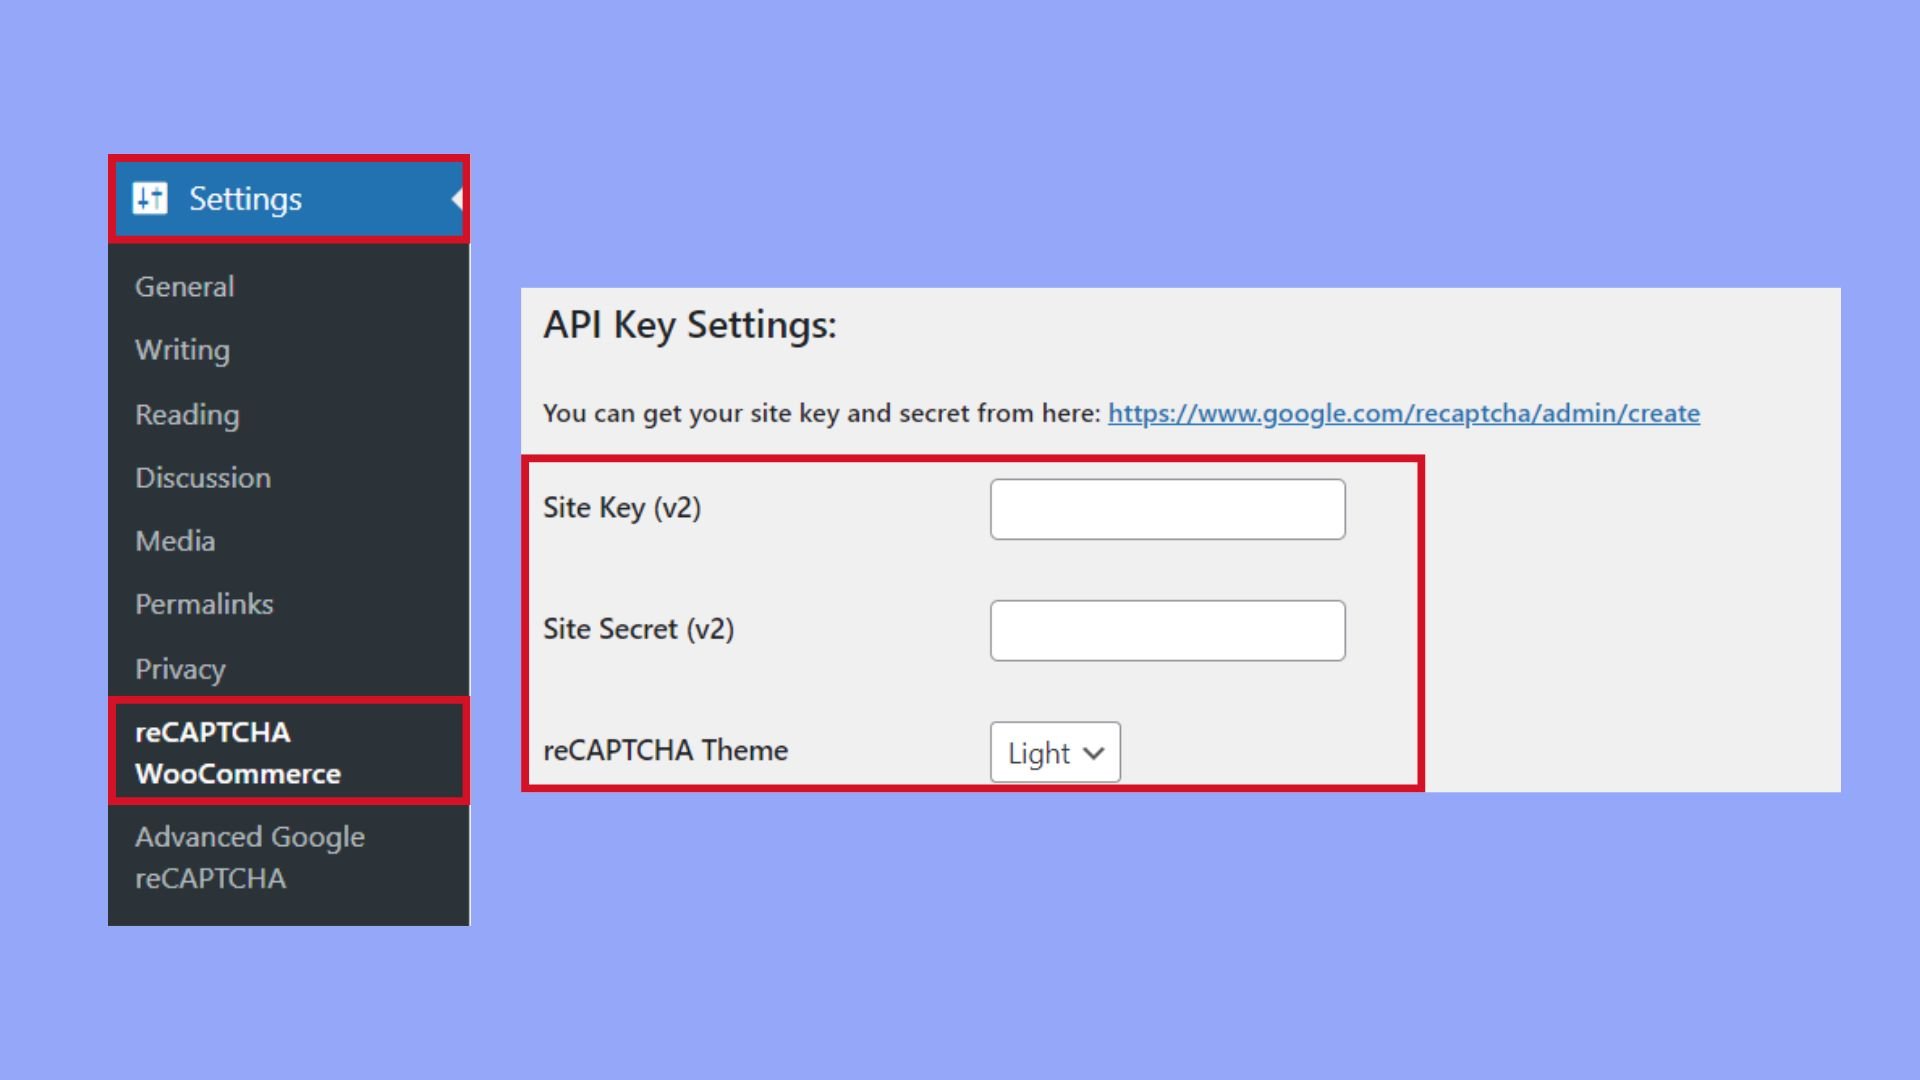
- Navigate to the WooCommerce settings by clicking WooCommerce from the sidebar and then Settings.
- Locate and click on the CAPTCHA tab within the settings screen.
- Here, you’ll need to enter your Site key and Secret key which you can get from the CAPTCHA provider, like Google reCAPTCHA’s website.

- Choose the CAPTCHA version you’d prefer to use for your forms.
Adding CAPTCHA to the WooCommerce registration form
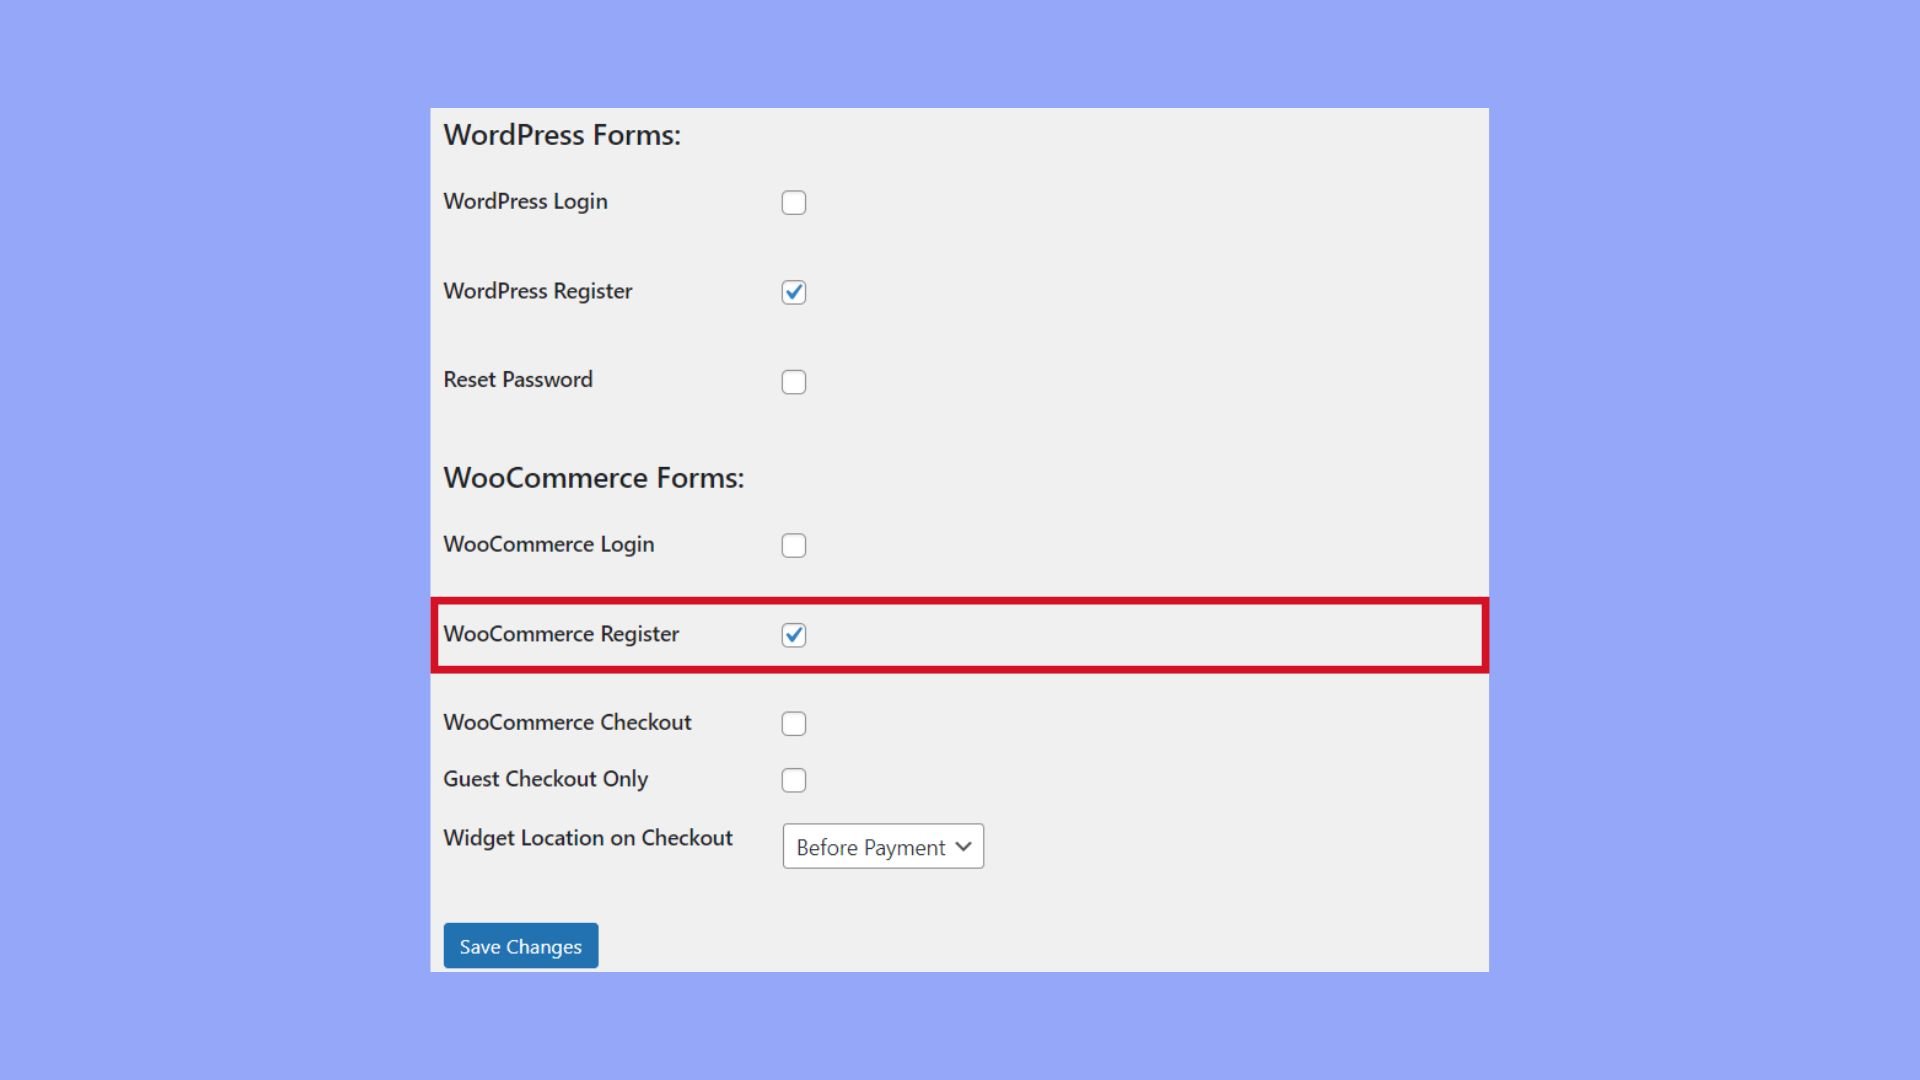
- After configuring the general CAPTCHA settings, look for the option within the plugin to enable CAPTCHA on the WooCommerce registration form.
- Check the appropriate box to activate CAPTCHA for registration.

- Save your changes.
Additionally, if you’re looking to customize your registration form further, such as learning how to add password field in WooCommerce registration form or how to add phone number field in WooCommerce registration form, you can usually find these options within the WooCommerce plugin settings or additional custom field plugins.
Integrating CAPTCHA with other WooCommerce forms
Adding CAPTCHA to your WooCommerce site enhances security for various forms, not just the registration. Let’s explore how you can integrate CAPTCHA functionality with login and checkout.
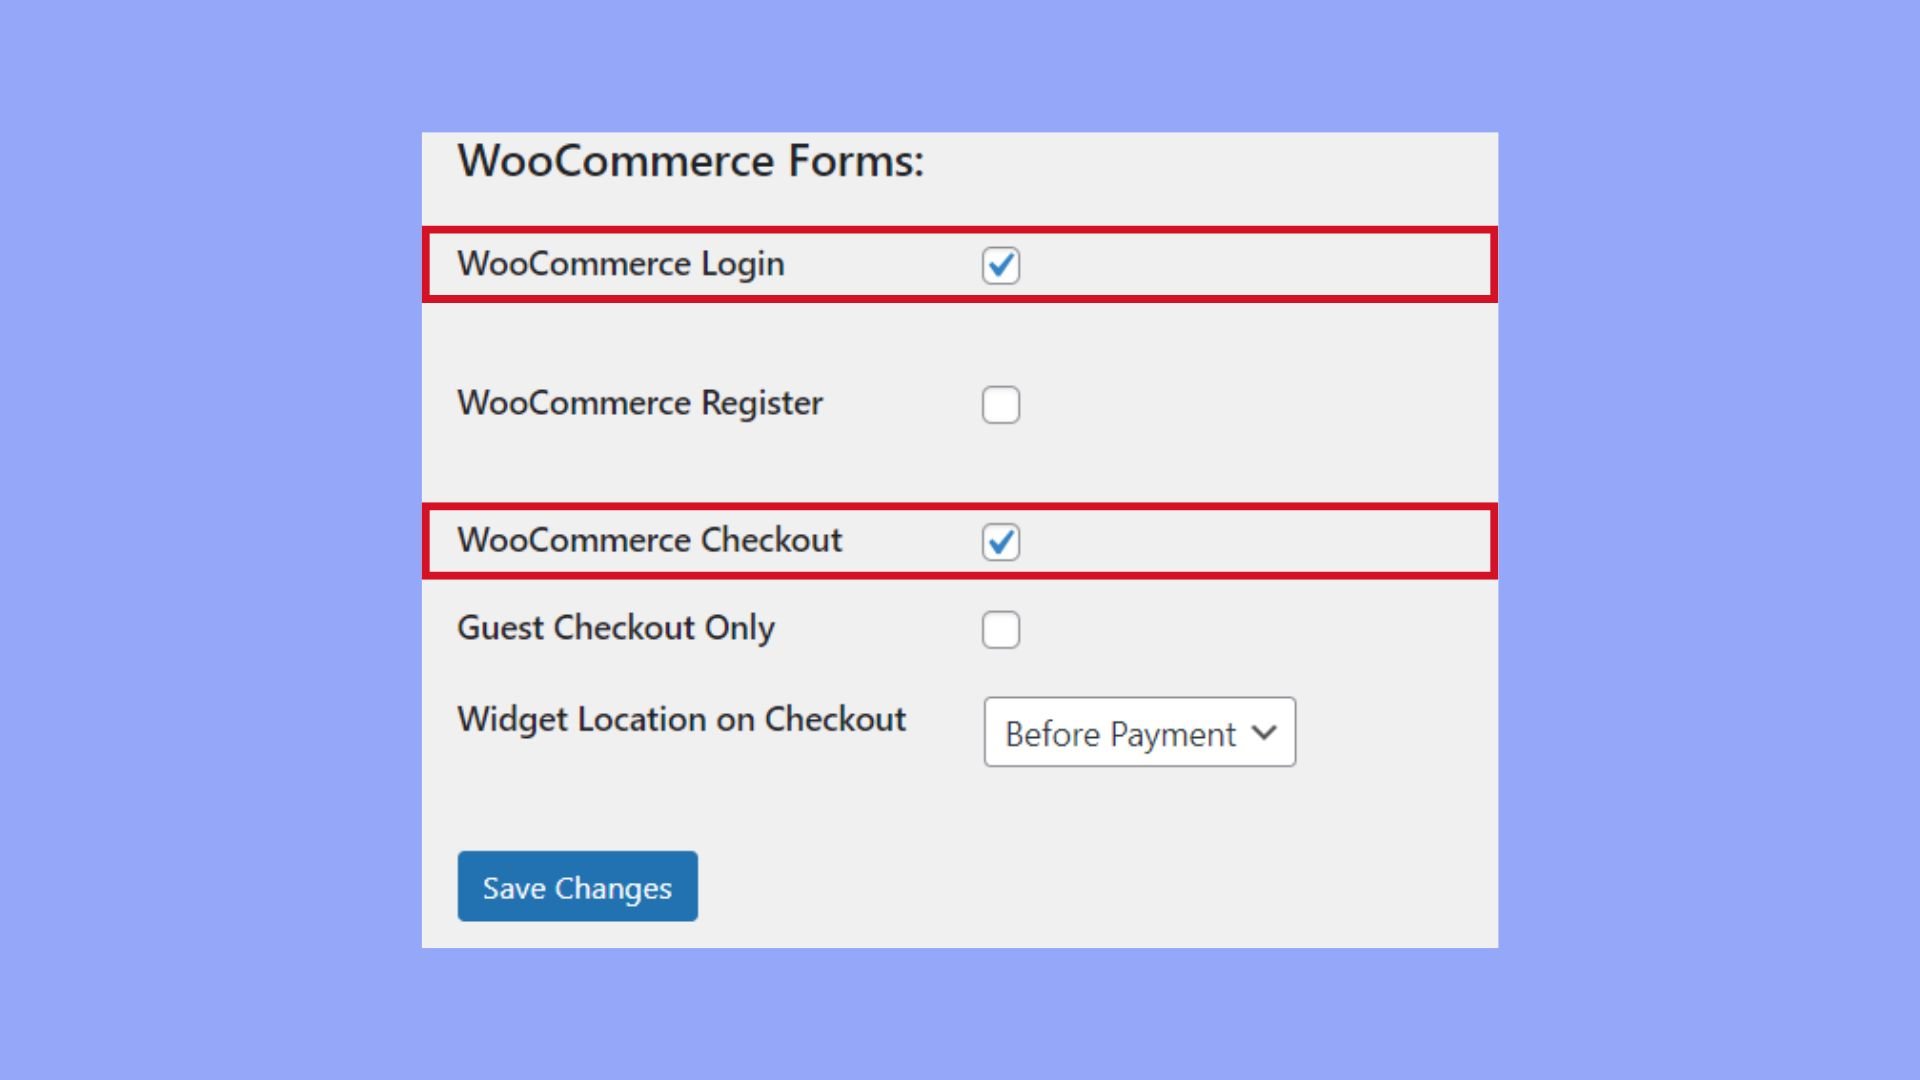
To improve the security of your WooCommerce forms, you can add CAPTCHA to the login forms to prevent automated attempts at unauthorized access. At the same time, incorporating CAPTCHA into the checkout helps in verifying human interaction, reducing fraudulent activity and unauthorized order submissions.
- Navigate to Settings > CAPTCHA in your WordPress dashboard.
- Enter your Site Key and Secret Key for the CAPTCHA service you’ve chosen to use.
- Select the option to enable CAPTCHA on Login Form and Checkout Form.

- Save your changes by clicking the Save changes button.
You have now successfully safeguarded both your WooCommerce login and checkout forms against spam and brute-force attacks.

Looking to sell online?
Create your custom online store in minutes with 10Web AI Ecommerce Website Builder and take your business online.
How to add different fields in WooCommerce registration form
In addition to CAPTCHA, you can seamlessly integrate various extra fields into your WooCommerce registration form. Enhancing your form with additional fields, such as a password field and a phone number field, can significantly improve user experience and gather essential information. This section will guide you through the process efficiently.
How to add extra fields in WooCommerce registration form
Adding extra fields to the WooCommerce registration form can help you gather more information from your customers, improving your ability to tailor services and communicate effectively. Here’s a simple guide:
- Navigate to Plugins > Add New and search for a plugin like WooCommerce Custom Fields or User Registration for WooCommerce.
- Install and Activate the plugin.
- Go to WooCommerce > Custom Fields or the respective settings page of your plugin.
- Click on Add Field and configure the field settings. You can choose field types like text, dropdown, checkbox, etc.
- Name the field (e.g., favorite color).
- Set additional properties such as placeholder text, required status, and default value.
- Save the changes.
- Ensure the new fields are enabled to show on the registration form.
- Check the registration form on your site to verify the new fields appear correctly.
How to add password field in WooCommerce registration form
By default, WooCommerce doesn’t ask for a password during registration, but you can add a password field to improve user experience and security. Here’s how:
- Use a plugin like WooCommerce Custom Registration Form Builder.
- Install and Activate the plugin from the WordPress plugin repository.
- Navigate to WooCommerce > Registration Form settings.
- Select Add Field and choose the Password field type.
- Configure the field by setting a label (e.g., create password) and making it a required field.
- Save the changes.
- Check the registration form on your site to ensure the new password field appears.
How to add phone number field in WooCommerce registration form
Adding a phone number field can help you collect contact information for customer support and marketing purposes. Follow these steps:
- You can use a plugin like WooCommerce Registration Fields Plugin again.
- Install and Activate the plugin from the WordPress plugin repository.
- Go to WooCommerce > Registration Fields or the relevant plugin settings page.
- Click Add Field and choose the Phone Number field type.
- Set the label (e.g., phone number) and make it a required field if necessary.
- Define additional settings such as placeholder text, field validation rules (e.g., numeric only), and default value.
- Save the changes.
- Visit your site’s registration form to ensure the phone number field is displayed and functions correctly.
By following these steps, you can easily add extra fields, a password field, and a phone number field to your WooCommerce registration form, enhancing its functionality and user experience.
Advanced CAPTCHA customization and troubleshooting
Enhancing the security of your WooCommerce store involves more than just adding CAPTCHA to your registration form. Customizing the language and appearance of your CAPTCHA, as well as addressing errors, can significantly improve the user experience.
Altering CAPTCHA language and appearance
When considering how to add CAPTCHA in WooCommerce registration form, you might want to customize it to better fit your store’s design and to communicate with your audience in their language. Follow these steps to adjust the language and styling:
- Navigate to the reCAPTCHA tab in your WooCommerce settings.
- Look for the option to set the language for your CAPTCHA. This typically defaults to auto-detect, but it can be manually set to ensure accurate localization.
- To modify visual elements, select the appropriate options for theme and size. This allows you to match the CAPTCHA to your site’s look and feel, choosing between light and dark themes, and compact or normal size displays.
- Save your settings to apply the changes.
Please note, you might also want to explore how to add extra fields in WooCommerce registration form for additional customization options that could further streamline your customers’ registration process.
Dealing with CAPTCHA errors
CAPTCHA errors can disrupt the registration experience on your site. Here’s how you can address the common ‘refresh captcha on guest checkout error’ and ‘refresh captcha on login checkout error’:
- Verify that your CAPTCHA keys are input correctly in the settings. Incorrect keys often lead to functionality issues.
- Ensure CAPTCHA validity timings align with your users’ behavior—if users are being timed out too quickly, they may encounter errors.
- If using additional plugins like Contact Form 7, double-check compatibility and settings within these plugins.
- Consider implementing a function to refresh CAPTCHA if users encounter an error during registration. This can be part of custom code or a feature in some CAPTCHA plugins.
- In case errors persist, contact the plugin’s support team or check their FAQs for specific troubleshooting steps related to your WooCommerce store.
Remember, keeping your CAPTCHA system functioning smoothly is crucial for both security and a positive user experience.
Maintaining your CAPTCHA solution
When you add reCAPTCHA to your WooCommerce registration form, keeping your security measures current and effective is as important as the initial setup. Let’s talk about how to keep your CAPTCHA up to date and running smoothly.
Monitoring CAPTCHA effectiveness
Regularly check your WooCommerce registration form for unusual activities, such as an increased number of fake registrations, which may indicate that your CAPTCHA isn’t effectively deterring bots.
Use the plugin settings to review the analytics provided by the CAPTCHA service, if available, to assess the performance and intervene when there’s a noticeable decline.
Updating CAPTCHA keys and version
Visit your WooCommerce settings and navigate to the reCAPTCHA tab to manage your CAPTCHA settings. If you have been notified about an update or just want to ensure maximum security, generate new keys from your Google reCAPTCHA account and update these in the corresponding fields within the plugin settings.
To keep up with the latest security standards, review and select the reCAPTCHA version that is most suitable for your site, particularly if newer versions have been released. Save changes to activate the new version.
Regular maintenance of your reCAPTCHA will help protect your WooCommerce registration forms from spam and automated abuse. With these proactive steps, you maintain the integrity and security of your online store.
Conclusion
In summary, implementing CAPTCHA in your WooCommerce registration form is essential for enhancing site security and protecting against spam and fraudulent activities. By following the steps outlined in this guide on how to add CAPTCHA in WooCommerce registration form, you ensure that your registration process is both user-friendly and secure. Regular maintenance and updates of your CAPTCHA solution will further safeguard your site, ensuring a seamless and secure experience for your users.


