Are you looking to tailor your online store to better serve a multilingual customer base? Learning how to change WooCommerce language settings can significantly enhance your website’s accessibility and user experience. This quick guide for beginners will walk you through the simple steps to modify the language in WooCommerce, ensuring your ecommerce platform speaks to every customer in their preferred language. Whether you’re aiming to expand your market reach or simply make your shop more inclusive, this article is your starting point.

Looking to sell online?
Create your custom online store in minutes with 10Web AI Ecommerce Website Builder and take your business online.
FAQ
How do I change the language on my WooCommerce dashboard?
How do I change the locale in WooCommerce?
- Install the necessary language packs in WordPress by going to Dashboard > Updates.
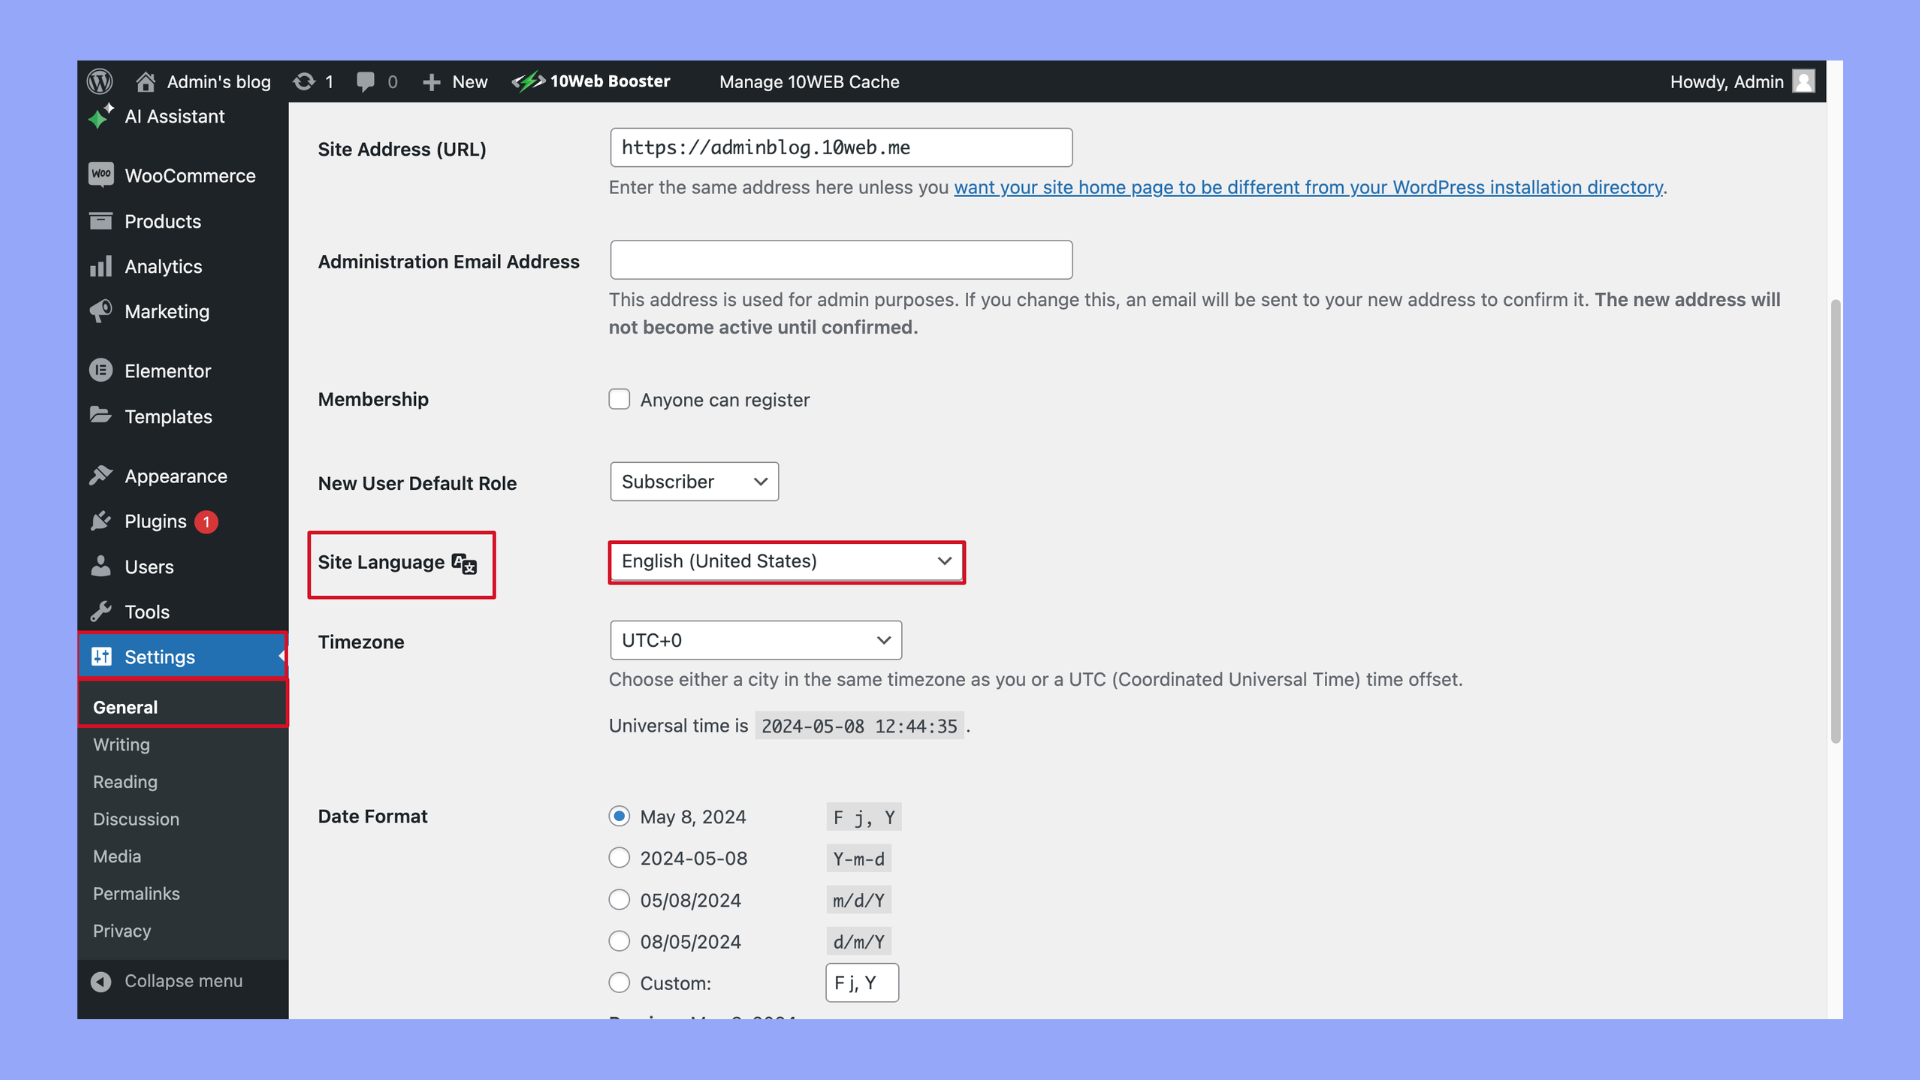
- Select the language under Settings > General > Site Language.
- If you need specific locale settings per user, consider using a plugin that allows users to switch locales dynamically.
How do I change the language on my cart in WooCommerce?
How do I install a language in WooCommerce?
- Go to your WordPress Dashboard.
- Navigate to Updates and scroll to the section labeled Translations.
- Click Update Translations to ensure all your language packs are up to date.
- If the language you need isn’t available, you may need to manually install the language files or use a plugin specifically for multi-language support like WPML or Polylang.
Understanding language settings in WooCommerce
When managing your online store, knowing how to change the WooCommerce language setting is crucial, not only for your ease of use but also for providing a localized shopping experience for your customers on the frontend, including the checkout page and product pages.
Overview of language options available in WooCommerce
WooCommerce leverages the language settings of WordPress, allowing you to choose from a variety of languages through a simple dropdown. Once you select a different language, WooCommerce automatically fetches and installs the corresponding language pack, which updates content across your store. Here’s a breakdown of how this works:
- Site language: In your WordPress Settings, there’s a Site Language dropdown where you can pick the desired language for your WooCommerce store.
- Language packs: Selecting a new language prompts WordPress to download and apply the respective WooCommerce language pack, which includes translations for the frontend components of your store.
How WooCommerce handles translations using WordPress
Your WooCommerce store gains its multilingual capabilities by utilizing the WordPress translation system. This process involves the following steps:
- Translation files: WordPress uses language files, like .mo and .po files, to manage translations. These files are part of the language packs specific to each language.
- Updates: Navigate to Dashboard > Updates to manually check for language updates, which may include new translations for WooCommerce strings.
- User profile settings: Individual users can adjust their own language preferences too — which impacts only their admin experience — by altering the language option in their user profile under Users > Profile.
By leveraging the WordPress translation system, your WooCommerce store can offer a multilingual shopping experience, ensuring broad accessibility and personalization for users worldwide.
Looking to sell online?
Create your custom online store in minutes with 10Web AI Ecommerce Website Builder and take your business online.
Preparing to change the language
When you’re looking to offer a more local experience for your users, changing the language of your WooCommerce site is a key step. This section will guide you through the preliminary checks and settings adjustments you need to make before updating the language of your WooCommerce-powered WordPress site.
Checking the current WordPress and WooCommerce language settings
Here’s how you can check the current language settings in WordPress and WooCommerce, presented in a step-by-step numbered list:
- Log in to the WordPress Dashboard, start by accessing your WordPress admin area by entering your credentials.
- Once you’re logged in, find the Settings menu on the left sidebar and click on it.
- Under the Settings menu, click on General. This page contains basic settings for your site.
- Look for the Site Language dropdown menu on the General Settings page. This setting determines the default language for your WordPress site, including all its content and the dashboard language.

- If you have WooCommerce installed, its language typically follows the WordPress site language. However, to check specific settings related to WooCommerce, navigate to WooCommerce → Settings in your dashboard and verify any language options available there to ensure they match your preferences.
Ensuring compatibility with themes and plugins
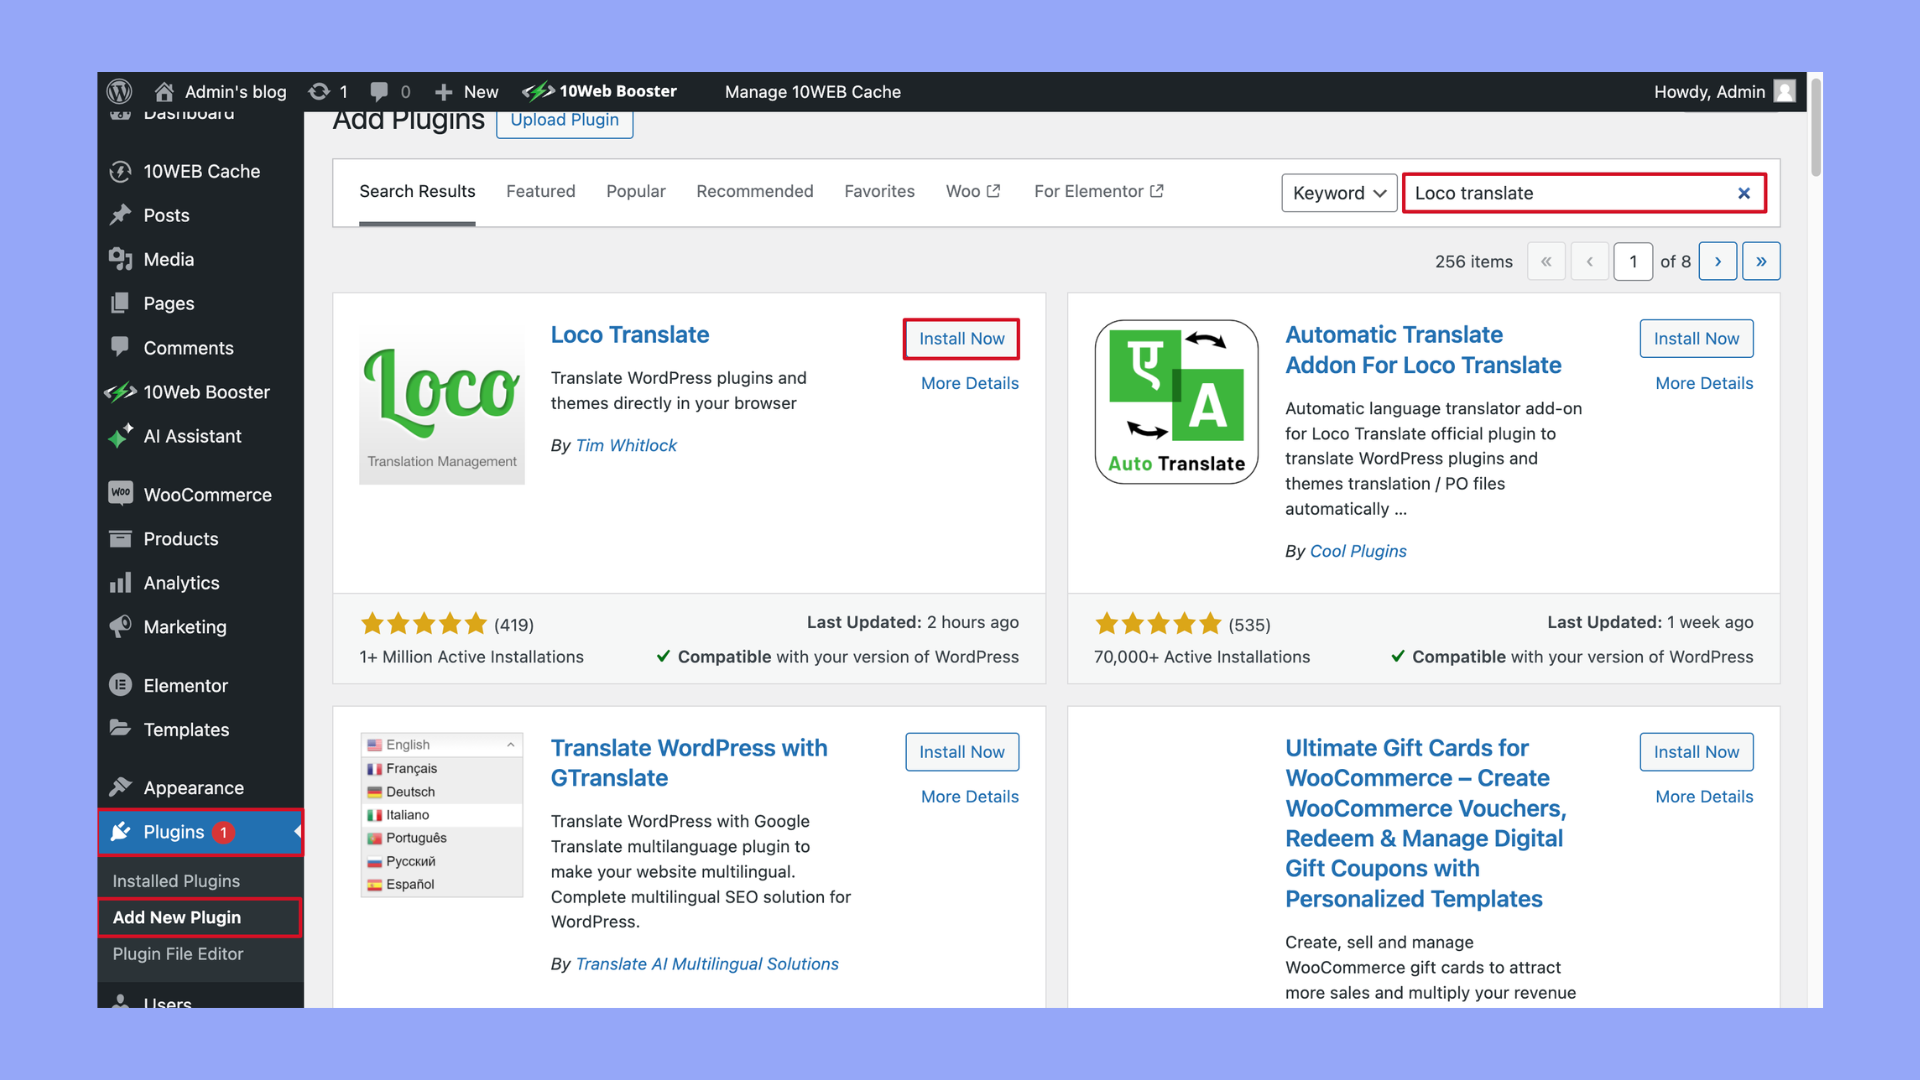
Before changing the language, it’s important to ensure that your theme and plugins support the new language you want to use. Check the documentation of each theme and plugin to verify compatibility. If a translation is not available, you might need a translation plugin like Loco Translate. Make sure that this plugin or any similar tool is properly installed and configured to handle the translations for your specific setup.
Methods to change the language in WooCommerce
When managing a WooCommerce store, you might need to alter the store language for various reasons, such as catering to a multilingual audience or simply using the store in your native language. Below are straightforward methods to modify the language settings in WooCommerce.
Method 1: Using WordPress settings
Changing your WooCommerce store language is a simple process that can be done within your WordPress dashboard settings. Here’s a step-by-step guide on how to change WooCommerce language through the WordPress settings:
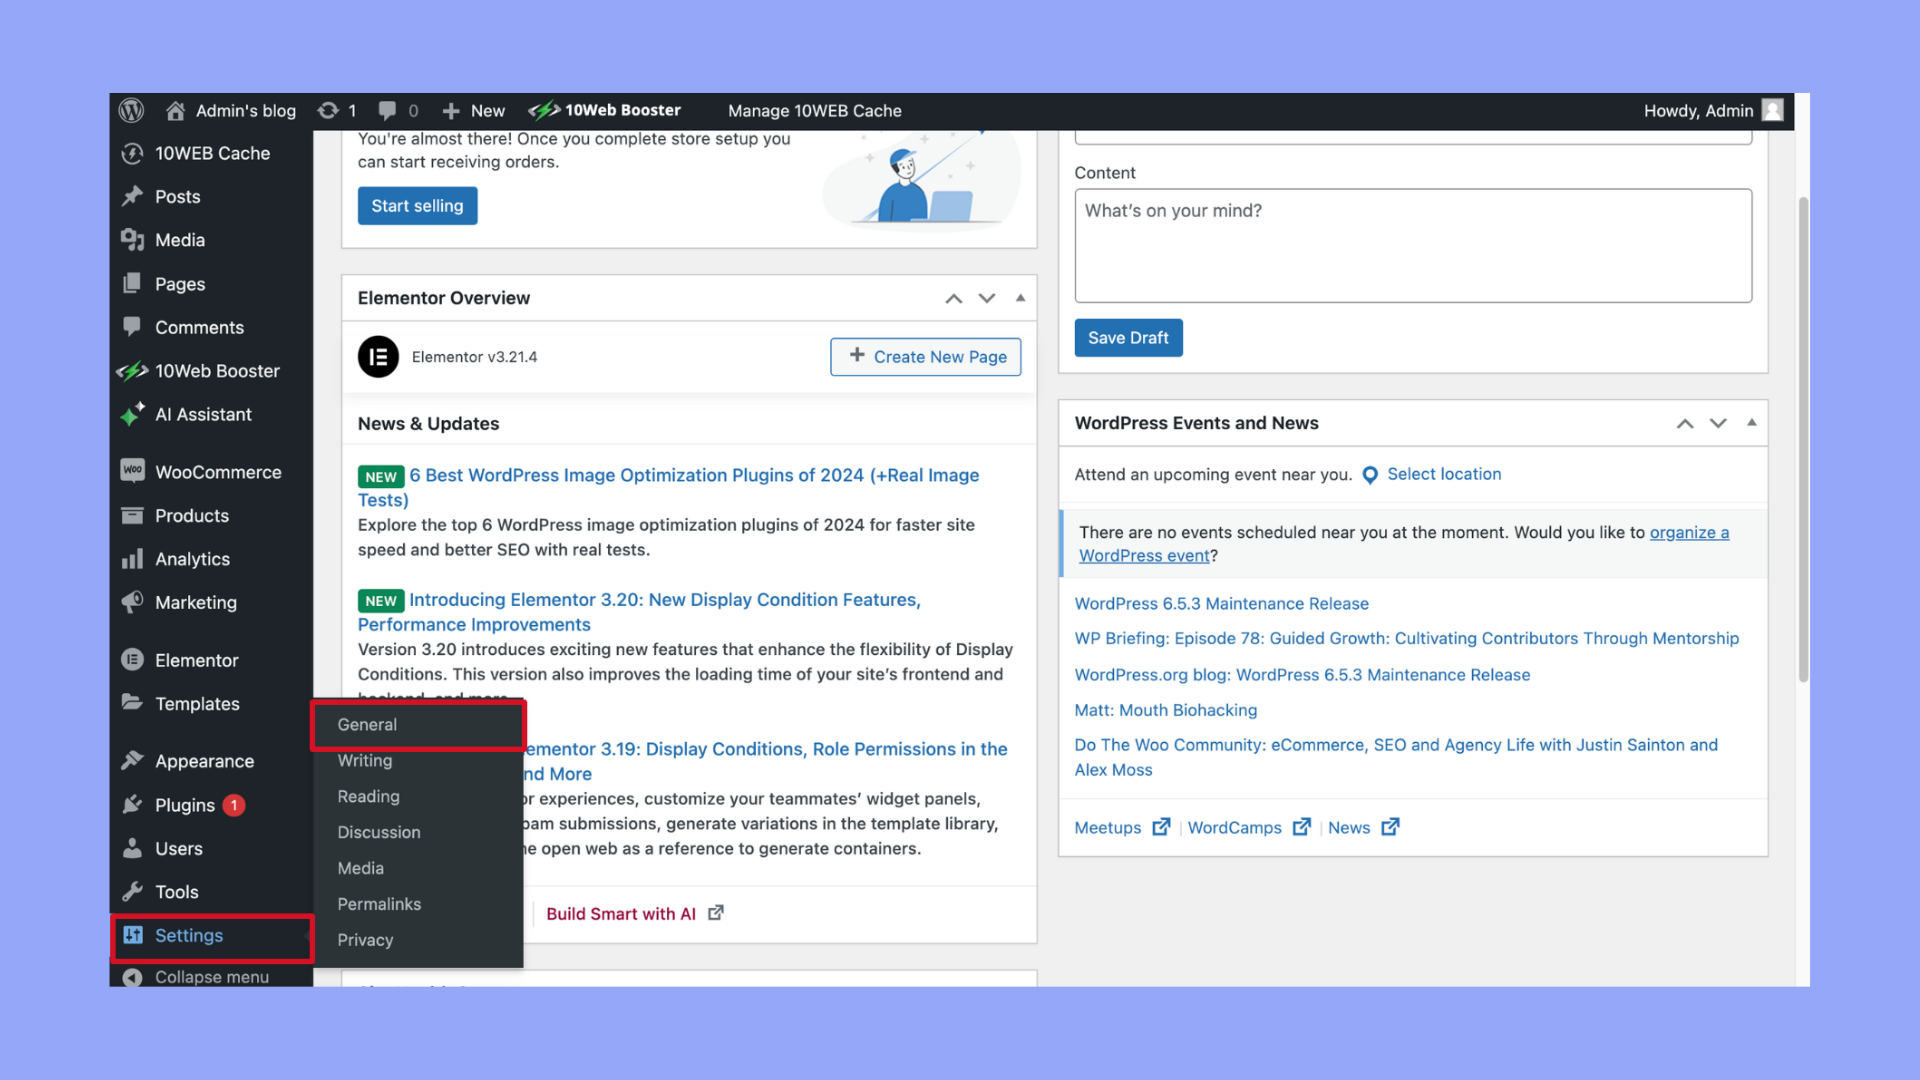
- Navigate to your WordPress dashboard.
- Click on Settings and then select General.
- Scroll down to find the Site Language drop-down menu.
- Select your desired language from the drop-down menu.
- Click on Save Changes at the bottom of the page.
It’s important to note that changing the site language will affect the entire user interface of your WordPress dashboard. This means menus, settings, and descriptions will now appear in the language you’ve selected. Additionally, if your theme and WooCommerce are translation-ready, the change will also apply to your store’s front-end, making it accessible to speakers of the selected language.
When you save these settings, WordPress will install the corresponding language files if they are not already installed. Keep in mind that some plugins and themes may still require manual language file updates or configurations to fully translate your shop’s interface.
This straightforward change can help create a more localized and welcoming environment for your customers, enhancing their overall shopping experience on your website.
Method 2: Using a plugin for multilingual support
When you’re looking to change your WooCommerce language, opting for a multilingual plugin is a well-suited approach. Plugins like WPML and Polylang are quite popular in the WordPress community for their robust features that enable you to manage multiple languages with ease.
To translate your store into multiple languages or apply more comprehensive changes, consider using plugins.
- Install and activate the plugin.
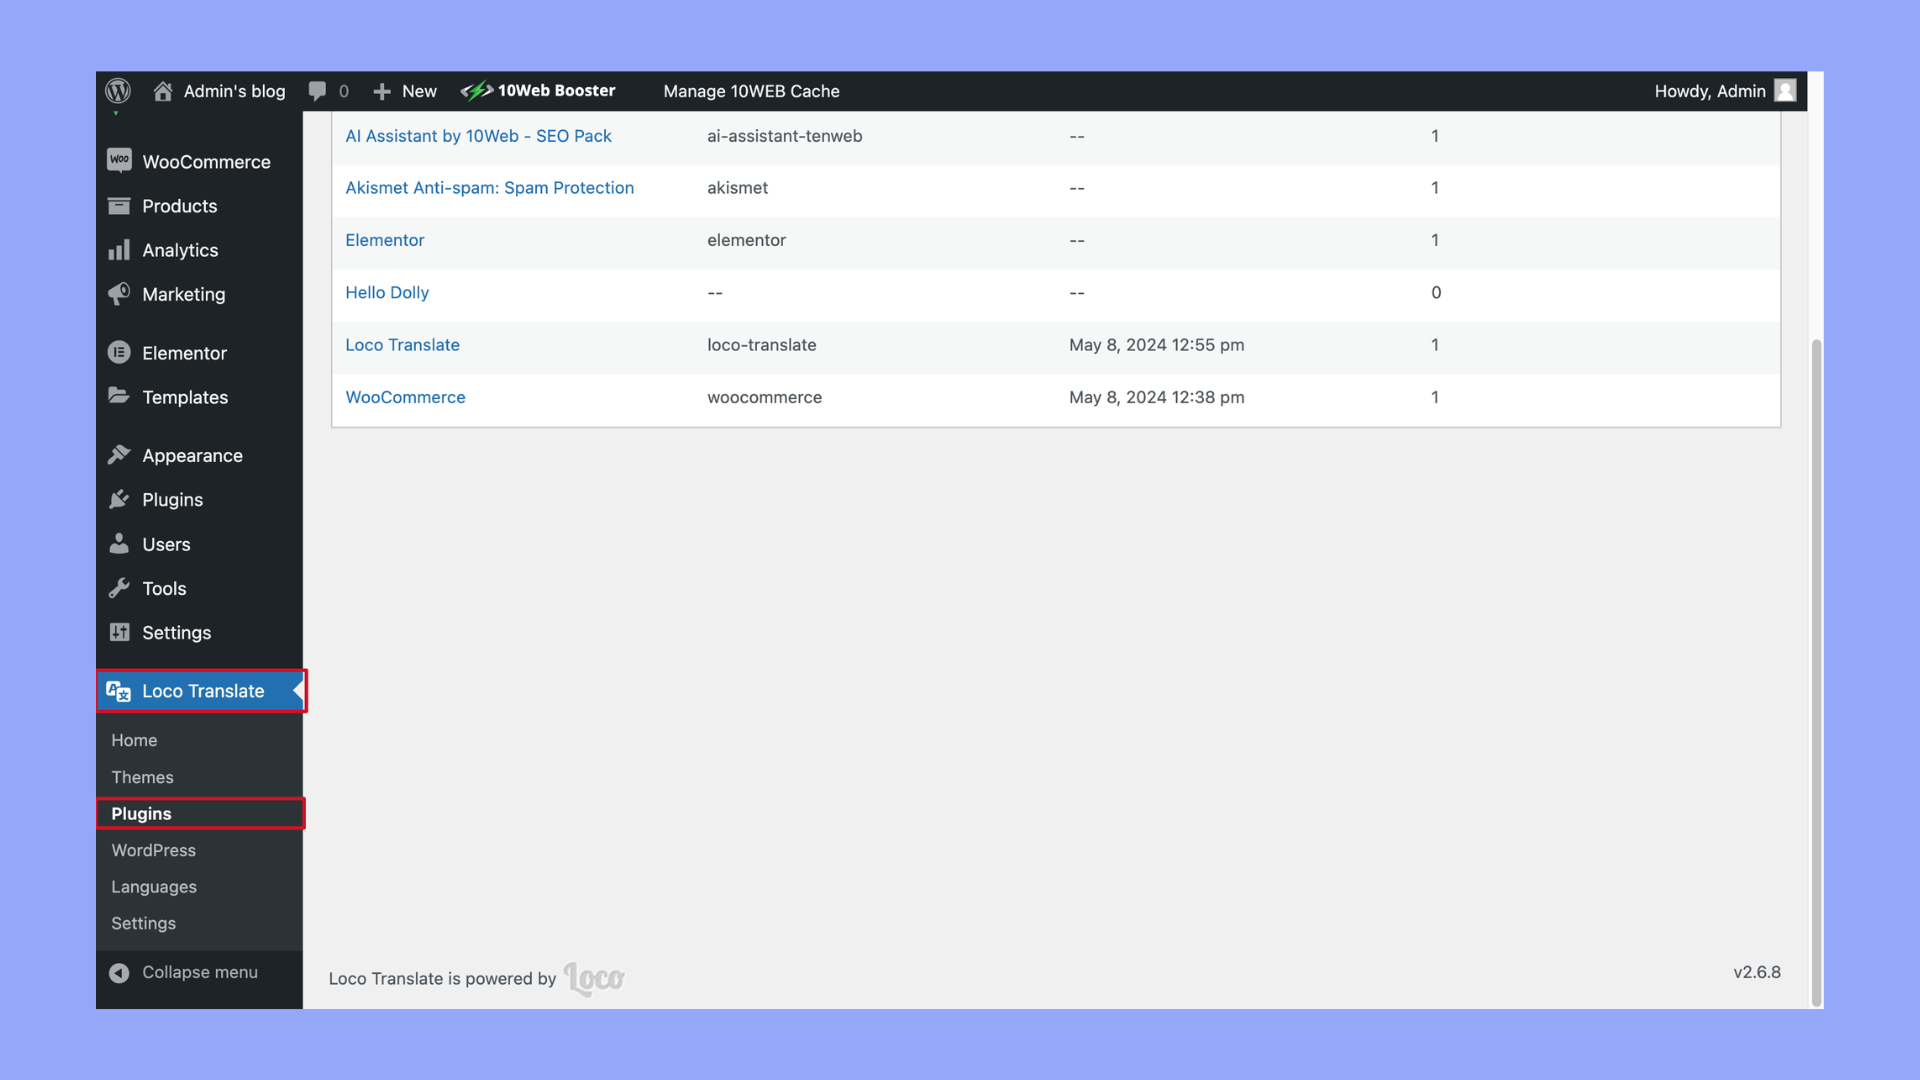
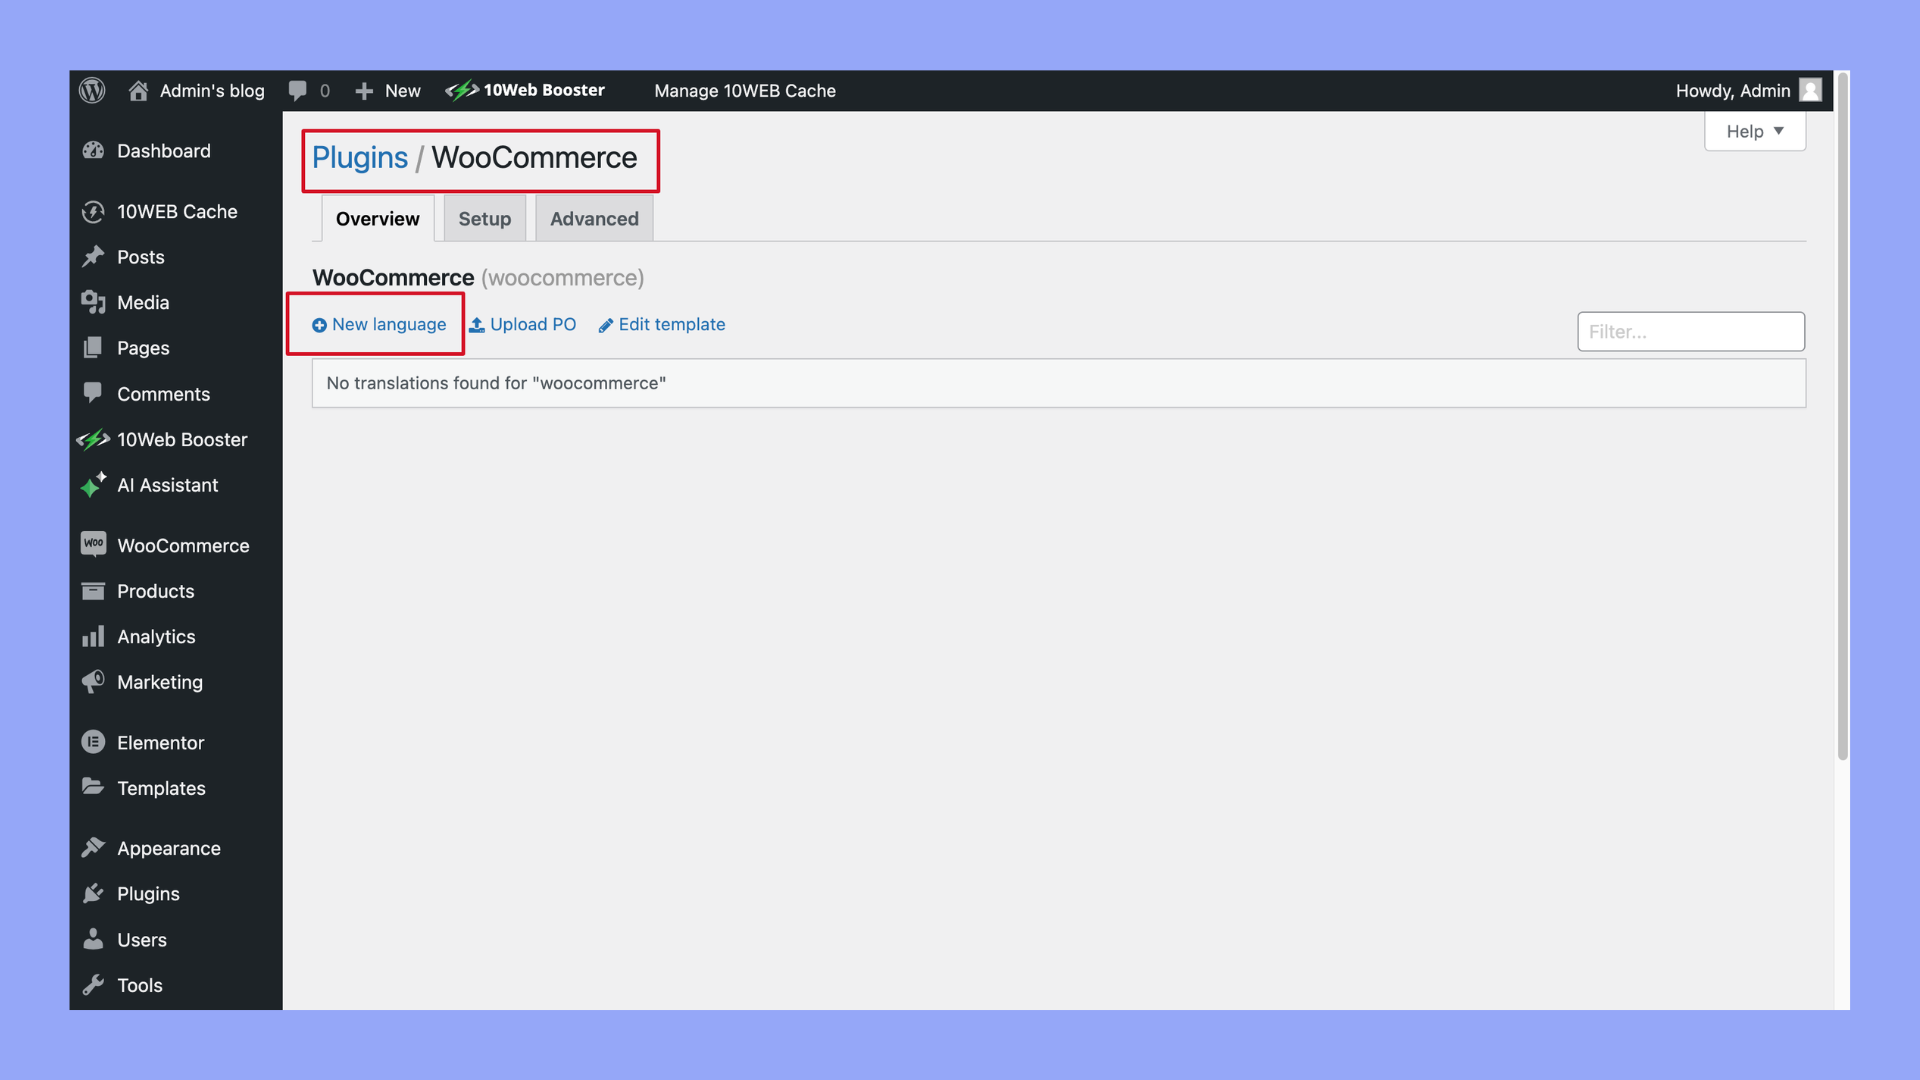
- Go to Loco Translate → Plugins.
- Select WooCommerce and click on + New Language.
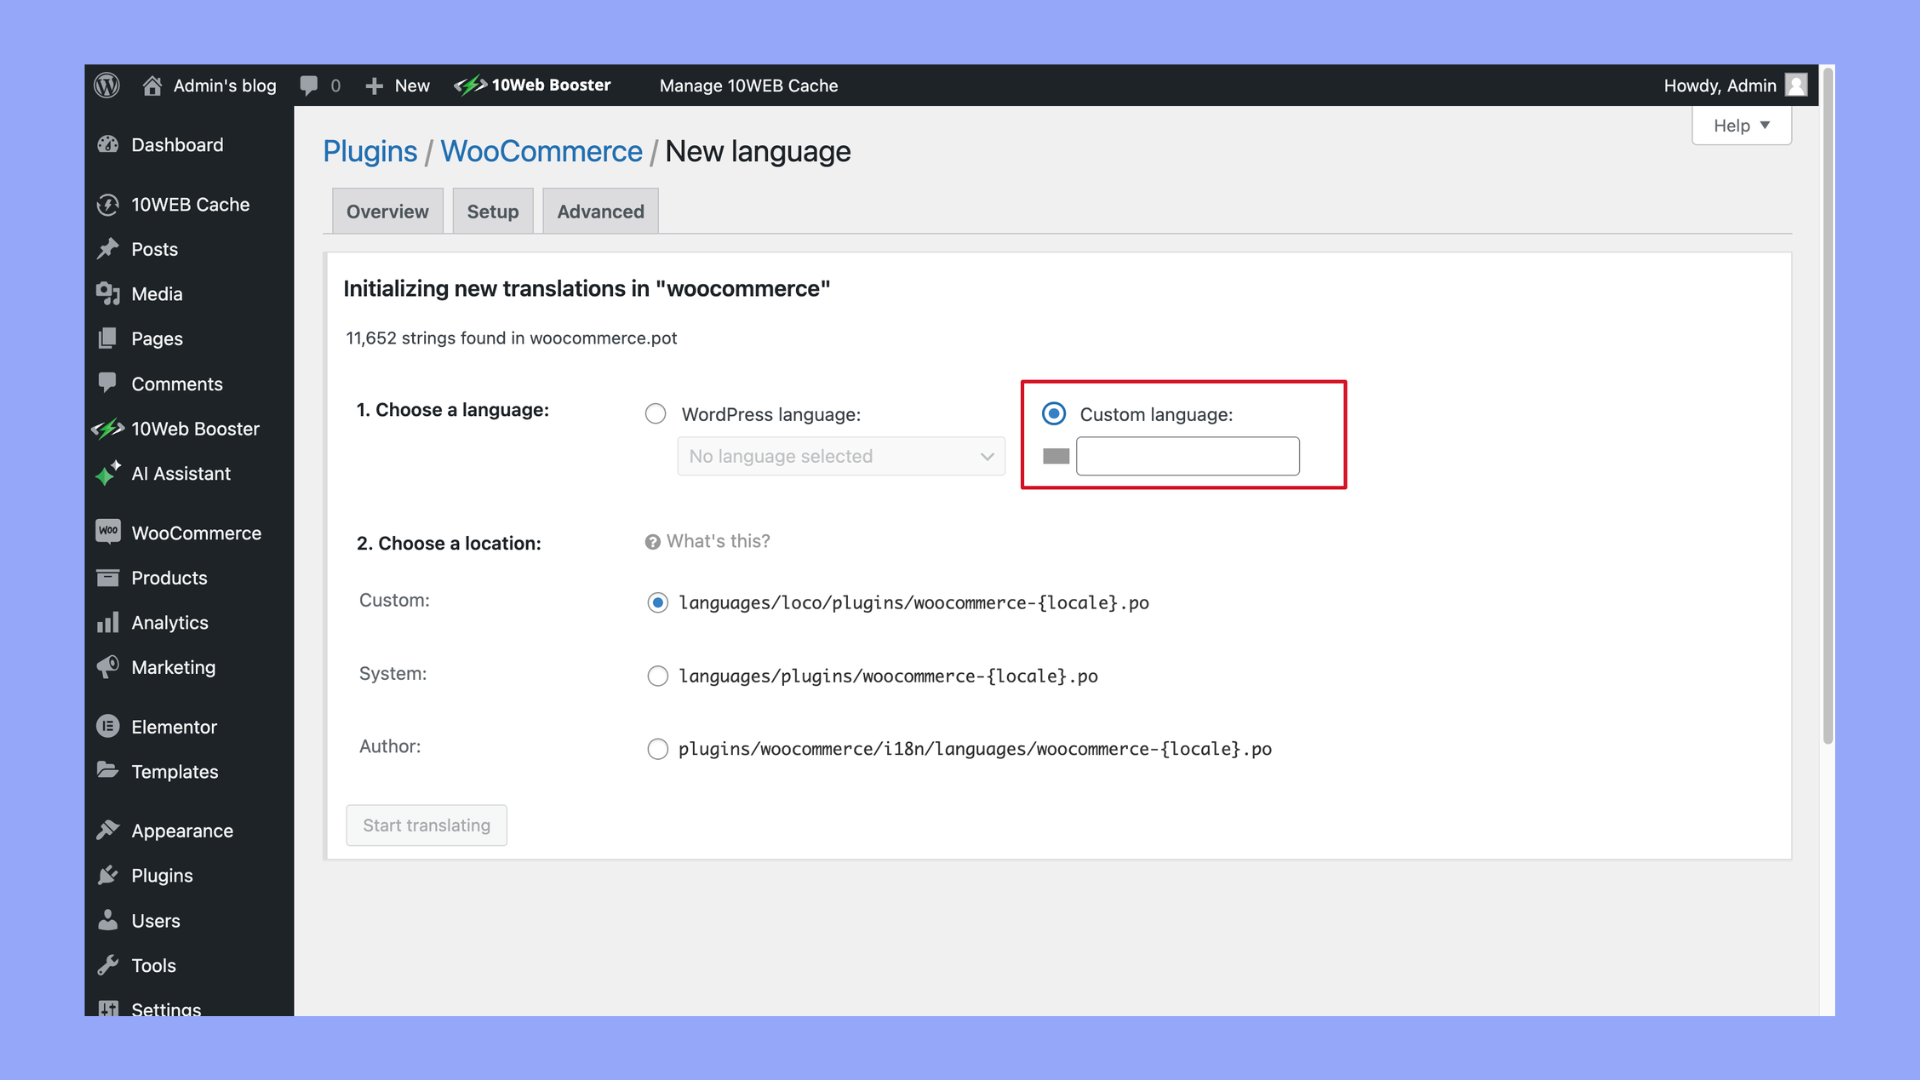
- Choose a language and folder for the translation files, typically Custom.
- Begin translating by clicking Start translating.
Configure the plugin for your WooCommerce shop. This typically involves:
- Adding new languages: Navigate to the plugin’s language settings, commonly found under Languages in your dashboard. Here, you can add and manage the different languages you want to offer in your store.
- Setting the default language: Specify which language will be displayed by default by selecting it from a dropdown menu or clicking a star icon next to the chosen language.
With the languages set up, the next step is to translate your content. This includes your product titles, descriptions, and pages. Both WPML and Polylang offer translation management systems where you can translate each item individually or use a bulk translation feature to save time.
Remember, changing your WooCommerce language enhances the shopping experience for your customers who prefer to shop in their native language. It’s not just about establishing a local presence; it’s about making your online store accessible and welcoming to everyone.
Method 3: Manual translation
When dealing with a diverse customer base, WooCommerce might not offer a ready-made translation for every language you need. Or perhaps you want to customize the translations to match your brand’s voice. In such cases, manual translation is your go-to method.
Before you start, ensure you have a .pot file (Portable Object Template) which serves as the basis for your translations. WooCommerce comes with this file, and it contains all the text ready to be translated.
Step-by-step guide for manual translation
- Getting the necessary tool: Begin by downloading and installing PoEdit, a popular software for editing .pot files.
- Opening your .pot file: Open PoEdit and choose File > New catalog from POT file. Navigate to the WooCommerce.pot file to get started.
- Translating text: In PoEdit, you’ll see the source text and a space to input your translations. Go line by line, translating the text as needed.
- Saving your translation: Once you’ve translated the text, save your new .po (Portable Object) and .mo (Machine Object) files. WooCommerce will use these files to display your custom translations.
- Uploading and applying the translations: Upload these files into your WordPress installation following the path wp-content/languages/plugins. If this folder doesn’t exist, you may need to create it. Make sure your file names follow the format woocommerce-<language_code>.po and woocommerce-<language_code>.mo
By following these steps, you can manually translate WooCommerce into any language of your choosing, ensuring your store speaks the language of your customers. Remember, meticulous attention to detail will ensure a professional and coherent shopping experience for users from all over the world.
Post-change configurations
After successfully changing your WooCommerce language, there are a few configurations to consider for your single-language store. These steps ensure that your new language settings are applied consistently across your store’s interface.
- Update language files: Languages are constantly evolving, and so are their translations. Regularly check for and apply language file updates in the Dashboard > Updates > Translations area to ensure all language packs are current.
- Check My Account, Cart, and Checkout pages: Visit these critical pages to confirm that the language changes have taken effect. Your My Account, Cart, and Checkout Page should display the new language without issues.
- Review email notifications: Check the email notifications sent to your customers. The language change might also affect these templates, so ensure that they are now in your chosen language.
- For this, navigate to WooCommerce > Settings > Emails, and go through each email template, updating any language as necessary.
- Adjust any overridden templates: If you’ve overridden WooCommerce templates in your theme, you’ll need to revisit these to apply the new language settings. This often involves updating translation strings in the PHP files.
- Cross-browser testing: Different browsers may display translated text in unique ways. Perform a cross-browser check to make sure translations appear correctly regardless of where customers access your site.
Remember, learning how to change WooCommerce language is just the beginning. Post-change maintenance is key to providing a consistent user experience for your customers. Regular checks and updates help maintain language coherence throughout your site.
Looking to sell online?
Create your custom online store in minutes with 10Web AI Ecommerce Website Builder and take your business online.
Troubleshooting common issues
When you’re updating the language settings for your WooCommerce store, you may encounter some common issues that can affect both the SEO of your site and the customer experience. It’s important to ensure a seamless switch so that your global audience enjoys a better experience.
- Missing language packs: If the available languages don’t show up in the dropdown list under Settings > General, go to Dashboard > Updates and check the Translations section. Install any missing translation packs to enable more options.
- Frontend and backend language mismatch: The language you select might not apply to both your site’s frontend and backend. To ensure a consistent user experience, change your user language in Users > Profile.
- Custom translations not showing: If you’ve added custom translations and they aren’t reflected on your site, verify that your language files are correctly named and located in the appropriate themes or plugins directory.Dynamic content not translating: For dynamic content, consider using a language translation plugin like Weglot or SEO pack addon. These can offer automatic translations and are generally SEO-friendly, helping you serve a multilingual audience more effectively.
- Incorrect product information: After switching the language, check your product pages for accuracy. Product information directly influences higher sales, so ensure that all details are correct in the new language.
Remember, when you’re customizing your WooCommerce store for a diverse customer base, consistent and accurate translation across your entire store is key for both SEO and user experience. Keep in mind the technical details, like ensuring your page titles and dropdown items are correctly translated, which contributes to a front-end language setting that resonates with your international customers.
By addressing these issues, you can greatly enhance the appeal of your ecommerce store to a wider audience and potentially attract more traffic from search engines like Google.
Looking to sell online?
Create your custom online store in minutes with 10Web AI Ecommerce Website Builder and take your business online.
Conclusion
In conclusion, understanding how to change WooCommerce language is a crucial step for any online store looking to cater to a diverse audience. By following the straightforward steps outlined in this guide, beginners can easily adjust their WooCommerce settings to meet the linguistic preferences of their customers. This adjustment not only improves customer satisfaction but also broadens your store’s global appeal. Embrace the power of language customization in WooCommerce and open your business to the world.
Looking to sell online?
Create your online store in minutes
Create your online store in minutes with 10Web AI Ecommerce Website Builder.