Harness the power of your WooCommerce store with the REST API, a versatile tool designed to automate and integrate your ecommerce operations seamlessly. This guide provides a straightforward method to generate API keys by navigating through WooCommerce settings, setting permissions, and ultimately securing your API keys for safe interactions. Whether you’re updating inventory, managing orders, or syncing customer data, the WooCommerce API equips you with the necessary tools to transform your online store into a dynamic and responsive business platform. Explore this essential technology to maximize efficiency and unlock new possibilities for your ecommerce activities.
FAQ
How do I connect to WooCommerce API?
To connect to the WooCommerce API, generate API keys in your WooCommerce settings under WooCommerce > Settings > Advanced > REST API. Use these keys for authentication when making API requests.
How do I use the REST API in WooCommerce?
To use the REST API in WooCommerce, first ensure you have API keys. Then, send HTTP requests (GET, POST, PUT, DELETE) to the WooCommerce endpoint URLs. Use these requests to manage products, orders, customers, and other store resources.
What is API in WooCommerce?
The API in WooCommerce refers to the Application Programming Interface that allows developers to interact with the WooCommerce platform programmatically. It includes RESTful APIs that facilitate the integration of external applications with WooCommerce functionalities.
How do I call WooCommerce API in WordPress?
To call the WooCommerce API in WordPress, use the WordPress HTTP API functions like wp_remote_get or wp_remote_post. Include your API keys for authentication and specify the WooCommerce endpoint and data format in your request.
Getting started with WooCommerce API
To harness the power of your WooCommerce store through automation and app integration, you’ll need to use the WooCommerce REST API. As a WordPress plugin, WooCommerce provides a robust way to manage your e-commerce operations. The REST API allows you to interact with your store’s data in JSON format, using HTTPS requests.
When you start working with the WooCommerce API, securing your data with proper authentication is crucial. This process involves generating API credentials and selecting the appropriate method to ensure your requests are always safe.
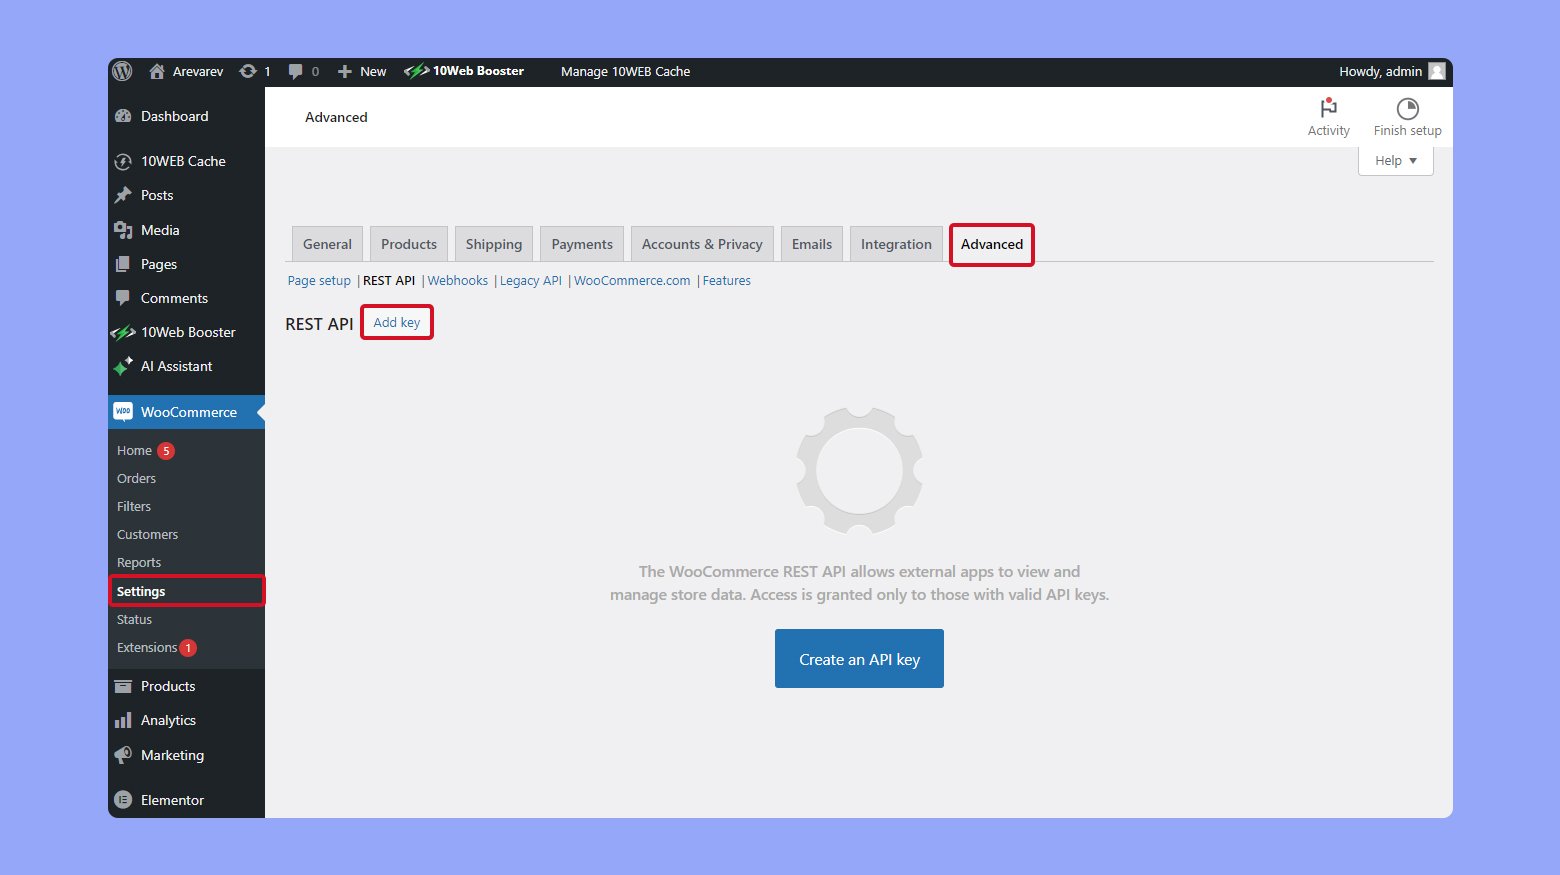
Generating API credentials
To generate your API credentials follow these steps:
- Log in to your WordPress dashboard.
- Navigate to WooCommerce > Settings > Advanced > REST API.
- Click on Add key.

- Input a Description for your reference.
- Choose the User you want the keys for from the dropdown menu.
- Set the Permissions to read, write, or read/write depending on your needs.
- Click on Generate API key.
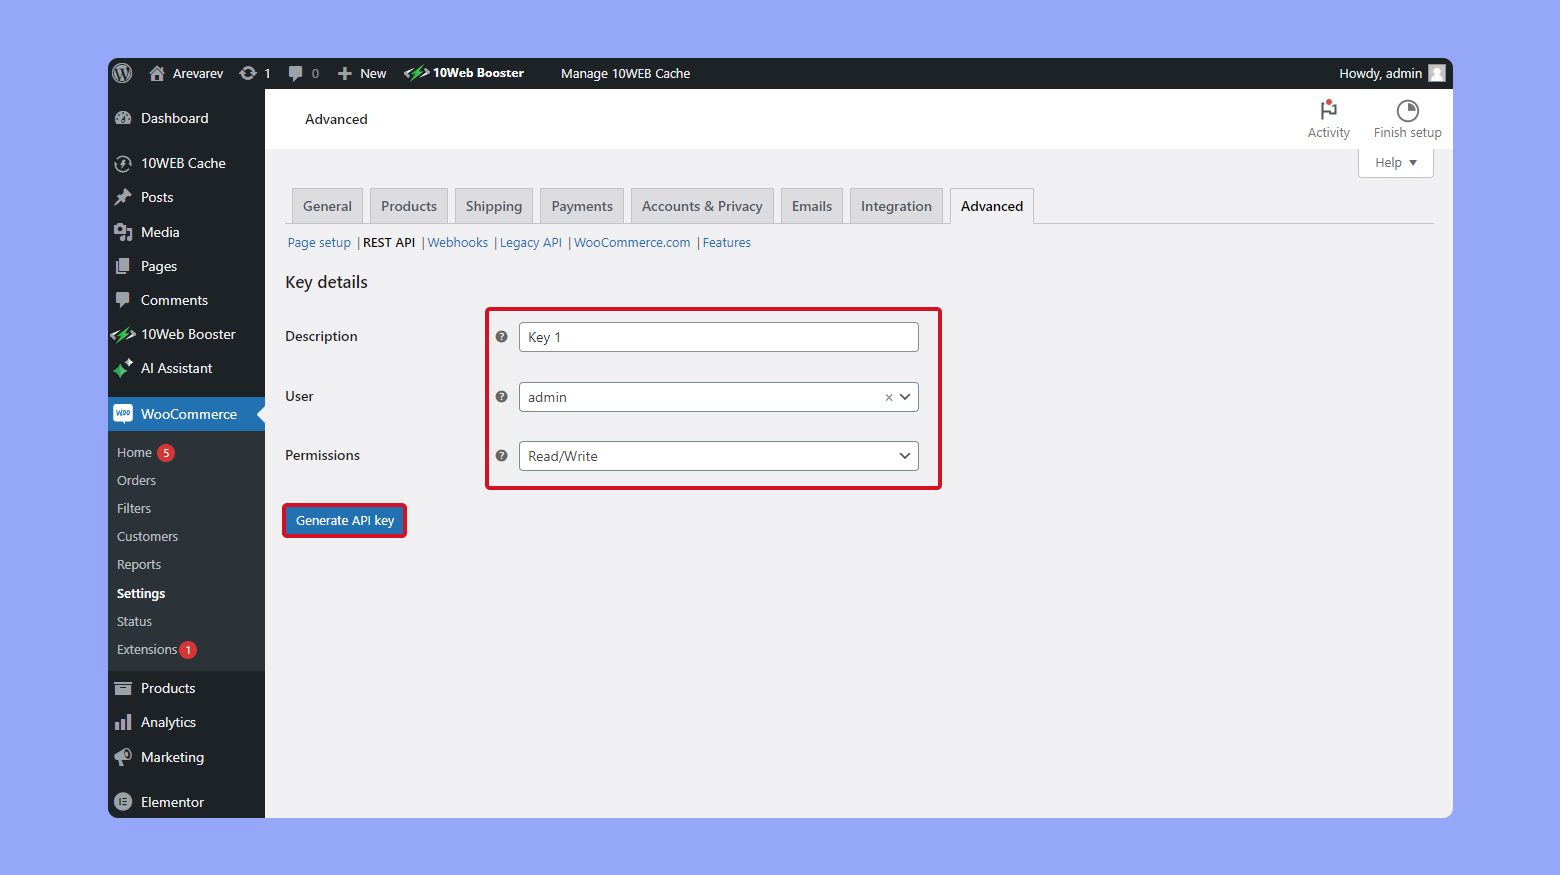
Once you complete these steps, two important pieces of information are provided: the Consumer key and the Consumer secret. Keep these details secure; they are what you’ll use to authenticate your API requests.
With the keys generated, you’re ready to make calls to the WooCommerce REST API and start managing your store programmatically. Use these keys to authenticate your HTTPS requests, letting you create, retrieve, update, or delete resources in your store. Create your custom online store in minutes with 10Web AI Ecommerce Website Builder and take your business online.

Looking to sell online?
Authentication methods
WooCommerce supports two main authentication methods:
- Basic Auth: This requires the use of SSL as it involves sending your Consumer key and Consumer secret over HTTP headers.
- OAuth 1.0a “one-legged”: Used mainly for non-SSL connections. It involves generating a signature using the API key, Consumer secret, and other parameters.
Choose the method that best suits your site’s setup and security requirements. Remember, if you select Basic Auth, always ensure your website is secured with SSL to protect your credentials.
Working with WooCommerce endpoints
When integrating with WooCommerce, you’ll interact with various endpoints that allow you to manage products, orders, and customers. Understand how to properly utilize these API endpoints to make the most of your eCommerce operations.
Products endpoints
The products endpoints are crucial for managing your online store’s inventory. You can retrieve a list of products, create new ones, update existing items, or delete them. Here’s how you can interact with products:
To list all products:
GET /products
For creating a product:
POST /products
To update a product:
PUT /products/{product_id}
To delete a product:
DELETE /products/{product_id}
Orders endpoints
Managing orders efficiently is vital for maintaining customer satisfaction. The orders endpoints will help you handle various order-related tasks:
To retrieve orders,:
GET /orders
To create an order:
POST /orders
This is useful when adding orders manually on behalf of a customer.
For updating an order:
PUT /orders/{order_id}
If you need to delete an order:
DELETE /orders/{order_id}
Customers endpoints
Keeping track of your customer details is essential for providing personalized experiences. Use the customers endpoints for various customer-related operations:
To list customers:
GET /customers
When creating a new customer record, use:
POST /customers
If updating a customer’s details is needed:
PUT /customers/{customer_id}
To delete a customer:
DELETE /customers/{customer_id}
Remember, with each request, you’ll often interact with these endpoints by appending them to your store’s base URL and including the necessary HTTP headers for authentication. Create your custom online store in minutes with 10Web AI Ecommerce Website Builder and take your business online.
Looking to sell online?
Managing WooCommerce API permissions
To securely manage your store’s data, WooCommerce allows you to control API permissions through a key system associated with WordPress user accounts. It’s essential to regulate reading and writing access correctly to maintain the store’s integrity and security.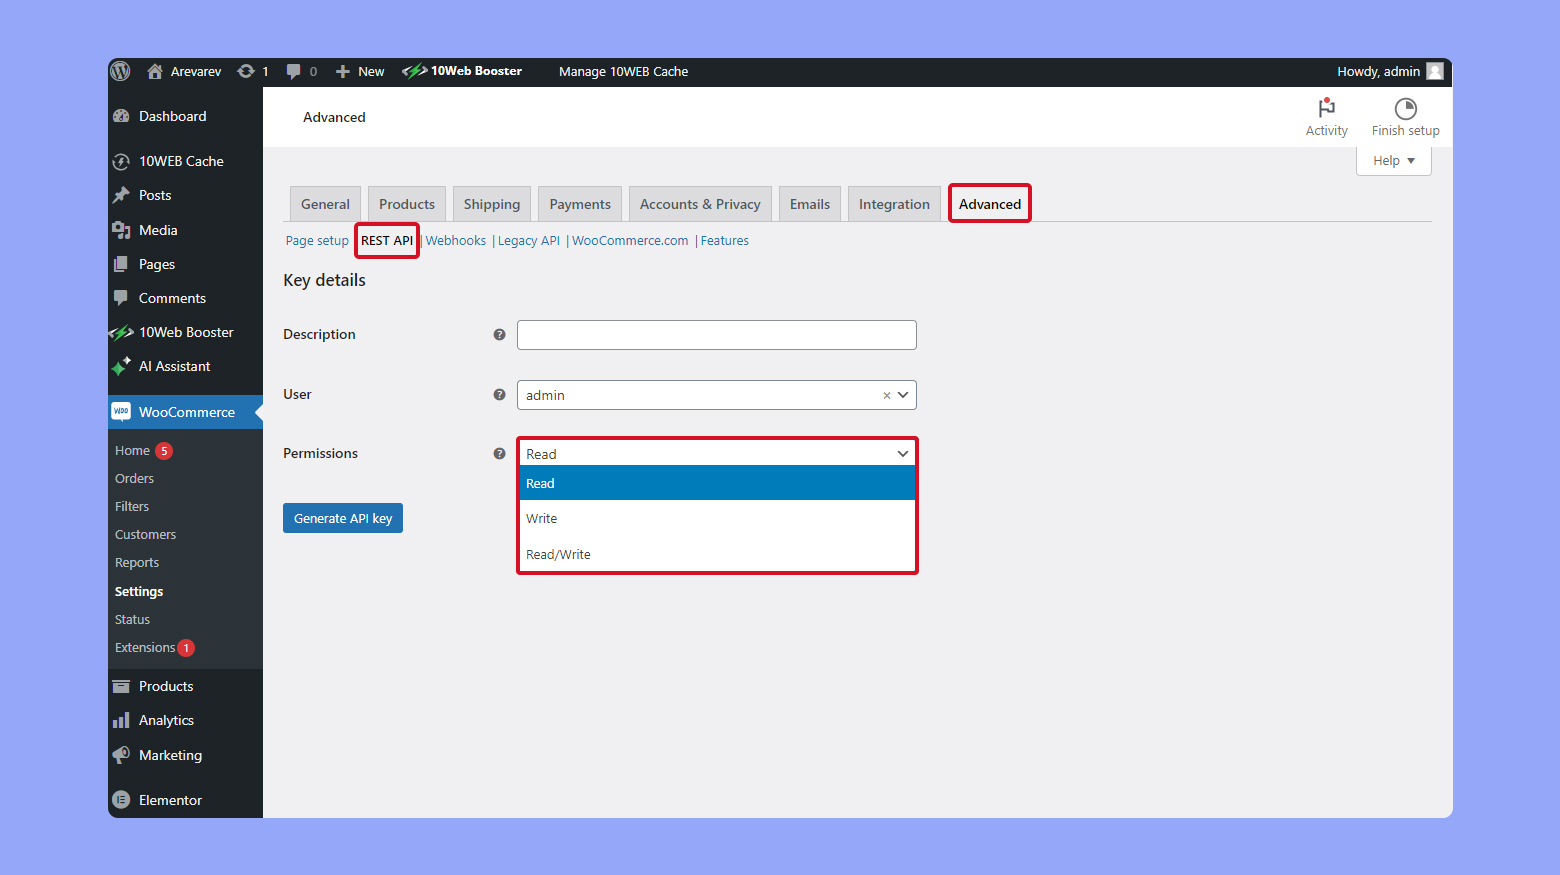
Read access control
For read access, the API key you generate in WooCommerce will need to have the correct level of permissions. These permissions determine what data the key can retrieve from your store. Here’s how you can manage read access:
- Navigate to your WordPress dashboard and select WooCommerce > Settings > Advanced > REST API.
- Choose Add Key to generate a new API key or select an existing one to modify.
- In the Permissions dropdown menu, select Read for read-only access to your data.
This level of access allows you to safely share data with third-party services without the risk of them modifying your store’s information.
Write access configuration
To configure write access, follow similar steps and determine which areas of your store can be altered through the API:
- Follow the same path: WooCommerce > Settings > Advanced > REST API.
- Click on Add Key or edit an existing key to set up new permissions.
- In the Permissions dropdown, choose Write or Read/Write to enable data modifications.
Write access should only be granted to trusted users or services since it allows for both reading and altering your store’s details. It’s important for managing inventory, orders, or any changes that need to be reflected on your website.
Sending requests and handling responses
When working with the WooCommerce API, you must use correct HTTP methods to perform actions on your online store data. The actions include retrieving data, adding new information, updating existing records, and deleting information when necessary. For this, you will need to download an API client.
Connecting to an API client
To facilitate the interaction with WooCommerce’s API, you first need to download and set up an API client. Insomnia is a robust choice due to its user-friendly interface and powerful features for both beginners and seasoned developers.
Create a new request
- Open Insomnia.
- Click on New Request which you can find either in the dashboard or by clicking the plus (+) icon in the sidebar.
- Name your request for easy identification, such as WooCommerce API Test.
- Set the request type to GET or POST, depending on what your specific API call requires. For a basic test, GET is typically used.

Authentication setup: In your newly created request interface, look for the Auth tab and select Basic Auth from the dropdown menu. You will be prompted to enter your credentials. Here, your username is the Consumer Key and the password is the Secret Key.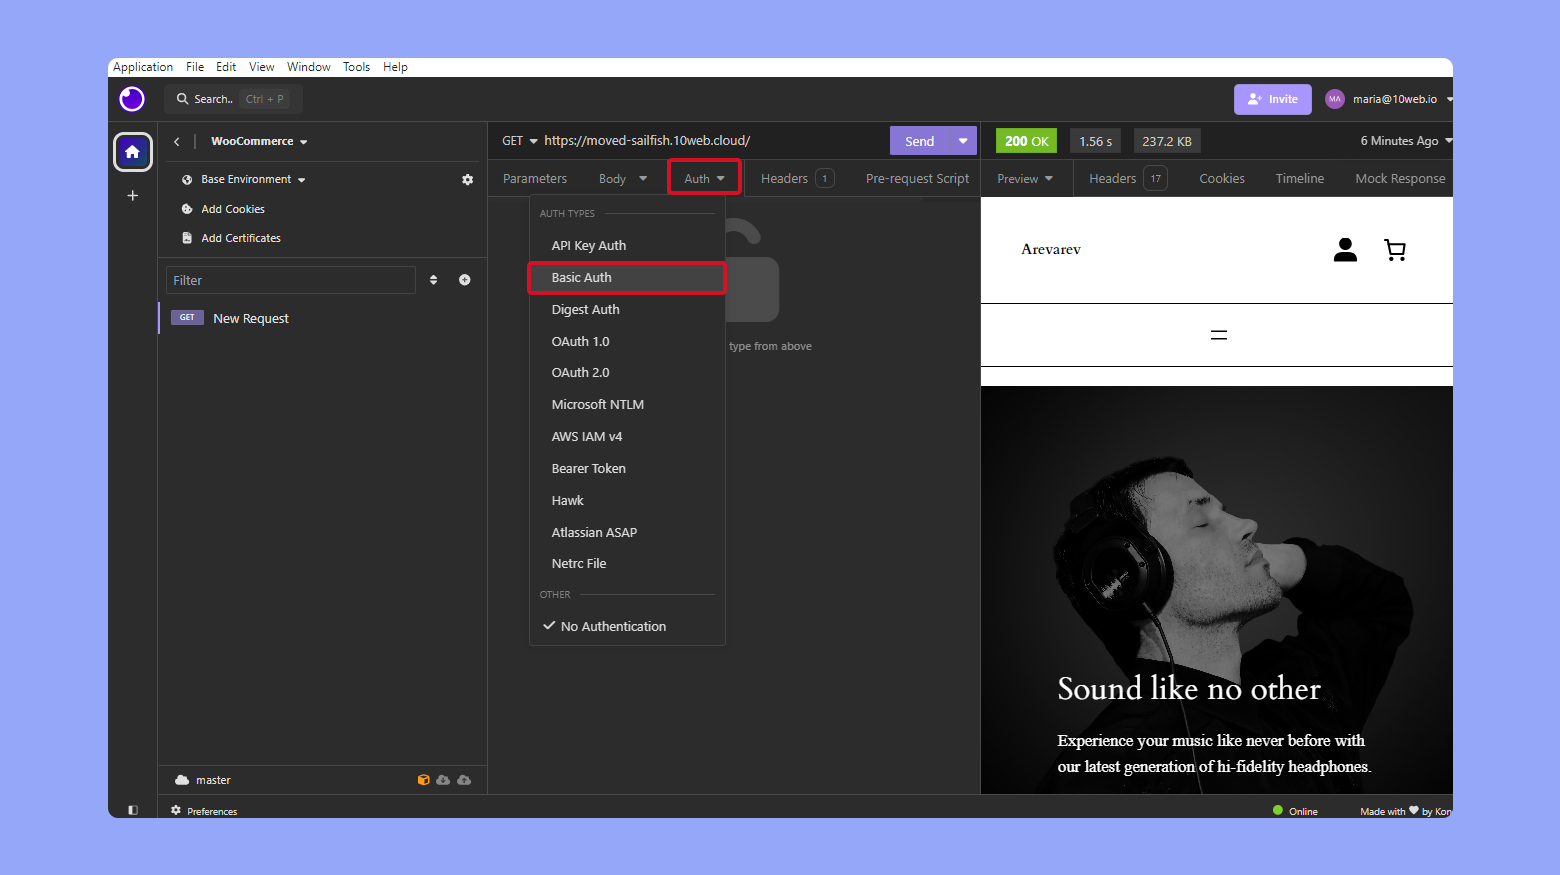
Making your first API call: Once you have set up your API client and configured the authentication, you’re ready to make your first API call. This process involves specifying the endpoint and sending the request.
Enter the API endpoint: In the URL field of the request setup in Insomnia, enter the endpoint URL provided by WooCommerce. This will typically be something like https://yourstore.com/wp-json/wc/v3/products to retrieve product data. Ensure the URL is correct and corresponds to the specific data you wish to access.
Send the request: Once all information is correctly entered, and the endpoint is set, click the Send button. Insomnia will process the request and display the response in the body below. Here, you can view the status code, response time, and the data retrieved.
Creating GET requests
To retrieve data from your WooCommerce store, you’ll use a GET request. It’s as simple as pointing your HTTP client—such as Postman or Insomnia—to the specific endpoint you’re interested in. For example, if you want to list all products, you’ll send a GET request to the /wp-json/wc/v3/products endpoint. The data returned will be in JSON format.
Posting data with POST requests
When you need to add new data to your store, you’ll use POST requests. You’ll prepare your data in JSON format and send it to the relevant endpoint.
For instance, to add a new product, send your POST request to /wp-json/wc/v3/products with the product details in the body of your request. Make sure your headers are set correctly to content-type: application/json.
Updating data with PUT requests
Once you need to update existing data in your store, PUT requests come into play. You’ll provide the updated data in JSON format in the request body and specify the unique identifier of the item you’re updating in the endpoint. For example, to update a product, you’ll target /wp-json/wc/v3/products/{id} where {id} is the product’s ID.
Deleting data with DELETE requests
To remove data from your store, DELETE requests are your method of choice. Similar to PUT requests, you’ll need to specify the unique identifier of the item you’re deleting in your endpoint. To delete a product, your DELETE request would be sent to /wp-json/wc/v3/products/{id} with the {id} being the ID of the product to remove.
Create your custom online store in minutes with 10Web AI Ecommerce Website Builder and take your business online.
Looking to sell online?
Securing API connections
When you decide to utilize the WooCommerce API, securing your API connections is critical. API credentials, which include consumer keys and consumer secrets, are your primary tools for keeping your data exchanges secure.
Enabling HTTPS on your site is essential. HTTPS encrypts the data transmitted between your store and your users, which prevents interception by third parties. Without HTTPS, the security of your API credentials can be compromised.
Note: Always limit the permissions to what is necessary for the task at hand. For example, if an app only needs to read order data, do not give it write permissions.
Remember to keep your API credentials secure:
- Never share your API keys in public forums or with individuals who do not require access.
- Regularly review and rotate your keys to minimize the risk of unauthorized access.
- Store keys securely, using password management tools if necessary.
Advanced features of WooCommerce API
In this section, you’ll learn about the powerful tools WooCommerce API offers for efficient store management, including real-time updates through webhooks, the ability to perform bulk operations, and managing data retrieval with API pagination.
Webhooks for real-time updates
Webhooks are one of the advanced features that enable your store to receive real-time notifications whenever specific events occur. By setting up webhooks in the WooCommerce > Settings > Advanced section of your dashboard, you can configure your site to send a data payload to a specified URL whenever events like new orders, updated products, or completed transactions happen. This allows your external applications to stay in sync with your WooCommerce store without polling the API for changes constantly.
Bulk operations
Executing bulk operations is a time-saving feature when you need to create, update, or delete multiple items at once. The WooCommerce API supports batch processing, which means you can send a single request to handle multiple operations simultaneously. This is particularly useful if you’re looking to update inventory levels, modify multiple product prices, or process a group of orders. You can perform bulk operations by sending a POST request with an array of items you wish to modify to the appropriate endpoint.
API pagination
When working with large sets of data, managing the flow of information is vital. WooCommerce API implements pagination, allowing you to retrieve data in manageable chunks rather than all at once. Within the API request, you can define parameters like page and per_page to navigate through lists of resources effectively. Not only does this save on resources, but it also ensures smoother performance by not overloading your server with too much data in a single request. To advance through your data, adjust the page parameter in your subsequent API calls.
Integrating WooCommerce API with external systems
When you aim to enhance your online store’s capabilities, integrating WooCommerce with external systems is your key move. This maximizes your e-commerce platform’s efficiency and helps you keep pace with your business needs.
API integration with mobile applications
To connect your WooCommerce store with a mobile app, you need to generate API keys through the WooCommerce settings.
Navigate to WooCommerce > Settings > Advanced > REST API on your WordPress dashboard and click on Add Key. Assign the key to the relevant user and determine the level of access depending on the application requirements.
API integration with desktop software
If your goal is to integrate WooCommerce with desktop software, such as inventory management or accounting systems, the process begins similar to mobile apps integration. Once you have your API keys, desktop software can retrieve data from your store or push updates back using the API, ensuring real-time synchronization and efficient management of your store’s operations.
API integration with third-party services
Linking your WooCommerce store with third-party services, like CRM tools or marketing platforms, requires the REST API to facilitate communication. Often, these services provide guidelines on how to establish the connection, which will involve entering the API keys you’ve created in WooCommerce into their systems, allowing for seamless data exchange and automation of various e-commerce functions.
Customization and extension of WooCommerce API
WooCommerce provides extensive APIs that allow for customizations and extensions to cater to your specific ecommerce needs. This flexibility ensures your online store can grow and adapt with your business.
Creating custom endpoints
To add new features to your WooCommerce store, you might need to create custom endpoints. A custom endpoint is a specific URL that you define to perform new operations or provide additional data that the default API doesn’t offer. To get started, you’ll first need to hook into the WooCommerce API through your plugin’s code. Use the register_rest_route function to define the endpoint and then create a callback function to process the API requests.
Here’s a basic structure in PHP:
add_action('rest_api_init', function () {

 register_rest_route('your_namespace/v1', '/your_endpoint/', array(

 'methods' => 'GET',

 'callback' => 'your_callback_function',

 ));

});

function your_callback_function($data) {

 // Your code to handle the request

}
Make sure to test your new endpoints using an API client to ensure they read and write data as intended, and remember to handle data synchronization carefully to maintain backend integrity.
Modifying API response data
Sometimes you need to modify the existing API response data to better suit your store’s needs. To do this, you can filter the response before it’s returned to the client. You achieve this by adding a filter to the API’s output.
Here’s how you can modify product data:
add_filter('woocommerce_rest_prepare_product_object', 'customize_product_response', 10, 3);

function customize_product_response($response, $object, $request) {

 // Your code to modify response data

 return $response;

}
Through customization of the API responses, you ensure that the data output matches what’s needed for your ecommerce operations. It’s crucial to ensure that all customizations maintain the integrity and security of the data being handled.
By leveraging these customization capabilities, you can ensure that WooCommerce continues to serve as a robust foundation for your online store as your business evolves.
Create your custom online store in minutes with 10Web AI Ecommerce Website Builder and take your business online.
Looking to sell online?
Troubleshooting common API issues
When using the WooCommerce API, you might encounter various errors and connectivity issues. Understanding how to read error codes and troubleshoot connectivity can help you resolve issues quickly.
Common error codes and messages
You’ll often receive error codes that provide clues to the root of the problem. Here’s a brief guide to common error codes you may run into:
- 401 Unauthorized: Ensure your API keys are correctly entered and have adequate permissions.
- 404 Not Found: The requested resource doesn’t exist; check for correct URLs and endpoints.
- 500 Internal Server Error: A generic error indicating something has gone wrong on the web server, not necessarily within the WooCommerce API itself.
By pinpointing these codes, you can target the specific area of trouble more effectively.
Debugging connectivity problems
Connectivity issues can arise due to a number of reasons. Here’s how to troubleshoot:
- Verify server status: Ensure your web server is running properly and accessible.
- Check resource limits: Server resources such as memory or timeout settings may need adjustment.
- Testing endpoints: Use tools like Postman to test API requests and responses.
- Examine API keys: Double-check that API keys have been set up with the correct permissions in WooCommerce > Settings > Advanced > REST API. If not, you may need to generate new ones.
Remember, consistent testing and methodically checking each component will help you troubleshoot effectively.
Best practices for API performance and security
When using the WooCommerce API, keeping your store’s performance optimal and your customer data secure is crucial. This section helps you understand how to responsibly manage server load and safeguard privacy.
Rate limiting and request optimization
To maintain efficient server performance, it’s important to implement rate limiting on your API requests. Rate limiting controls the number of requests a user can submit in a certain timeframe, which helps to prevent server overload and ensures that all users can access your services reliably.
You can optimize your API requests by:
- Using GET methods to fetch data whenever possible, as they are typically faster than POST.
- Reducing the number of requests by batching them, if supported by the API.
- Using filters to request only the data you need, rather than fetching entire datasets and filtering them client-side.
Ensuring data privacy and compliance
Protecting your customer’s privacy is not just ethical but also legally required in many jurisdictions. To ensure data privacy and compliance with regulations such as GDPR:
- Always use HTTPS to encrypt data in transit.
- Store API keys securely, ensuring they are not hard-coded into your application’s codebase.
- Regularly audit and update user permissions to adhere to the principle of least privilege.
By following these focused guidelines, you can maintain a high performance level for your WooCommerce operations and foster consumer trust through robust security measures.
Conclusion
The WooCommerce REST API offers a powerful means to automate and integrate your ecommerce operations, making your online store more dynamic and responsive. By generating API keys through a secure procedure, setting appropriate permissions, and choosing the right authentication methods, you can manage your store’s products, orders, and customer data efficiently. This guide not only outlines the steps to set up and use the API but also provides insights on securing API keys, handling data with different HTTP methods, and using advanced features like webhooks for real-time updates. Store owners and developers can leverage this knowledge to enhance their ecommerce platform, ensuring smooth operations and maintaining high standards of security and performance.
Create your online store in minutes with 10Web AI Ecommerce Website Builder.Looking to sell online?
Create your online store in minutes


![]()