Learning how to install an SSL certificate on WordPress is a crucial step towards securing user data and boosting your website’s credibility. This guide will walk you through the process, from choosing the right SSL certificate to configuring it properly within your WordPress hosting environment.
Whether you’re looking to enhance your website’s security, improve your search engine rankings, or simply provide peace of mind to your visitors, understanding how to implement an SSL certificate is essential for any WordPress site owner.
FAQ
How do I manually install an SSL certificate in WordPress?
How do I manually install an SSL certificate?
How do I add an SSL certificate to my WordPress admin?
How do I add a certificate verification in WordPress?
What is an SSL certificate?
An SSL (Secure Sockets Layer) certificate is a digital certificate that authenticates the identity of a website and enables an encrypted connection. This is crucial for ensuring that all data transferred between the web server and browsers remains private and integral.
SSL certificates are used to secure data transfers, credit card transactions, logins, and other personal information. They provide security by encrypting the internet connection and preventing criminals from reading and modifying any information transferred, including potential personal details.
The process works like this:
- Encryption: The SSL certificate turns the data into an unreadable format, known only to the specific server and the client’s browser, which can then decrypt the data. This protects the information from theft or tampering by hackers.
- Authentication and trust: SSL certificates also authenticate the identity of a website, which assures website users that they are not on a bogus site. SSL certificates are issued by Certificate Authorities (CAs), trusted entities that validate the identity and legitimacy of any organization requesting a certificate.
- HTTPS: Websites with an SSL certificate can use HTTPS (the secure version of HTTP) in their URLs, which indicates they are secure. In most web browsers, a site with an SSL certificate will display a padlock icon in the address bar, signifying that the connection is secure.
Overall, SSL certificates are an essential security tool for any website that handles sensitive data. They help to protect the integrity and confidentiality of data as it travels across the internet. To learn more about SSL certificates you can read this article.
Does installing an SSL certificate cost extra?
The cost of installing an SSL certificate can vary depending on several factors:
- Type of SSL certificate: There are different types of SSL certificates, such as Domain Validated (DV), Organization Validated (OV), and Extended Validation (EV) certificates. DV certificates are typically the least expensive, while EV certificates are the most expensive due to the thorough validation process required before issuance.
- Certificate Authority (CA): The prices can also vary depending on the Certificate Authority you choose. Some well-known CAs might charge more for their certificates due to the brand recognition and the trust they carry.
- Free options: There are also free options available, like Let’s Encrypt, which offers free SSL certificates as part of a drive to encourage a more secure internet. These certificates are generally DV certificates and are suitable for many standard websites.
- Web hosting provider: Many web hosting providers now include a free SSL certificate as part of their hosting packages. This is becoming a standard practice, especially with managed WordPress hosting providers. However, for EV certificates or certain specific needs, you might still need to purchase a certificate.
- Installation fees: Some hosting providers might charge a fee to install an SSL certificate, especially if you’re installing a third-party certificate not provided by the host itself. This varies by provider.
It’s essential to consider your website’s specific needs when choosing an SSL certificate. If you’re handling a lot of sensitive transactions, investing in a paid SSL certificate from a reputable CA could be worthwhile. For personal blogs or small websites not handling sensitive data, a free SSL certificate from services like Let’s Encrypt might be entirely adequate.
Simplify WordPress with 10Web
Automate manual work with 10Web Managed WordPress Hosting and 10Web AI Website Builder. Optimize your WordPress website effortlessly.
Why do you need to learn how to install an SSL certificate?
Learning how to install an SSL certificate on WordPress is important for several reasons, especially if you manage or develop websites:
- Security: An SSL certificate encrypts the data exchanged between a user’s browser and your website, making it difficult for hackers to intercept or tamper with information. This is crucial for protecting sensitive data like login credentials, personal information, and payment details.
- Trust and credibility: Websites with SSL certificates display a padlock icon in the address bar, which is a visual indicator of security that builds trust with users. Websites that use HTTPS also tend to be ranked higher by search engines like Google, which can improve your site’s visibility and traffic.
- Compliance: Certain regulations, such as the Payment Card Industry Data Security Standard (PCI DSS), require websites that handle credit card information to use SSL/TLS encryption. Failing to comply can result in penalties and lost business.
- Technical skills: Understanding how to install an SSL certificate on WordPress enhances your technical skill set, which is beneficial if you manage multiple websites or work in web development or IT support. This knowledge can save costs and dependency on external vendors for installation and troubleshooting.
- Avoiding downtime and errors: Incorrect installation of an SSL certificate can lead to errors and warnings in browsers, which may deter users from visiting your site. Learning how to properly install and configure an SSL certificate ensures that your website remains accessible and error-free.
Overall, knowing how to install an SSL certificate on WordPress is a valuable skill that contributes to the security, compliance, and user confidence of your websites.
What do you need before installing SSL certificate
Before installing an SSL certificate, there are several preparatory steps you should take to ensure the process goes smoothly. Here are the key steps:
1. Check whether your website already has an SSL certificate
Before proceeding with a new installation, you should check if your website already has an SSL certificate installed. This can be done by accessing your website with https:// in front of your domain name. If the browser shows a padlock icon next to the URL, your site already has SSL. You can also use tools like SSL Labs’ SSL Test to check the details of any existing certificate.
2. Backup your website
It’s crucial to back up your entire website before making changes like installing an SSL certificate. This ensures that you can restore your site to its previous state if anything goes wrong during the installation process. Backup all files, databases, and configuration settings. Most hosting providers offer tools to facilitate this process, or you can use plugins if you’re using a content management system like WordPress.
3. Purchase or obtain an SSL certificate
Depending on your needs, you may choose a free SSL certificate from providers like Let’s Encrypt or purchase one from a Certificate Authority. The right choice depends on your specific requirements, such as the level of validation needed and the trust assurance you want to provide to users.
4. Have access to your hosting control panel
You will need access to your web hosting control panel (e.g., cPanel, Plesk) to install the SSL certificate. This is where you can manage server settings and typically where you can install the certificate.
5. Check server configuration
Ensure that your hosting environment is configured to support SSL/TLS. This includes having a unique IP address, although this requirement has become less common due to the widespread adoption of Server Name Indication (SNI).
6. Generate a CSR (Certificate Signing Request)
Before installing an SSL certificate, you must generate a CSR on your web server. This request contains details about your website and company, such as the domain name, company name, locality, and country. It’s used by the Certificate Authority to create the SSL certificate.
7. Prepare for configuration changes
Depending on your server setup, you might need to adjust some configuration settings to ensure that all content is served over HTTPS. This can involve configuring redirects from HTTP to HTTPS, updating hard-coded links in your website’s content, and ensuring external resources like scripts and images are loaded over HTTPS.
By following these steps, you can prepare for a smooth and secure SSL certificate installation, enhancing your website’s security and credibility.
Simplify WordPress with 10Web
Automate manual work with 10Web Managed WordPress Hosting and 10Web AI Website Builder. Optimize your WordPress website effortlessly.
Install SSL certificate in WordPress using plugins
Installing an SSL certificate in WordPress can be straightforward, especially if you use plugins designed to help with SSL configuration and ensure your entire site uses HTTPS. Here’s how you can do it using two popular plugins: Really Simple SSL and WP Force SSL.
Method 1: Using Really Simple SSL
Really Simple SSL automatically detects your settings and configures your website to run over https. It’s very user-friendly and handles most of the technical aspects with minimal user input.
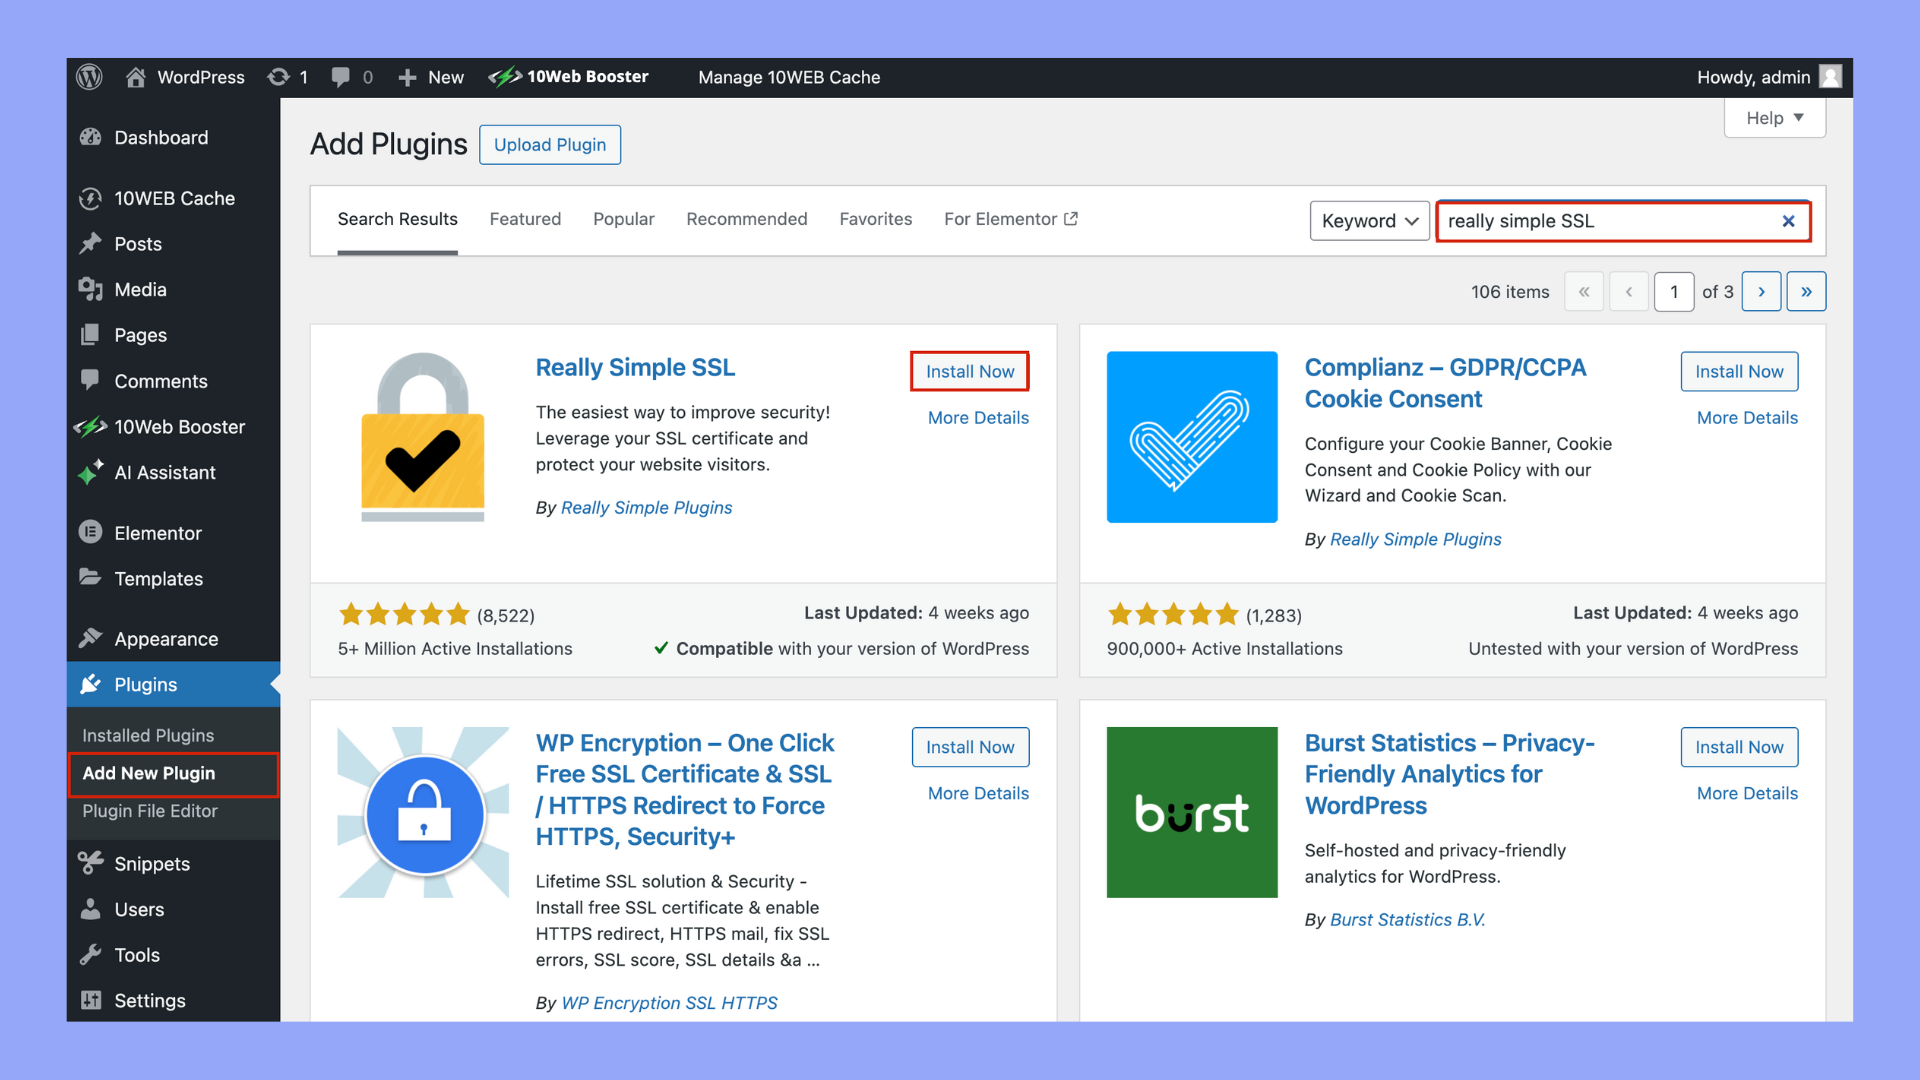
Step 1: Install the plugin
- Go to your WordPress dashboard.
- Navigate to Plugins > Add New.

- Search for Really Simple SSL.
- Click Install Now and then Activate.

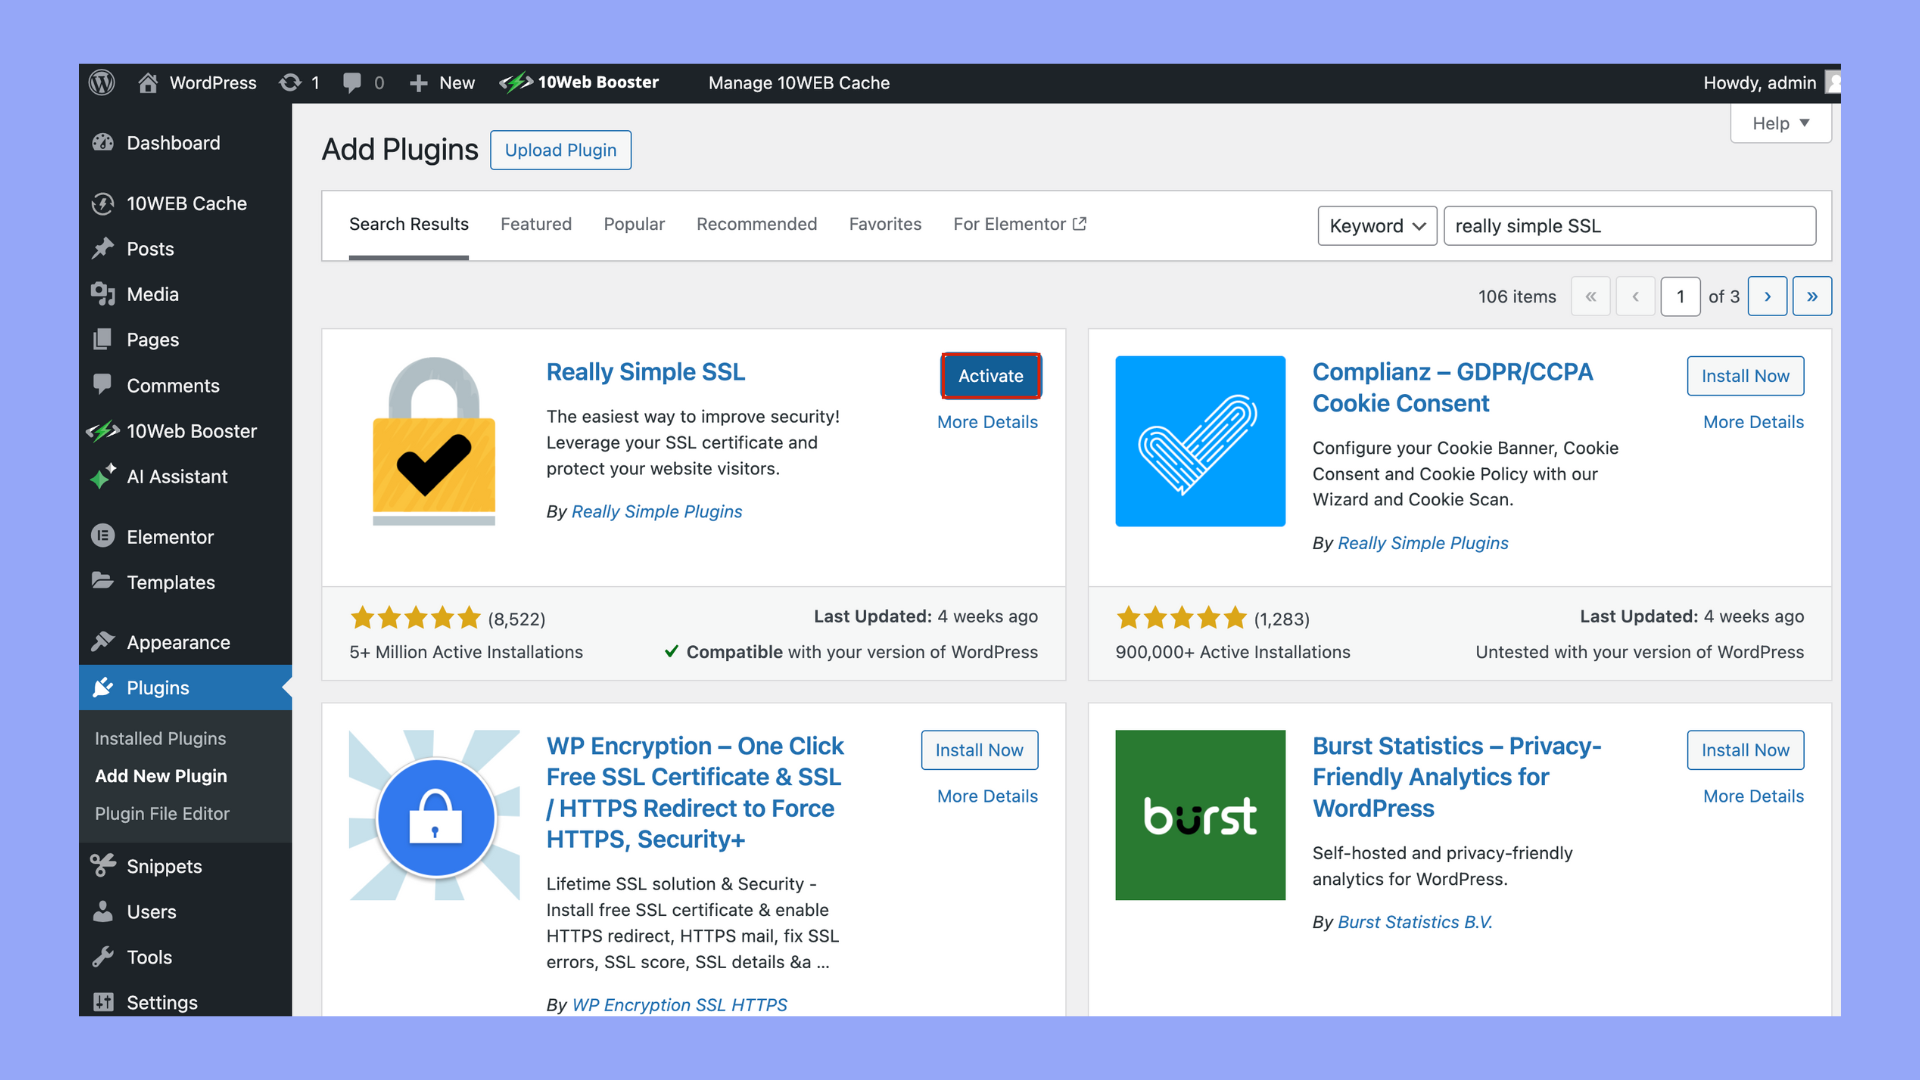
Step 2: Activate SSL
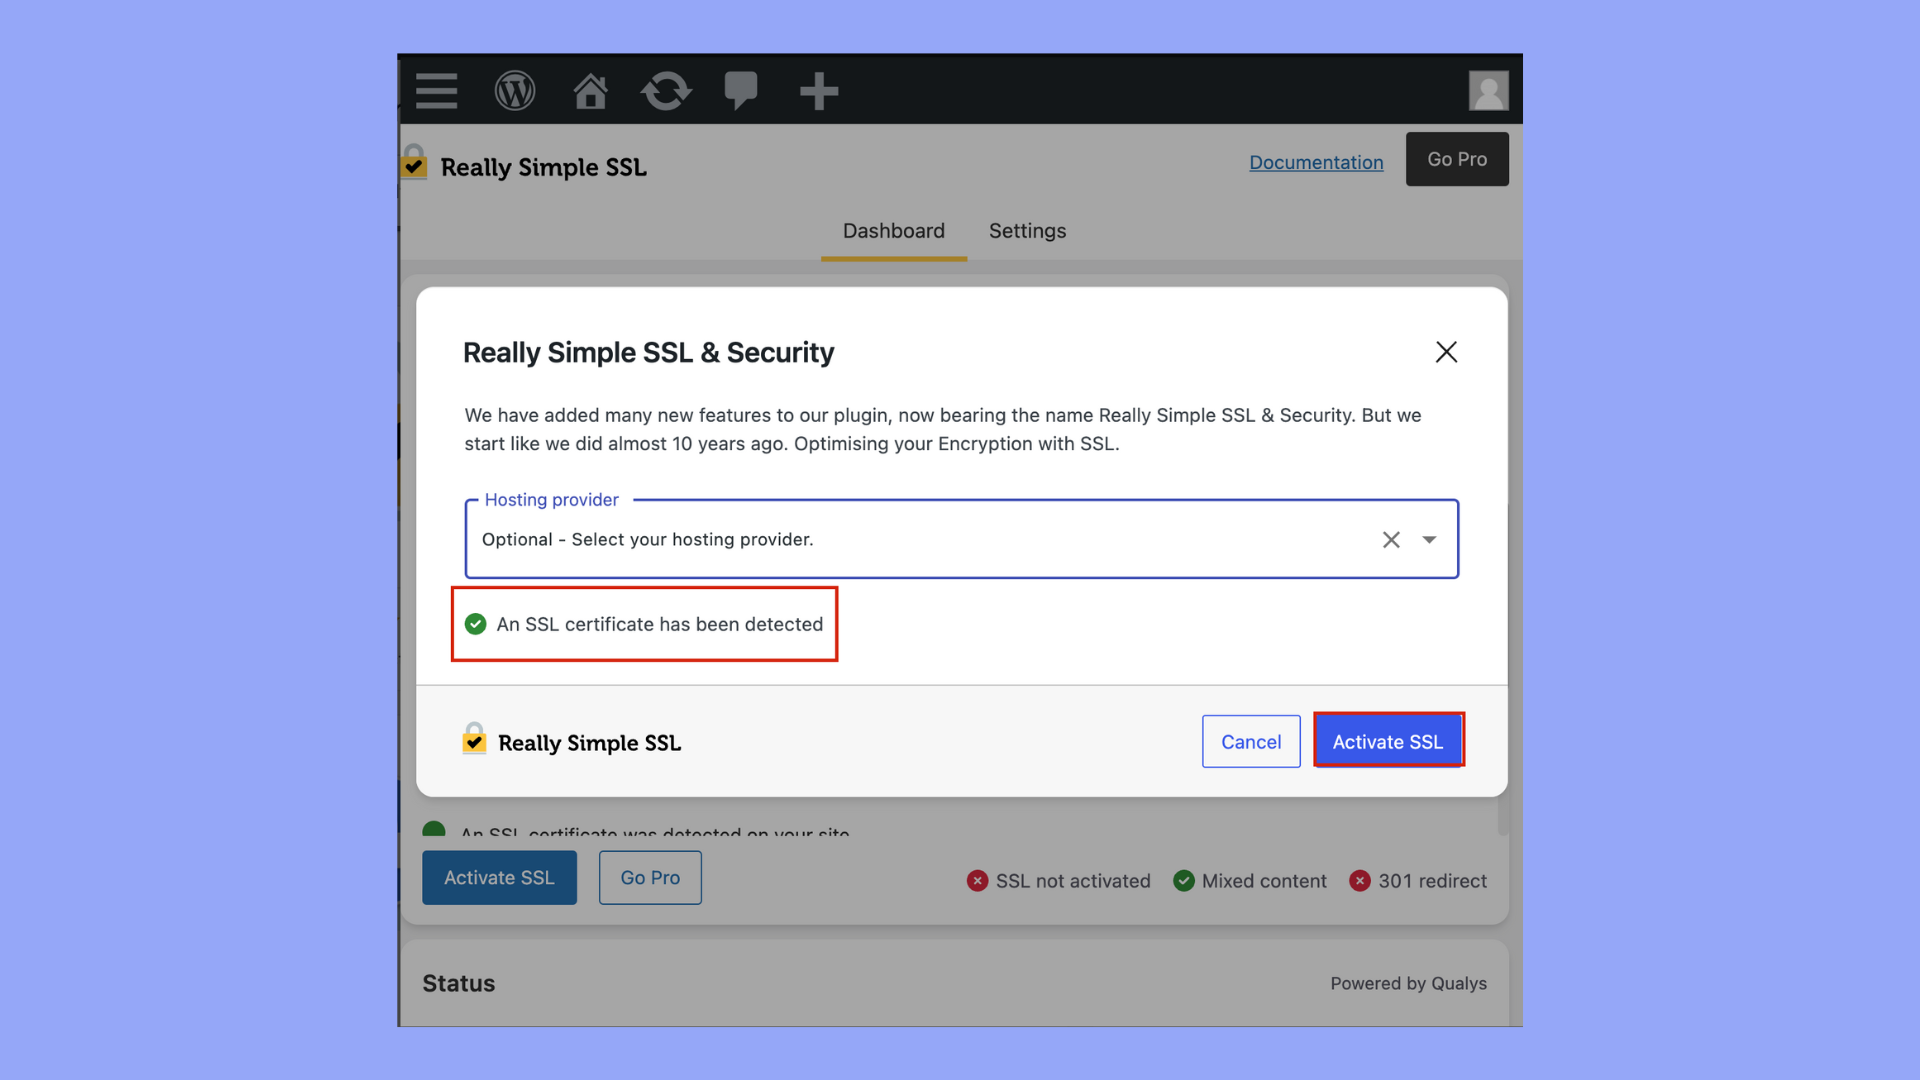
- Once activated, Really Simple SSL will check for an existing SSL certificate. If your server has one, the plugin will prompt you to activate SSL with a single click.
- Click on Go ahead, activate SSL! This will configure your website to start using HTTPS.
Step 3: Check your site
- The plugin should handle everything including setting up redirects from HTTP to HTTPS and fixing content URLs to ensure they use HTTPS.
- Browse your site to check for any mixed content warnings or errors.
Method 2: Using WP Force SSL
WP Force SSL helps you redirect HTTP traffic to HTTPS without touching any code and takes care of mixed content automatically.
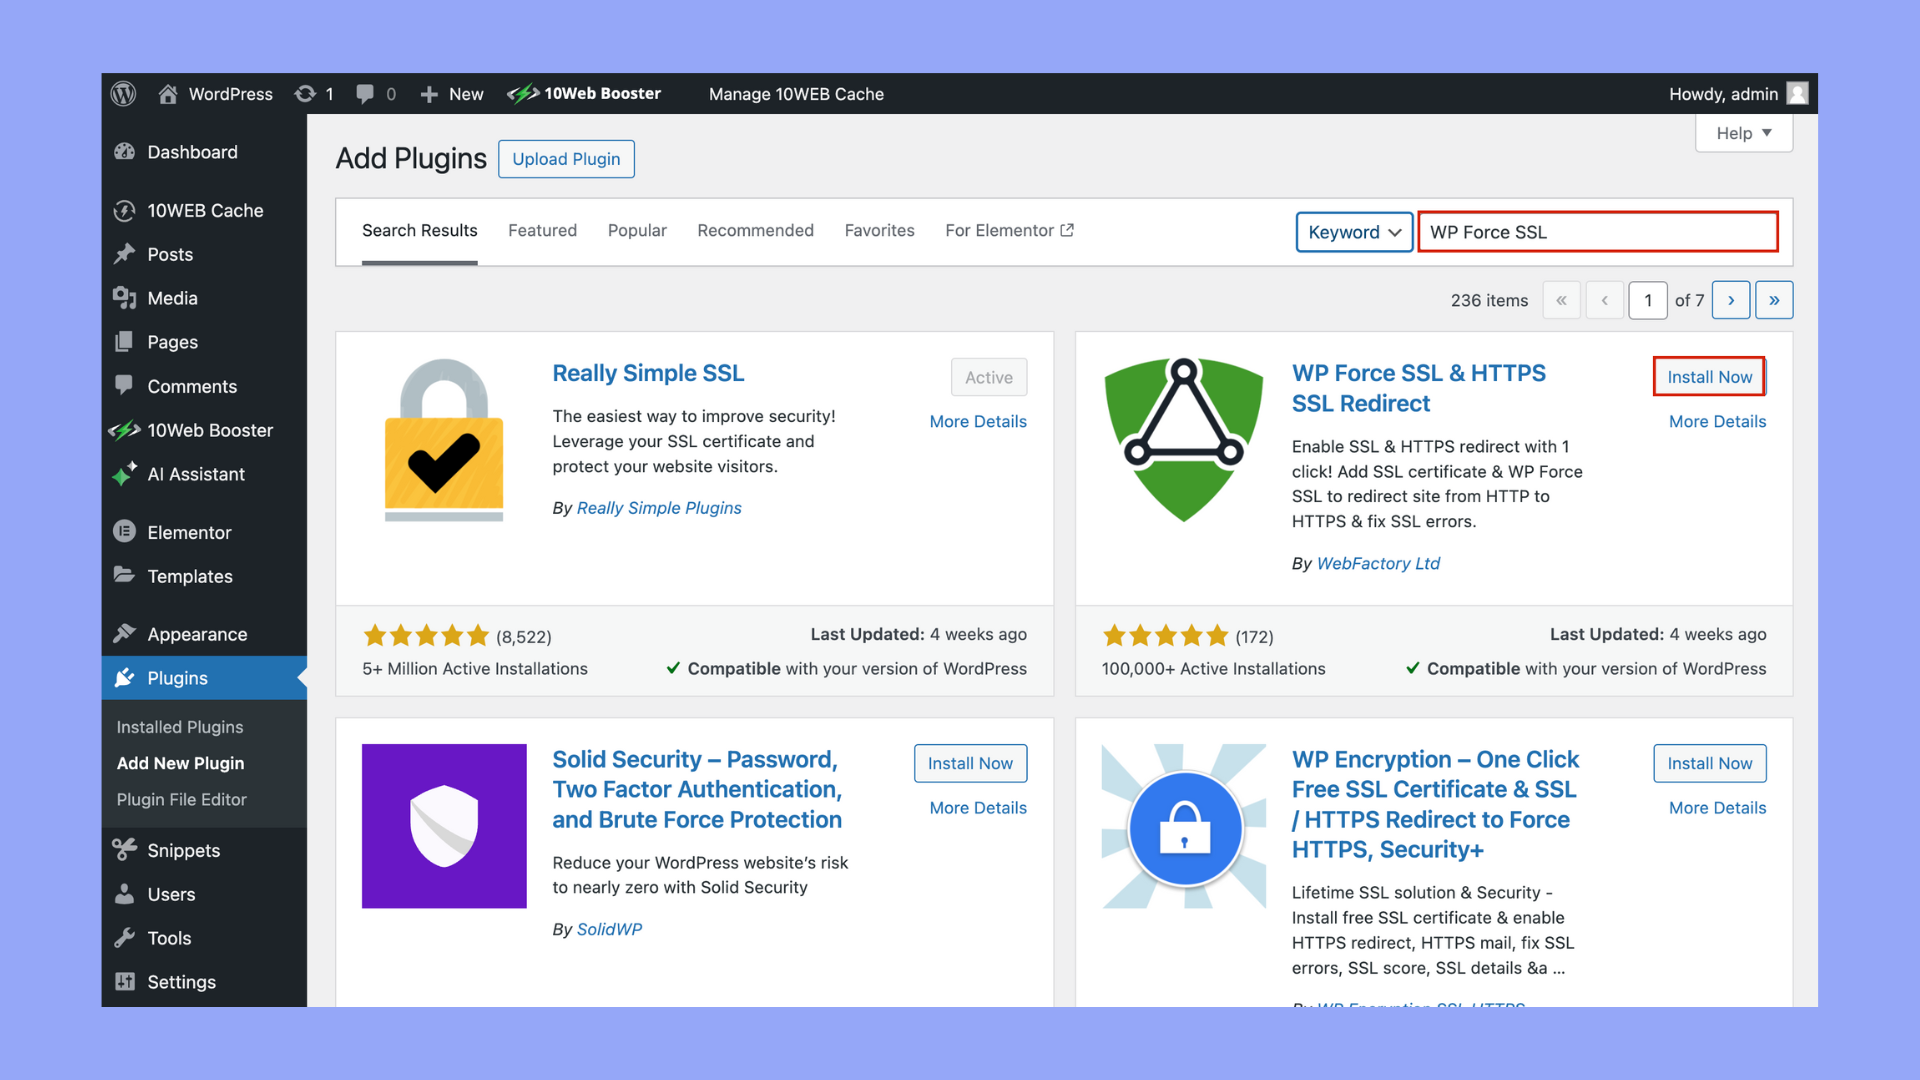
Step 1: Install the plugin:
- Go to Plugins > Add New in your WordPress dashboard.
- Search for WP Force SSL.
- Click Install Now and then Activate.
Step 2: Configure settings
- Once activated, you can access the plugin settings by navigating to Settings > WP Force SSL.
- The plugin offers a setup wizard that can help you check your SSL status and configure any necessary settings.
Step 3: Check and fix mixed content
- WP Force SSL can scan your site for mixed content issues, where some resources might not be loading over HTTPS.
- The plugin typically offers solutions or automatic fixes for these issues.
Post-Installation Tips
- Check for mixed content: Even with these plugins, it’s good to manually check for mixed content. You can use the browser’s developer tools (usually accessed via F12 or right-click > Inspect) to look for warnings in the console.
- Update Google Analytics and Search Console: If you use Google Analytics or have your site verified with Google Search Console, update the URL to use HTTPS. This ensures your traffic data remains accurate.
- Update other services: Don’t forget to update your URL to HTTPS in any other external services you use like social media profiles, email marketing tools, etc.
Using plugins makes the process of installing SSL and transitioning to HTTPS in WordPress much easier and less error-prone, ensuring your website is secure and trusted by visitors and search engines alike.
Install SSL certificate on WordPress using web host
Installing an SSL certificate on your WordPress site directly through your web hosting provider is often the easiest way. Many hosts, including 10Web, offer tools to simplify this process. Here’s how 10Web facilitates this essential security feature:
- Accessibility: 10Web provides free SSL certificates through LetsEncrypt for all websites hosted on their platform.
- Simple process: Users can easily generate an SSL certificate directly from the 10Web dashboard by navigating to the Hosting Services section, selecting SSL Certificates, and following a straightforward process to apply it to their domain.
- Comprehensive coverage: The SSL certificate is valid for the main domain and any associated subdomains, ensuring thorough security across the entire website.
- Cloudflare compatibility: There are also instructions for users who employ Cloudflare, enabling a seamless integration.
To install an SSL certificate on WordPress using 10Web:
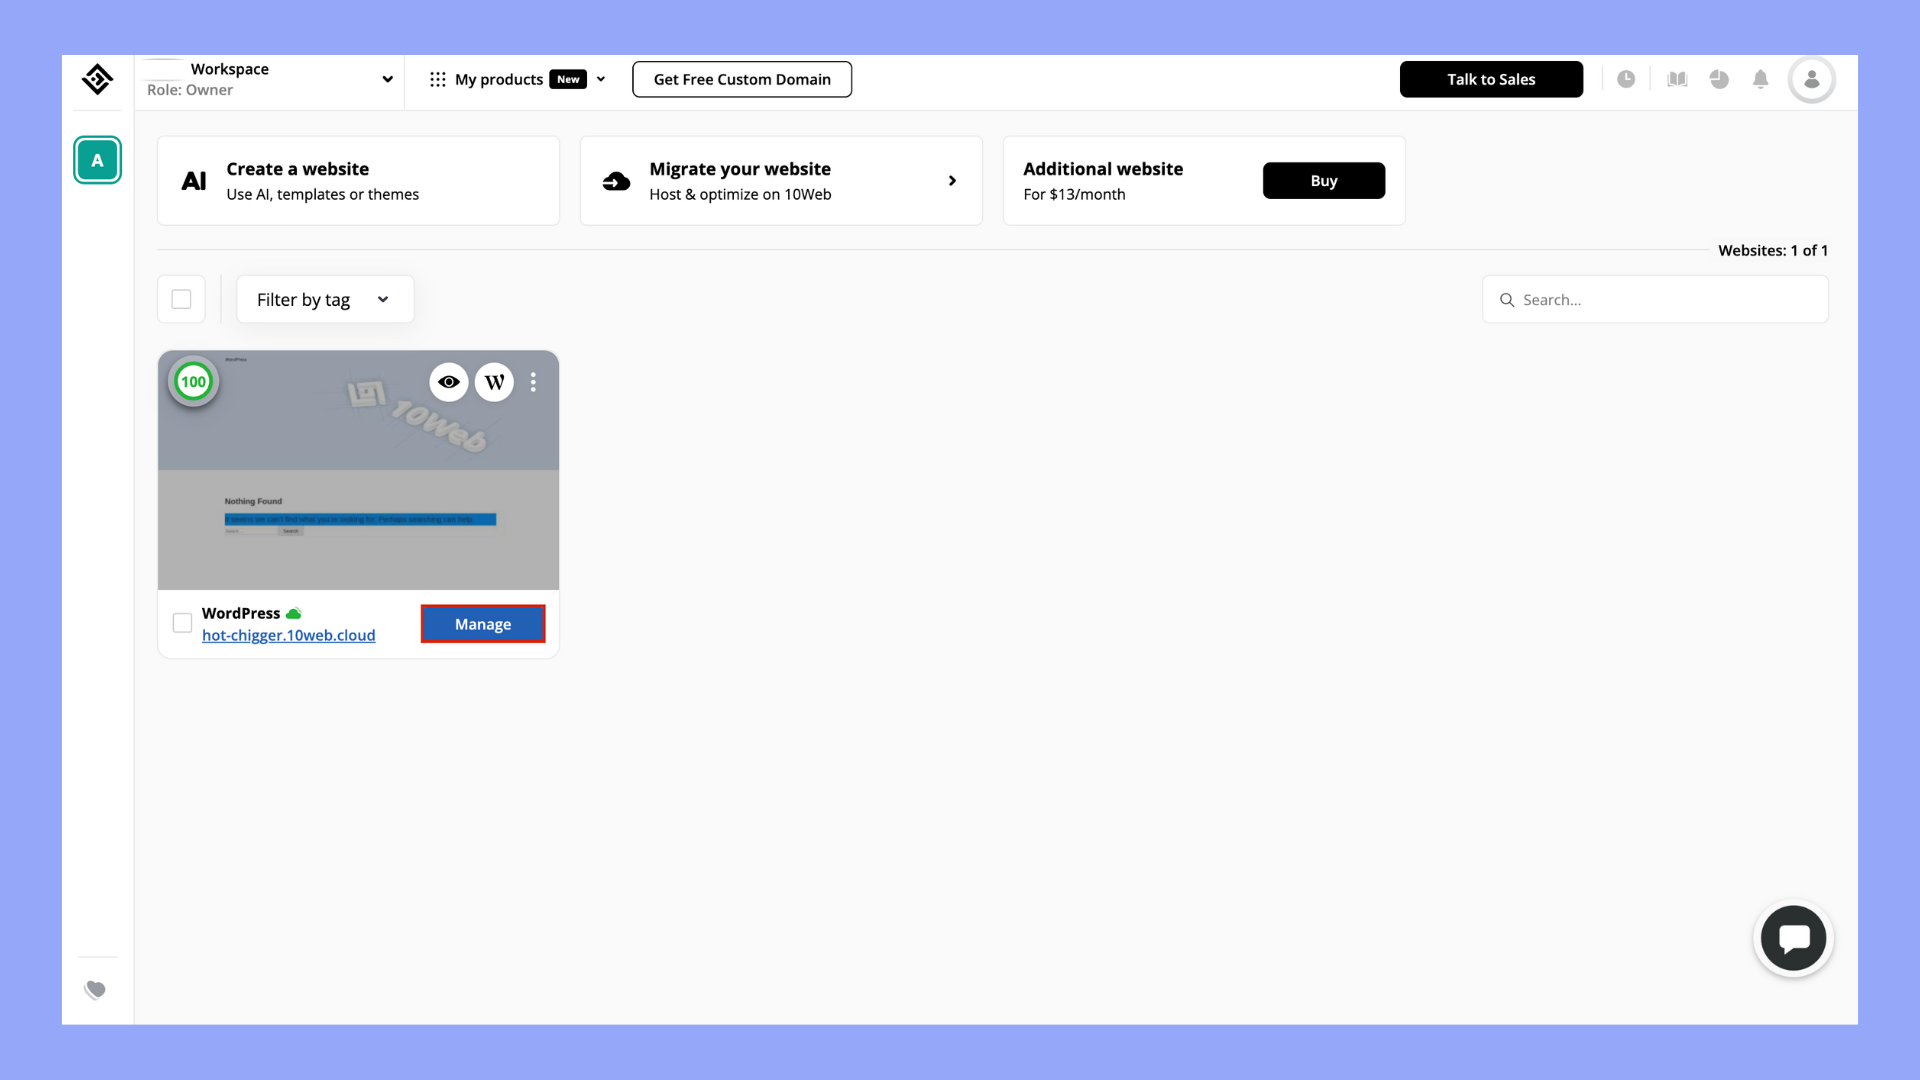
- Log into the 10Web dashboard and access your account where your WordPress site is hosted.
- Click Manage on the website you want to install an SSL certificate.
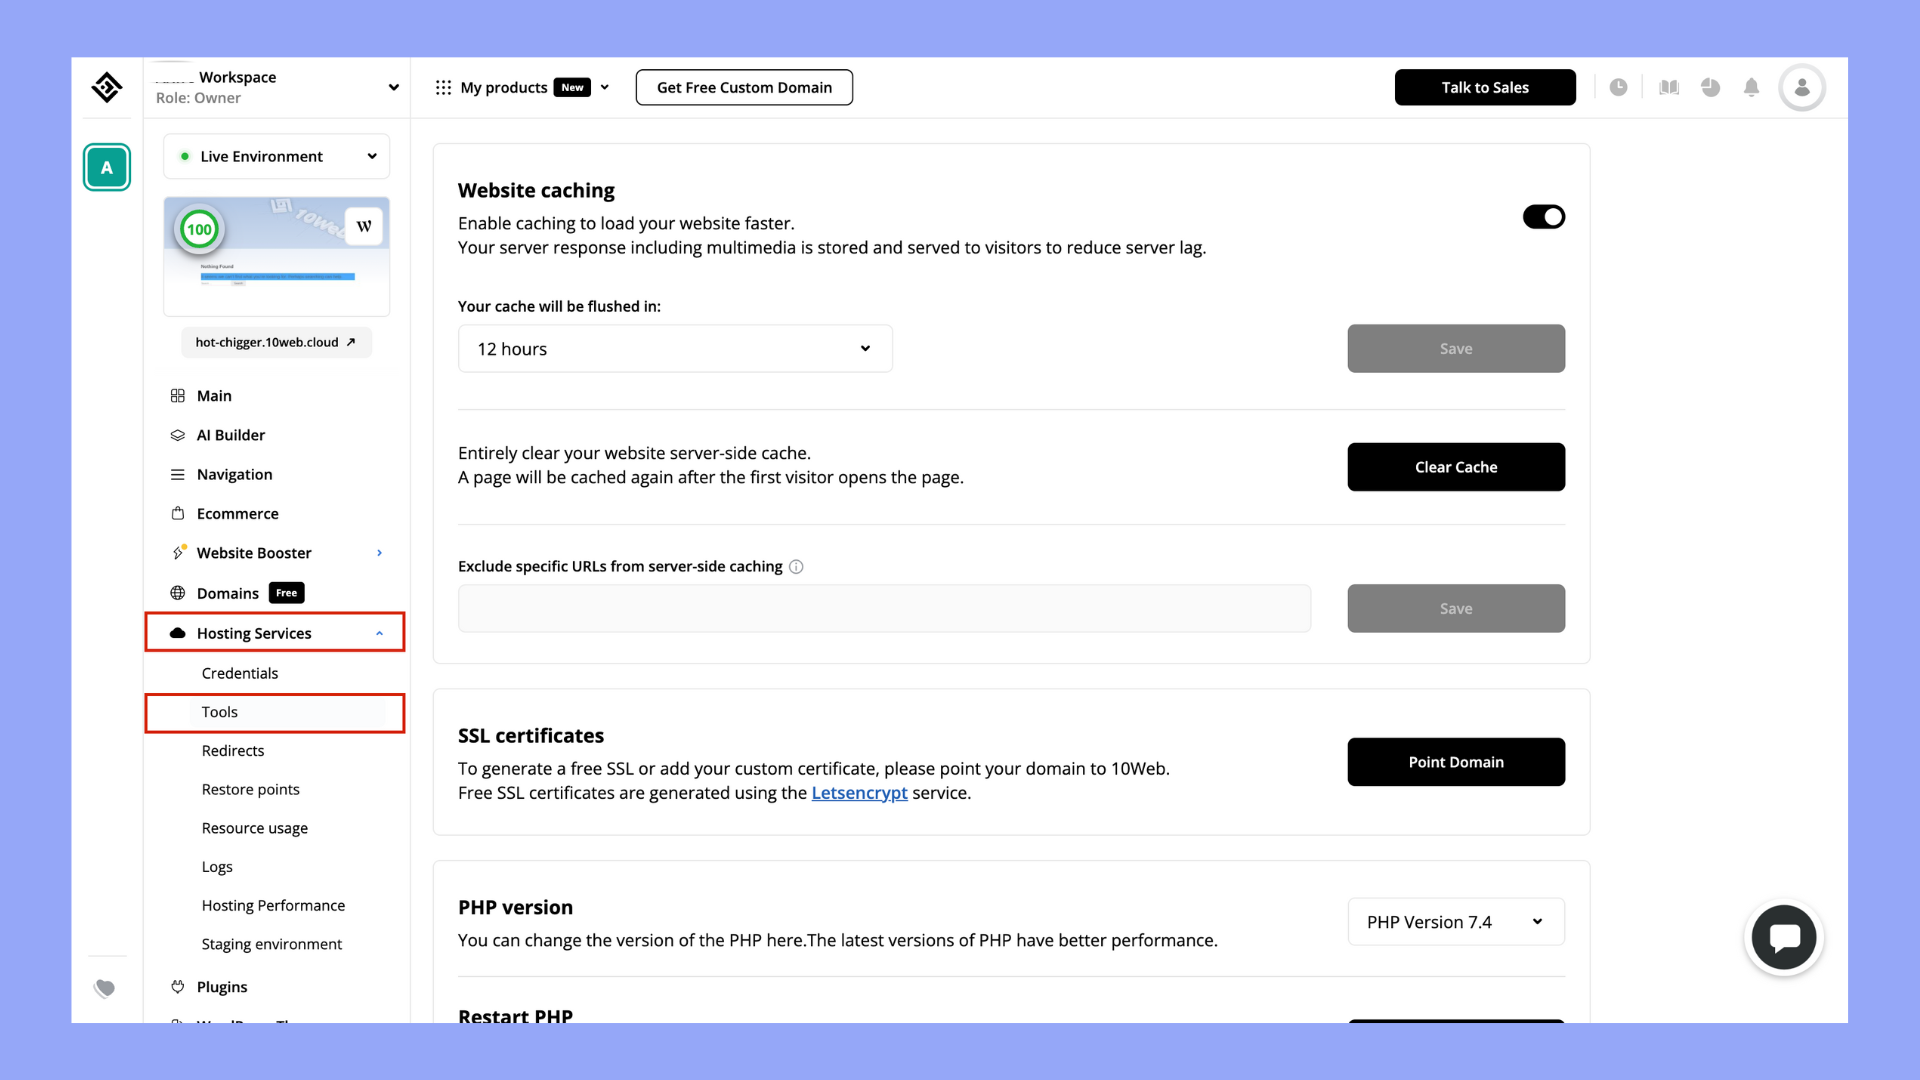
- Find and select the Hosting Services section.
- Choose the SSL Certificates option.
- Click on Generate next to your domain to initiate the SSL certificate creation.
- The SSL certificate will automatically install and activate for your domain and subdomains.
This streamlined process ensures that even those with minimal technical background can secure their WordPress site effectively with SSL.
Post-Installation Considerations
After installing the SSL certificate, ensure everything functions correctly:
- Verify that your website loads correctly over HTTPS and that the browser shows a padlock icon.
- Check for any mixed content issues, where links to images, scripts, or stylesheets are not loaded over HTTPS.
- Update any hard-coded URLs in your custom code or database from HTTP to HTTPS to prevent mixed content warnings.
Both Cloudways and SiteGround make it relatively simple to secure your WordPress site with SSL, enhancing both security and trustworthiness.
Simplify WordPress with 10Web
Automate manual work with 10Web Managed WordPress Hosting and 10Web AI Website Builder. Optimize your WordPress website effortlessly.
Install SSL certificate in WordPress manually
Installing an SSL certificate manually on a WordPress site involves several key steps, including generating a Certificate Signing Request (CSR), installing the certificate, and configuring WordPress to use HTTPS. Here’s a simple step-by-step guide:
- Obtain an SSL certificate: Purchase or acquire a free SSL certificate from a Certificate Authority (CA).
- Generate a CSR: Log into your hosting control panel, navigate to the SSL/TLS section, and generate a Certificate Signing Request (CSR).
- Submit CSR to CA: Send the generated CSR to your chosen CA to issue your SSL certificate.
- Install your SSL certificate: Once you receive your certificate from the CA, return to the SSL/TLS section in your control panel and install the certificate for your domain.
- Configure WordPress URLs: In the WordPress admin area, go to Settings > General and change the WordPress Address and Site Address to use https://.
- Set Up HTTPS redirects: Add HTTPS redirect rules to your .htaccess file to automatically redirect HTTP traffic to HTTPS.
- Test and verify: Use tools like SSL Labs’ SSL Test to check your SSL installation and ensure everything is configured correctly.
By following these steps, you will learn how to install an SSL certificate on WordPress manually, securing your website’s connections and ensuring data integrity and confidentiality.
What to do after installing SSL certificate in WordPress
After installing an SSL certificate on your WordPress site, there are several important steps you should take to ensure everything is running smoothly and securely. Here’s a checklist:
- Verify the installation: Check that the SSL certificate is installed correctly by visiting your site with https://. Look for the padlock icon in the address bar, which indicates that the site is secure.
- Update the site URL: If you haven’t already, update your WordPress Address and Site Address to https:// in your WordPress dashboard under Settings > General. This ensures that WordPress uses HTTPS for all site links.
- Set up HTTPS redirects: Configure your .htaccess file or NGINX server block to redirect all HTTP traffic to HTTPS. This ensures that users and search engines are directed to the secure version of your site.
- Update hard-coded links: If you have any hard-coded links in your themes or plugins that use http://, update them to https:// to prevent security warnings.
- Update CDN and external resources: If you use a Content Delivery Network (CDN) or external resources, make sure they are compatible with HTTPS and update their URLs accordingly.
- Update Google Analytics and Search Console: Change your website’s URL to https:// in Google Analytics and Google Search Console. This helps maintain accurate data tracking and SEO rankings.
- Inform your users: Consider informing your users about the security update, especially if you collect sensitive data. This can enhance trust and reassure your visitors.
- Monitor site performance: Check your site’s performance and functionality to ensure that the SSL implementation has not affected the loading times or user experience negatively.
- Renew your SSL certificate: Keep track of your SSL certificate’s expiration date and set up reminders to renew it before it expires to avoid any lapse in your site’s security.
By following these steps, you ensure not only the security of your WordPress site but also maintain SEO rankings and user trust.
Simplify WordPress with 10Web
Automate manual work with 10Web Managed WordPress Hosting and 10Web AI Website Builder. Optimize your WordPress website effortlessly.
Conclusion
In conclusion, mastering how to install an SSL certificate on WordPress is a vital step for enhancing your website’s security and trustworthiness. By following the steps outlined in this article, you can ensure that your site is not only protected against common security threats but also well-positioned to improve its standing with both search engines and users. As you continue to maintain and update your WordPress site, remember that the security measures you implement are crucial for safeguarding your online presence and enhancing user experience.
Simplify WordPress with 10Web
Simplify WordPress with 10Web
Skip and automate manual work with 10Web Managed WordPress Hosting and the 10Web AI Website Builder.