When you’re navigating the web and suddenly hit a dead end with the message “HTTP Error 404 – The Requested Resource Is Not Found,” it’s more than just a minor problem; it’s a sign that the web’s intricate map has a missing piece. This error occurs when the server can’t find the specific resource (like a web page, image, or file) that was requested. Essentially, it’s the internet’s way of telling you that the address you punched in or clicked on points to a ghost town.
Understanding why a 404 error pops up is crucial to diagnosing and fixing the problem, whether you’re a website owner, developer, or just a curious user. The root of the issue can lie in various places: the URL might have been typed incorrectly, the page could have been moved or deleted, or there might be a problem with the server where the resource is supposed to live. To get to the bottom of a 404 error, one needs to grasp how web addresses work and how websites are structured and hosted.

Variations of the issue
The 404 error can manifest in several ways, depending on the website, browser, or device you’re using. Here are some common variations you might encounter:
- HTTP 404 Not Found
- 404 Error
- Error 404
- The page cannot be found
- The requested URL was not found on this server
- HTTP 404 Not Found
- 404 Page Not Found
- Error 404 Not Found
- 404 File or Directory Not Found
- Webpage cannot be found
Each of these messages essentially means the same thing: the resource you’re looking for can’t be found. However, the wording might vary slightly from one website or server to another.
Reasons why this error occurs
Several reasons can lead to a 404 error, each with its own set of intricacies:
Incorrect URL: The most common cause is simply that the URL (the web address) was typed incorrectly. A missing letter, a misplaced dash, or any small typo can send you to a 404 page.
Moved or deleted content: If a website undergoes a redesign or updates its content, pages might be moved to new locations or removed altogether. Without proper redirection, this leads to 404 errors.
Broken links: Sometimes, links on websites point to pages that have been moved or deleted. Clicking these links will result in a 404 error.
Domain name issues: If the domain name isn’t correctly pointing to the website’s server or if there’s a problem with the DNS settings, it can cause a 404 error.
Server problems: On rare occasions, server issues can also lead to a 404 error. If the server is configured improperly or is unable to handle requests correctly, it might fail to serve the requested page even if it exists.
Say goodbye to website errors
Achieve peace of mind with 99.99% uptime on 10Web Managed
WordPress Hosting, powered by Google Cloud.
Fixing the HTTP Error 404 The Requested Resource Is Not Found in XAMPP
Having familiarized yourself with this XAMPP error, let’s take a look at some ways to resolve it.
Check the URL
The most common and easily overlooked cause of a 404 error is simply mistyping the URL. A single misplaced character, unnecessary subdirectory, or misspelled word in your URL can lead to this error. Since XAMPP serves your projects locally, ensuring the URL matches your directory structure exactly is crucial.
- Make sure you’ve entered the correct address in your browser. Compare the URL to your project’s directory structure in XAMPP’s `htdocs` folder. The URL should correspond to the folder and file names exactly.
- Do not include “XAMPP” or other unrelated terms in your URL. If your project is located in `C:\xampp\htdocs\myproject\index.php`, the correct URL would typically be `http://localhost/myproject/index.php`.
- On some systems, URLs are case-sensitive. Ensure that the case of the letters in your URL matches that of the actual files and folders.
If after this step, you’re still staring down a 404 error, it’s time to dive a bit deeper into potential causes and their solutions.
Analyze your .htaccess file
The `.htaccess` file plays a crucial role in how Apache serves files from its root directory. Among other things, it can rewrite URLs, redirect requests, and control access. The `.htaccess` file directs the server on how to handle certain types of requests. For WordPress, it ensures that the URL structure is correctly interpreted, directing all requests through `index.php` unless the requested file or directory exists. This process is vital for the server to serve the correct content and not return a 404 error for dynamically generated URLs.
This file should be in the `htdocs` folder where your project is stored. If you’re using WordPress, it’s essential for handling permalinks and redirects. If the file is not present, creating one may resolve your 404 error. The content of the `.htaccess` file can vary based on your site’s needs but starting with the default WordPress structure is a good baseline.
Finding or creating the .htaccess file
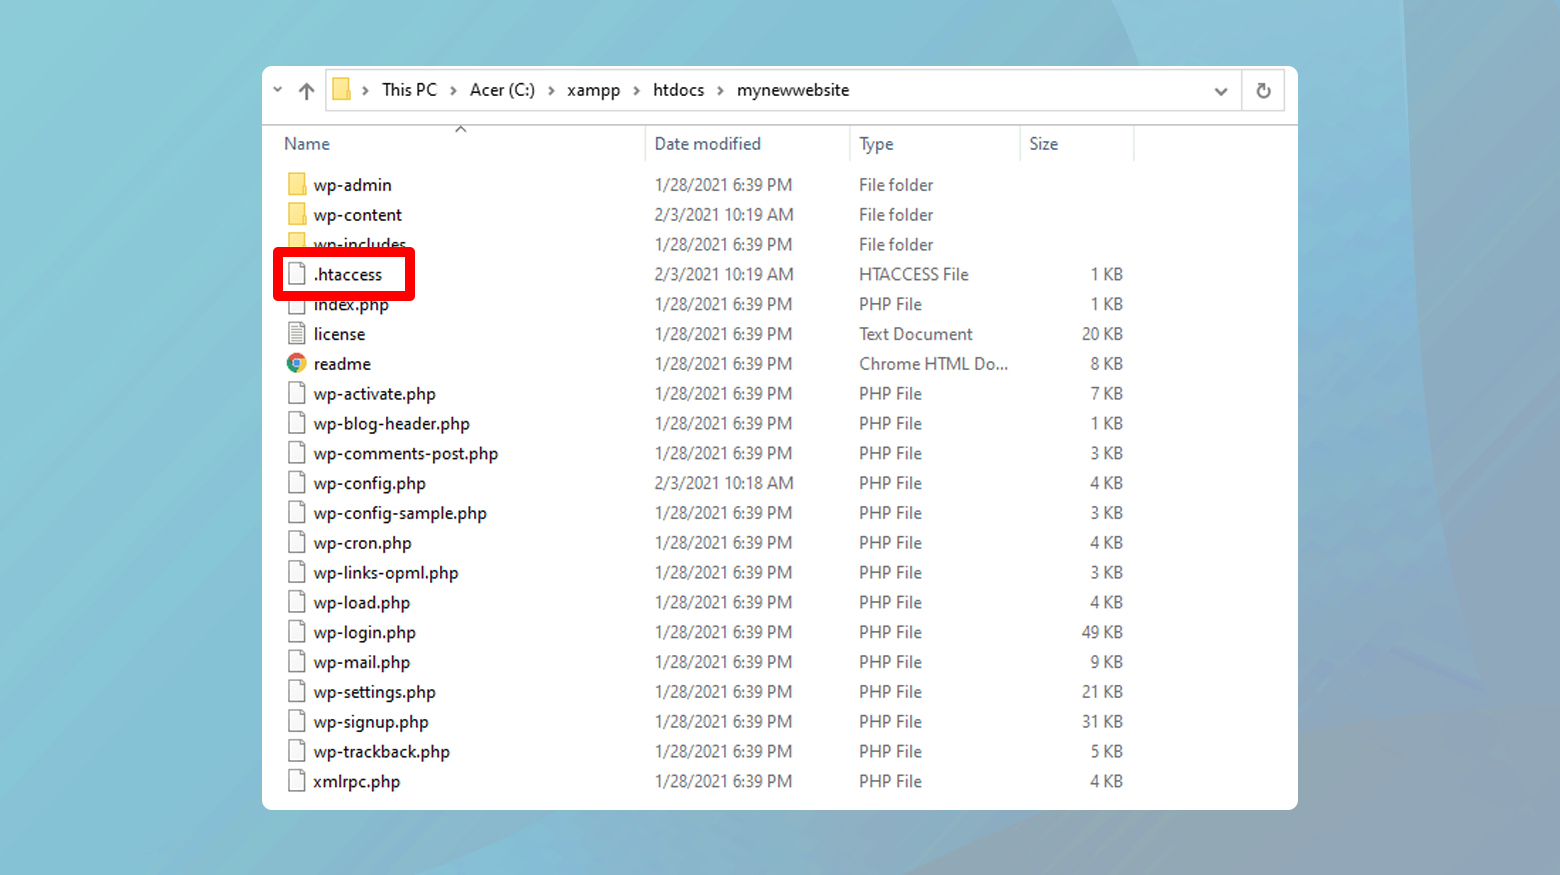
- Navigate to the XAMPP root directory, then to `htdocs`, and locate your project folder.
- If you’re on macOS, go through Applications > XAMPP > xamppfiles > htdocs.
- Look for the `.htaccess` file. If it’s not there, you’ll need to create one.
Creating a new .htaccess file (if needed)
-
- Open a text editor of your choice.
- Copy the provided code block into the new file. This is a standard setup for WordPress but adjust according to your specific requirements:
 # BEGIN WordPress
 RewriteEngine On
 RewriteRule .* - [E=HTTP_AUTHORIZATION:%{HTTP:Authorization}]
 RewriteBase /
 RewriteRule ^index.php$ - [L]
 RewriteCond %{REQUEST_FILENAME} !-f
 RewriteCond %{REQUEST_FILENAME} !-d
 RewriteRule . /index.php [L]
 # END WordPress
- Save the file as `.htaccess` in the root directory of your project within `htdocs`.
Replace an existing .htaccess file (if applicable)
If you suspect the existing `.htaccess` file might be corrupted or improperly configured, replace it with a new one following the steps above. Sometimes, a fresh start is all it takes.
Deactivate and remove recently added plugins.
Plugins extend the functionality of your website, but they can also be the source of unexpected issues, including the dreaded 404 error. This can happen if a plugin modifies your site’s .htaccess file, interferes with permalink settings, or makes other changes that disrupt the normal functioning of your site. Identifying and removing the problematic plugin can quickly resolve these issues.
Deactivating and uninstalling plugins can reverse changes they’ve made to your site’s configuration, including any unintended alterations to the .htaccess file or database entries that might be causing the 404 error.
How to deactivate plugins via the WordPress dashboard
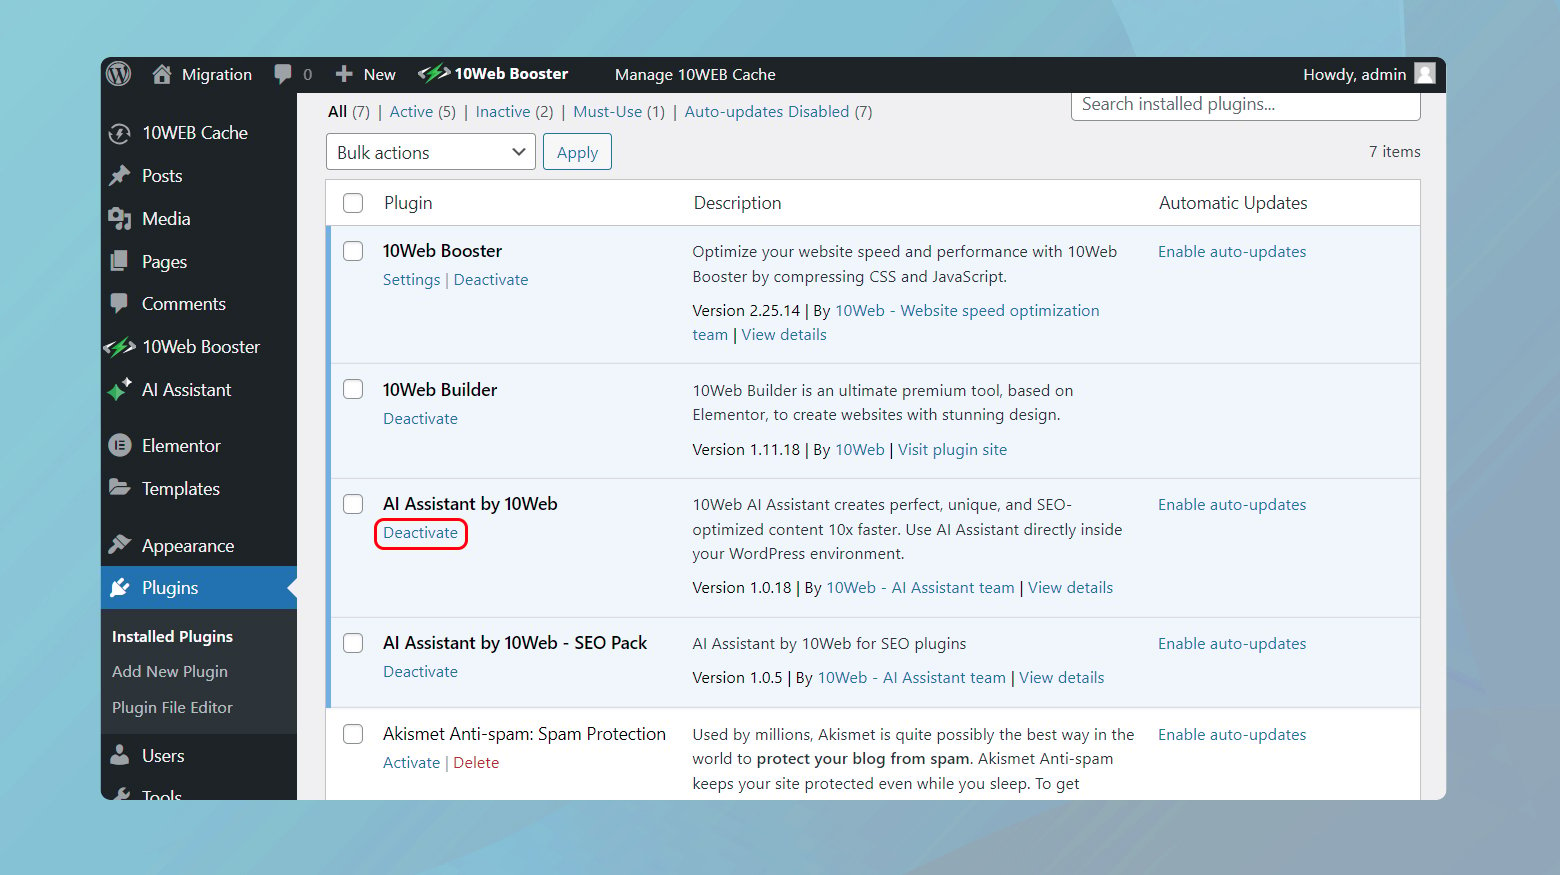
- Log in to your WordPress admin dashboard.
- Navigate to Plugins > Installed Plugins from the menu on the left.
- Find the plugin you suspect might be causing the issue. Click on the “Deactivate” link located under the name of the plugin.
To perform a bulk deactivation:
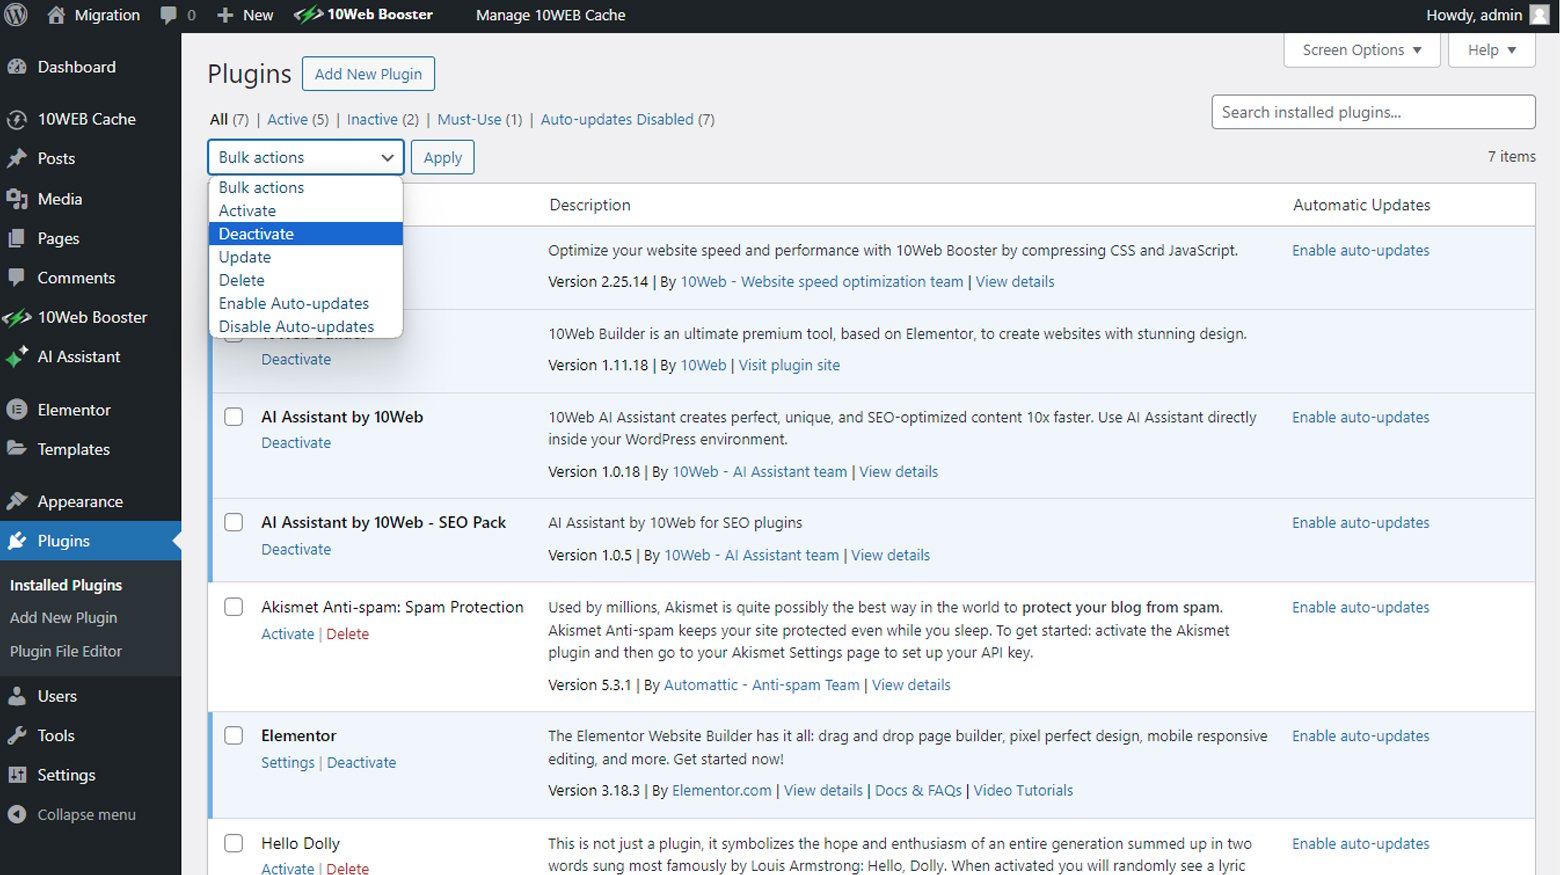
- In the Plugins page click the checkbox next to Plugin to select all plugins.
- Click on the bulk actions dropdown menu and choose Deactivate.
After deactivating, check your site to see if the 404 error persists. If it’s resolved, you’ve found the problematic plugin.
Uninstalling plugins
- After deactivating the plugin, a “Delete” link will appear below the plugin’s name. Click this link to completely remove the plugin from your site.
- Confirm the deletion. WordPress will then remove the plugin files from your site.
Deactivate plugins via FTP
If you’re unable to access your WordPress admin dashboard, or if you prefer a quicker method to deactivate all plugins at once, you can do so by renaming the plugins folder.
- Access your site’s files through an FTP client or your hosting file manager.
- Navigate to the `wp-content` folder.
- Rename the `plugins` folder to something like `plugins_old`. This will deactivate all plugins at once.
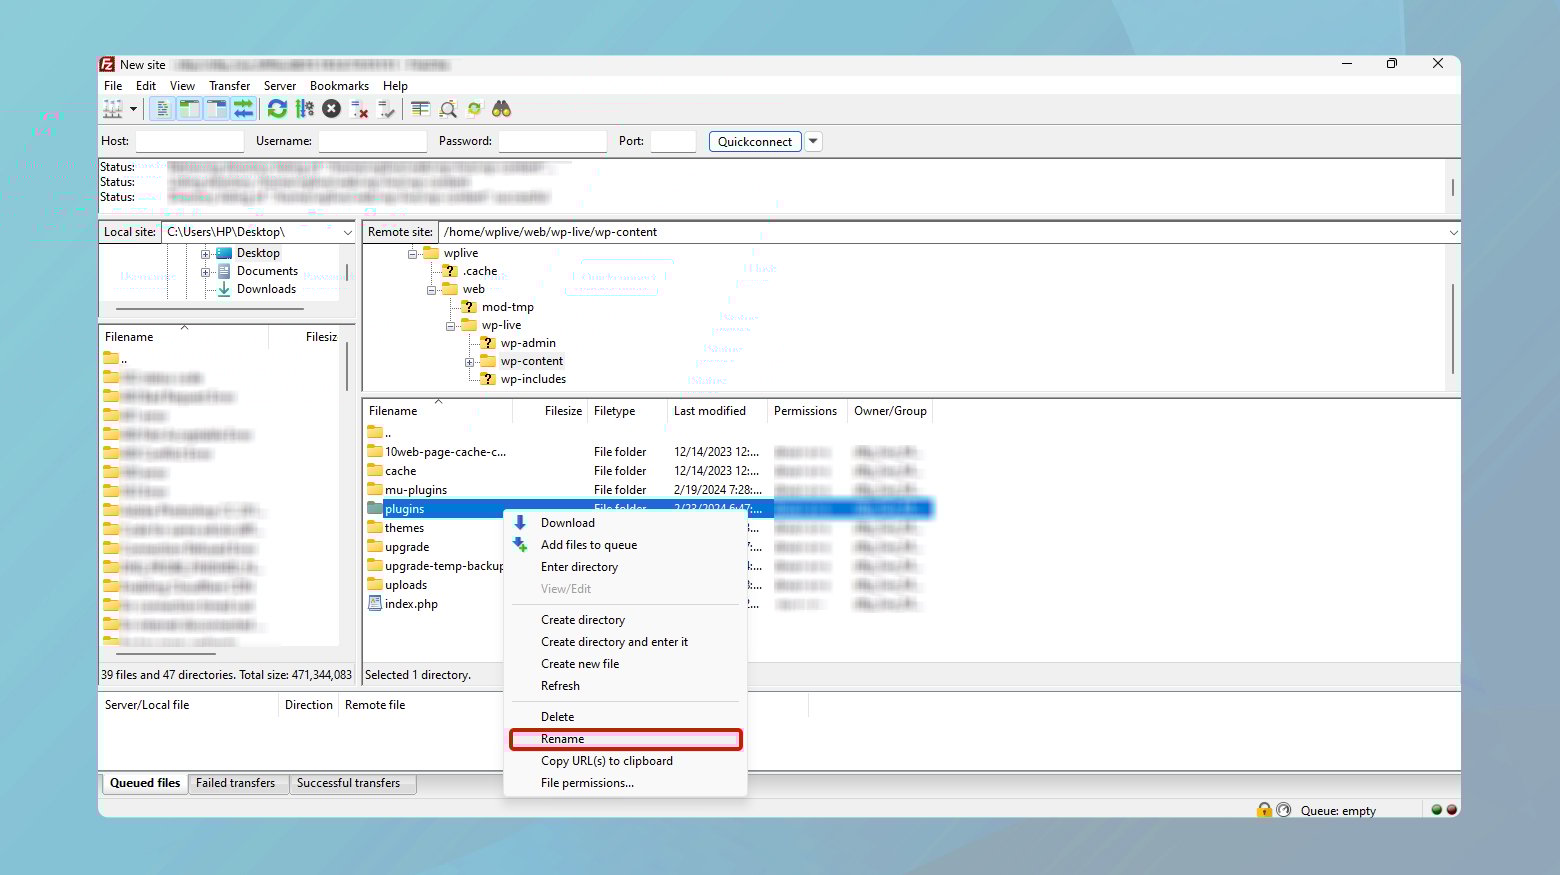
Try accessing your site again. If the error is resolved, one of the plugins was the cause. You can then rename the folder back to `plugins` and activate each plugin one by one in the dashboard to identify the problematic one.
By methodically testing each plugin, you ensure that you’re not accidentally removing or disabling a plugin that’s vital to your site’s functionality.
Check for changes in your database
Plugins not only interact with your site’s files but can also make significant modifications to your database. These changes might persist even after a plugin is uninstalled, potentially leading to issues like the 404 error. Checking your database allows you to identify and rectify these remnants, ensuring your site’s smooth operation.
Accessing your database via phpMyAdmin
Access your database via phpMyAdmin. This tool provides a user-friendly interface for managing your MySQL databases. It’s an essential step for reviewing your database’s structure and content without needing to use command-line SQL queries.
Review and modify database tables. Specifically, look for tables added by plugins or changes within key tables like `wp_options`, which could be causing issues.
- Go to the phpMyAdmin dashboard.
- Enter your credentials to log in.
- Click on the “Databases” tab at the top of the phpMyAdmin screen.
- Find and click on your WordPress site’s database from the list. The default WordPress tables should appear, such as `wp_posts`, `wp_options`, etc.
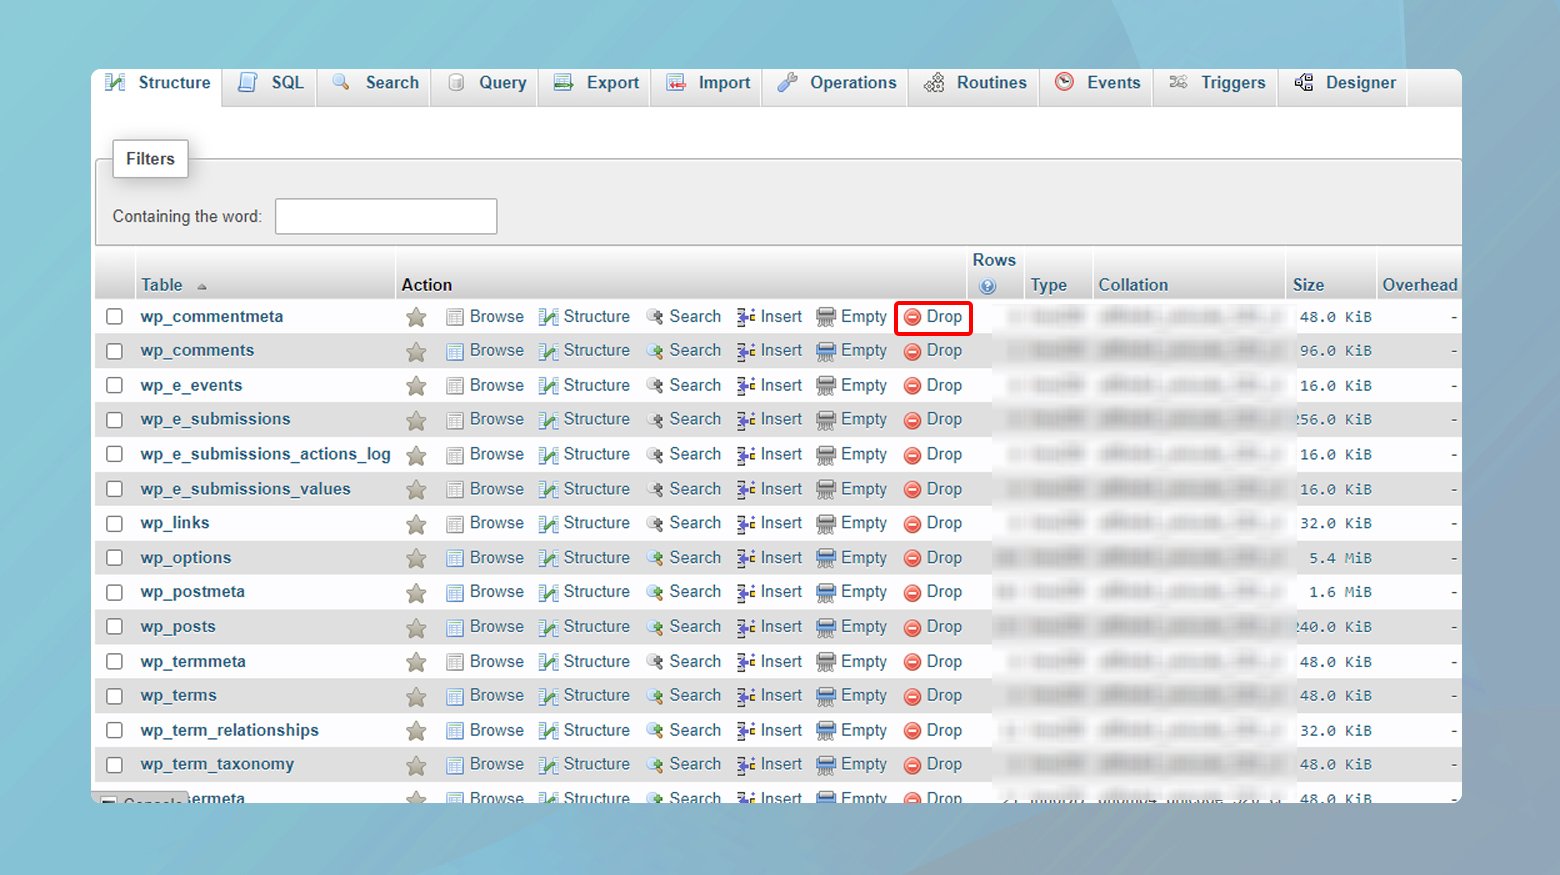
- Carefully go through the list of tables. Look for any that do not match the standard WordPress table structure or seem to be related to the plugin you uninstalled.
- To remove an unnecessary table, click on the “Drop” link next to it. Confirm the action when prompted. Be cautious with this step to avoid deleting vital data.
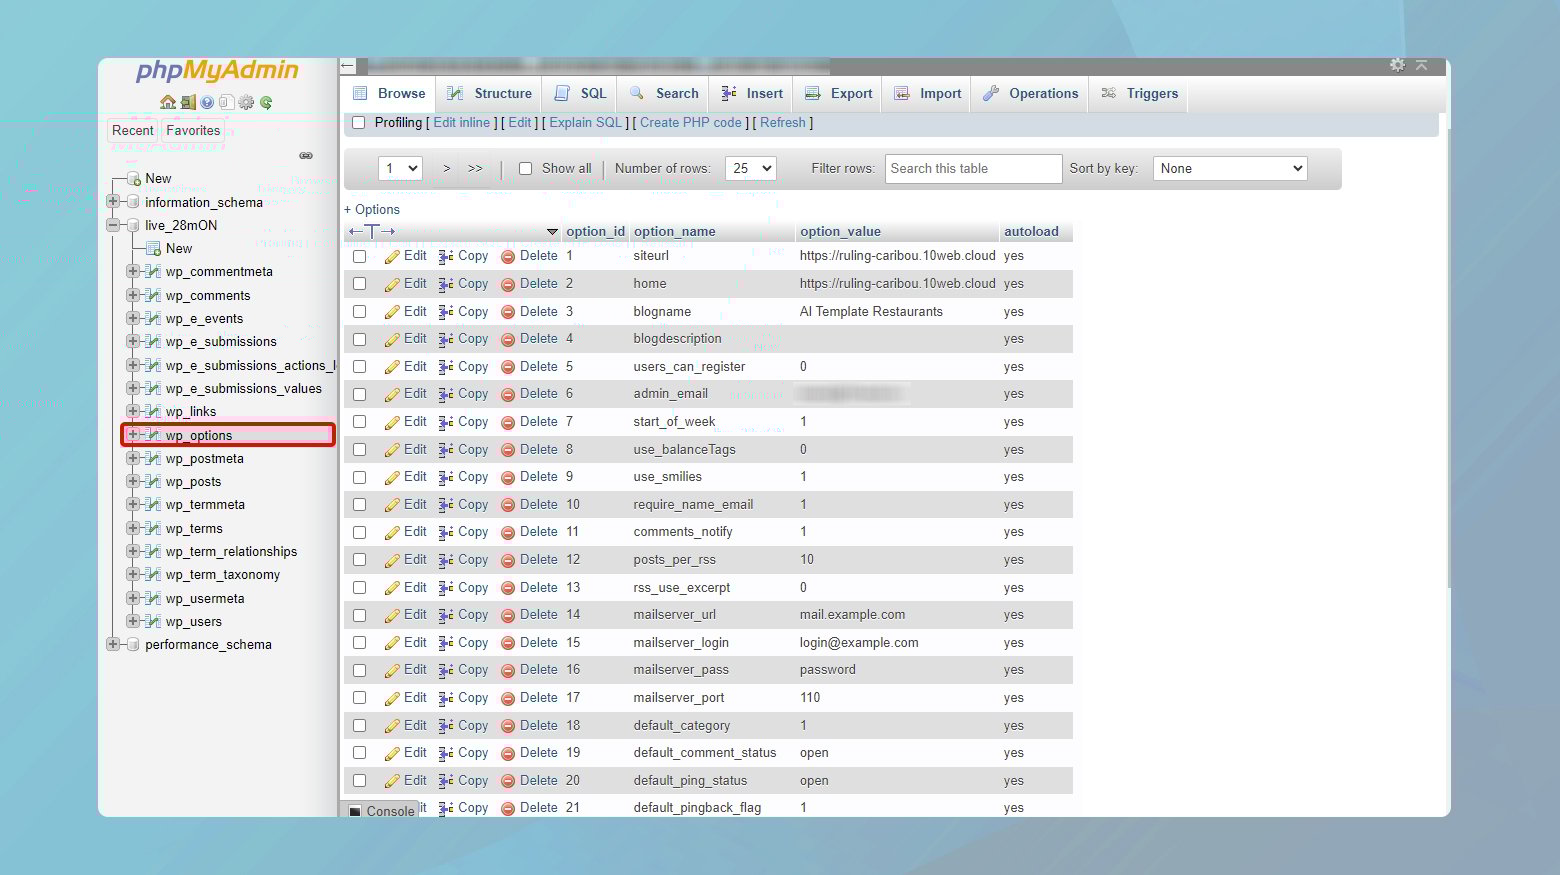
Inspecting the wp_options table
- Within your WordPress database, click on the `wp_options` table.
- Review the entries for any remnants of the problematic plugin. This might include settings or other data left behind.
If you’re not sure about what to look for, setting up a new WordPress installation and comparing its clean database structure to your current one can help identify discrepancies.
Verify your Apache settings
Apache serves as the backbone for serving your web content. A misconfiguration, especially related to the ports it uses, can lead to your PHP files not being accessible. Port conflicts are a common issue, particularly on machines where multiple applications might be listening on the default ports.
Changing the listening port in Apache’s configuration files resolves conflicts with other applications that may be using the default ports. This ensures that Apache has a clear, unobstructed path to serve your web content, thereby resolving access issues like the 404 error when trying to open PHP files.
Identifying a free port
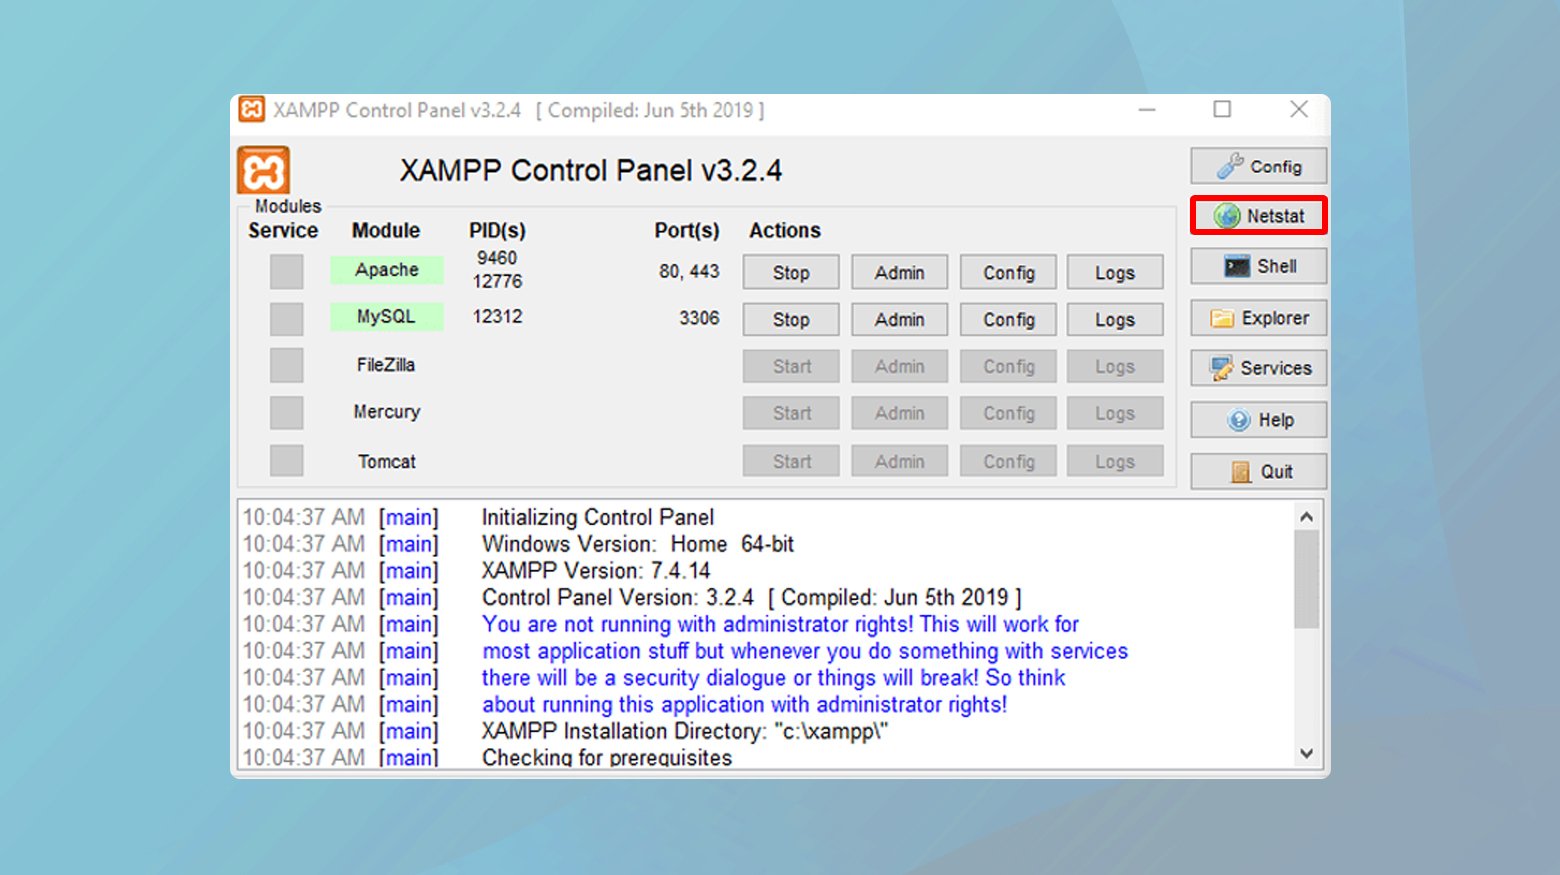
- Open the XAMPP control panel.
- Click on the “Netstat” button to display a list of ports currently in use. Look for port 80 (the default for HTTP) and 443 (the default for HTTPS).
- If either is in use and causing conflicts, choose an alternative, such as 8080 for HTTP or 8443 for HTTPS.
Modifying the httpd.conf file
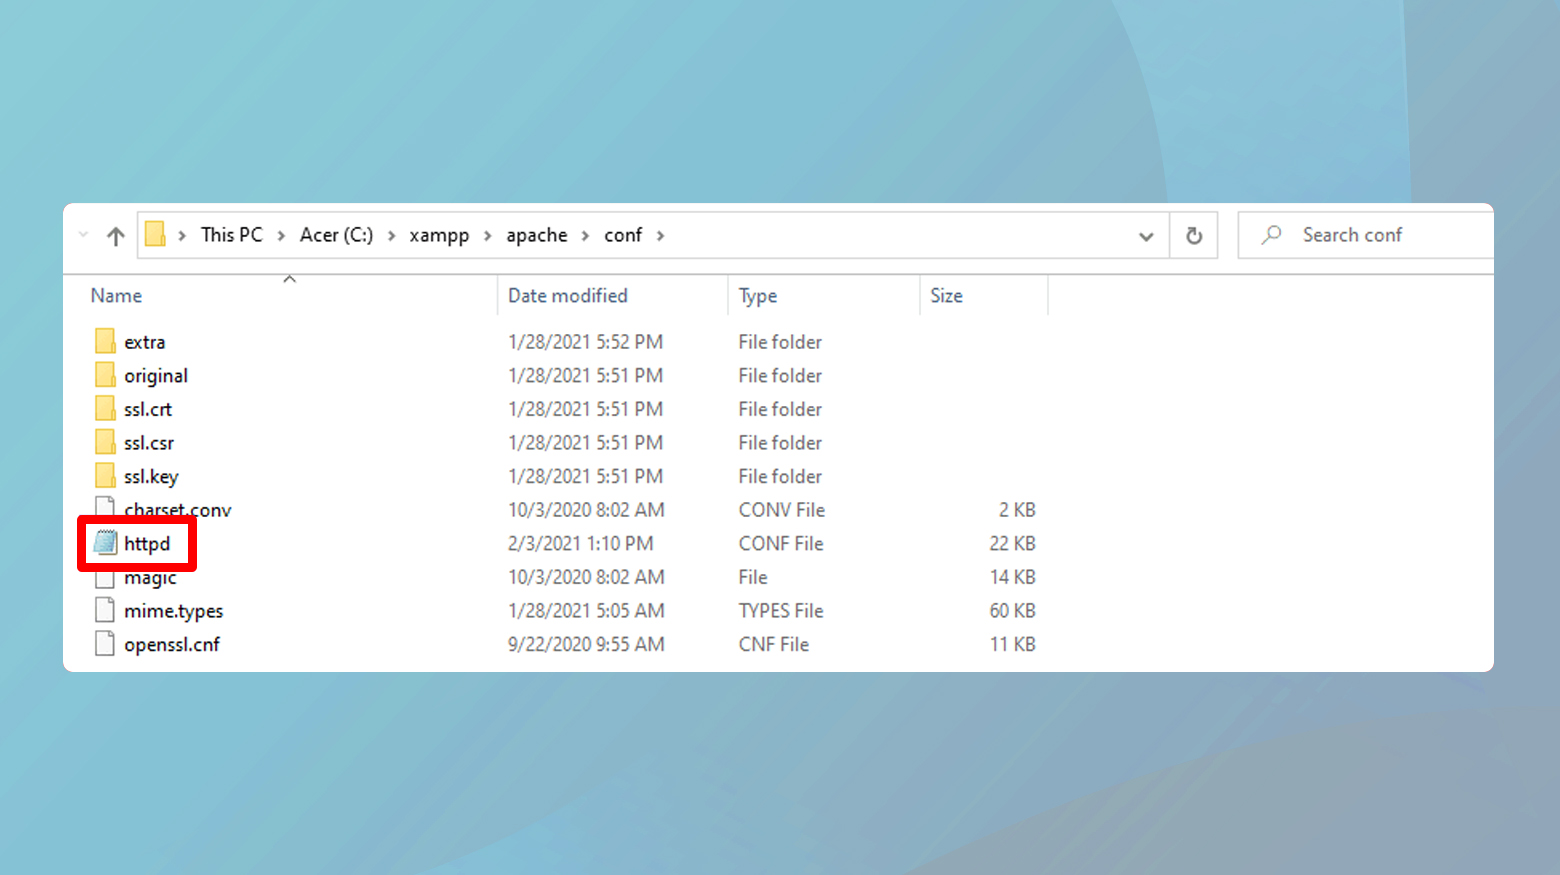
- Locate the `httpd.conf` file. In Windows, it’s typically found at `C:\xampp\apache\conf\httpd.conf`.
- On macOS, use Finder’s Go to Folder and type `/etc/apache2` to locate Apache’s configuration directory.
- Open the `httpd.conf` file in a text editor.
- Find the line that reads `Listen 80` and change 80 to your chosen port number (e.g., 8080).
- Similarly, update the `ServerName` directive from `localhost:80` to `localhost:8080` (or your chosen port).
- Save and close the file.
Editing the `httpd-ssl.conf` file for HTTPS
- If you’re working with HTTPS, locate the `httpd-ssl.conf` file, often found in `C:\xampp\apache\conf\extra` or `/etc/apache2` on macOS.
- Open it with your text editor.
- Change the `Listen 443`, `<VirtualHost _default_:443>`, and `ServerName localhost:443` lines to reflect your new port choice, like 8443.
- Save the changes.
After making the necessary changes, go back to the XAMPP control panel.
Stop and then restart the Apache service to apply the changes.
Try accessing `localhost:8080` (or whichever new port you chose) in your web browser to test the configuration.
Conclusion
Addressing the HTTP Error 404: The Requested Resource Is Not Found in XAMPP involves a efficient approach, starting with simple checks like verifying the URL and advancing to more complex solutions such as examining the .htaccess file, deactivating and uninstalling problematic plugins, inspecting database changes, and adjusting Apache’s configuration to resolve port conflicts. Each step offers a pathway to identifying and fixing the root causes of the issue, ensuring your local development environment runs smoothly. By tackling the problem systematically, you can restore access to your web content and continue your development work with minimal disruption.
Say goodbye to website errors
Achieve peace of mind with 99.99% uptime on 10Web Managed
WordPress Hosting, powered by Google Cloud.
Say goodbye to website errors
Fix all the website errors in one click
Migrate your website to the world's best Managed WordPress Hosting.