Navigating the complexities of WooCommerce can enhance your online shop’s functionality and aesthetic appeal. This guide answers frequently asked questions about customizing your WooCommerce shop page, from basic edits to advanced modifications. Whether you’re looking to add content, change text, or set up a different shop page entirely, these insights will empower you to tailor your digital storefront to better meet the needs of your business and customers.
FAQ
Why can't I edit my shop page in WooCommerce?
WooCommerce treats the shop page as a special archive page, not a regular page you can edit in the WordPress editor. This setup means it automatically generates product listings based on your settings and doesn’t allow for direct editing like a standard page. If you need to customize the layout or content around the product listings, you’ll have to modify WooCommerce templates or use a plugin designed for WooCommerce customization.
How do I add content to my WooCommerce shop page?
To add content to your WooCommerce shop page, you can utilize widgets or custom hooks within your g. For example, adding text or images above or below your product listings can be done by inserting widgets in designated areas of your theme. Alternatively, if you’re comfortable with code, you can use WooCommerce’s built-in hooks (like `woocommerce_before_shop_loop` or `woocommerce_after_shop_loop`) to inject content directly into the shop page’s template files.
How do I change the shop page text in WooCommerce?
Changing the text on your WooCommerce shop page involves tweaking either the theme files or using a plugin that allows for translations and text changes. You can directly edit text by modifying the `archive-product.php` file in your theme (or child theme) if you’re familiar with PHP. Otherwise, consider using a plugin that provides a more user-friendly interface for changing specific strings of text within WooCommerce.
How do I change the shop page description in WooCommerce?
To change the description on the WooCommerce shop page, you first need to ensure that your theme supports and displays the description field of the shop page. You can edit the description by navigating to Pages in your WordPress dashboard, selecting the shop page, and then editing the text in the description field. For themes that do not display the description by default, you might need to add or customize the template file `archive-product.php` in your theme to include this description.
Basics of WooCommerce shop pages
WooCommerce provides a default shop page that displays all of your published products as an archive page. This shop page acts as your online storefront, allowing your visitors to browse through everything you have to offer. Think of it as the digital equivalent of a physical store’s display window.
Importance of a custom shop page
Creating a custom shop page can transform the shopping experience. It allows you to tailor the layout and content to better suit your brand and cater to your customers’ needs. A personalized shop page not only reflects your unique brand personality but also has the potential to increase sales by making the buying process more intuitive for your customers.
Customization options
You have several ways to customize your WooCommerce shop page. Options range from minor tweaks to major overhauls:
- Organize your products: You can choose to display your products individually, by category, or both. By using navigation aids like filters, you can make it easier for your customers to find exactly what they need.
- Tailor the buying experience: Depending on what you’re selling, you might want to highlight certain products with badges indicating features like “vegan” or “nut-free.” This helps your customers quickly identify products that suit their preferences.
- Feature products and promotions: Use the Top Rated Products or On Sale Products blocks to draw attention to special items or deals.
- Match your brand identity: Customize the look and feel of your shop page to align with your brand, reinforcing brand recognition and trust.
- Change the shop page: Change the default WooCommerce shop page and create a completely custom shop page for your products.
No-code methods to edit the WooCommerce shop page
Several user-friendly options are available when you want to customize your WooCommerce shop page without diving into code. You can edit your shop page effortlessly using native WordPress tools and plugins while maintaining a professional appearance that speaks to your brand.
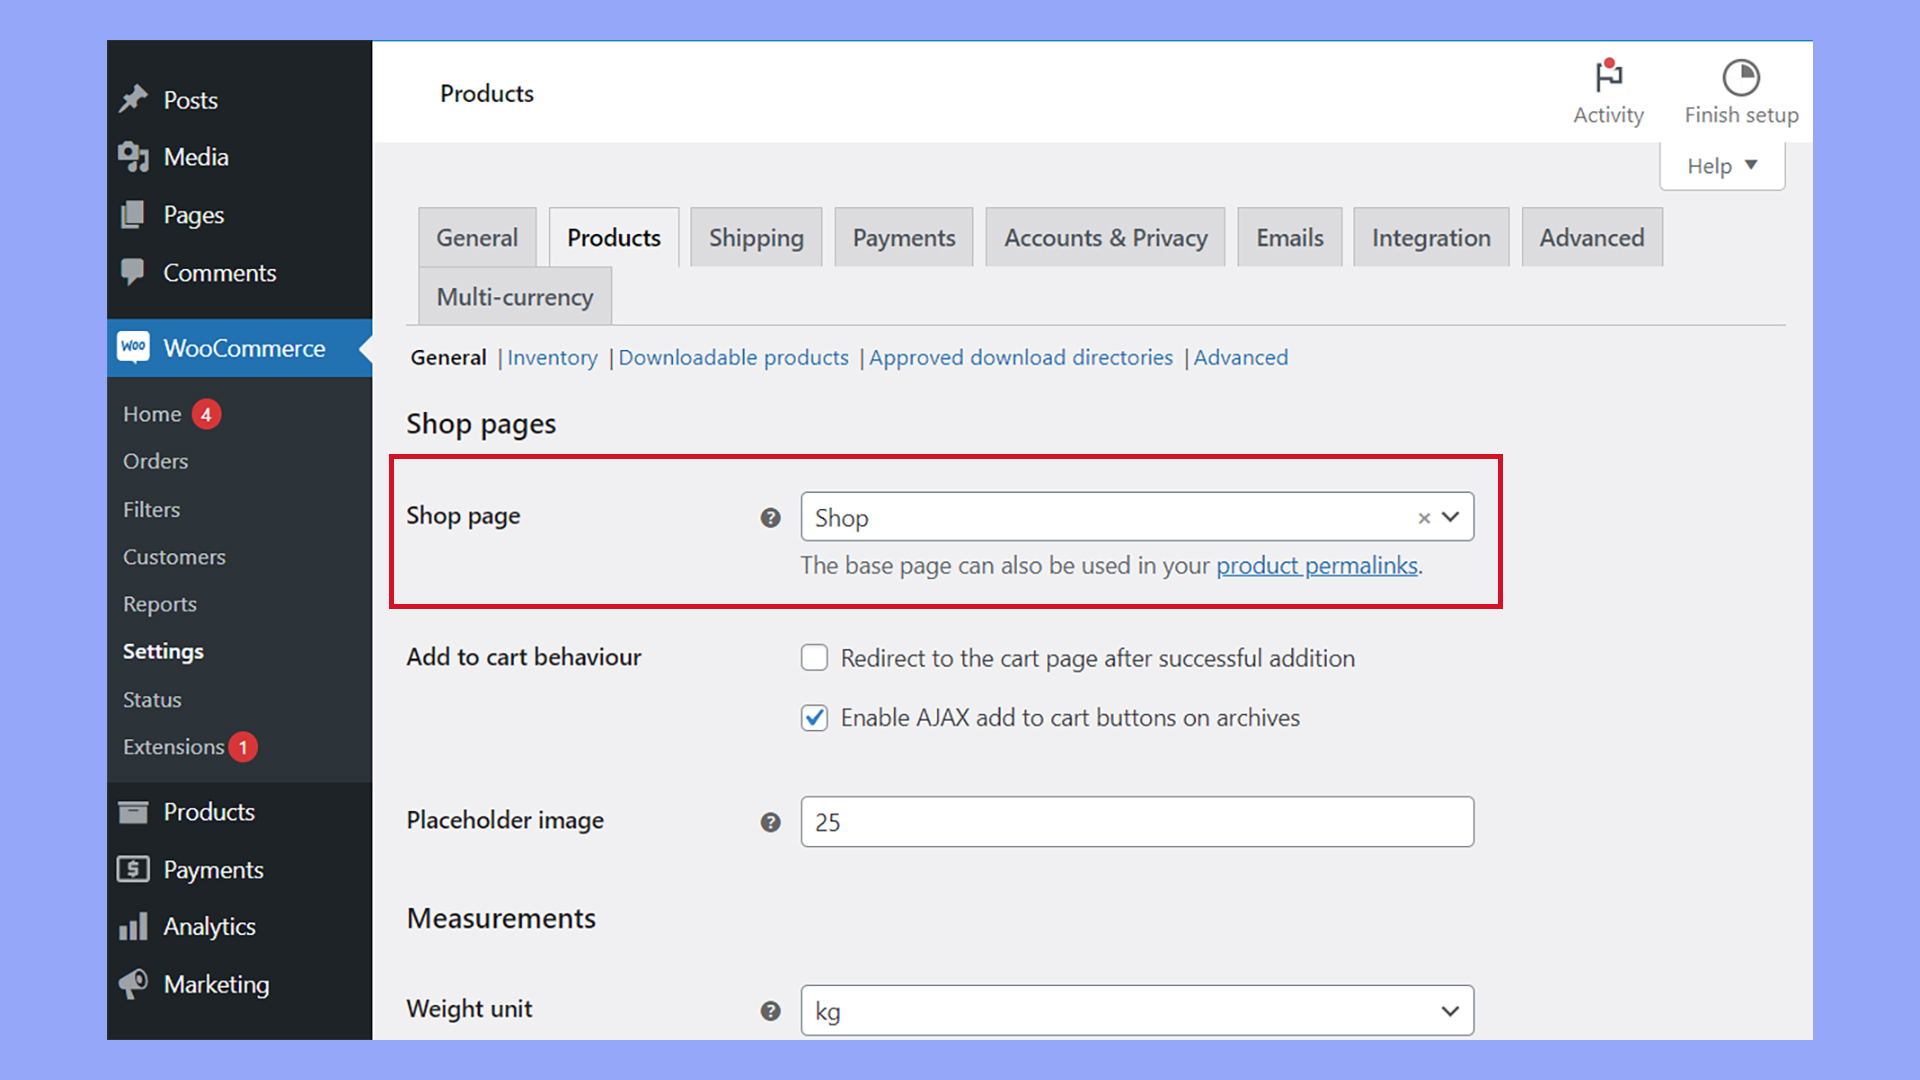
How to change the shop page in WooCommerce
Before you edit your WooCommerce shop page, you may want to consider designating a new shop page. This method retains the default WooCommerce shop page and uses an existing page to display products and function as the shop page.
- Go to WooCommerce > Settings and select the Products tab, General section.
- Select the new WooCommerce shop page from the Shop page dropdown menu.
- Click Save changes.
Using the WooCommerce Customizer
WooCommerce has a built-in Customizer that allows you to make quick changes to your store. Navigate to Appearance → Customize → WooCommerce to tweak settings like Product Catalog layout or set up a Store Notice for announcements.
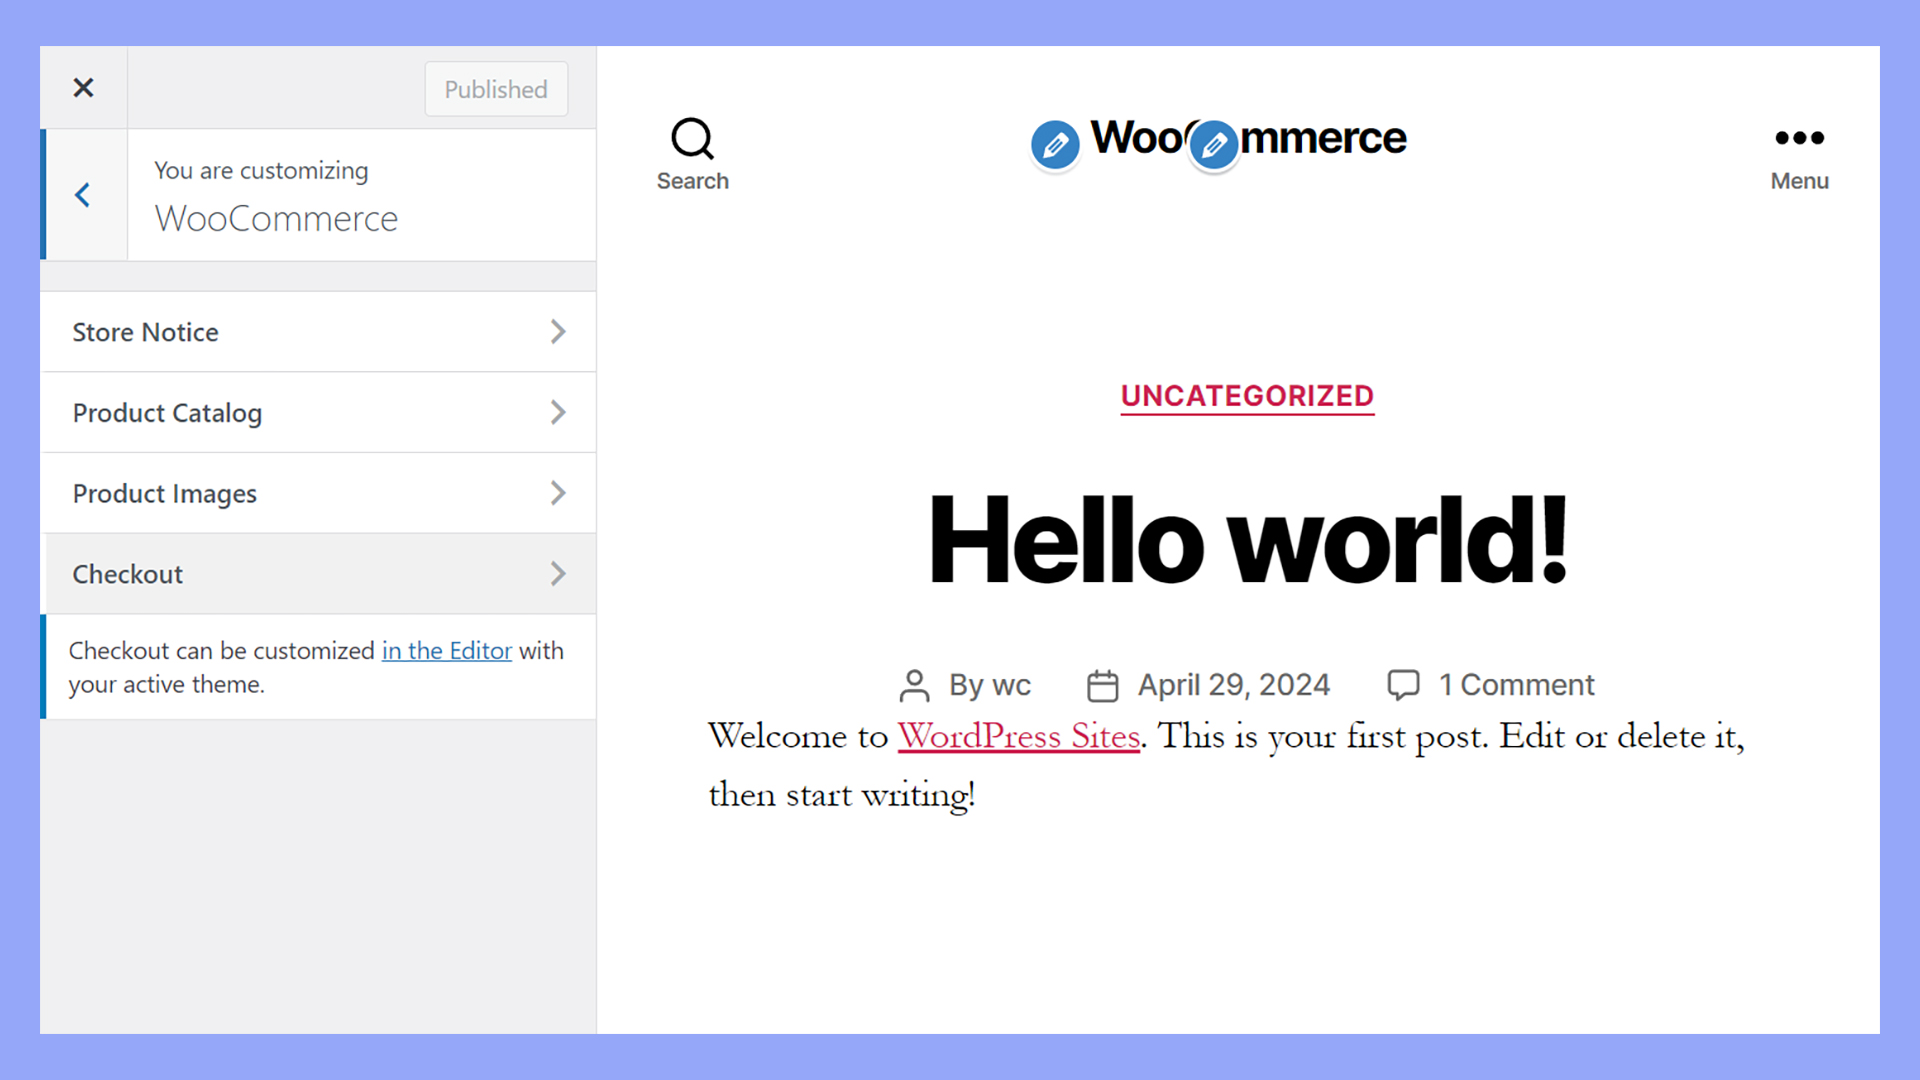
From there, you can choose to display categories, individual products, or a combination on your shop page, as well as adjust the default sorting of products.
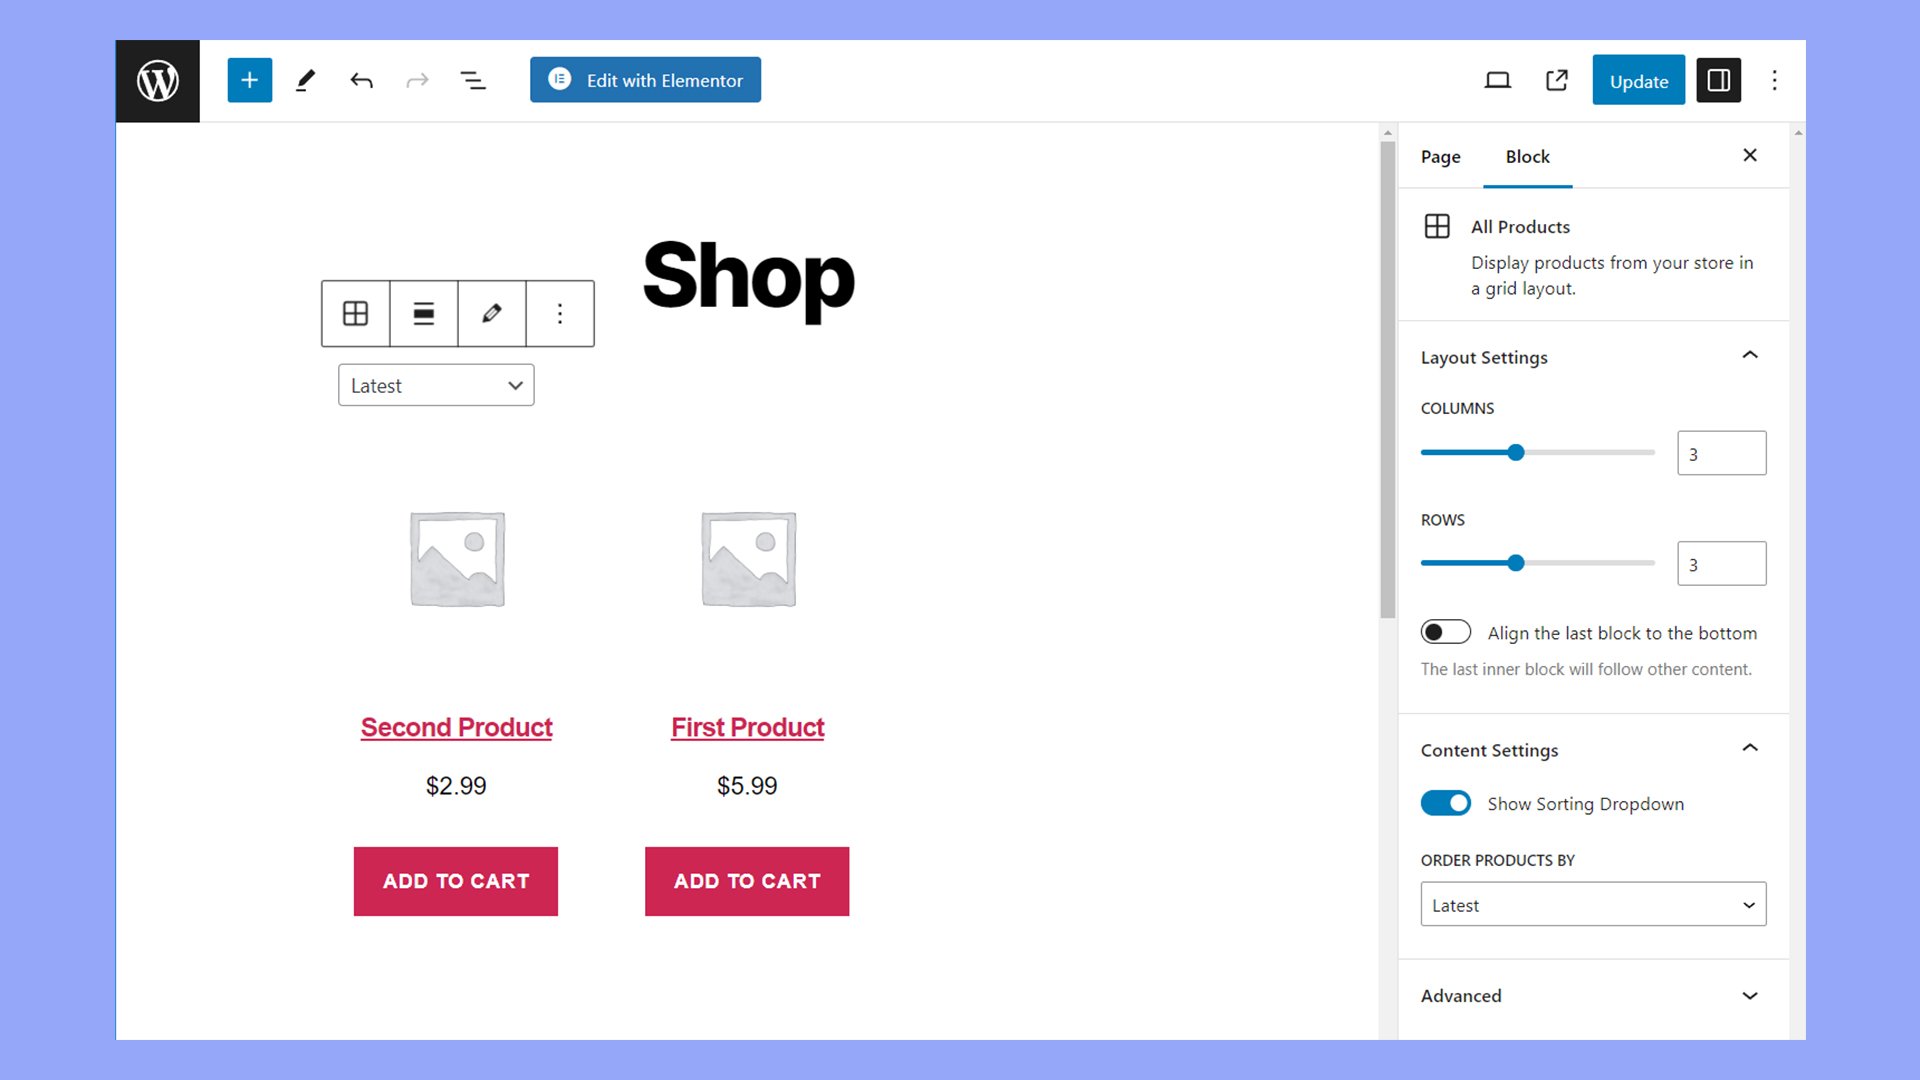
Using the Gutenberg block editor
You can edit your WooCommerce shop page with the Gutenberg Block Editor. This built-in WordPress editor lets you to add, arrange, and customize blocks with no need for coding.
To use this feature, edit the shop page and experiment with WooCommerce blocks such as Product Grids, Featured Products, or Categories. By combining different content types, you can create an engaging and interactive shop front.
Using WooCommerce plugins
WooCommerce plugins generally extend or add functionality to your online store, enabling you to customize and enhance both the backend management and the frontend shopping experience. They cover a wide range of functions, such as:
- Adding payment gateways: Plugins can integrate additional payment methods beyond the basic options provided by WooCommerce, such as Stripe, PayPal, or region-specific payment processors.
- Improving SEO: Some plugins help optimize your store for search engines, enhancing product page metadata and improving URL structures to increase visibility.
- Customizing shipping options: You can add plugins that offer more detailed shipping methods and logistics, including real-time shipping rates, geographic-specific shipping rules, or integration with major shipping carriers.
- Enhancing product functionality: Plugins can allow you to offer customizable products, digital downloads, subscription services, or bookings, which are not typically available in the standard WooCommerce setup.
- Streamlining the checkout process: There are plugins designed to simplify or modify the checkout process, reducing the number of steps, adding custom fields, or even enabling one-page checkout to improve conversion rates.
- Implementing marketing tools: You can find plugins that add functionality for affiliate marketing, conduct email marketing campaigns, or manage rewards and loyalty programs directly from your store.
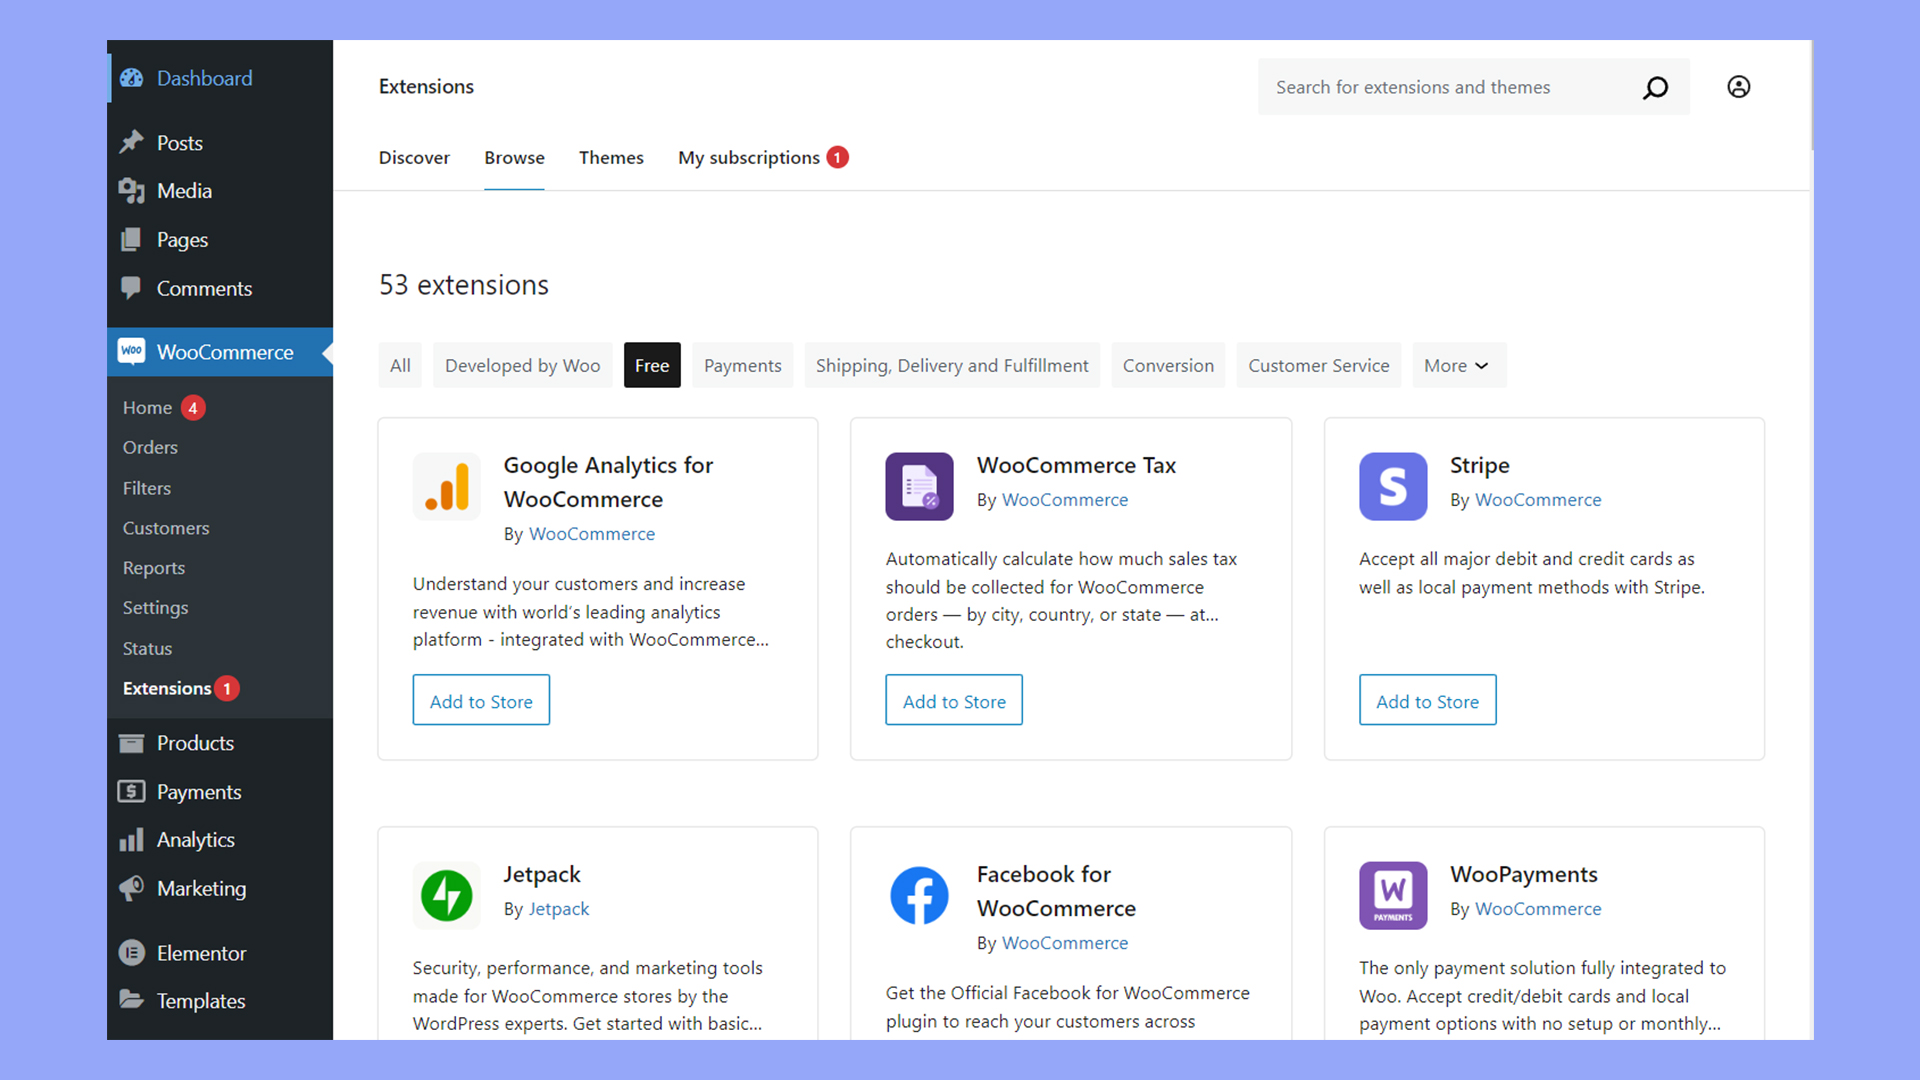
Using WooCommerce extensions
Enhancing your WooCommerce Shop page is a breeze with the right extensions. They add functionality and integrate with services that make shopping more intuitive, guiding your customers seamlessly from browsing to checkout.
You can add WooCommerce extensions in the WordPress dashboard under WooCommerce > Extensions. Here are some of the most popular extensions to help you customize the shop page in WooCommerce.
Product filters
To help customers quickly find what they need, use the search box at WooCommerce > Extensions to search for “Product Filters”.
Once active, navigate to the extension’s settings within WooCommerce. Customize the filter criteria to match your inventory, whether that be size, color, or any unique attribute.
These filters then appear as options on your Shop page, allowing shoppers to refine their product search without hassle.
Quick view
Add a quick view option by installing the Quick View extension.
In the extension settings under WooCommerce, you can set the information that will appear in the Quick View modal, like product details and images.
Now, customers can view product information directly on the Shop page and quickly add items to their cart, enhancing their shopping experience with speed and convenience.
Advanced product labels
Enhance product visibility with labels that highlight key product features.
Look for an advanced product labels extension and install it. In the extension’s settings within WooCommerce, design labels for new arrivals, discounts, or any special features.
Apply these labels to the respective products so your customers can easily notice them and make informed choices.
Product tables
For a more straightforward, list-based view, utilize a product table extension.
Once installed, configure the extension settings via WooCommerce to determine which product details to display.
You can include columns for price, reviews, add to cart options, and more. With product tables, you offer customers an efficient way to compare products, manage quantities, and make bulk purchases directly from the Shop page.
Manually editing the shop page
Customizing the WooCommerce shop page to reflect your brand and enhance user experience can significantly influence buyer behavior. To make manual changes to the shop page, you will need a basic understanding of PHP and CSS. It is also essential to use a child theme to prevent updates from overriding your customizations.
Using custom PHP
To manually adjust the shop page using PHP, begin by ensuring you have a child theme activated. This is important to maintain changes even when the parent theme updates.
- Access your child theme’s functions.php file.
- Insert your custom code snippet to modify shop page elements.
For example, if you want to hide the result count and the default sorting dropdown menu, you would add a function utilizing the relevant WooCommerce hooks.
Here’s a sample snippet to hide certain elements:
add_action( 'woocommerce_before_shop_loop', 'customize_shop_page', 1 );

function customize_shop_page() {
    remove_action( 'woocommerce_before_shop_loop', 'woocommerce_result_count', 20 );
    remove_action( 'woocommerce_before_shop_loop', 'woocommerce_catalog_ordering', 30 );
}
Remember to backup your site before making changes in case you need to restore it.
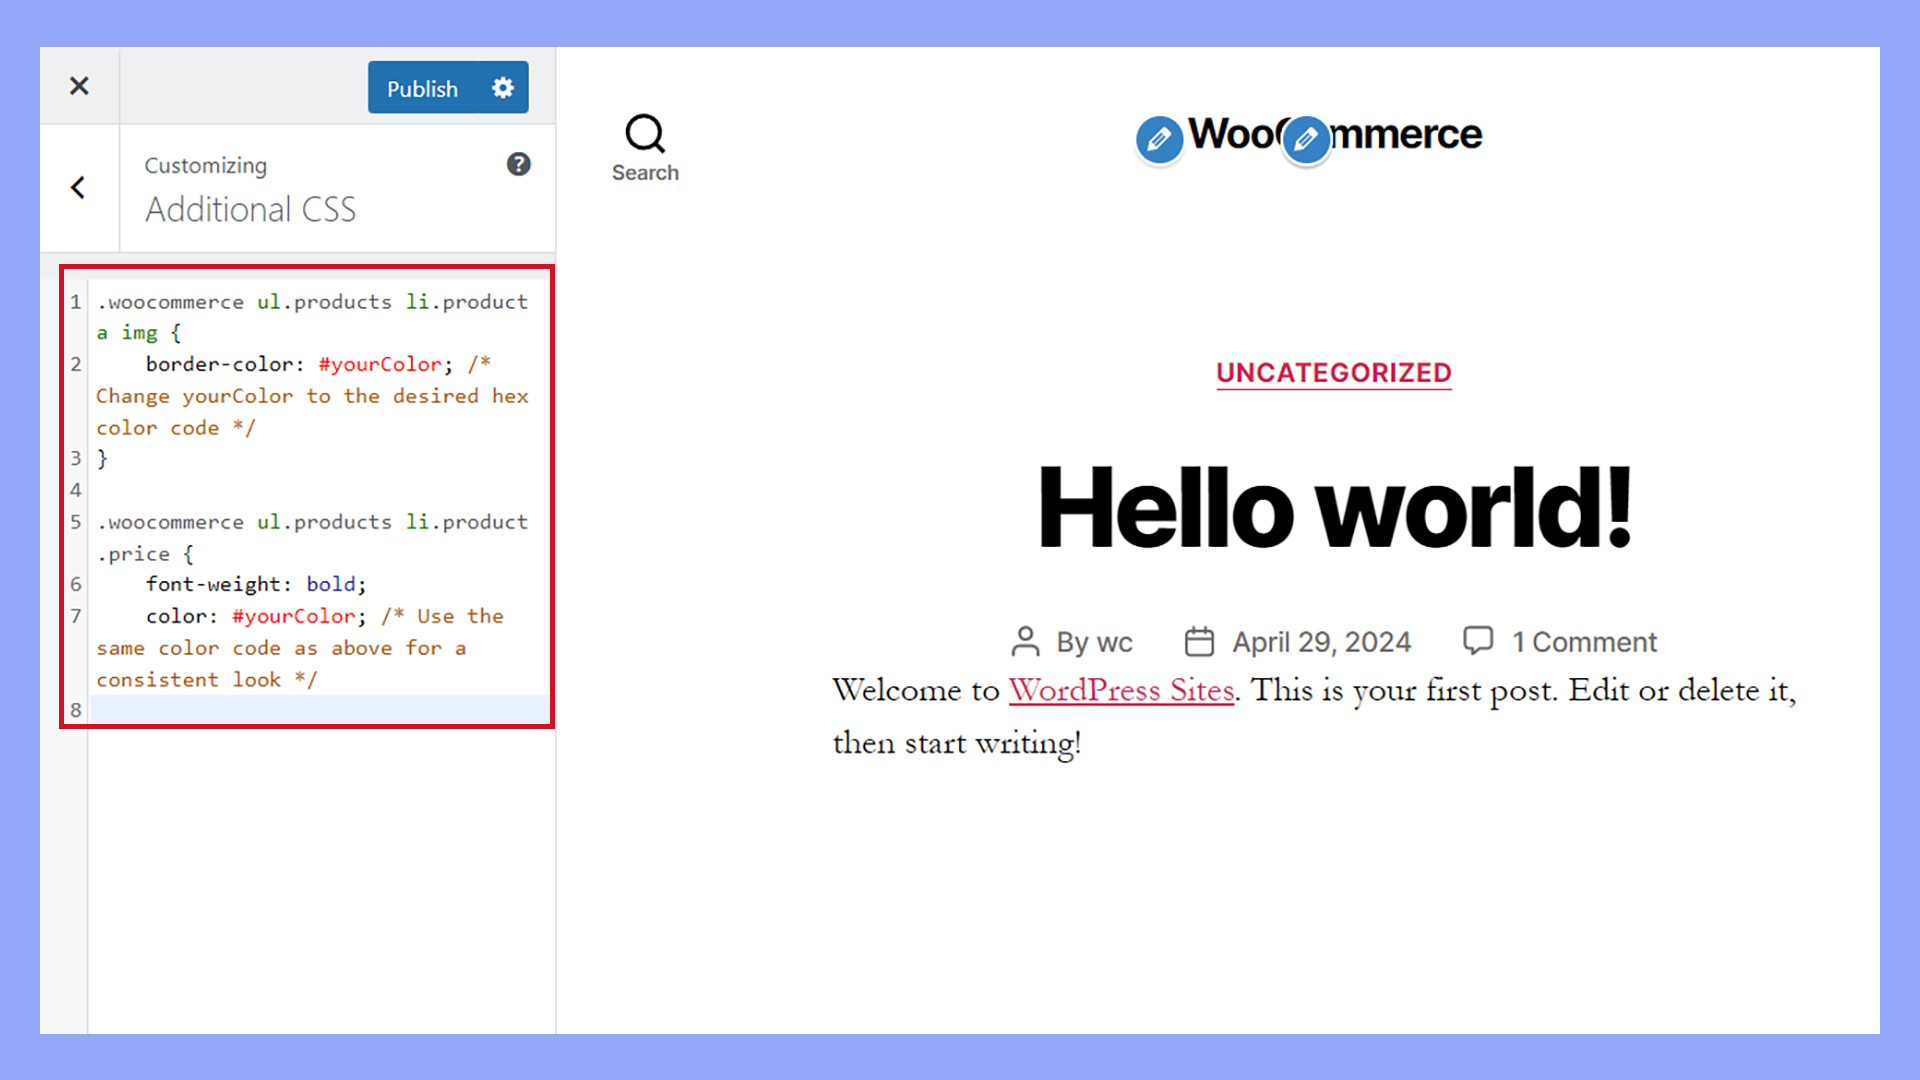
Adding custom CSS
To tweak the look of your shop page with custom CSS:
- Navigate to Appearance > Customize in your WordPress dashboard.
- Click on the Additional CSS section.
Here, you can add custom CSS styles to alter the visual appeal of your shop page.
For example, to change the color and product image presentation, you might add code like this:
.woocommerce ul.products li.product a img {
    border-color: #yourColor; /* Change yourColor to the desired hex color code */
}

.woocommerce ul.products li.product .price {
    font-weight: bold;
    color: #yourColor; /* Use the same color code as above for a consistent look */
}
To adjust the products per row and rows per page, include CSS rules that target the WooCommerce layout classes:
.woocommerce ul.products.columns-4 li.product {
    width: 22% !important; /* Smaller values can increase products per row */
}

.woocommerce-page .products .product {
    margin-bottom: 30px; /* Adjust spacing between rows */
}
Adjust the percentage values and margins until you achieve your desired layout. Always make sure to save your changes and check out how they appear on the live site. Using a child theme ensures that your custom styles remain intact even after theme updates.
Editing shop page elements
Customizing your WooCommerce shop page allows you to offer a more personalized shopping experience to your customers. By editing elements such as the Add to cart button and product images, you can streamline the user experience, drawing attention to featured products, categories, or top-rated items using widgets and filters.
Customizing add to cart button behavior
To enhance the shopping experience on your WooCommerce site, you can allow customers to add products to their cart directly from the shop page.
Navigate to your WooCommerce settings by clicking on WooCommerce > Settings. Then, select the Products tab and choose General.
Here, you’ll find an option to enable Add to cart behavior.
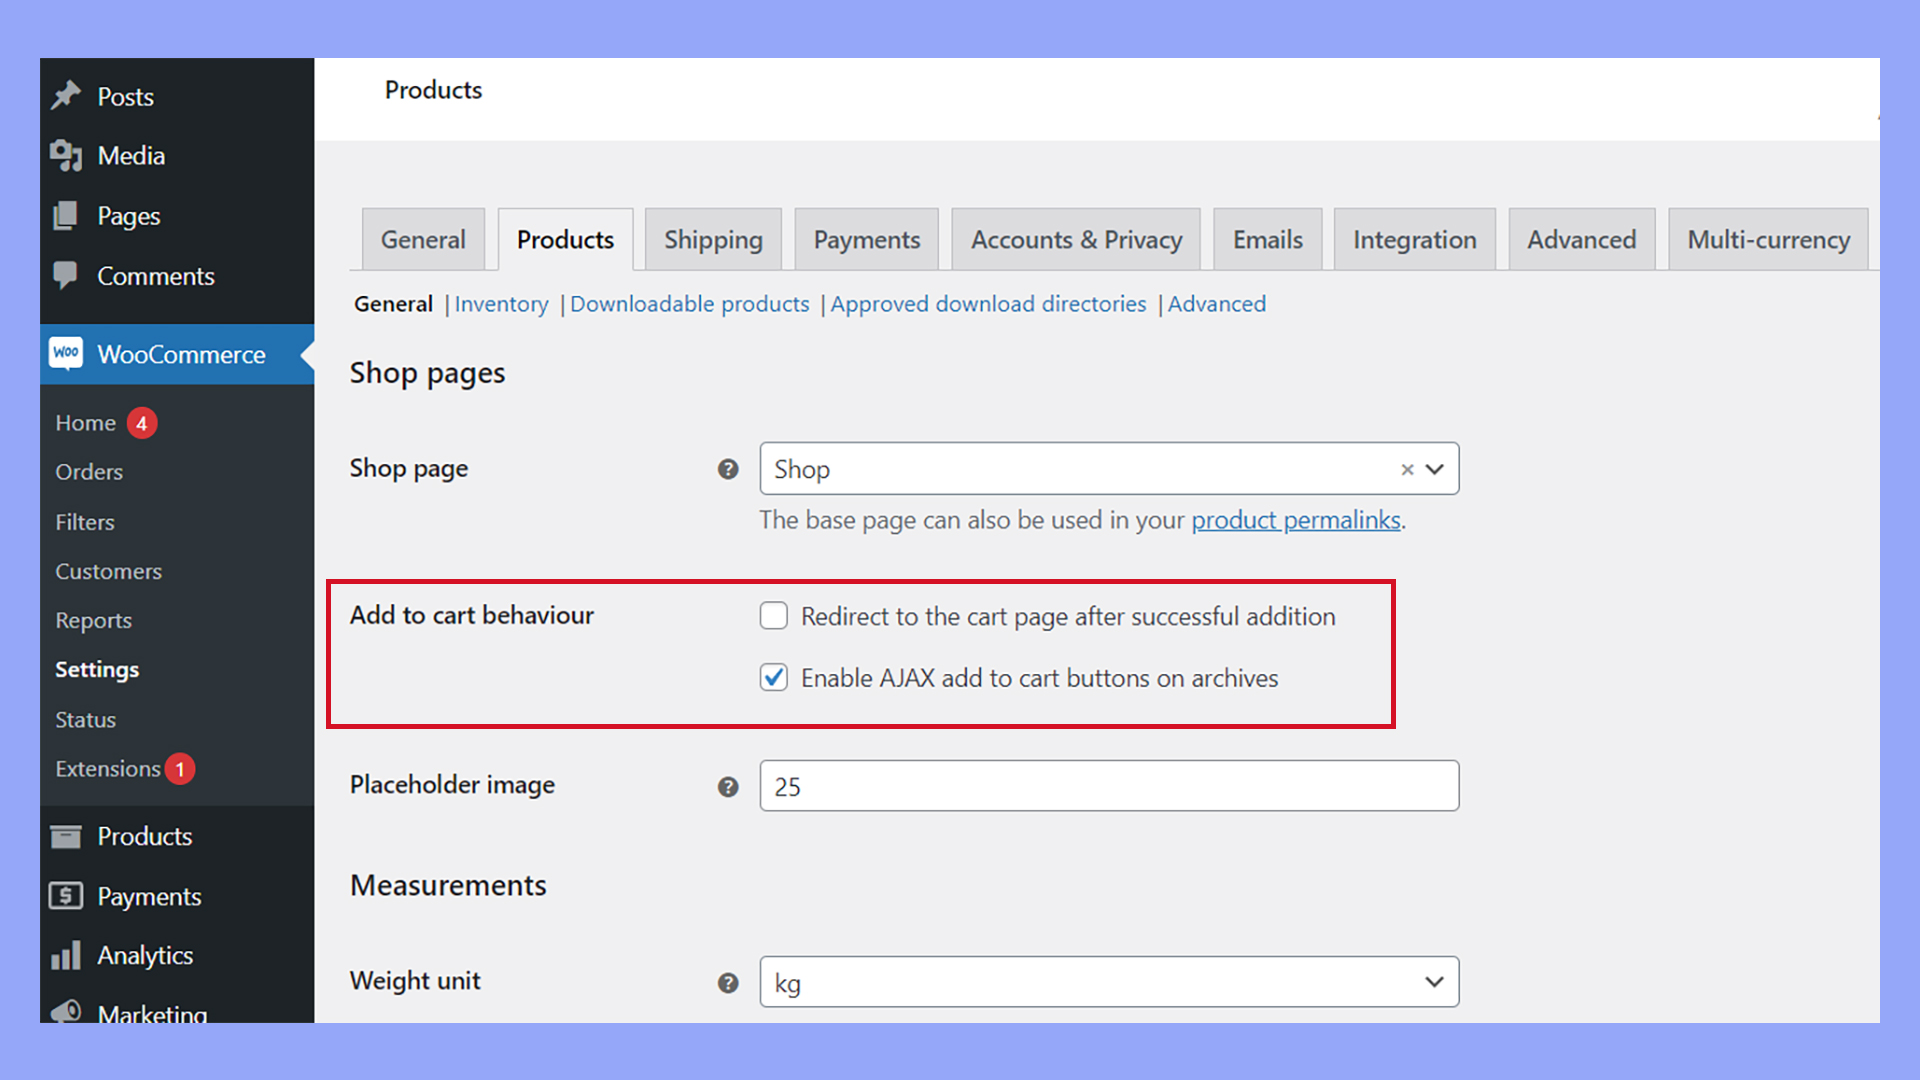
Enable Redirect to the cart page after successful addition if you want customers to go straight to their cart after adding an item, saving them time and simplifying the checkout process.
Don’t forget to click Save changes to apply your new settings.
How to set a default product placeholder image
In case you don’t have an image for a product, setting a default placeholder image is a useful way to maintain a professional look in your store.
To set a default product placeholder image, go back to WooCommerce, click on Settings, and then hit Products.
Within the Products tab, look for the sub-section named Product images. Here, you’ll find an option to use an image from your Media Library as a default placeholder image.
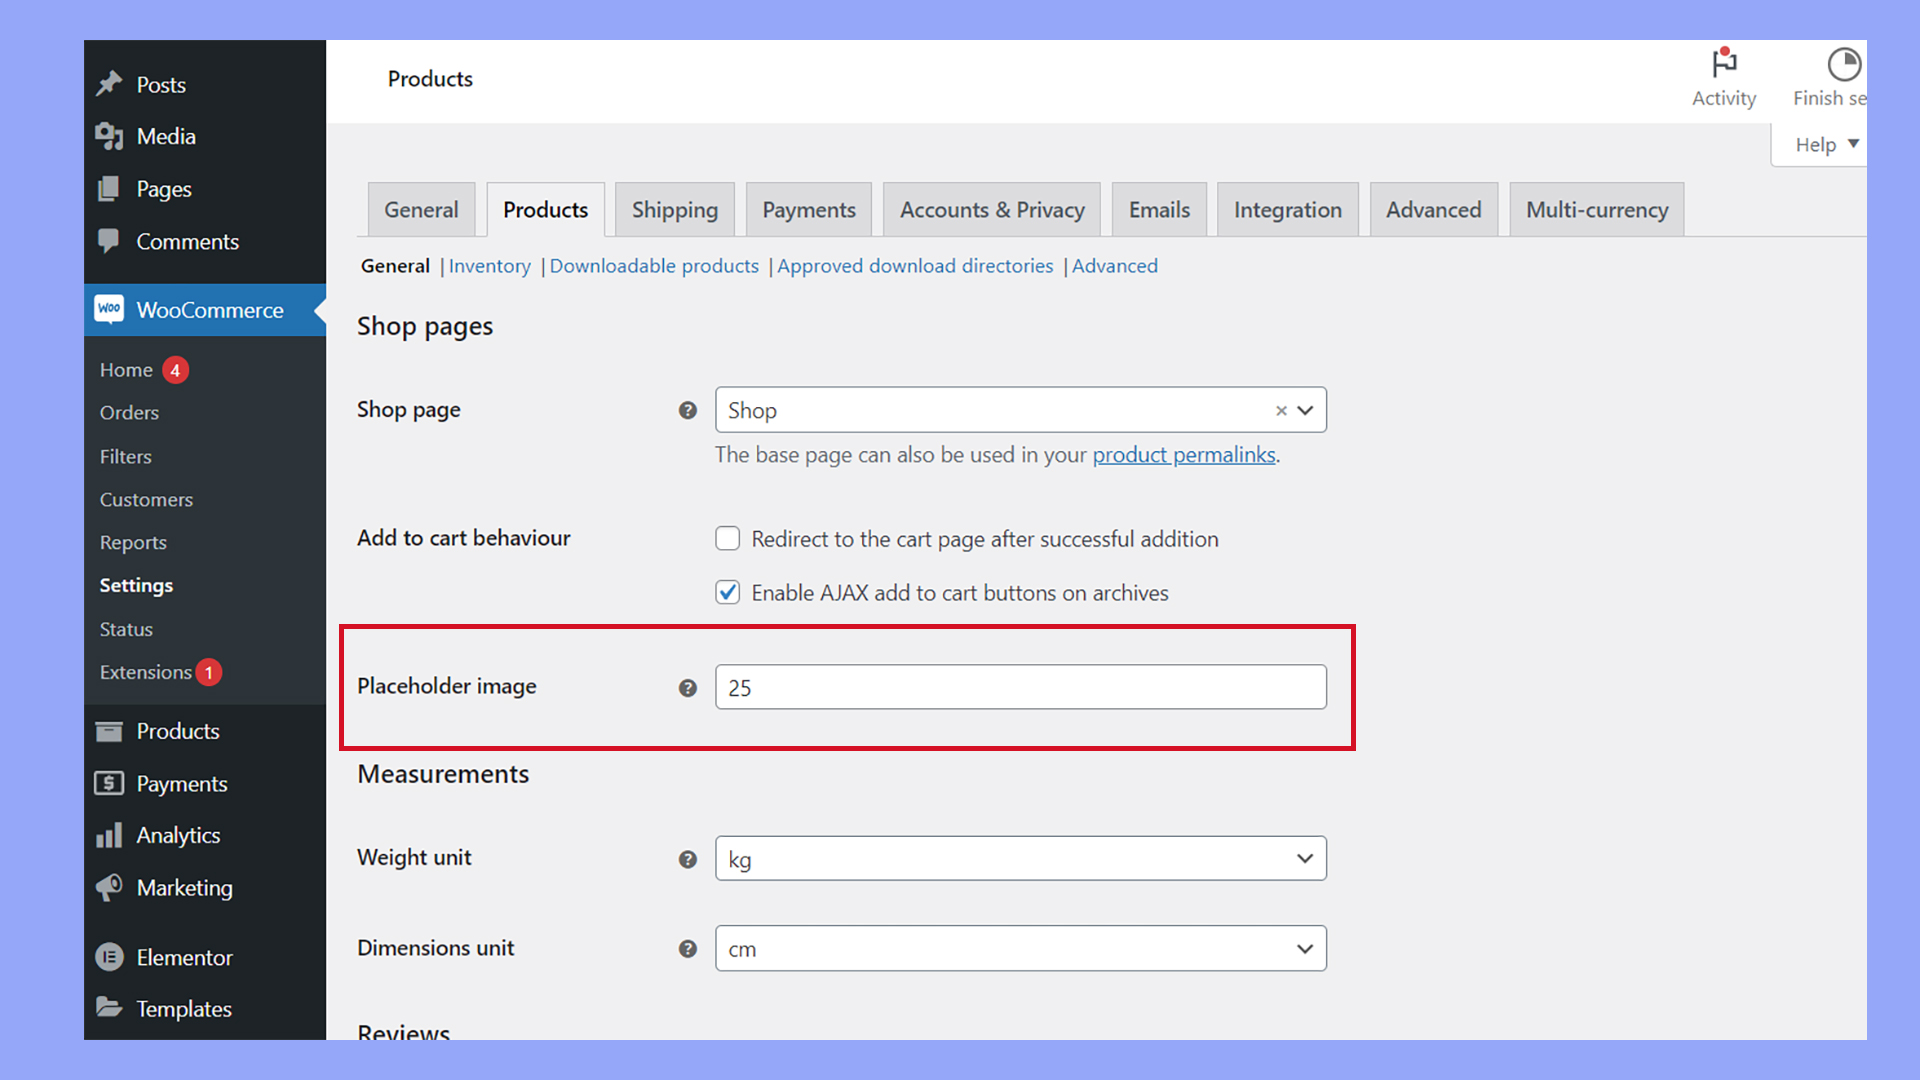
Upload an image that aligns with your brand or a generic image that indicates an item’s image is coming soon. Insert the image’s URL in the Placeholder image field. You can find the image URL on the image in the Media library.
Using page builders for shop customization
When looking to enhance your WooCommerce shop page, page builders provide a flexible and intuitive way to design a fully customized storefront without the need for coding.
For example, using 10Web Builder with WooCommerce, you can drag and drop a diverse array of widgets to enhance your shop’s appearance and functionality.
These widgets allow you to provide an extensive collection of widgets specifically for WooCommerce. These include options such as eye-catching Add To Cart buttons, Product Ratings, Product Meta, Upsells, and much more.

Looking to sell online?
Create your custom online store in minutes with 10Web AI Ecommerce Website Builder and take your business online.
Monitoring and improving conversions
When aiming for higher sales, focusing on your conversion rate is essential. This means not only tracking the number of conversions but also implementing strategies to increase them.
A key factor is site speed, as a swift and responsive site encourages users to stay longer and engage more deeply.
Site speed and responsiveness
To keep your site running quickly, invest in a quality hosting service which optimizes performance.
For example, hosting solutions like 10Web automate many aspects of performance optimization, leading to faster loading times. This is crucial since every second of delay can result in lost sales.
Mobile experience
Ensure your WooCommerce Shop Page is mobile-friendly.
Users should find it easy to navigate, explore products, and make purchases on any device.
Use the Responsive Settings in your theme or page builder to configure how your shop displays on various screen sizes, ensuring a seamless experience.
Making the shop page attractive and effective
- Update your product images and descriptions regularly. This keeps content fresh and engaging.
- Add customer reviews to provide social proof and build trust with potential buyers.
- Use visually appealing elements like a countdown for sales. This can create a sense of urgency and encourage immediate purchases.
The key to boosting conversions is to monitor performance and respond dynamically. Use analytics tools to track conversion rates. Then, tweak your strategies as needed. With dedication and continual improvement, you can create a WooCommerce Shop Page that not only looks great but also effectively turns visitors into customers.
Summary
Customizing your WooCommerce shop page is crucial for creating a distinctive and efficient online presence that resonates with your audience. By leveraging the tools and techniques discussed, from simple widget additions to more sophisticated coding and plugins, you can significantly enhance the shopping experience. Remember, a well-customized shop page not only reflects your brand identity but also facilitates smoother customer interactions, potentially boosting your sales and customer satisfaction.
Simplify WordPress with 10Web
Simplify WordPress with 10Web
Skip and automate manual work with 10Web Managed WordPress Hosting and the 10Web AI Website Builder.


![Featured image for How to Make WooCommerce Faster [29 Tips and Tricks] article](https://10web.io/blog/wp-content/uploads/sites/2/2024/04/make_woocommerce_faster-742x416.jpg)