A WordPress theme controls everything from color schemes and typography to layouts and widget placement. Whether you’re looking to establish a brand identity, enhance user experience, or unlock your creative potential, creating your own theme offers complete control over how your site looks and operates. In this guide on how to create a WordPress theme, you’ll discover the essentials of customizing your website’s appearance and functionality.
FAQ
How do I create my own WordPress theme? To create your own WordPress theme, start by learning basic web technologies like HTML, CSS, and PHP. Set up a local development environment, then create a new theme folder in `wp-content/themes` in your WordPress directory. Inside, you’ll need at least two files: `style.css` and `index.php`. Use the WordPress Codex and developer resources to guide you through the process of adding more complex features and templates. Alternatively, you can use an AI website builder like 10Web’s AI Builder, which makes the process easier for beginners.
Is it better to make your own WordPress theme?
How much does it cost to create a custom WordPress theme?
Is it profitable to make a WordPress theme?
How long does it take to create a custom WordPress theme?
Automate manual work with 10Web Managed WordPress Hosting and 10Web AI Website Builder. Optimize your WordPress website effortlessly. ![]()
Simplify WordPress with 10Web
Why create your own WordPress theme?
Creating your own WordPress theme can offer several significant advantages, especially if you want a website that stands out from the crowd or has specific functionalities tailored to your needs. Before learning how to create a WordPress theme, let’s look at some key reasons why people choose to create custom WordPress themes:
Unique design
A custom theme allows you to create a unique design that isn’t limited by the constraints of pre-made themes. This uniqueness can reinforce your brand identity and ensure that your website doesn’t look like countless others.
Optimized performance
Pre-built themes often come with a lot of built-in functionality that you may not need, which can slow down your website. A custom theme allows you to include only the features you need, potentially increasing your site’s speed and efficiency.
Tailored functionality
With a custom theme, you can integrate specific functionalities that are crucial for your business right into the theme itself rather than relying on plugins. This can improve performance and ensure better compatibility across your website.
Better control
Creating your own theme gives you complete control over the code. This means you can ensure best coding practices are followed, maintain the quality of the code, and make updates or changes without being dependent on a third-party theme developer.
Learning and development
Building a WordPress theme from scratch can be an excellent learning experience. It helps you understand how WordPress works behind the scenes, including its core functions, the template hierarchy, and more. This knowledge can be invaluable for further customization and troubleshooting.
Security
Custom themes can be more secure than their off-the-shelf counterparts because you have control over every aspect of the theme. By avoiding unused or unnecessary features, you reduce the risk of security vulnerabilities.
Scalability
A custom theme can be designed with scalability in mind, making it easier to expand as your business or audience grows. This is particularly important for websites expecting to increase traffic or add significant new functionality over time.
Integration
If your site needs to integrate with other systems or applications (like an external API, a specific CRM, or proprietary systems), a custom theme can be designed to facilitate these integrations smoothly and securely.
Setting up your environment
To start this guide on how to create a WordPress theme, you’ll need to learn how to set up a local development environment. This setup allows you to run WordPress on your computer, making it easier to develop and test your theme without affecting a live website. Here’s a step-by-step guide to get you started:
1. Install a local server environment
For Windows or macOS: XAMPP
- Visit the Apache Friends website and download XAMPP for your operating system (Windows or macOS). XAMPP includes PHP, Apache, and MySQL which are essential for running a WordPress site.
- Run the installer and follow the on-screen instructions. Choose the components you need (Apache, MySQL, PHP, phpMyAdmin). You can skip other components like FileZilla, Mercury, or Tomcat if you don’t plan to use them.
- Open the XAMPP Control Panel and start Apache and MySQL. Make sure both services are running.
For macOS: MAMP
- Go to the MAMP website and download the free version of MAMP.
- Double-click the downloaded file and follow the installation instructions.
- Launch MAMP. Set the ports for Apache and MySQL to the default settings (Apache: 8888, MySQL: 8889) to avoid conflicts with other applications. Start the servers.
2. Install WordPress
- Go to WordPress.org and download the latest version of WordPress.
- Place WordPress in XAMPP or MAMP: For XAMPP: Extract the WordPress .zip file and rename the resulting folder to something meaningful related to your project. Place this folder in `C:\xampp\htdocs\` (Windows) or `/Applications/XAMPP/htdocs/` (macOS). For MAMP: Extract and rename the WordPress folder, then move it to `/Applications/MAMP/htdocs/`.
- Create a Database: For XAMPP: Open your browser and go to `http://localhost/phpmyadmin/`. Create a new database for your WordPress installation. For MAMP: Go to `http://localhost:8888/phpMyAdmin/` and create a new database.
- Navigate to `http://localhost/your-project-folder/` in your web browser. Follow the WordPress installation prompts, entering the details for the database you created earlier.
3. Create a new theme folder
- Go to your WordPress installation directory in `htdocs`, then `wp-content/themes/`.
- Create a new directory for your theme, for example, `mytheme`.
Now, your environment is set up, and you can begin adding your essential files and develop your theme further.
How to create a WordPress theme
Creating a custom WordPress theme involves understanding several core concepts, including the template hierarchy, how to structure your files, and how to add functionality and styling. This comprehensive guide will walk you through the steps on how to create a WordPress theme, from setting up essential files to implementing advanced features and styling strategies.
Step 1: Create the essential theme files
Your next step is to create essential files for your theme. Below is a guide to help you create those files for a basic WordPress theme: `index.php`, `style.css`, and `functions.php`. Inside your newly created directory, you will create three crucial files:
`index.php`: The primary template file that dictates what the theme displays on the front end. It includes the WordPress loop to display posts dynamically:
 ?php get_header(); ?>
 <div id="content">
 <?php if (have_posts()) : while (have_posts()) : the_post(); ?>
 <h2><?php the_title(); ?></h2>
 <?php the_content(); ?>
 <?php endwhile; endif; ?>
 </div>
 <?php get_footer(); ?>
`style.css`: This is the main stylesheet that affects the appearance of your theme. It starts with a header block that defines essential theme details:
 /*
 Theme Name: My Theme
 Theme URI: http://example.com/my-theme
 Author: Your Name
 Author URI: http://example.com
 Description: A description of your theme.
 Version: 1.0
 License: GNU General Public License v2 or later
 License URI: http://www.gnu.org/licenses/gpl-2.0.html
 Text Domain: mytheme
 */
 body {
 font-family: Arial, sans-serif;
 }
`functions.php`: Used to define functions, hooks, and other PHP snippets that add functionality to your theme:
 <?php
 function mytheme_enqueue_styles() {
 wp_enqueue_style('main-style', get_stylesheet_uri());
 }
 add_action('wp_enqueue_scripts', 'mytheme_enqueue_styles');
Step 2: Activate your theme
After creating these files:
- Log into your WordPress dashboard.
- Navigate to Appearance > Themes.
- Locate your new theme in the list and click Activate.
Your basic theme is now active and appears in the site’s front end, ready for further development.
Step 3: Developing theme templates
Understanding the WordPress template hierarchy is crucial for expanding your theme. You can add specific templates for different types of content:
- `single.php` for single posts.
- `page.php` for individual pages.
- `archive.php` for listings of posts, such as categories or date archives.
Create `header.php` and `footer.php` to manage common elements across all pages:
<!DOCTYPE html>
<html <?php language_attributes(); ?>>
<head>
 <meta charset="<?php bloginfo('charset'); ?>">
 <meta name="viewport" content="width=device-width, initial-scale=1">
 <?php wp_head(); ?>
</head>
<body <?php body_class(); ?>>
 <header>
 <h1><?php bloginfo('name'); ?></h1>
 <h2><?php bloginfo('description'); ?></h2>
 </header>
 <footer>
 <p>© <?php echo date('Y'); ?> <?php bloginfo('name'); ?></p>
 </footer>
 <?php wp_footer(); ?>
</body>
</html>
Step 4: Adding functions and features
In `functions.php`, register navigation menus and widget areas, and enqueue styles and scripts:
 function mytheme_register_menus() {
 register_nav_menus(array(
 'header-menu' => __('Header Menu', 'mytheme'),
 'footer-menu' => __('Footer Menu', 'mytheme')
 ));
}
add_action('init', 'mytheme_register_menus');
function mytheme_widgets_init() {
 register_sidebar(array(
 'name' => __('Sidebar', 'mytheme'),
 'id' => 'sidebar-1',
 'description' => __('Widgets in this area will be shown on all posts and pages.', 'mytheme'),
 'before_widget' => '<div id="%1$s" class="widget %2$s">',
 'after_widget' => '</div>',
 'before_title' => '<h2 class="widgettitle">',
 'after_title' => '</h2>',
 ));
}
add_action('widgets_init', 'mytheme_widgets_init');
Step 5: Styling the theme
Discuss CSS structuring strategies like SMACSS or BEM for better maintainability, and ensure your theme is responsive by using media queries in your CSS.
 @media only screen and (max-width: 600px) {
 body {
 background-color: lightblue;
 }
}
Step 6: Testing and debugging
Once your theme is active and styled, the next crucial phase is testing and debugging. This step ensures that your theme functions correctly across various devices and browsers and identifies any potential issues in the code.
Testing your theme across multiple devices and browsers is essential to ensure that it provides a consistent user experience, regardless of how visitors access your site.
- Manual testing: Open your website in different browsers (like Chrome, Firefox, Safari, and Edge) and on various devices (such as smartphones, tablets, and desktops) to check for any inconsistencies or bugs in the layout and functionality.
- Responsive design testing tools: Use tools like Chrome DevTools’ Device Mode to simulate your website on different screen sizes and resolutions directly from your browser.
- Cross-browser testing services: Platforms like BrowserStack or CrossBrowserTesting allow you to test your theme on multiple browsers and operating systems without having to install them on your device.
- Real device testing: Nothing can substitute for testing on actual devices. This approach provides the most accurate insights into how users will experience your site.
Tools and plugins for debugging WordPress themes
Debugging is crucial for identifying and fixing any issues in your WordPress theme. Here are some tools and plugins that can help streamline this process:
WordPress debug mode
Enable WordPress’s built-in debug mode by adding the following lines to your `wp-config.php` file:
 define('WP_DEBUG', true);

 define('WP_DEBUG_LOG', true);

 define('WP_DEBUG_DISPLAY', false);
This setup will log all errors to a file named `debug.log` within the `wp-content` directory and prevent errors from being displayed on your site.
Query Monitor plugin
Query Monitor is a developer tool that provides a wealth of information about the current page. It reports on database queries, PHP errors, hooks and actions, block editor blocks, enqueued scripts and stylesheets, HTTP API calls, and more. It’s particularly useful for tracking performance issues and pinpointing slow-loading queries.
Theme Check plugin
The Theme Check plugin is essential for developers looking to ensure their theme adheres to the latest WordPress theme review standards.It runs automated testing on your theme and will alert you to any potential issues or deprecated functions.
Browser developer tools
Almost all modern web browsers include developer tools. These tools allow you to inspect HTML and CSS, debug JavaScript, and view the console for any errors. Using these tools can help you understand how your theme behaves in different browsers and fix any issues that arise.
By thoroughly testing and effectively utilizing debugging tools, you can significantly enhance the stability, performance, and cross-browser compatibility of your WordPress theme. This not only provides a better experience for your users but also improves the overall quality and maintainability of your theme.
Creating a theme with AI builders
Now that you know manual steps of how to create a WordPress theme, let’s explore why you might opt for an AI builder instead. The AI builder utilizes deep neural networks and powerful AI algorithms, which can significantly streamline the process of theme creation. This technology is especially useful for those who wish to minimize time spent on technical details while still achieving a highly customized and functional website.
Let’s see how you can build your WordPress theme with 10Web AI Website Builder.
Automate manual work with 10Web Managed WordPress Hosting and 10Web AI Website Builder. Optimize your WordPress website effortlessly. ![]()
Simplify WordPress with 10Web
1. Create landing pages and initial content with AI Builder
Step 1: Create a new WordPress website with 10Web
To create the initial content that you can customize later, you’ll need a new empty WordPress install. If you already have an account with 10Web Hosting, go to your dashboard and select the option Create with AI Builder.
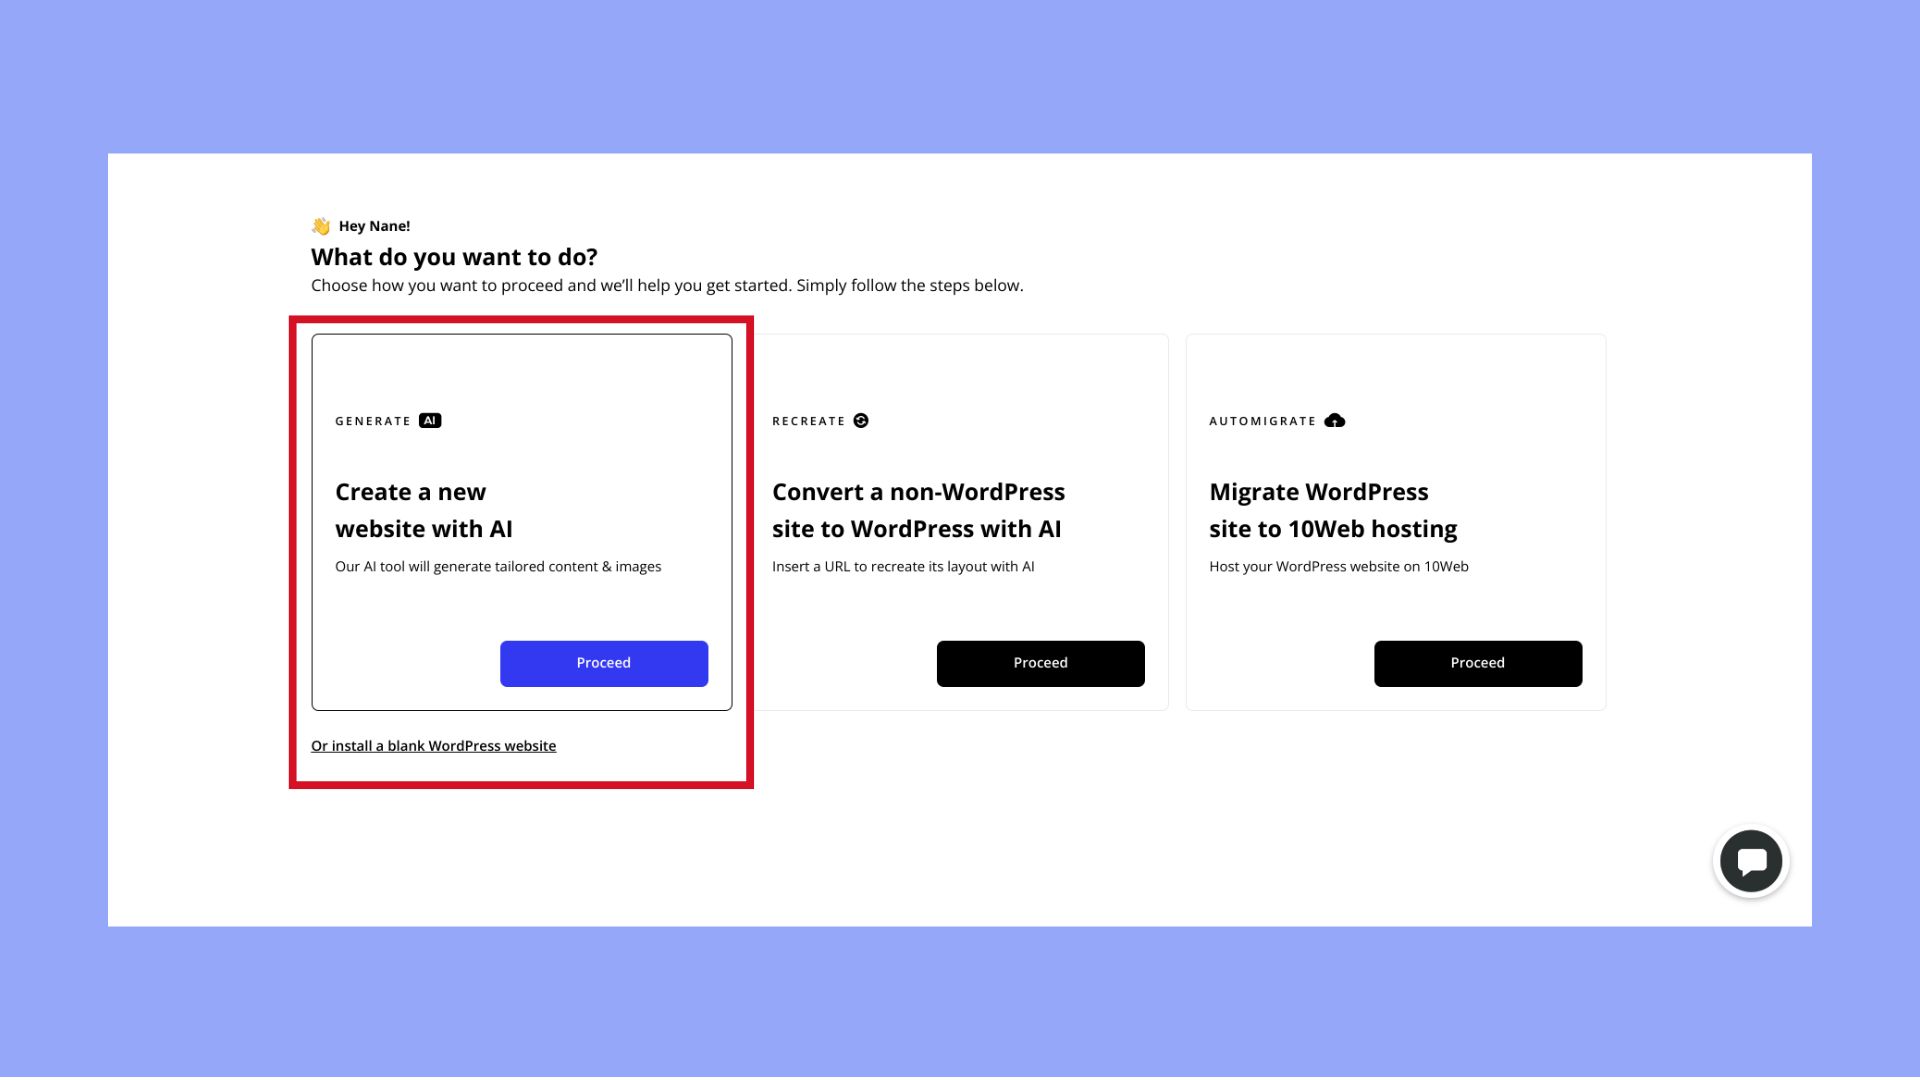
Otherwise, visit the AI Builder Homepage and click on the signup button. Create your account and then select the option to create a brand new WordPress website.
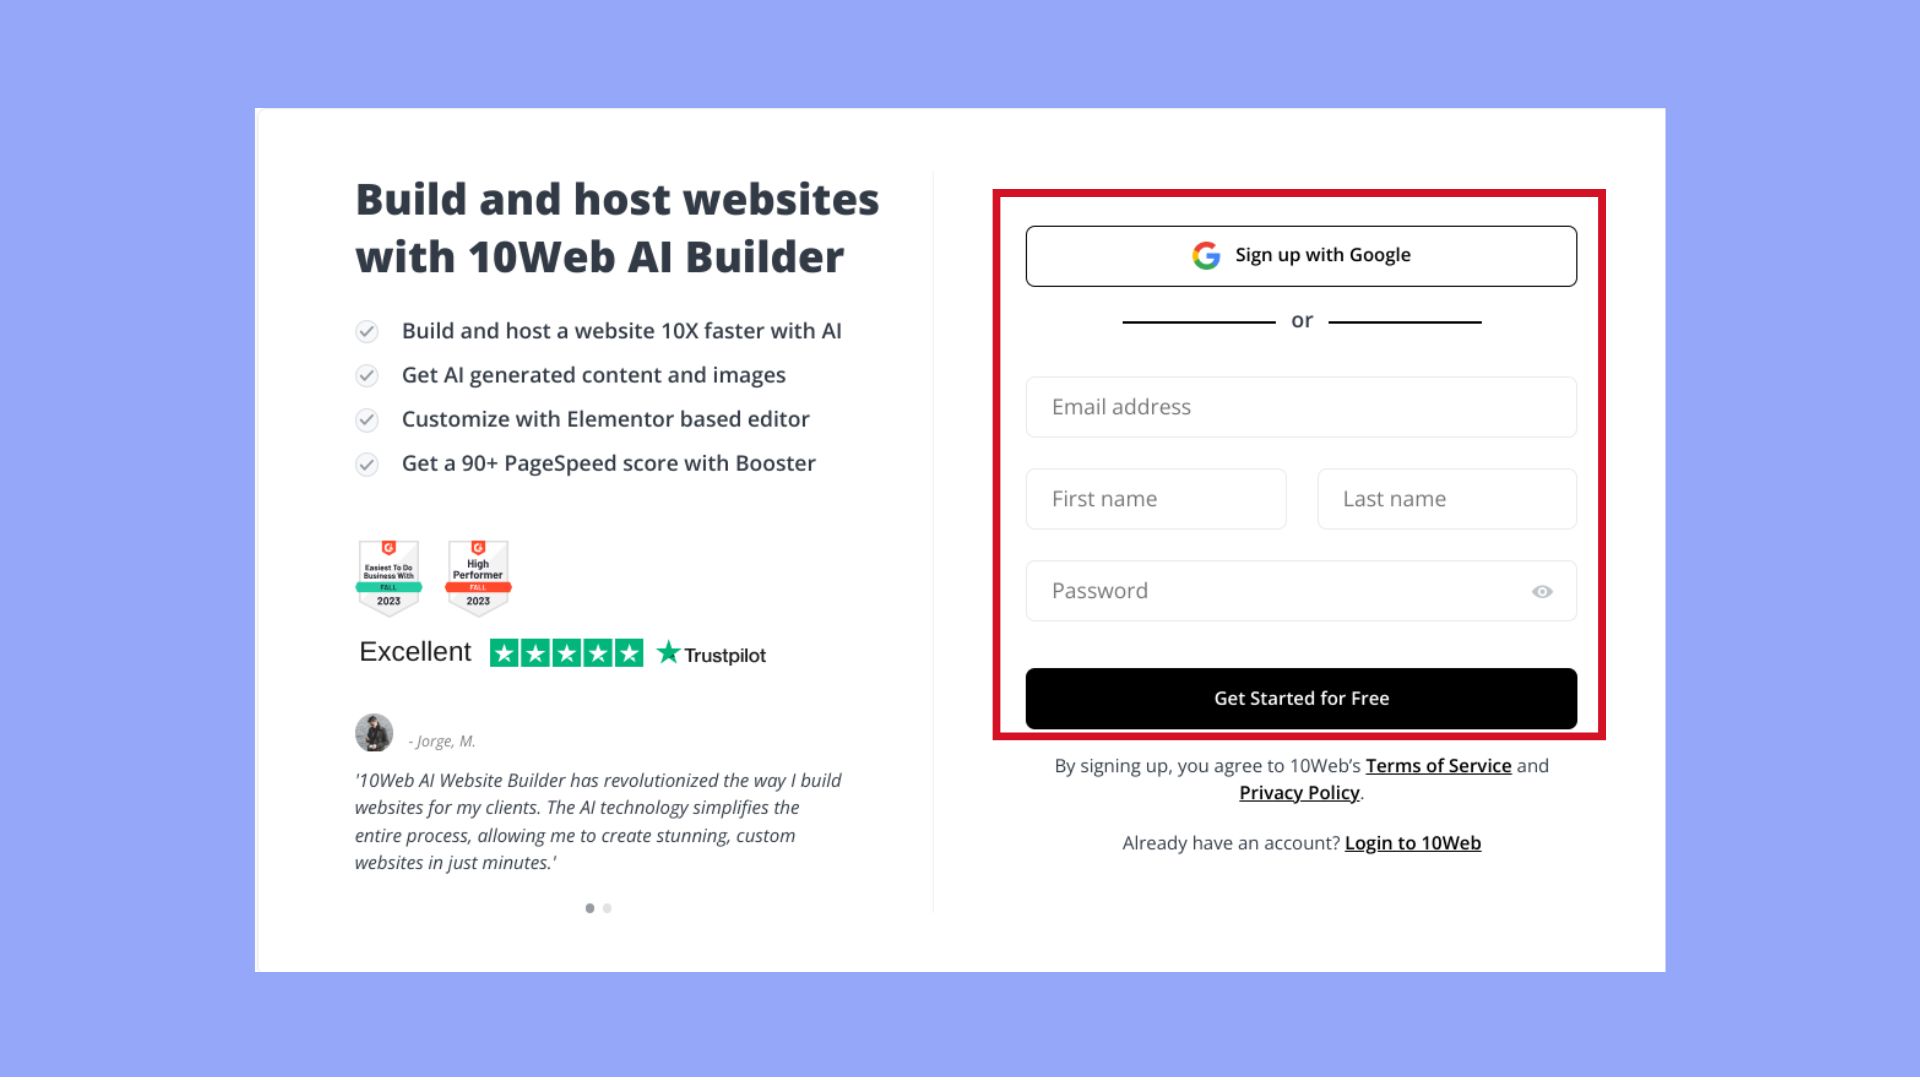
Step 2: Create the initial content
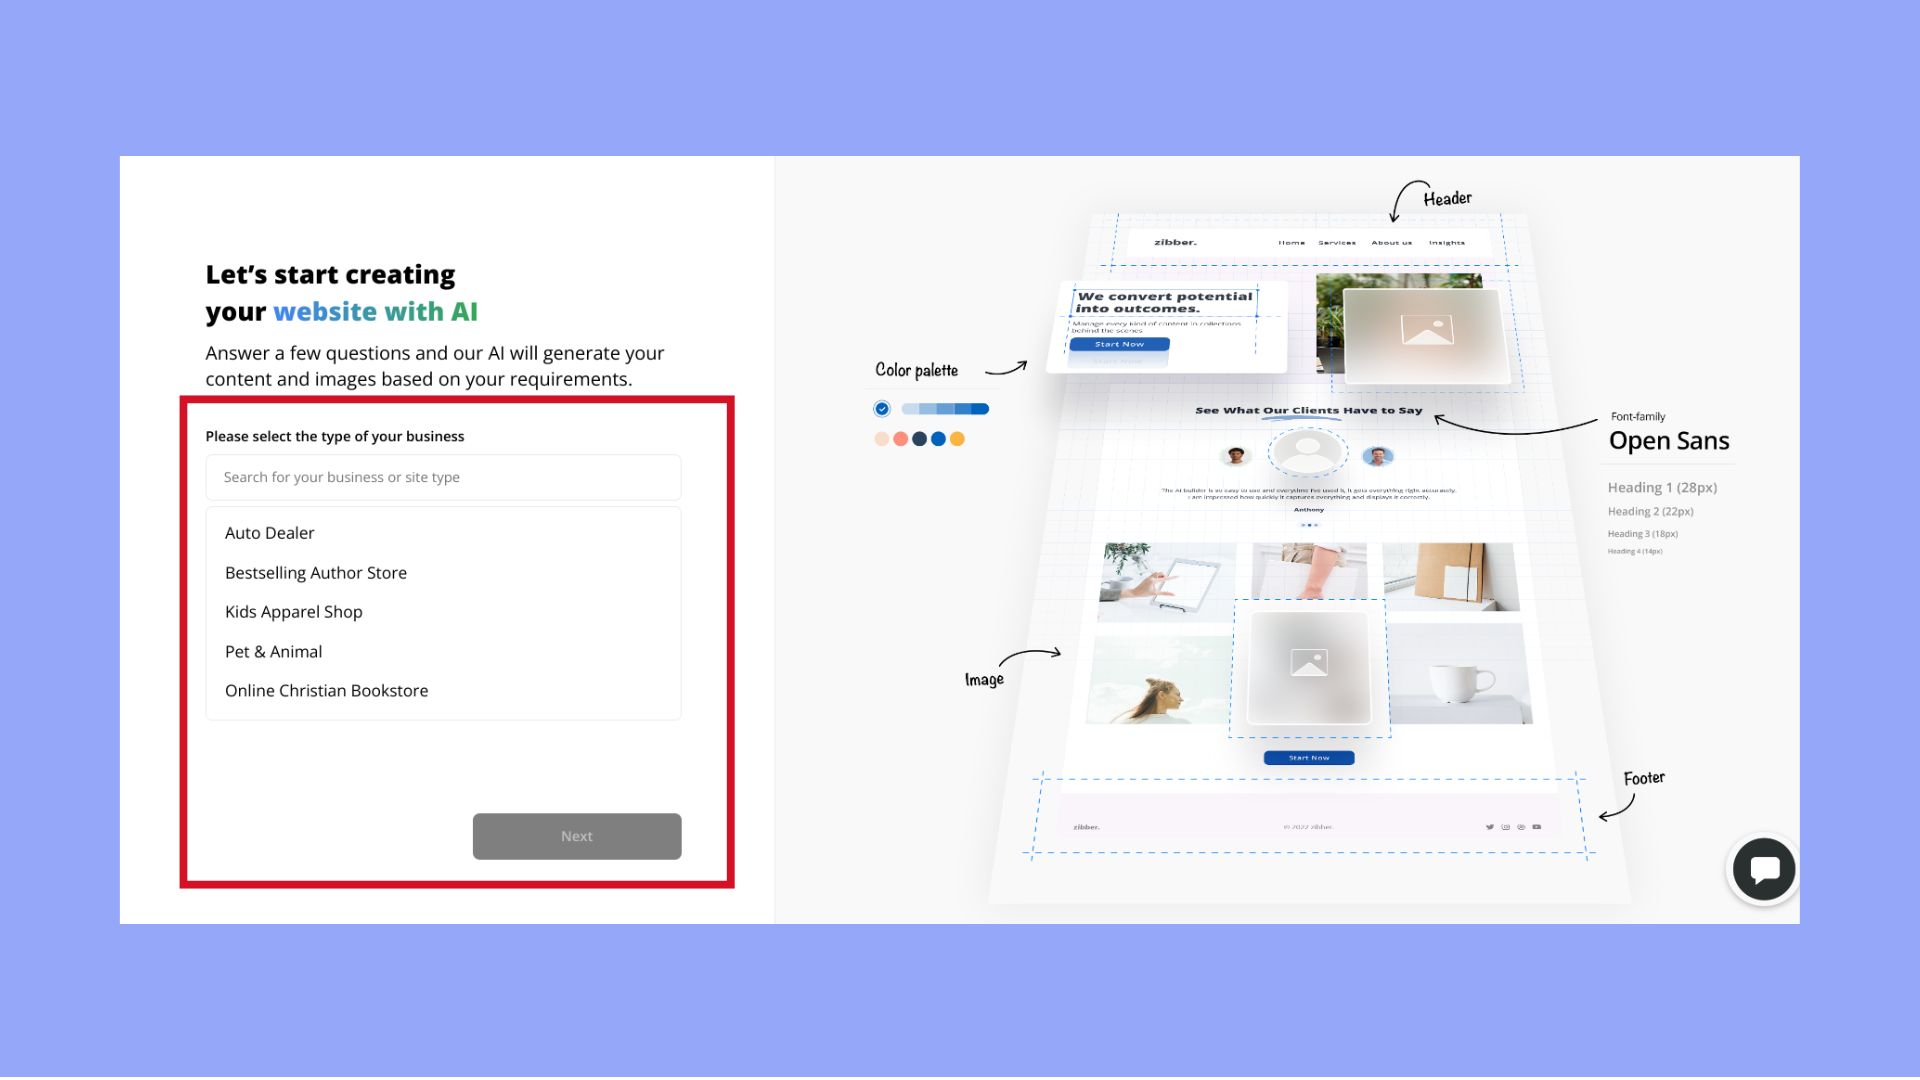
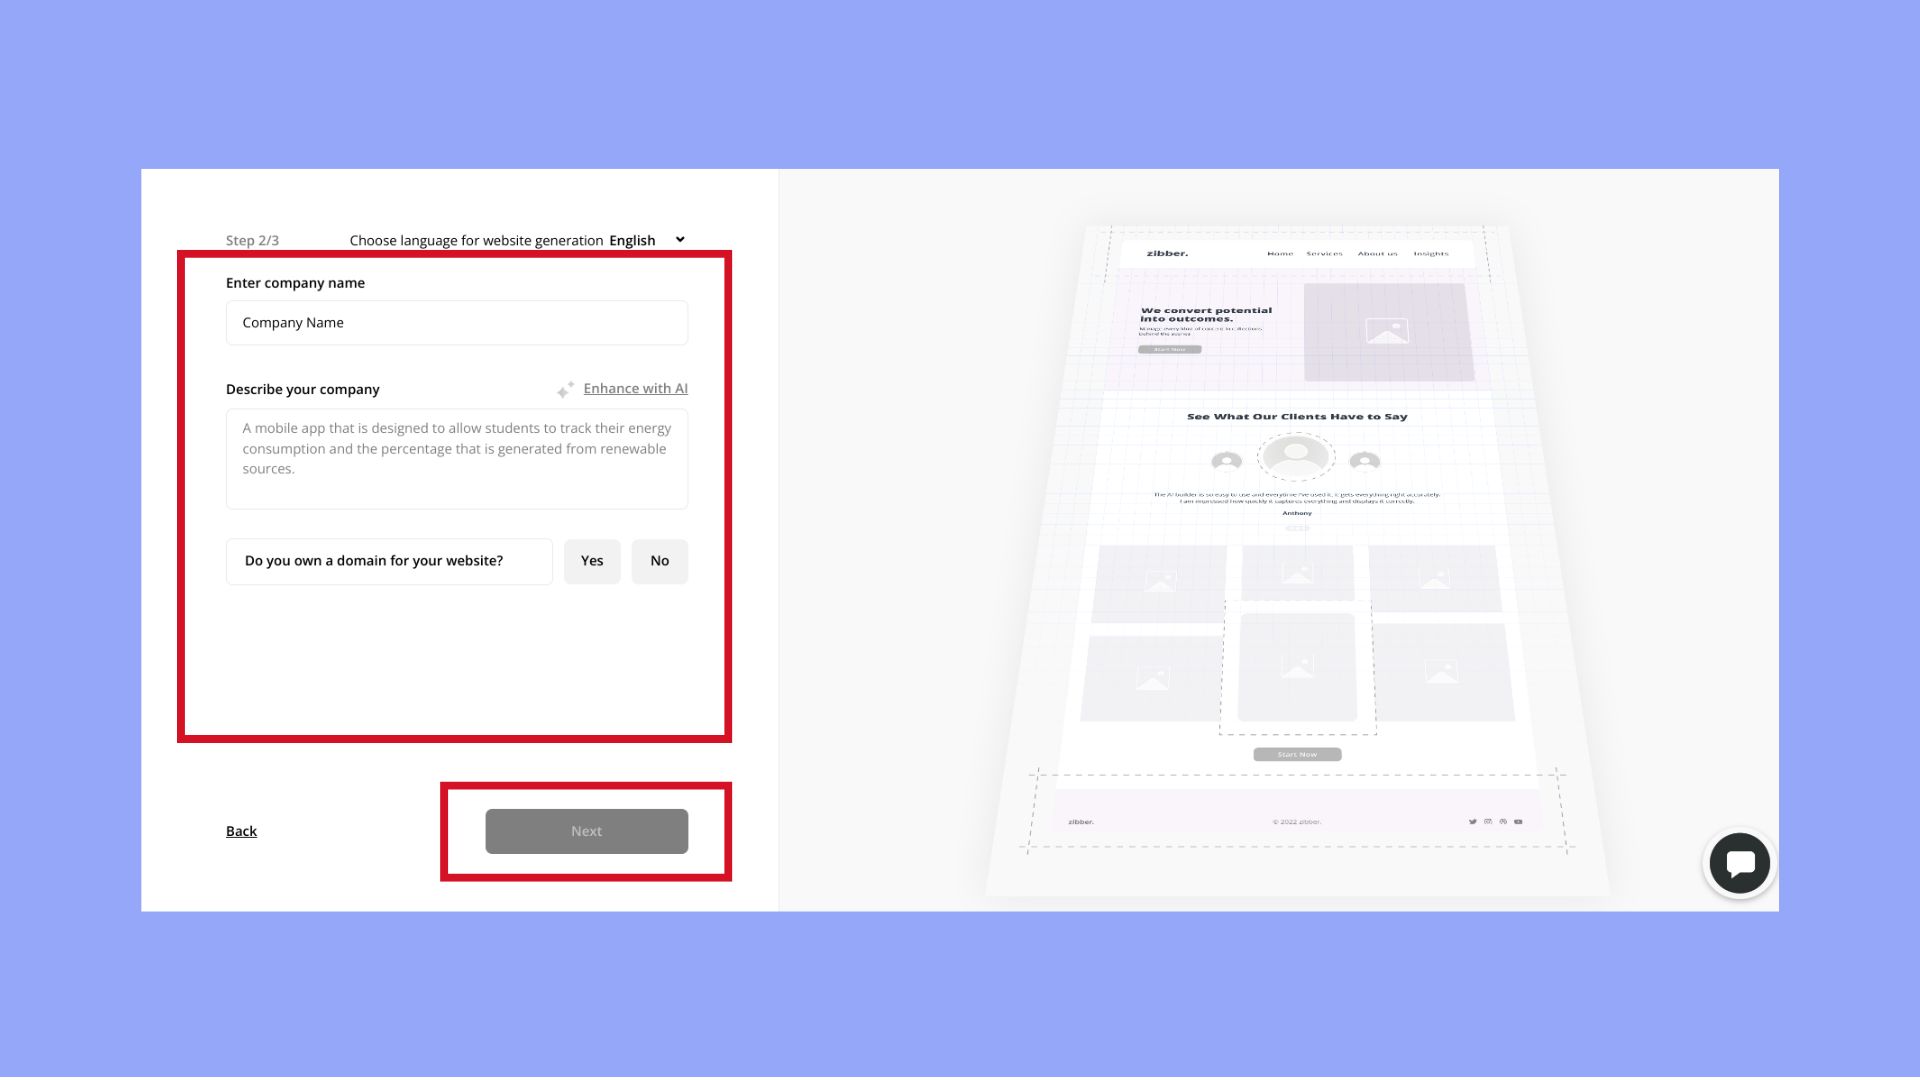
Now, you have to complete the form provided by the AI Builder. The form is simple enough. It merely asks questions regarding your website and its requirements. Examples of answers to the questions are also provided to give you an idea of what you can include. Your answers will guide AI in the creation of a unique and personalized theme for your website.
After creation, you can review your website and make edits using 10Web AI Builder.
To further complete your theme and website, the AI Builder also provides three options for page creation: AI recreation, pre-made pages with designer-made templates, and a blank page.
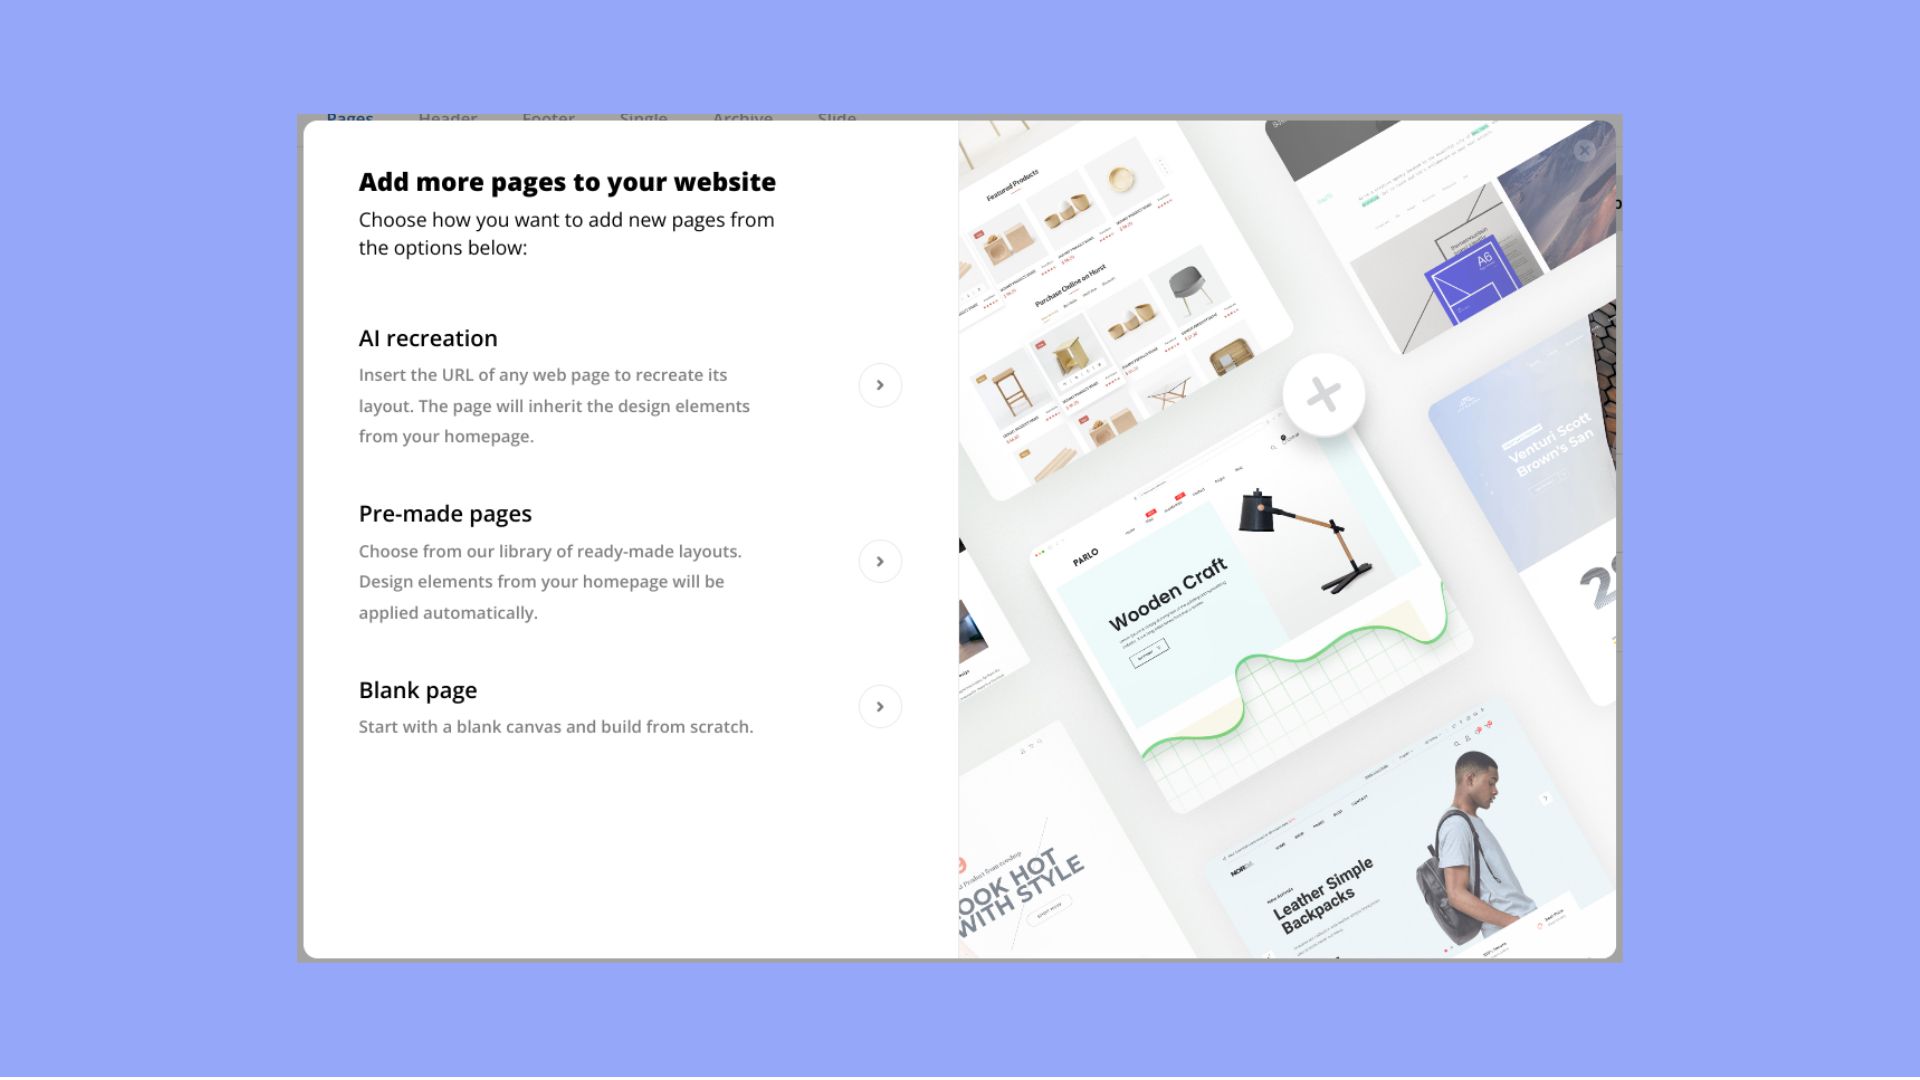
You can even add more pages based on already existing landing pages with the AI recreation tool. To recreate additional pages follow the steps below:
- In the dashboard, click on Add New Page and choose Add with AI recreation.
- Paste the URL of your existing landing page or the URL of the landing page (which can be of a third party) you would like to recreate.
- Click Recreate to start the recreation.
- After recreation, you can review the results of your recreation and edit your website using Elementor.
Step 3: Create header and footer templates
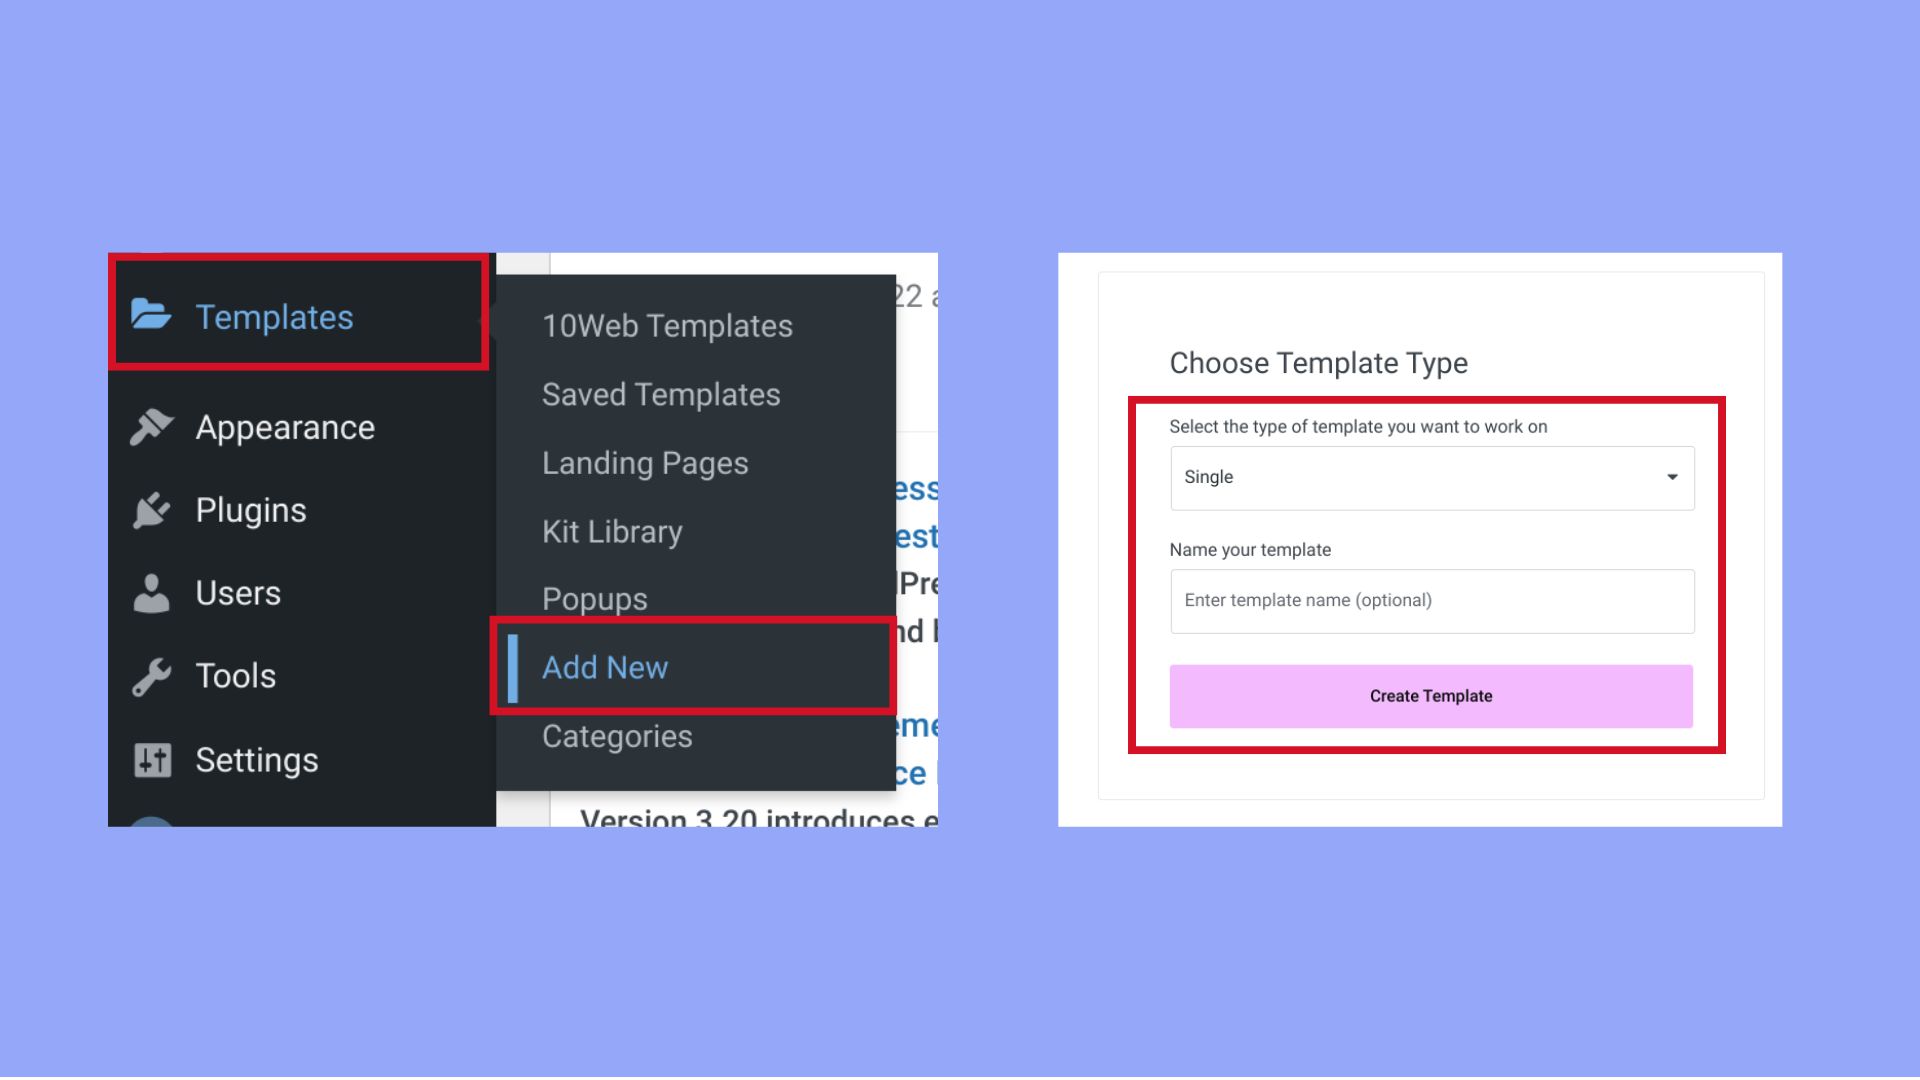
The last step in this part of the process is to create header and footer templates that will be used on your website. Go to your WordPress dashboard and click Templates > Add New.
In the popup screen that appears, select the type of template you want to create from the drop-down menu, give it a name, and click Create Template. You can then use the 10Web Builder based on Elementor to create a custom header or footer for your theme. Of course, if the input URLs contain the same header and footer, these templates will be automatically created for you by the 10Web AI Website Builder, so you won’t need to complete the above steps.
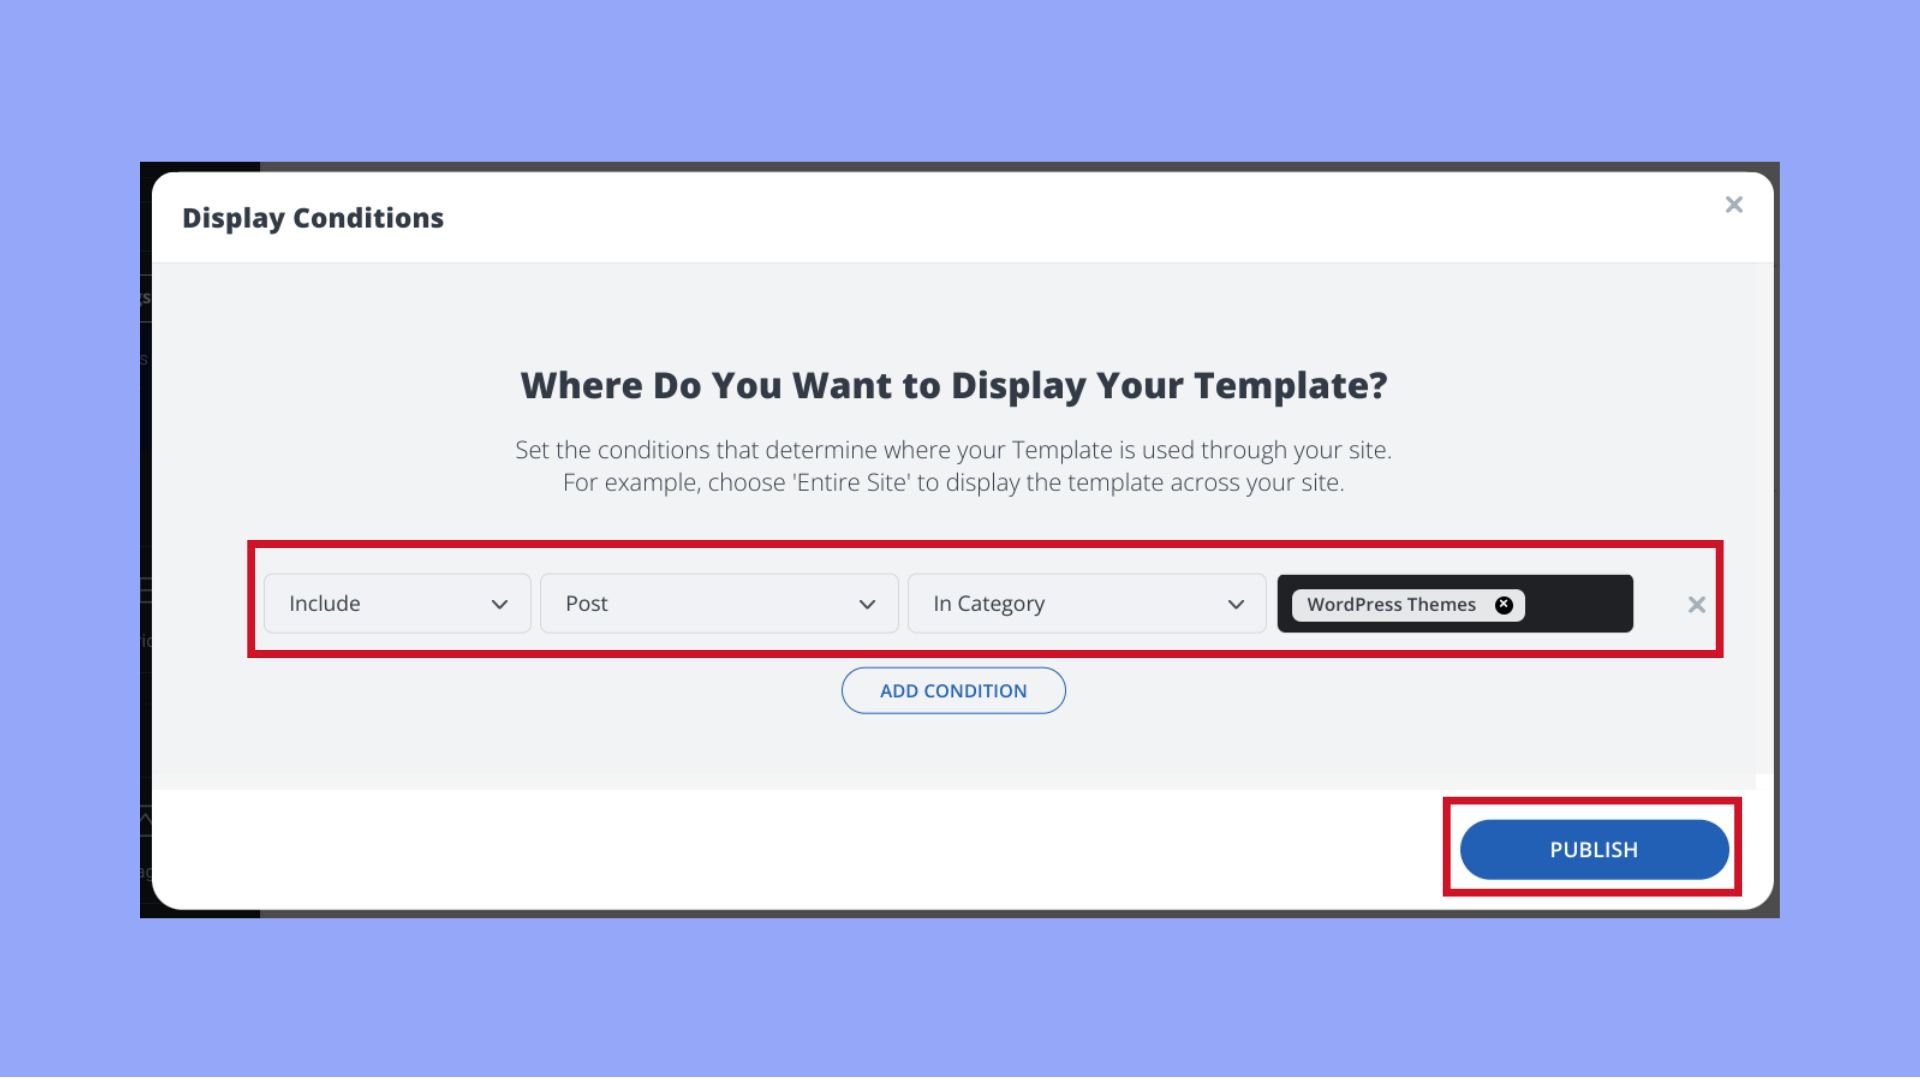
When you’re done creating the header and the footer template, you can add a condition that will determine where on your website you would like to display that particular template. This includes displaying the template on all the pages of the entire site or on a singular page, then including it on a specific page type or not, and so on and so forth.
To add a condition, click Advanced, add the conditions based on your preferences, and then hit Publish. You can then repeat the same steps to create more header templates or to create your footer template.
2. Create theme features
Now that you have the basics in place, it’s time to create the abovementioned page templates and core theme features.
Step 1: Create template files
The first step in this part of the process is to create page template files. As a reminder, you’ll need to create the following:
- Index page to display your blog posts
- Single post template to display the contents of a single blog post
- Search page template that will display search results
- Single page template to display individual pages
- 404 page that displays when content is not found on your site
To create a page template, go to your WordPress dashboard and click Templates. Select Add New and then choose a template type from the drop-down menu. For example, to create a single post template, choose Single, give it a name, and click Create template.Then use the 10Web Site Builder widgets to create a blog post template. In this example, I’ve added the Post/Page title widget, the featured image widget, and the post content widget.
When you’re done customizing your template, use the Advanced menu to set conditions for this template to display all the blog posts on your site. Hit Publish when you’re done. Repeat the same steps for other templates such as the archive page, 404 page, and any other necessary page templates.
Step 2: Create styles
The next step is to create the styles for your custom WordPress theme. To do this, click on the hamburger menu in the 10Web Builder. From there, you can set default colors, default fonts, global settings, and other visual styles for your theme.
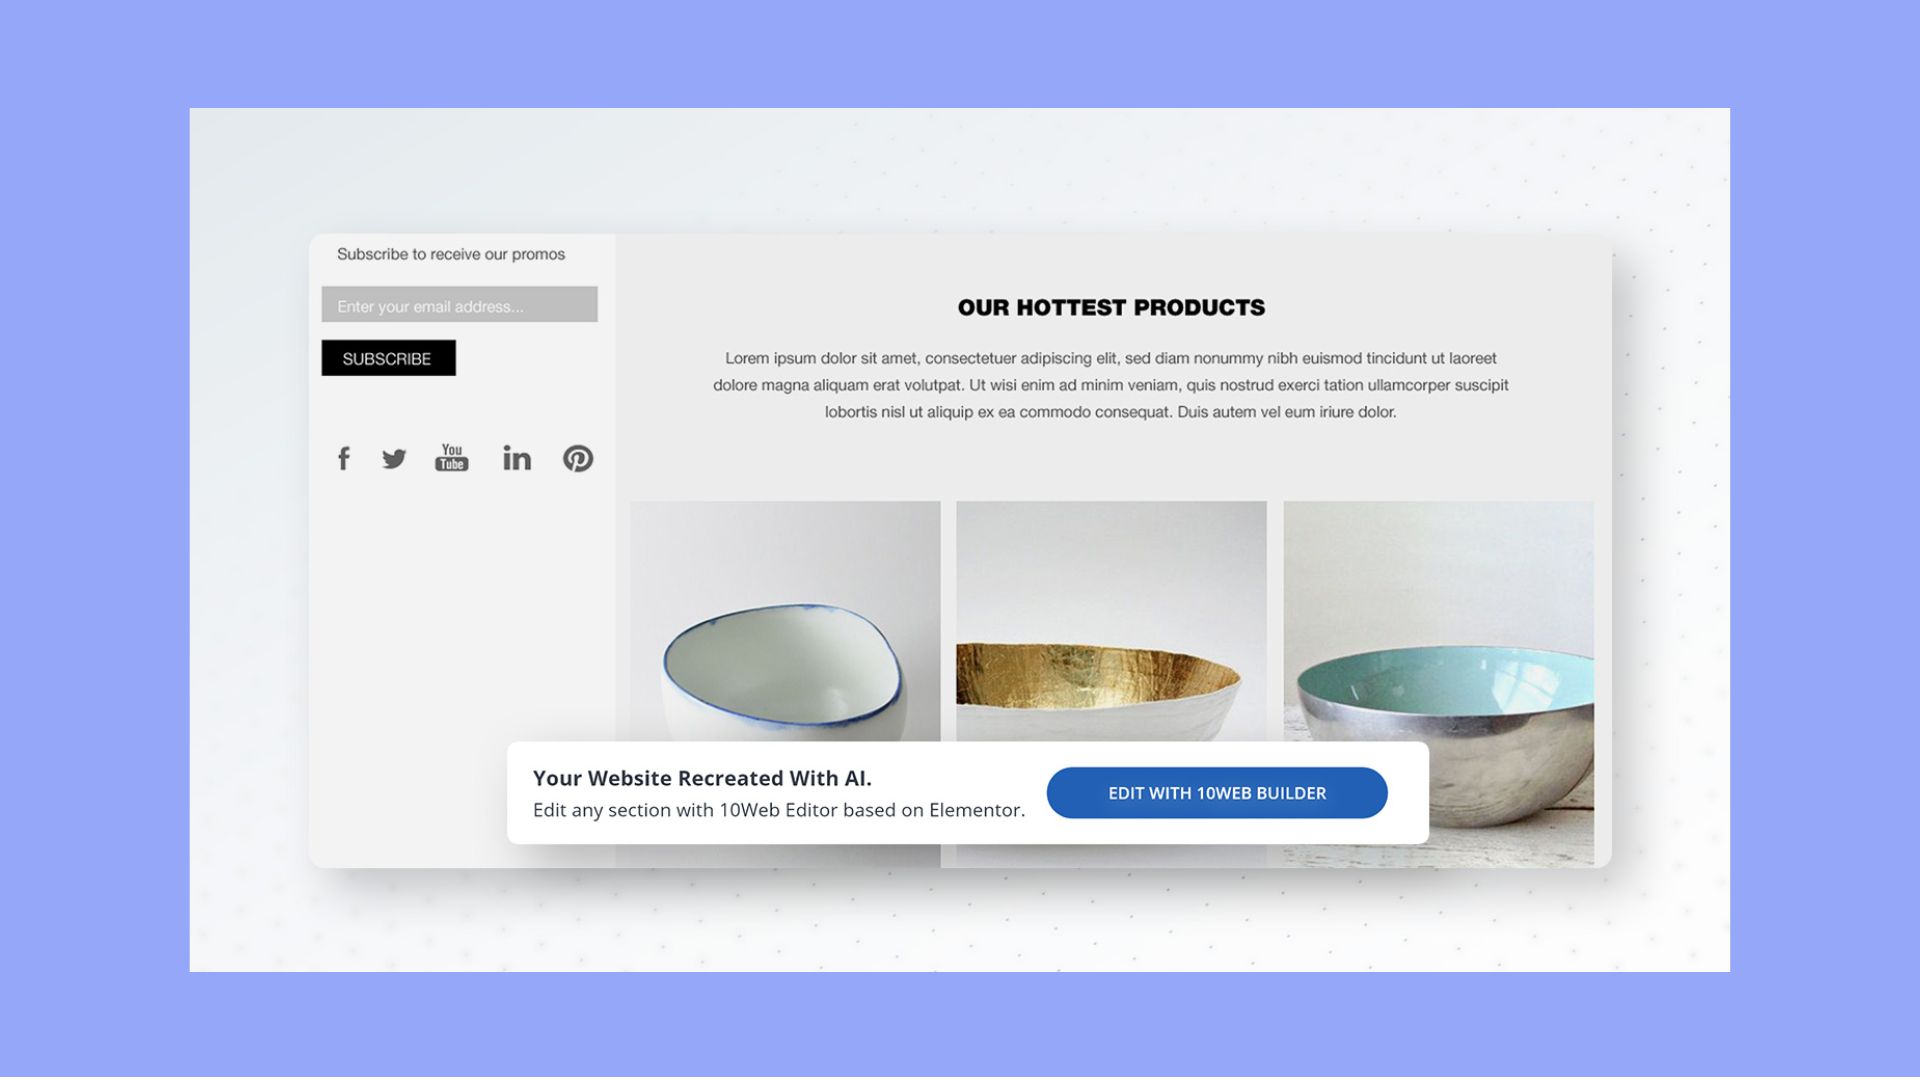
Keep in mind that you’ll need to disable the Global Colors and Global Fonts in the Settings panel of Elementor for your theme to inherit the styles you set.
Step 3: Create content parts
Once you’ve created the styles and the page templates, the last thing you might want to do is create different content parts and reusable blocks. This can include things like a newsletter opt-in form, a section for feature services, an about section, a call to action, and more.
The process for creating a content part is the same as it is for creating page templates. In your WordPress dashboard, click Templates > Add New and choose Section.
Then use the widgets and content blocks to create the type of section you need.
3. Install necessary plugins
Once you’ve created and installed your theme, it’s recommended to install any necessary plugins to give your clients the features they need. A few additional plugins we recommend include:
- An SEO plugin — you can use Yoast SEO, or any other SEO plugin
- Image optimization plugin — you can use 10Web’s Image Optimizer service to automatically optimize images on your site
- Contact form plugin — WPForms or Contact Form 7 are reliable advanced contact form plugins that will make it easy for visitors to get in touch with you or your client. If you have just basic form needs, however, the form widget in the 10Web Builder will suffice.
- Backup plugin — this will help you backup your site regularly so you can easily restore it if something goes wrong. You can enable 10Web’s Backup plugin or another backup plugin of your choice
- Performance plugin — the performance plugin will help your website to load fast. You can enable 10Web’s Optimizer plugin to keep everything running smoothly.
4. Make the theme/website reusable
The last step is to make your custom WordPress theme reusable so you can use it for future projects. There are two ways of achieving this:
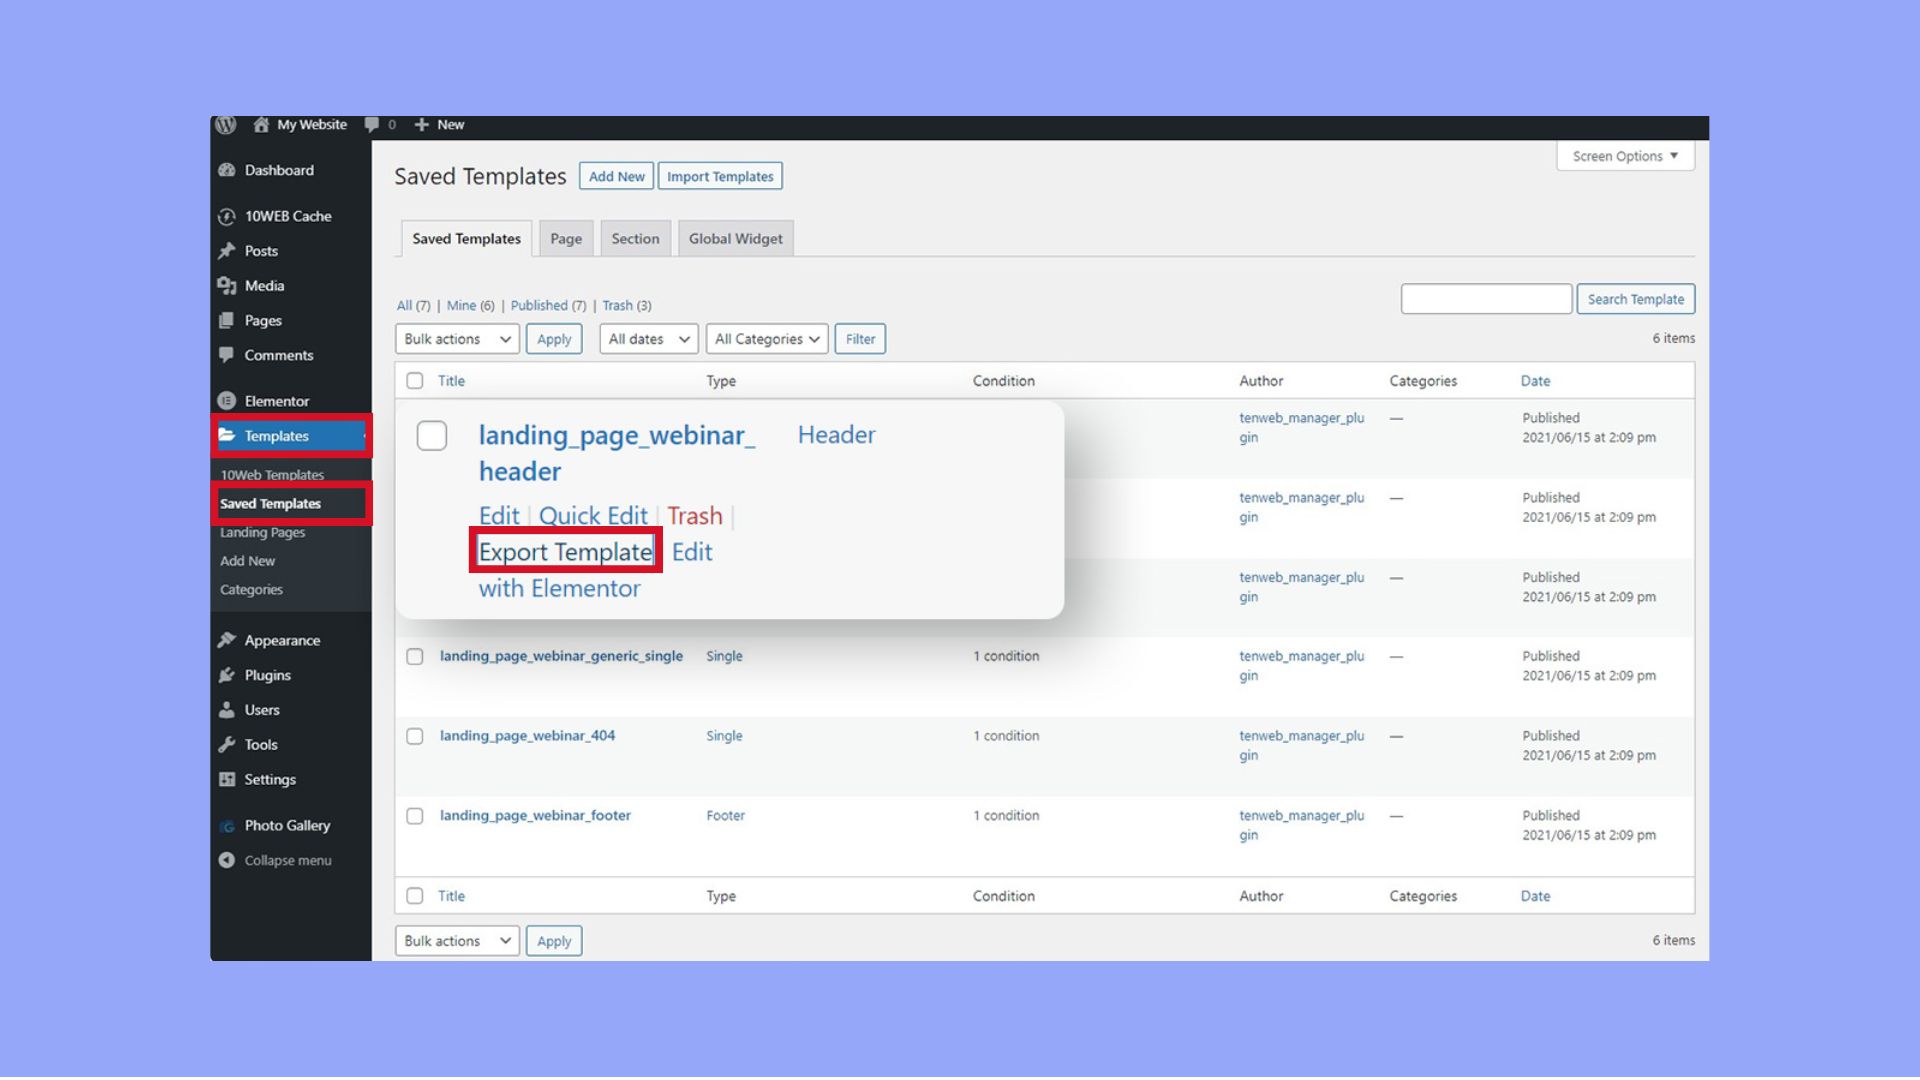
- Exporting individual pages/templates — simply export all the individual pages and templates as JSON files and use the import feature to import them to another site. To export the template, go to Templates > Saved Templates. Hover over the template you want to export and click Export Template.

- Make a whole site or database backup — use a backup plugin to create and export your site’s backup and then import the backup into a different site.
Both of these options allow you to reuse the theme when you’re creating new pages and save you a ton of time in your design and development process.
Preparing the theme for distribution
When you’re ready to distribute your custom WordPress theme, whether for personal use, clients, or submission to the WordPress Theme Directory, proper preparation and packaging are crucial. Here’s how to ensure your theme is ready for distribution and what you need to know if you’re considering submitting it to the WordPress Theme Directory.
Preparing the theme for distribution
Clean up your code
Ensure that your theme code is clean, well-documented, and follows WordPress coding standards. This includes:
- Properly formatting the code.
- Removing any debug code and console logs.
- Adding comments where necessary to explain the functionality of the code.
Include necessary files and documentation
Make sure to include all necessary files that your theme depends on. This includes template files, PHP files, CSS, JavaScript, and image files. Additionally, it’s good practice to include a `README` file that describes the theme, how to install it, and how to use its features.
Test the theme
Thoroughly test your theme to ensure it works well across different browsers and devices. Also, check your theme with the latest WordPress version to ensure compatibility. Using tools like Theme Check can help you validate your theme against WordPress standards.
Create a theme screenshot
WordPress displays a screenshot of your theme in the Appearance > Themes section of the WordPress admin. Create a `screenshot.png` file that is 1200 x 900 pixels in size, which shows a representative look of your theme.
Zip your theme
Once everything is ready, package your theme into a `.zip` file. This file should contain your theme’s directory and all of its files. Most operating systems can zip files natively, or you can use tools like WinZip, 7-Zip, or others.
Submitting themes to the WordPress theme directory
Review the guidelines
Before submitting your theme to the WordPress Theme Directory, ensure it meets the Theme Review Team’s guidelines. These guidelines cover licensing, privacy, coding standards, and functionality.
Use the theme check plugin
Install and run the Theme Check plugin, which checks your theme for the latest WordPress standards and practices. Fix any issues it identifies before submission.
Internationalize your theme
Ensure your theme is ready for translation by internationalizing it. This process involves wrapping text strings in your PHP files in a gettext function, allowing them to be translated into other languages.
Submit your theme
To submit your theme, you must have a WordPress.org account. Once logged in, go to the WordPress Theme Upload page, and upload your theme’s `.zip` file. After submission, your theme will be reviewed by the Theme Review Team. This process can take time depending on the queue and the revisions required.
Handle updates and maintenance
Once your theme is approved and live, you’ll need to maintain it by updating it for compatibility with new WordPress releases, fixing bugs, and potentially adding new features. Regular updates keep users happy and ensure your theme remains popular.
Conclusion
In wrapping up this guide on how to create a WordPress theme, it’s evident that crafting your own theme provides a tailored experience for your site. By building from scratch, you can ensure that every aspect of your website aligns perfectly with your vision and functional requirements. You’ve learned not only how to set up essential files and templates but also how to extend your theme’s capabilities with advanced functions and impeccable styling, preparing you to create a responsive and dynamic WordPress theme that stands out. Additionally, utilizing AI website builders like 10Web can make this process easier, cheaper, and faster, allowing even those with minimal coding experience to achieve professional results efficiently.


