In the competitive world of ecommerce, presenting your products with high-quality images is crucial for attracting and retaining customers. WooCommerce offers a range of options for adding and managing product images, ensuring your products look their best. Whether you’re a beginner looking to use the WooCommerce dashboard or a developer aiming to add images programmatically, this comprehensive guide will walk you through everything you need to know on how to add product image in WooCommerce.
FAQ
How do I add an image to a product attribute in WooCommerce?
How do I upload custom product images to WooCommerce?
The importance of product images in WooCommerce
Product images are essential in WooCommerce, playing a key role in attracting customers and enhancing their shopping experience. High-quality visuals not only capture attention but also build trust and credibility, making customers more likely to make a purchase. Here are the key points why the compelling product images are important:
- First impressions: High-quality images capture potential buyers’ attention, often being the first interaction a customer has with a product. This sets the tone for their overall shopping experience.
- Builds trust and credibility: Clear and detailed images help in building trust. Customers are more likely to purchase from a site that presents its products professionally.
- Increases conversion rates: Compelling visuals can significantly enhance conversion rates. Shoppers are more likely to buy a product if they can see it clearly from multiple angles.
- Reduces returns: Detailed images help customers make informed decisions, reducing the likelihood of returns due to unmet expectations.
- Enhances SEO: Well-optimized images with proper alt text can improve search engine rankings, driving more traffic to the ecommerce site.
- Showcases product details: Images provide a clear view of the product’s features, materials, and quality, which descriptions alone might not convey effectively.
- Supports branding: Consistent and high-quality images contribute to a cohesive brand image, helping to differentiate from competitors.
- Engages customers: Interactive features like zoom, 360-degree views, and videos can enhance customer engagement, making the shopping experience more interactive and enjoyable.
- Influences perceived value: High-quality images can enhance the perceived value of a product, justifying higher prices and enhancing overall product appeal.
- Mobile shopping: With the rise of mobile shopping, clear and optimized images ensure a better user experience across all devices, encouraging purchases from mobile users.

Looking to sell online?
Create your custom online store in minutes with 10Web AI Ecommerce Website Builder and take your business online.

How to add product images in WooCommerce?
Method 1: Using the WooCommerce dashboard
If you wonder how to add product image in WooCommerce effortlessly, you can consider using the WooCommerce dashboard. Here are the steps:
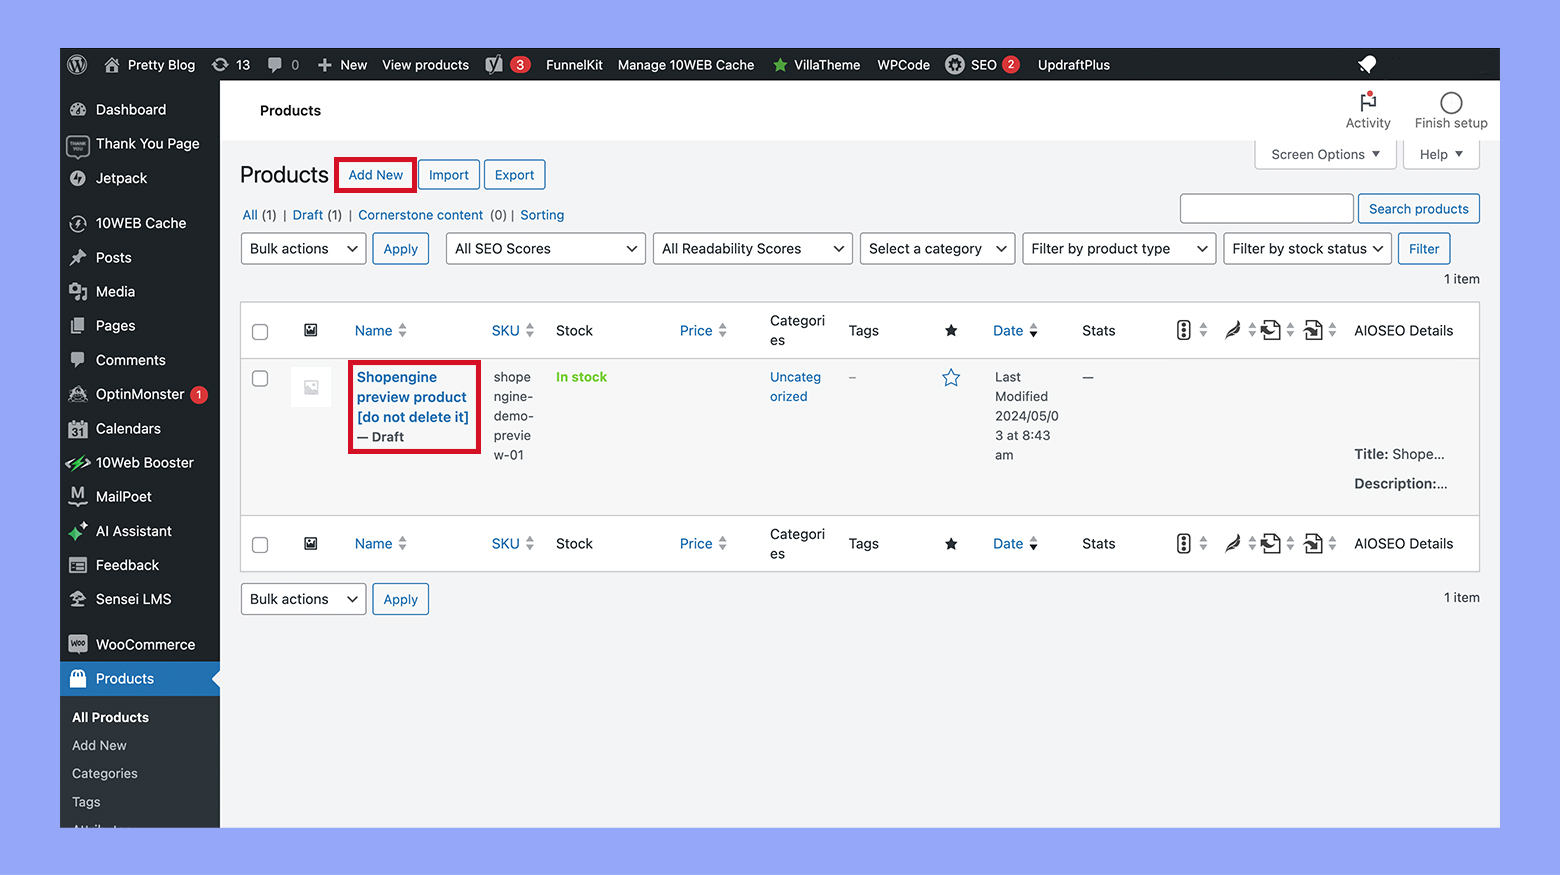
- From your WordPress dashboard, go to Products.
- Click on Add new to create a new product or select an existing product to edit.

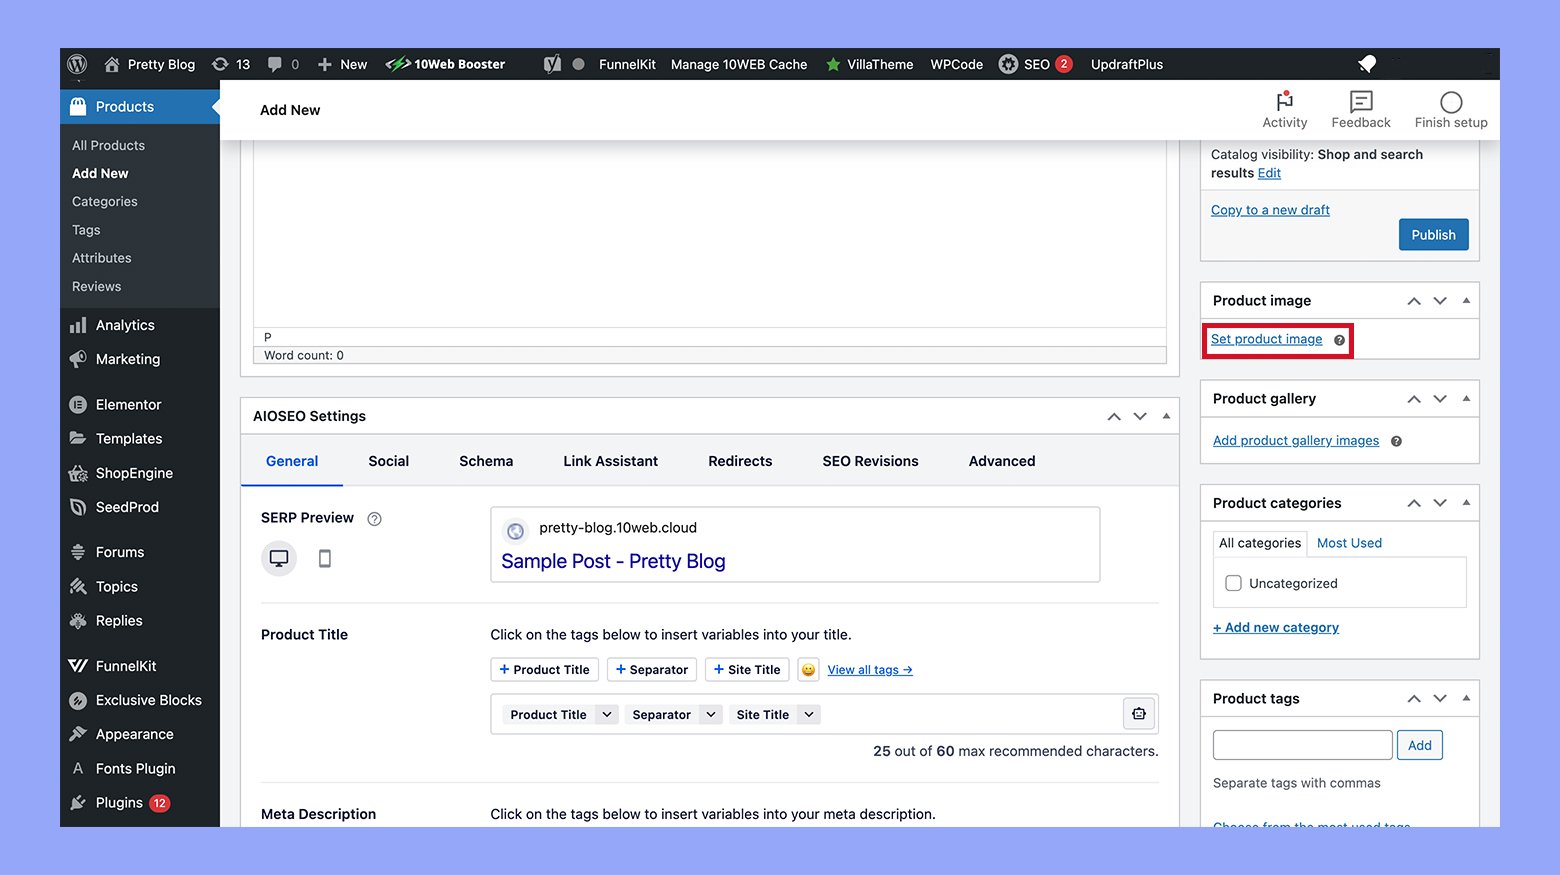
- In the Product Image section on the right-hand side, click on Set product image.
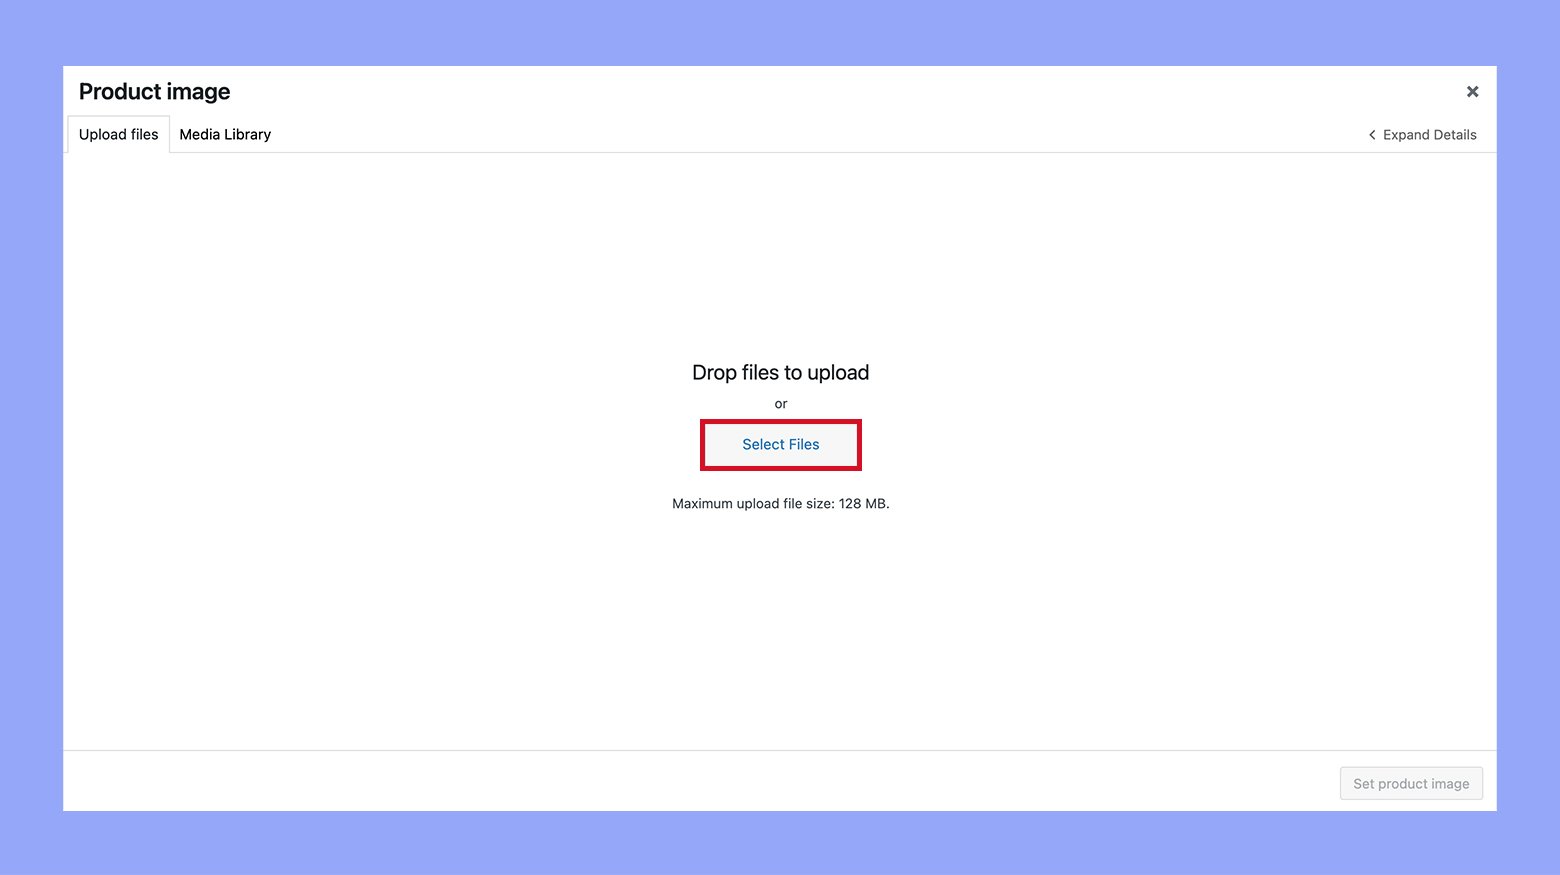
- You can upload a new image from your computer or choose an existing image from your media library.
- Click Publish or Update to save your changes.
Method 2: Using the Media library
Another easy method on how to add a product image in WooCommerce is by using the media library.
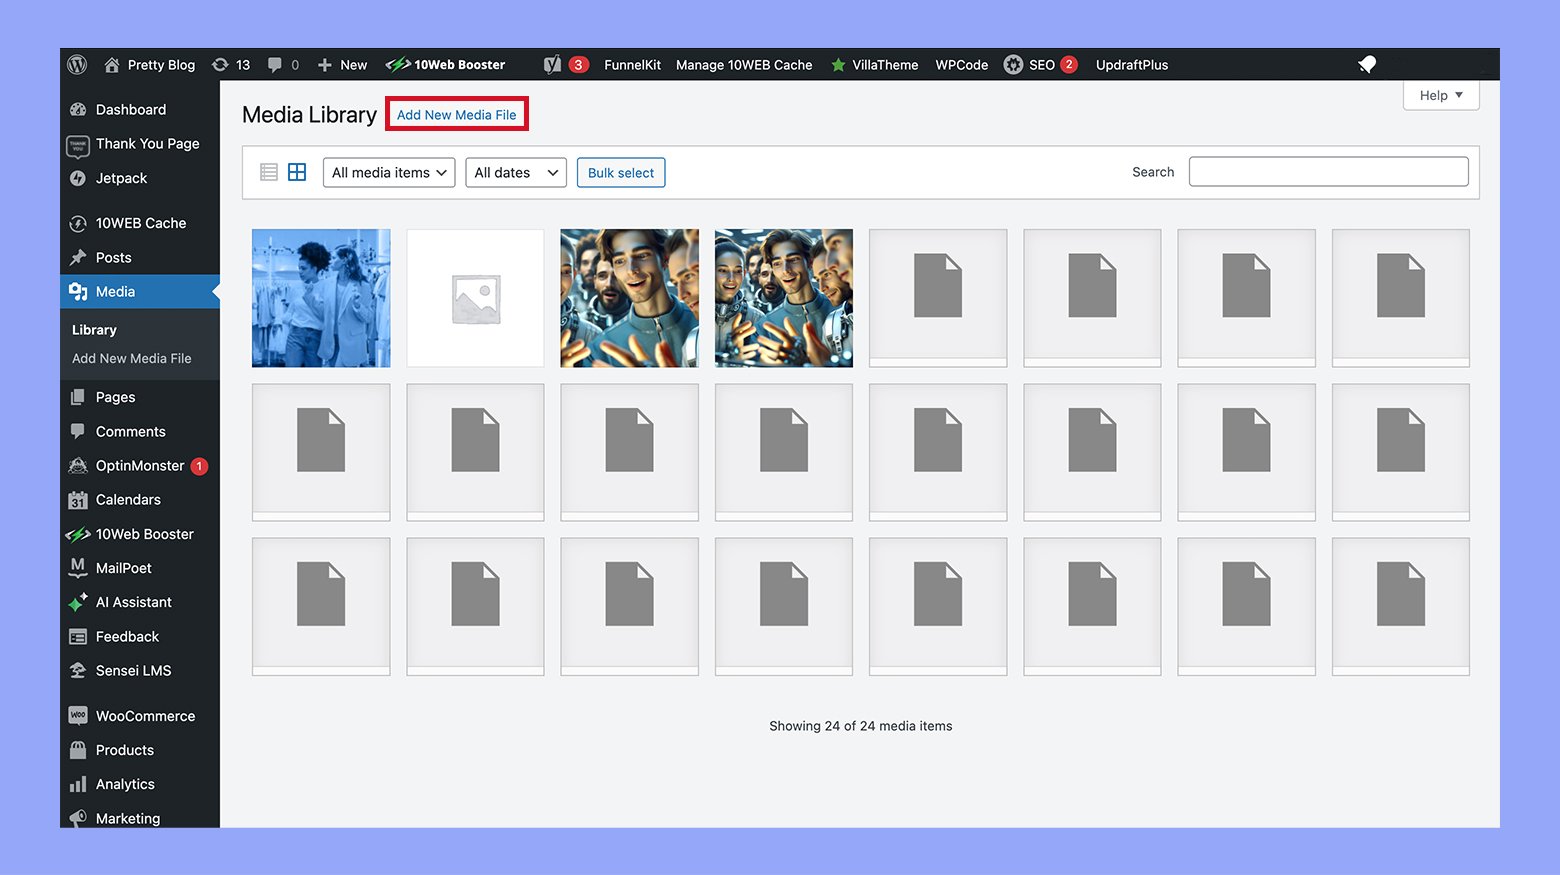
- Go to Media > Add new media file and upload your product images.
- Go to Products and edit the desired product.
- In the Product image section, select the image from the media library.
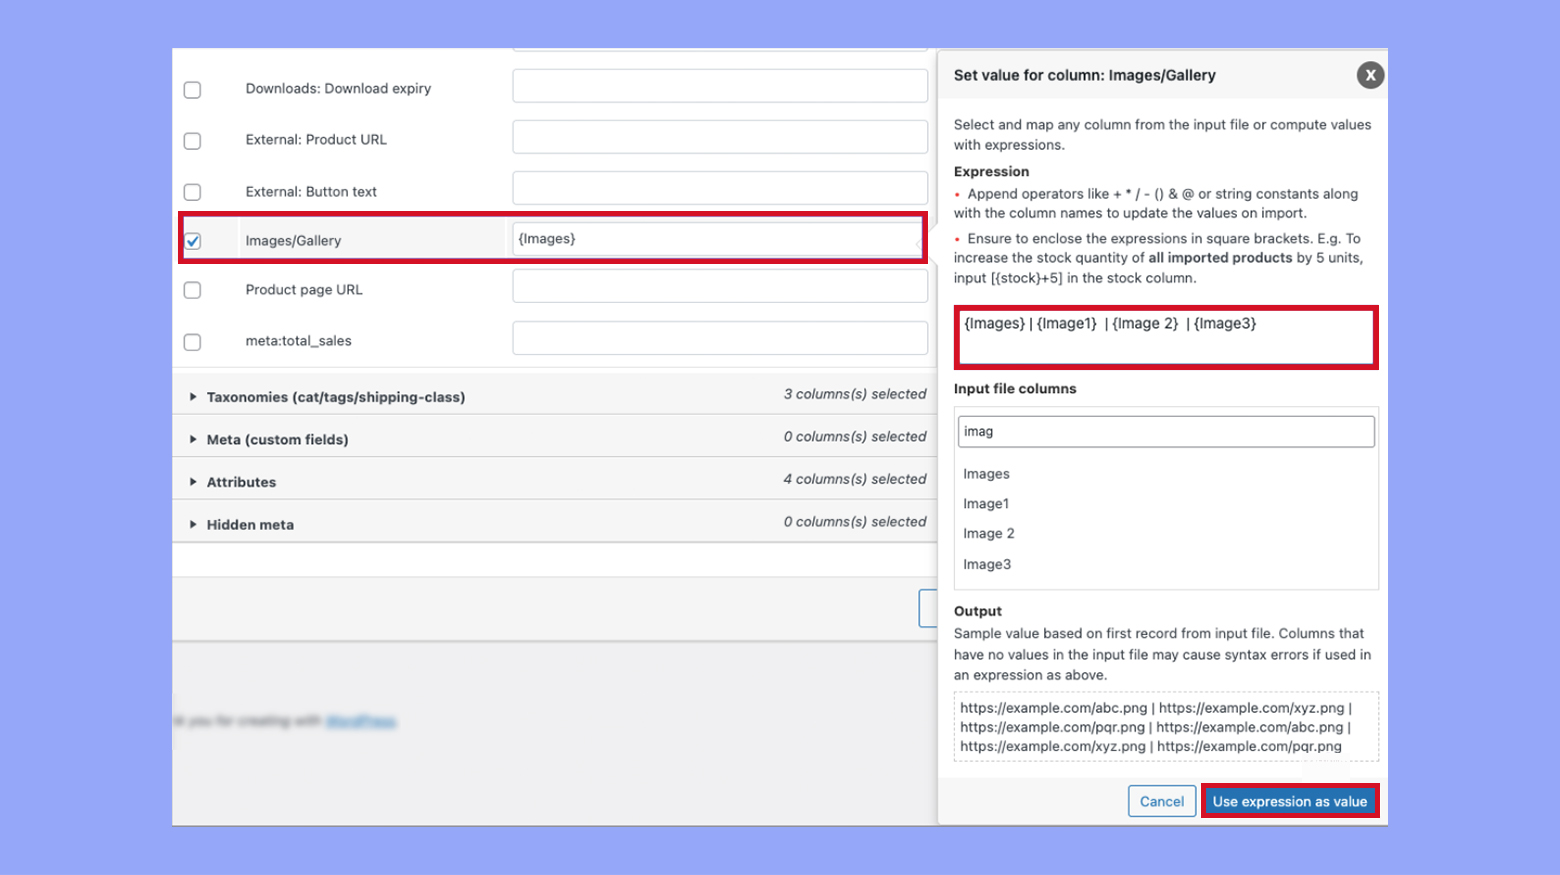
Method 3: Importing product images from multiple CSV columns
To import multiple product images from several CSV columns, you need to map the input file columns to the Image/Gallery column and separate them using the | symbol. For instance, if your CSV file has columns named Image1, Image2, and Image3, map these columns to the Images/Gallery field by following these steps:
- In your WordPress admin panel, go to WooCommerce > Import Export Suite > Import.
- Choose the post type as Product.
- Select Advanced as the import method, and use a pre-saved template if available.
- To map multiple product images, click on the Images/Gallery column name, add the input file columns, separate them with the | symbol, and select Use expression as value. This will allow the import of multiple product images from different columns.
- Configure the advanced import options, set up batch import, and schedule the import if necessary.
- Click on Import to complete the process.
Method 4: Adding images programmatically
Featured image for single product
To add a featured image to a single product programmatically, you can use the following code snippet in your theme’s functions.php file:
function set_featured_image_for_product($product_id, $image_url) {

 $image_id = attachment_url_to_postid($image_url);

 if ($image_id) {

 set_post_thumbnail($product_id, $image_id);

 }

}

// Usage

set_featured_image_for_product(123, 'http://example.com/image.jpg');
Featured image for multiple products
For adding featured images to multiple products, you can loop through product IDs and apply the same function:
function set_featured_image_for_products($product_ids, $image_url) {

 $image_id = attachment_url_to_postid($image_url);

 foreach ($product_ids as $product_id) {

 if ($image_id) {

 set_post_thumbnail($product_id, $image_id);

 }

 }

}

// Usage

set_featured_image_for_products([123, 124, 125], 'http://example.com/image.jpg');
Adding images to product gallery
To add images to a product gallery, use the following code:
function add_images_to_product_gallery($product_id, $image_urls) {

 $gallery_ids = [];

 foreach ($image_urls as $image_url) {

 $image_id = attachment_url_to_postid($image_url);

 if ($image_id) {

 $gallery_ids[] = $image_id;

 }

 }

 update_post_meta($product_id, '_product_image_gallery', implode(',', $gallery_ids));

}

// Usage

add_images_to_product_gallery(123, [

 'http://example.com/image1.jpg',

 'http://example.com/image2.jpg'

]);

Setting a default image for products without a featured image
To set a default image for products without a featured image, use this code snippet:
function set_default_featured_image() {

 $default_image_url = 'http://example.com/default-image.jpg';

 $default_image_id = attachment_url_to_postid($default_image_url);

 $args = [

 'post_type' => 'product',

 'posts_per_page' => -1,

 'meta_query' => [

 [

 'key' => '_thumbnail_id',

 'compare' => 'NOT EXISTS'

 ]

 ]

 ];

 $products = get_posts($args);

 foreach ($products as $product) {

 set_post_thumbnail($product->ID, $default_image_id);

 }

}

add_action('init', 'set_default_featured_image');
Advanced image management in WordPress
Adding custom image sizes
To add custom image sizes in WordPress, you need to modify your theme’s functions.php file. This file is crucial for adding functionality to your theme. By adding custom image sizes, you can control the dimensions of images used throughout your site.
- Open your theme’s functions.php file.
- Add the following code to define a custom image size:
function custom_image_sizes() {

 // Add a custom image size with the dimensions 800x600 pixels, cropped to fit

 add_image_size('custom-size', 800, 600, true);

}

// Hook the custom image size function to the 'after_setup_theme' action

add_action('after_setup_theme', 'custom_image_sizes');
-
- ‘custom-size’ is the name of the new image size.
- 800 is the width in pixels.
- 600 is the height in pixels.
- true enables hard cropping, ensuring the image fits exactly within the specified dimensions.
- Use the new image size in your theme. To use this new image size in your theme files, you can call it in your template files like so:
the_post_thumbnail('custom-size');
Removing default image sizes
If you want to clean up your WordPress installation by removing default image sizes, you can do so by adding code to the functions.php file. This helps in saving storage space and ensures that only necessary image sizes are generated.
- Open your theme’s functions.php file.
- Add the following code to remove default image sizes:
function remove_default_image_sizes($sizes) {

 // Remove the default 'thumbnail' image size

 unset($sizes['thumbnail']);

 // Remove the default 'medium' image size

 unset($sizes['medium']);

 // Remove the default 'large' image size

 unset($sizes['large']);

 return $sizes;

}

// Apply the filter to modify the available image sizes

add_filter('intermediate_image_sizes_advanced', 'remove_default_image_sizes');
- unset($sizes[‘thumbnail’]);: Removes the ‘thumbnail’ size.
- unset($sizes[‘medium’]);: Removes the ‘medium’ size.
- unset($sizes[‘large’]);: Removes the ‘large’ size.
- The return $sizes; statement ensures the modified sizes array is returned.
- The add_filter(‘intermediate_image_sizes_advanced’, ‘remove_default_image_sizes’); line applies this function to the image size generation process.
Conclusion
Adding and managing product images in WooCommerce is essential for creating an engaging and professional online store. By utilizing the WooCommerce dashboard, implementing programmatic solutions, and importing images effectively, you can enhance your product presentation, ultimately boosting customer satisfaction and sales. With these comprehensive strategies, your WooCommerce store will be well-equipped to showcase products in the best possible light.
Looking to sell online?
Create your online store in minutes
Create your online store in minutes with 10Web AI Ecommerce Website Builder.