Creating a website in WordPress is a dynamic way to present your content, but many newcomers struggle with the basics. This guide will show you exactly how to add pages in WordPress, breaking down the process into simple, actionable steps. From accessing the dashboard to publishing your first page, we cover all the essentials to help you expand your site’s structure and functionality. Whether you’re setting up a blog, business site, or portfolio, mastering this skill is fundamental for building an effective online presence.
Simplify WordPress with 10Web
Automate manual work with 10Web Managed WordPress Hosting and 10Web AI Website Builder. Optimize your WordPress website effortlessly.
FAQ
How do I add more pages to my WordPress site?
How do you create pages in WordPress?
- Log into your WordPress dashboard.
- Go to Pages > Add New.
- Enter a title for your page in the title area.
- Use the block editor to add and format your text, insert images, embed videos, or add any other content.
- Once you’ve added and formatted your content, click Publish to make the page available on your site.
How do I add and edit pages in WordPress?
How do I create separate pages in WordPress?
- Logging into your WordPress dashboard.
- Navigating to Pages > Add New.
- Entering a title and adding content using the block editor.
- Publishing each page separately by clicking Publish.
Each page you create can be customized independently, allowing you to have distinct pages such as Home, About Us, and Contact.
What is a WordPress page
A WordPress page is designed to host static and timeless content on a website, such as About Us, Contact, and Privacy Policy. Pages support hierarchical organization, allowing for the creation of parent and child pages to logically structure information. They can be customized with different templates depending on the theme, catering to various layout needs. This makes them well-suited for essential functions like hosting contact forms, displaying legal disclosures, or showcasing portfolios. Each page has a permanent URL, known as a permalink, which can be customized to fit the structure of the website.
How are pages different from posts in WordPress
WordPress pages differ from posts in several key aspects, which reflect their distinct uses within a WordPress site:
| Feature | Pages | Posts |
| Nature of content | Static, does not change frequently. | Dynamic, time-sensitive, changes frequently. |
| Organization | Hierarchical structure (parent and child pages). | Organized by categories and tags, chronological order. |
| Engagement features | Typically lacks features like comments sections and RSS feeds. | Often includes comments and is integrated with RSS feeds for updates. |
| Templates and appearance | Can use various templates for different layouts. | Generally follows a standard layout that includes metadata (author, date, categories). |
| Permalinks | Simple and straightforward, often reflecting the site’s structure. | Include date or category information, reflecting chronological order. |
By understanding these distinctions you will be able to decide whether to use a page or a post for specific content needs, based on how you want the content to function and be perceived by visitors.
Simplify WordPress with 10Web
Automate manual work with 10Web Managed WordPress Hosting and 10Web AI Website Builder. Optimize your WordPress website effortlessly.
How to add pages in WordPress with the Gutenberg Block Editor
The Gutenberg Block Editor is the default editor in WordPress versions 5.0 and above, offering a more visual, block-based approach to content creation.
- Log into your WordPress administration area – the Dashboard. Usually, you can access this by adding /wp-admin to the end of your website’s URL (like http://www.yoursite.com/wp-admin).
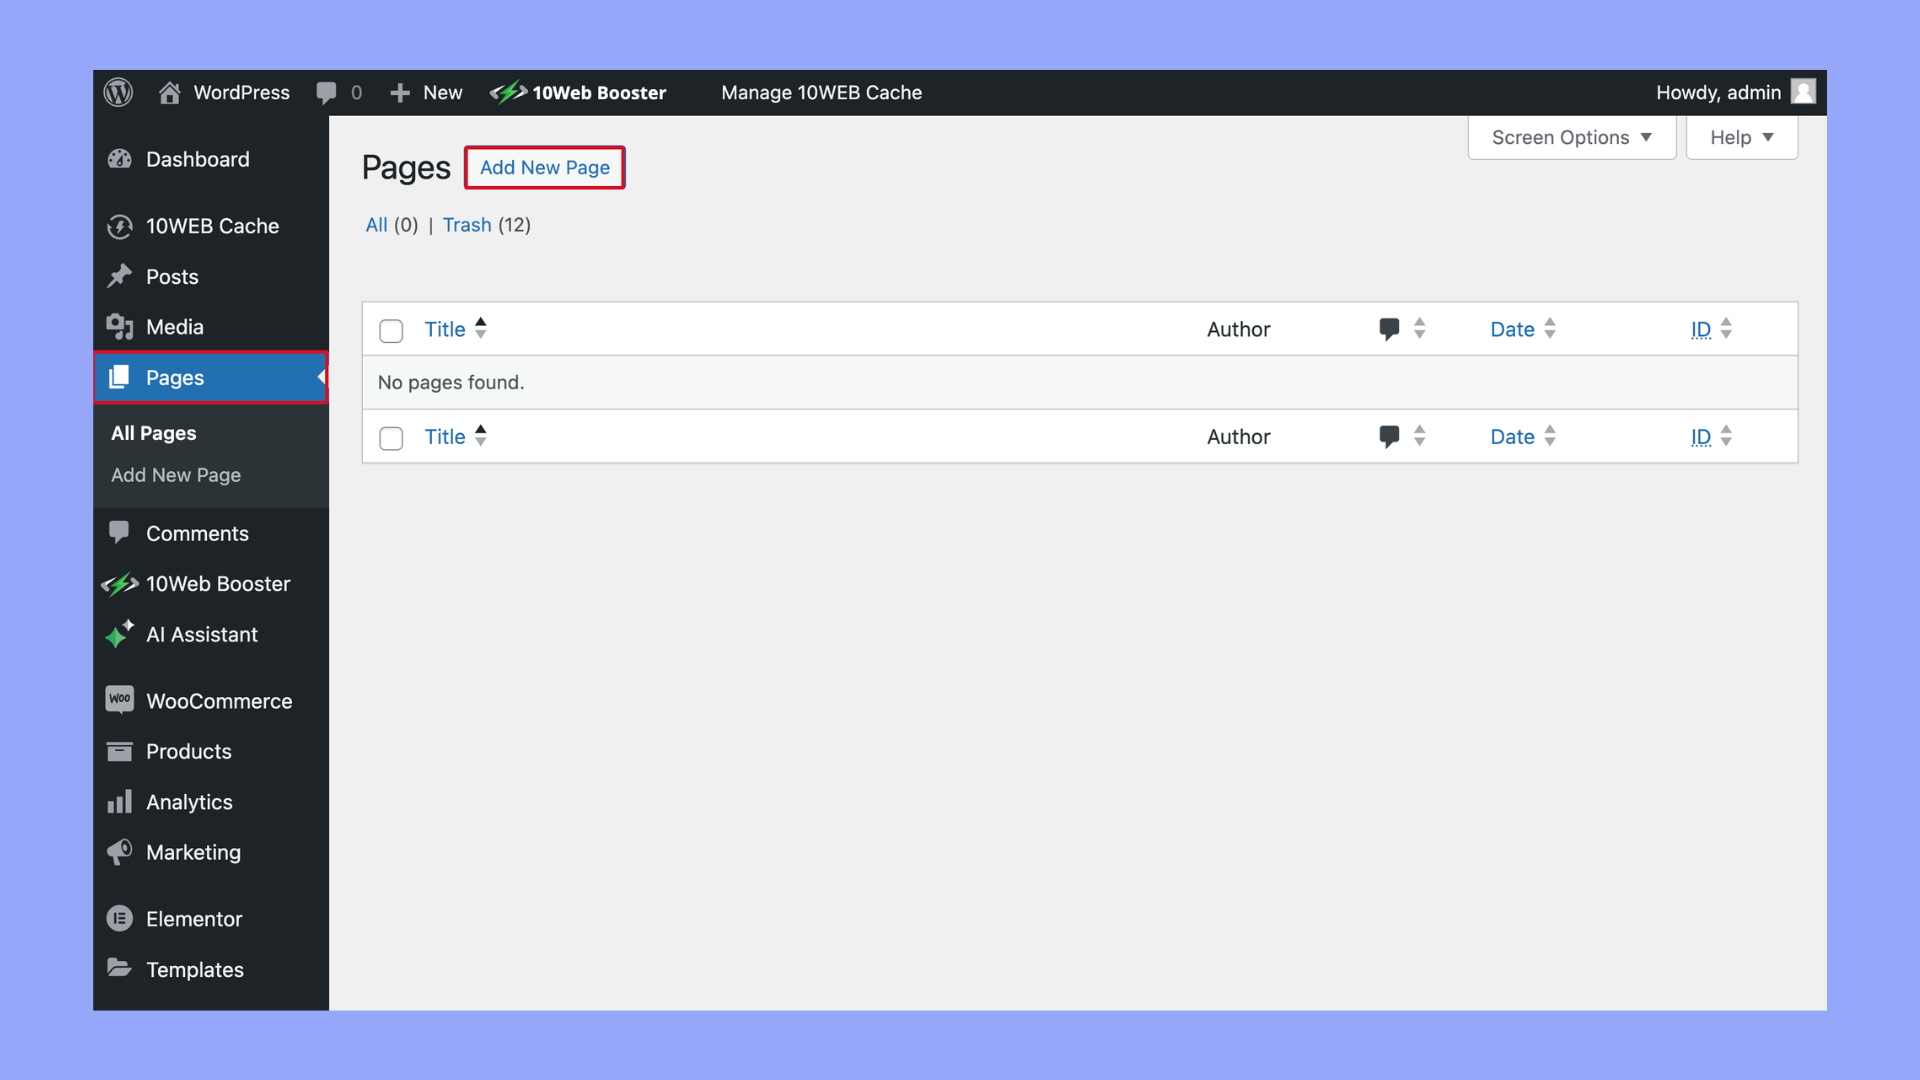
- Navigate to the left-hand side of the dashboard, you’ll see a menu. Click on Pages to open the submenu.
- In the Pages submenu, click on Add New. This will take you to the page editor, where you can create your new page.

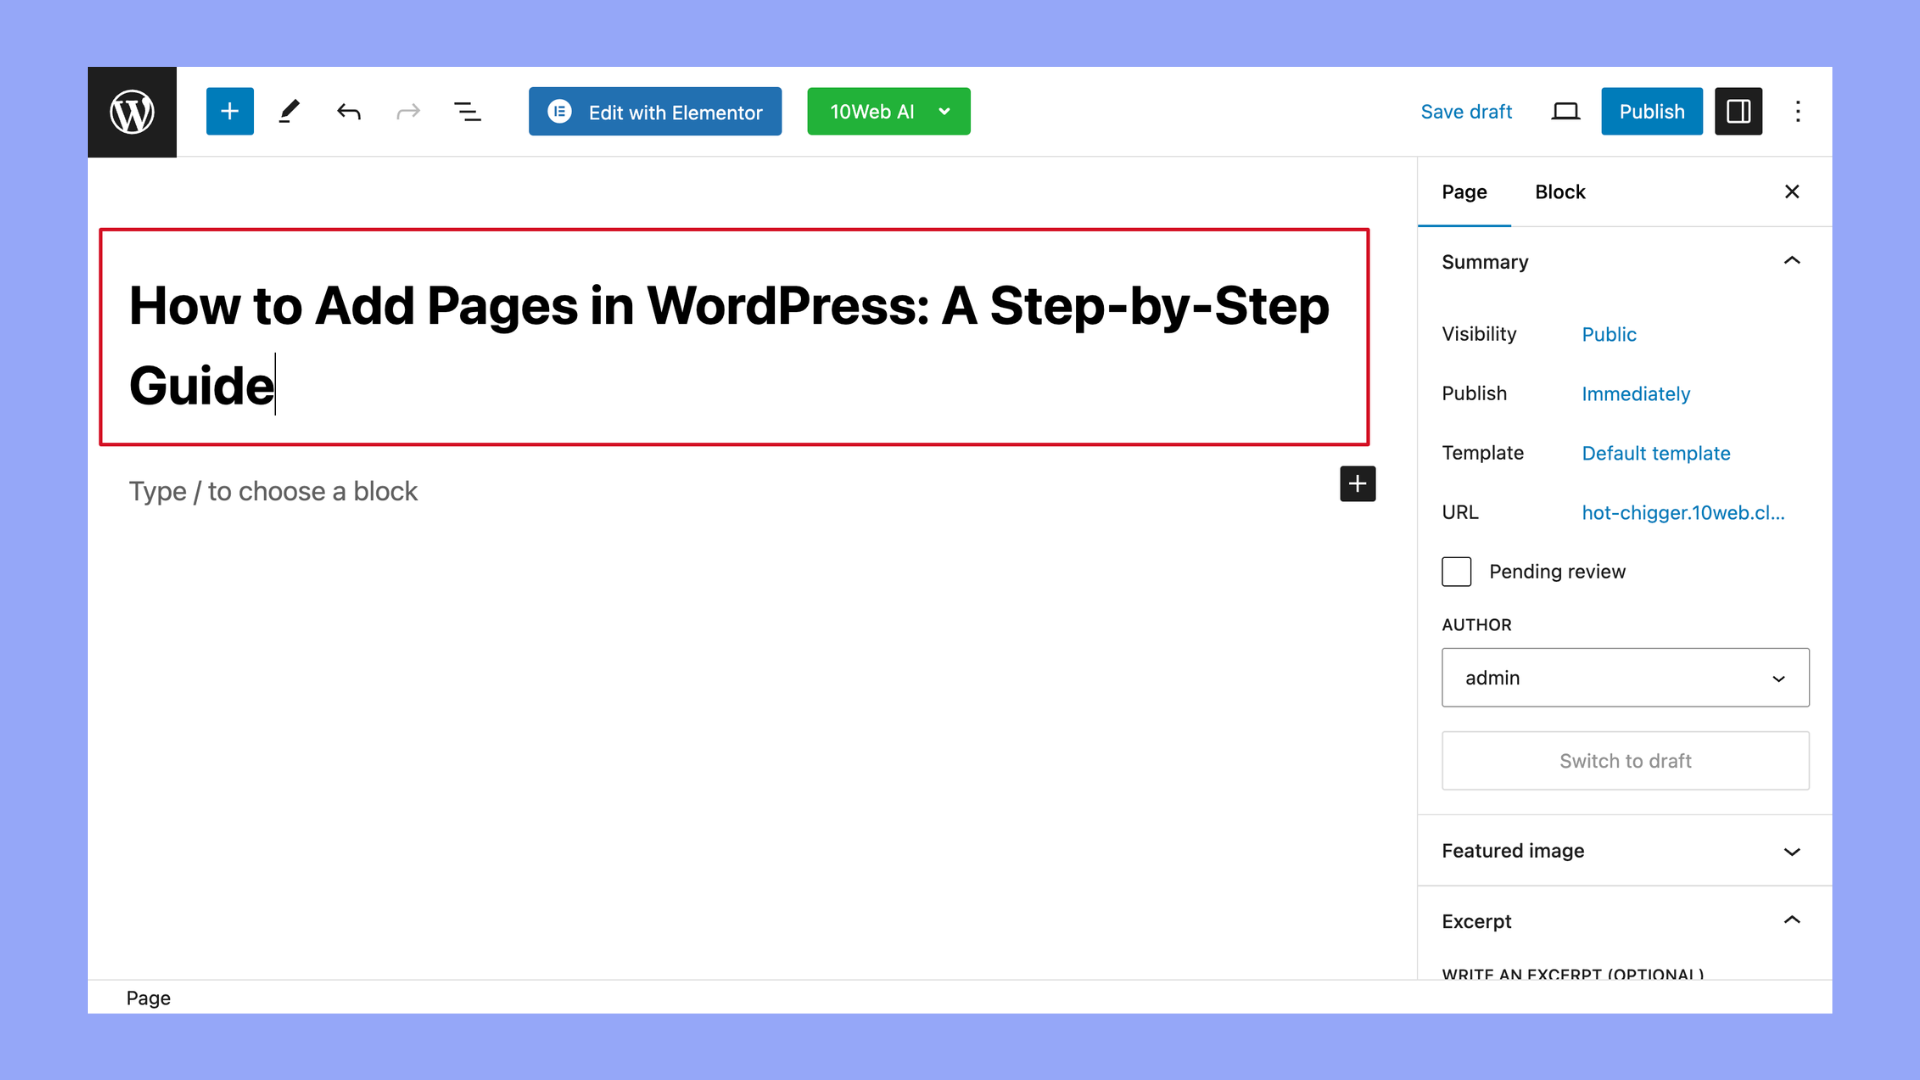
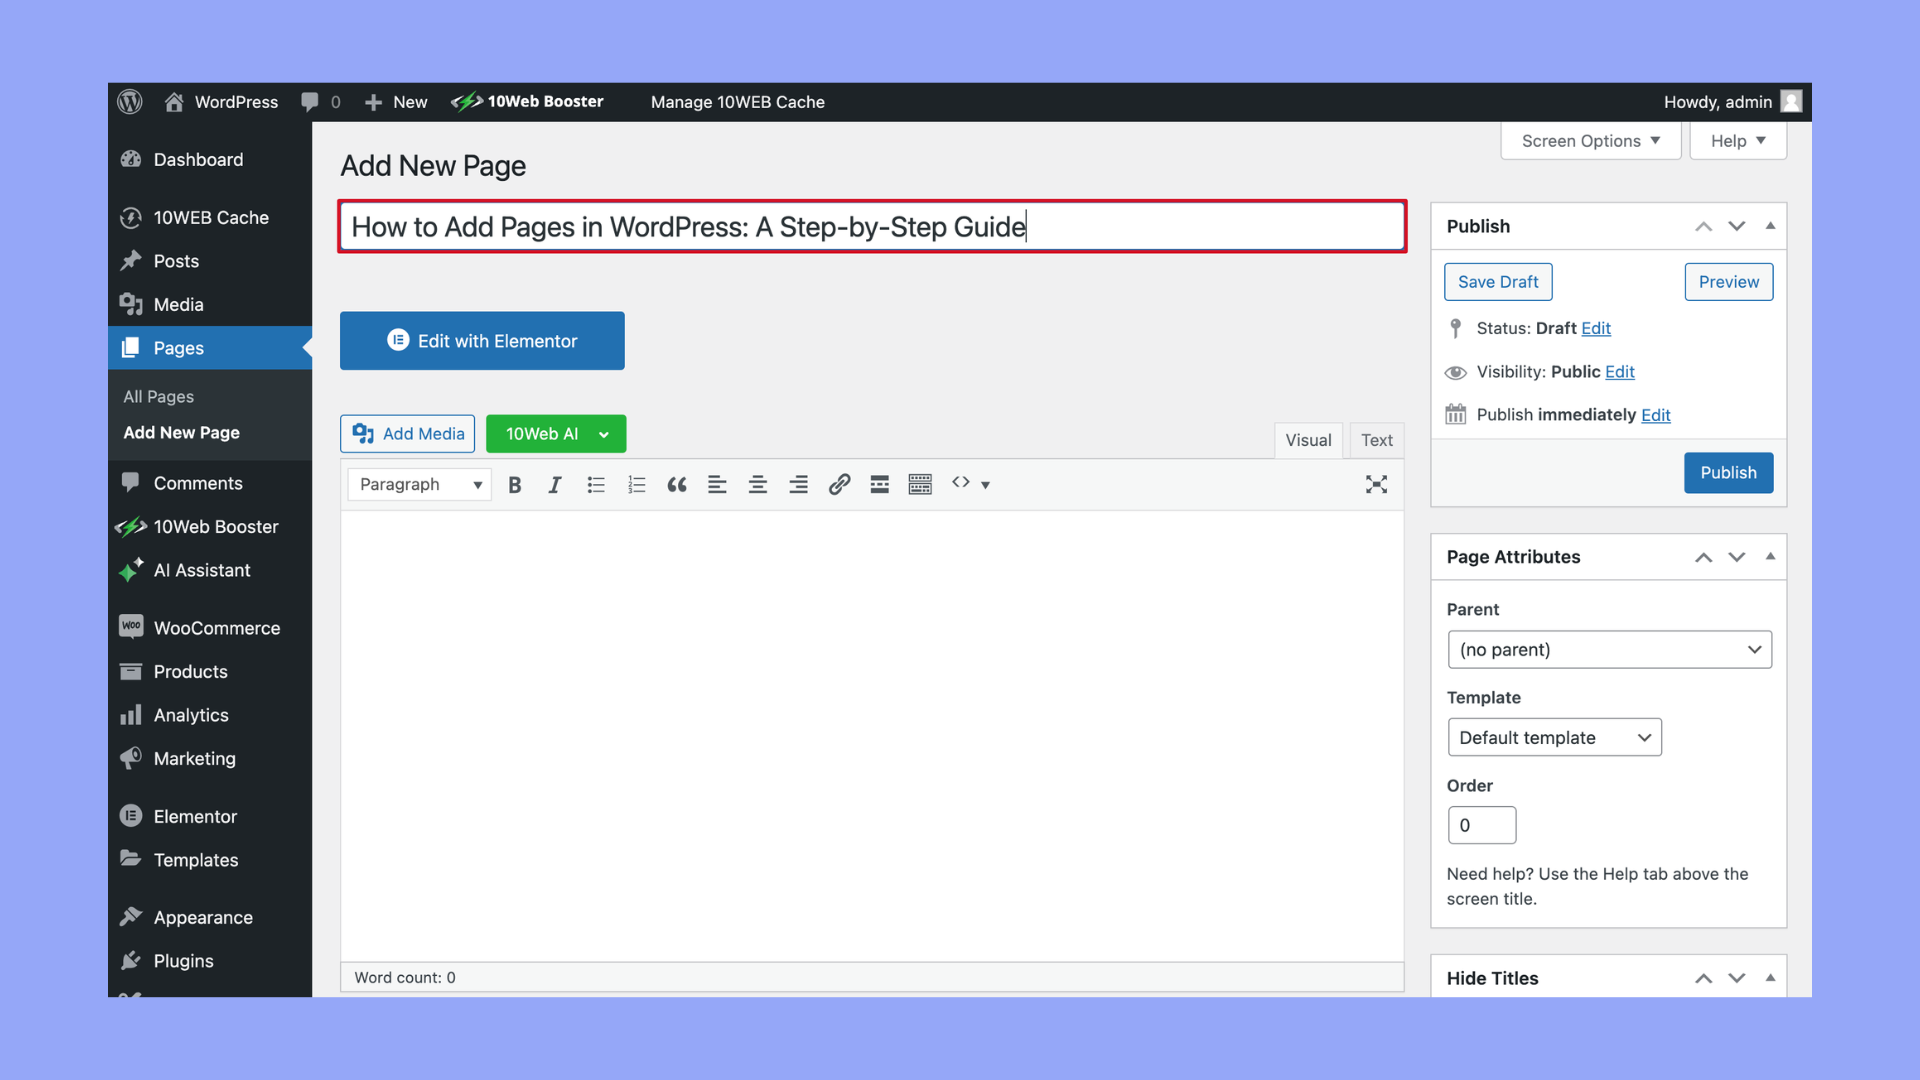
- At the top of the page editor, you’ll find a field to enter the title of your new page. This title will also be used as the headline on the page unless you change it later.
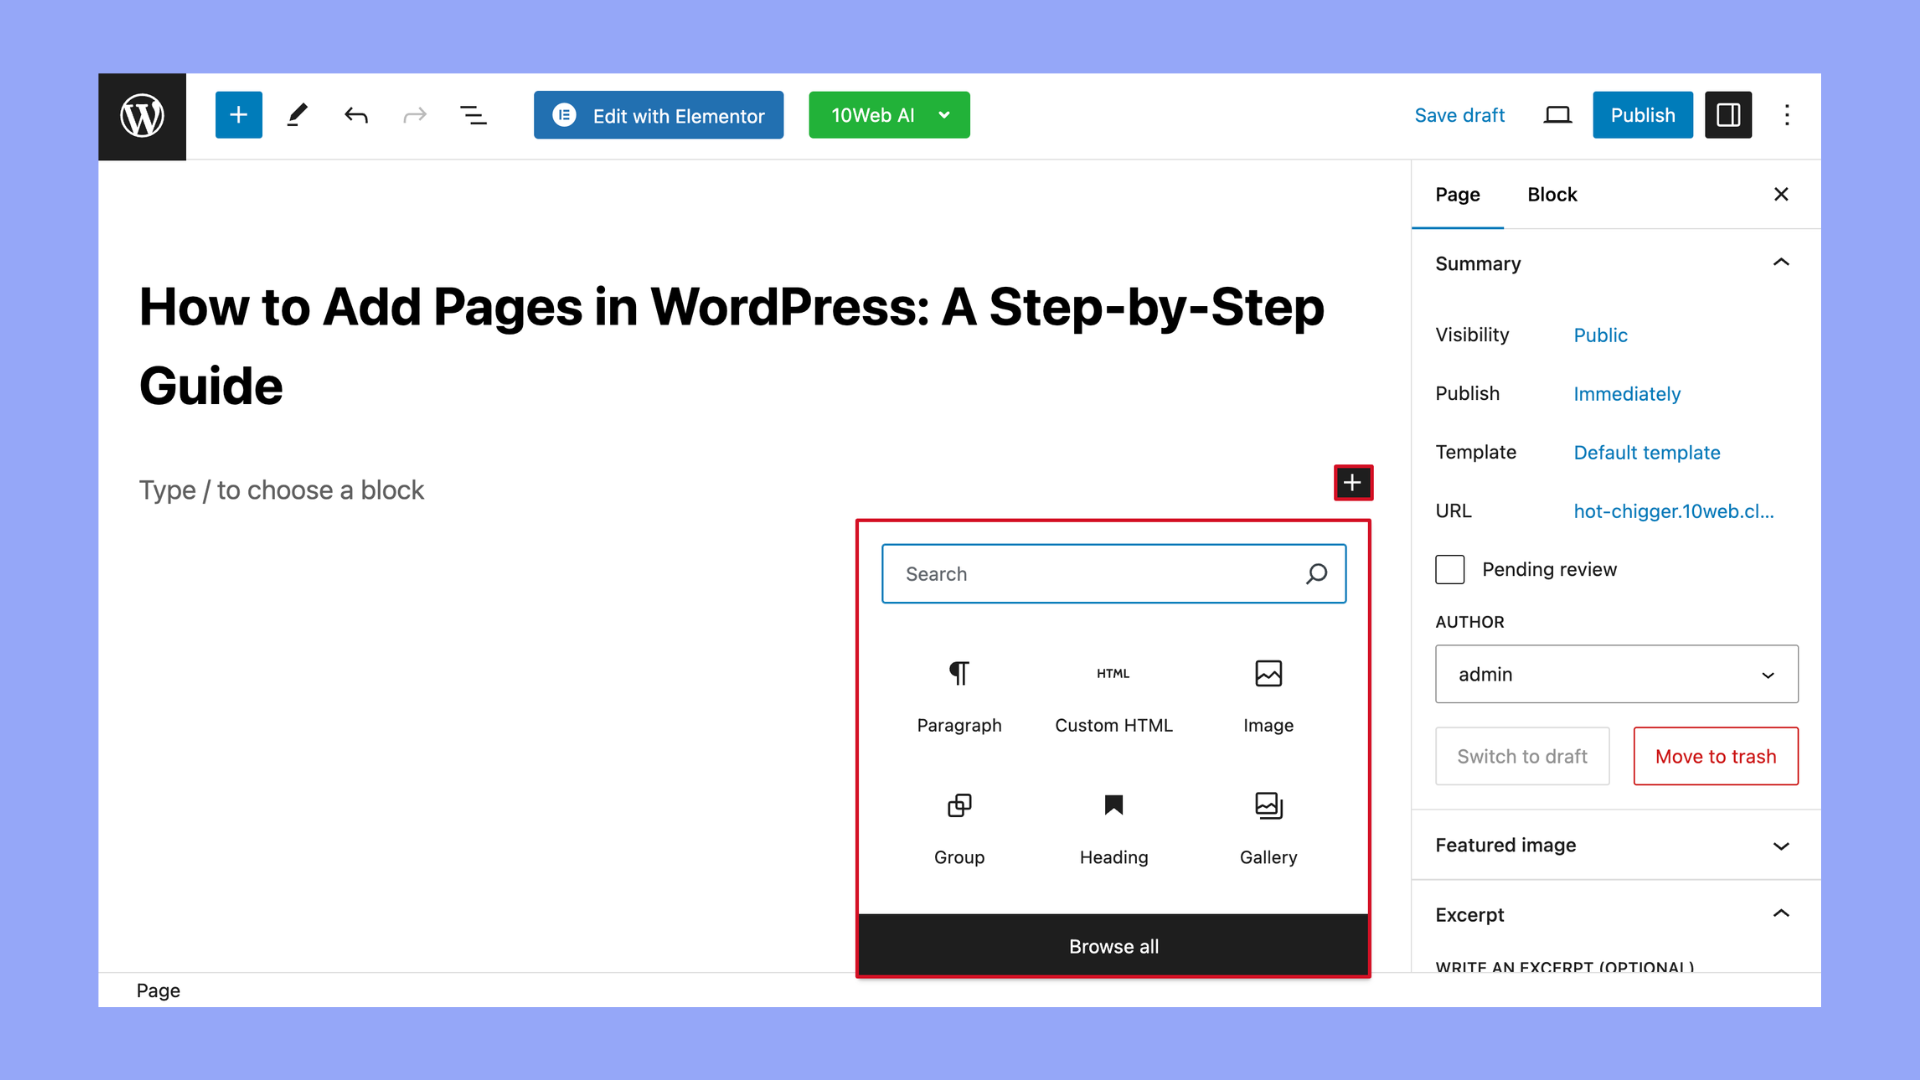
- Below the title field, you’ll see the WordPress Block editor (also known as Gutenberg). Here, you can add text, images, videos, and other content using various blocks. You can add blocks by clicking on the + icon.
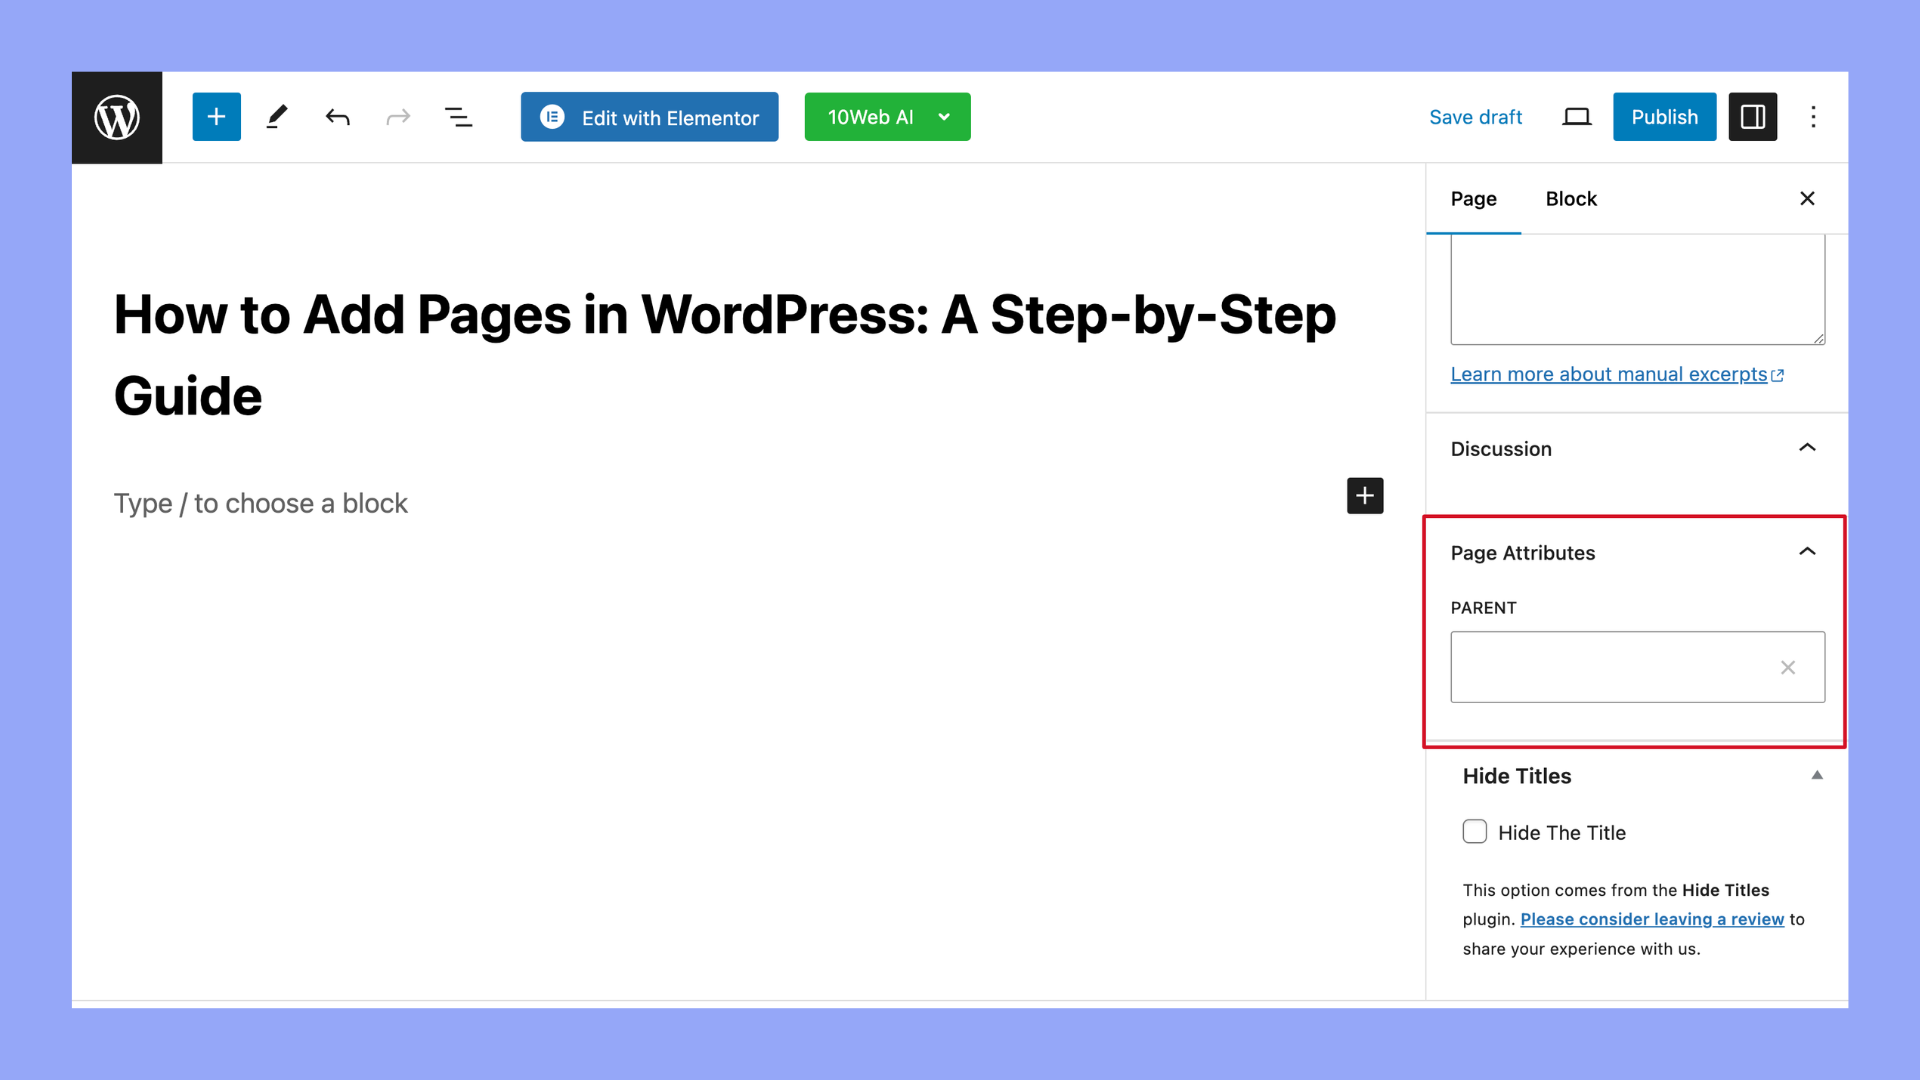
- On the right-hand side of the editor, you’ll see the Page Attributes box. Here you can set parent pages (to create a hierarchy of pages, if necessary) and order among siblings.
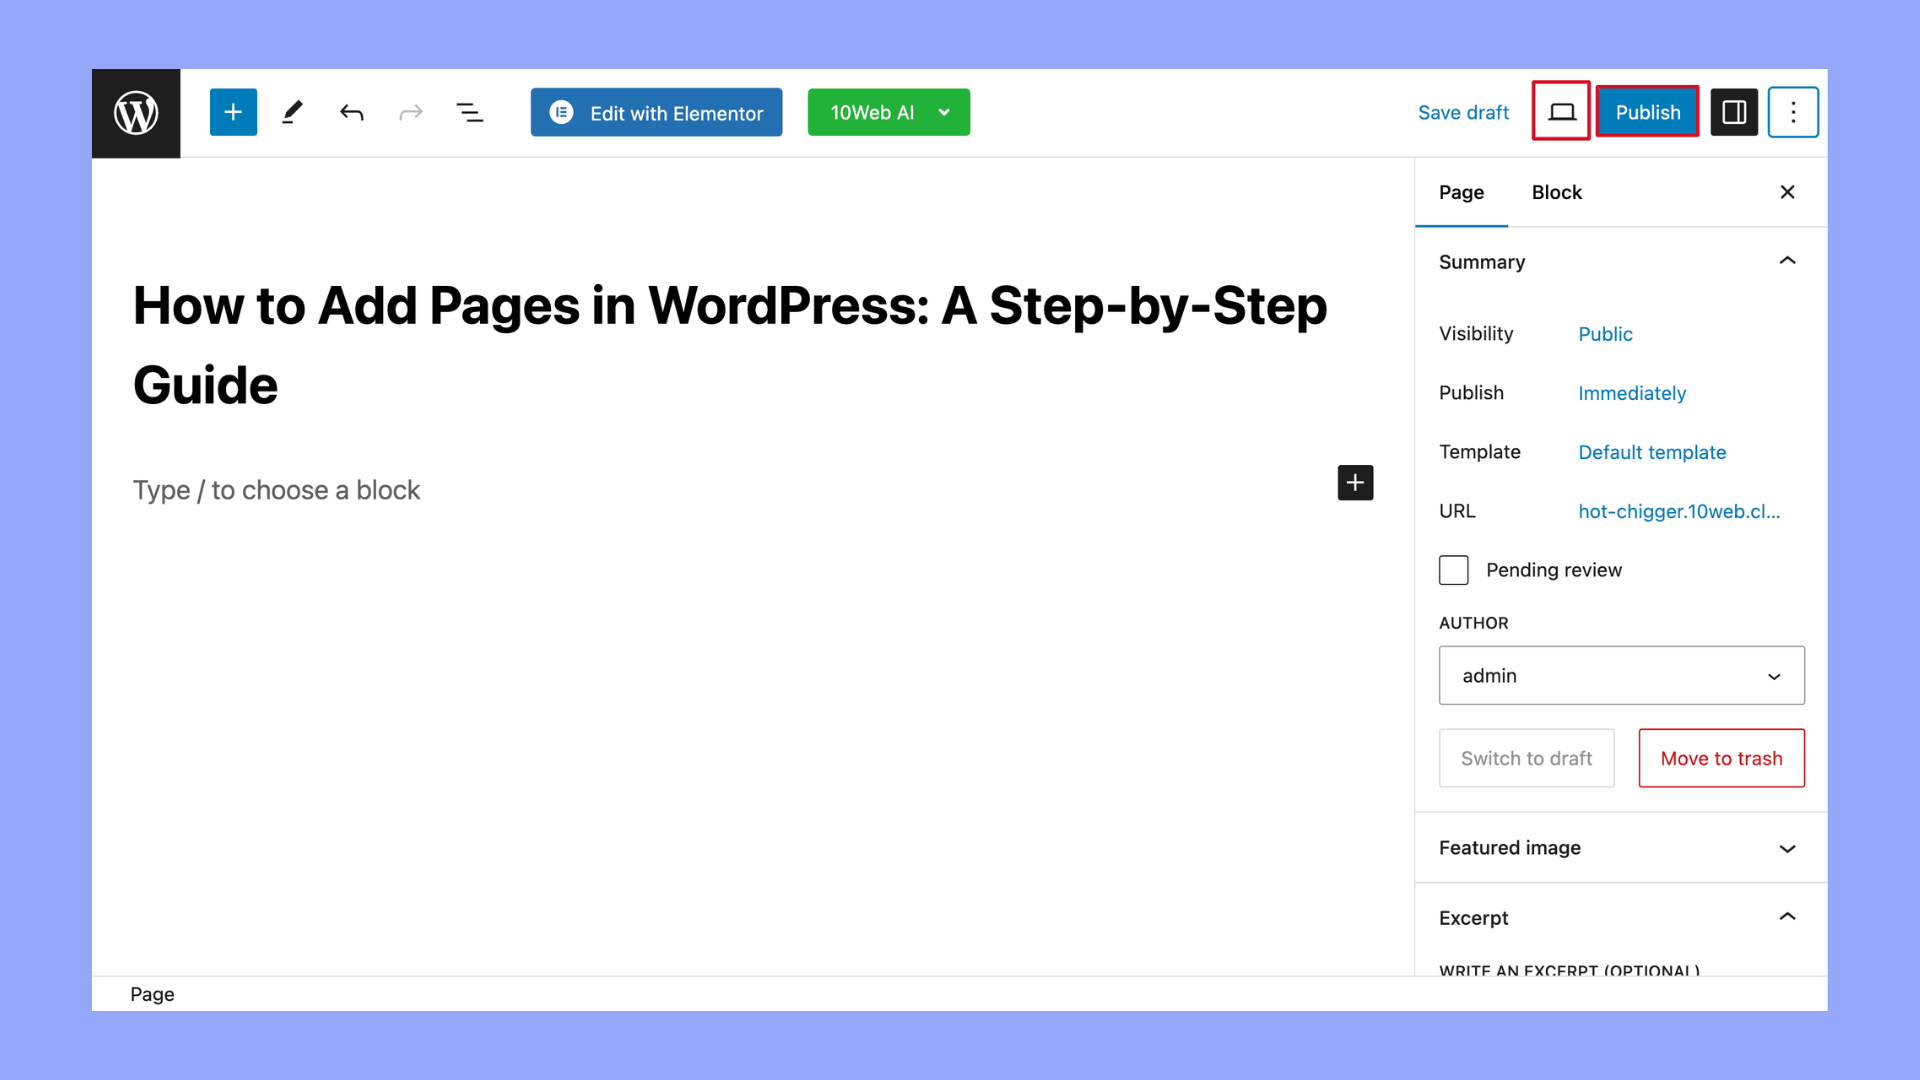
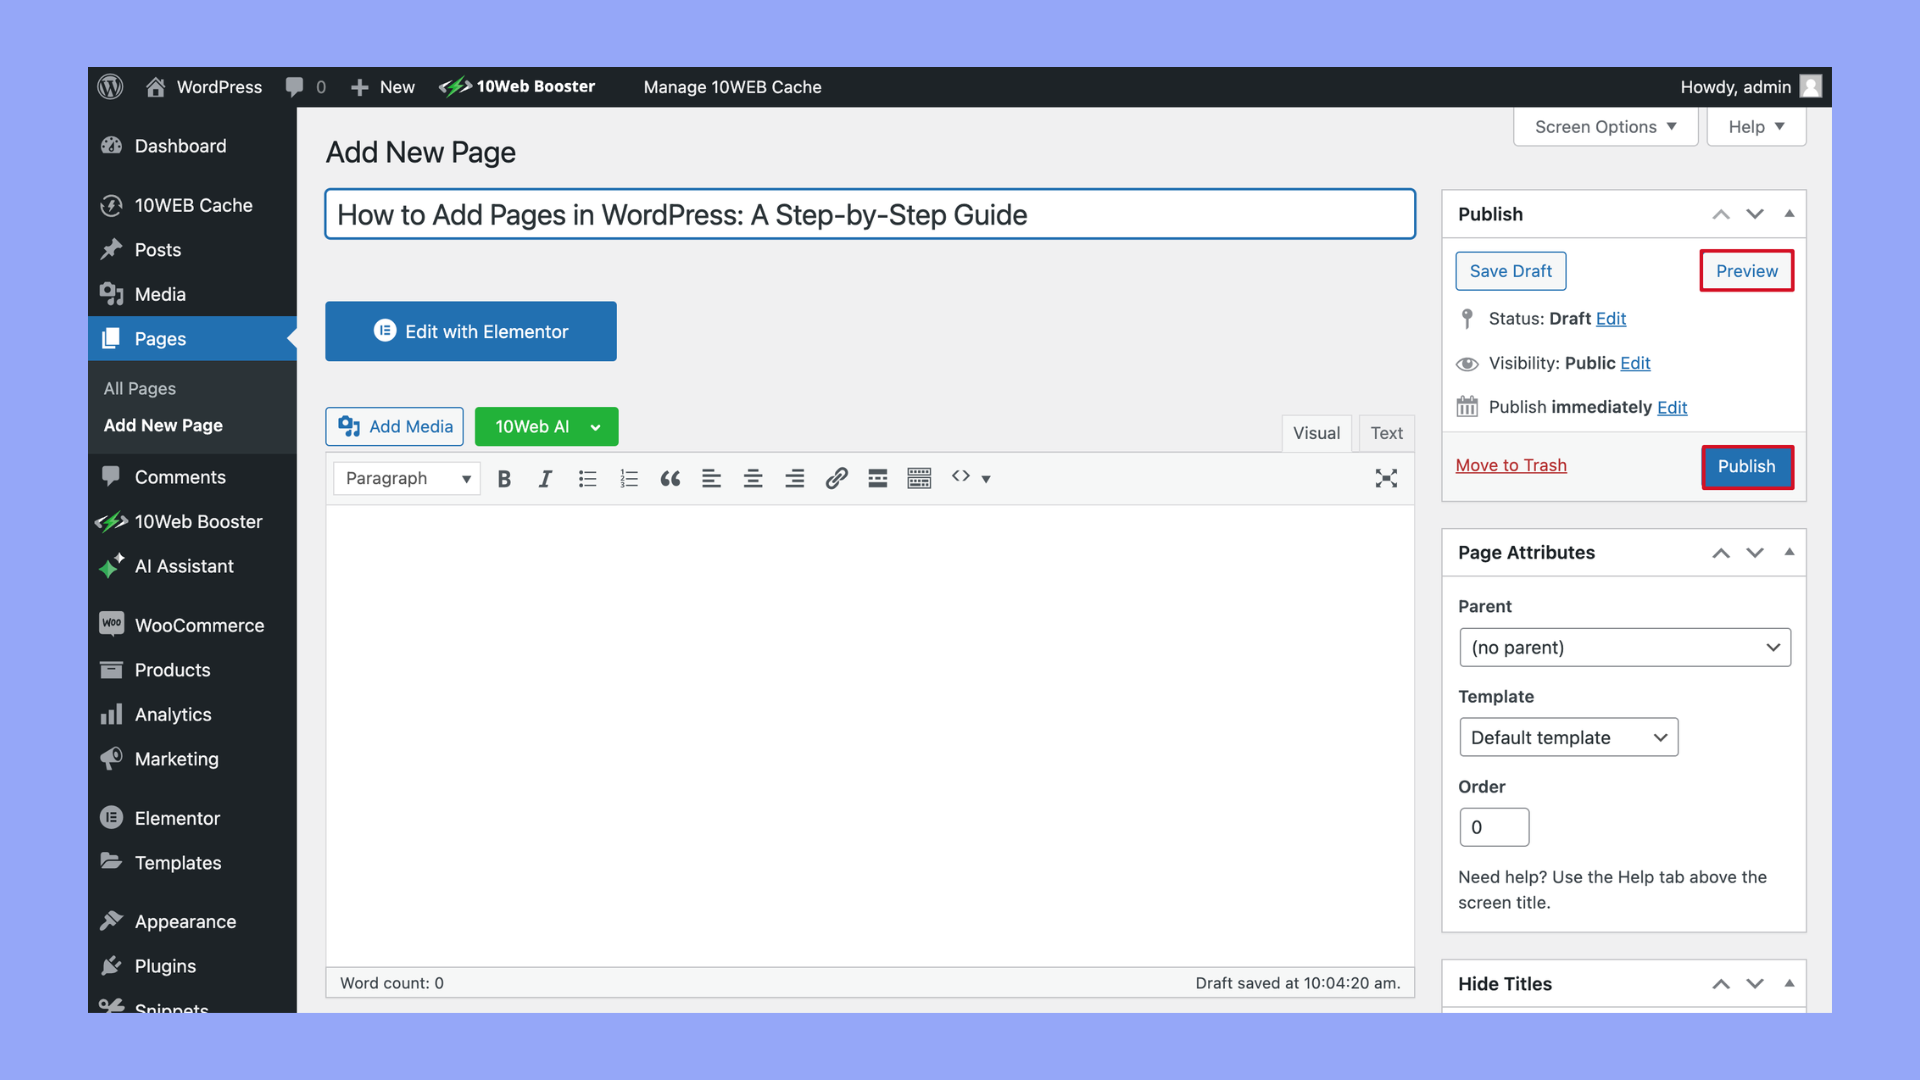
- Before publishing your page, you can preview it to see how it will look on your website by clicking the Preview button at the top. When you’re satisfied with everything, click the Publish button to make your page live.
Optional: If you want your new page to appear in your site’s navigation menu, go to Appearance > Menus in your dashboard. Here, you can add your new page to any of your existing menus. Select the page from the list on the left and click Add to Menu. Then you can drag and drop to rearrange its position within the menu.

Different types of blocks
In WordPress, using the Gutenberg editor, content is added and arranged in blocks. These blocks are versatile components that can be used to create complex layouts. Here is a list of some common types of blocks you can use in WordPress, along with their descriptions:
| Common blocks | Description |
| Paragraph | The most basic block, used for adding plain text. It comes with options for adjusting size, color, and spacing. |
| Heading | Used for adding headings (H1, H2, H3, etc.) to structure your content for better readability and SEO. |
| Image | Allows you to insert images. Supports alignment options, captions, and linking to larger versions or URLs. |
| Gallery | A collection of images displayed in a grid. You can adjust the columns and add captions. |
| List | Perfect for adding numbered or bulleted lists. |
| Quote | For highlighting quotations. Comes with styling options for distinct visual appeal. |
| Audio | Enables you to embed audio files and manage playback options. |
| Cover | Lets you add a cover image with text overlay, ideal for headers or sections with a strong visual element. |
Block settings
In WordPress’s Gutenberg editor, the Block settings, also known as the Block Inspector, provide various options and controls that allow you to customize and manage individual blocks within your page or post. Here’s an overview of what you can typically do from the Block settings:
1. Customization options
- Typography: Adjust font size, line height, and sometimes font family depending on the block and theme.
- Color settings: Change text color, background color, and gradient options for many blocks.
- Alignment: Set text alignment (left, center, right) or content alignment within the block, such as wide width or full width for images and other media.
- Advanced customization: Depending on the block, you might be able to add custom CSS classes for further styling or additional attributes like rel tags for links.
2. Block-specific controls
Each type of block comes with its own specific settings tailored to its function. For example:
- Image block: Options to set alt text, select image size, and add a link to the image.
- Paragraph block: You might find drop caps toggle to stylize the first letter of the paragraph.
- Button block: Customize button text, link, and style options such as border radius, background color, and text color.
- Gallery block: Adjust the number of columns, crop images, and set image link settings.
3. Layout and spacing
- Columns block: Control the number of columns and the spacing between them.
- Spacer block: Adjust the height of space added between blocks.
- Group block: Group multiple blocks together, allowing you to layout or style them as a single unit.
4. Advanced settings
- HTML anchor: Add an HTML anchor to create a link to a specific block.
- Additional CSS classes: Add custom CSS classes to the block for more precise styling with your theme’s CSS code.
5. Interactive settings
- Video block: Include autoplay, loop, and mute controls.
- Audio block: Similar controls to the video, such as autoplay and loop.
- Cover block: Set a fixed background, customize overlay color, and opacity.
6. Accessibility settings
- Table block: Add header sections and make the table more accessible.
- List block: Convert between ordered and unordered lists, affecting how the information is perceived in terms of importance or sequence.
7. Reusable blocks
- Manage reusable blocks: Convert any block into a reusable block, which can be saved and reused across posts and pages. Also, manage these blocks directly from the block settings.
These settings provide a powerful toolkit to fine-tune each block, enhancing both the functionality and aesthetics of your content in WordPress. Each update to the Gutenberg editor often brings even more options to the Block settings, making it increasingly versatile.
Simplify WordPress with 10Web
Automate manual work with 10Web Managed WordPress Hosting and 10Web AI Website Builder. Optimize your WordPress website effortlessly.
How to add pages in WordPress with the Classic Editor
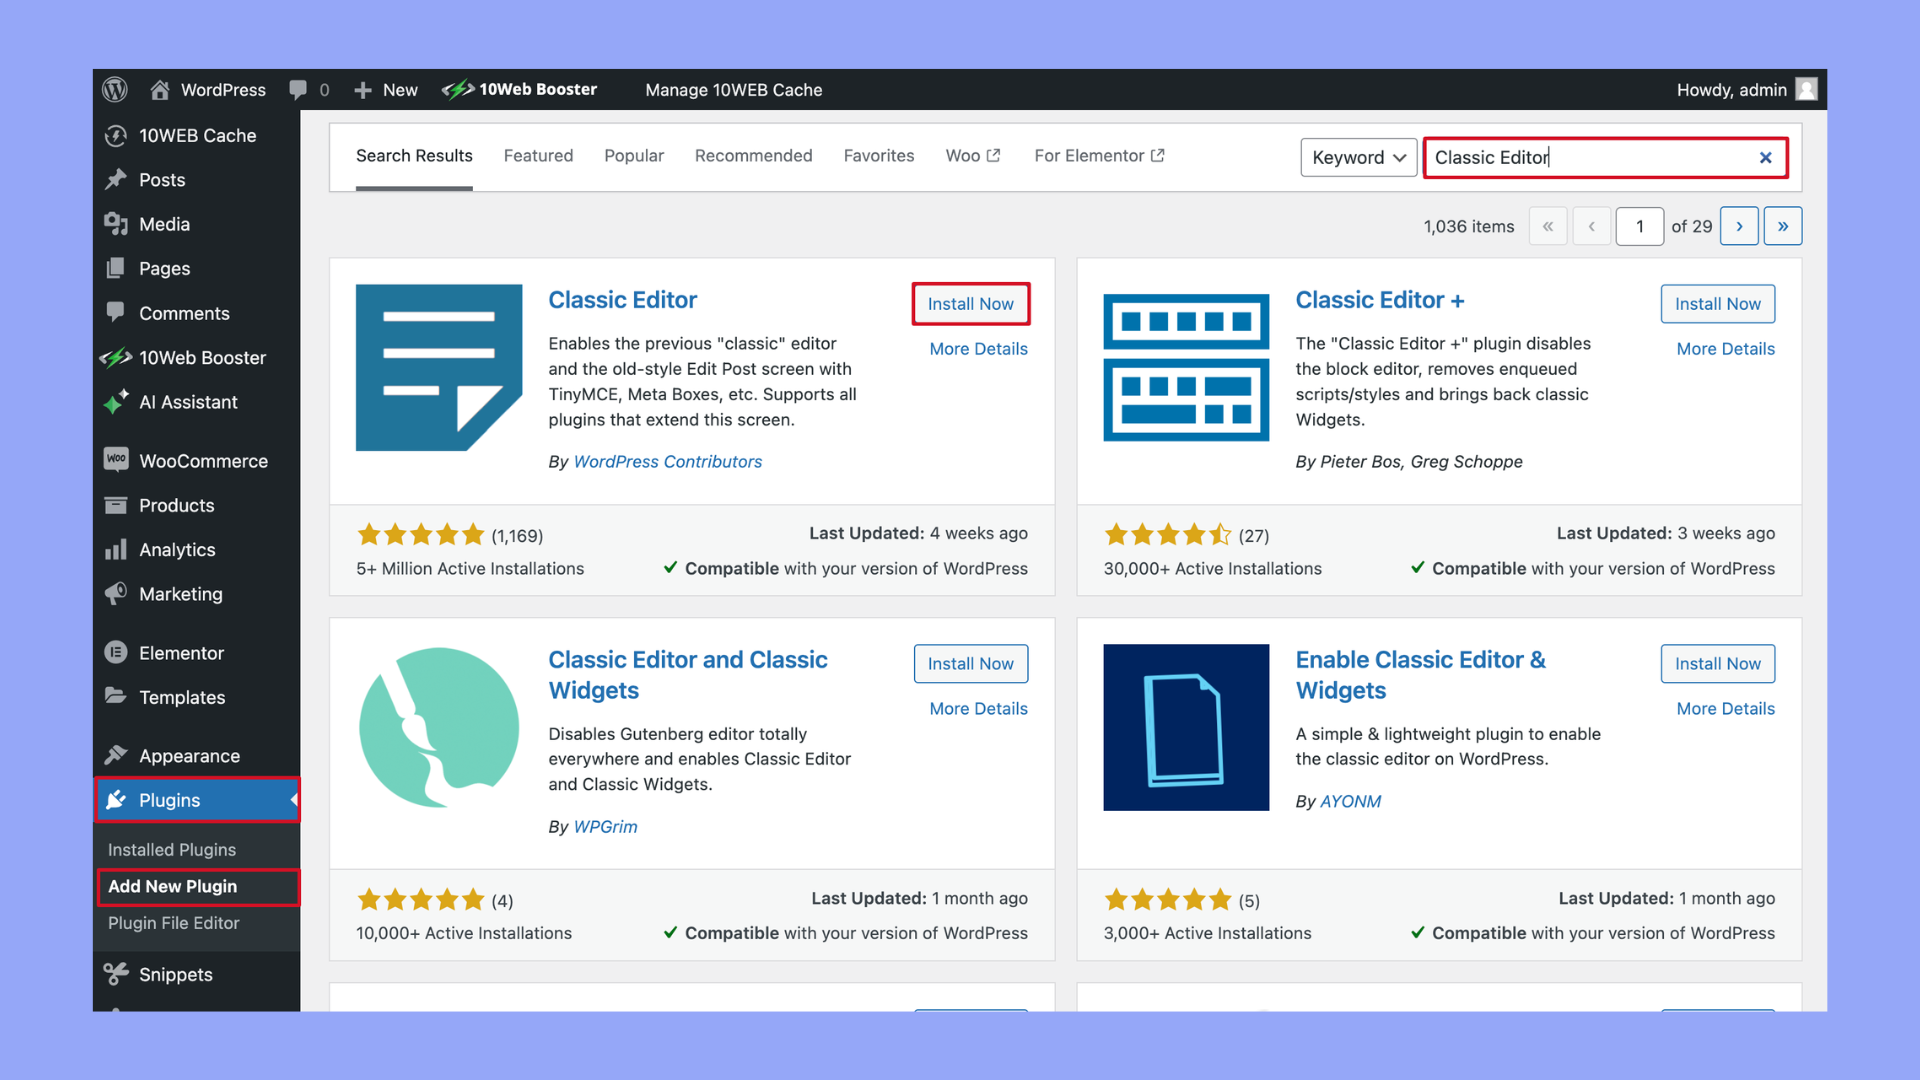
If you prefer a more traditional, word processor-like experience, you can use the Classic Editor. If it’s not already enabled, you may need to install the Classic Editor plugin from the WordPress plugin repository.
- Install the Classic Editor plugin by going to Plugins > Add New. Search for Classic Editor, install, and activate it.
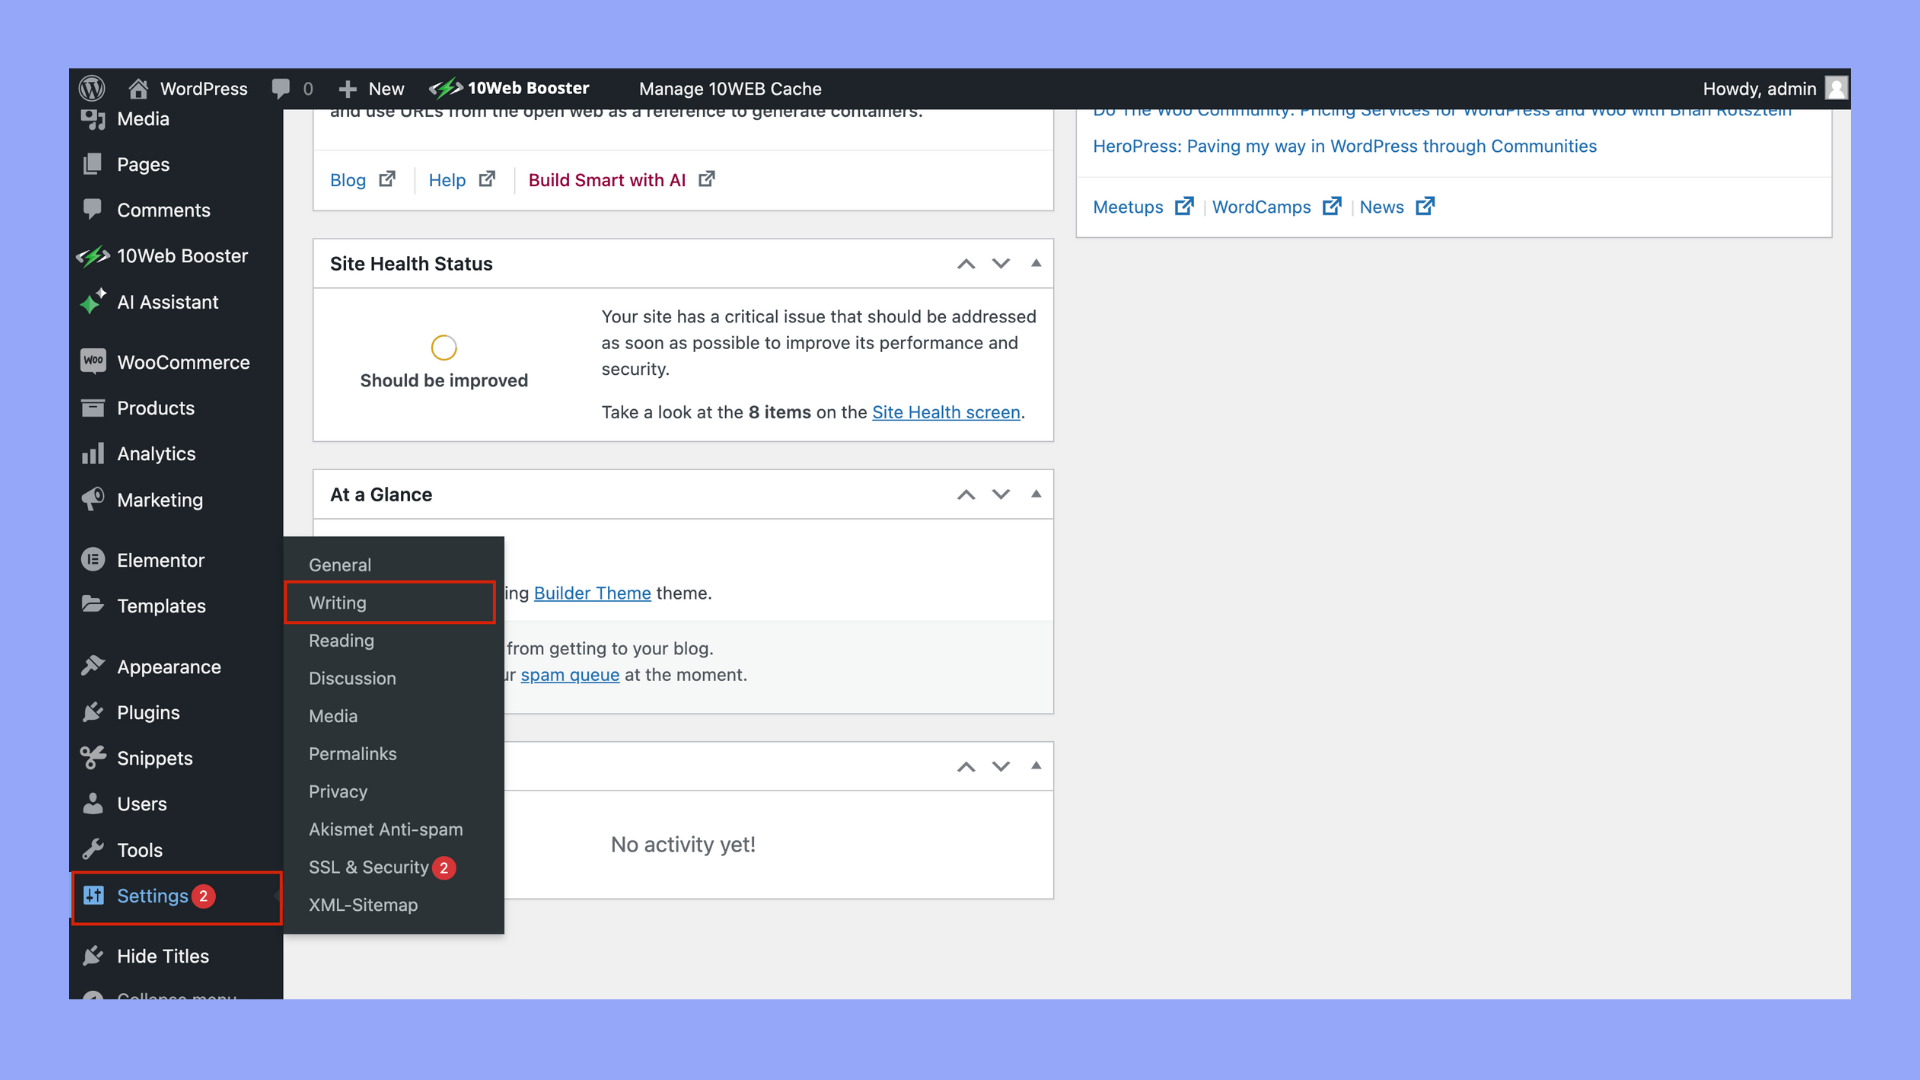
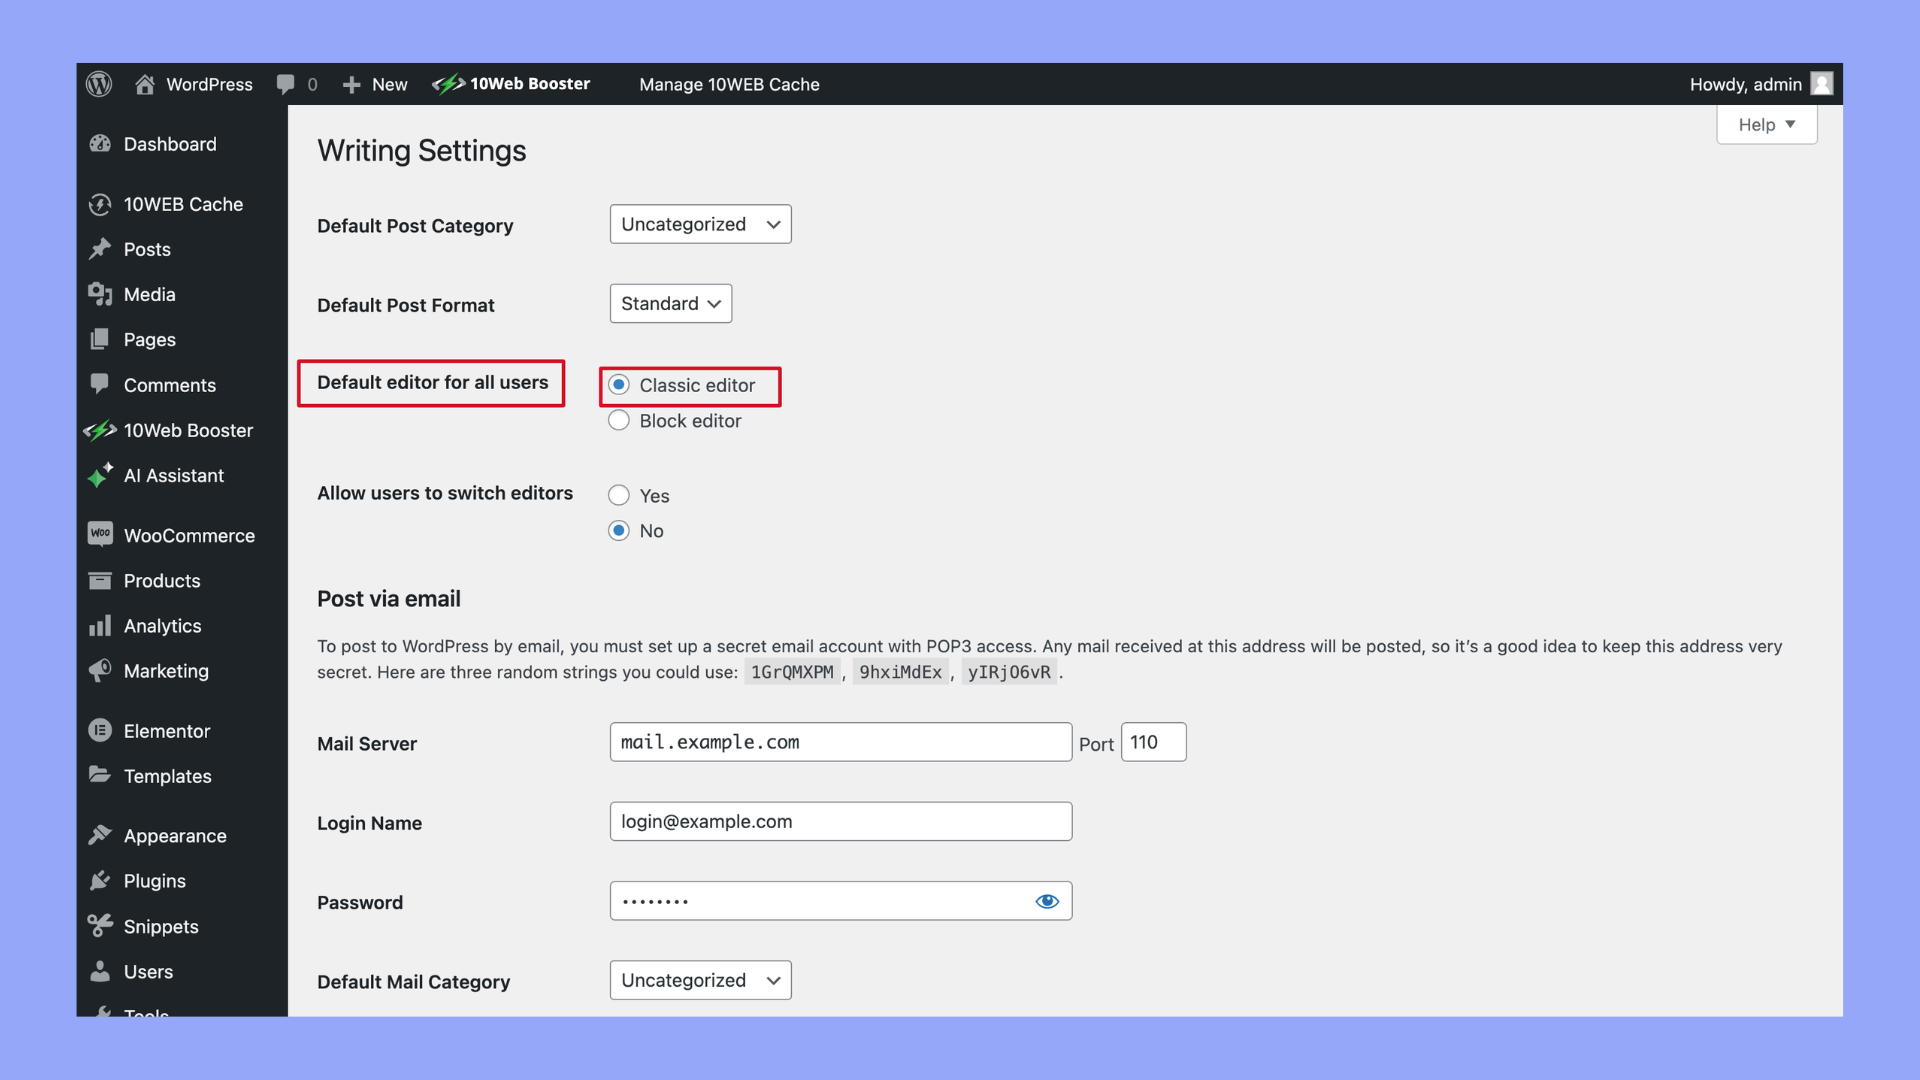
- Once activated, go to Settings > Writing and select Classic Editor as the default editor.
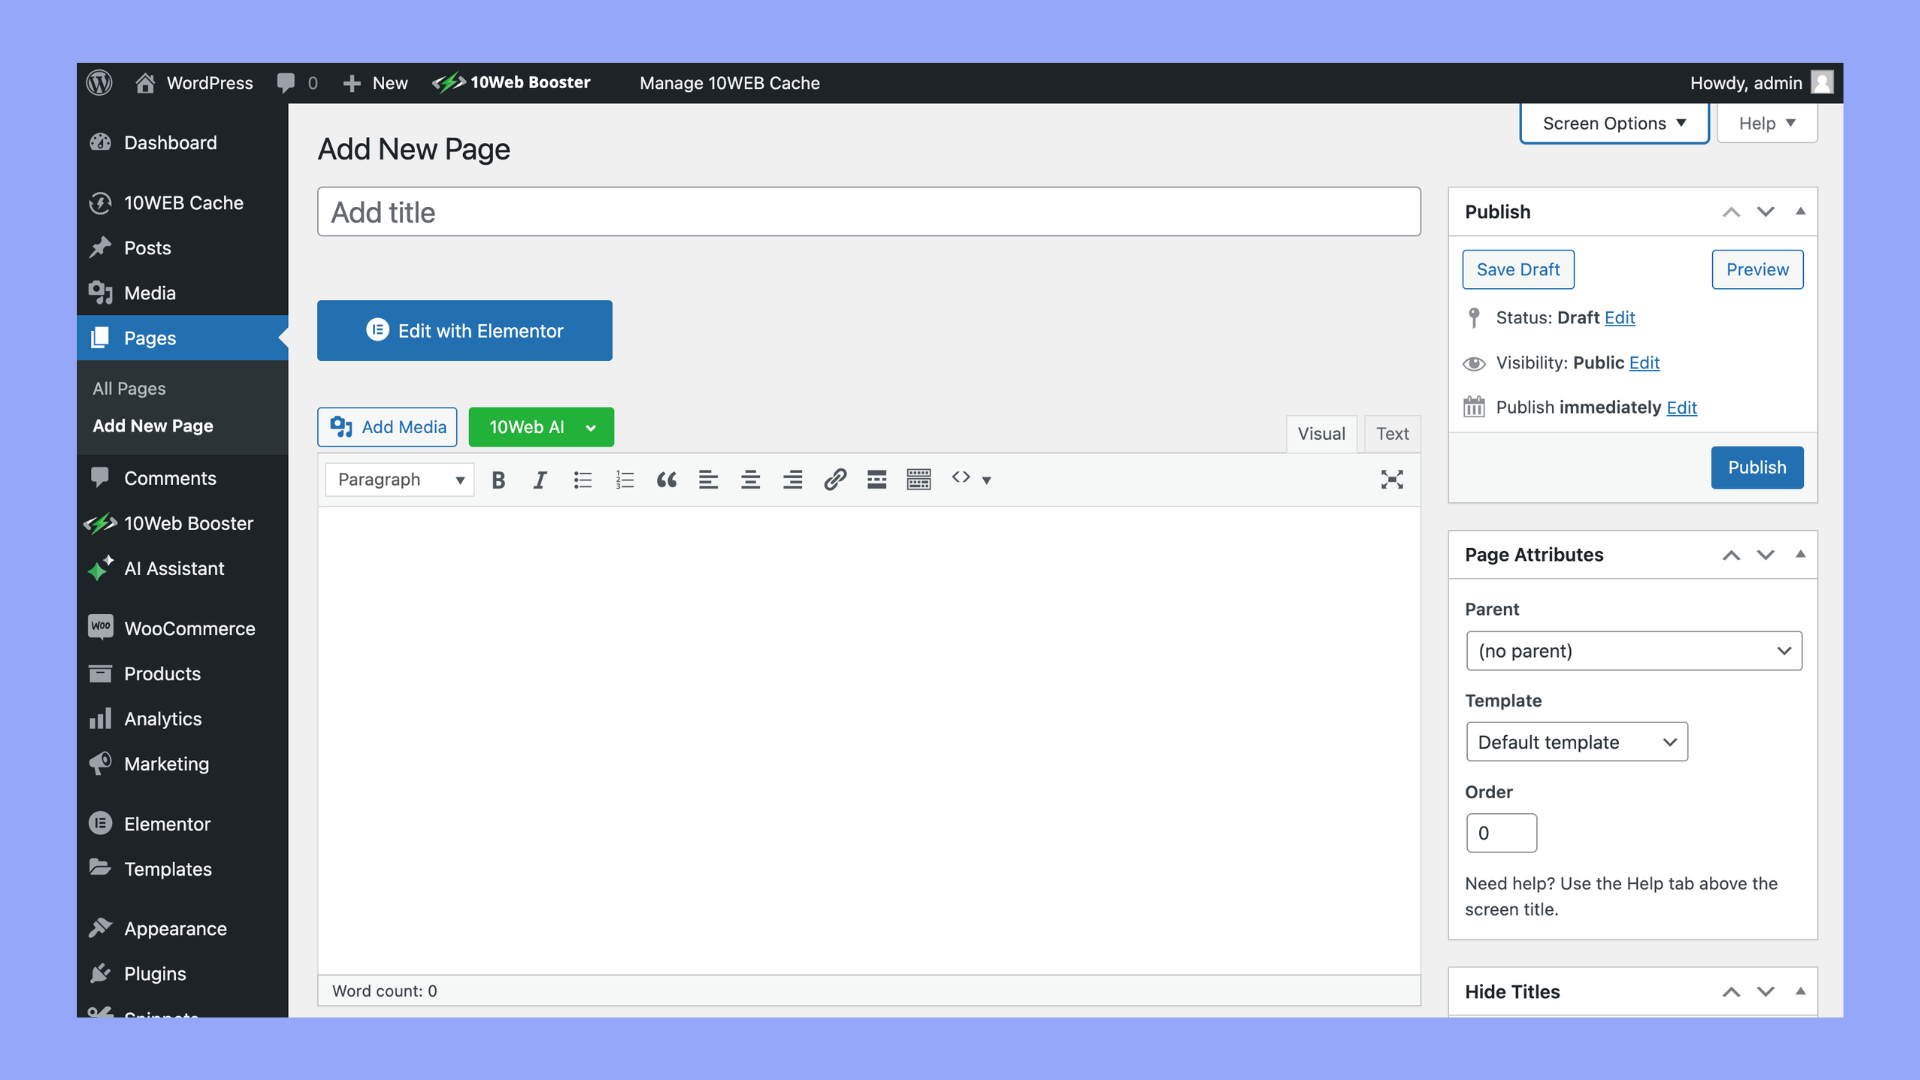
- Similar to the Gutenberg method, navigate to Pages > Add New. This will open a new page using the Classic Editor.
- You will see a WYSIWYG (What You See Is What You Get) editor that resembles a word processor.
- Add your title at the top, and use the text area below to add content. You have formatting options such as bold, italic, lists, and more in the toolbar above the text area.
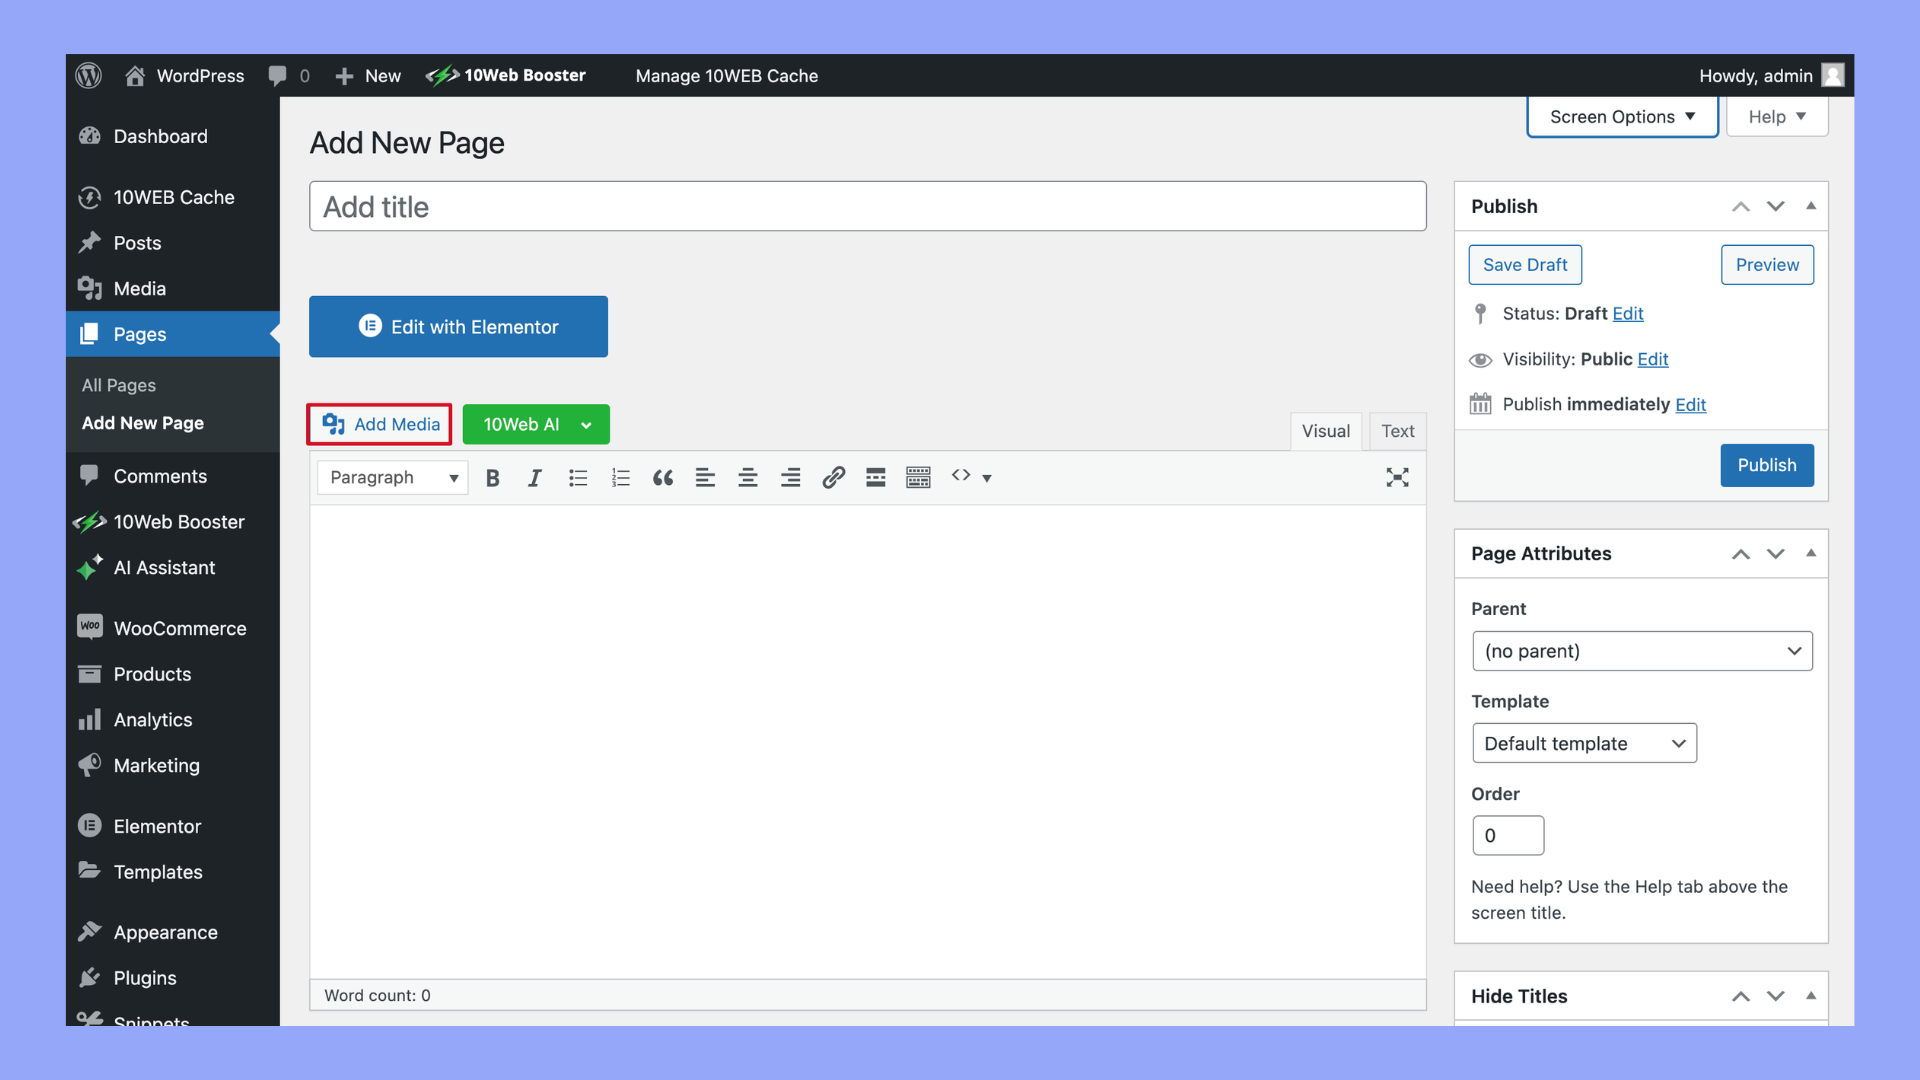
- To add images or videos, click on the Add Media button above the toolbar and upload or select existing media from your library.
- Use the Preview button on the right to view your page before it goes live.
- Click Publish to make your page accessible to visitors.
Whether you choose Gutenberg for its modern block-based approach or the Classic Editor for its straightforward word processing capabilities, WordPress makes it easy to build and customize your site’s pages.
How to delete pages in WordPress
When you need to remove a page from your WordPress site, follow these straightforward steps for a neat and clean deletion process.
Step 1: Navigate to Your Pages list
- Log in to your WordPress Dashboard.
- Click on Pages to open the list of your current pages.

Step 2: Locate the page to delete
- Browse through the list of pages or use the search feature to find the specific page you want to delete.
Step 3: Delete a single page
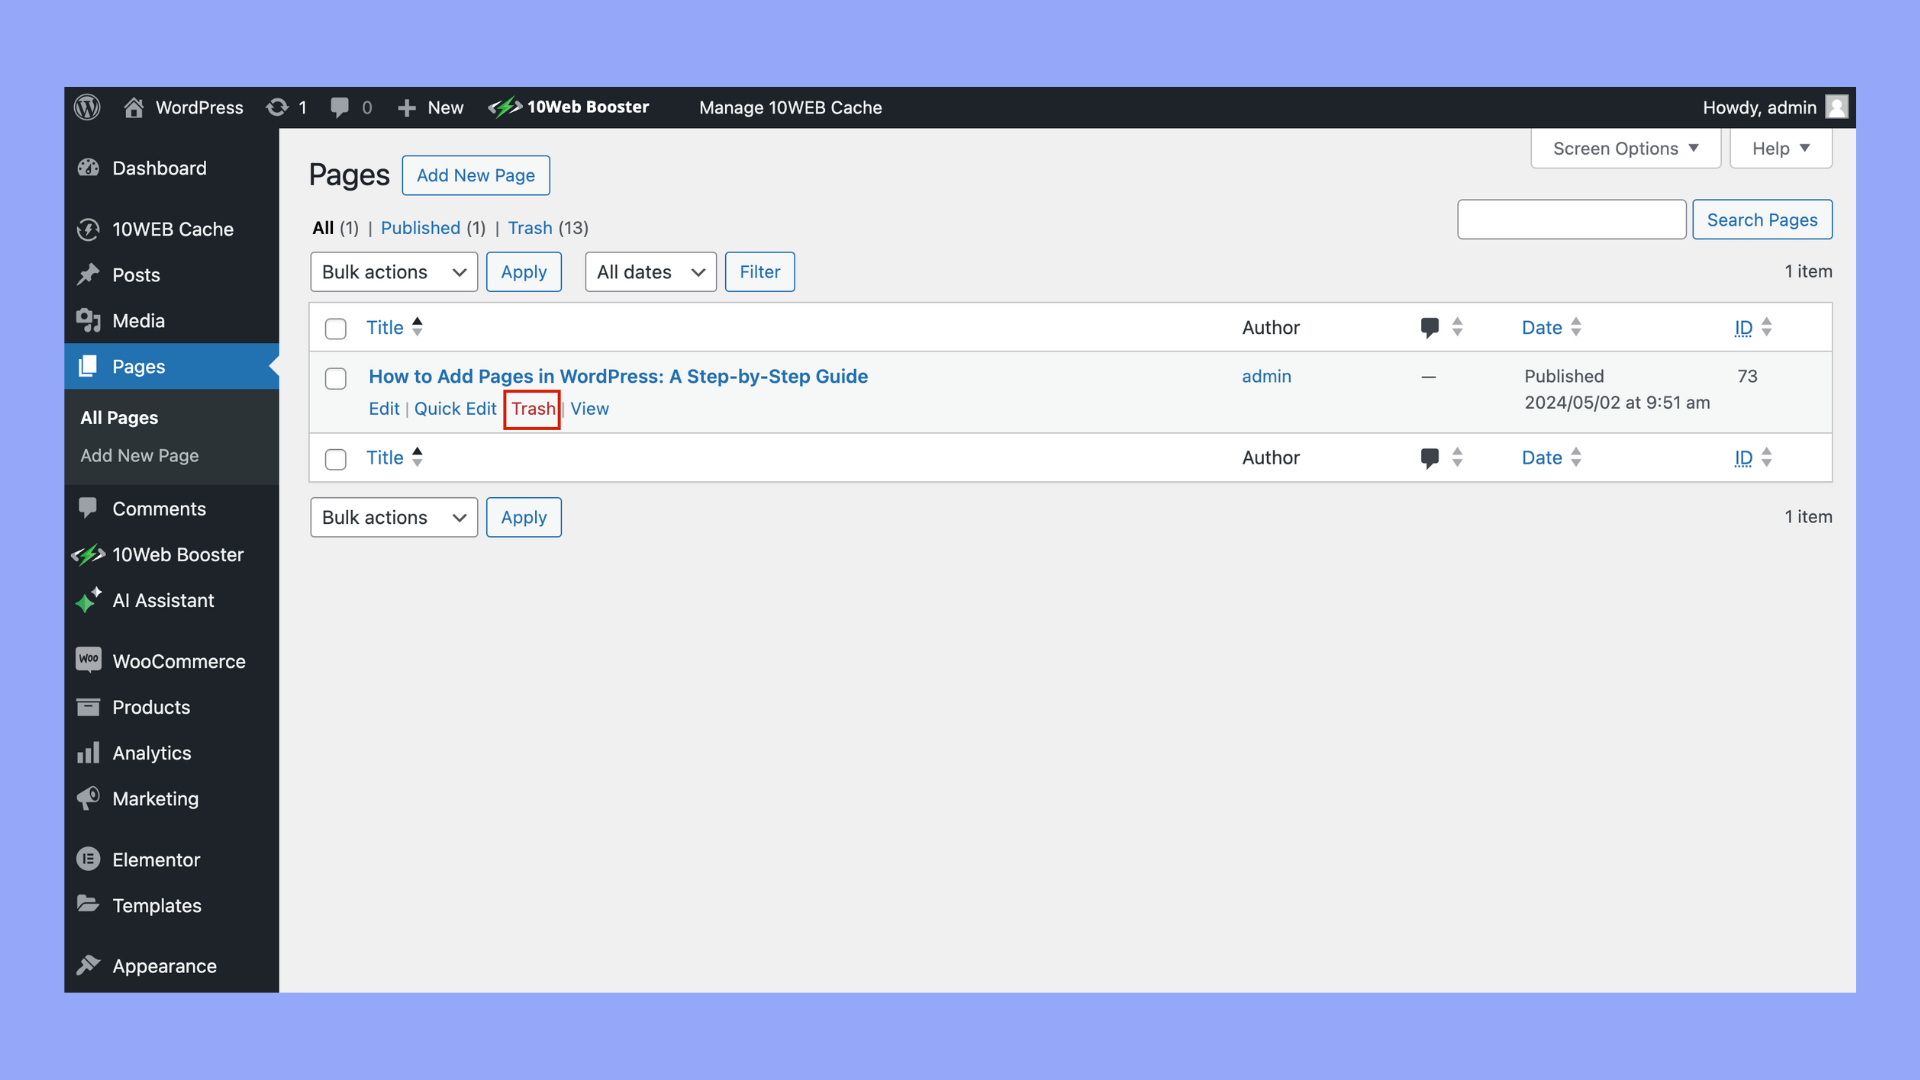
- If you’re deleting just one page, hover over the page title to reveal options.
- Click on Trash to move the page to the trash bin.
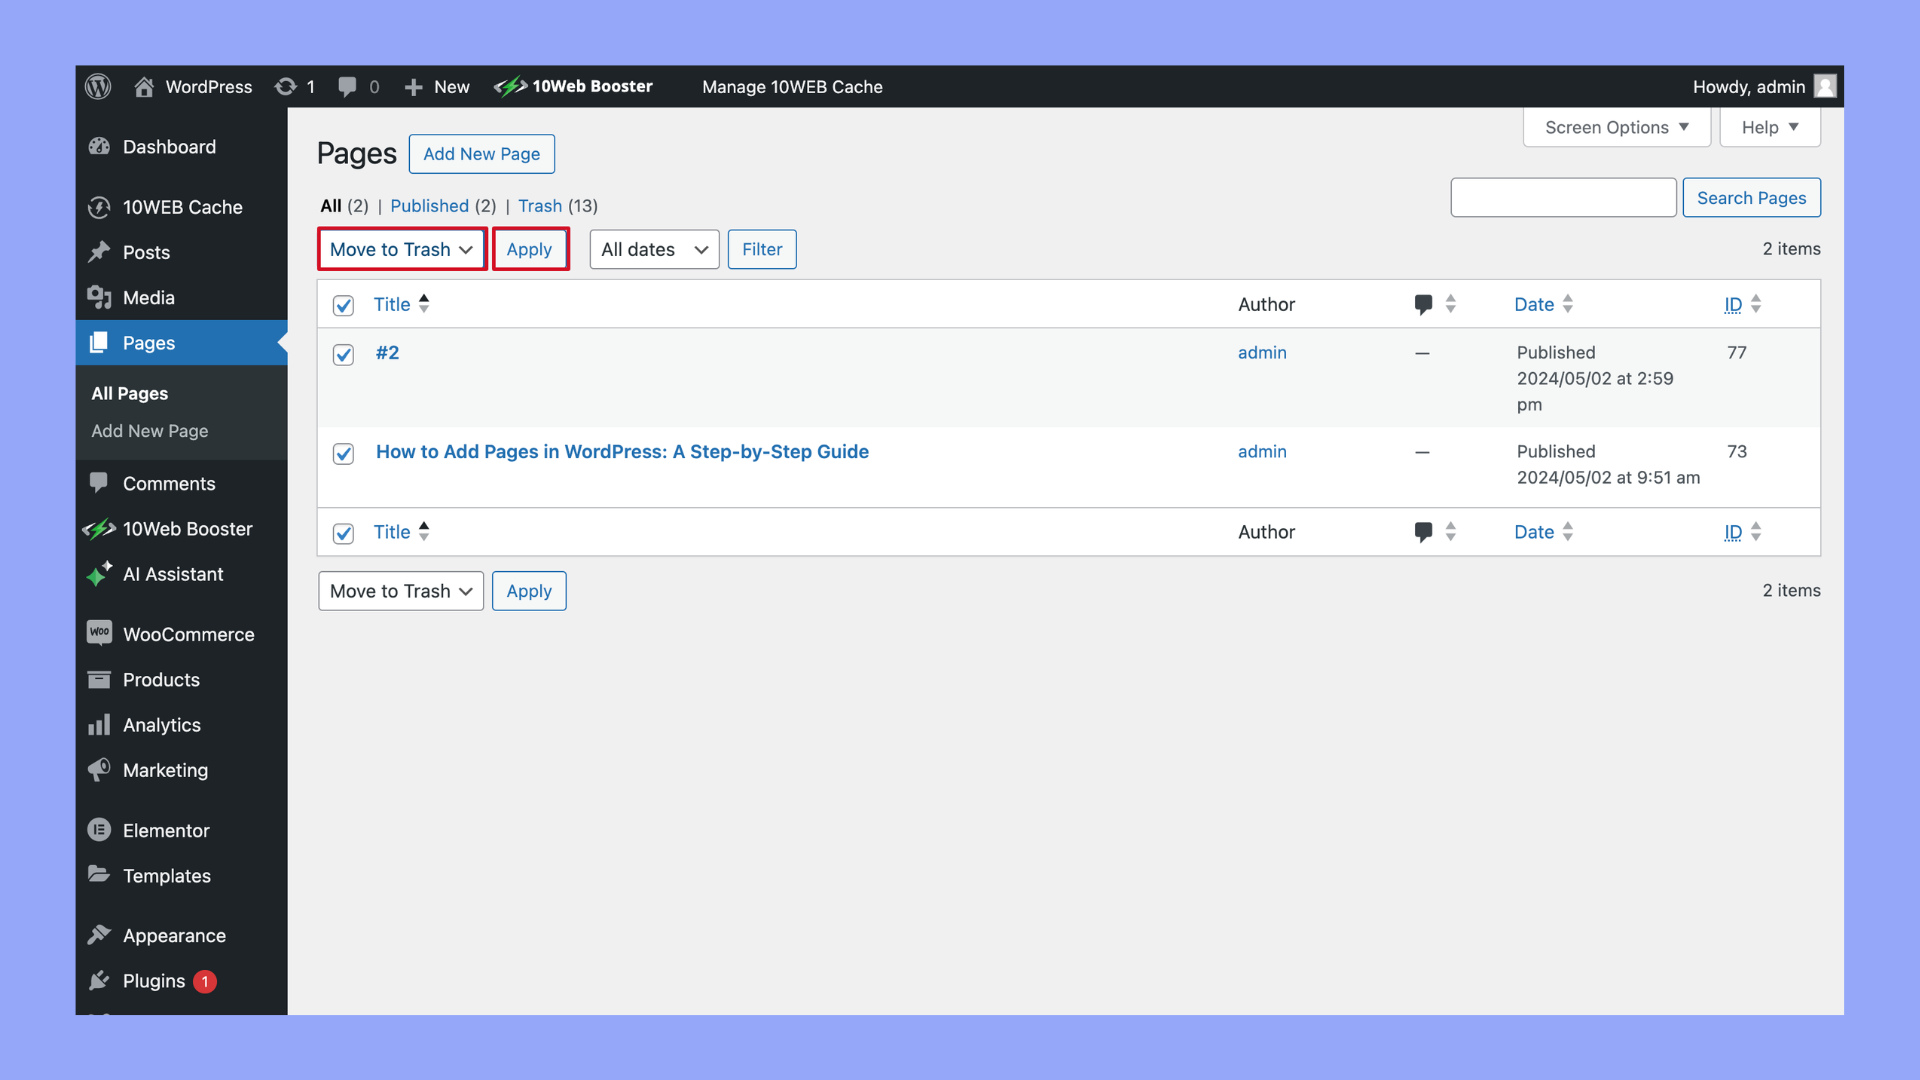
Step 4: Delete multiple pages
- To remove multiple pages, tick the checkbox next to each page’s title.
- Select Bulk Actions > Move to Trash.
- Press the Apply button.
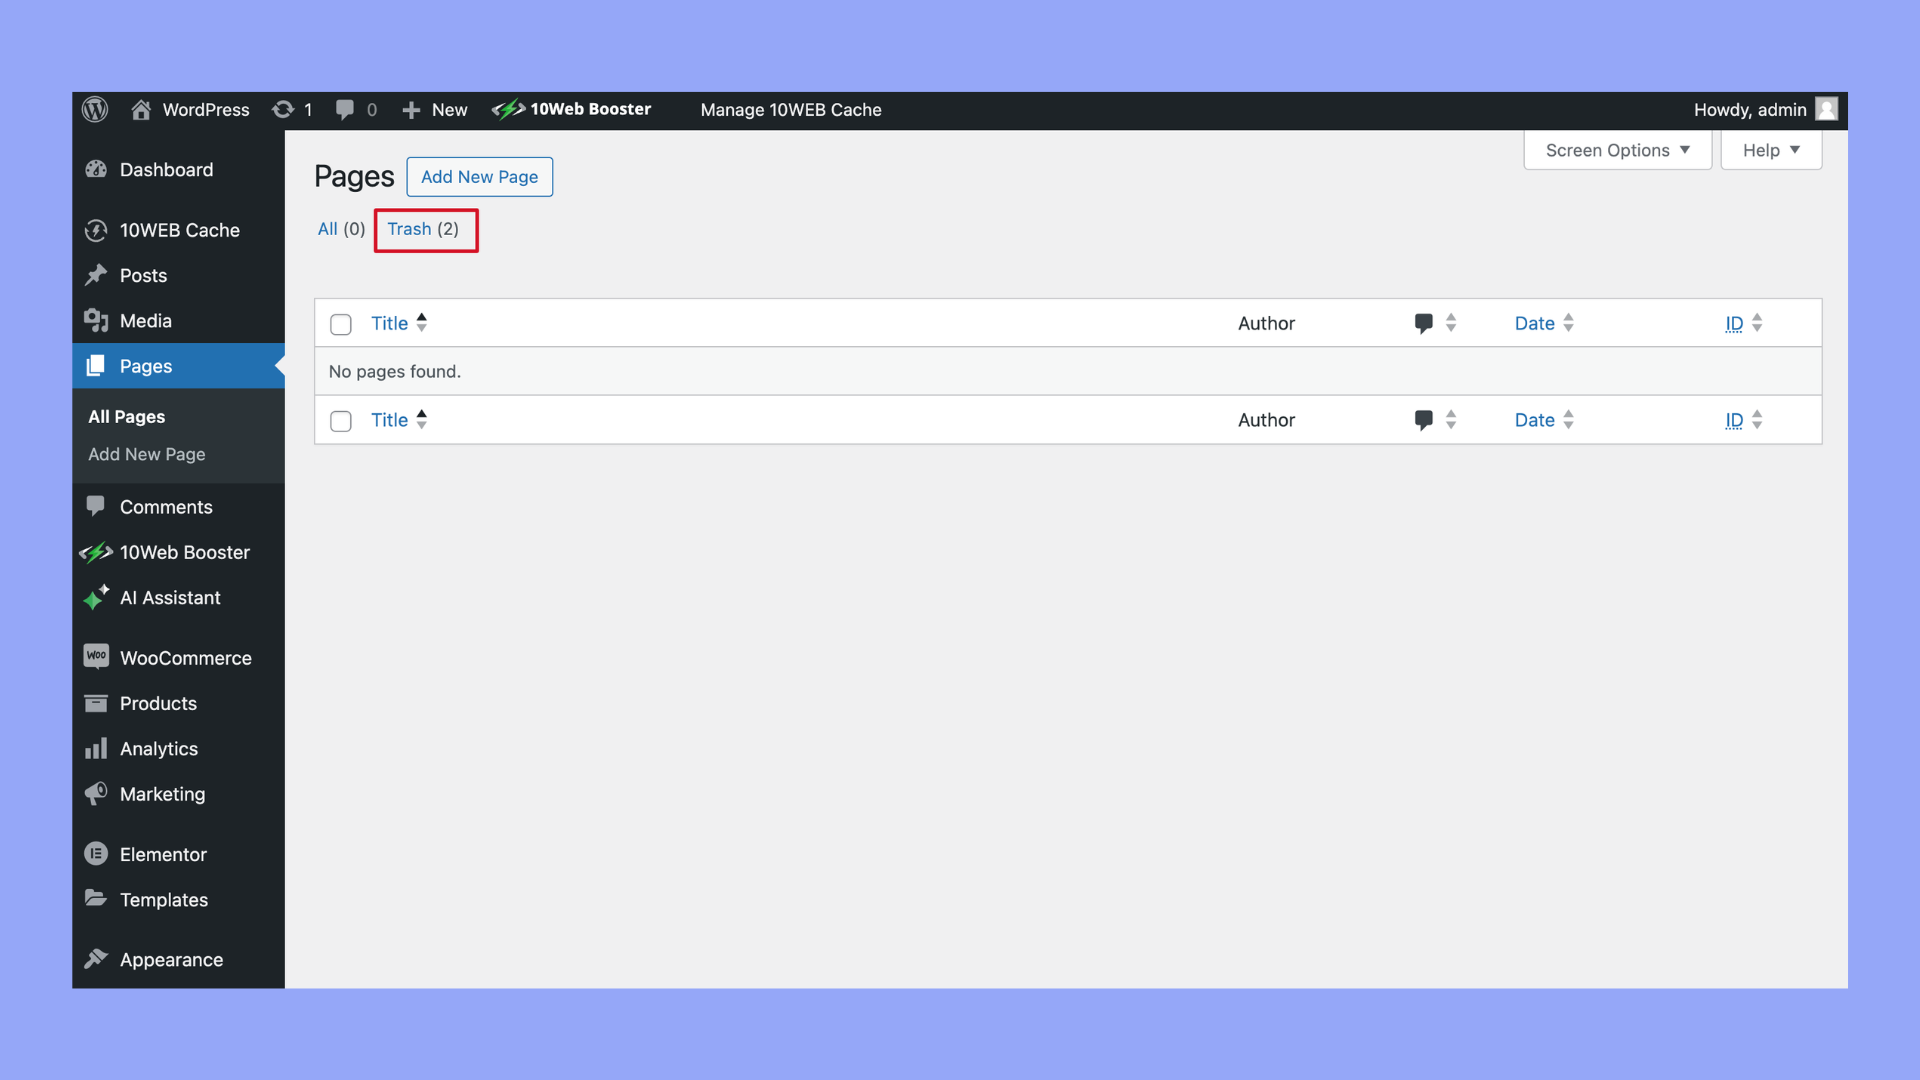
Step 5: Permanently Delete the Page(s)
- Access the trash by clicking on the Trash link at the top of the page listing.
- To permanently delete a page, hover over it and click Delete Permanently.
- For bulk deletions, repeat the process using bulk actions.
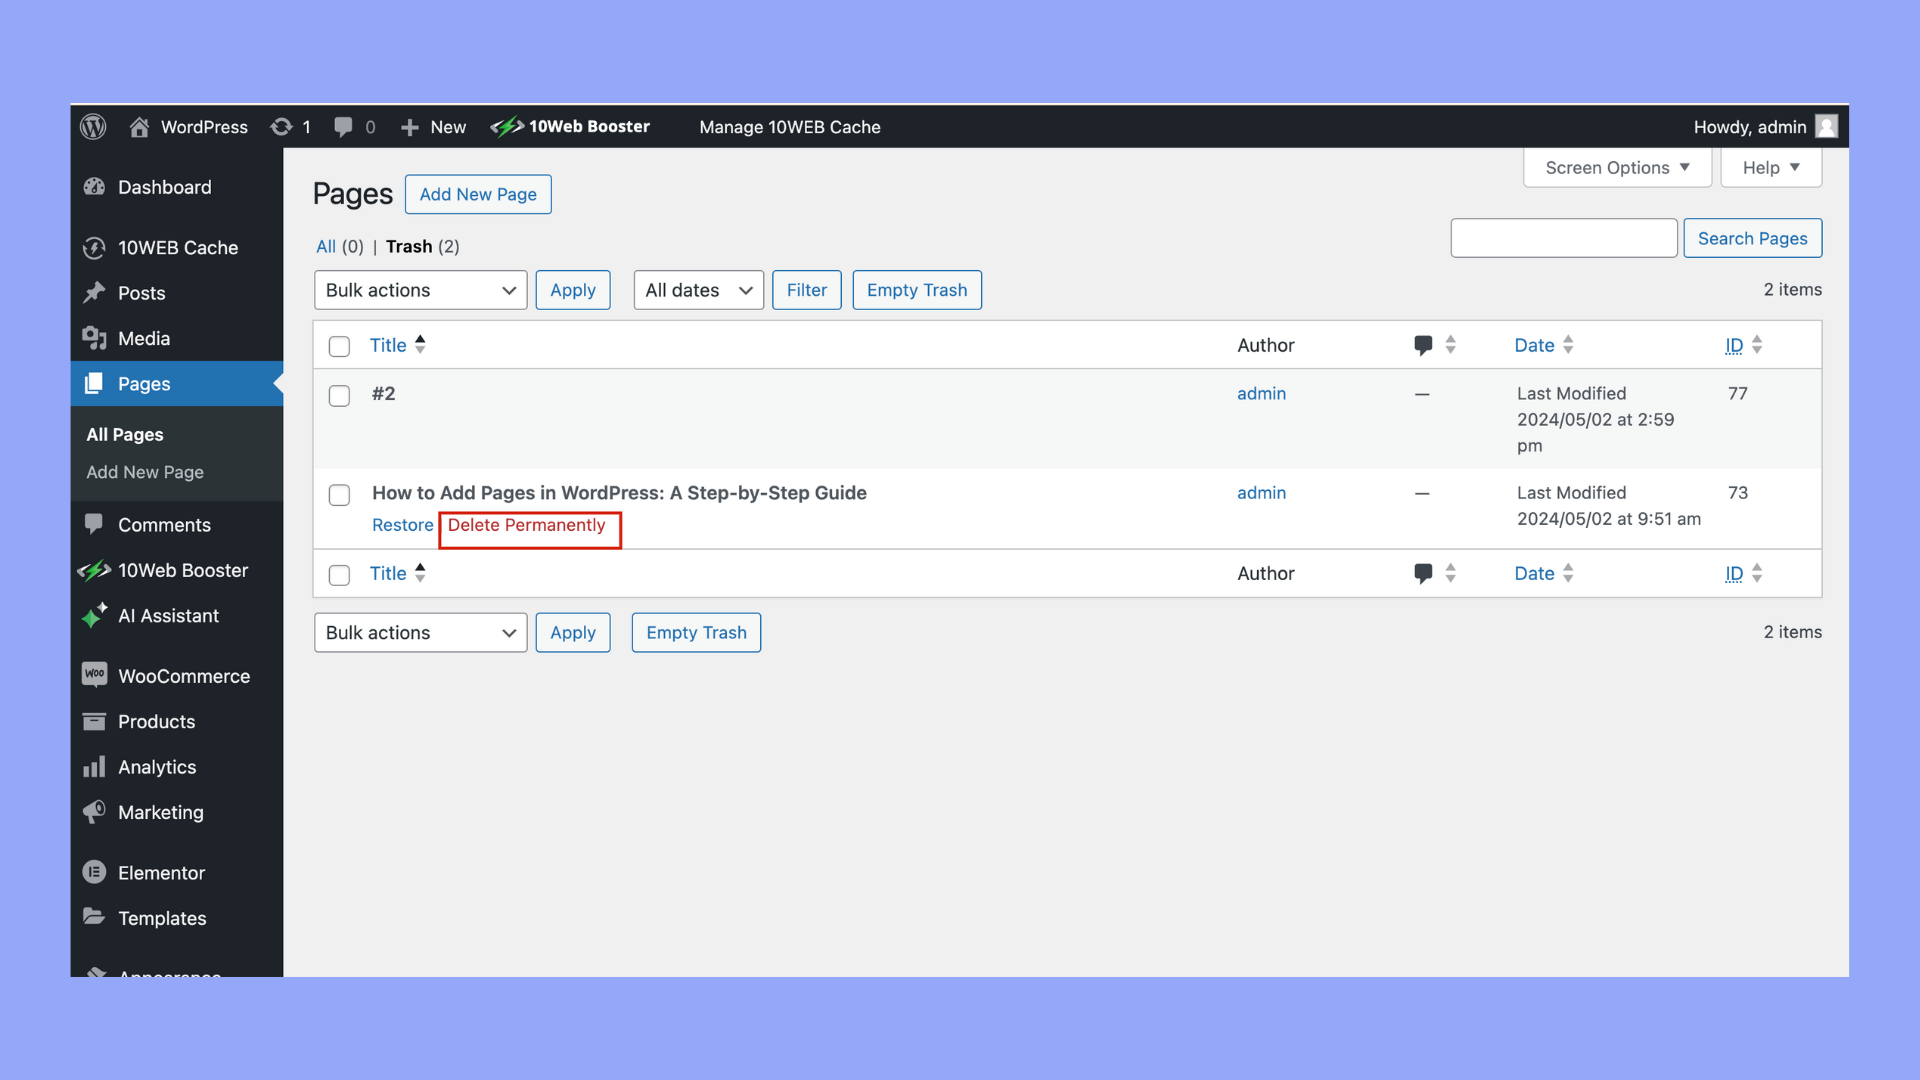
Remember that once you permanently delete a page, it’s not recoverable unless you have a backup. Consider reviewing your pages before deleting them to ensure you won’t need the content in the future.
Design and customization
When constructing a website, the visual identity is expressed through design and customization. Utilizing themes, customizing menus, and selecting page layout options are keys for crafting a distinct look that resonates with your brand and audience.
Using themes
Select a theme that aligns with your site’s purpose; it dictates the aesthetic and functional pattern of your pages. Browse the Appearance section in your WordPress dashboard, ensuring you preview and activate a theme that corresponds to your desired appearance. Themes not only provide a collection of pre-designed templates and patterns, but they also define the overall layout and allow for extensive customization of headers, footers, and other elements.
Customizing menus
To enhance site navigation, tailor your navigation menu under the Appearance > Menus section. Create a new menu and drag-and-drop pages to arrange the order. Remember to:
- Set a display location for your menu (e.g., top header, footer).
- Incorporate categories, custom links, or posts for comprehensive navigation.
- Use menu options to customize items’ labels or attributes.
Page layout options
Choose a page template to establish the structure of individual pages. WordPress offers various template options such as default, full-width, or with sidebars, each affecting the layout of your content. Create unique page designs by:
- Adding blocks such as paragraphs, images, or columns using the editor.
- Implementing cover images in headers for visual impact.
- Adjusting the settings for sidebars and columns to suit your page’s purpose.
Selecting the right combination of themes, menu configurations, and page layouts helps to create a cohesive and visually appealing website.
Enhancing SEO and visibility
When adding pages to your WordPress site, it’s crucial to enhance their search engine optimization (SEO) for greater visibility. SEO refers to optimizing your website so that it ranks higher in search engine results, making it more likely that people will find your content.
- Permalinks and URLs: Ensure your permalinks are SEO-friendly. Use a clear structure that includes keywords relevant to your page content. Instead of default URLs with numbers and question marks, your URLs should be readable and describe the page’s topic.
- Example: https://www.yourdomain.com/how-to-add-pages-in-wordpress is more informative and SEO-optimized than https://www.yourdomain.com/?p=123.
- Categories and tags: Use categories and tags to organize content and help search engines understand the structure of your site. Categories are broader, whereas tags are more specific, highlighting topics within a page.
-
- Categories: Broad topics like “SEO Tips”, “WordPress Guides”
- Tags: More specific like “Permalinks”, “URL Optimization”
-
- Social media integration: Add social sharing buttons to your pages. This encourages visitors to share your content, increasing visibility and potentially driving more traffic.
In summary, as you learn how to add pages in WordPress, remember that simple actions like setting up SEO-focused URLs, effectively using categories and tags, and integrating social media can significantly impact your site’s visibility on search engines. Focus on these elements to boost your SEO efforts.
Simplify WordPress with 10Web
Automate manual work with 10Web Managed WordPress Hosting and 10Web AI Website Builder. Optimize your WordPress website effortlessly.
Interacting with visitors
Engaging with visitors on your WordPress site is crucial for building a community and encouraging interaction. Here are ways to create a dialogue:
- Comments: Enable comments on your posts to allow visitors to offer feedback and start discussions. You can manage these settings under Discussion in your WordPress dashboard.
- Contact: A Contact page is essential. Use plugins like WPForms to create a contact form without the need for coding.
- About: An About page should clearly state who you are and what your site is about. Including a personal or brand story helps make a connection with your visitors.
- Subscribe: Offer a subscription option. A simple “Subscribe” button or form integrated into pages helps retain visitors by notifying them about new content.
- Social media integration: Create buttons linking to your social media profiles, or use plugins to display latest social media posts directly on your site.
| Action | Tools |
| Share Content | Social media plugins |
| Start Dialogue | Commenting system |
| Build Network | Contact forms, subscribe |
Remember, maintaining a professional, respectful environment in comment sections or forums is as important as the content itself. Your About Us section brings in a human touch, and utilizing your Contact Page effectively ensures your audience can reach you with ease.
Make each interaction with your visitors purposeful and reflective of the brand you represent. Empower them to be an active part of your online space.
Managing website structure
Effective management of your website’s structure is crucial for both user navigation and search engine optimization. By thoughtfully organizing your pages and setting up your homepage, you lay a solid foundation for your site’s usability and growth.
Organizing pages and posts
Pages serve as the static elements of your site, typically containing evergreen content such as About Us or Contact information. Posts, on the other hand, are dynamic and often organized into categories reflecting topics or themes. Here’s how you can organize them:
- Ordering: Arrange pages in a hierarchical structure with main pages and subpages (child pages). This can be done by assigning a parent page to each subpage.
- All Pages: Use the All Pages screen to manage published pages, draft pages, and rearrange them through quick actions like ‘Edit’, ‘Trash’, or ‘View’.
- Categories: To help users navigate blog posts, group them into categories, reflecting the subjects or topics for easy discovery.
By ensuring that each page or post is appropriately classified and ordered, you enhance your site’s clarity and flow.
Setting up the homepage
Your website’s home is the first impression visitors get, so setting it up strategically is key:
- Static page: Choose a static page as your homepage if you wish to present a consistent welcome message or feature.
- Blog page: Select a blog page to display the latest blog posts as the home interface if your focus is on regularly updated content.
- Settings: Navigate to Settings > Reading in your WordPress dashboard to configure whether your home is a static page or your blog page.
Remember, the homepage should reflect the purpose of your site, be it evergreen content for a business page or fresh, regularly updated content for a blog.
Simplify WordPress with 10Web
Automate manual work with 10Web Managed WordPress Hosting and 10Web AI Website Builder. Optimize your WordPress website effortlessly.
Publishing and maintaining your site
After learning how to add pages in WordPress, the next critical steps involve making your site public and ensuring its smooth operation over time.
Going live with your site
To publish your site, logging into your WordPress dashboard is the first step. Here’s how to make your newly created pages live:
- Navigate to the Pages section.
- Hover over the page you want to publish and click the Preview button to check your page one last time.
- If all is well, click the Publish button to go live.
- In case you want to publish it later, use the Save Draft or Schedule feature to set a future date.
Website maintenance best practices
Regular maintenance on your WordPress is essential to keep your website functioning optimally. Adopt these maintenance best practices:
- Update content: Regularly add new pages or update existing ones to keep your site relevant.
- Backups: Set up automated backups for your website in case you need to restore previous versions.
- WordPress updates: Keep your WordPress installation, themes, and plugins updated to patch security vulnerabilities and improve functionality.
- Monitoring: Use tools to monitor site performance and security to proactively manage any issues.
Conclusion
In mastering how to add pages in WordPress, you can significantly enhance your website’s structure and content delivery. By following the simple steps outlined in this guide, you can efficiently create and customize pages, allowing you to better organize your content and improve visitor engagement. Remember, practice makes perfect, so don’t hesitate to experiment with different settings and layouts to find what works best for your site.
Simplify WordPress with 10Web
Simplify WordPress with 10Web
Skip and automate manual work with 10Web Managed WordPress Hosting and the 10Web AI Website Builder.