Do you want to change the order status in WooCommerce? This guide will help you through the process. We will cover modifying order statuses, from core and custom statuses to bulk updates and automation. You’ll learn how to use the WooCommerce dashboard, implement coding techniques for custom statuses, and enhance customer communication. Whether you’re handling individual orders or automating status changes, this comprehensive guide ensures you can streamline your order management processes and improve overall workflow efficiency.
Let’s start by understanding the WooCommerce order statuses, then learn how to change order status in WooCommerce.
FAQ
How does WooCommerce order status work?
How to update order status in WooCommerce programmatically?
How do I change order details in WooCommerce?
How do I customize my order tracking in WooCommerce?
WooCommerce order statuses: the basics
In the WooCommerce platform, order statuses are crucial for managing the ecommerce process, as they allow you to track each step from order receipt to completion.
Default statuses
WooCommerce assigns specific default order statuses that reflect the state of an order throughout its lifecycle. Here’s a breakdown:
- Pending payment: The order has been placed but payment hasn’t been received.
- Processing: Payment has been received and the order is being prepared.
- On hold: The order is waiting for something, often payment verification.
- Completed: The order has been fulfilled and no further action is necessary.
- Canceled: The order has been canceled by an admin or the customer.
- Refunded: The customer has been refunded for their order.
- Failed: Payment failed or was declined.
These statuses help you and your customers keep track of orders from start to finish.
Custom statuses and their benefits
Adding custom order statuses can enhance your workflow and communication. Benefits include:
- Clearer customer communication: Custom statuses can provide more detailed updates to customers.
- Workflow efficiency: They can align the order statuses with your unique processing steps.
For example, a custom status might be “Awaiting pickup” for a local delivery option. We’ll discuss ways to manage orders on WooCommerce dashboard more effectively by learning how to change default order status in WooCommerce.
Managing order status on WooCommerce dashboard
Navigating to and managing orders within the WooCommerce dashboard is a streamlined process designed to aid efficiency in handling customer transactions. Here’s how to change order status in WooCommerce right from the dashboard.
Access orders page
To view and modify the statuses of your WooCommerce orders, start by accessing the orders page on your dashboard:
- Log in to your WordPress dashboard.
- In the left sidebar, click on WooCommerce to expand the menu options.
- Choose Orders from the drop-down menu to open the orders dashboard.

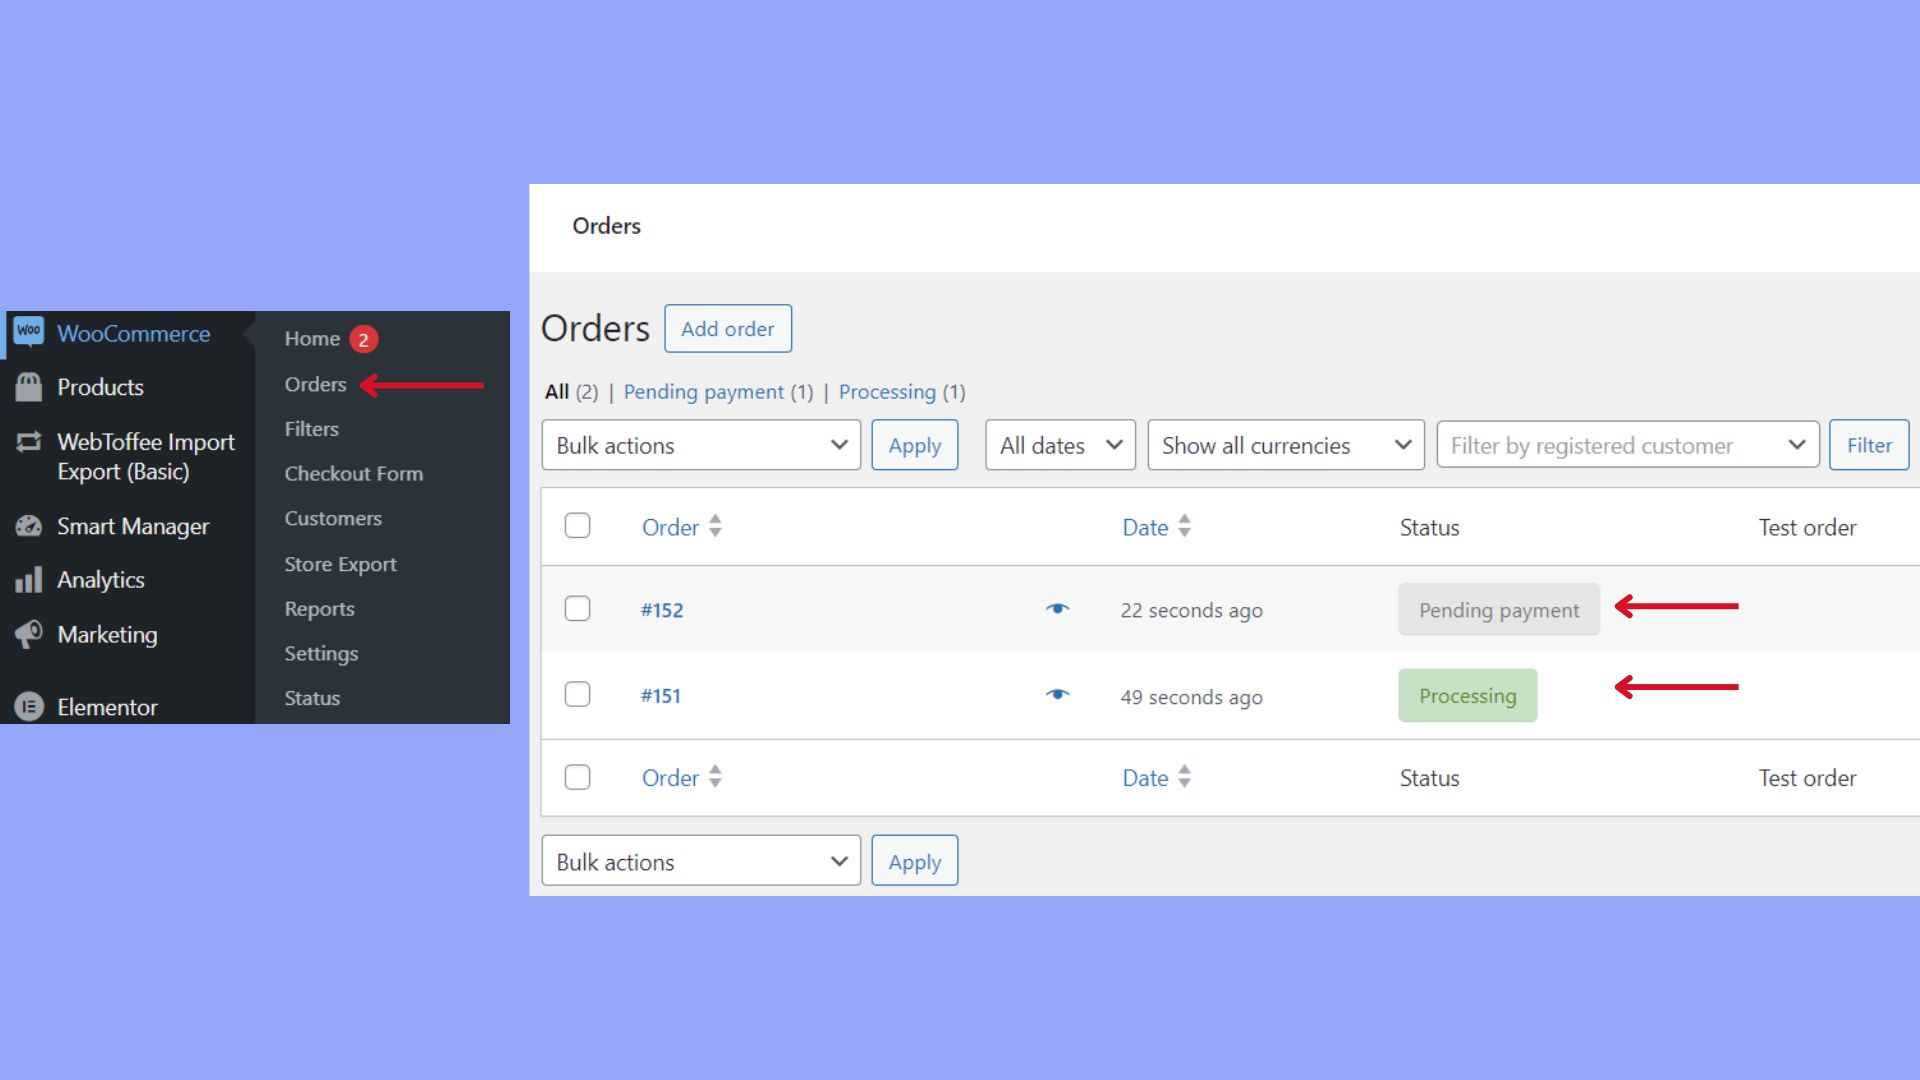
Here, you will find a list of all orders, where you can monitor their current statuses and perform individual order management tasks.
Use bulk actions
For managing multiple orders at once, WooCommerce provides bulk actions that can save you time:
- On the WooCommerce Orders page, select the checkbox next to each order you wish to update or use the checkbox at the top to select all orders on the page.
- Above the order list, locate and click the Bulk Actions dropdown menu.
- Choose the desired action, such as marking orders as completed or processing.
- Click Apply to change the status for the selected orders in bulk.


With these steps, you can efficiently handle large volumes of orders, giving you more time to focus on growing your business. Knowing how to change default order status in WooCommerce using the dashboard is crucial for timely updates to your customers and inventory management.
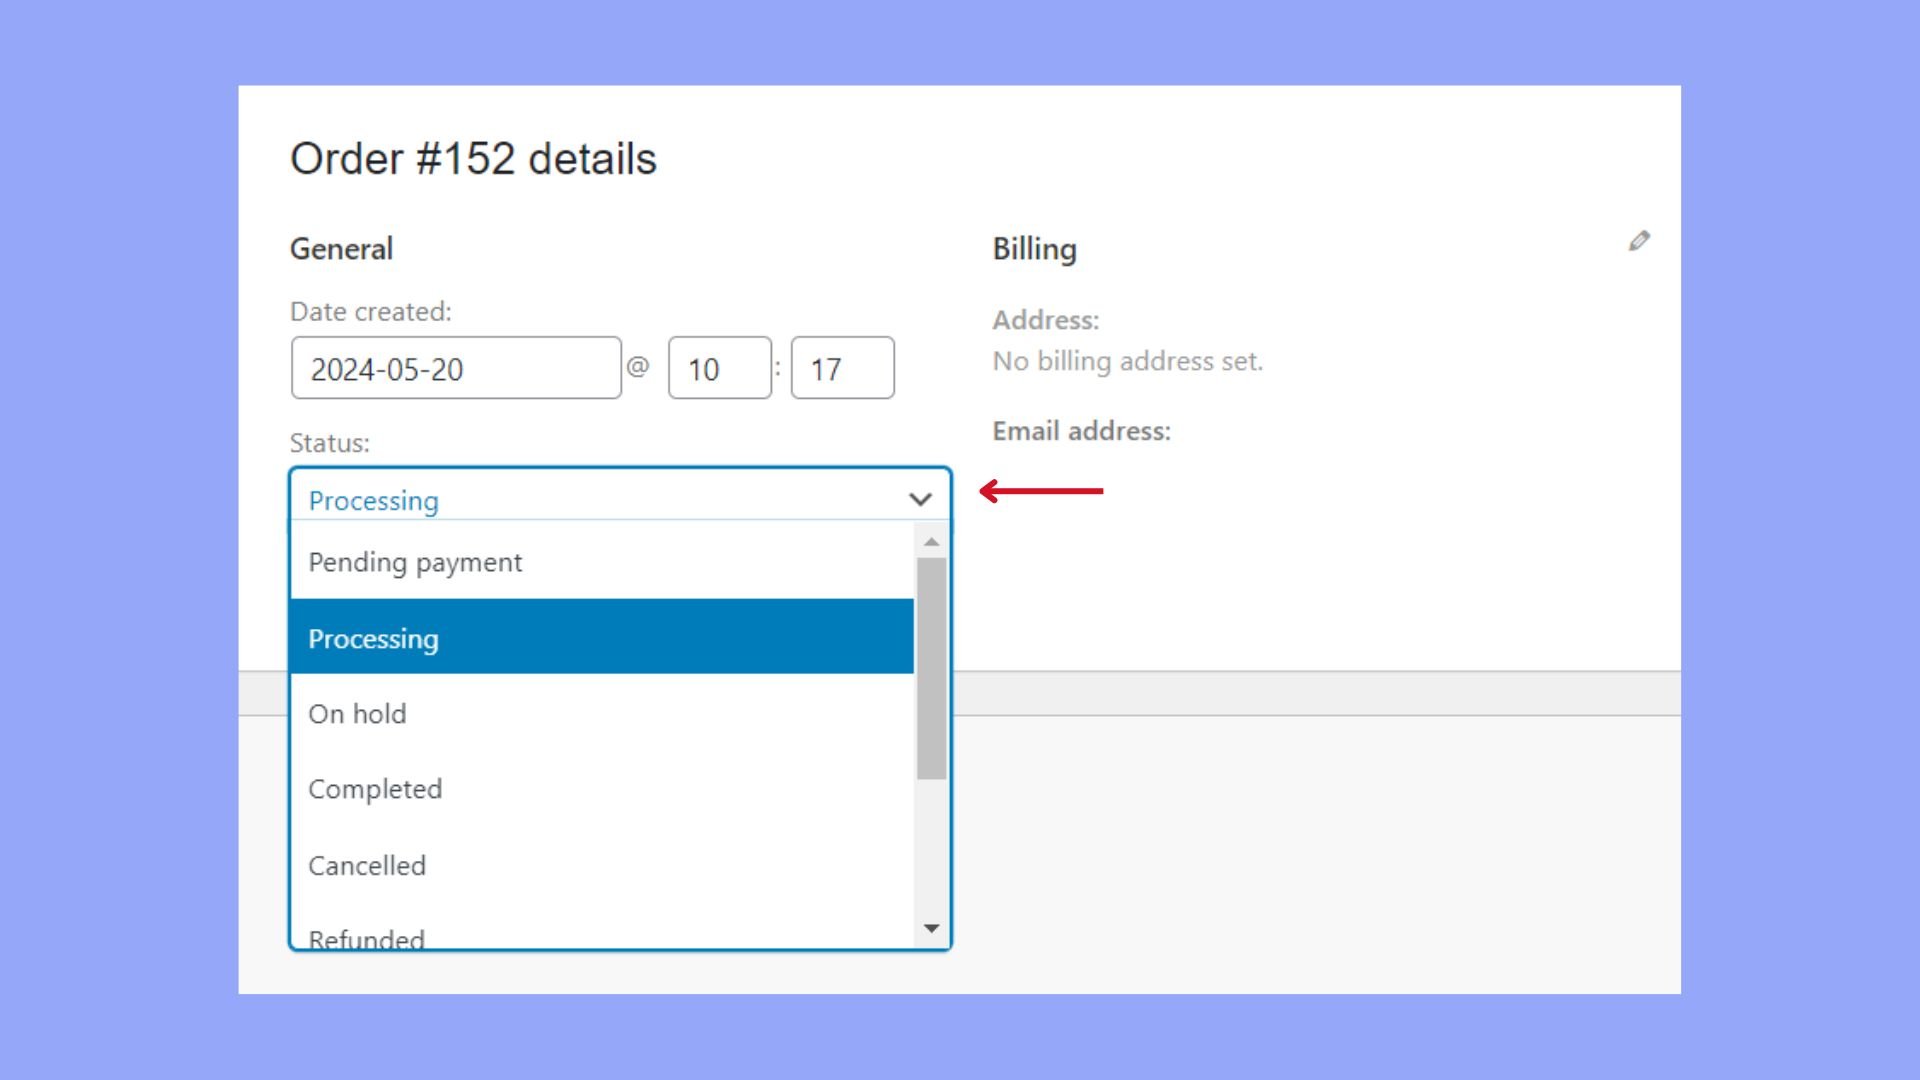
Change statuses individually
Besides the bulk action, you can also utilize the individual status-changing method. To update the status of an individual order in WooCommerce:
- Go WooCommerce Orders from your WordPress dashboard.
- Find and click on the order you wish to update.
- Find the Order status dropdown menu on the right side of the order details page. Click to edit.
- Select the new status for your order. You can choose from several statuses such as Pending payment, Processing, On hold, Completed, Cancelled, Refunded, and Failed.
- After selecting the new status, click the Update button to save your changes.
If you are using the 10Web ecommerce solution, you can change the order status right from your 10Web dashboard by going to Ecommerce > Orders from the left-hand side and then manually changing the status of the order you wish to edit.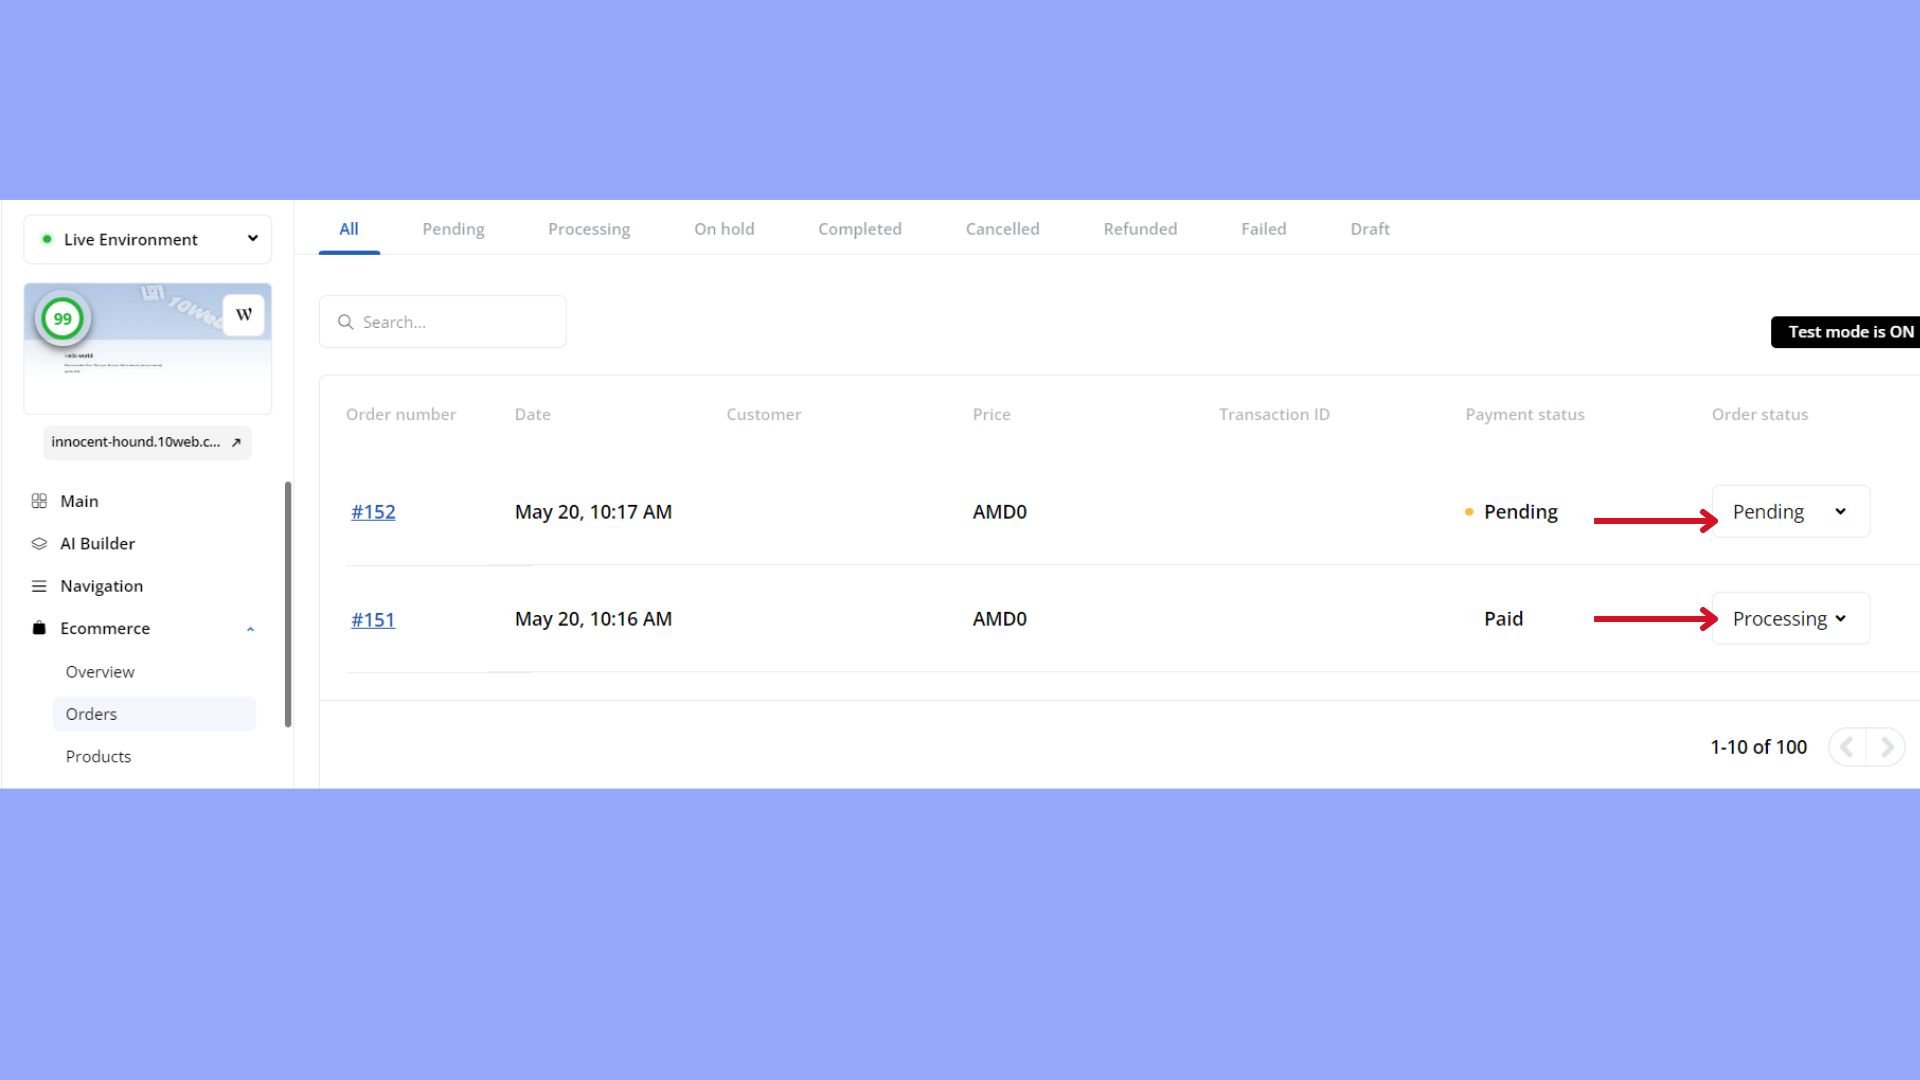
Click Update to save.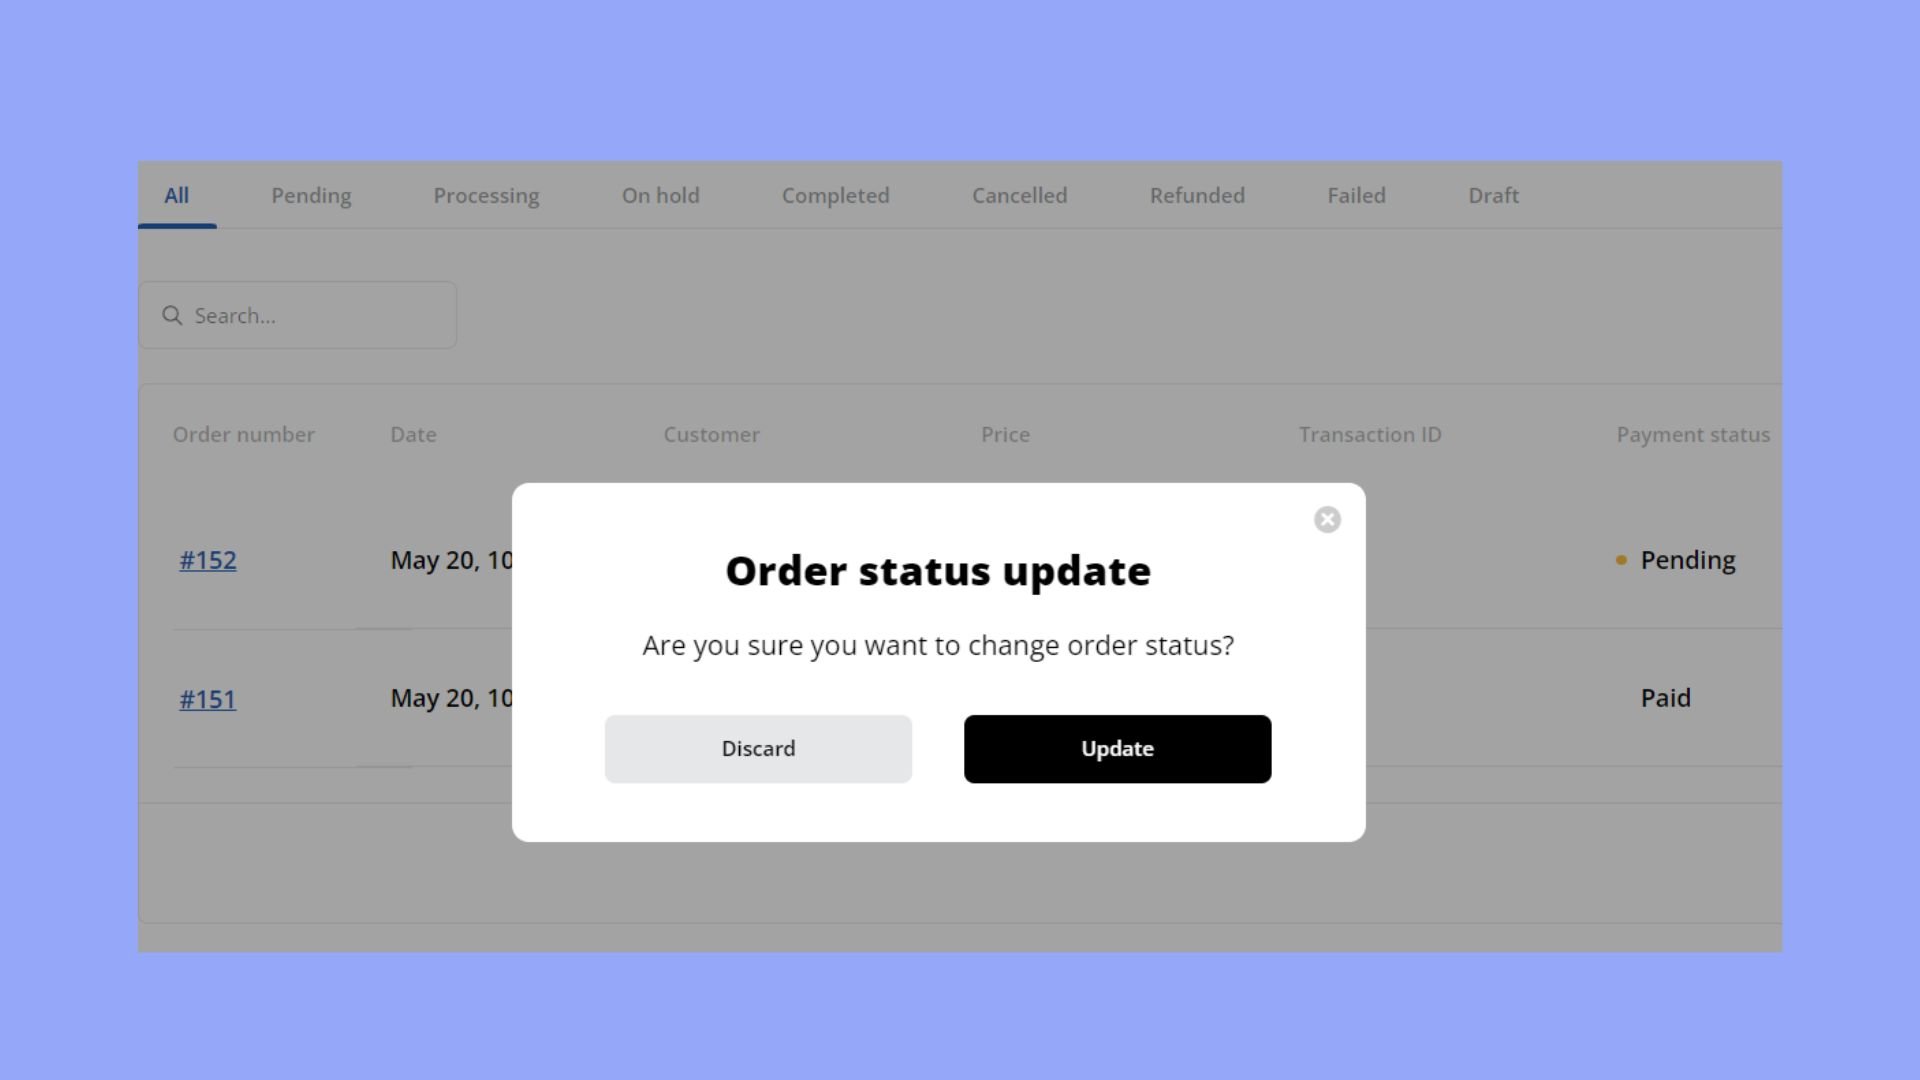
Modifying order status via code
When you want to tailor your WooCommerce store to suit specific needs, adjusting order statuses directly through PHP is a powerful approach. You’ll typically work with the functions.php file or employ action hooks and filters for deeper customization. You can choose this method if you prefer technical solutions. Let’s understand how to change order status in WooCommerce programmatically.
Edit functions.php file
Customizing order statuses in WooCommerce can begin with editing the functions.php file which is a part of your active WordPress theme. This file allows for adding custom PHP code that alters the default behavior of your WooCommerce store.
- On your WordPress dashboard go to Appearance, then Theme Editor.
- Locate and select the functions.php from the list of theme files.
- Insert your custom PHP code to modify the order status. For example, to add a new order status, you will use the register_post_status() function, including the new status slug and label.
add_action('init', 'register_my_new_order_statuses');

function register_my_new_order_statuses() {

 register_post_status('wc-custom-status', array(

 'label' => _x('Custom status', 'Order status', 'textdomain'),

 'public' => true,

 'exclude_from_search' => false,

 'show_in_admin_all_list' => true,

 'show_in_admin_status_list' => true,

 'label_count' => _n_noop('Custom status (%s)', 'Custom status (%s)', 'textdomain')

 ));

}
Save your changes by clicking the Update File button.
Use action hooks and filters
The next method of how to change order status in WooCommerce programmatically is using action hooks and filters. Action hooks and filters in WordPress are functions that allow you to hook into the platform and modify content or functionality.
- Identify the hook or filter that corresponds to the event where you wish to change the order status. For example, woocommerce_order_status_changed is a hook that triggers when an order’s status is updated.
- In the functions.php file, add an action or filter that hooks into the desired point of the process.
- Make sure your hooked function handles the order status change logic as needed.
- Again, save your work with the Update File button.
add_action('woocommerce_order_status_changed', 'your_function_name');

function your_function_name( $order_id, $old_status, $new_status ) {

 if( 'new-status' === $new_status ) {

 // Your code to handle what happens when the order moves to the new status.

 }

}
Each of these methods allows you to align how to change order status in WooCommerce to your specific business processes, ensuring that you have full control over the order management in your WooCommerce store.
Creating new order statuses
In WooCommerce, you can enhance the functionality of your store by adding custom order statuses. So, besides learning how to change order status in WooCommerce, you should also be wondering how to create new order statuses. This helps you track the progress of orders more efficiently and provides clearer communication with your customers. Let’s look at how to add these statuses to your system.
Adding custom statuses programmatically
If you’re comfortable with code, adding a custom status to your WooCommerce site can be done by inserting a snippet into your theme’s functions.php file. This method gives you flexibility and control over the new status.
- Go to Appearance > Theme File Editor. Select the functions.php from the right-hand side.
- You will need to add PHP code to create your new custom status. Here is an example of a simple code snippet that you can add:
 function add_custom_woocommerce_order_statuses() {

register_post_status('wc-custom-status', array(

 'label' => _x('Custom status', 'Order status', 'text-domain'),

 'public' => true,

 'exclude_from_search' => false,

 'show_in_admin_all_list' => true,

 'show_in_admin_status_list' => true,

 'label_count' => _n_noop('Custom status (%s)', 'Custom statuses (%s)', 'text-domain')

 ));

}

add_action('init', 'add_custom_woocommerce_order_statuses');
Replace ‘wc-custom-status’ and ‘Custom status’ with the slug and name of your new order status, respectively.
To ensure WooCommerce recognizes your new status, add the following function:
function add_custom_status_to_woocommerce_order_statuses($order_statuses) {

 $new_order_statuses = array();

 // add new order status after processing

 foreach ($order_statuses as $key => $status) {

 $new_order_statuses[$key] = $status;

 if ('wc-processing' === $key) {

 $new_order_statuses['wc-custom-status'] = _x('Custom status', 'Order status', 'text-domain');

 }

 }

 return $new_order_statuses;

}

add_filter('wc_order_statuses', 'add_custom_status_to_woocommerce_order_statuses');
Setting up status properties
Once you’ve added your custom statuses, it’s important to define their properties, such as the icon and color, to make them visually distinct on the dashboard.
You can set an icon and color for your new status by including them in your code snippet:
// Example: Setting icon and color for 'wc-custom-status'

add_action('admin_head', function() {

 echo '<style>

 .order-status.status-wc-custom-status {

 background: #c6e1c6;

 color: #5b841b;

 }

 .order-status.status-wc-custom-status::after {

 font-family: woocommerce;

 content: "\e011";

 }

 </style>';

});
Customize the background and color values to match your store’s theme and choose an appropriate icon code for content.
With these steps, you can tailor the order management process to better fit your business workflows, ensuring you know how to change order status in WooCommerce to your requirements.
Automation and customer experience
When dealing with online shopping, staying and keeping your customers informed about order progress is key. This section will guide you through setting up email notifications for order status changes and automating status transitions in WooCommerce. At the same time, providing a clear and informative customer journey can significantly enhance the shopping experience. Adequately updating and communicating order statuses are crucial components of this process.
Setting email notifications
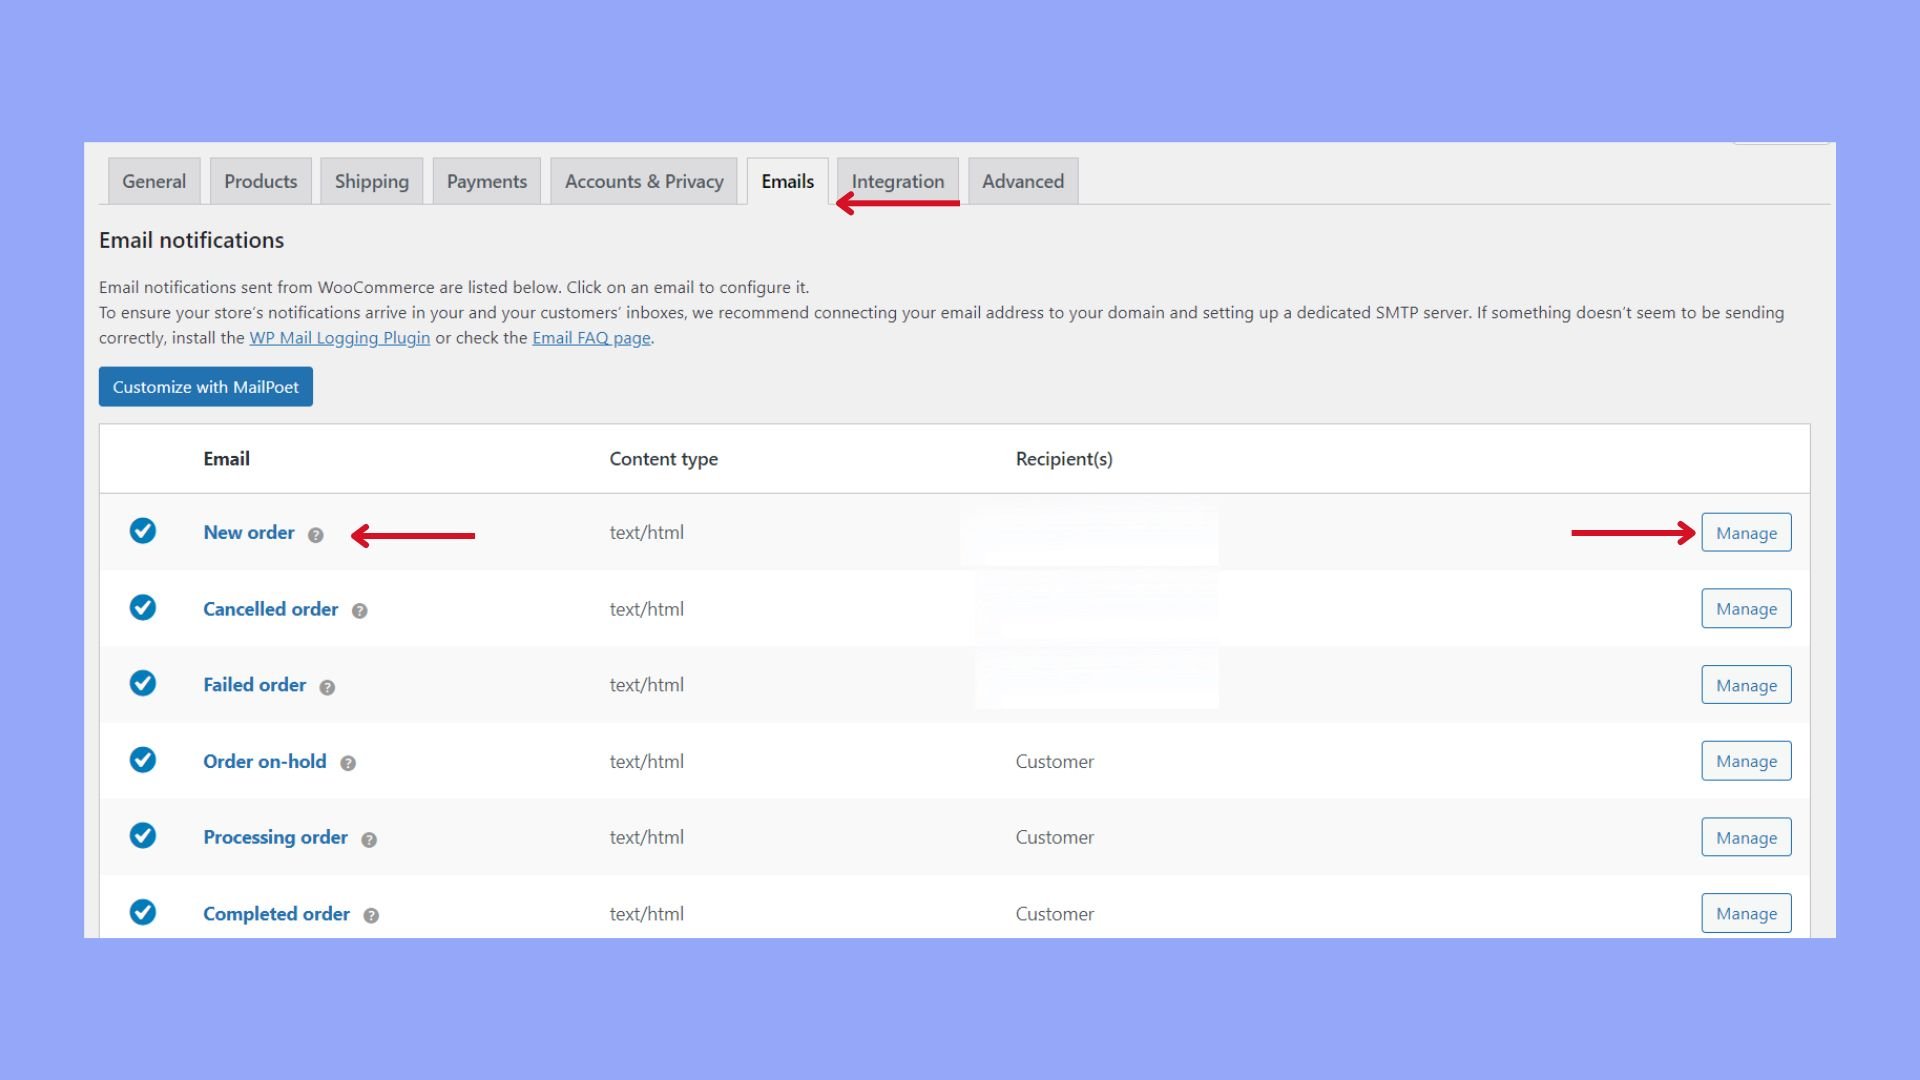
WooCommerce can automatically trigger an email to the customer, keeping them updated when a status is changed or another action is done to their order. Below is how to set up these email triggers if you don’t have them set up yet:
- Go to WooCommerce > Settings > Emails.
- Scroll to the email notification you want to configure (e.g. Processing order, Completed order).
- Click Manage next to the email you want to customize.
- Here, you can ensure that the Enable this email notification option is checked to activate the trigger.
- Customize the email subject, heading, and content as needed.
- Click Save changes.
You can use the woocommerce_thankyou action hook to send a custom order status email after the order is completed.
Order status icons and descriptions
After you have learned how to change default order status in WooCommerce, you should focus on how they look on the customer’s screen. Icons play a visual role in quickly conveying order status to customers, making their shopping experience more intuitive. To effectively utilize icons in your WooCommerce store:
- Choose an icon that universally represents the order status, such as a clock for “Pending payment” or a truck for “Shipped”.
- Visit WooCommerce > Settings > Order Statuses to assign icons to each status.
- Ensure the icons are aesthetically pleasing and cohesive with your brand to maintain professionalism.
- Include a brief description for each status so customers understand exactly what it means.
Customer access to order details
Allowing customers to view comprehensive order details is essential for transparency and trust:
- Ensure customers can access their order details easily from their account page.
- Provide a link right after purchase and in order confirmation emails that leads to the order details page.
- On the order details page, display the order status with the associated icon and description.
- Update customers promptly when their order status changes to keep them informed throughout the delivery process.
Thus, you can greatly improve your customers’ experiences, fostering trust and encouraging repeat business.
Conclusion
Managing order statuses in WooCommerce is a crucial aspect of running a successful ecommerce store. By understanding and utilizing both default and custom order statuses, store owners can enhance their workflow efficiency and provide clearer communication to customers.
Whether you’re handling status changes manually through the WooCommerce dashboard, using bulk actions, or implementing programmatic solutions, having a flexible approach to order management ensures your business can adapt to various needs and scenarios. In this guide, you have learned how to change order status in WooCommerce and enhance your customer experiences through better notifications of this change.
Create your custom online store in minutes with 10Web AI Ecommerce Website Builder and take your business online. Create your online store in minutes with 10Web AI Ecommerce Website Builder.
Looking to sell online?
Looking to sell online?
Create your online store in minutes


![]()