Integrating your WooCommerce store with Facebook is a strategic move that can significantly expand your market reach and enhance your sales. This guide provides a comprehensive step-by-step process on how to connect WooCommerce to Facebook, leveraging the powerful tools of social media to bring your products directly to a broader audience. Whether you’re aiming to increase visibility, drive sales, or improve customer interaction, connecting WooCommerce to Facebook can provide the tools and platform necessary to achieve these goals.
FAQ
Can you link WooCommerce to Facebook?
Does WooCommerce integrate with social media?
How do I connect to WooCommerce store?
Importance of connecting WooCommerce to Facebook
Connecting your WooCommerce store to Facebook can significantly enhance your online presence and sales potential. With billions of active users, Facebook offers a vast audience for your products and an opportunity for increased revenue.
- Broaden your reach: By integrating WooCommerce with Facebook, you tap into a large audience. Your products become visible to a wide range of potential customers.
- Leverage targeted advertising: Facebook’s advertising platform allows you to display your products to users based on their interests, behavior, and demographics.
- Streamline customer interaction: You can provide customer support directly through Facebook, offering a convenient way for customers to reach out and for you to respond.
- Increase sales with ease: Facebook Shops provide a seamless shopping experience, allowing users to browse and purchase products without leaving the Facebook app.
- Gather insights: Learn about customer preferences and behaviors with the analytics tools provided by Facebook to refine your marketing and sales strategies.
In short, integrating your WooCommerce store with Facebook can be a strategic move to expand your online business’s reach and success. Create your custom online store in minutes with 10Web AI Ecommerce Website Builder and take your business online.

Looking to sell online?
How to connect WooCommerce to Facebook
Integrating your WooCommerce store with your Facebook page can significantly expand your online presence and potential customer reach. Follow these straightforward steps to get started.
Step 1: Getting started with WooCommerce and Facebook integration
Setting up a Facebook page
Creating a dedicated Facebook page for your WooCommerce store is the next step in the integration process.
- Create page: Go to Facebook and create a new page for your business if you haven’t already. Ensure all details like your store name and contact information are accurate.
- Configure: With your page set up, go to the Facebook Commerce Manager and link your WooCommerce Product Catalog. Choose the relevant catalog and use it in your Facebook shop.
By following these initial steps, you’ll be well on your way to harnessing the power of Facebook for your WooCommerce store.
Integrating your WooCommerce store with your Facebook page opens new possibilities for reaching customers and boosting sales. The process involves setting up a synchronization between your product catalog and Facebook shop.
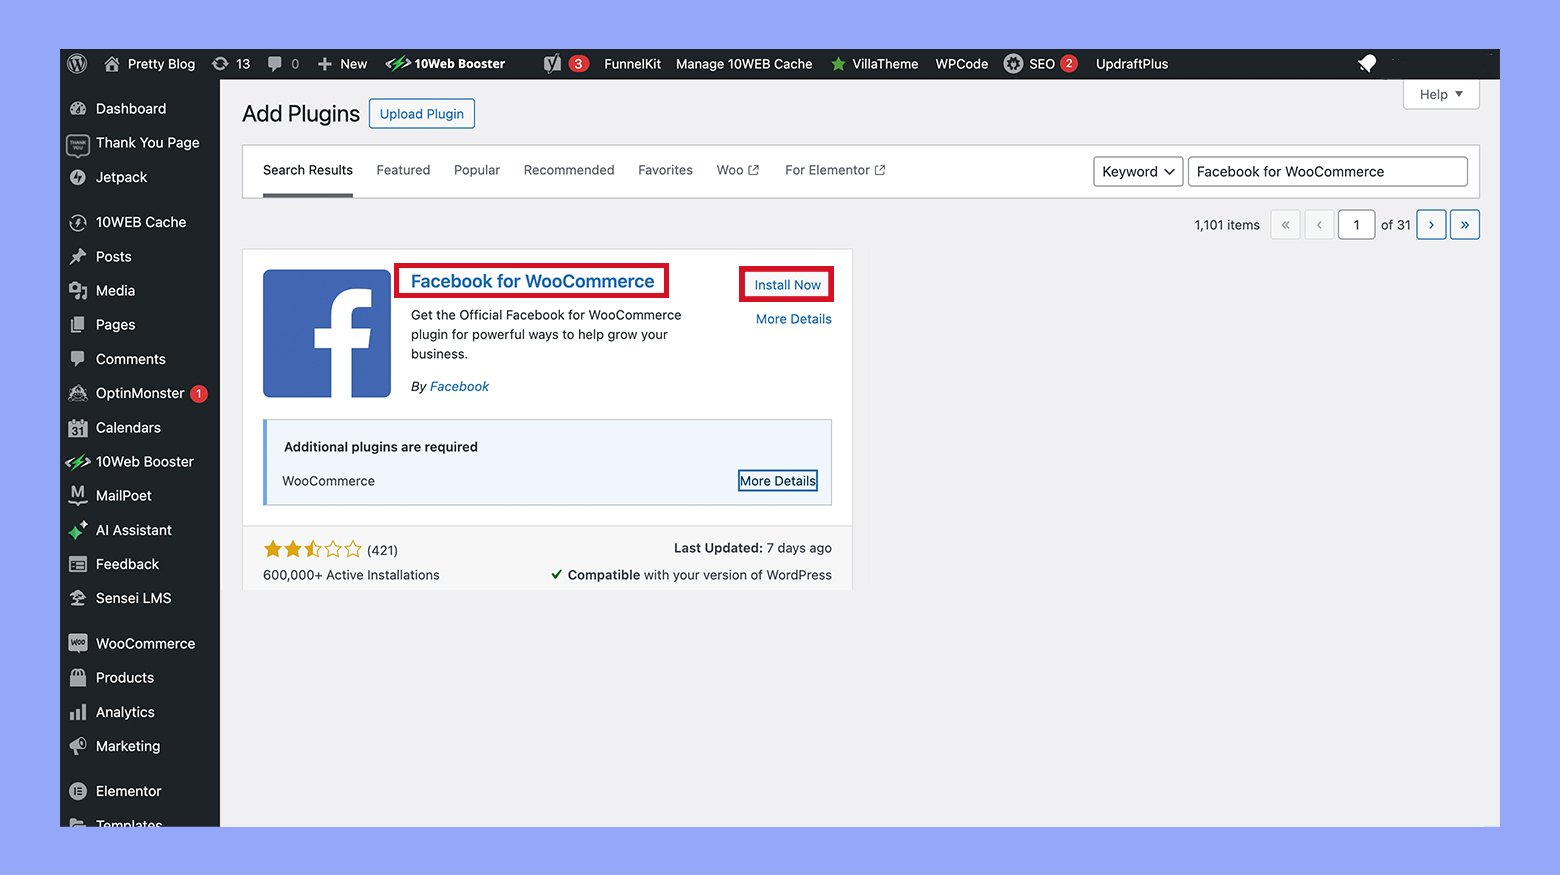
Installing the Facebook for WooCommerce plugin
To seamlessly connect your WooCommerce store to your Facebook page, the Facebook for WooCommerce plugin is a convenient tool. Below are the steps to get started:
- Install the Facebook for WooCommerce plugin from the WooCommerce marketplace or the plugin section in your WordPress dashboard.

- Activate the plugin, then navigate to Marketing > Facebook.
- Connect to your Facebook account by following the on-screen prompts. Ensure you’re logged into the Facebook account linked to your business.
- Authorize the plugin to access your Facebook page and associated business assets.

Click here for detailed documentation on the Facebook for WooCommerce plugin setup.
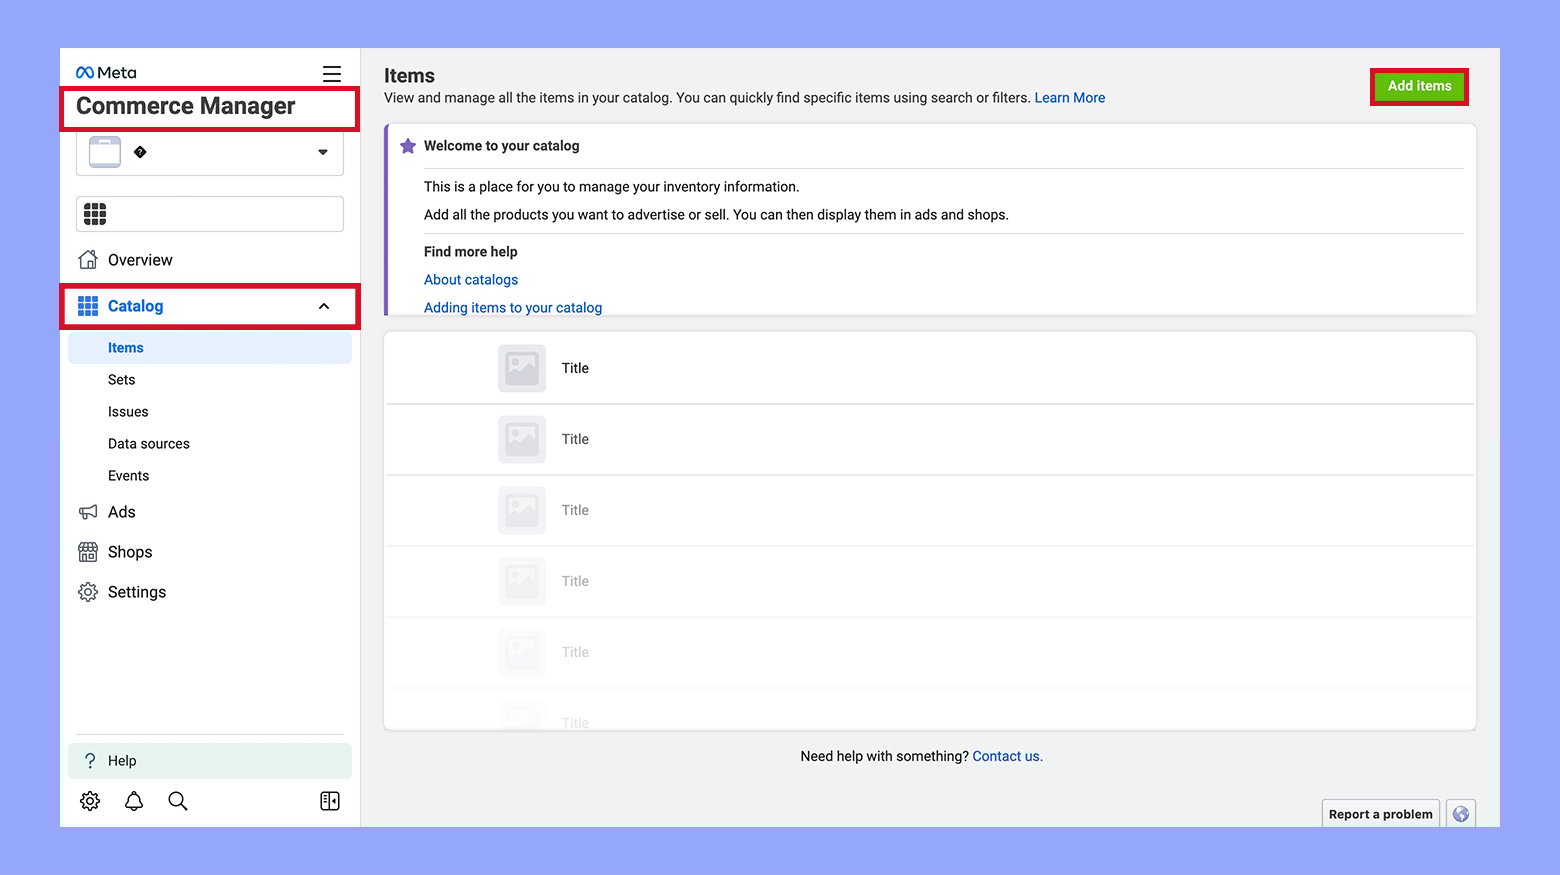
Synchronizing your product catalog
After the plugin is configured, the next step revolves around synchronizing your WooCommerce product catalog with your Facebook shop:
- Access Facebook Commerce Manager and select Catalogs from the menu.
- Choose the WooCommerce product catalog you wish to sync with your Facebook shop.
- In Commerce Manager, navigate to Shops and use the Go To Shops button to proceed.
- Follow the prompts to import your WooCommerce products, ensuring that your inventory is accurately reflected in your Facebook shop.
Check out the guidelines on the process of adding your WooCommerce store to Facebook step by step.
Connecting your WooCommerce store to your Facebook shop through these methods helps maintain a consistent product presence across both platforms and potentially increases your store’s visibility and sales on social media.
Step 2: Optimizing your product listings for Facebook
When listing your WooCommerce products on your Facebook store, it’s crucial to ensure they’re compelling and up-to-date to attract and engage potential customers.
Enhancing product descriptions
- Choose descriptive titles: Make sure your product titles are clear and engaging. Use relevant keywords that your customers might use to search for your products.
- Write compelling descriptions: Include specific features and benefits that highlight why your product is unique or superior. Use short paragraphs and bullet points to make the content easy to read.
- Use high-resolution images: Quality images can boost engagement and help users make a buying decision. Ensure every product has a high-quality image associated with its listing.
Managing inventory and stock levels
- Regularly update inventory: Keep your inventory information consistent across your WooCommerce store and Facebook catalog.
- Set up product sync: Automate the process by using a tool that can help you sync your product catalog, ensuring inventory levels are always current.
- Inform customers about stock levels: Be transparent about the availability of items, which can save you from overselling and help manage customer expectations.
By following these guidelines, your WooCommerce product listings on Facebook can become more attractive to shoppers, potentially increasing your sales opportunities. Remember, the more detailed and up-to-date your product listings are, the better the shopping experience for your customers.
Step 3: Marketing your products on Facebook and Instagram
Connecting your WooCommerce store to Facebook and Instagram can significantly amplify your marketing efforts. In this era of social commerce, leveraging both platforms enables you to not only reach a broader audience but also provides a streamlined shopping experience for your customers.
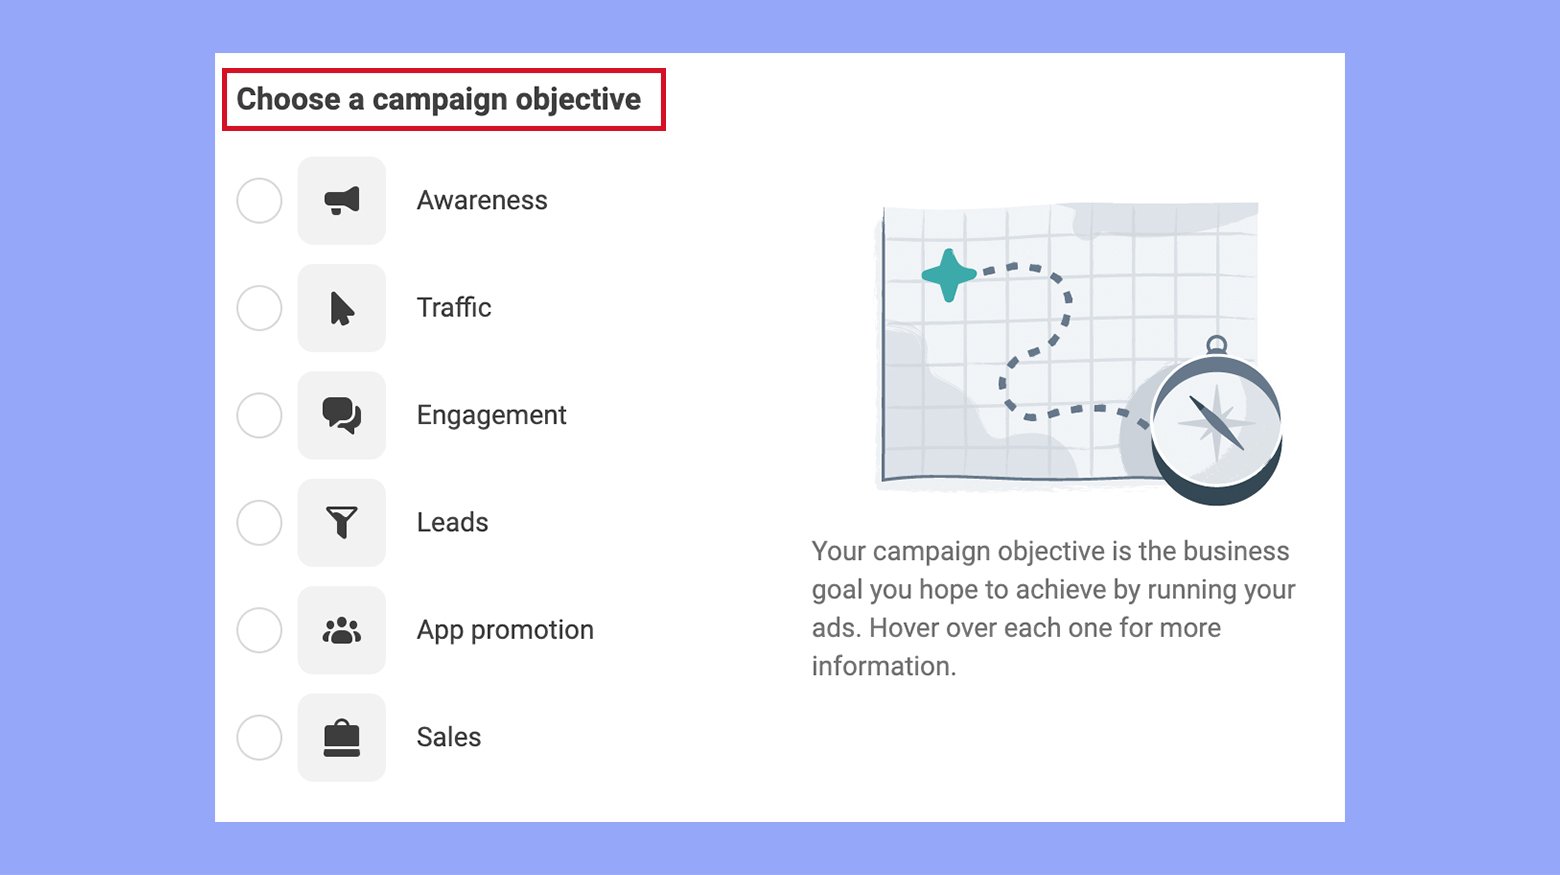
Creating engaging Facebook ads
- Define your campaign objective by selecting options such as Awareness or Traffic to tailor your ad based on your marketing goals.
- Use Facebook’s Ads Manager to create your ad, ensuring you select your WooCommerce store’s Facebook Page as the identity.
- Upload high-quality images or videos to capture attention and write compelling ad text that speaks directly to your target audience.
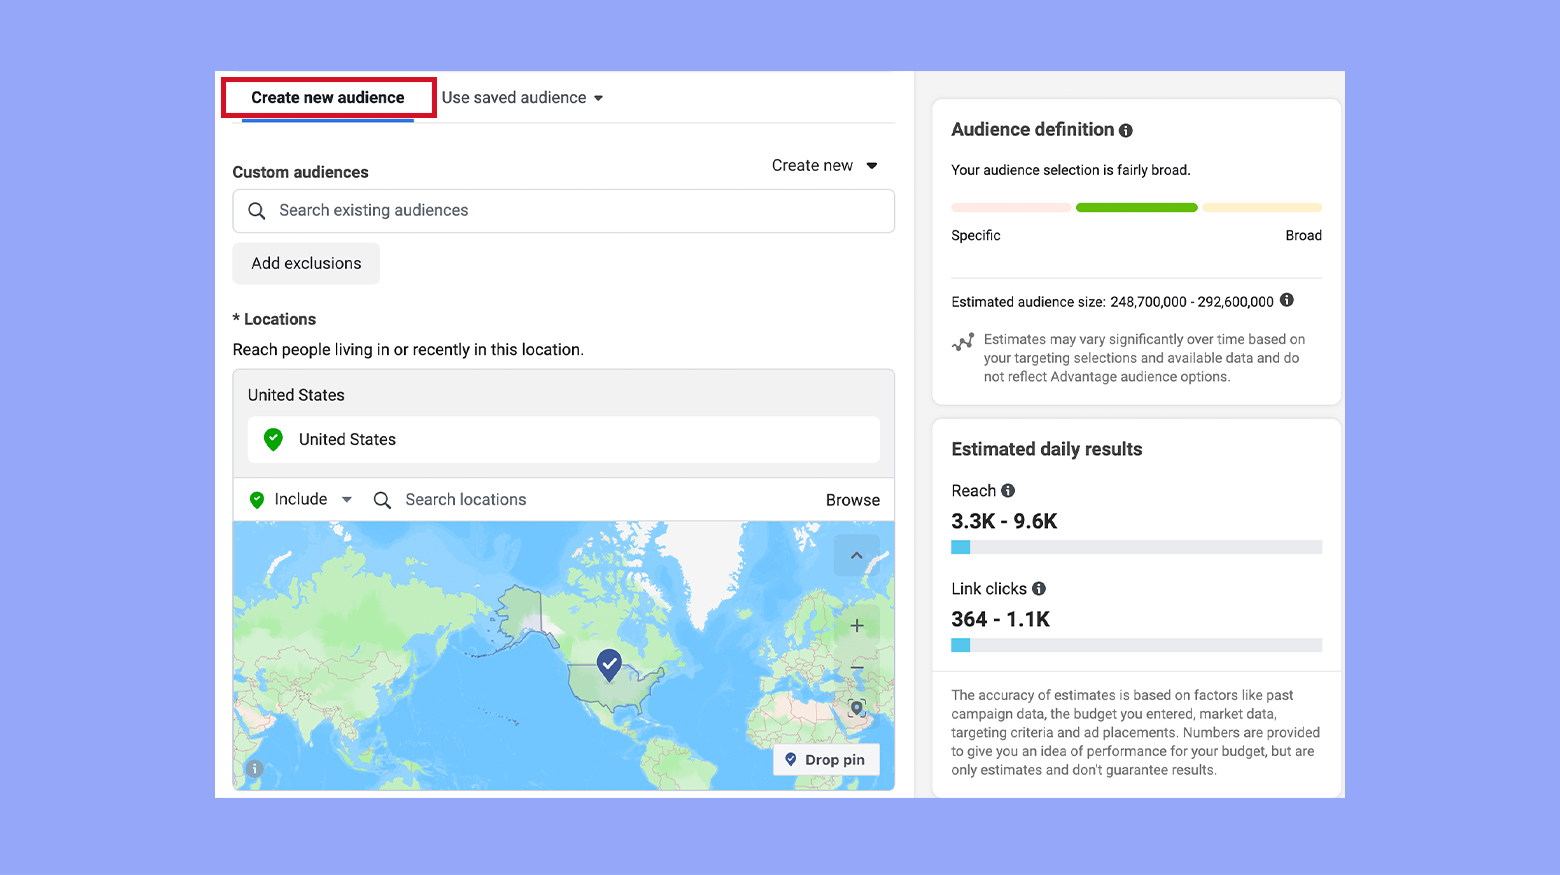
- Set up detailed target demographics, including interests and behaviors, through the Audience section to precisely reach potential customers.
- Opt for Dynamic Ads to automatically promote the most relevant products to people who have expressed interest on your website, app, or elsewhere on the Internet.
Leveraging Instagram shopping features
- Ensure your business account is connected to a Facebook catalog by visiting Settings > Business > Shopping on your Instagram profile.
- Post captivating content on your feed or stories and use the Tag Products feature to link directly to the products in your catalog.
- Take advantage of Instagram’s visual-centric platform by using high-quality and aesthetically pleasing images that showcase your products effectively.
- Consider utilizing Instagram Checkout for a seamless purchase experience, allowing customers to buy directly within the app without being redirected.
By adopting these tactics, you can create a cohesive shopping experience across both platforms, ultimately driving sales and fostering customer loyalty for your online store.
Step 4: Utilizing Facebook’s advanced marketing tools
To effectively enhance your WooCommerce store’s presence and sales on Facebook, leveraging advanced marketing tools such as the Facebook Pixel and Ad Extensions is key. These tools allow you to track user interaction and extend your ad functionality for better targeting and retargeting campaigns.
Setting up the Facebook pixel
The Facebook Pixel is a critical tool for monitoring how users interact with your website after clicking on your Facebook ads. It helps in tracking conversions, optimizing your ads, building targeted audiences for future ads, and remarketing to people who have already taken some kind of action on your website.
- Navigate to your Facebook Events Manager.
- Click on the Connect Data and select Web.
- Choose Facebook Pixel and then Connect.
- Assign a name to your Pixel, insert your WooCommerce store URL, and click on Continue.

By setting up the Facebook Pixel, you can enable features such as advanced matching, adjust your pixel settings, and set up event tracking on your WooCommerce site.
Exploring Facebook’s ad extensions
Facebook provides a selection of ad extensions that can enhance your advertising efforts. Utilize them to display additional information about your brand and products directly in your ads.
- Carousel Ads: Create carousel ads through the Facebook Ads Manager to showcase multiple products. These can be used to highlight different attributes of a single product or a variety of products.
- Checkout on Facebook: With this ad extension, customers can purchase your products directly from Facebook, simplifying the process.
- Set up a Facebook Shop if you haven’t already.
- Add your WooCommerce products to your Facebook Catalog.
- Enable checkout on your Facebook Shop settings.
By incorporating these extensions, not only can you provide a richer experience for your audience, but you can also streamline the path from ad to purchase. Remember to keep refining your audience targeting to ensure your ads reach potential customers based on their preferences and behaviors.
Step 5: Driving sales and building customer relationships
Connecting your WooCommerce to Facebook can revolutionize your online presence by enhancing your sales strategies and strengthening customer relationships. Utilize the power of Facebook to interact directly with your shoppers and showcase your virtual products effectively.
Strategies for increasing online sales
- Set up your Facebook Shop: To get started, integrate your WooCommerce store with your Facebook Business Page. This creates a seamless shopping experience for customers who discover your products on Facebook. For assistance with setup, you can refer to the guide on WPBeginner.
- Use Facebook ads to reach a wider audience: Craft targeted ad campaigns that funnel potential leads directly to your Facebook Shop. Take advantage of Facebook’s robust analytics to refine your strategy and improve ad performance.
- Leverage social proof: Encourage customers to leave reviews and ratings on your Facebook Business Page. Positive feedback can significantly influence the purchasing decisions of potential customers.
- Offer exclusive deals on your Facebook Shop: Providing special offers and discounts can attract more visitors to your store and encourage them to make a purchase.
- Optimize product listings: Ensure your product titles and descriptions are clear, compelling, and include relevant keywords. High-quality images and videos can also increase the attractiveness of your listings.
Engaging customers through Facebook Messenger
- Activate Messenger on your Facebook Business Page: By doing so, you enable a direct communication channel with your customers. This helps to answer queries, provide personalized recommendations, and foster strong customer relationships.
- Implement automated responses: Set up custom messages for common inquiries. This ensures prompt communication, even when you are not available to respond immediately.
- Utilize Messenger for marketing: Inform customers about new products, restocks, or upcoming promotions. Messenger can serve as a versatile tool for increasing repeat purchases and building customer loyalty.
By carefully integrating these strategies with your WooCommerce store and Facebook Business Page, you can significantly increase sales and cultivate stronger customer relationships. Remember, your presence on Facebook is not just about selling; it’s about creating an engaging and responsive brand experience that resonates with your audience.
Step 6: Understanding Facebook Commerce Manager
Facebook Commerce Manager is an essential hub for managing your online sales across the Facebook family of apps. With its centralized interface, you can oversee your catalog, track sales, and connect with customers. Let’s dive into how you can handle product collections and set up your commerce account effectively.
Managing collections and product sets
Your commerce account allows you to create Collections which are essentially groupings of related products that you want to showcase together. Think of them as themed displays in a brick-and-mortar store. For example, you might have a “Summer Essentials” collection featuring sunglasses and beachwear.
Here’s how you can manage your collections and product sets:
- Go to your Facebook Commerce Manager and select your Shop.
- Click on Collections.
- To create a new collection, click on + Add Collection and follow the prompts to select the products and customize your collection.
- Within collections, you can create Product Sets, which are subsets of items that fit a narrower theme or are part of a promotion.
Product tags can be utilized in your posts and stories to directly link your audience to the products in these sets, encouraging immediate engagement and sales.
Step 7: Troubleshooting and maintaining your Facebook integration
Connecting your WooCommerce store to Facebook can help you reach a wider audience. However, ensuring a smooth integration requires regular maintenance and quick troubleshooting of any issues that may arise.
Dealing with common plugin issues
Running into problems with the Facebook for WooCommerce plugin can be frustrating, but there are some steps you can take to address the most common issues:
- Check plugin versions: Always ensure that your plugins are up to date as outdated versions may be incompatible or have known bugs. Regularly update both your WooCommerce and Facebook for WooCommerce plugins.
- Support queries: If you’re experiencing issues, you can look for assistance on the WooCommerce support page. Use this resource to troubleshoot common error messages and connection problems.
- Delete all products: In some cases, you might need to delete and re-upload your product catalog on Facebook if there are sync issues. After clearing the catalog, use the plugin to re-connect and synchronize your products again.
Keeping your integration secure
Security is a key aspect of maintaining your Facebook integration. Follow these tips to help safeguard your connection:
- Security vulnerability checks: Regularly scan your website for vulnerabilities and make sure any plugins, especially those related to Facebook integration, adhere to a responsible disclosure policy. This means that any detected vulnerabilities are reported and fixed before they can be exploited.
- Two-factor authentication (2FA): For additional security, enable 2FA on your linked Facebook account. This adds an extra layer of security and helps protect your account from unauthorized access.
By staying vigilant about updates, utilizing support resources, and focusing on security, you can address plugin problems and maintain a secure WooCommerce-Facebook integration.
Conclusion
Connecting your WooCommerce store to Facebook is a powerful strategy to amplify your online presence and tap into a larger customer base. With the help of this guide, you will learn how to connect WooCommerce to Facebook, integrating your product catalog for enhanced visibility and direct sales on one of the world’s largest social media platforms. With the right setup and consistent management, this integration can lead to increased sales, improved customer engagement, and a robust online business that leverages the best of eCommerce and social media synergies. Create your online store in minutes with 10Web AI Ecommerce Website Builder.
Looking to sell online?
Create your online store in minutes


![]()