

Adding Facebook Pixel into your WordPress site is essential for tracking visitor interactions and refining your advertising strategies. This guide covers everything from generating to installing the Pixel using plugins or manual code insertion to optimizing its functionality through conversion tracking and custom audiences. Whether you’re enhancing retargeting campaigns or troubleshooting installation issues, understanding and implementing Facebook Pixel correctly ensures that your WordPress site leverages Facebook’s advertising capabilities effectively.
FAQ
How do I connect my Facebook pixel to my WordPress site?
How do I add a conversion pixel in WordPress?
How does incorrect pixel installation affect my retargeting campaigns?
Understanding Facebook pixel
Facebook Pixel is a powerful tool that allows you to collect valuable data about how visitors interact with your website. This data includes a wide variety of events, such as page views, form submissions, or purchases, which are considered conversions. By tracking these actions, you’re better equipped to measure the effectiveness of your Facebook ads.
To grasp how Facebook Pixel can benefit you, it’s important to understand its features:
- Events: Specific actions visitors take, vital for tracking and optimizing ad performance.
- Conversions: Achievements like completed sign-ups or purchases that you aim to increase.
- Data sources: Origin points, such as your website or app, where user interactions are tracked.
- Custom audience: A group of visitors segmented based on their onsite actions, useful for retargeting.
- Retargeting: The process of displaying ads to users based on previous website interaction.
With these components in mind, you have the ability to tailor your advertisements to target specific user behaviors. For instance, you might create a Custom Audience of users who visited a product page but didn’t purchase to retarget them with specific ads.
Another valuable feature is conversion tracking, which helps you understand the journey from viewer to customer. The Event Setup Tool within Facebook Pixel assists you in configuring and mapping out these actions without needing to code.
Simplify WordPress with 10Web
Automate manual work with 10Web Managed WordPress Hosting and 10Web AI Website Builder. Optimize your WordPress website effortlessly.
Setting up Facebook pixel in WordPress
To begin, you’ll need to obtain your Facebook Pixel ID from your Facebook Ads Manager dashboard.
How to create a Meta/Facebook pixel
Creating a Facebook Pixel involves a few straightforward steps that will help you track visitor activity and refine your advertising strategies.
Here’s how to set it up:
- Log into your Facebook account.
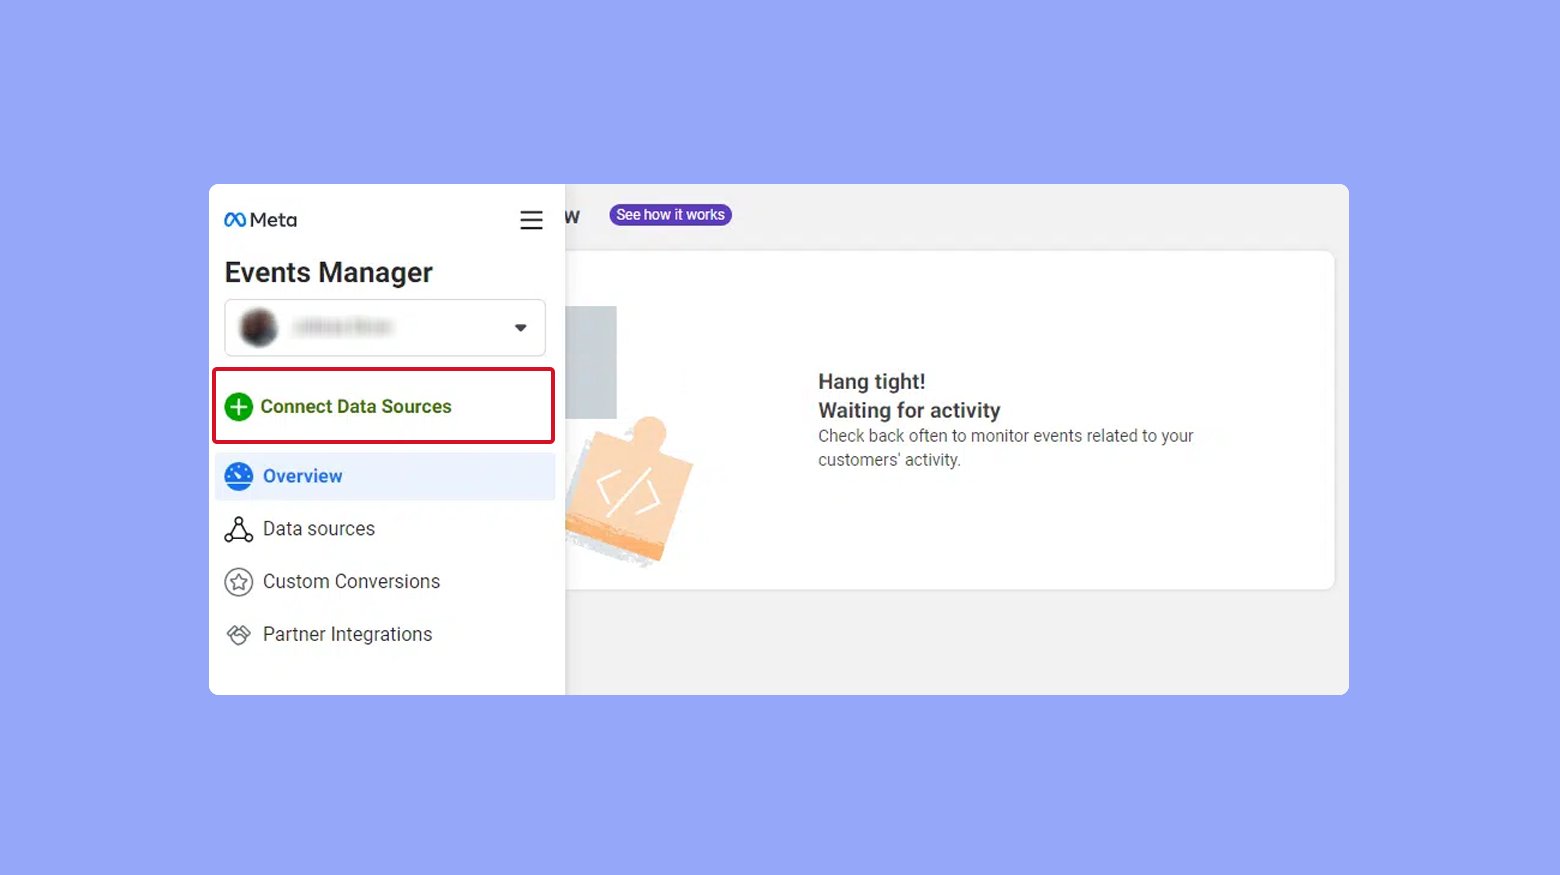
- Go to the Events Manager from the main menu.
- In the Events Manager, click on the Connect Data Sources tab.

- Next click Web > Connect.
- Name your pixel and click Create Pixel.
- Insert your website URL and click Check.
- Select Meta Pixel only and click Next.
- Lastly, click Install Code Manually.
Once you have your Pixel ID, you’re ready to implement it on your WordPress site. There are two common methods for adding the Facebook Pixel to your WordPress site: using a plugin or adding the code snippet manually to your theme.
Using a plugin
Plugins such as PixelYourSite or Insert Headers and Footers can simplify the process. Here’s how to use a plugin:
- Navigate to your WordPress dashboard.
- Go to Plugins and select Add New.
- Search for the plugin you prefer. We will use PixelYourSite.
- Install and activate the plugin. Once activated, a new menu item will appear in the WP sidebar.
- Go to PixelYourSite > Dashboard.
- In front of the Facebook icon, click on Click for Settings.
- Enter your pixel ID in the Meta Pixel (formerly Facebook Pixel) ID field.
- Scroll down and click Save Settings.
Adding the code snippet manually
If you prefer not to use a plugin, manually inserting the code into your theme’s files is an option.
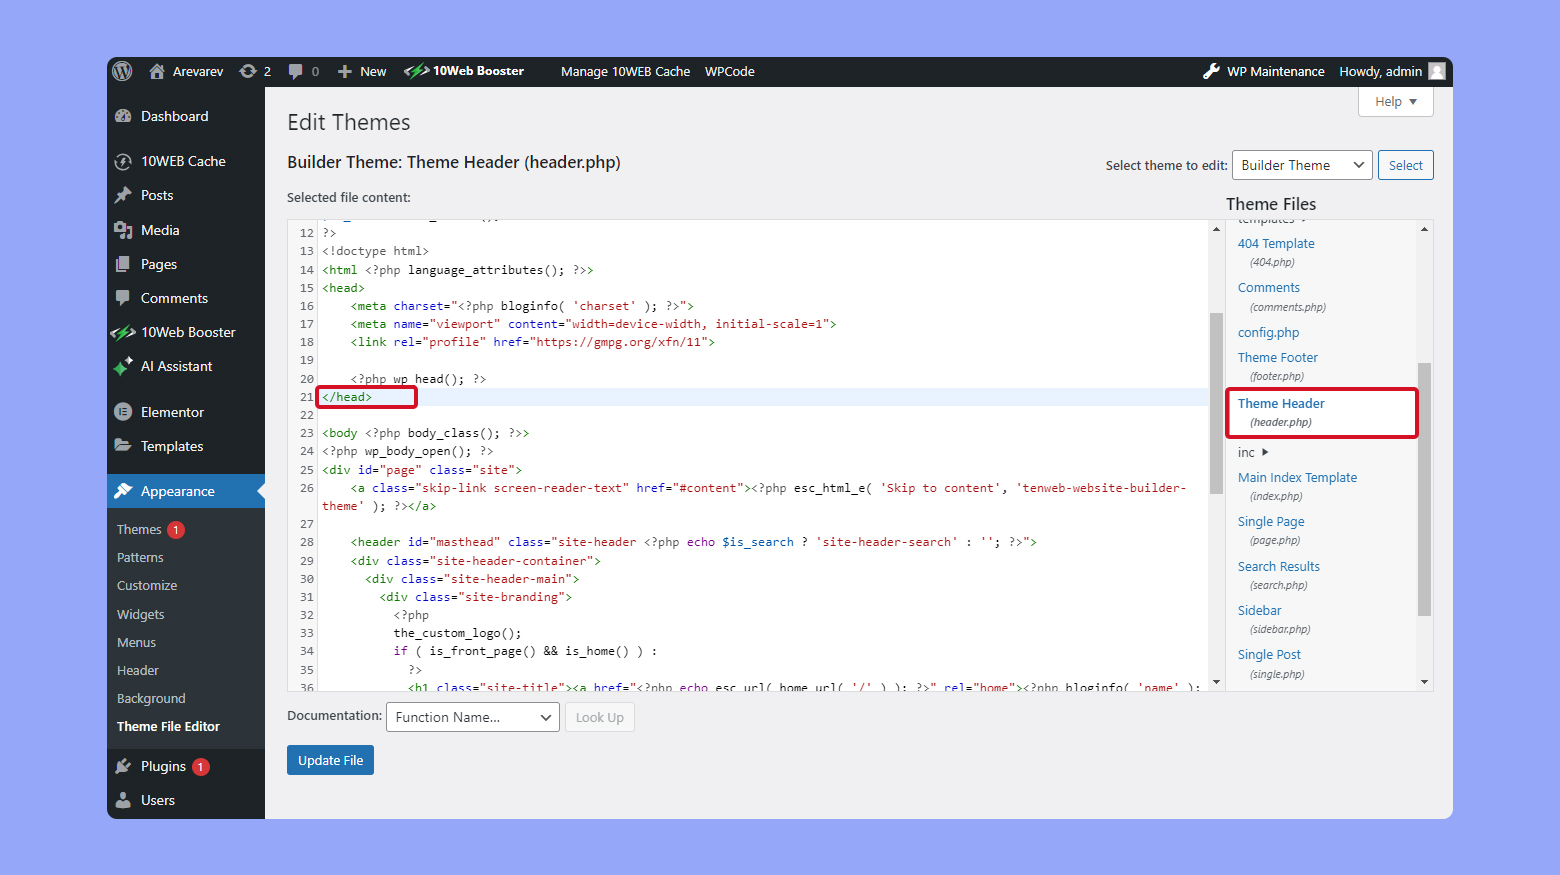
- Access your WordPress editor through the Appearance section.
- Locate the header.php file.
- Paste the Facebook Pixel code snippet—obtained from Facebook’s dashboard—just above the </head> tag.
Note: Be cautious when editing theme files. Consider using a child theme to preserve changes during updates.
Remember, after adding the pixel, it may take some time, typically up to 20 minutes, before the status updates on your Facebook dashboard. Ensure your website respects user privacy and complies with data protection regulations such as GDPR when using tracking technologies.
Verify the installation
After installing the Pixel, it’s crucial to verify that it’s firing correctly:
- Install the Facebook Pixel Helper, a Google Chrome extension that helps you validate your Pixel installation.
- Navigate to your website where the Pixel was added.
- Click on the Pixel Helper icon in the Chrome toolbar. It should show that the Pixel is active.
- Check for any errors and ensure that the Pixel is receiving data.
Configuring Facebook pixel settings
Once you have your Facebook Pixel created through your Facebook business account, you’re ready to configure it for your WordPress site. Navigate to Events Manager on your Facebook ads dashboard to manage your pixel settings.
Here’s a quick guide to help you configure the pixel and make the most of its features:
- Locate your pixel ID: In Events Manager, find the pixel you’d like to work with. Your Pixel ID is a unique identifier for your pixel. Keep it handy, as you’ll need it for integration with WordPress.
- Set up conversions API: The Conversions API works alongside the Pixel to send events directly from your server. This is an optional step but recommended for more accurate data tracking, especially if you’re running an ecommerce site like WooCommerce.
- Enable automatic advanced matching: This feature enhances the pixel’s ability to match conversion events with Facebook users. It does so by using additional information (like email addresses) that users may provide during their visit.
- Configure events: Determine which actions on your site you wish to track, such as form submissions or product purchases. These events can be set up to tailor your Facebook ads for better conversion rates.
- Parameter tuning: Customize the data sent with events by adding params. This helps in capturing specific details like product IDs or categories in WooCommerce.
Remember, integration of Facebook Pixel with WordPress can be as straightforward as adding a code snippet to your website’s header, or using a plugin for a simpler setup. Plugins can also help with detailed integrations and support for features like WooCommerce.
Simplify WordPress with 10Web
Automate manual work with 10Web Managed WordPress Hosting and 10Web AI Website Builder. Optimize your WordPress website effortlessly.
Facebook pixel and ecommerce integration
Integrating Facebook Pixel into your WooCommerce store can dramatically enhance your ecommerce tracking capabilities. Here’s a straightforward guide to get you started.
Once your Pixel is set up, you can enable eCommerce tracking. This feature allows you to track actions such as Add to Cart, Initiate Checkout, and Purchase events.
Begin by selecting your Pixel in the Data Sources screen and click on the Settings tab. Here, you can generate your Conversion API token by clicking on the Generate Access Token link. This token is essential for sending server-side events to Facebook, providing a more reliable tracking method than browser-based events alone.
For WooCommerce users, the integration process is seamless. Various plugins are available that smoothly interface with WooCommerce, automating the Pixel integration and enabling advanced features like Advanced Matching. This matches customer data with Facebook users, improving your ad targeting capabilities.
Remember to utilize the Conversion API in addition to browser events to cover scenarios when cookies can’t track user interactions, ensuring you capture a complete picture of your conversion data. Steps to enable this include enhancing your Pixel code with additional event data that corresponds to customer actions on your store.
Advanced Facebook pixel features
With the Meta Pixel (formerly Facebook Pixel), you unlock several advanced features that can dramatically improve your ad targeting strategies. Here’s how to harness these features for your WordPress site:
- Custom audiences: You can create audiences based on user behavior on your site. This allows you to retarget visitors with ads tailored to their interests and interactions.
- Insights: Gain valuable data about how users interact with your website. This informs your ad strategy with concrete analytics.
To ensure the pixel is working correctly, you might want to install the Facebook Pixel Helper, a Chrome extension that helps troubleshoot and confirm the pixel is firing as expected.
For retargeting ads, here are steps you can take:
- Access the Facebook Ads Manager.
- Create a Custom Audience based on past website activity.
- Craft retargeting ads specifically aimed at this audience.
Remember, effective retargeting converts potential leads into customers by reminding them of their previous interest in your site. The Facebook Ads Manager provides a suite of tools to manage and analyze the performance of your ads.
Furthermore, when setting up your pixel, you might encounter the term Create Pixel. This is the initial step in harnessing the power of Meta Pixel, allowing you to track conversions and optimize your ads for sales leads and more.
With these tools and strategies, you can fine-tune your remarketing efforts, ensuring that your WordPress site leverages Facebook’s powerful advertising capabilities to the fullest.
Troubleshooting
Having trouble adding the Facebook Pixel to your WordPress site? Don’t worry, you’re not alone. Here’s a quick guide to help you navigate some common issues and frequently asked questions.
Why isn’t my Facebook Pixel tracking properly?
- Check code placement: Make sure you’ve placed the pixel code in the header section of your WordPress site.
- Use a plugin: Consider using a WordPress plugin like “PixelYourSite” to streamline the process.
- Clear cache: If you’ve recently added the pixel, clear your website and browser cache.
I can’t find my Pixel in the Facebook account
- Navigate to Events Manager in your Facebook account.
- If you don’t see your Pixel, you might not have the correct access. Check with the account admin or developer for the right permissions.
How do I know if my Pixel is active?
- After setup, it can take up to 20 minutes for changes to reflect.
- Check the status in the Facebook dashboard or use the Facebook Pixel Helper browser extension for real-time verification.
The pixel is set up, but it’s not creating audiences correctly
| Common Issue | Solution |
| Access Token Issue | Verify if your access token is active or expired. Renew it if necessary. |
| Misconfigured Pixel | Revisit the setup process to ensure all steps were followed correctly. |
I get an error during installation
- Review error messages: Most of the time, the error message will guide you to the problem.
- Seek support: WordPress plugin support forums and Facebook’s help center are valuable resources for troubleshooting.
Remember, you can always reach out to developer forums or check online reviews from other website owners who have successfully integrated the Facebook Pixel into their WordPress site.
Additional resources and best practices
When integrating Facebook Pixel with WordPress, you may want to bolster your site’s tracking and analytics capabilities. Below are some resources and practices that can aid in enhancing the performance and insights of your ad campaigns.
- Do: Sync Pixel with Google Analytics to analyze traffic and user behavior.
- Don’t: Overlook privacy settings and user consent.
- Monitoring clicks and conversions
- Track: Use Pixel to monitor user interactions such as clicks, especially when testing new ad campaigns.
- Avoid: Assuming all clicks lead to conversions without analyzing the data.
- Leveraging plugins for E-commerce
- For WordPress sites using Easy Digital Downloads, ensure that your setup includes proper conversion tracking by using compatible plugins.
- Leveraging plugins allows for streamlined and automated integration.
- Understanding Ads Manager
- Facebook’s Ads Manager is your hub for configuring and analyzing ad campaigns. Take time to learn its features and how it works in conjunction with Pixel.
- Regularly check your Pixel’s performance in the Ads Manager to optimize your campaigns.
- Connecting with your Facebook page
- Connect Pixel to your Facebook page to gain more detailed insights into how your ads perform with your page’s audience.
- GitHub repositories
- Explore GitHub for community-contributed tools and plugins related to Pixel integration.
- Always ensure the sources are reliable and the plugins are up to date.
Conclusion
In this article, we have walked through how to integrate the Facebook Pixel into a WordPress site, a tool essential for tracking user interactions and optimizing advertising strategies. It covers installation methods using plugins or manual code insertion, setting up conversion tracking, and creating custom audiences. The guide emphasizes the importance of proper implementation for effective retargeting campaigns and improving ad performance. Additionally, it addresses troubleshooting and the need to comply with privacy regulations like GDPR. Overall, utilizing Facebook Pixel can significantly enhance advertising outcomes on WordPress sites.
Simplify WordPress with 10Web
Simplify WordPress with 10Web
Skip and automate manual work with 10Web Managed WordPress Hosting and the 10Web AI Website Builder.


