Adding JavaScript to your WordPress website is a powerful way to enhance user experience with dynamic content and interactive features. JavaScript enables you to implement everything from simple animated effects to complex web applications. When used effectively, it can greatly improve the functionality and appeal of your site, making it more engaging for your visitors.
You might want to integrate JavaScript into your WordPress site for a variety of reasons. Maybe you’re looking to add a live chat widget, create custom forms, or even include interactive maps. Whatever the feature may be, WordPress provides several methods to incorporate JavaScript, ensuring that you can tailor your site to meet your needs without compromising performance or security.
FAQ
How do I add JavaScript code to WordPress?
You can add JavaScript code to WordPress by editing your theme’s header.php or footer.php files and placing your <script> tags either in the <head> or before the closing </body> tag.
How do I import JavaScript into WordPress?
To import JavaScript into WordPress, enqueue the script in your theme’s functions.php file using the wp_enqueue_script() function. This function allows you to specify the script’s source URL, dependencies, version, and whether to load it in the footer.
How do I add custom JS to WordPress without plugins?
Add custom JavaScript to WordPress without plugins by using the wp_enqueue_script() function in the functions.php file of your theme. Provide a handle, the path to your JS file, and optionally set dependencies, version, and footer loading.
How do I add JavaScript to my backend in WordPress?
To add JavaScript to the WordPress backend, use the admin_enqueue_scripts action hook. Attach your wp_enqueue_script() function call to this hook in your theme’s or plugin’s functions.php file to load scripts specifically in the admin panel.
How to insert a script in the header?
Why is my JavaScript not working in WordPress?
What are the best JavaScript plugins for WordPress?
Introduction to JavaScript
JavaScript is a versatile programming language essential for modern web development. It enables websites to move beyond static content by adding dynamic and interactive features. Alongside HTML and CSS, JavaScript forms the core of client-side web development, allowing for real-time updates and user-driven experiences.
Key Functionalities
- Dynamic content: Modify and update HTML/CSS without page reloads.
- Interactive elements: Implement features like sliders, pop-ups, and form validations.
- Event handling: Respond to user actions (e.g., clicks, form submissions).
- APIs and data: Fetch and manipulate data for live updates.
- Animations: Create visually engaging transitions and effects.
Importance in Web Development
JavaScript enhances user experience by making sites interactive and responsive, automates tasks like form validation, and boosts engagement through interactive content. For WordPress developers, mastering JavaScript opens up the ability to create custom themes, plugins, and optimize site functionality, making it an invaluable tool for web development.
Preparing your WordPress for custom JavaScript
Before you dive into adding custom JavaScript, it’s important to ensure your WordPress site is properly set up to handle the changes smoothly and safely.
Understanding WordPress structure
WordPress is built on a core system that uses themes and plugins to customize the functionality and appearance of your site. Typically, themes control the visual presentation, while plugins add functionality. Within the theme, the functions.php file plays a crucial role in adding custom code.
Child theme vs parent theme
- Parent Theme: This is the main theme that includes all the core features, functions, and styles of your website.
- Child Theme: A child theme inherits features from the parent theme and is the safest way to modify WordPress themes, including adding custom JavaScript. You make changes here to avoid losing them when the parent theme updates.
Creating a child theme involves making a new folder in your wp-content/themes directory, and then creating a style.css file within it that contains:
/*

 Theme Name: Twenty Twenty-One Child

 Template: twentytwentyone

*/
Make sure you replace twentytwentyone with the directory name of your parent theme. Additionally, you should also enqueue the child and parent theme stylesheets by adding a function in your child theme’s functions.php file:
add_action( 'wp_enqueue_scripts', 'enqueue_child_theme_styles');

function enqueue_child_theme_styles() {

 wp_enqueue_style( 'parent-style', get_template_directory_uri().'/style.css' );

 wp_enqueue_style( 'child-style', get_stylesheet_directory_uri().'/style.css', array('parent-style') );

}
Backup before changes
Before you start tweaking your site, you should always back it up. Here’s a quick checklist to help ensure you’ve got everything covered:
Database: Contains posts, pages, comments, and other settings.
Files: Includes all themes, plugins, media, and uploads.
You can use WordPress plugins or your hosting provider’s tools to backup your site. Always verify that your backup files are complete and functional by doing a test restoration. Make it a habit to backup before making any changes, this way, if anything goes wrong, you can restore your site to the functioning state.
Simplify WordPress with 10Web
Automate manual work with 10Web Managed WordPress Hosting and 10Web AI Website Builder. Optimize your WordPress website effortlessly.
3 easy methods to add JavaScript
There are several methods to introduce JavaScript into your WordPress site. These range from simple plugin options to inserting code directly into your theme files.
Using plugins for JavaScript integration
Plugins provide an easy way to extend the functionality of your WordPress site without touching any code.
Advantages
- Ease of use: Allows non-technical users to add custom code without editing theme files or understanding PHP.
- Safety: Minimizes the risk of breaking your site by incorrectly editing PHP files directly.
- Persistence: Code snippets added via WP Code remain active and are not lost even when you switch themes, ensuring continuity of functionality.
Here’s how to get started with a plugin:
Depending on the plugin, after installation you may need to access it via the settings menu or it may add a new menu item to the left sidebar. For this blog, we will be using WP Code.
The WP Code plugin, formerly known as Insert Headers and Footers by WP Beginner, is a WordPress plugin that simplifies the process of adding code snippets to your WordPress site, particularly in the header, body, and footer sections. This plugin is commonly used to insert JavaScript, CSS, HTML, or PHP code that can influence the appearance or behavior of the entire site without directly editing theme files. Here’s a detailed look at how the WP Code plugin works.
Installation and setup
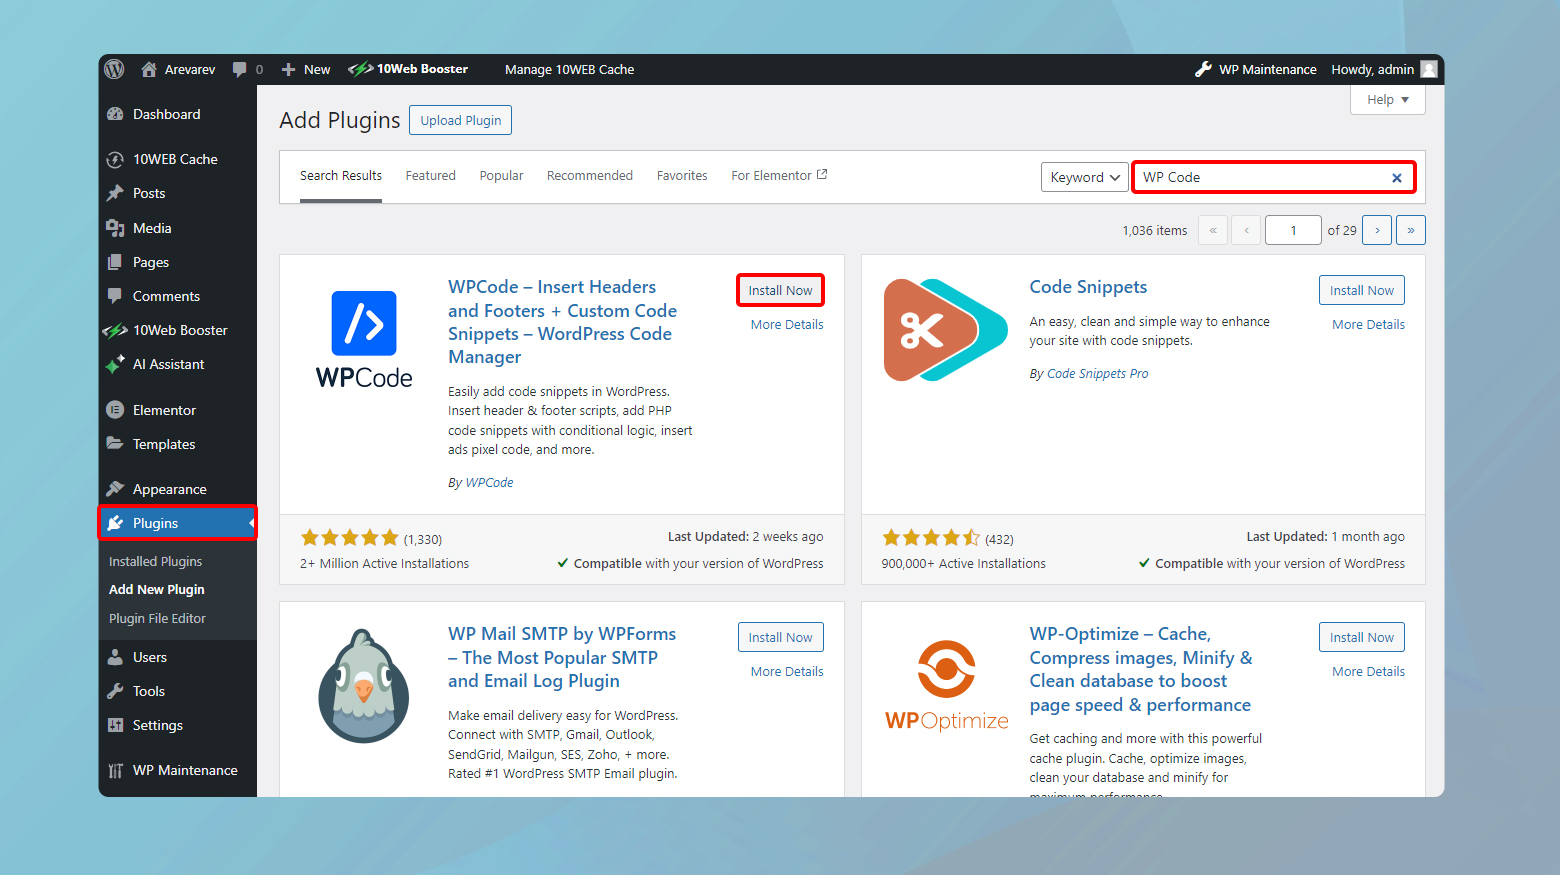
- Go to Plugins > Add New and search for WP Code.
- Once found, Install and Activate it.
Once activated, WP Code will add a new menu item to your WordPress dashboard. From here, you can access the plugin’s settings page.
Adding code snippets
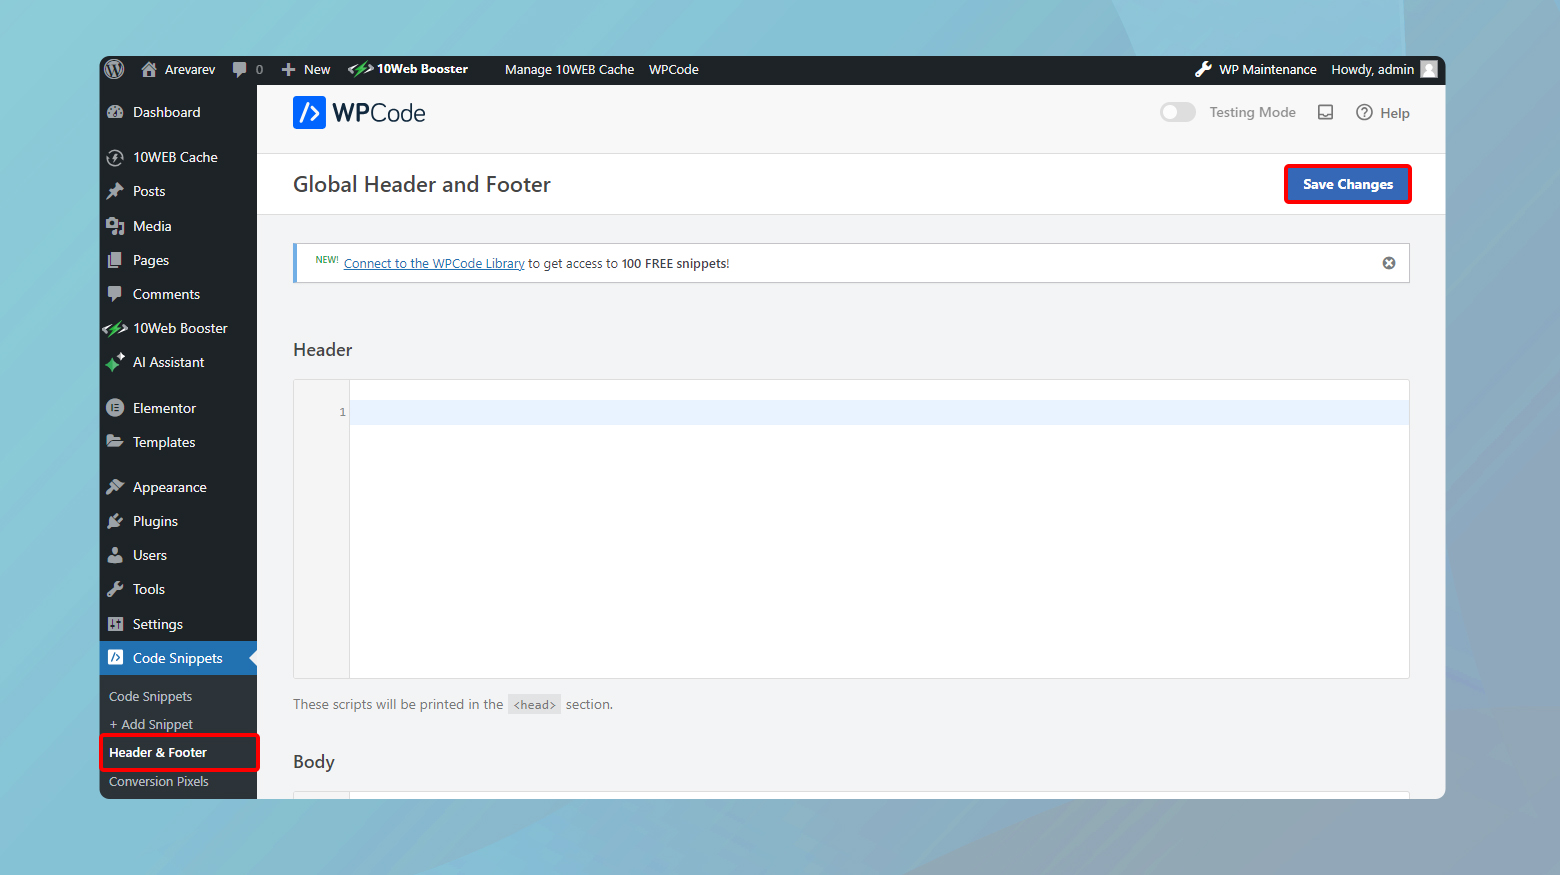
The main functionality of WP Code is to provide an easy interface where you can add code snippets without touching the theme’s PHP files. This is especially useful for adding analytics tracking codes, custom CSS, meta tags, or JavaScript libraries. Here’s how you use it:
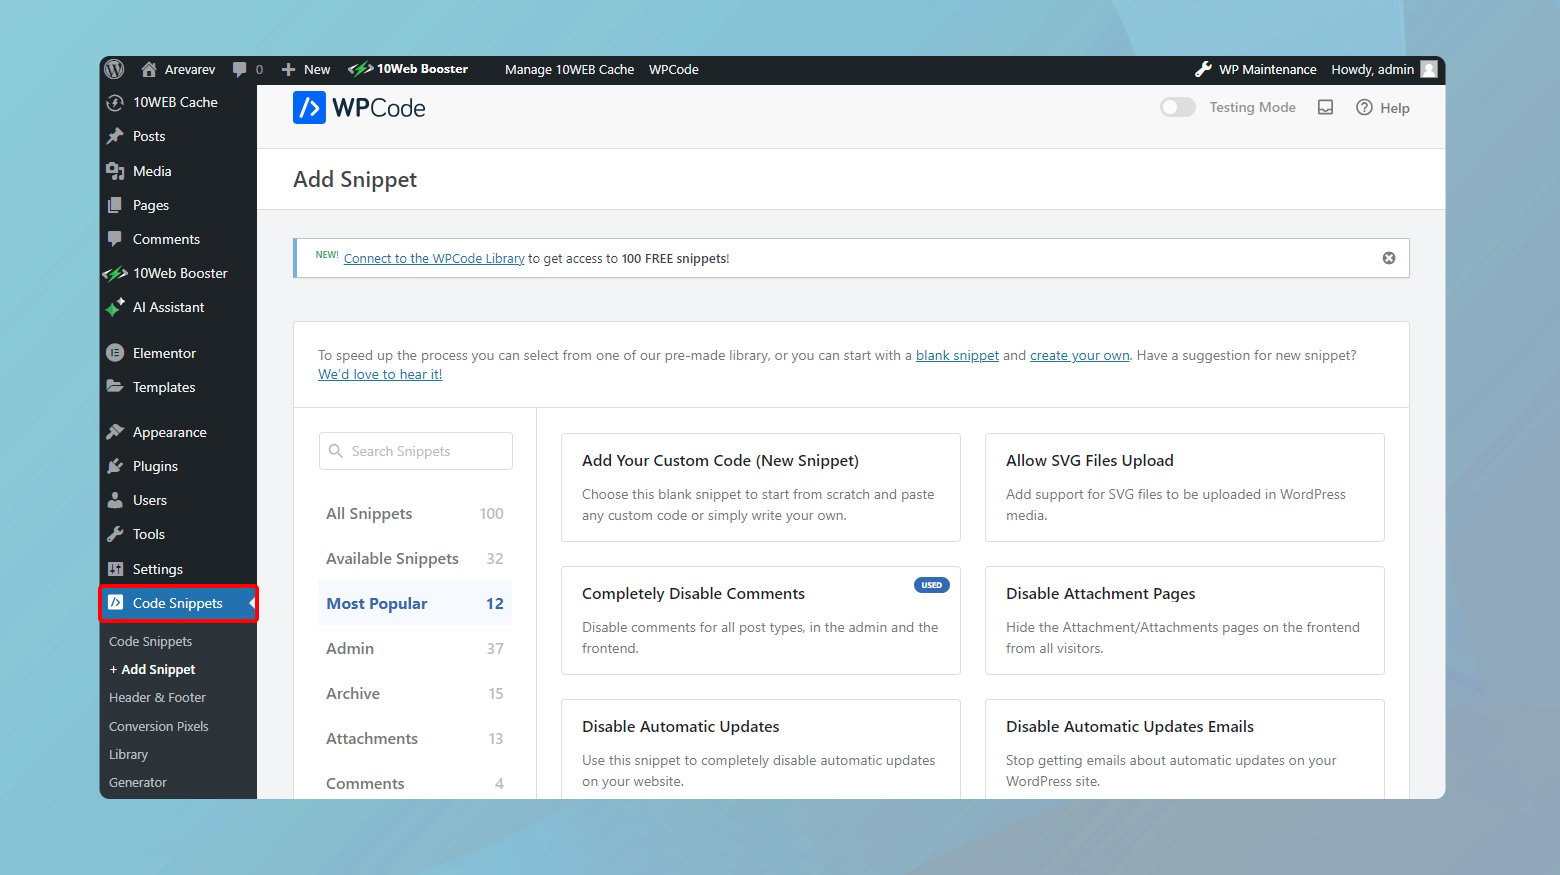
- Open the WP Code settings from your WordPress dashboard. You will typically find separate sections for adding code to the header, body, and footer.
- Header code: Code placed here will be added to the <head> section of your WordPress site. This section is often used for CSS or JavaScript that needs to load early in the page load process, like CSS stylesheets or Google Analytics scripts.
- Body code: You can insert code that needs to be placed immediately after the opening <body> tag. This might be used for scripts that need to interact with DOM elements or for various tracking body tags.
- Footer code: Adding code in the footer section places it just before the closing </body> tag. This area is ideal for JavaScript scripts that need to load after the HTML content, such as jQuery scripts or conversion tracking pixels.
- Saving changes: After adding your code snippets in the appropriate boxes, you save the changes. The plugin then automatically inserts these snippets into your site’s HTML output in their specified locations on every page load.
How it works technically
Technically, WP Code utilizes WordPress hooks to inject code into various parts of your site:
wp_head() hook: This action hook is called within the <head> section of the theme’s header.php file. It allows WP Code to insert any scripts or links you’ve specified for the header area.
wp_body_open() hook: Introduced in WordPress 5.2, this hook fires just after the opening <body> tag, which is used by WP Code for injecting body scripts.
wp_footer() hook: This action hook is located in the footer.php file of the theme and is used to inject scripts that need to be loaded at the end of the page.
Manually editing theme files
If you’re comfortable with HTML/PHP and WordPress theme structure, you might prefer to manually insert JavaScript code into your theme files.
Important files
- header.php: Inserting scripts here make them load in the section of your site.
- footer.php: Scripts added here load right before the closing tag.
Steps:
- From your WordPress dashboard, go to Appearance > Theme File Editor.
- Locate the header.php or footer.php file from the list on the right.
- Insert your JavaScript code between <script> tags at the appropriate location in the file.
- Save your changes.
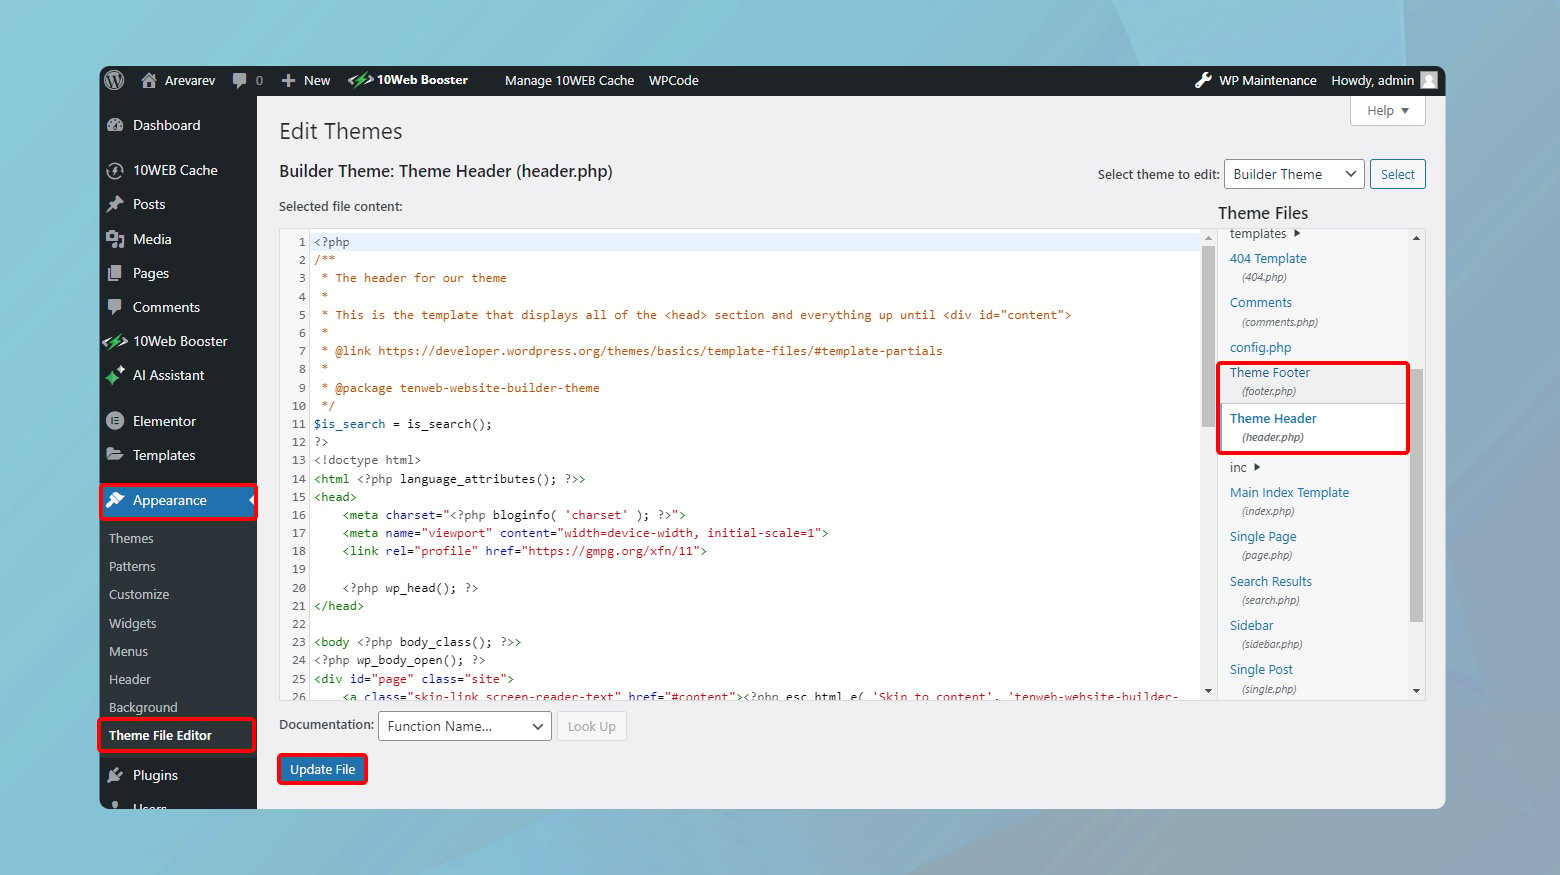
Be cautious with this method as it can affect your site if not done correctly.
Simplify WordPress with 10Web
Automate manual work with 10Web Managed WordPress Hosting and 10Web AI Website Builder. Optimize your WordPress website effortlessly.
Utilizing functions.php
The functions.php file in your WordPress theme allows you to add custom functions, including enqueuing JavaScript files, which is a WordPress-standard method.
Method
Using wp_enqueue_script(): This function ensures your scripts don’t conflict with others and can be combined with WordPress hooks for precise placement.
Code snippet:
function add_custom_script() {

 wp_enqueue_script('my-custom-script', get_template_directory_uri() . '/js/custom-script.js', array(), true);

}

add_action('wp_enqueue_scripts', 'add_custom_script');
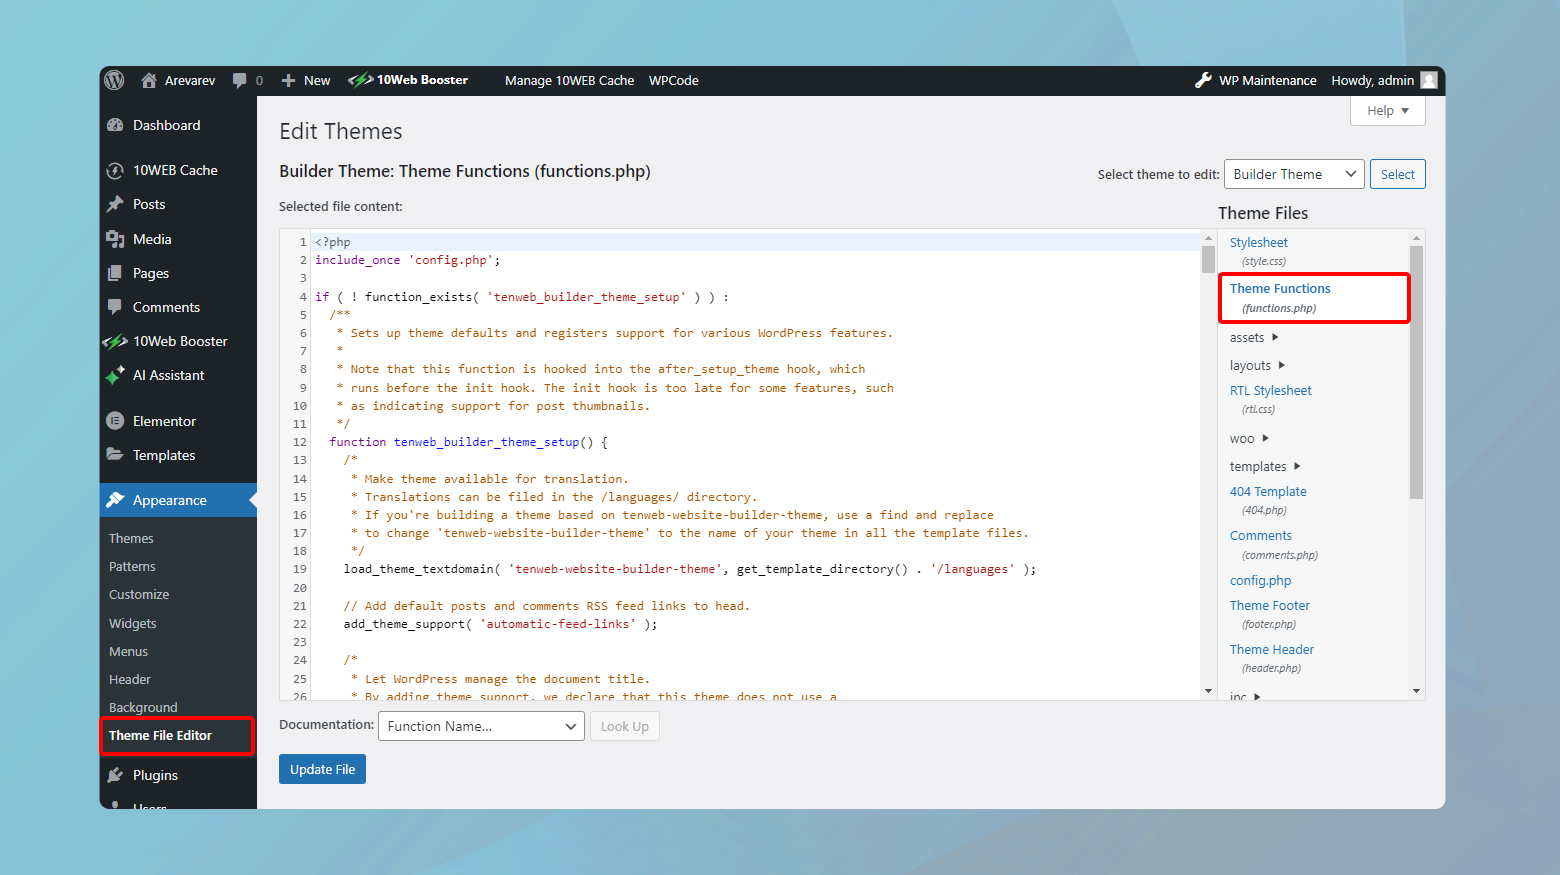
- Access the functions.php file via Appearance > Theme Editor in WordPress.
- Add a custom function using the snippet above, modifying the handle my-custom-script and the path to your file /js/custom-script.js.
- Make sure to save the changes.
With this approach, your scripts load in an organized way, and you preserve changes even when switching themes if you use a child theme.
Enqueueing scripts properly in WordPress
To ensure your website runs smoothly, it’s crucial to add JavaScript files correctly in WordPress. Enqueueing scripts is the best practice to manage scripts without causing conflicts.
The enqueue function
The function wp_enqueue_script() is your go-to tool for safe script handling. When you enqueue a script, you’re telling WordPress to load a JavaScript file in a structured way. You use this function by first providing a handle that uniquely identifies the script, then specifying the path to the script. Here’s a basic usage:
wp_enqueue_script( 'your-script-handle', get_template_directory_uri() . '/js/your-script.js', array(), '1.0.0', true );
Handling dependencies
Scripts can often depend on other scripts, like how many rely on jQuery. By handling dependencies right, you ensure scripts load in the correct order. Specify dependencies in the wp_enqueue_script() function by passing them in the array parameter:
wp_enqueue_script( 'your-script-handle', get_template_directory_uri() . '/js/your-script.js', array( 'jquery' ), '1.0.0', true );
Avoiding conflicts with jQuery
WordPress comes with jQuery, so there’s no need to load it separately. This avoids potential issues with multiple instances running at once. If your script relies on jQuery, make sure to declare it as a dependency, so WordPress loads it for you if it isn’t already loaded. Here’s how you do that:
wp_enqueue_script( 'your-script-handle', get_template_directory_uri() . '/js/your-script.js', array( 'jquery' ), '1.0.0', true );
To avoid conflicts, always use wp_enqueue_script() and keep away from direct script tags when it comes to jQuery and your custom JavaScript files.
Inserting JavaScript in specific areas
When you want to enhance your WordPress site with custom JavaScript, knowing where and how to insert the code is crucial. You have several options to place JavaScript strategically in various sections of your site, whether it’s on certain pages, posts, or within the site’s header or footer.
Conditional logic for pages and posts
Using conditional logic in WordPress, you can inject JavaScript into specific pages or posts. For this, the functions.php file of your theme is your starting point. You’ll want to use the is_page() or is_single() functions to target particular pages or posts. Here’s a lightweight example of how to include a script on a specific page:
function add_custom_js_to_specific_page() {

 if ( is_page('about-us') ) { // Replace 'about-us' with the slug of your page

 wp_enqueue_script('my-custom-script', get_stylesheet_directory_uri() . '/js/custom_script.js', array(), false, true);

 }

}

add_action('wp_enqueue_scripts', 'add_custom_js_to_specific_page');
Remember to replace my-custom-script with the handle for your script and adjust the file path to match where your JavaScript file is stored.
Loading scripts in header and footer
You might want to load scripts globally across your entire site, either in the head or before the closing body tag (in the footer). For this, you’ll use the wp_head and wp_footer hooks, respectively. To add a script in the header, you can use the following:
function add_js_to_header() {

 echo '<script src="path-to-your-script.js"></script>';

}

add_action('wp_head', 'add_js_to_header');
To include a script in the footer, which is often recommended to improve page load times, you can use:
function add_js_to_footer() {

 echo '<script src="path-to-your-script.js"></script>';

}

add_action('wp_footer', 'add_js_to_footer');
In both cases, make sure you specify the correct path to your JavaScript file. By strategically placing scripts, you improve user experience and ensure that your site runs efficiently.
Maintaining performance and compatibility
When adding JavaScript to your WordPress website, it’s essential to keep the site running smoothly and ensure it functions correctly on all themes and devices.
Optimizing loading times
Your website’s speed is critical for user experience and search engine rankings. To maintain optimal performance:
- Minify JavaScript files to decrease their file size.
- Use asynchronous loading for scripts that don’t need to be run immediately, by adding async to your <script> tags.
- Defer large scripts to avoid blocking the rendering of the page, which can be done by adding the defer attribute to your script tags.
- Make sure script version numbers are clear to avoid loading outdated scripts due to browser caching.
Simplify WordPress with 10Web
Automate manual work with 10Web Managed WordPress Hosting and 10Web AI Website Builder. Optimize your WordPress website effortlessly.
Handling third-party scripts
Third-party scripts can provide valuable features, but they can also affect your site’s speed and performance. To integrate them effectively:
- Only use reputable scripts from trusted sources.
- Limit the number of third-party scripts to minimize impact on loading times.
- Update regularly to take advantage of performance improvements and ensure compatibility with the latest web standards.
Ensuring theme compatibility
Themes control how content looks on your website, and adding JavaScript can sometimes lead to conflicts or issues. To avoid them:
- Always check theme documentation for any specific instructions or restrictions related to JavaScript.
- Test your JavaScript on multiple themes where possible, especially on the themes that are most commonly used by your audience.
- Prioritize using child themes for modifications, which helps to ensure stability when parent themes are updated.
Monitor, test, and update
When adding JavaScript to your WordPress site, it’s crucial not only to implement the code, but also to maintain it. This involves a consistent process of monitoring the code for performance, testing for functionality, and updating when necessary to ensure everything operates smoothly.
Track changes and test functionality
Keeping tabs on tracking scripts like Google Analytics is essential as they provide insight into user interactions on your site. To ensure these scripts and any custom code are working as intended:
- Set up version control (such as Git) to track changes in your code.
- Perform thorough testing every time you add or modify your JavaScript—consider using tools for automated browser testing.
- Use your browser’s Developer Tools to monitor script performance and debug issues.
Update and maintain custom code
Periodic maintenance is vital for the health of your website:
- Regularly review your custom code to ensure compatibility with the latest WordPress updates.
- Implement a schedule to update both tracking scripts and custom code, which might involve:
- Checking if new versions of scripts like Google Analytics are available.
- Updating your code snippets to use the most current JavaScript practices and API versions.
By taking these steps, you’re helping to safeguard the integrity and performance of your website. Remember, a well-maintained site is more secure and provides a better experience for your visitors.
Learning Resources
When working to enhance your WordPress site with custom JavaScript, having a strong foundation in both WordPress structure and JavaScript fundamentals is crucial. Here are some of the top resources and guides to deepen your knowledge:
Official WordPress documentation
The WordPress Codex and Developer Resources are indispensable for learning the ins and outs of WordPress. These resources provide comprehensive guides on how WordPress functions, including detailed sections on theme and plugin development, hooks, and script enqueueing.
MDN Web Docs for JavaScript
The Mozilla Developer Network (MDN) Web Docs is a go-to source for all things JavaScript. It offers in-depth tutorials, references, and guides covering JavaScript from basic to advanced levels. The content is regularly updated to align with current web standards, ensuring you stay up-to-date.
JavaScript courses on online learning platforms
- freeCodeCamp: This platform offers a comprehensive, interactive curriculum for learning JavaScript from scratch, perfect for beginners and those looking to solidify their knowledge.
- Codecademy: Codecademy provides hands-on learning with interactive lessons and projects to build practical JavaScript skills.
- Udemy and Coursera: These platforms host courses that range from JavaScript fundamentals to advanced topics. Look for courses focused on JavaScript integration in web development.
WordPress-focused JavaScript tutorials
- WPBeginner: Known for its beginner-friendly content, WPBeginner has numerous tutorials that cover how to use JavaScript effectively within the WordPress ecosystem.
- WP Tavern: A great resource for news and in-depth articles that cover WordPress development, including topics related to JavaScript.
- Smashing Magazine: This site offers high-quality articles and tutorials that often include practical tips on integrating JavaScript with WordPress.
Developer blogs and community forums
- CSS-Tricks: While primarily focused on CSS, CSS-Tricks frequently posts articles that blend JavaScript into modern web development practices. Many of these can be applied to WordPress development.
- Stack Overflow: A valuable platform for asking questions and learning from the experiences of other developers. Searching for specific problems or tips about JavaScript and WordPress integration will often yield helpful results.
- WordPress Support Forums: These forums are a great place to ask questions about adding custom JavaScript, troubleshooting, and optimizing your code for WordPress.
YouTube channels for visual learners
- Traversy Media: Offers excellent tutorials on JavaScript and web development, including practical examples for integrating JavaScript with content management systems like WordPress.
- The Net Ninja: Provides beginner to advanced JavaScript courses and project-based lessons that help bridge the gap between theory and real-world application.
- WPCrafter: Focuses on WordPress tutorials, including plugin reviews and guides on customizing your site using code.
Books and e-books
- “JavaScript: The Good Parts” by Douglas Crockford: A must-read for understanding the core concepts and best practices of JavaScript.
- “Professional WordPress: Design and Development” by Brad Williams, David Damstra, and Hal Stern: This book provides an excellent overview of WordPress development and is a solid companion when working on custom JavaScript integrations.
- “Eloquent JavaScript” by Marijn Haverbeke: Available as both a physical book and a free online resource, this guide is ideal for developers who want to build a strong understanding of JavaScript.
Interactive coding platforms
CodePen and JSFiddle: These platforms allow you to test and share your JavaScript code snippets directly in the browser, making it easier to experiment with scripts before implementing them on your WordPress site.
These resources will help you build an understanding of JavaScript and how to integrate it into WordPress effectively. By continuously learning and exploring, you can expand your skill set and confidently enhance your site with custom features and interactive elements.
Conclusion
Adding JavaScript to a WordPress site can significantly enhance its functionality and user engagement by enabling dynamic content and interactive features. For successful integration, it is essential to use methods that align with WordPress best practices to avoid conflicts and ensure site stability.
This involves careful handling of script addition, whether through using plugins for ease and safety, editing theme files directly for those with more technical expertise, or enqueuing scripts properly to manage script dependencies and avoid conflicts. Utilizing a child theme for modifications ensures that updates to the parent theme do not affect custom JavaScript.
Regular backups, performance optimization, and maintenance of scripts are crucial to keeping the site functional and responsive. By following these guidelines, users can effectively enhance their WordPress websites with custom JavaScript while maintaining a high-performing and stable online presence.
Simplify WordPress with 10Web
Simplify WordPress with 10Web
Skip and automate manual work with 10Web Managed WordPress Hosting and the 10Web AI Website Builder.