Customizing the WooCommerce checkout page is essential for enhancing user experience and boosting conversion rates. This article delves into understanding the checkout components, the importance of a seamless checkout experience, and practical tips for customizing fields, design, and layout.
By simplifying processes and incorporating targeted plugins, you can tailor the checkout page to better meet your customers’ needs, ultimately driving higher sales and customer satisfaction. Explore how to edit WooCommerce checkout page with coding tips, plugins, and layout adjustments for an effective shopping experience.
FAQ
How do I customize the WooCommerce checkout page?
How do I edit WooCommerce checkout page without a plugin?
How do I customize my WooCommerce page?
How do I change the text on my WooCommerce checkout page?
To change the text on your WooCommerce checkout page, you can use a code snippet added to your theme’s `functions.php` file or a custom plugin. This involves using the `woocommerce_checkout_fields` filter to modify the placeholder and label texts of the checkout fields. Alternatively, a simpler approach is to use a translation plugin like Loco Translate, which allows you to search for the specific text strings you want to change and replace them with your desired text directly from the WordPress dashboard.
Understanding WooCommerce checkout page
Before you dive into how to edit your WooCommerce checkout page, it’s essential to recognize its components, why the checkout experience is vital, and how it impacts your user experience and conversion rates.
Checkout page components
The checkout page is the final step of the online shopping process where customers review their cart, enter their shipping information, and proceed with payment. On your WooCommerce checkout page, you typically find:
- Billing details: Where customers input personal information.
- Shipping details: For customers to provide a delivery address, if different from billing.
- Order review: A summary of the products to be purchased.
- Payment options: Where customers choose how they wish to pay and input details for payment.
These sections are critical for a successful transaction, and WooCommerce provides shortcodes, such as [woocommerce_checkout], to integrate these elements into your checkout page.
Checkout experience importance
A well-designed checkout experience is crucial for ensuring customers complete their purchases. A complicated checkout process can increase abandonment rates, affecting your store’s success. Therefore, the checkout experience should be straightforward, intuitive, and as frictionless as possible to encourage consumers to return for repeat purchases.
User experience and conversion rates
To improve the user experience on your WooCommerce checkout page, consider:
- Minimizing the number of steps required to complete a purchase.
- Adjusting the order and presence of fields to suit your store’s needs—you can drag and drop fields to reorder them for better flow.
- Enabling design settings and using the Checkout Design tab to tailor the page’s look, enhancing its appearance and coherence with your brand.
By focusing on these aspects, you can significantly improve usability, which in turn can lead to better conversion rates.
How to edit WooCommerce checkout page
Configuring checkout fields in WooCommerce, you can add or remove fields, edit field properties, and even modify the aesthetic aspects and layout to improve user engagement. Let’s discuss how to edit WooCommerce checkout page.
Adding custom fields
To add custom fields to your WooCommerce checkout page, navigate to the Checkout Field Editor.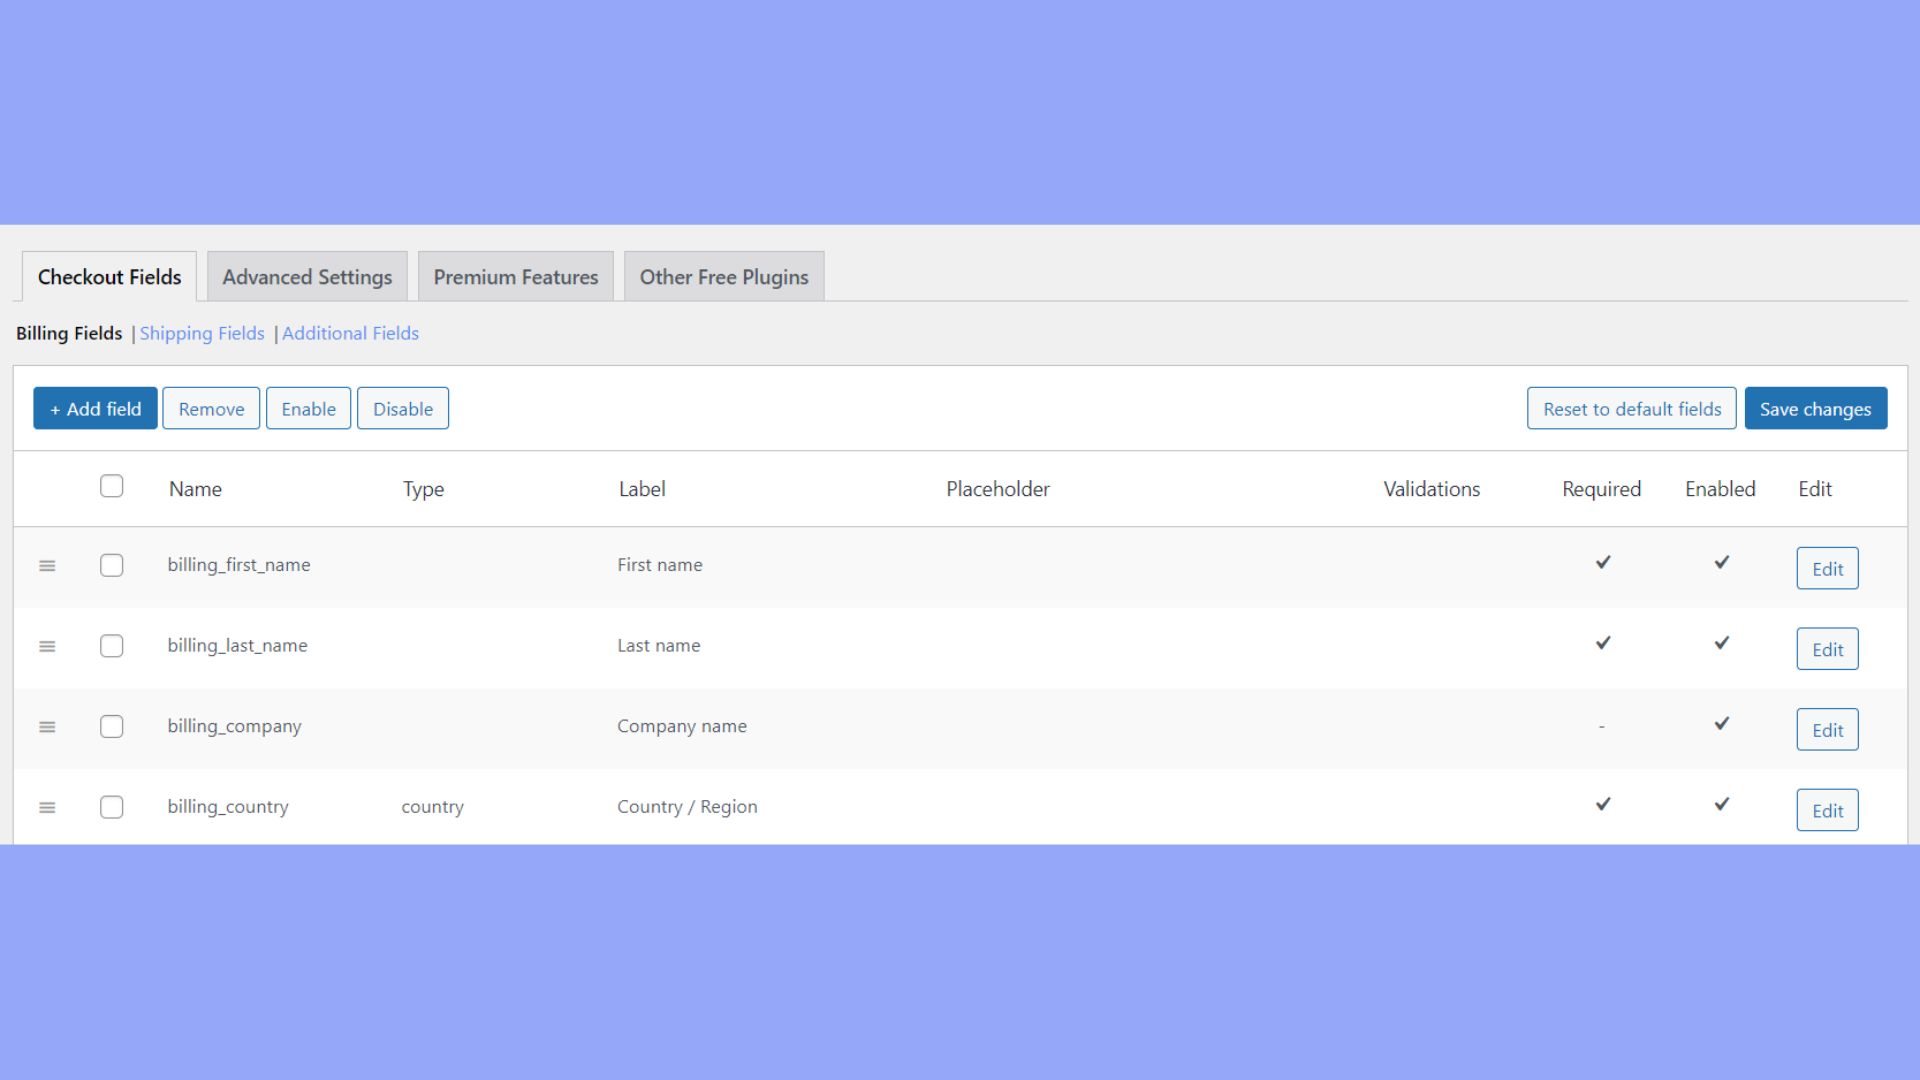
Here, you can easily insert new fields by selecting Add Field. When introducing a new field, such as First name or Last name, you can designate them as required by ticking the Required checkbox, ensuring users won’t proceed without completing these fields.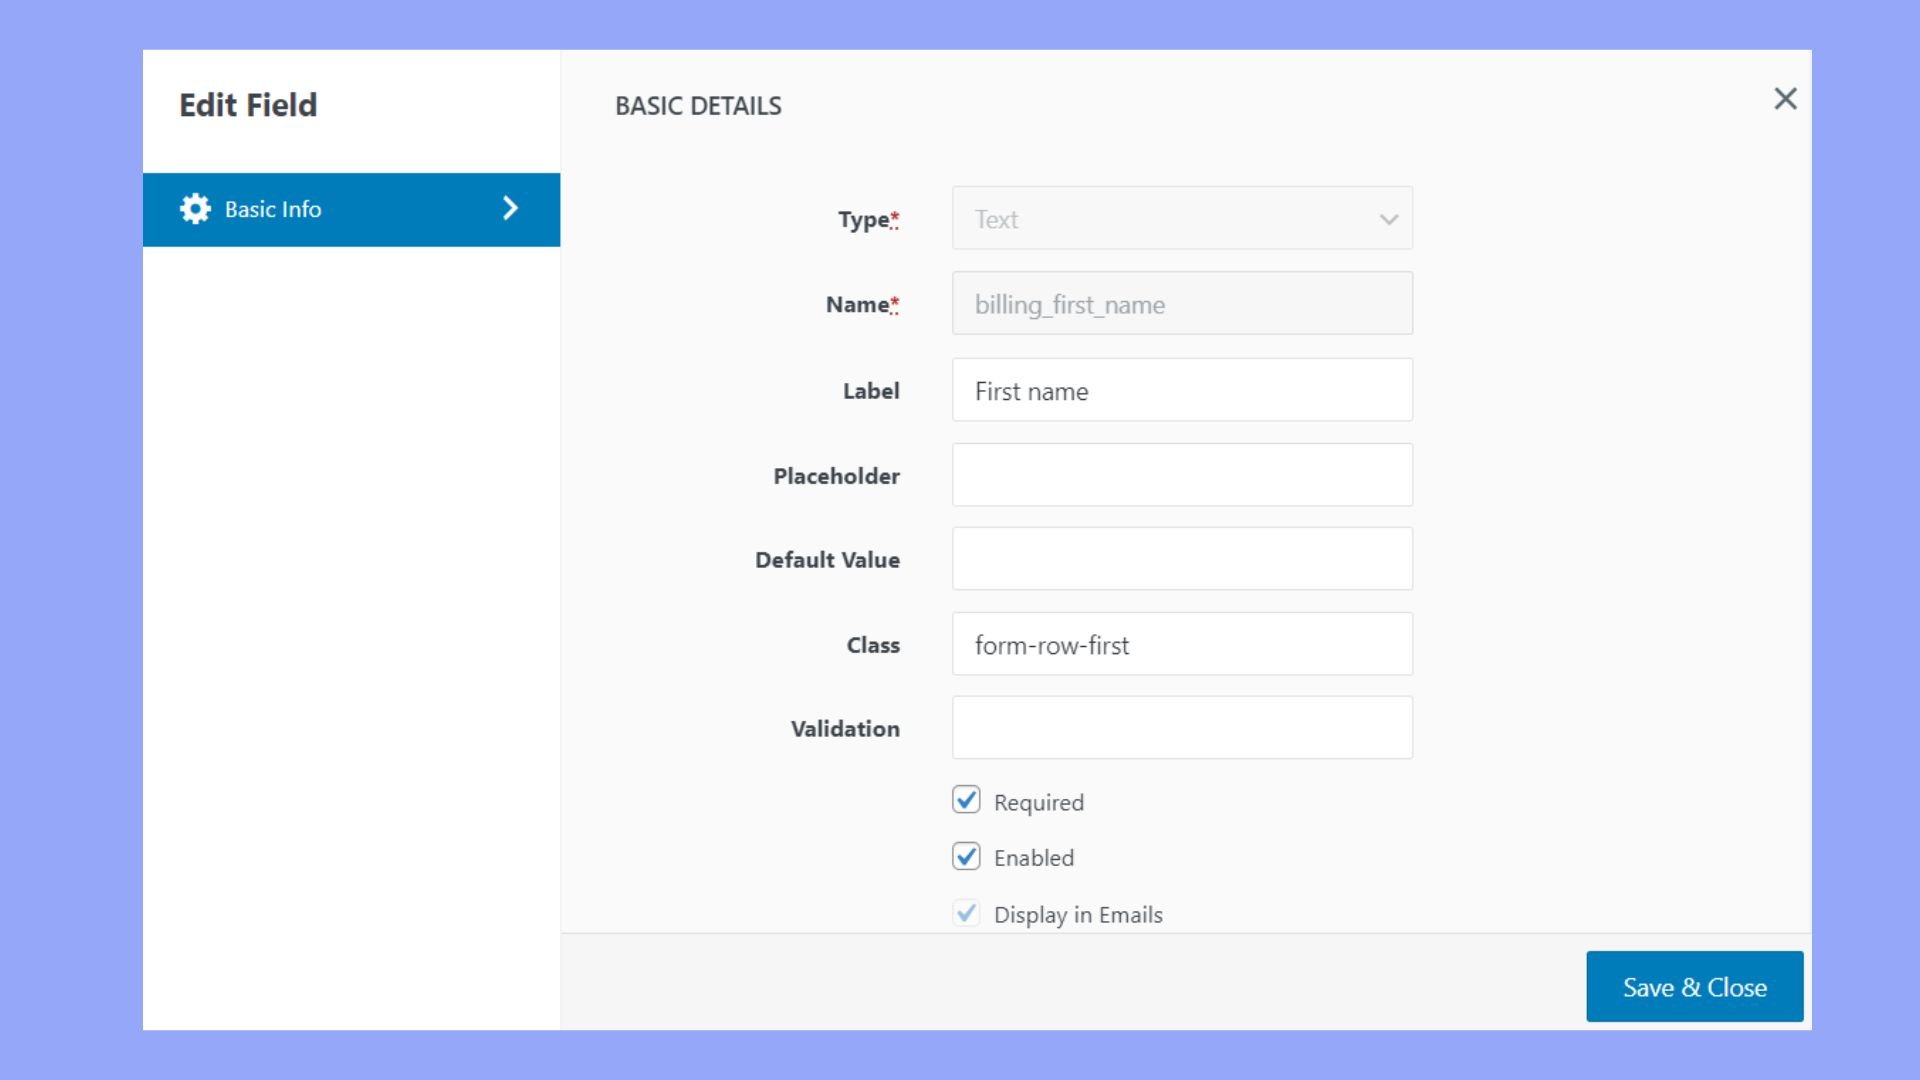
Removing fields
If you find certain fields unnecessary, such as company name or phone number, you can streamline your checkout process by selecting the Remove field. Simplifying your checkout can lead to a better user experience.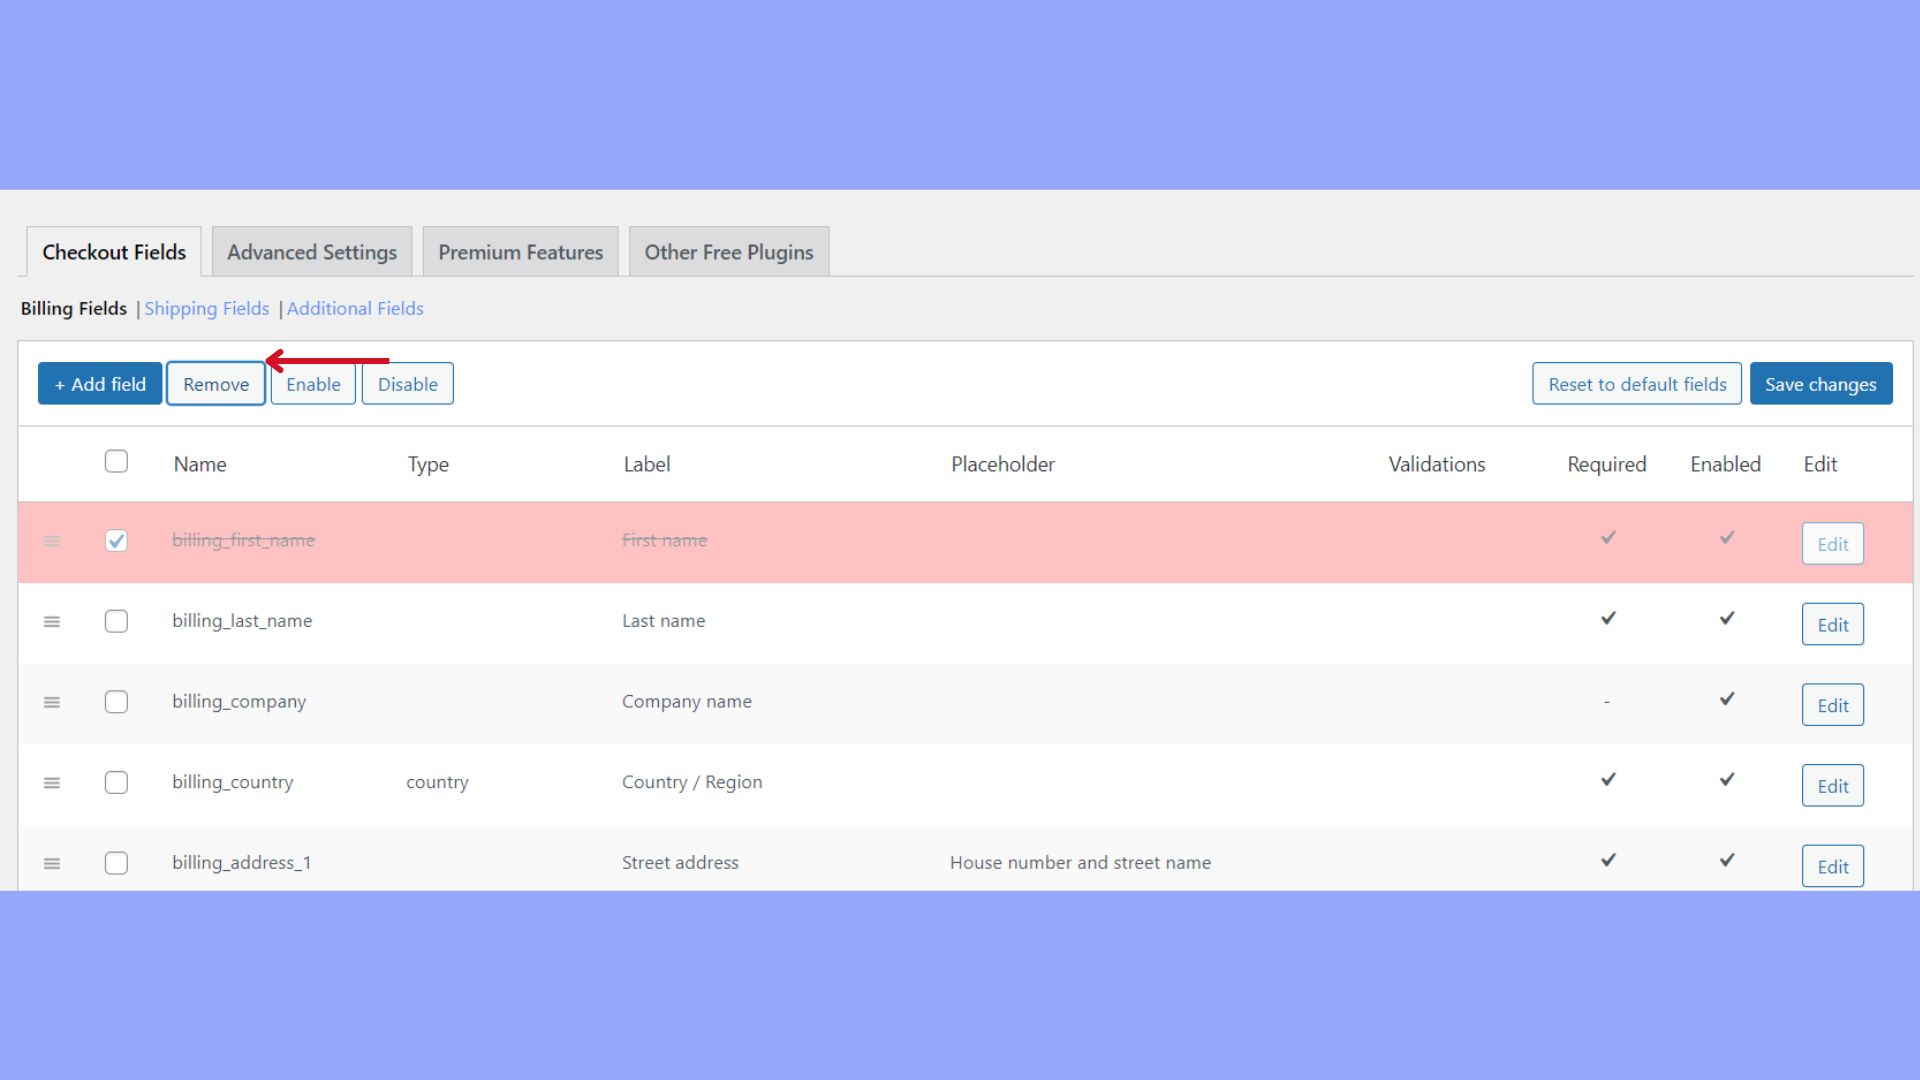
Editing field properties
For each field, you can modify various properties including:
- Type: Change the field to text, dropdown, checkbox, etc.
- Label: Update the field label, such as changing country to shipping country.
- Placeholder text: Edit the placeholder to give hints or examples, like “Enter your first name.”
To access these options, click on the field and make your changes. Remember to Save changes to apply any modifications.
Adjusting the layout structure
Adjusting the layout of your checkout fields affects the flow and visual appeal of the checkout process. Using a drag-and-drop interface, you can reorder the fields to prioritize important information. To do this, simply click and hold the field you want to move, and then drag it to its new position. This helps you to make sure that mandatory fields like Last name or First name are properly organized on your checkout page.
Customizing colors and fonts
You’re able to personalize the look of your checkout fields for a more branded experience. Changes here will affect how the fields match your overall website theme.
If you have hosted your website at 10Web, you’ll automatically be suggested to edit with 10Web Builder, which gives you access to special widgets, also you can edit the design elements, such as font size, color, borders, etc.

Looking to sell online?
Create your custom online store in minutes with 10Web AI Ecommerce Website Builder and take your business online.
Using checkout page plugins
When learning how to edit WooCommerce checkout page, plugins make this task simpler, allowing for extensive customization without the need for complex coding.
Popular plugins for checkout customization
For an efficient checkout process, several plugins can come to your rescue. Here’s a list of some popular ones:
- Checkout Field Editor for WooCommerce: This plugin gives you the freedom to add, edit, and remove fields on your checkout page, ensuring a tailored experience for your customers.
- WooCommerce Checkout Manager: If you’re looking to reorder, rename, or hide fields on your checkout page, this plugin will provide the flexibility you need.
- StoreApps Smart Manager: Speed up checkout with a one-page layout and add custom fields to streamline the process using this tool.
Drag-and-drop editors for easy layouts
Creating an appealing and functional checkout page layout doesn’t have to be a chore. With drag-and-drop editors, you can effortlessly adjust the layout to your liking.
You can pair Elementor Page Builder with WooCommerce to craft custom checkout templates through a visual editor. Just drag and drop the elements you want to use.
By utilizing these plugins, you can create a checkout page that not only looks great but also works perfectly for your store’s needs.
Modifying checkout page via actions and filters
We learned how to edit WooCommerce checkout page through the WooCommerce page editor and plugins. You can also edit your checkout page via actions and filters. It can be achieved by using hooks and filters in your theme’s functions.php file. Here’s how you can use these tools to customize the WooCommerce checkout experience.
Using hooks to add or alter functions
WooCommerce provides various hooks that allow you to execute custom code at specific points within the checkout process. For example, to add a custom function, you’ll need to attach it to an action hook using add_action(). Here is how you can modify your checkout page:
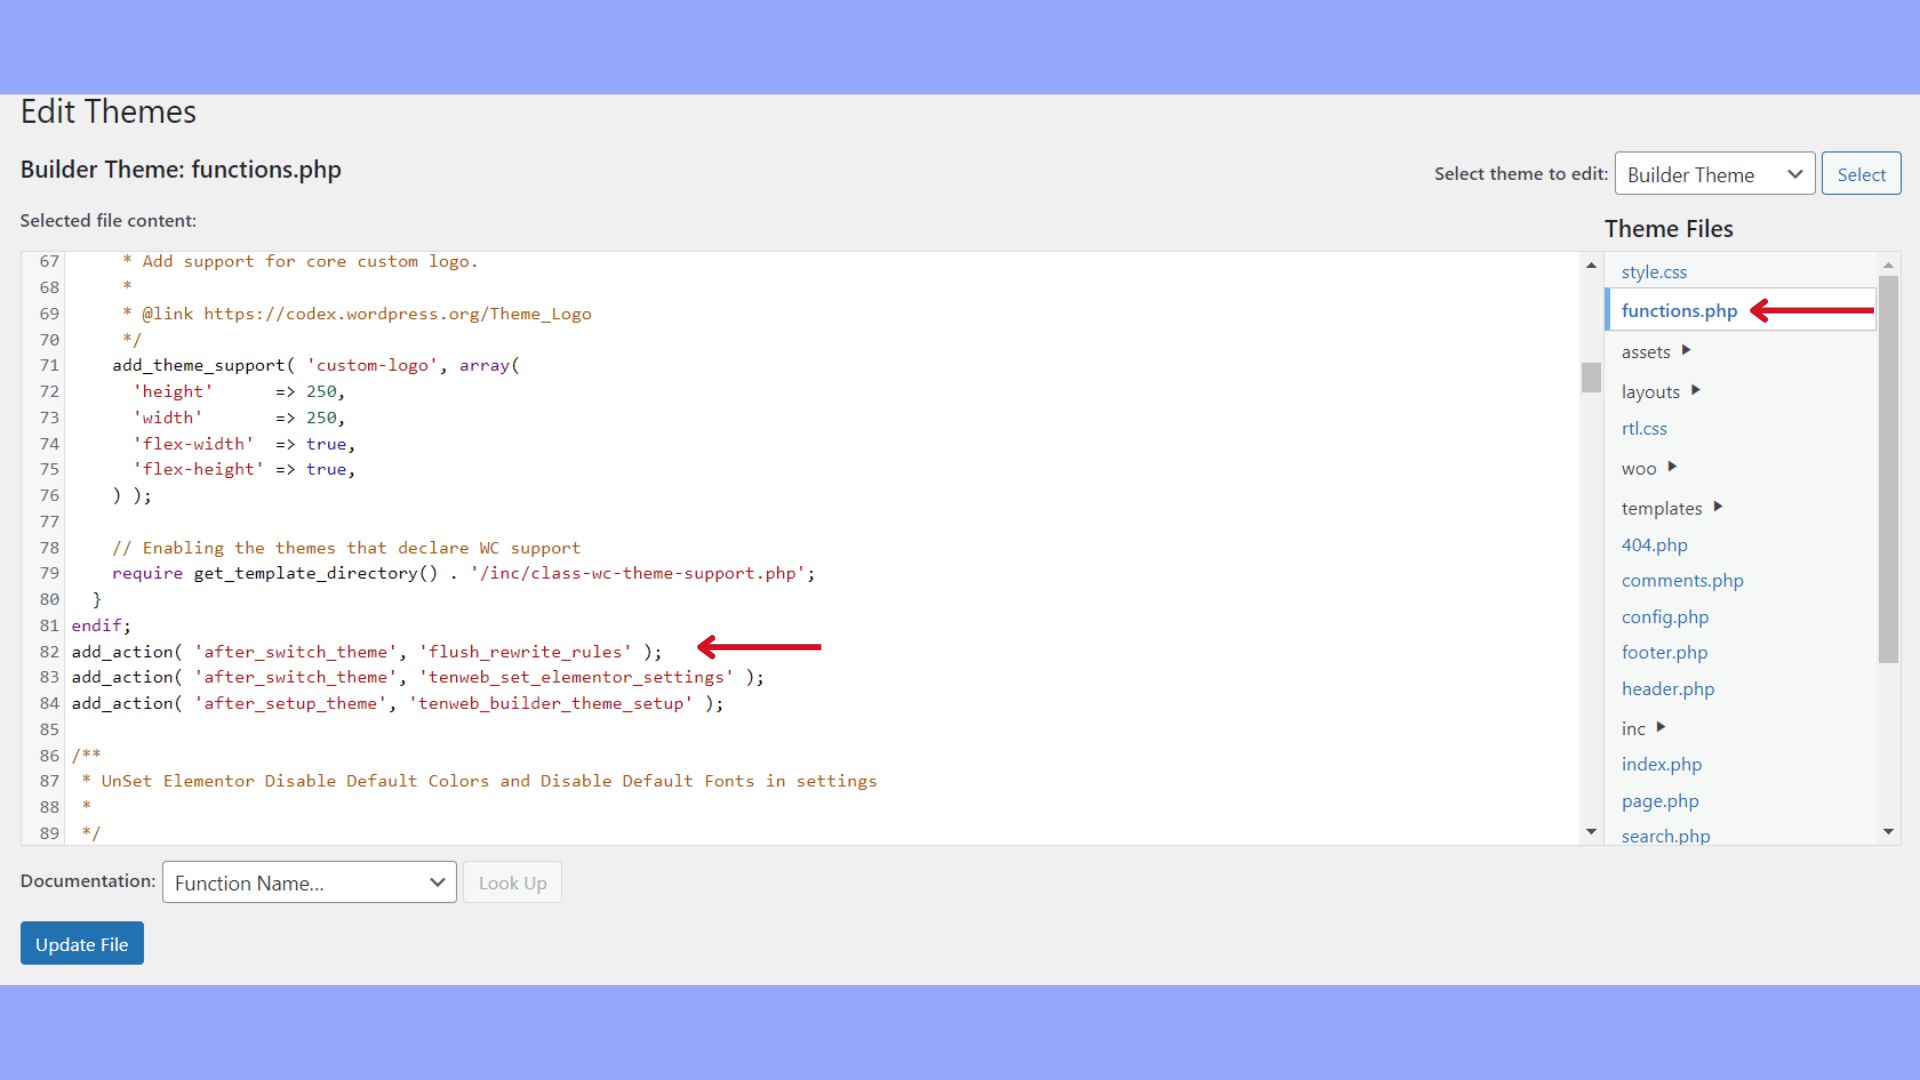
- Go to Appearance > Theme File Editor > find your theme’s functions.php file.

- Use an action hook to insert your code. For instance:add_action(‘woocommerce_before_checkout_form’, ‘your_custom_function’);
- This line of code will execute your_custom_function before the checkout form is rendered.
Applying filters to modify fields
Filters are another powerful tool that WooCommerce makes available for customizing checkout fields. With filters, you can alter existing data and adjust fields as needed. The woocommerce_checkout_fields filter allows you to customize the fields on the checkout page. To use a filter:
- Open your theme’s functions.php file.
- Add a filter to modify checkout fields. For example:
add_filter('woocommerce_checkout_fields', 'custom_override_checkout_fields');

function custom_override_checkout_fields($fields) {

 // Modifying the 'billing' address fields

 $fields['billing']['billing_first_name']['placeholder'] = 'First Name';

 return $fields;

}
This code changes the placeholder for the first name in billing fields.
Always test any changes on a development site before implementing them on your live site to ensure they work as expected. Use these tools wisely to enhance your customer’s checkout experience.
Optimizing checkout for better conversions
To enhance your online store’s performance, it’s crucial to optimize the checkout process as it can lead to improved conversion rates and increased sales.
Incorporate upsells and cross-sells
Leverage the checkout page to suggest additional related products or upgrades that complement what your customer is already purchasing. Upsells are higher-end products compared to what’s in the cart, while cross-sells are items that go well with the chosen products.
To achieve this, you can add a section within the checkout that showcases these items, possibly under a heading like “You might also like” or “Enhance your order with…”. This can be done by modifying the Checkout form to include these options, which can potentially increase your average order value.
Simplify checkout for faster conversions
A streamlined checkout process can significantly lower the cart abandonment rate, as we discussed. You should:
- Minimize the number of steps required to complete a purchase.
- Have a clear and easy-to-use checkout form with labeled fields and an intuitive layout.
- Offer guest checkout options to eliminate the need for account creation.
- Display multiple shipping options clearly to cater to different needs.
- Ensure the coupon field is visible but not distracting, as searching for codes can cause customers to leave the checkout.
Keeping the checkout simple and straightforward encourages quicker transactions.
Advanced customizations with code
When you’re ready to take your WooCommerce checkout page to the next level, coding customizations give you total control over form and function.
Custom CSS for unique styles
You can inject Custom CSS into your WordPress theme to alter the look of your checkout page. This involves adding styles to the style.css file of your theme. For example, to change the color of the checkout button, you might add:
.woocommerce-checkout #place_order {

 background-color: #1E90FF; /* Change this hex code to your desired color */

}
Always make changes in a child theme to ensure updates do not overwrite your customizations.
Function overrides in functions.php
Your theme’s functions.php file is a powerful tool for customizing checkout functionality. You can use it to remove or add fields, change button text, or modify virtually any part of the checkout process. For instance, to remove the ‘company’ field:
add_filter( 'woocommerce_checkout_fields' , 'custom_override_checkout_fields' );

function custom_override_checkout_fields( $fields ) {

 unset($fields['billing']['billing_company']);

 return $fields;

}
Use this file with caution; an error here can affect your entire site.
Custom code snippets
Inserting Custom Code Snippets is ideal for adding specific functionality without modifying core files. These snippets can go into functions.php, a custom plugin, or a site-specific plugin. For example, to add a custom field for a delivery date you could use:
add_action( 'woocommerce_after_order_notes', 'custom_checkout_field' );

function custom_checkout_field( $checkout ) {

 echo '<div id="custom_checkout_field"><h3>'.__('Delivery Date').'</h3>';

 woocommerce_form_field( 'delivery_date', array(

 'type' => 'date',

 'class' => array('delivery-date-form-class form-row-wide'),

 'label' => __('Choose a date'),

 'placeholder' => __('Select a date'),

 ), $checkout->get_value( 'delivery_date' ));

 echo '</div>';

}
Adding custom code allows for tailored experiences but should be tested thoroughly to avoid disrupting the checkout process.
Conclusion
Customizing your WooCommerce checkout page is essential for enhancing user experience and boosting conversion rates. In this article, we learned how to edit WooCommerce checkout page by understanding its components and simplifying the process with targeted plugins and design tweaks to create a seamless and user-friendly checkout flow.
Streamlining fields, improving layout, and incorporating upsells can significantly enhance customer satisfaction and drive sales. Advanced customizations with CSS and code allow for a unique, branded experience, ensuring a checkout process that aligns with your business needs and encourages higher conversions.
Looking to sell online?
Create your online store in minutes
Create your online store in minutes with 10Web AI Ecommerce Website Builder.