Expanding your WooCommerce store globally requires a multilingual checkout page to serve diverse customer bases. This guide provides a comprehensive step-by-step approach to translating your WooCommerce checkout page, emphasizing the use of WordPress plugins and understanding the technical aspects of the process.
You’ll learn how to translate WooCommerce checkout page; from setting up your translation environment, and choosing the right plugin, to optimizing your workflow for seamless integration. Thus, you will ensure every aspect of your store is accessible and user-friendly across different languages.
FAQ
How to translate checkout page in WooCommerce?
How do I change the language of my WooCommerce checkout page?
How do I translate a WooCommerce product page?
How do I change the text on my WooCommerce checkout page?
WooCommerce translation essentials
Before you dive into learning how to translate WooCommerce checkout page, it’s important to grasp the basics of how translation works in the context of WooCommerce on WordPress. This understanding will streamline your process and help you reach your multilingual audience more easily.
Translation prerequisites for WooCommerce
To start translating your WooCommerce checkout page, ensure you have the following:
- WooCommerce installed and activated.
- WordPress set to the correct default language, as this will serve as the base for your translations.
- A multilingual plugin to facilitate the translation process.
- Keeping WooCommerce, WordPress, and all translation tools up to date to avoid compatibility issues.
Setting up your translation environment
To effectively translate your WooCommerce checkout page, you’ll need to select a suitable translation plugin and configure it properly. Let’s get into discovering how to translate WooCommerce checkout page.
Choose the translation plugin
Your first step is to find a translation plugin that meets your needs. Two popular choices for WooCommerce are TranslatePress and WPML, both WordPress plugins with robust translation features.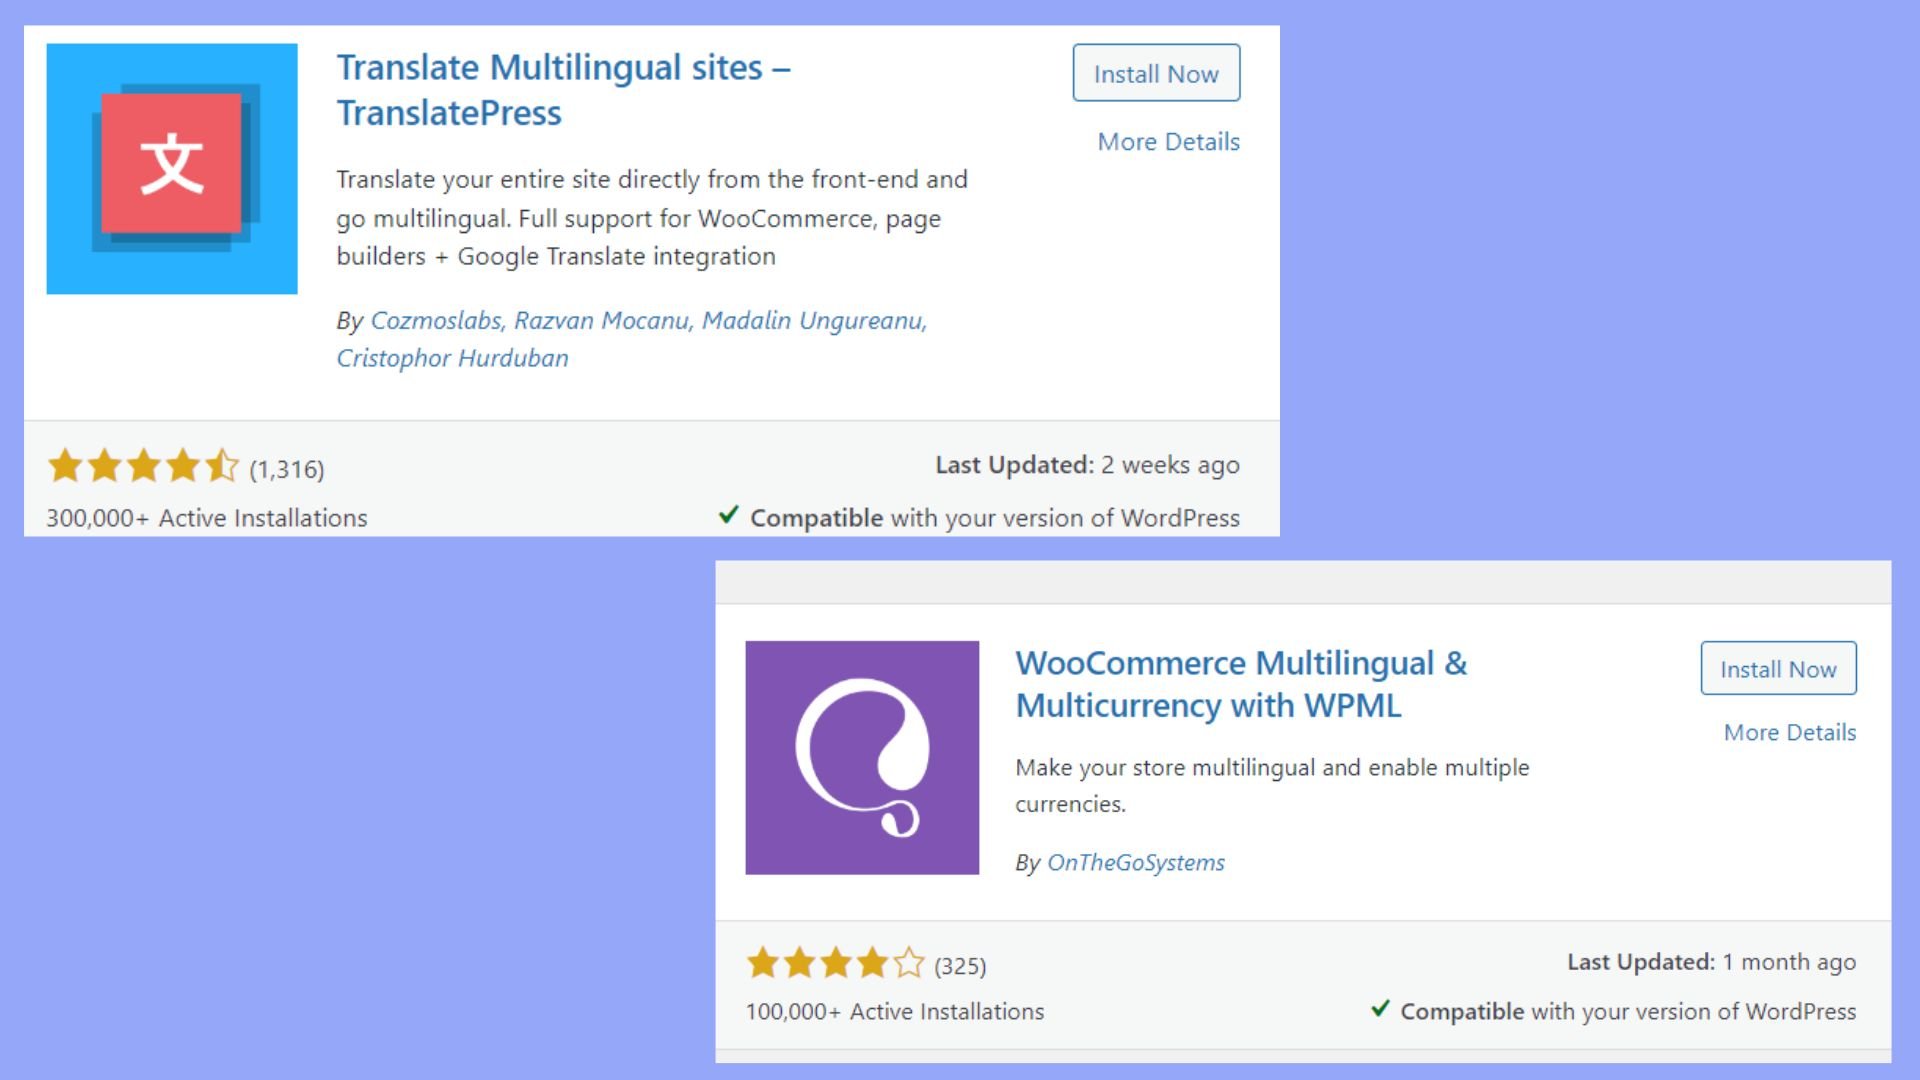
After you have researched some of the translation plugins, compare those to see which fits your WooCommerce store the best. Ensure that the plugin supports both your WooCommerce version and the languages you intend to use.
Install and configure
After choosing your plugin, you need to get it up and running on your site.
- Install your selected translation plugin by navigating to Plugins > Add New in your WordPress dashboard, then searching for the plugin by name.
- Click on Install Now for the plugin you’ve chosen and then click on Activate once the installation is complete.
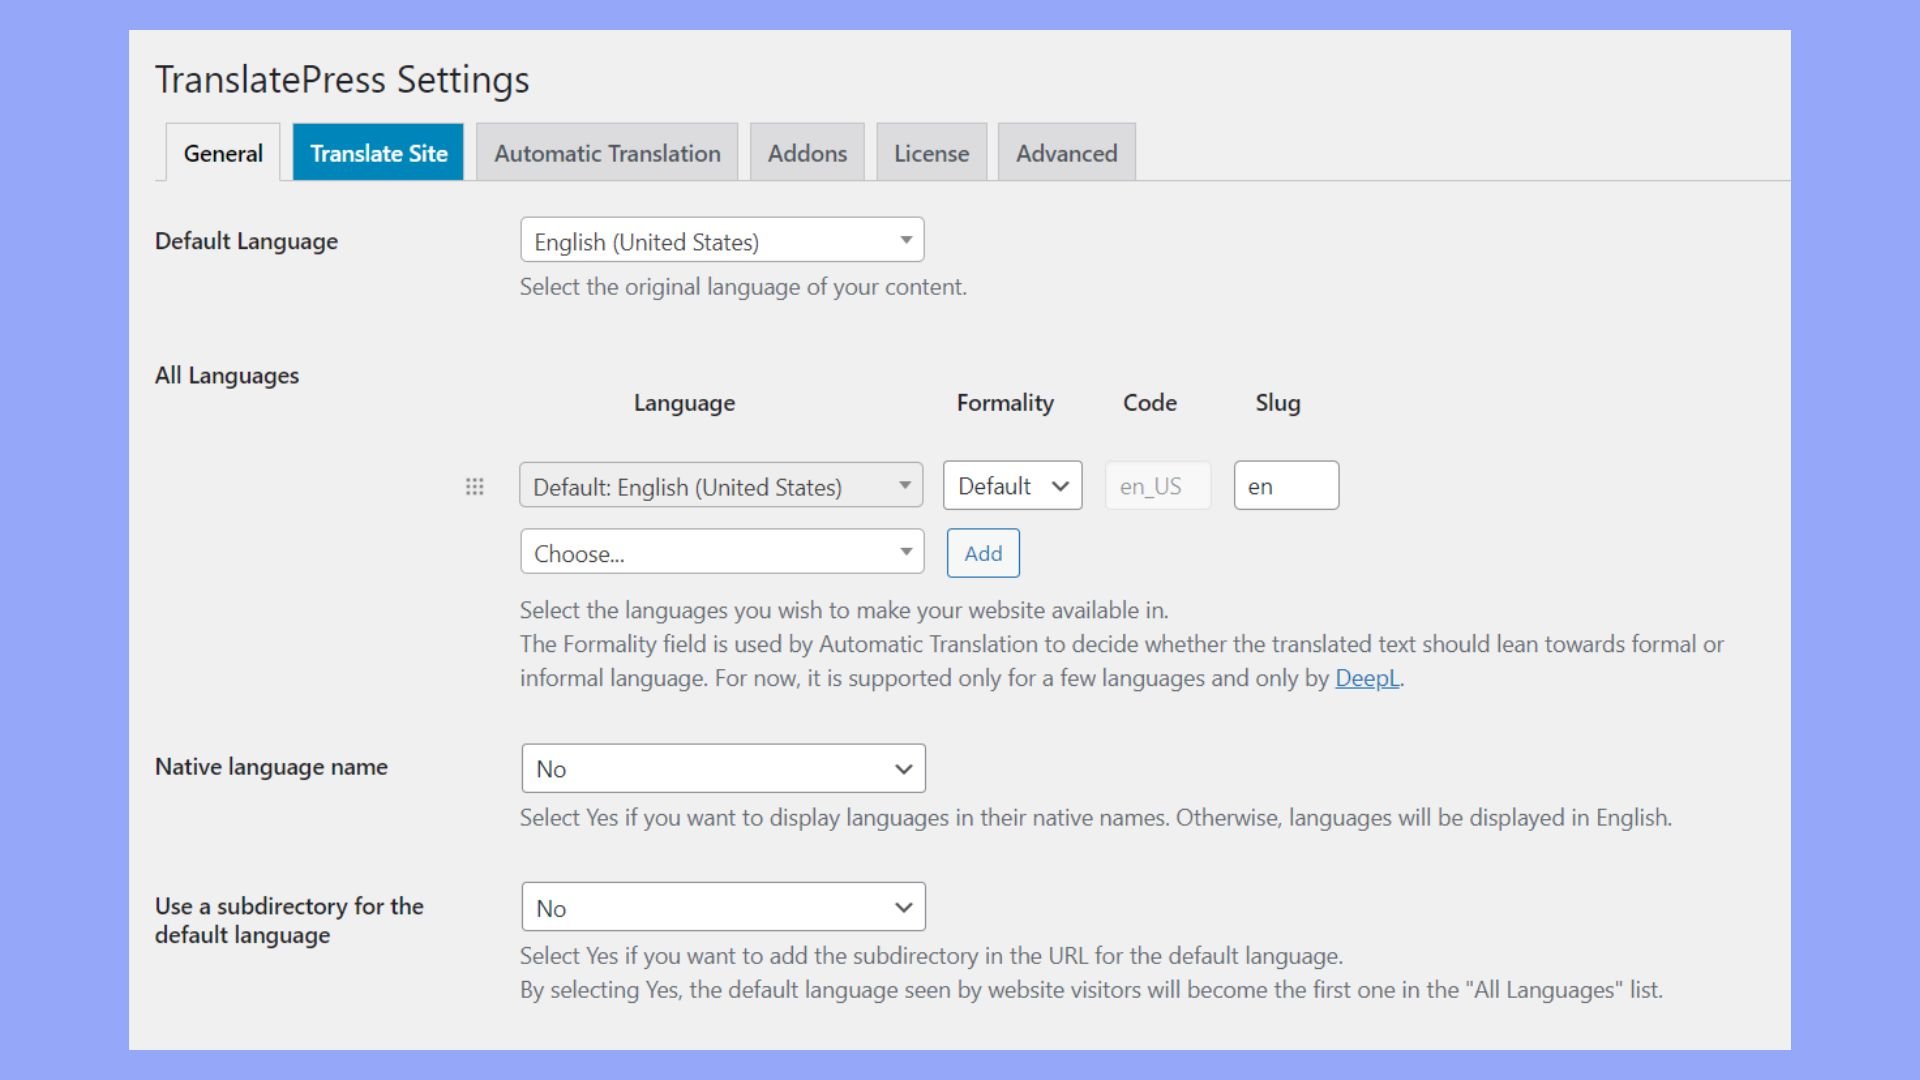
- Go to the plugin’s Settings page and follow the setup wizard or the provided instructions to configure the basic settings, like selecting the Default language for your store.

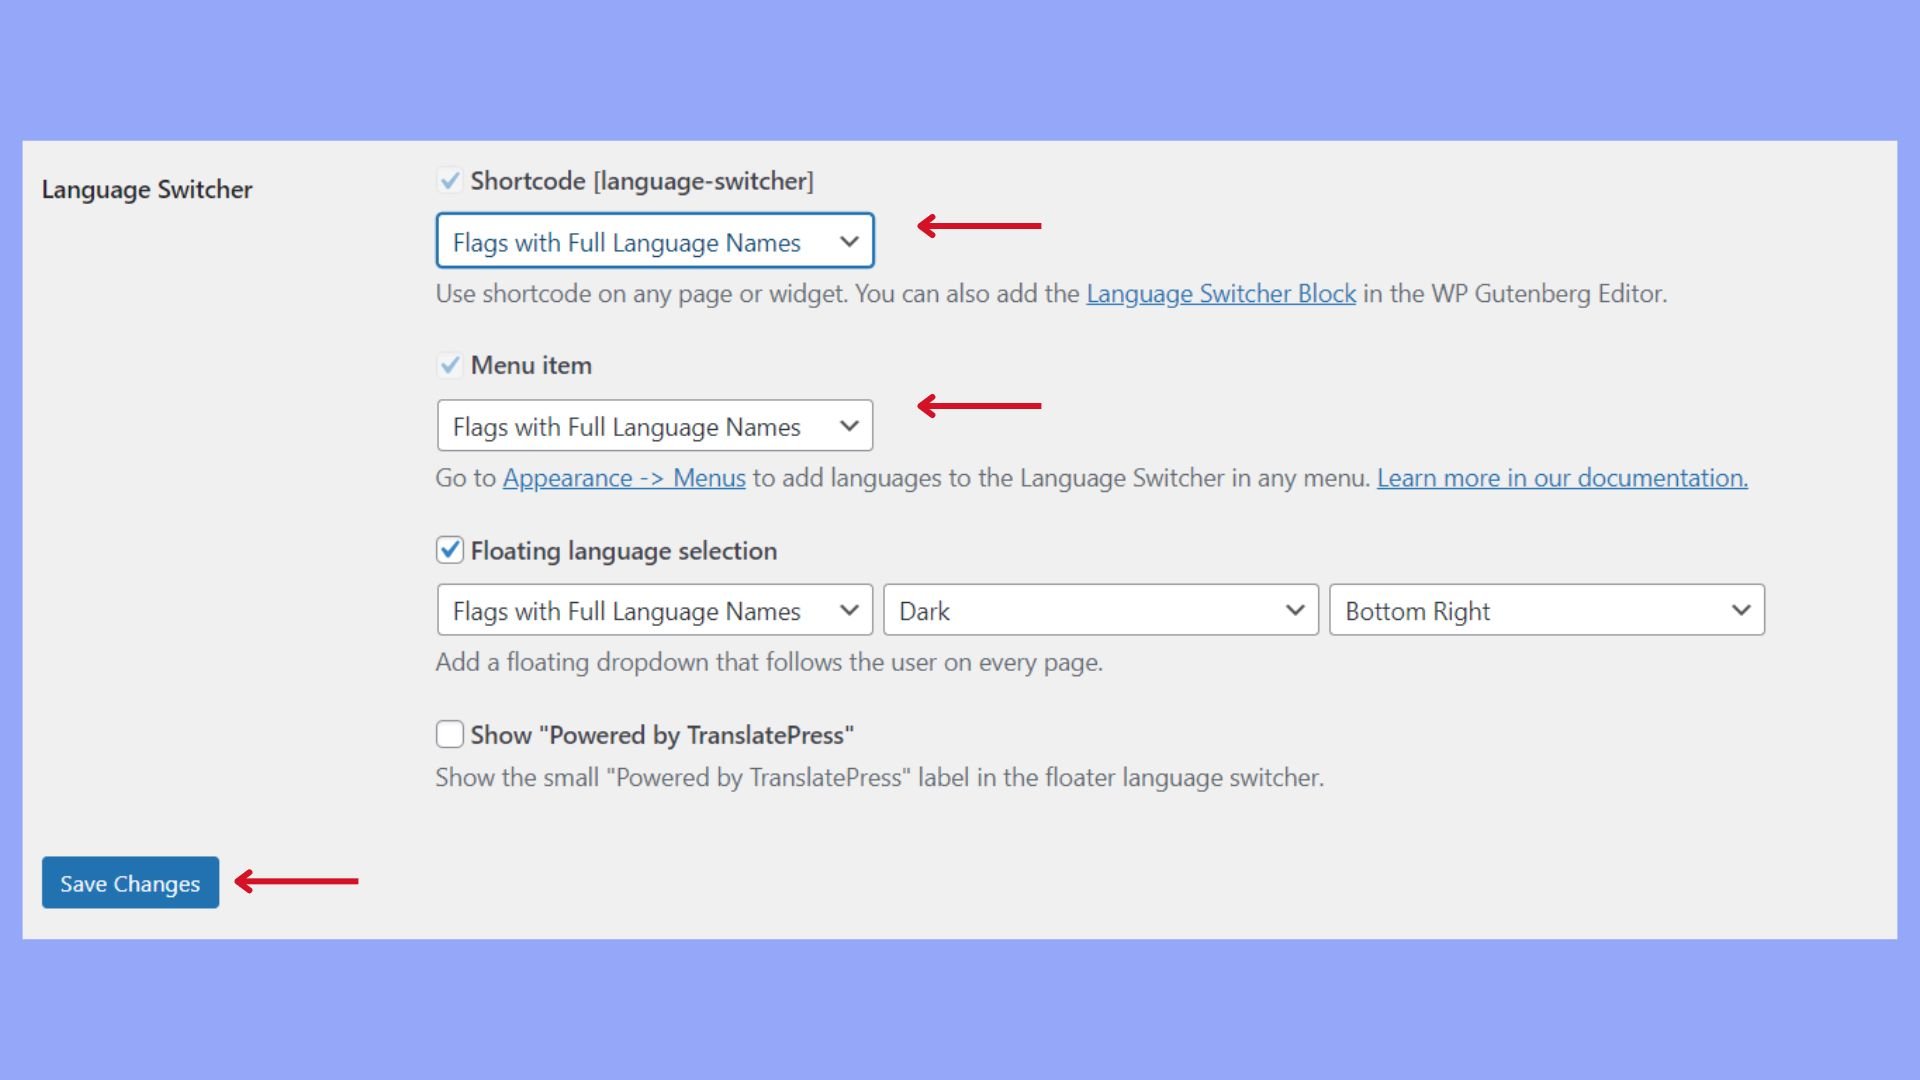
Add a language switcher to your site
A language switcher lets your customers choose their preferred language.
- Under the plugin’s Settings or a dedicated section for language options, look for an option to add a Language switcher to your site.
- Configure the switcher options such as display type and placement to your liking.
- Save your settings, and ensure the language switcher appears on your site in the front end.
Each plugin will have its specific instructions, so make sure to follow the documentation provided with your chosen plugin to achieve the best results.
How to translate WooCommerce checkout and cart pages
You have already set up and configured the necessary items when learning how to translate WooCommerce checkout page. Now you are ready to get to the translation part both for the checkout and cart pages.
Managing checkout page translation
When it comes to effectively managing the translation of your WooCommerce store’s checkout page, you should follow these steps:
- Go to your WooCommerce settings.
- Select the default language your checkout page currently uses.
- Choose the additional languages you wish to include for your checkout page translation.
- Use a translation plugin such as TranslatePress to automate the translation process.
Review each translated element for accuracy and coherence, ensuring all the instructions and information on the checkout page are clear in all languages offered.
Ensuring cart page localization
Ensuring your cart page is correctly localized requires attention to detail:
- Ensure the translation of your cart page aligns with the checkout page to provide a consistent shopping experience.
- Utilize either a translation plugin or a manual translation editor like POEdit for string translation.
- Confirm that any dynamic content, such as price formats and data structures, matches the local conventions.
Localizing your cart page is not just about translating text but also about adapting it to the cultural nuances of your audience.
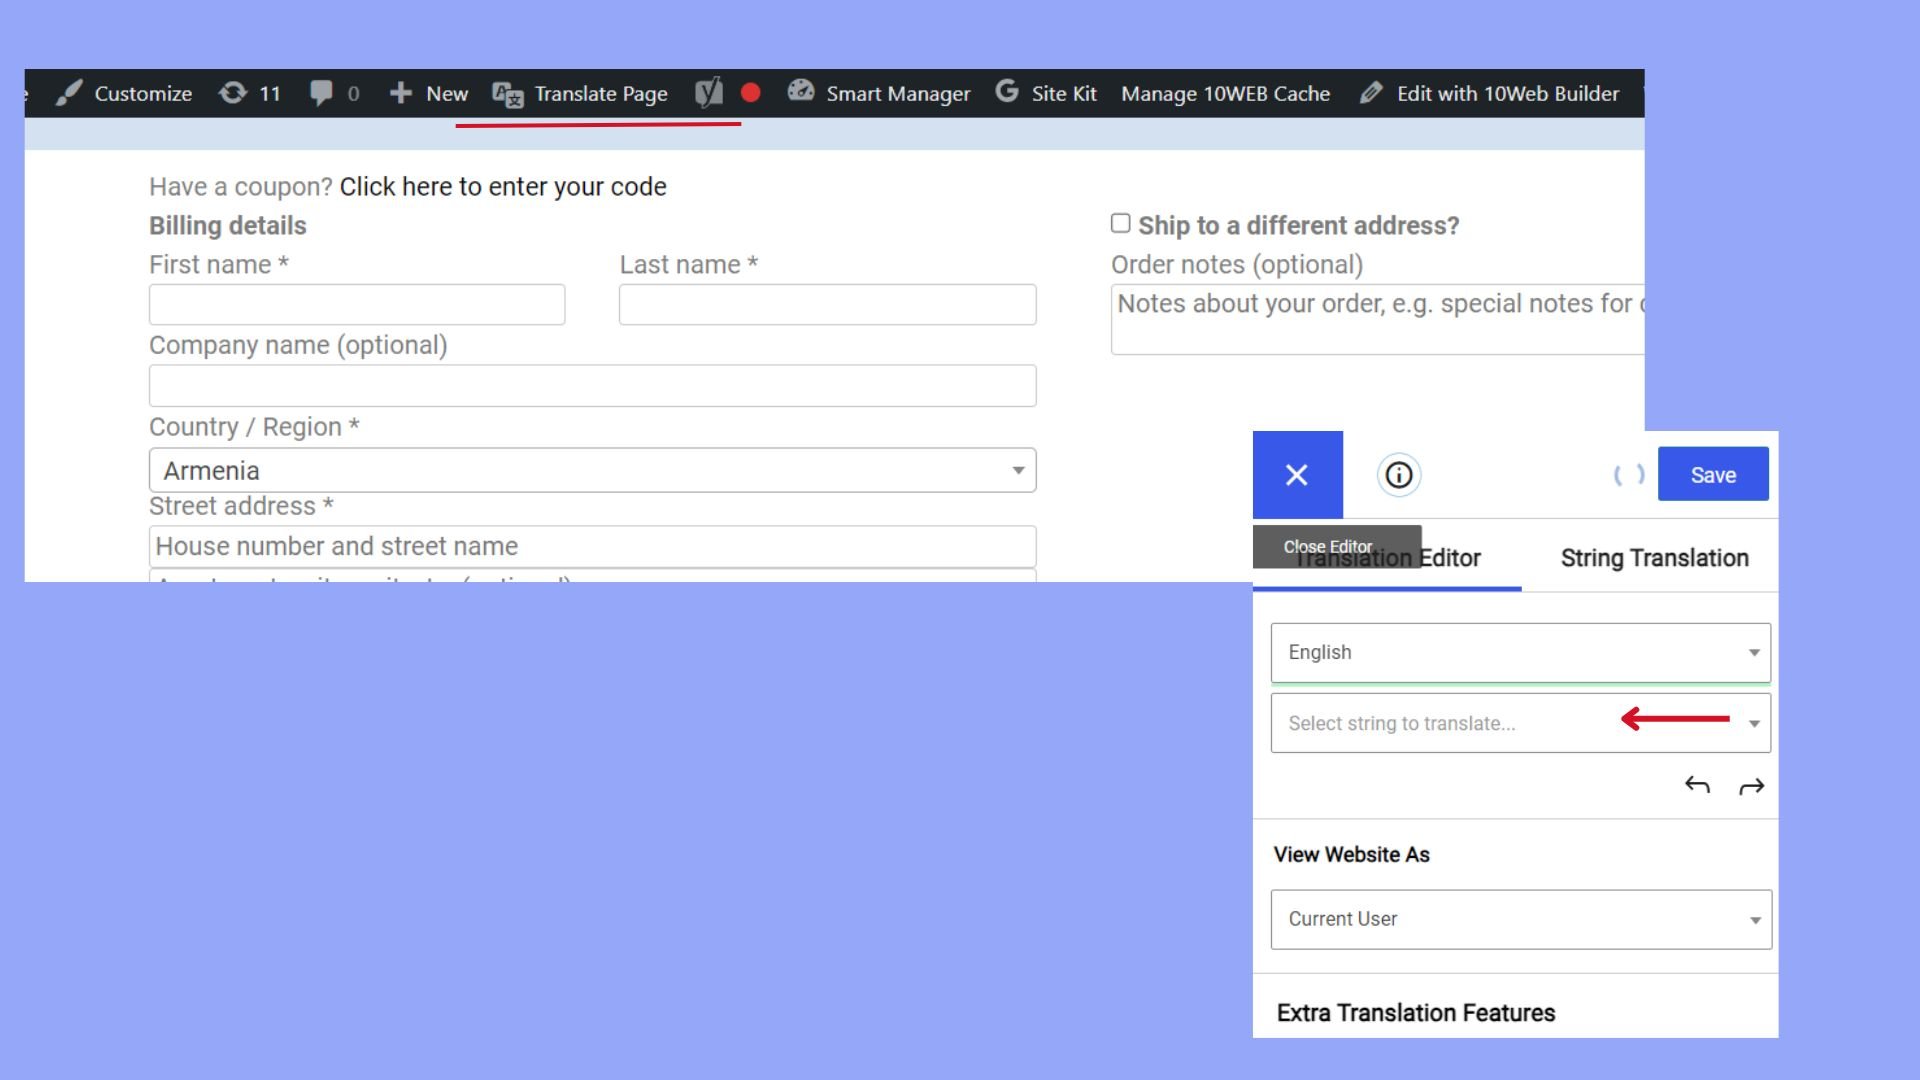
Using a visual translation editor
A visual translation editor allows you to translate directly within the context of the page layout.
- If you’re using TranslatePress or a similar plugin, start by navigating to your checkout page.
- Open the visual editor by selecting the Translate Page option in the admin toolbar.
- Click on the strings on the page that you want to translate, input your translations in the sidebar that appears, and save your changes.
- Preview your checkout page in different languages to ensure that all custom elements appear correctly and are functional.
By customizing these elements, you ensure that all parts of the checkout process are understandable and user-friendly for all your customers.
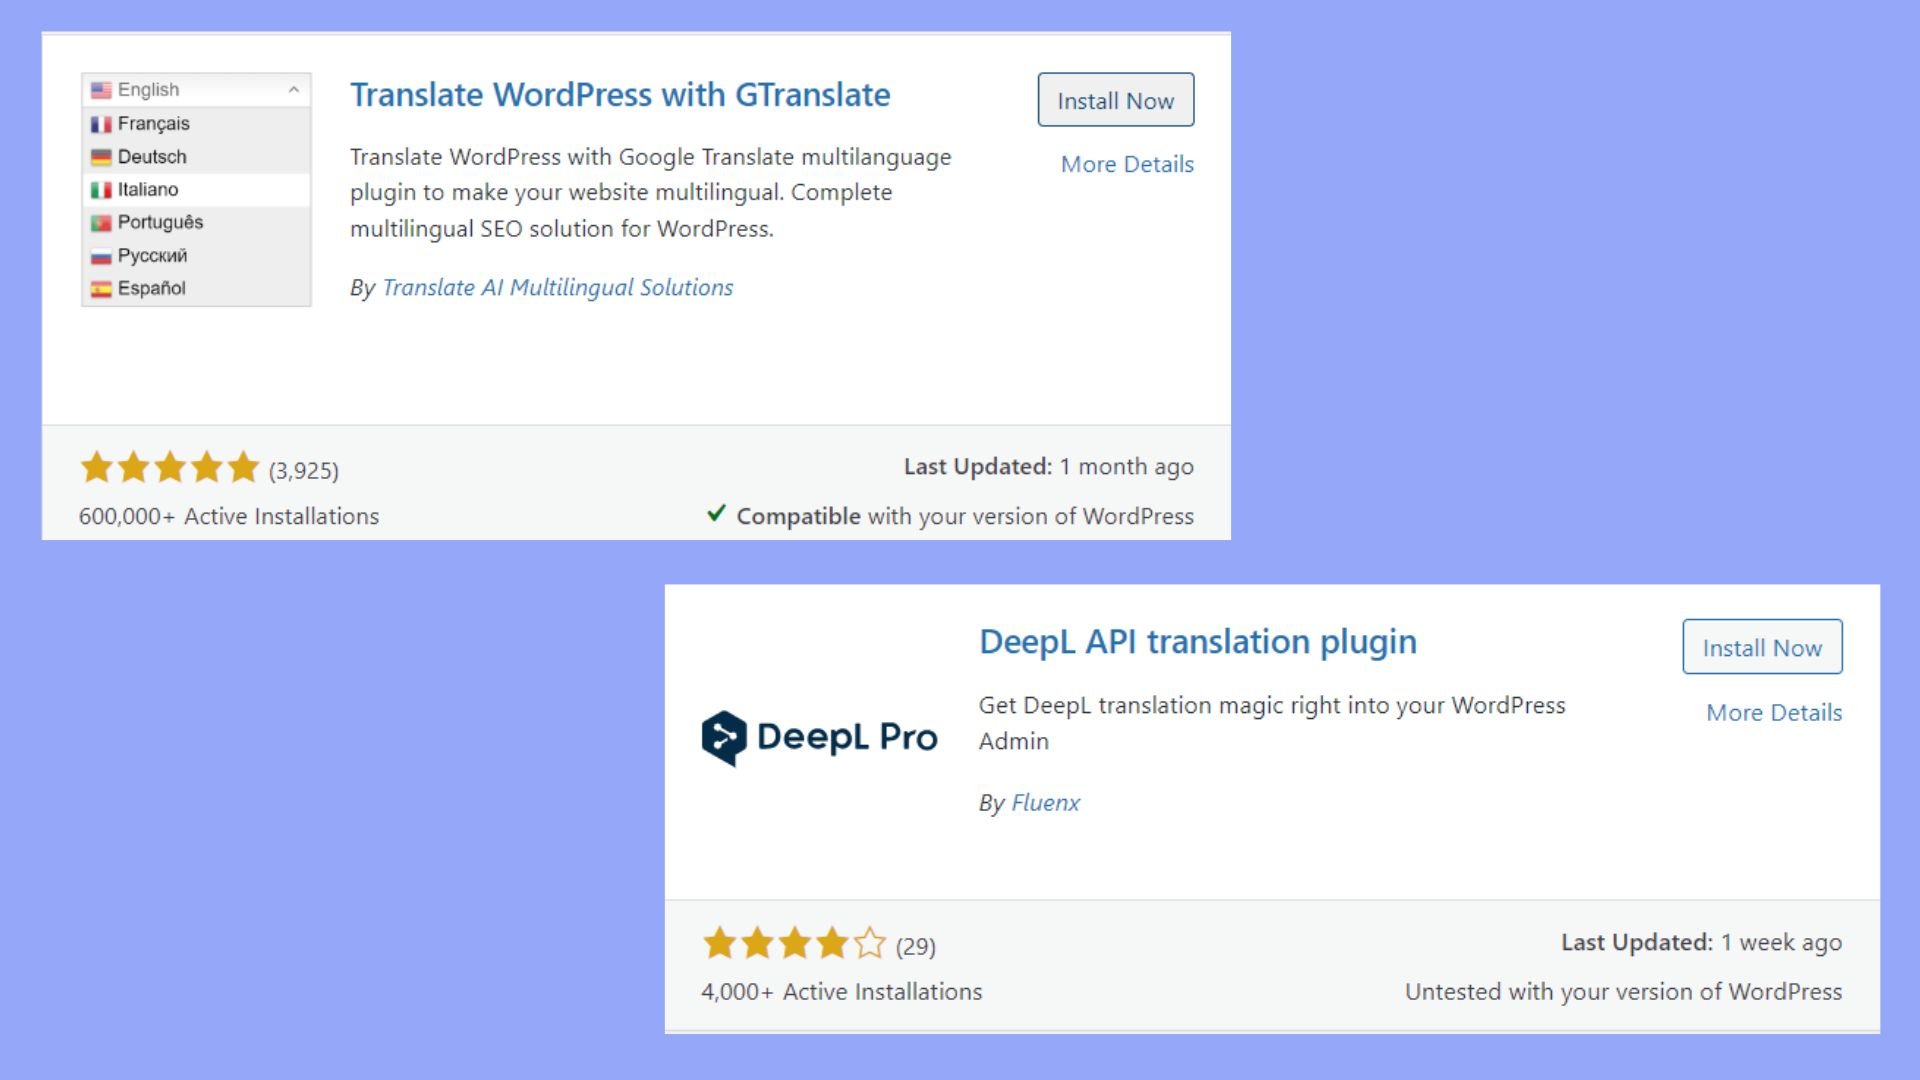
Using automatic machine translation services
You can enhance your workflow by integrating automatic translation services like Google Translate or DeepL.
- Install a plugin that supports integration with machine translation services.
- Head over to the plugin settings and select your preferred service.
- Choose to automatically translate all product descriptions, titles, and other text, or opt for a specific text selection.
This can provide a solid base translation, which you can then review and refine to ensure accuracy.
Updating translations and managing language files
Keeping your translations up to date is as important as creating them. The WPML plugin, for instance, simplifies managing your string translation and language files.
- Navigate to WPML > String Translation after any update or change in the text.
- Use the domain feature to sort strings by themes or plugins, then identify the strings that need translation.
- Update translations as needed and save them to the correct directory, typically wp-content/languages/plugins/, ensuring your WooCommerce language pack is current.
By following these steps, your checkout page remains accurately translated even as you update your WooCommerce store.
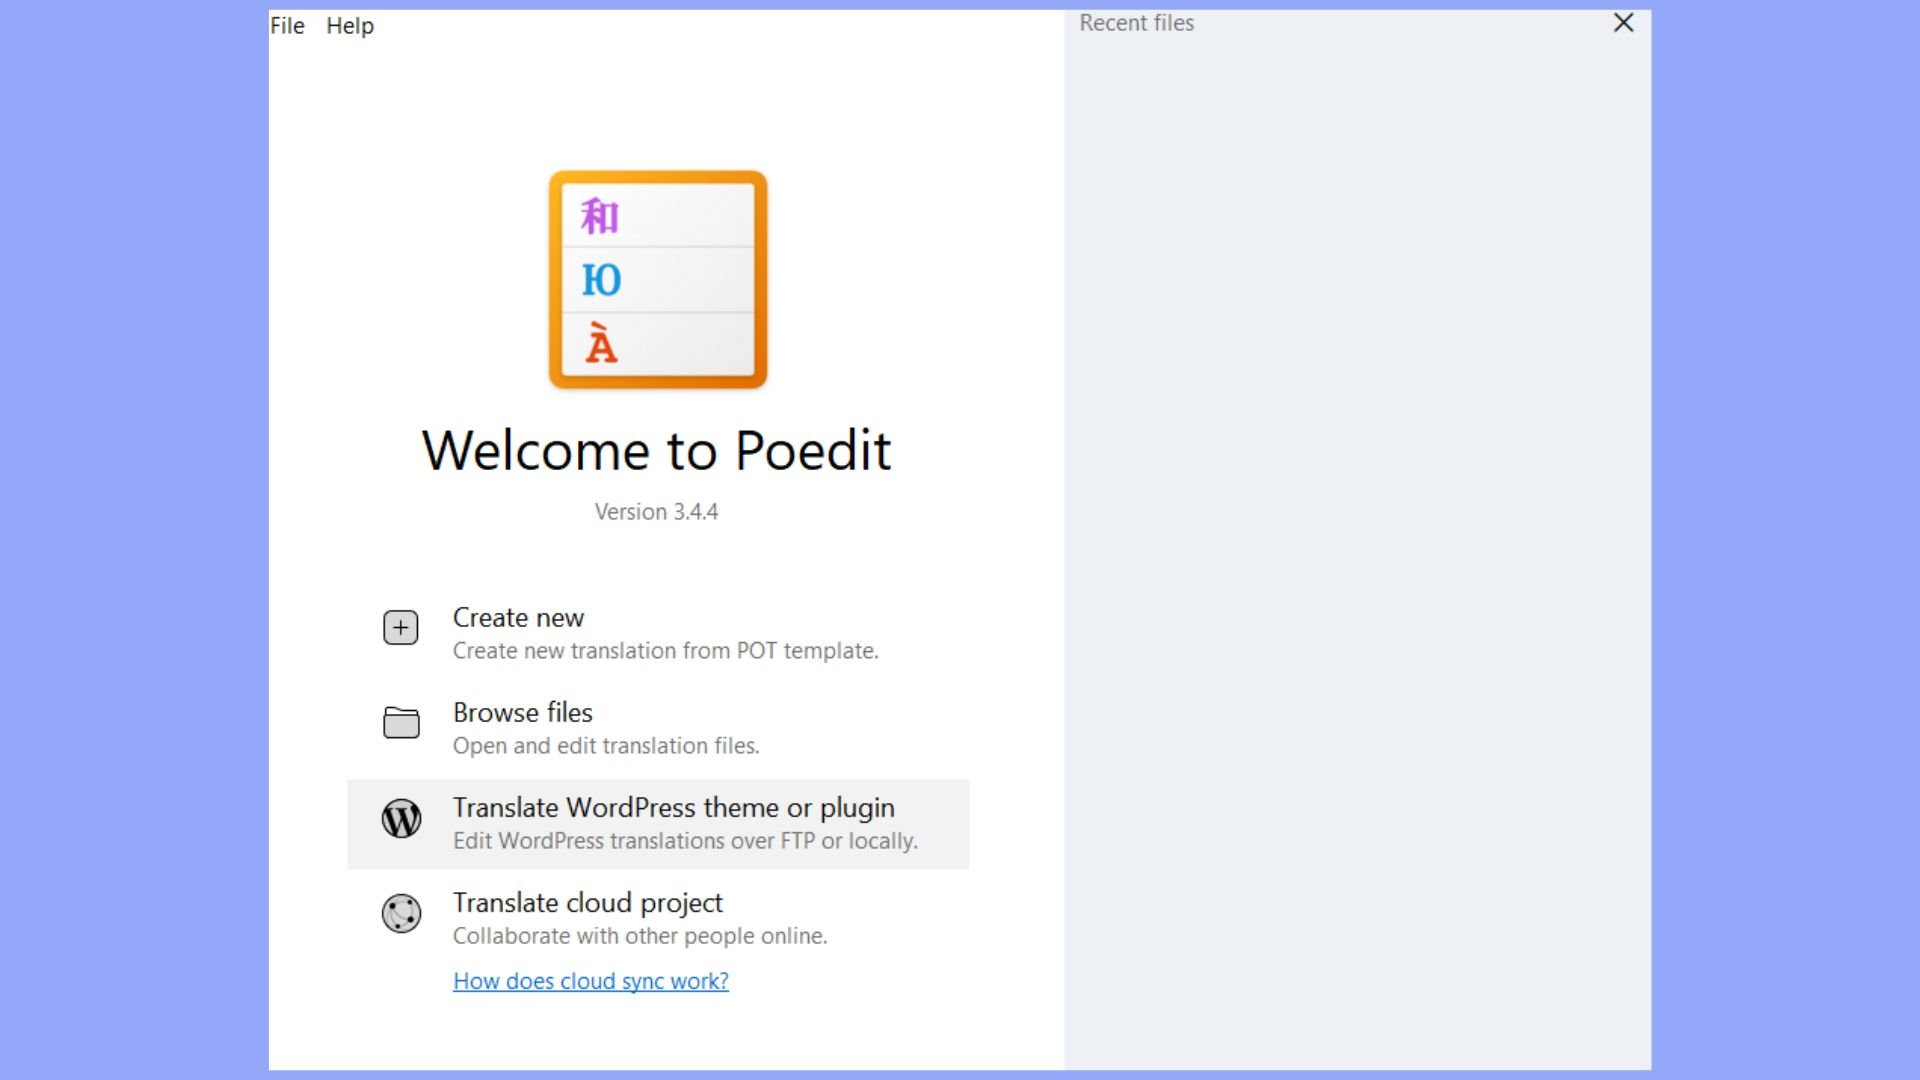
Using .po and .mo files for translation
Translating your WooCommerce checkout page using .po and .mo files involves several steps. These files are essential for storing and displaying translations in WordPress. Follow steps below to learn how to translate WooCommerce checkout page manually using these files.
- Visit the PoEdit website and download the appropriate version for your operating system. Then, install PoEdit on your computer following the installation instructions for your OS.
- Go to your WordPress installation directory via FTP or your hosting control panel’s file manager.
- Look for the `.po` file corresponding to the language you want to translate. For example, for Spanish, it would be `woocommerce-es_ES.po`.
- In PoEdit, click on File and then Open.
- Go to the WooCommerce `.po` file you located in the previous step and open it.
- In PoEdit, you will see a list of original strings (text in English) and their translations (empty or already translated). Click on a string to translate it. The original text appears at the top, and you can enter the translation in the box below.
- Focus on translating strings related to the checkout process, such as Billing Details, Payment Method, Place Order, etc.
- After translating the strings, save your changes. PoEdit will automatically generate the corresponding `.mo` file.
- Using your FTP client or hosting file manager, upload the saved `.po` and `.mo` files back to `wp-content/plugins/woocommerce/i18n/languages/`.
- Visit your WooCommerce checkout page on your site.
With these steps, you can manually translate your WooCommerce checkout page using .po and .mo files, ensuring a customized and localized shopping experience for your customers.
Create your custom online store in minutes with 10Web AI Ecommerce Website Builder and take your business online.

Looking to sell online?
Enhancing multi-language WooCommerce sites
Creating a WooCommerce store that serves a diverse customer base necessitates a focus on multilingual SEO strategies, seamless user experiences across languages, and the delicate balance between professional and machine translation.
Improving multilingual SEO
To optimize your multilingual store for search engines, it’s crucial to implement a dedicated SEO strategy for each language. Here’s how you can improve your multilingual SEO:
- Use a plugin like Weglot to automatically create and index language-specific URLs for each of your product pages.
- Ensure that your product titles and descriptions are meticulously translated and include popular keywords in the respective languages.
- Implement hreflang tags to signal to search engines like Google the linguistic and regional targeting of your pages, which helps in presenting the correct language to users.
Creating a seamless user experience
Your WooCommerce store should offer a frictionless experience for every customer, regardless of their preferred language. To create a seamless user experience for your multilingual site:
- Localize your content fully, which includes not just product listings but also checkout and cart pages, by using translation plugins compatible with WooCommerce.
- Customize language-switching options to be obvious and accessible, allowing users to easily select their preferred language.
- Design the store layout to be consistent across different languages, avoiding format breaks or misaligned text after translation.
Professional translation vs. machine translation
The quality of your translations can significantly impact your WooCommerce site, and you need to choose between professional translation services and machine translation tools. Consider these points:
- Professional translation provides high accuracy, cultural nuance, and better localization but can be more expensive and slower than machine alternatives.
- Machine translation is a faster and more cost-effective solution like Google Translate can be integrated into your store; however, they might lack a nuanced understanding of cultural context compared to a professional service.
Every aspect of translation on your site contributes to a robust, multilingual WooCommerce presence.
Conclusion
Successfully translating your WooCommerce checkout page is a crucial step towards expanding your ecommerce store globally. This comprehensive guide has provided you with all the necessary information to set up a multilingual store, from selecting and configuring the right translation plugin to managing updates and enhancing the user experience across different languages.
By leveraging both professional and machine translation services, you can ensure that your store not only communicates effectively with a diverse audience but also maintains a seamless and culturally relevant shopping experience. By now you have learned how to translate WooCommerce checkout page as well as any element on your WordPress website. Good luck with your ecommerce site’s expansion.
Create your online store in minutes with 10Web AI Ecommerce Website Builder.Looking to sell online?
Create your online store in minutes


![]()