
Creating WordPress custom user roles and capabilities you’re bound to experience the agony of choice. Your head will be spinning from endless opportunities. Basically, you may have no clue which roles and capabilities you should create and how to best combine them.
That’s why we’re here to tell you why you need custom user roles and capabilities to begin with, what you should consider when assigning roles and capabilities, and, last but not least, how to create them.
But before we delve into all that, let’s understand what WordPress custom user roles are all about.
For starters, assigning multiple user roles allows you to share the burden of website management with other users. At the same time, it gives these users separate access to your website meaning they don’t have to use your login credentials. This enhances the safety of your website.
WordPress offers a set of 6 pre-defined user roles. There’s your Super Admin, who’s basically your puppet master because he can assign capabilities to users. Then there’s the Administrator, Editor, Author, Contributor, and Subscriber. These roles aren’t set in stone. You can delete them and add new ones if you like.
Each of these roles has default capabilities. For instance, if you’re an author you’ll be assigned the user role “author” and you’ll have the capability to perform the task of writing and editing your own posts. Of course, just like the user roles, you can edit capabilities if you feel like it.
- Why do we need custom user roles and capabilities?
- How to create and customize user roles and capabilities
- FAQs
1. Why do we need custom user roles and capabilities?

We’ll start by assuming that plenty of websites aren’t just run by one individual but rather by several people from different departments. Now, naturally, you won’t give them all access to do anything they want with the website, right? Especially if they have no clue whatsoever about all the technical aspects. They’ll just end up causing more harm than good.
That’s why you need to carefully manage who gets access to the website and for what purpose.
User capabilities determine the purpose of a user’s access. So, for any action, there are defined sets of capabilities that we have to make sure users have. For example, each capability in WordPress is tied to a certain action. This action can refer to modifying certain procedures and features or it can refer to only viewing certain pages in the WordPress admin area or front end. WordPress offers over 70 default user capabilities.
Let’s take a look at some predefined capabilities that WordPress offers to paint a better picture.
- create_sites
- upload_plugins
- create_users
- edit-plugins
- moderate_comments
- edit_others_posts
- publish_posts
- edit_published_posts
- edit_posts
- delete_posts
- read
So, as already explained, these capabilities are assigned to user roles. Every role has a bunch of capabilities attached to it that also determines the capacity of actions a user can undertake.
Let’s take a look at the pre-set user roles and their default capabilities (keep in mind that this is for multisite WP. For single site WP setup, the roles Super Admin and Admin are the same):
| Super Admin | Admin | Editor | Author | Contributor | Subscriber |
| create_sites, upload_plugins |
create_users edit_plugins |
moderate_comments edit_others_posts |
publish_posts edit_published_posts |
edit_posts delete_posts |
read |
As we go from the Super Admin to the Subscriber, the capabilities of the user roles become less and less. For instance, the Editor can moderate comments, edit others’ posts, publish posts, edit your own published posts, while the Author can only do the latter. Assigning capabilities is exclusive by nature.
The main concern here is to understand how to decide whether a user should have a certain capability.
For this, plugin/theme developers have to understand the business logic of the application and the internal logic of WP user roles and capabilities. Besides that, the final plugin/theme application logic should be intuitive, reasonable, and consistent with the general WP user experience, and it should follow the principle of least privilege. If you’re not familiar with this principle, this definition will clear things up:
The principle of least privilege (POLP), an important concept in computer security, is the practice of limiting access rights for users to the bare minimum permissions they need to perform their work. Under POLP, users are granted permission to read, write or execute only the files or resources they need to do their jobs: In other words, the least amount of privilege necessary.
In short, it’s important to be restrictive when assigning capabilities, otherwise you might end up compromising security.
To paint a clear picture, here are two examples:
Example #1
You have a Gallery plugin. How do you know if a certain user should be able to create a new gallery? First, we should create {pluginprefix}_create_gallery capability. Then, we have to think of the most reasonable and intuitive approach which is to tie gallery creation capability to certain WP standard capabilities, such as the creation of posts. This means we allow to create a gallery only to users who are allowed to create a post. By default users with standard WP roles, i.e. Super Admin, Admin, Editor, and Author as well, can perform this action. However, your application logic can be a little bit different and you can decide that only Admins can create a gallery.
Example #2
Another example is when your website possesses certain transaction data. The user who performs the transaction should be able to view its details. However, site administrators shouldn’t be able to have insight into these data. On the other hand, an additional role might be needed for auditing purposes, meaning that another user has to have access to the data. The business logic of the application should define the assignment of capabilities taking into account the WP standard roles for capabilities.
Now that everybody is caught up on the purpose of custom user roles and capabilities, let’s move to the next step:
2. How to create and customize user roles and capabilities
There are two ways to create custom user roles. There is the manual one and the plugin method. But, don’t worry, we’ll show you both and leave it up to you to decide which one is best for you. It’ll be short and painless!
Let’s start with the easier option – creating custom user roles via plugins.
The plugin method
There’s practically a plugin for everything, and managing user capabilities is no exception. And like any other function, this one also has a wide variety of plugins offering their services to add, edit, and delete user roles and capabilities.
Here’s a plugin that WordPress offers called User Role Editor plugin.
The first thing that needs to be done is, of course, install and activate the plugin. After that, just head to the left-side panel and select Users then User Role Editor. What you’ll get is a long list of capabilities that you can manage.
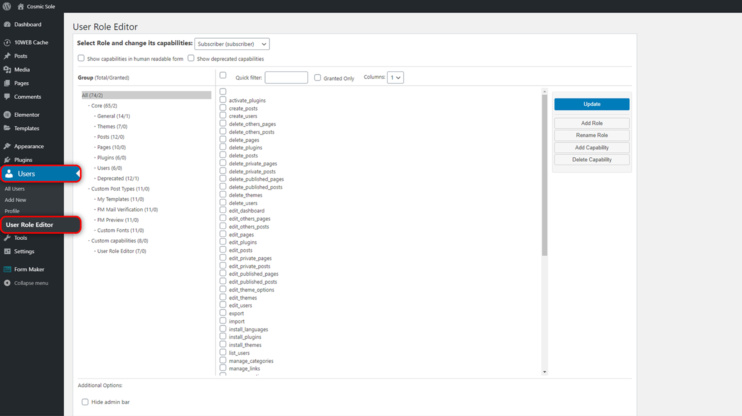
Now, if you take a look at the top of the page, you’ll find a part that says Select Role and change its capabilities. There you’ll find the already existent Roles. You can choose one of these roles, check the Granted Only box to see its capabilities, and edit them if necessary. If you happen to be confused about which capabilities to assign to which roles, here’s an overview to refresh your memory.
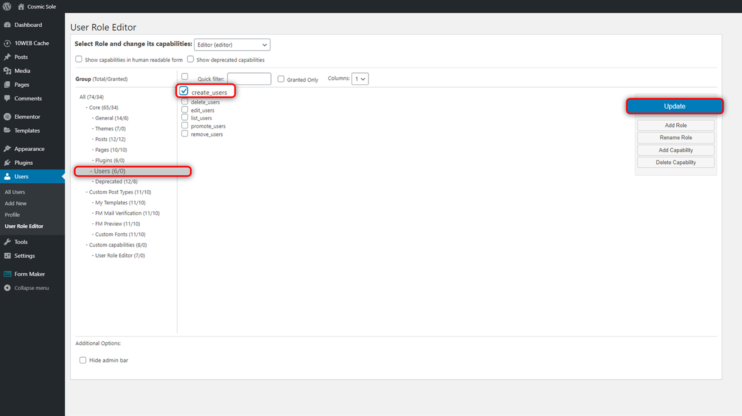
Once you have your capabilities’ overview under control you can go ahead and add or delete capabilities. For that, you can, for example, select a group from your left-side panel and add a new capability. So, let’s say you want to allow an Editor to create users (which isn’t a default capability for Editors). You just have to select the group “Users” and then create_users. Now, just click Update and your selected user role is good to go.
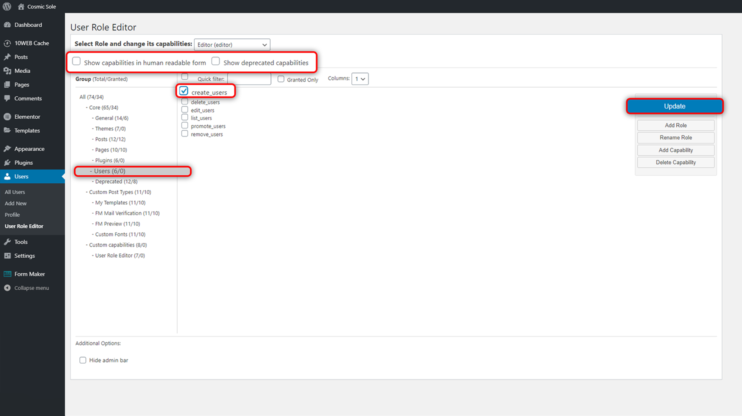
By the way, you have the ability to choose between having capabilities shown to you in “human readable form” or in a deprecated capacity – depends on what is easier for you to manage.
So, now you know how to edit the capabilities of your existing user roles. But what if you want to add a new user role?
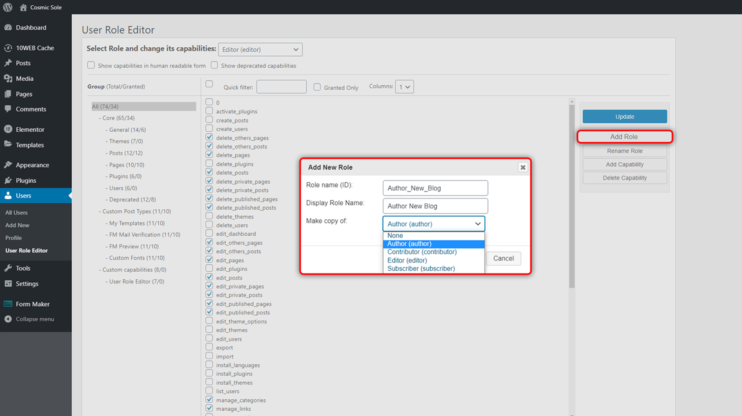
Well, it’s easy enough, you just have to select Add Role on your right-side panel. There you can give the user a display role name and a deprecated one. Under “Make copy of,” you select which existent role this new one is based upon. This will save a lot of time because you don’t have to hand-pick every single capability.
The manual method
If you don’t want to work with plugins, you, of course, have the option to go with the manual option. With WordPress, you can delete all predefined user roles and create custom roles according to your needs. Be that as it may, we don’t recommend removing user roles. It’s better to keep the standard ones and add custom roles with capabilities or add custom capabilities to standard roles. You can even do both. But all in all, we recommend you extend your user roles and capabilities instead of deleting the standard ones.
Here are the 5 functions that you need to get acquainted with, they’re pretty self-explanatory:
- add_role(): to add custom roles.
- remove_role(): to remove custom roles.
- add_cap(): to add a custom capability to a role.
- remove_cap(): to remove a custom capability from a role.
- get_role (): informs about the role and its capabilities.
First, let’s take a look at how you can remove a default user role.
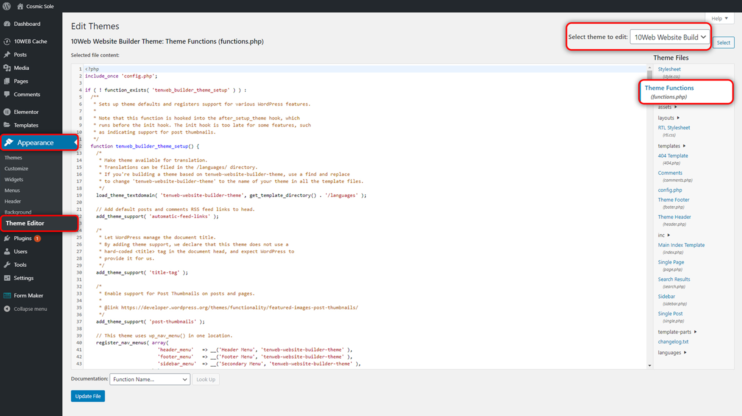
Just head to your WordPress Admin page, select Appearance on the left bar, then Editor. On the right side, select Theme Functions. Now, let’s say you want to remove the Editor and the Author role; all you have to do is add the remove_role() function (i.e. remove_role( ‘editor’ ); remove_role( ‘author’ )) to the end of the Theme Functions file. And then click Update File.
Again, we must warn you that you shouldn’t remove WordPress standard roles because it can break some standard functionality of WordPress and many plugins. We’re only demonstrating how this process works for comprehension purposes.
Now, after learning how a user role can be deleted, let’s see how you can create new ones.
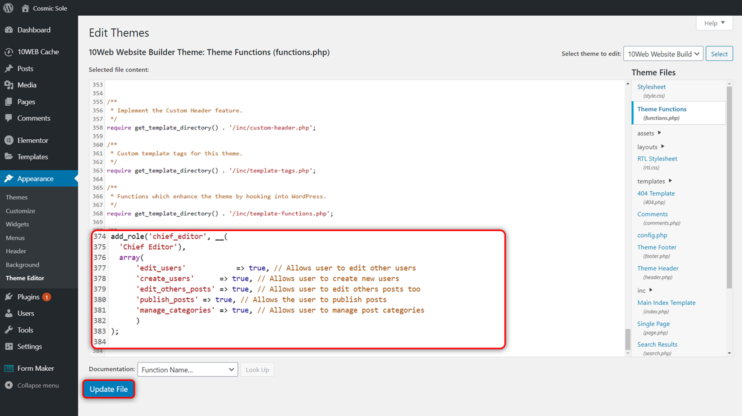
In our example, we’ll add a custom user role of a Chief Editor. Of course, we’ll be using the add_role() function for that. But we’ll also add the following syntax to it:
add_role( $role, $display_name, $capabilities);
As we did with the plugin version, we need to select a role name (i.e. chief_editor) and a display name (i.e. Chief Editor). But, of course, this isn’t enough, you’ll also need to add capabilities. For that, we’ll again leave this overview of capabilities here for you to browse through in case you need it.
Here’s how our exemplary function looks like when all capabilities are added:
add_role('chief_editor', __(
  'Chief Editor'),
  array(
      'edit_users'            => true, // Allows user to edit other users
      'create_users'      => true, // Allows user to create new users
      'edit_others_posts' => true, // Allows user to edit others posts too
      'publish_posts' => true, // Allows the user to publish posts
      'manage_categories' => true, // Allows user to manage post categories
      )
);
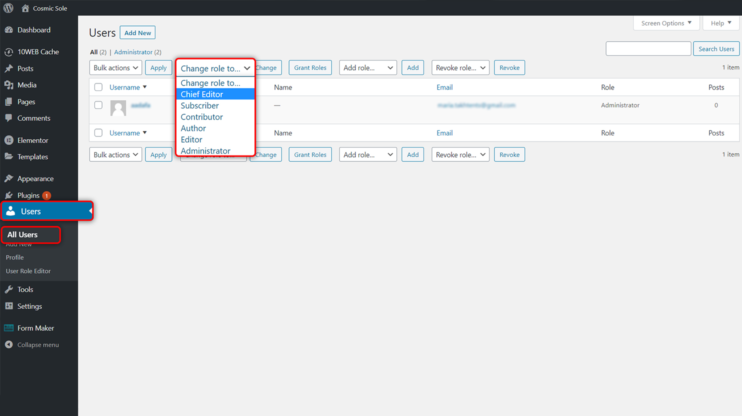
Once this is done, you can assign the new custom user role to a user. For this, go to the left-side panel and select Users, then All Users. Choose a user, then select the added role, and click Change.
3. FAQs

Is it possible to assign multiple user roles to WordPress users?
Sure, you can either use a plugin to help you out, such as Multiple Roles. Alternatively, you can do this by using this code:
$someone = new WP_User( $user_id );
$someone->add_role( 'role-1' );
$someone->add_role( 'role-2' );
Just keep in mind that even though your code allows for the assignment of multiple roles, your WordPress Admin UI doesn’t. In other words, if you save a user again using the WordPress Admin UI, all the other additional roles will disappear and only the one from the Roles dropdown will remain.
That’s why we don’t recommend creating multiple roles. Instead, you can add new necessary capabilities to a user role or create a custom user role that has the desired combination of capabilities from two different roles.
Can I use capability checks to ensure plugin security?
Yes, you can and you should! Especially if your plugin allows users to submit data, it should use capability checks. Basically, you’re adding a security layer through a permission system that assigns user roles to users and capabilities which are permissions to take specific actions that are assigned to each user.
So, when building a plugin, you have to run your code only when the current user has the required capabilities.
Here’s an example where an activity – in this case, trashing posts – has no capabilities check:
/**
 * Generate a Delete link based on the homepage url.
 *
 * @param string $content   Existing content.
 *
 * @return string|null
 */
function wporg_generate_delete_link( $content ) {
    // Run only for single post page.
    if ( is_single() && in_the_loop() && is_main_query() ) {
        // Add query arguments: action, post.
        $url = add_query_arg(
            [
                'action' => 'wporg_frontend_delete',
                'post'   => get_the_ID(),
            ], home_url()
        );

        return $content . ' <a href="' . esc_url( $url ) . '">' . esc_html__( 'Delete Post', 'wporg' ) . '</a>';
    }

    return null;
}


/**
 * Request handler
 */
function wporg_delete_post() {
    if ( isset( $_GET['action'] ) && 'wporg_frontend_delete' === $_GET['action'] ) {

        // Verify we have a post id.
        $post_id = ( isset( $_GET['post'] ) ) ? ( $_GET['post'] ) : ( null );

        // Verify there is a post with such a number.
        $post = get_post( (int) $post_id );
        if ( empty( $post ) ) {
            return;
        }

        // Delete the post.
        wp_trash_post( $post_id );

        // Redirect to admin page.
        $redirect = admin_url( 'edit.php' );
        wp_safe_redirect( $redirect );

        // We are done.
        die;
    }
}


/**
 * Add the delete link to the end of the post content.
 */
add_filter( 'the_content', 'wporg_generate_delete_link' );

/**
 * Register our request handler with the init hook.
 */
add_action( 'init', 'wporg_delete_post' );
This allows for everyone to delete posts. If you want to avoid such a disaster take a look at how to restrict capabilities:
/**
 * Generate a Delete link based on the homepage url.
 *
 * @param string $content   Existing content.
 *
 * @return string|null
 */
function wporg_generate_delete_link( $content ) {
    // Run only for single post page.
    if ( is_single() && in_the_loop() && is_main_query() ) {
        // Add query arguments: action, post.
        $url = add_query_arg(
            [
                'action' => 'wporg_frontend_delete',
                'post'   => get_the_ID(),
            ], home_url()
        );

        return $content . ' <a href="' . esc_url( $url ) . '">' . esc_html__( 'Delete Post', 'wporg' ) . '</a>';
    }

    return null;
}


/**
 * Request handler
 */
function wporg_delete_post() {
    if ( isset( $_GET['action'] ) && 'wporg_frontend_delete' === $_GET['action'] ) {

        // Verify we have a post id.
        $post_id = ( isset( $_GET['post'] ) ) ? ( $_GET['post'] ) : ( null );

        // Verify there is a post with such a number.
        $post = get_post( (int) $post_id );
        if ( empty( $post ) ) {
            return;
        }

        // Delete the post.
        wp_trash_post( $post_id );

        // Redirect to admin page.
        $redirect = admin_url( 'edit.php' );
        wp_safe_redirect( $redirect );

        // We are done.
        die;
    }
}


if ( current_user_can( 'edit_others_posts' ) ) {
    /**
     * Add the delete link to the end of the post content.
     */
    add_filter( 'the_content', 'wporg_generate_delete_link' );

    /**
     * Register our request handler with the init hook.
     */
    add_action( 'init', 'wporg_delete_post' );
}
This said, checking capabilities isn’t enough, because all it does is ensure that only users who have the capability to delete a post are able to delete a post. But there are scenarios where someone can make you click the link that initiates the removal of a post through deception.
That’s why you also need Nonce security checks. Nonce is an arbitrary or semi-arbitrary number that is only used once. What it does is it adds a protection layer for your URLs and forms and reduces the risk of hack attempts. Once you enforce a URL with a nonce key, there’s a verification check. This will ensure that the user that’s executing the URL also intends to perform the specific action.
For more information on Nonces and how to create them check out this article.
How can I check a WordPress user role in shortcode?
Let’s say you need to check if a user is allowed to view a certain content, this is how you do it:
function func_check_user_role( $atts, $content = null ) {
    $user = wp_get_current_user();
    $user_role = $atts['role'];
    $allowed_roles = [];
    array_push($allowed_roles , $user_role);

if ( is_user_logged_in() && array_intersect($allowed_roles, $user->roles ) ) {
      return $content;
 } else {
    return '';
}

}
add_shortcode( 'check-user-role', 'func_check_user_role' );
So, finally, your shortcode will look like this:
[check-user-role role="subscriber"] Your content [/check-user-role]
Are you all set to create your own custom user roles or do you still have some unanswered questions? In the case of the latter, leave a comment, and we’ll be happy to assist you!
Simplify WordPress with 10Web
Simplify WordPress with 10Web
Skip manual work with 10Web Managed WordPress Hosting.

Simplify WordPress with 10Web
Simplify WordPress with 10Web
-
 Experience automated website management
 -
Keep your site up-to-date with automatic updates
-
Forget about security threats and malware
 Experience automated website management