To effectively harness the power of analytics for your ecommerce site, it is essential to integrate Google Analytics with your WooCommerce platform. Understanding how to add Google Analytics to WooCommerce will enable you to track vital metrics such as user behavior, conversion rates, and marketing campaign effectiveness.
This integration provides detailed insights, allowing you to make data-driven decisions to optimize your online store’s performance and enhance the user experience. With the right setup, you’ll be equipped to monitor your site’s traffic and make informed improvements to boost sales and customer satisfaction.

Looking to sell online?
Create your custom online store in minutes with 10Web AI Ecommerce Website Builder and take your business online.
FAQ
How do I connect Google to WooCommerce?
How do I add Google Analytics to my WordPress site?
Understanding Google Analytics
Google Analytics is a powerful tool that offers insight into your website’s traffic and user behavior. By using this service, you can track how visitors interact with your WooCommerce store, which helps in making informed decisions to improve your business’s online presence. It provides data on various aspects such as page views, user sessions, and conversion rates, which are crucial for understanding the performance of your ecommerce site.
Google Analytics has a few key benefits when integrated with your WooCommerce website:
- Tracking user behavior: Gaining insights into how visitors navigate through your store and which pages they interact with the most, enabling the optimization of the user experience.
- Monitoring conversion rates: Analyzing the effectiveness of your sales funnel to identify and address areas for improvement, ultimately increasing the percentage of visitors who complete purchases.
- Measuring marketing campaigns: Evaluating the performance of various marketing efforts, such as email campaigns and social media ads, to determine which channels drive the most traffic and conversions.
- Understanding customer demographics: Accessing detailed information about your audience’s demographics and interests, allowing for more targeted and effective marketing strategies.
- Optimizing product listings: Identifying top-performing products and using data to enhance product descriptions, images, and overall listings to boost sales and customer engagement.
By leveraging Google Analytics, as a WooCommerce store owner, you can gain valuable insights, optimize their marketing efforts, and enhance their online store’s performance and user experience.
Creating a Google Analytics account
To add Google Analytics to your WooCommerce store, you must first set up an analytics account. Here’s how to go about it:
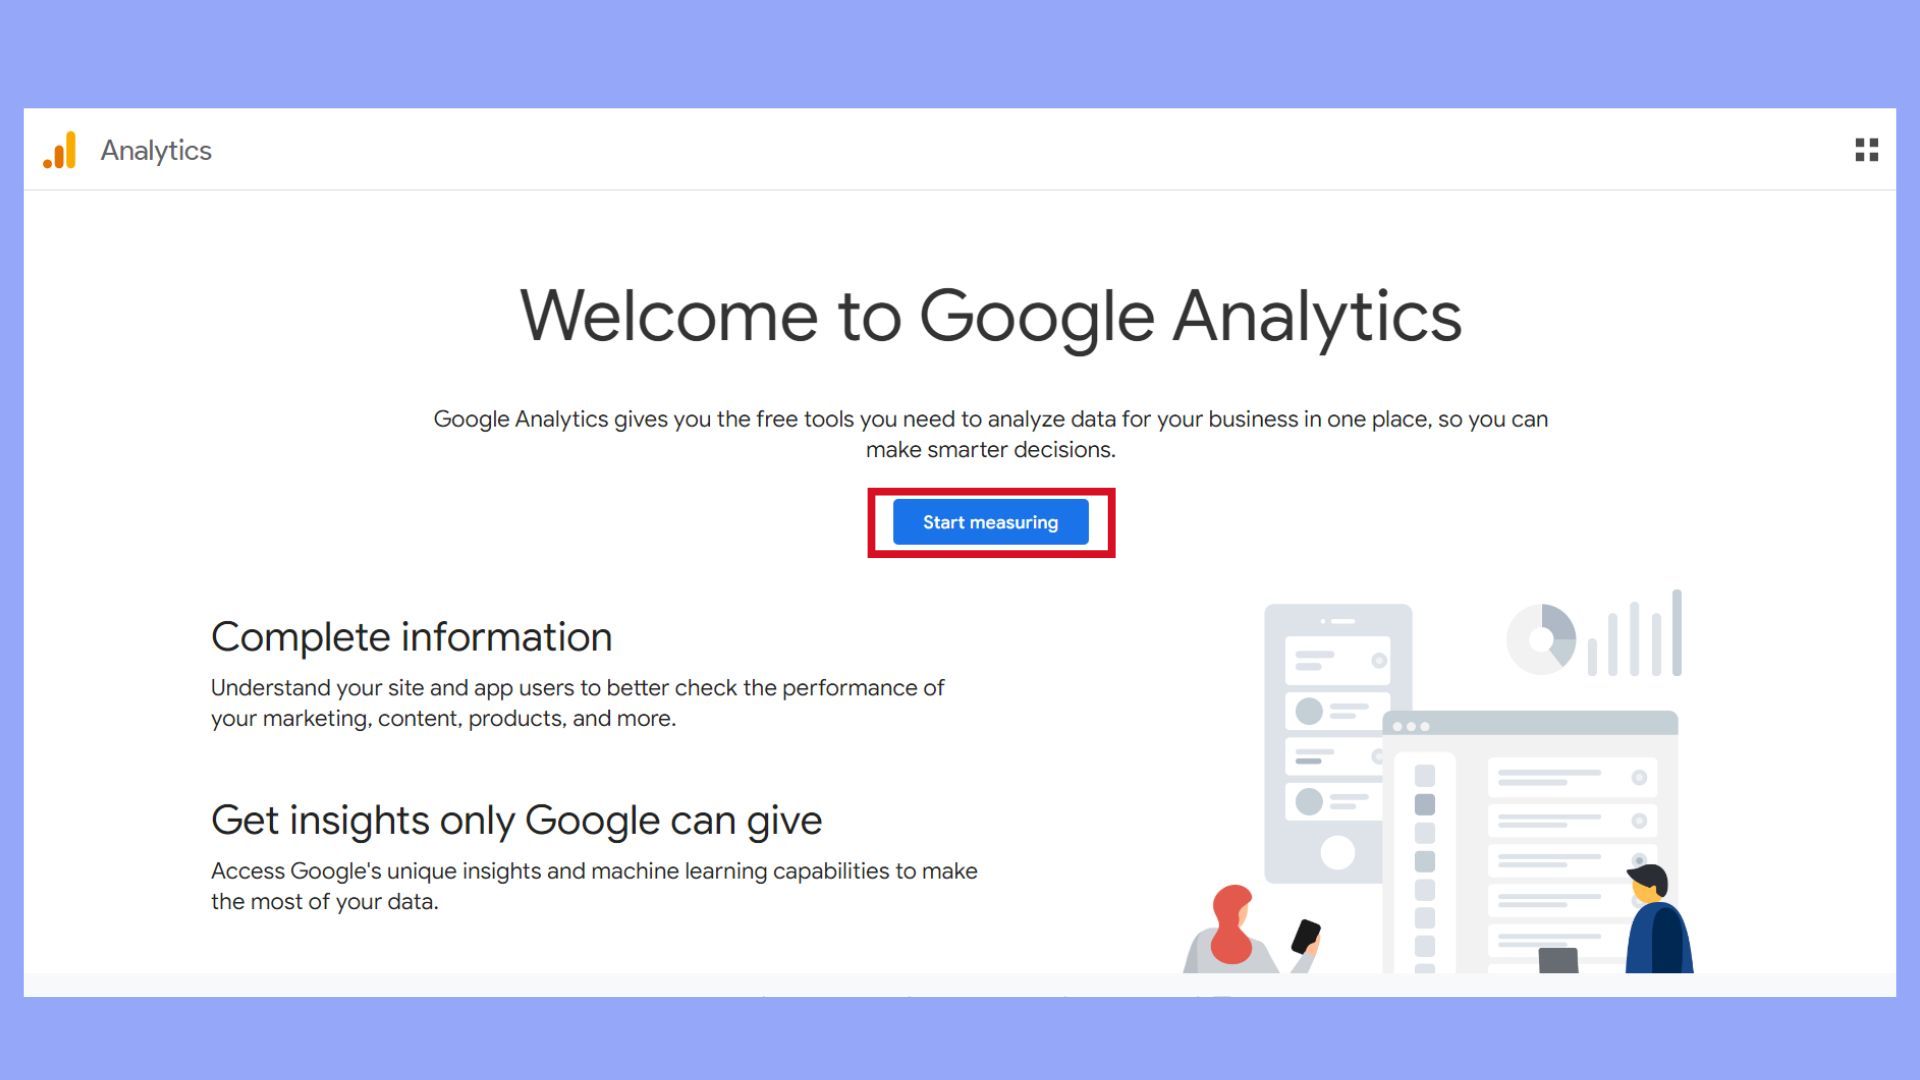
- Visit the Google Analytics website.
- Click on the Start measuring button.

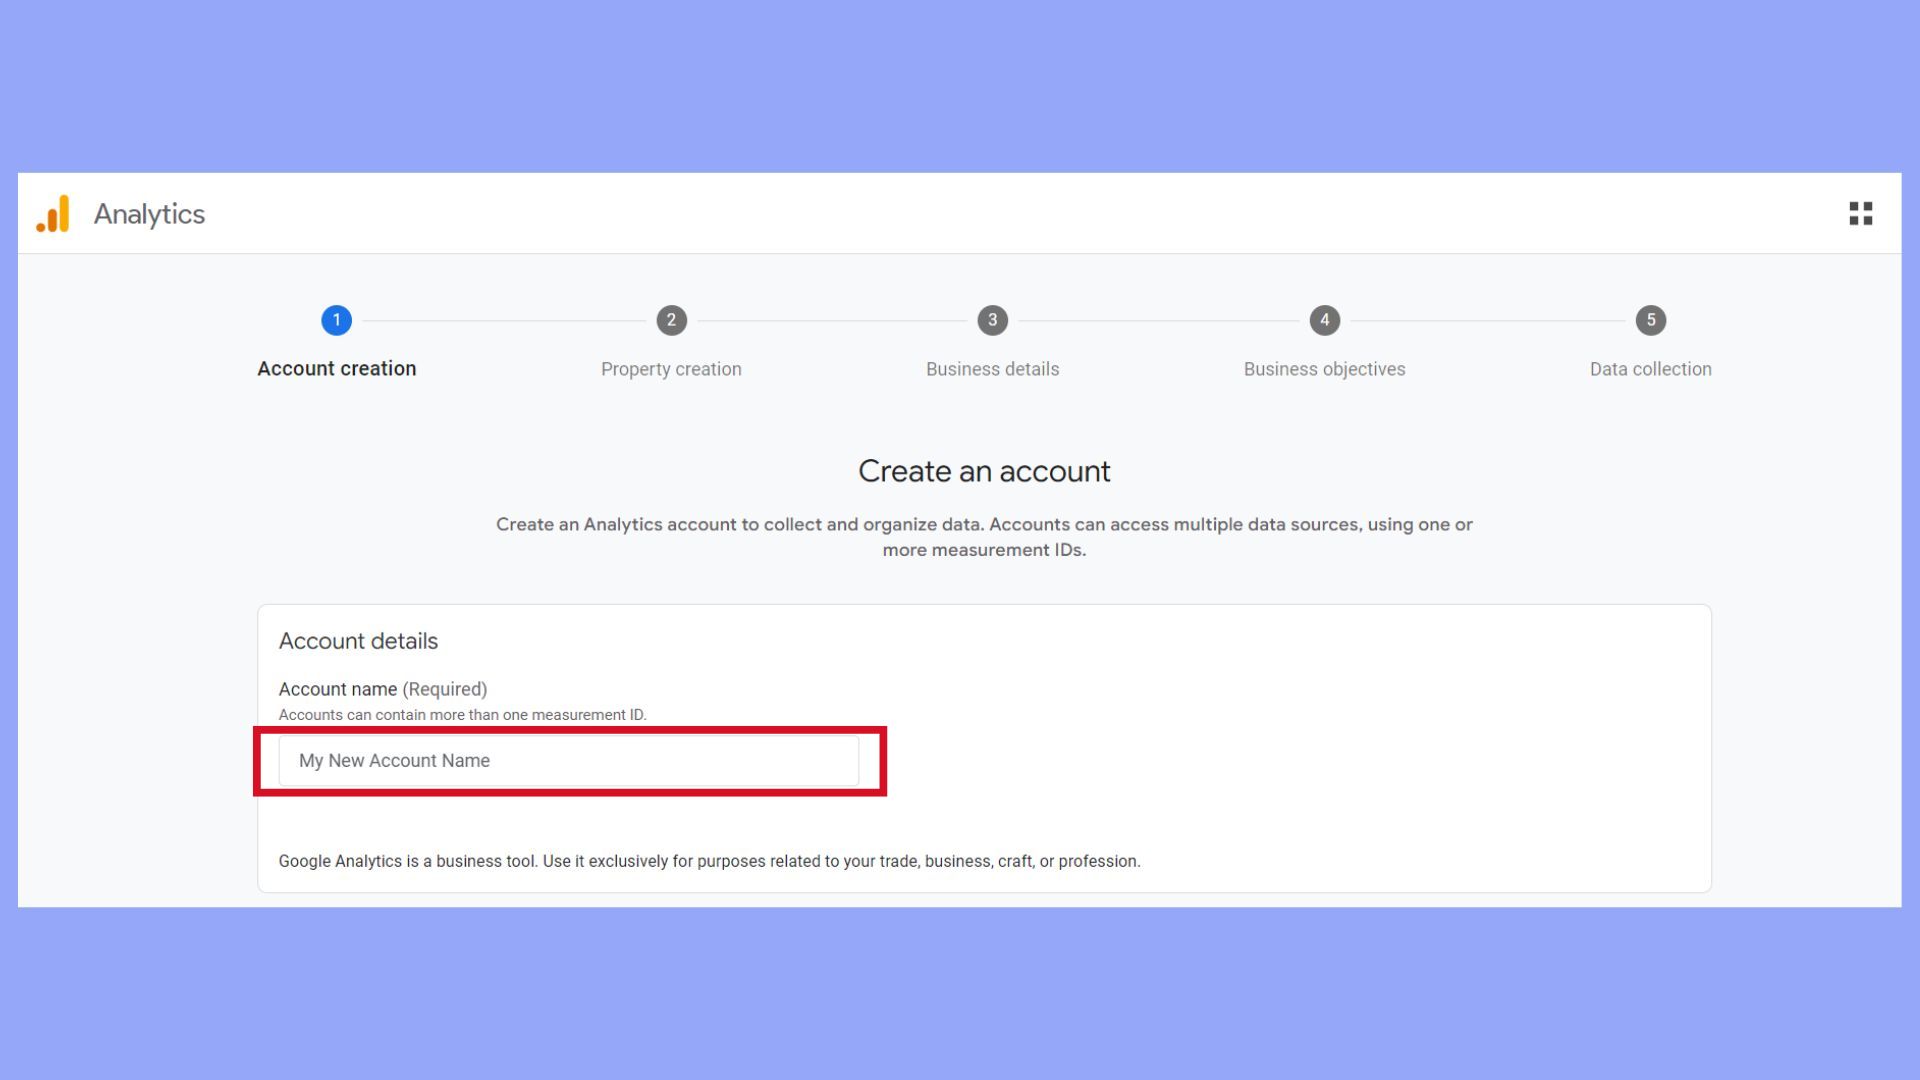
- Create an account using your business details.
- Log in using your Google account credentials.
- Set up Analytics by providing essential details.

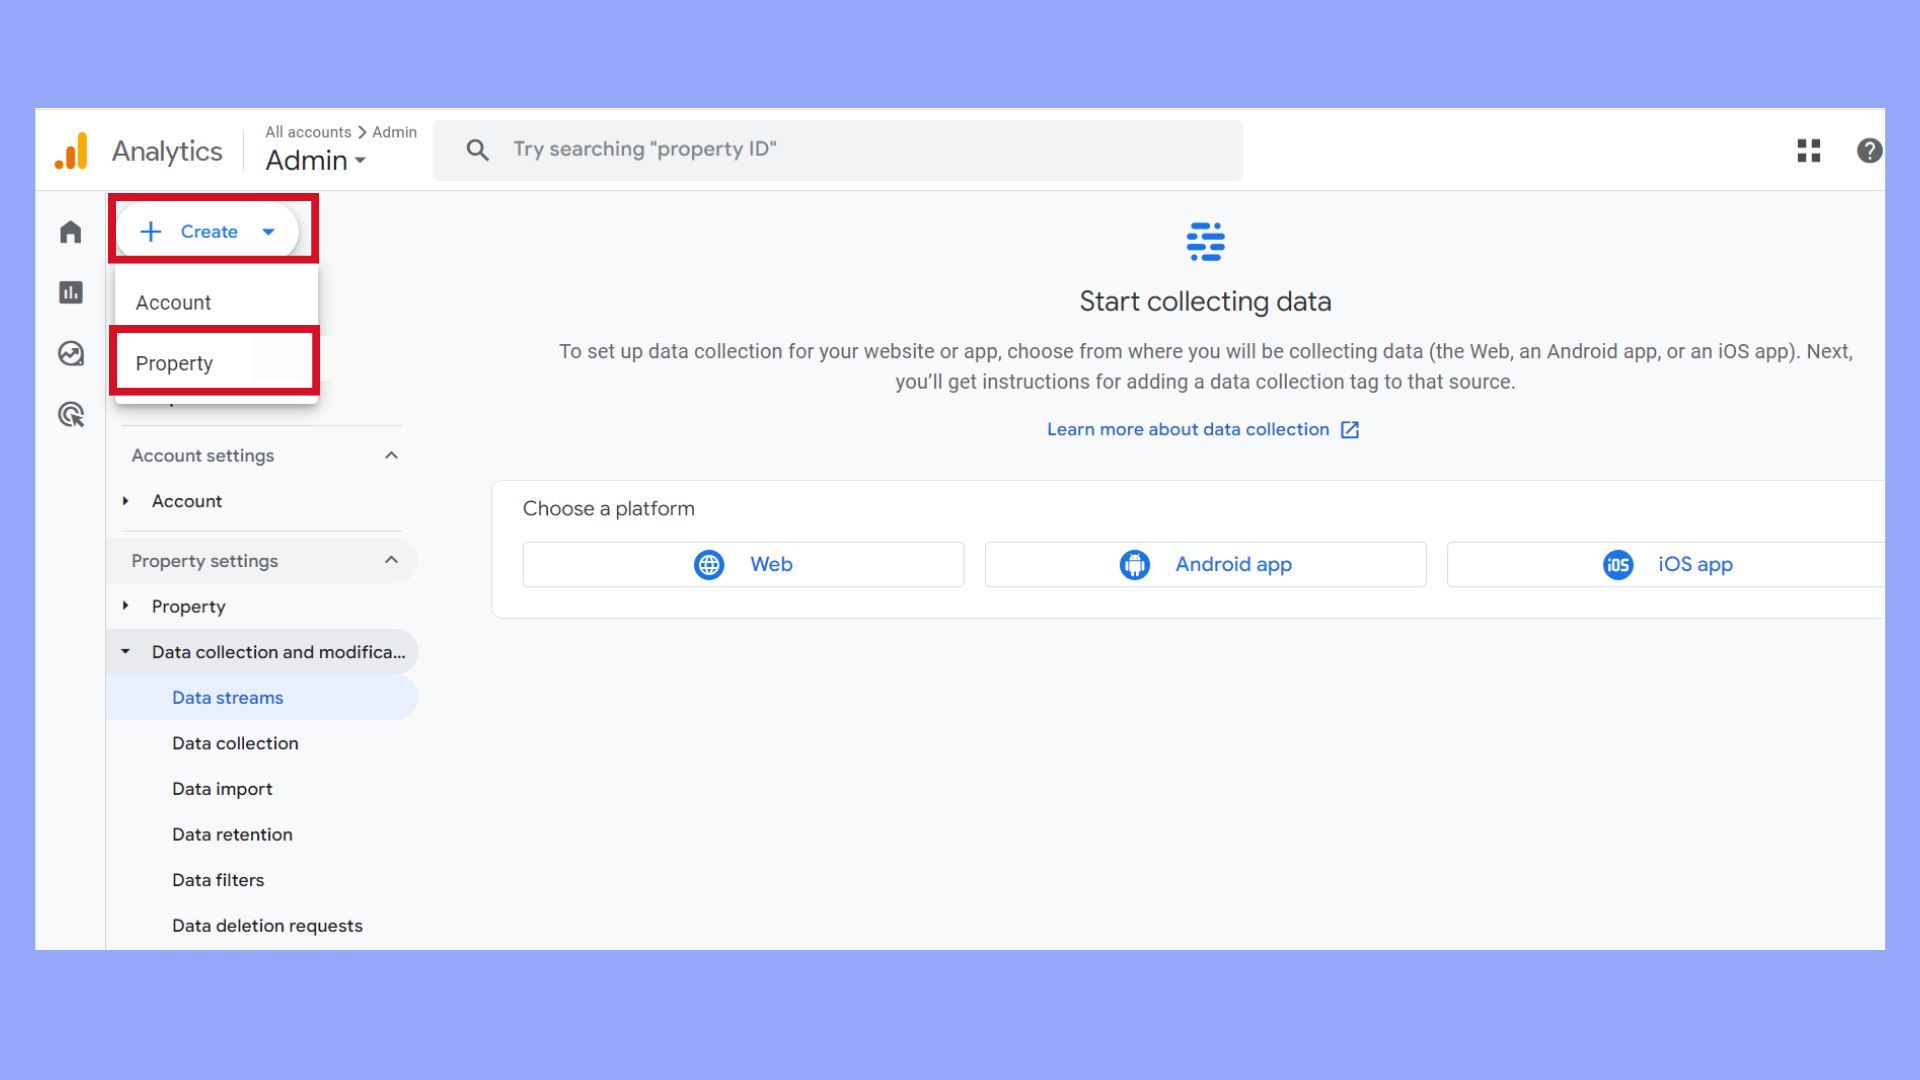
- Go to the Admin section and select Create Property.

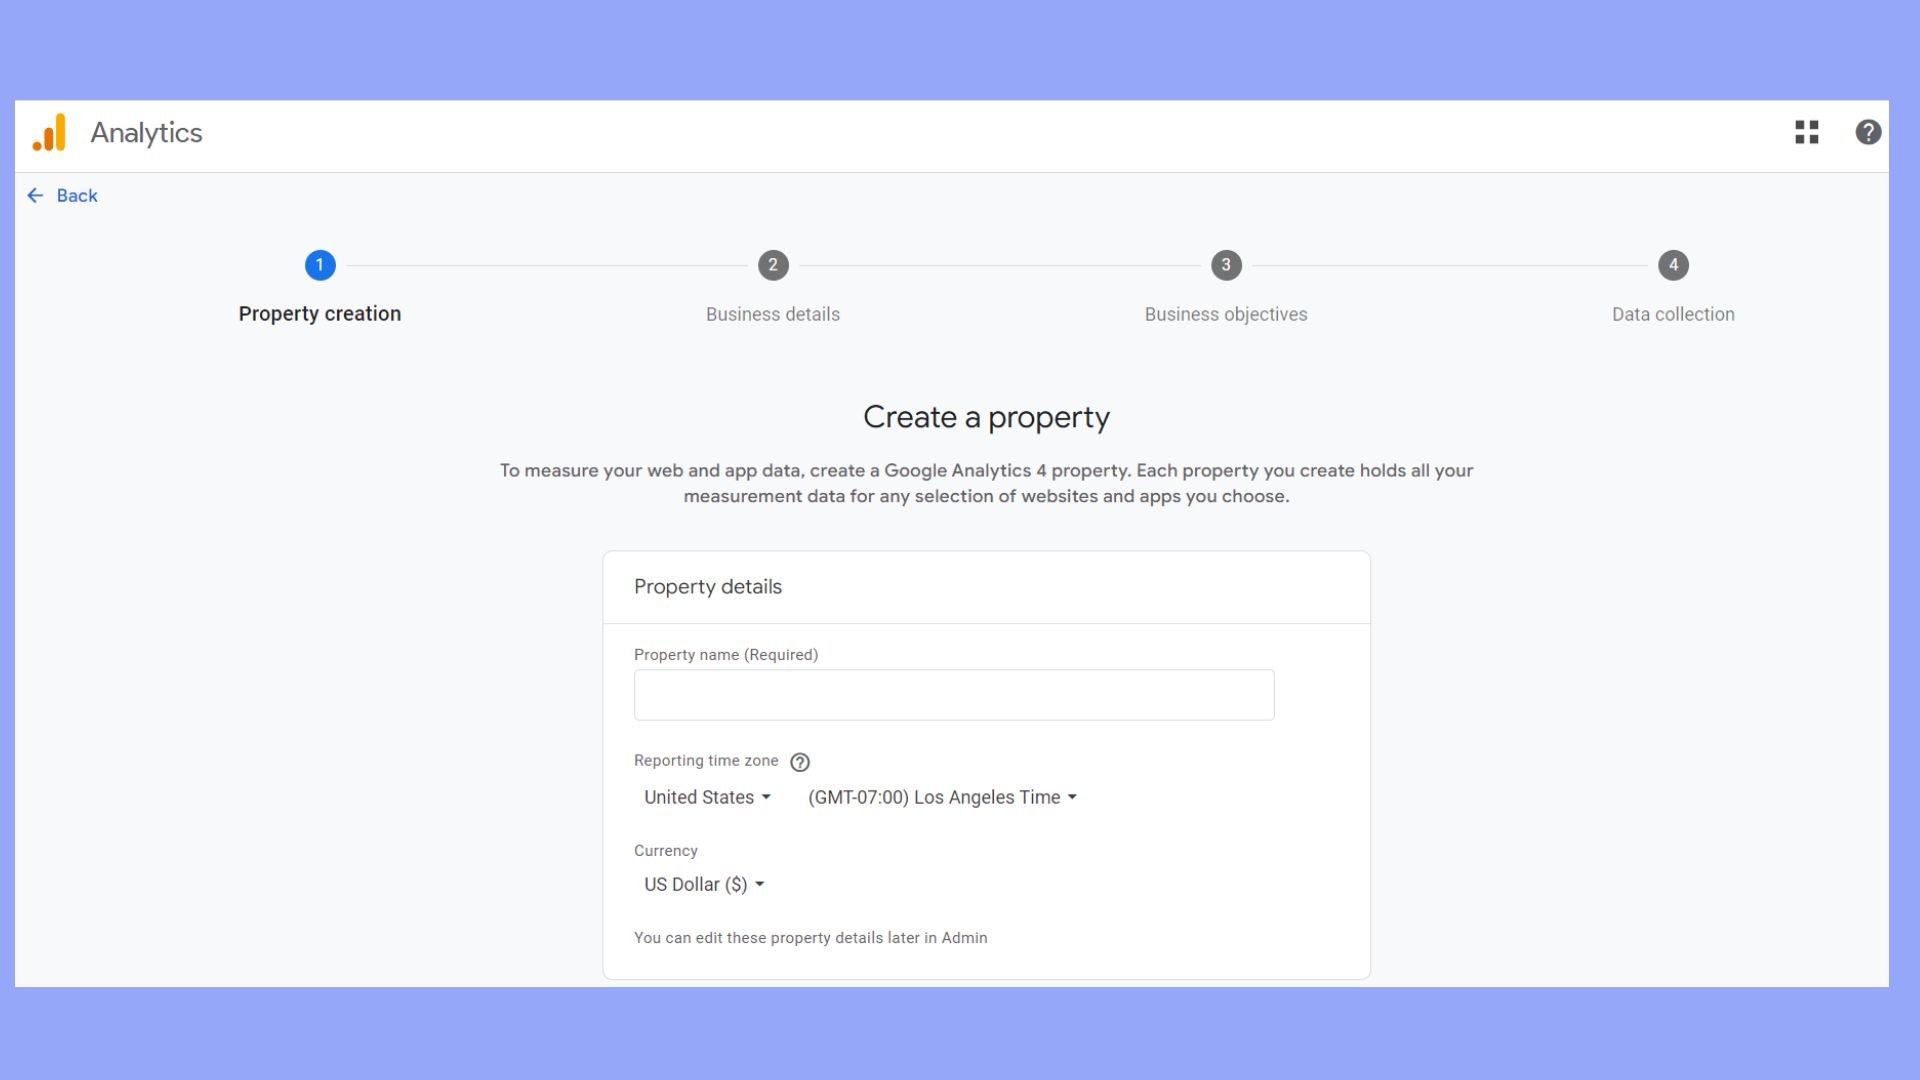
- Enter your website name and URL.

- Choose your website’s industry, category, and reporting time zone.
- Specify the currency to use for financial data reporting.
- Follow the instructions to get your tracking code to insert into your WooCommerce website.
This tracking code is essential for the integration process and allows Google Analytics to start gathering data on how users are interacting with your WooCommerce site. With this setup process complete, you can move forward with linking Google Analytics to your online store and gaining valuable insights into your customers’ behaviors.

Looking to sell online?
Create your custom online store in minutes with 10Web AI Ecommerce Website Builder and take your business online.
How to add Google Analytics to WooCommerce
Integrating Google Analytics with your WooCommerce store can greatly enhance your understanding of customer behavior and help increase your sales. With the right tools and steps, you can easily add detailed tracking data to your dashboard.
There are two primary methods to add Google Analytics to your website: using a plugin or manually embedding the tracking code. The plugin method simplifies the process and requires no coding, while the manual method provides more customization options for those comfortable editing their site’s HTML.
Method 1: Integrating Google Analytics with plugins
Adding Google Analytics to your WooCommerce store can be efficiently accomplished using a plugin method. In this section you will learn how to integrate Google Analytics with WooCommerce using a plugin. This method simplifies the process, eliminating the need for manual code insertion and offering advanced tracking options tailored to ecommerce.
Step 1. Choose the right Google Analytics plugin
Selecting the appropriate plugin is essential for a seamless integration of Google Analytics with WooCommerce. There are several options available, including the free Google Analytics for WordPress by MonsterInsights or WooCommerce Google Analytics Integration, and premium solutions like WooCommerce Google Analytics Pro. Each offers different features to match your business needs, so assessing each plugin’s capabilities against your requirements is key.
- Visit the WordPress plugin repository or the official WooCommerce marketplace.
- Search for Google Analytics plugins that are compatible with WooCommerce.
- Read the reviews and feature lists to ensure the plugin satisfies your specific tracking goals.
Step 2. Installing the plugin on WordPress
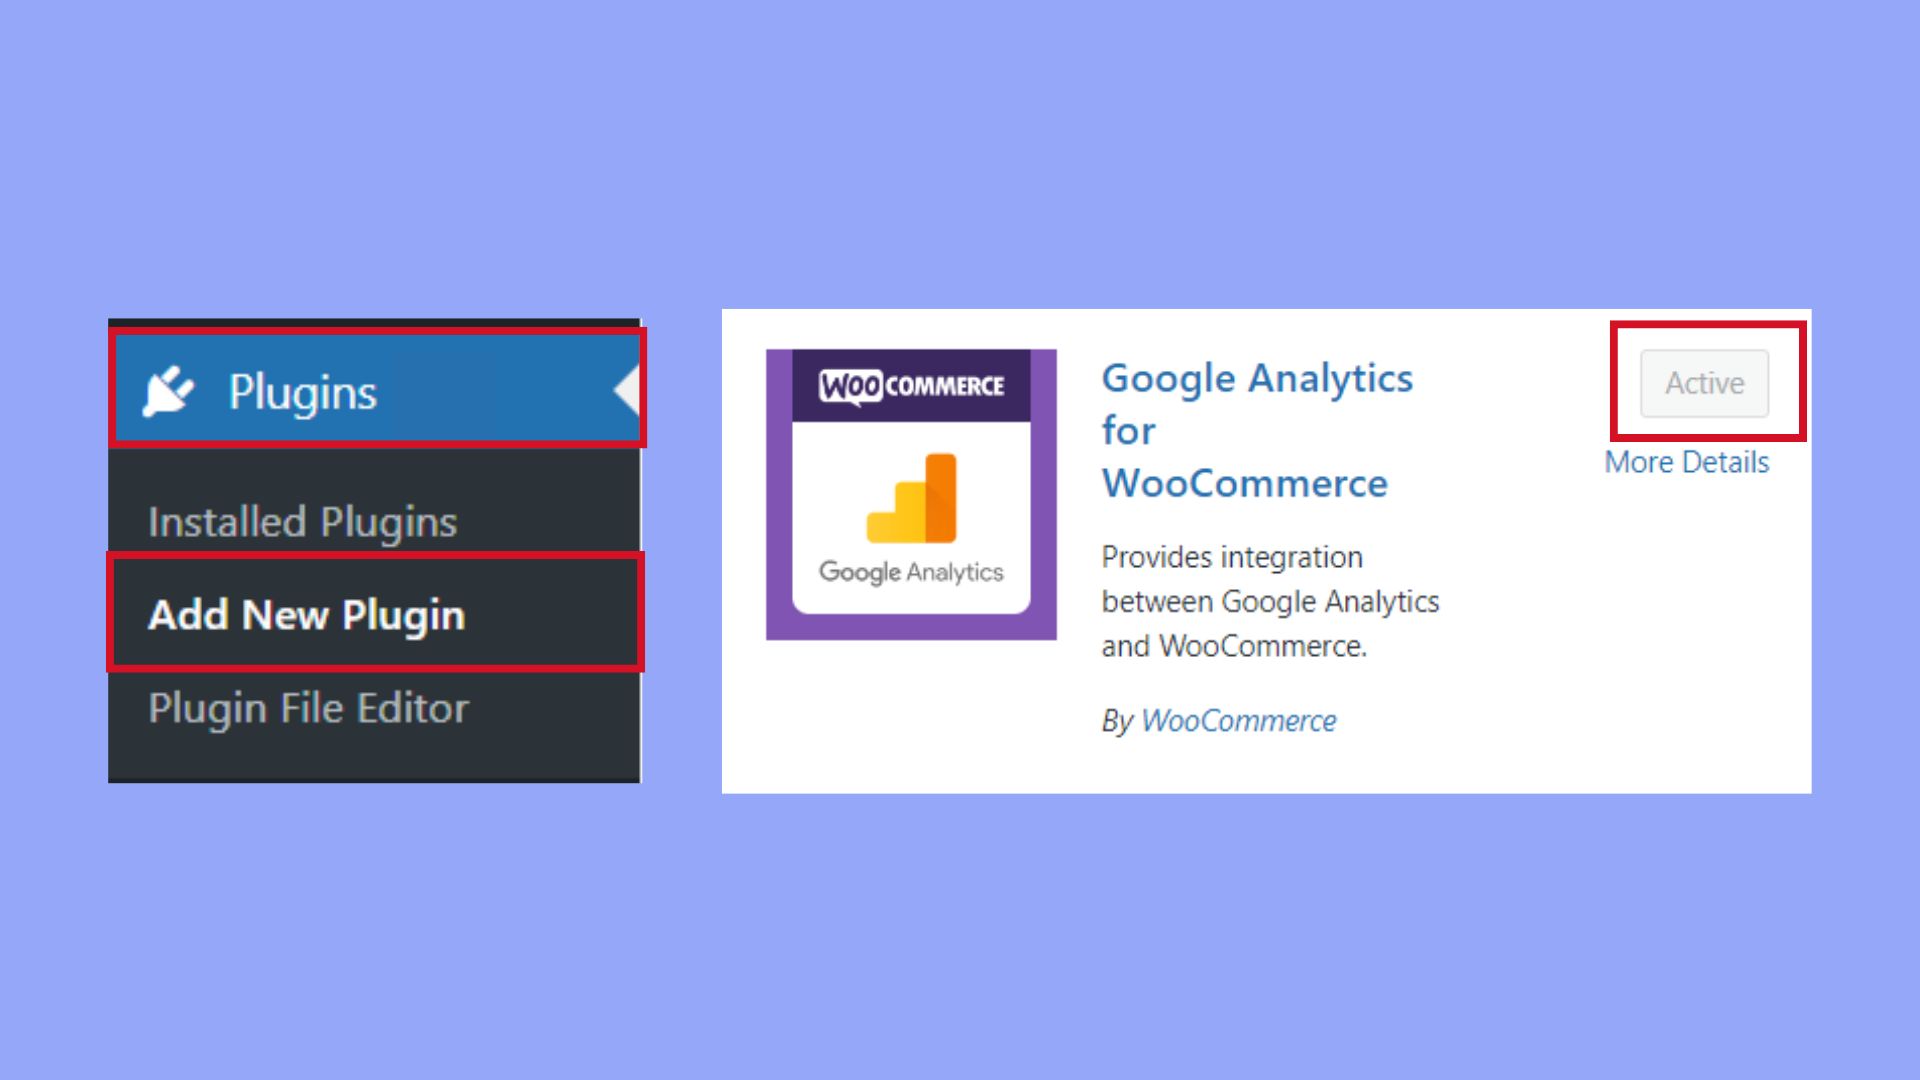
Once you’ve chosen a plugin, the next step is to install and activate it on your site.
- Log in to your WordPress dashboard.
- Navigate to Plugins and select Add New.
- Use the search bar to find the plugin you decided on.
- Click Install Now on your chosen Google Analytics plugin.
- When the installation is complete, press Activate to enable the plugin on your WordPress site.

Step 3. Setting up WooCommerce Google Analytics integration
The final step involves configuring the plugin to start tracking your WooCommerce store’s data accurately.
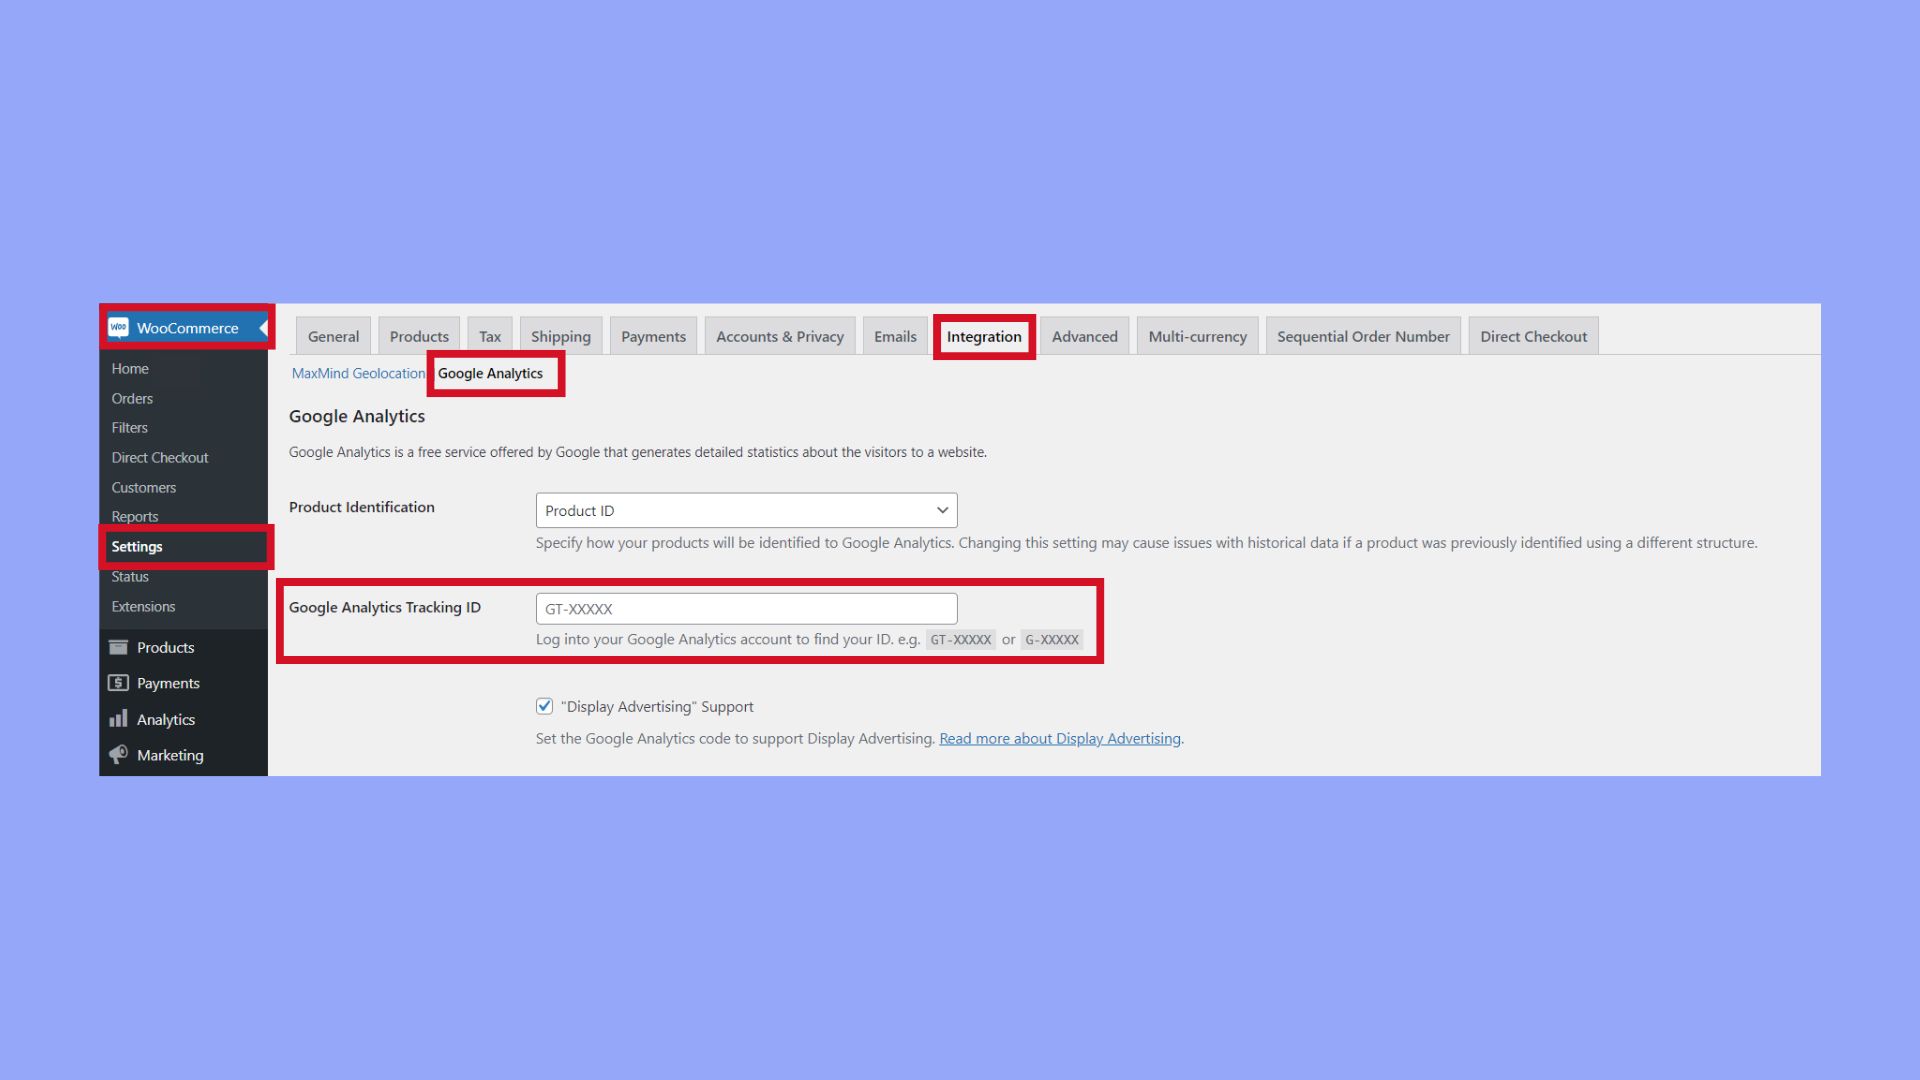
- After activation, head over to WooCommerce > Settings in your WordPress sidebar.
- Click on the Integration tab or similar, which could be specific to the plugin you installed.
- Enter your Google Analytics Tracking ID; this can typically be found in your Google Analytics account under the Admin settings.

- Configure additional settings according to the plugin’s documentation to match your tracking preferences, such as enabling enhanced ecommerce features.
- Save your changes, and your store should now be sending data to Google Analytics.
By following these steps, you’ll have a powerful analytics tool at your disposal, providing valuable insights into your WooCommerce store’s performance.
Step 4. Customizing advanced tracking features
You can configure analytics tracking settings further by customizing advanced tracking options to suit your needs.
- Inside your WooCommerce integrations settings, you’ll find several options to tweak your data collection.
- Enable Use Global Site Tag (gtag.js) if you are transitioning to or setting up a Google Analytics 4 property.
- Configure additional settings such as Set Domain, Track User ID, and other advanced features according to your needs.
- Remember to click the Save changes button after making any modifications to apply your custom settings.
Using these configurations, you can tailor how to add Google Analytics to WooCommerce to better fit your store’s specific analytics objectives.

Looking to sell online?
Create your custom online store in minutes with 10Web AI Ecommerce Website Builder and take your business online.
Method 2: Manual integration of Google Analytics
Incorporating Google Analytics into your WooCommerce website by hand involves inserting the tracking code into your theme files. This guide will walk you through adding Google Analytics manually, ensuring you can track valuable data about your store’s visitors and their behavior.
Editing the header.php file
To integrate Google Analytics manually, you must insert the tracking code provided by Google Analytics into the `header.php` file of your theme. Follow these steps:
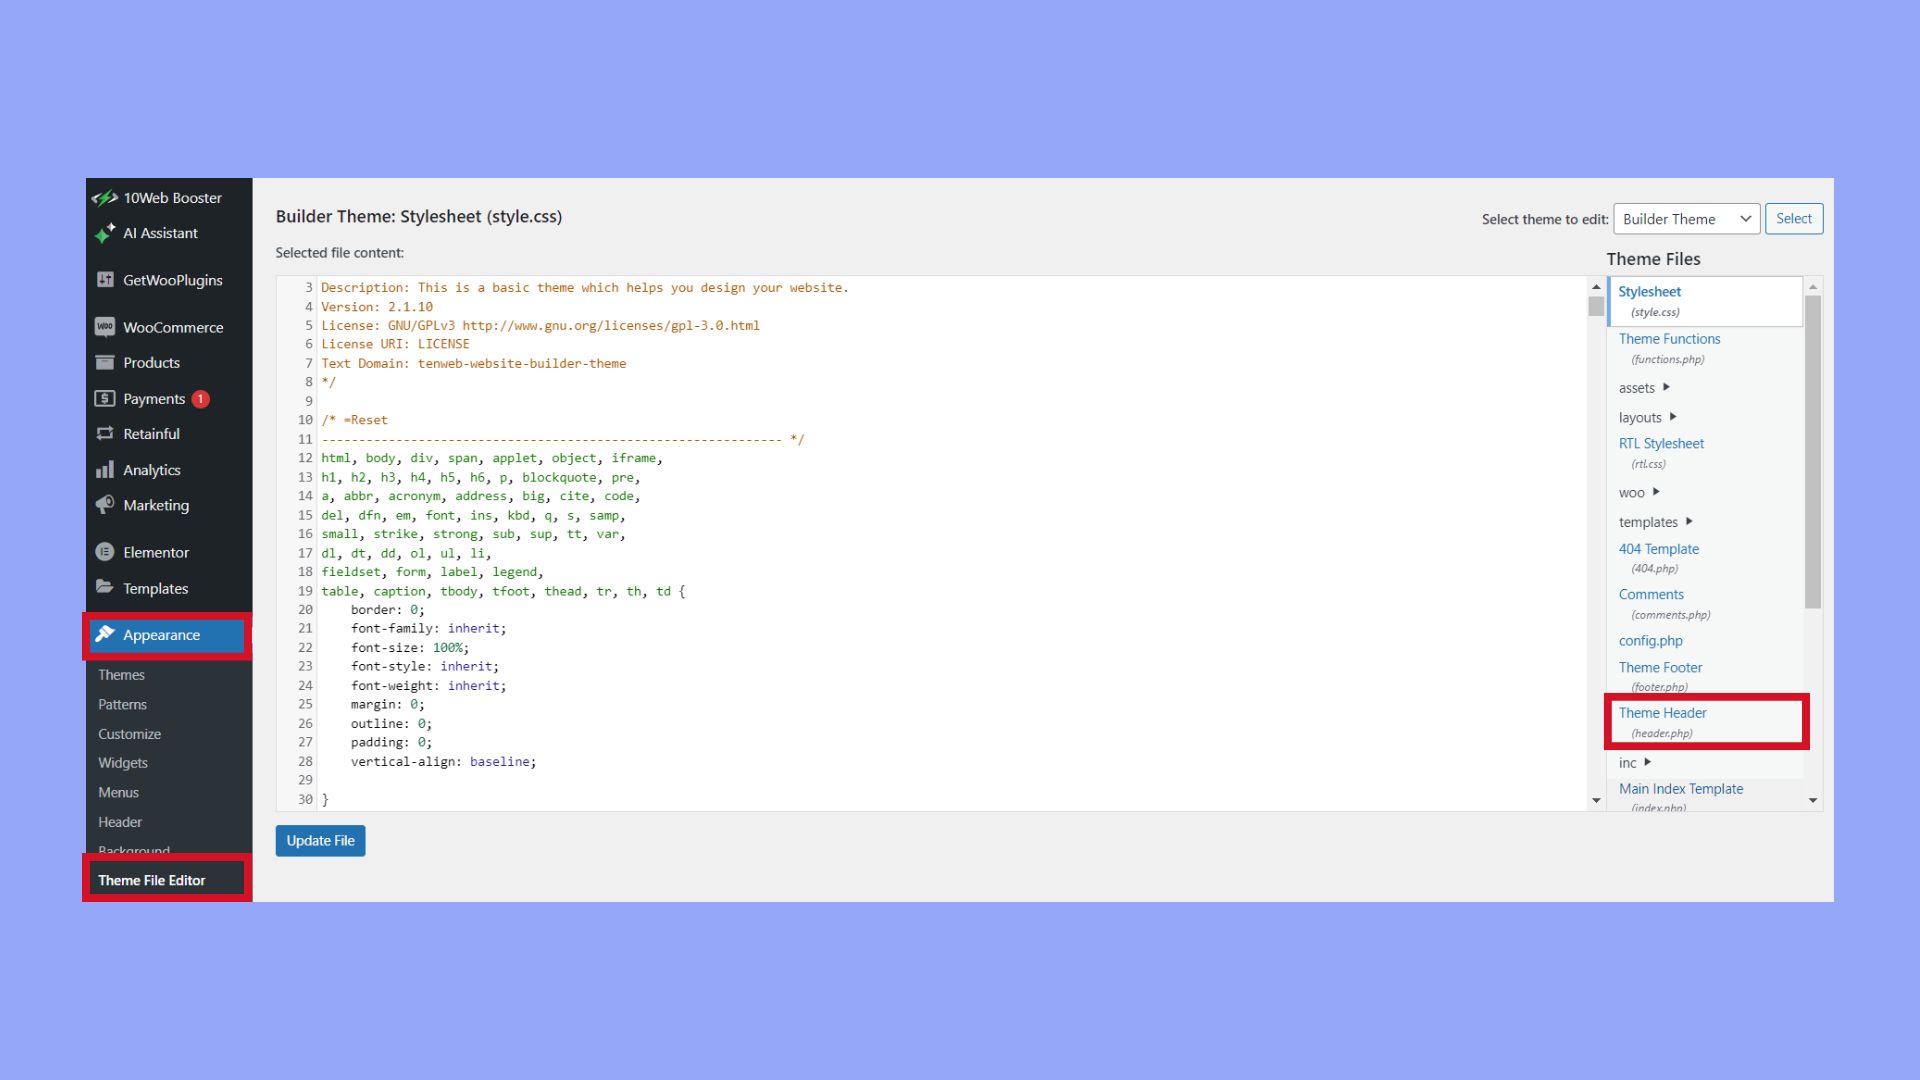
- Go to your WordPress dashboard.
- Navigate to Appearance > Theme Editor.
- Find the `header.php` file on the right-hand side and click to edit it.

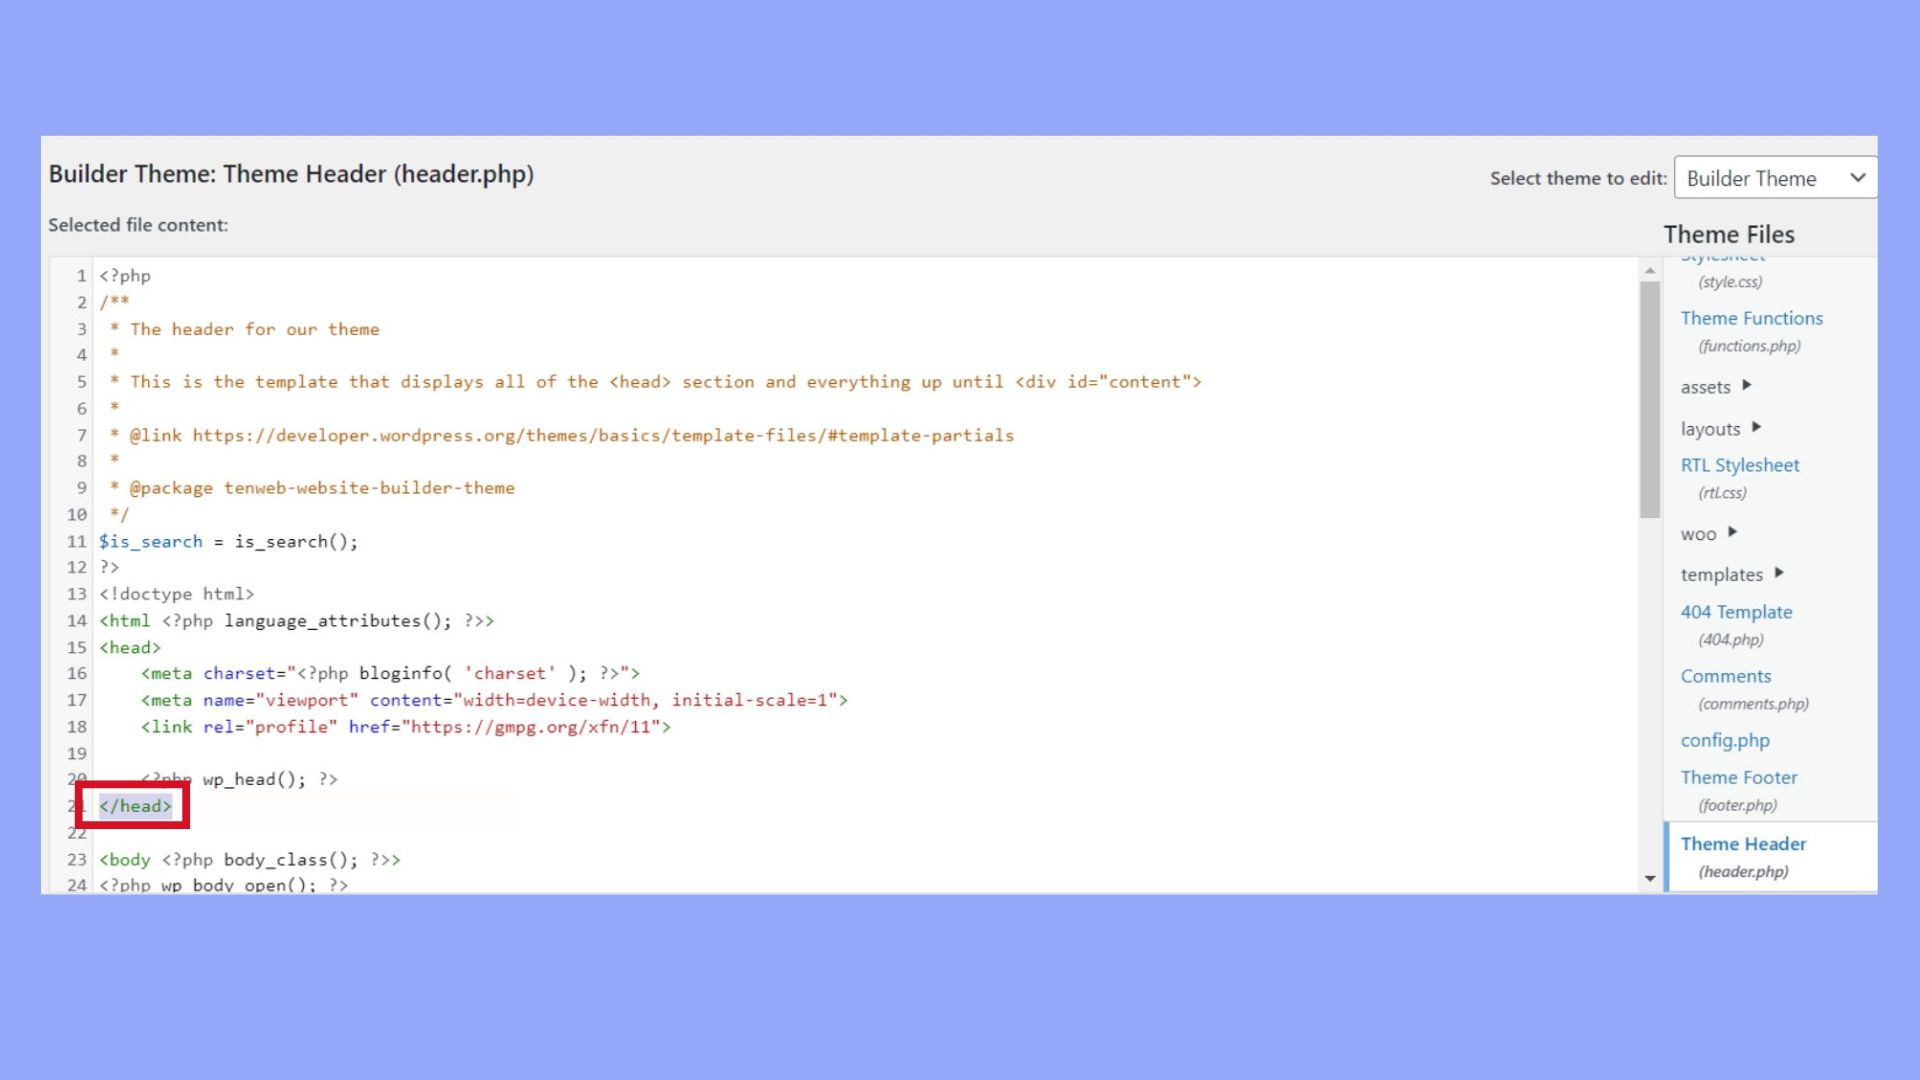
- Paste your Google Analytics tracking code just before the `</head>` tag.

- Click the Update File button to save your changes.
Note that if you update or change your theme, you will need to re-add the code as it’s specific to the theme files.
Using functions.php file
Alternatively, you can add the tracking code to your theme’s `functions.php` file. This method ensures the tracking code remains active even if you change your theme’s `header.php` file:
- Go to your WordPress dashboard.
- Navigate to Appearance > Theme Editor.
- Find the `functions.php` file on the right-hand side and click to edit it.
- Add the following snippet to the file:
```php
function add_googleanalytics() { ?>
<!-- Google Analytics tracking code -->
<script>
// Your Google Analytics tracking code here
</script>
<?php }
add_action('wp_head', 'add_googleanalytics');
```
Replace // Your Google Analytics tracking code here with your actual Google Analytics tracking code.
By following these steps, you can manually add Google Analytics to your WooCommerce website, allowing you to gather and analyze valuable data to improve your store’s performance.
Understanding and utilizing analytics data
When you add Google Analytics to WooCommerce, you’ll gain valuable insights through a range of data and reports. Understanding these details helps you optimize your online store for better performance.
Analyzing customer and visitor data
Gathering and examining your visitors’ data is the first step in making use of your site’s analytics. Reports in your dashboard will show pageviews, traffic sources, and visitor demographics. Look at:
- Where your customers are coming from, geographically and digitally.
- The most viewed products to understand popular items or trends.
By paying attention to these metrics, you tailor your marketing and stock more effectively.
Evaluating product and purchase transactions
Your product performance and purchase transactions provide a clear picture of your sales health. Consider:
- Which products have the highest conversion rates, indicating strong customer interest or effective promotion.
- Transaction reports revealing top-selling products and potential areas for additional sales or marketing efforts.
These reports help you focus on what’s working and adjust what isn’t to boost your sales.
Improving website by tracking conversions and checkout behavior
Your checkout behavior plays a crucial role in understanding how users interact with your purchasing process. Monitor your conversions to enhance the user experience. Here’s what to look for:
- Identify any common drop-off points in the checkout process to pinpoint areas for improvement.
- Use conversion rate data to track the effectiveness of changes you make.
By analyzing this data, you can refine your checkout process to reduce cart abandonment and increase conversions.

Looking to sell online?
Create your custom online store in minutes with 10Web AI Ecommerce Website Builder and take your business online.
Enhancing ecommerce analytics with additional tools and plugins
When diving into ecommerce analytics for your WooCommerce store, leveraging various tools and plugins can significantly improve your data analysis capabilities. These additions can help you track user behavior with precision and gain deeper business insights.
Integrating with Google Tag Manager for finer control
Integrating Google Tag Manager with your WooCommerce store allows for more granular control over tracking codes and analytics. With this tool, you can implement and update your tags for tracking, analysis, and more without altering the codebase.
- Sign up for Google Tag Manager and create a new container for your WooCommerce store.
- Install the Google Tag Manager for WordPress plugin from your dashboard.
- Activate the plugin and configure it by adding your container ID in the plugin settings.
- Use the Tag Manager interface to set up and manage tags for enhanced ecommerce reporting.
Boldly using this tool will fine-tune your tracking and data collection, yielding actionable insights for your online storefront.
Setting up ecommerce events and conversion tracking
Tracking ecommerce events and conversions gives you insights into the user journey and ultimately helps in understanding customer behavior.
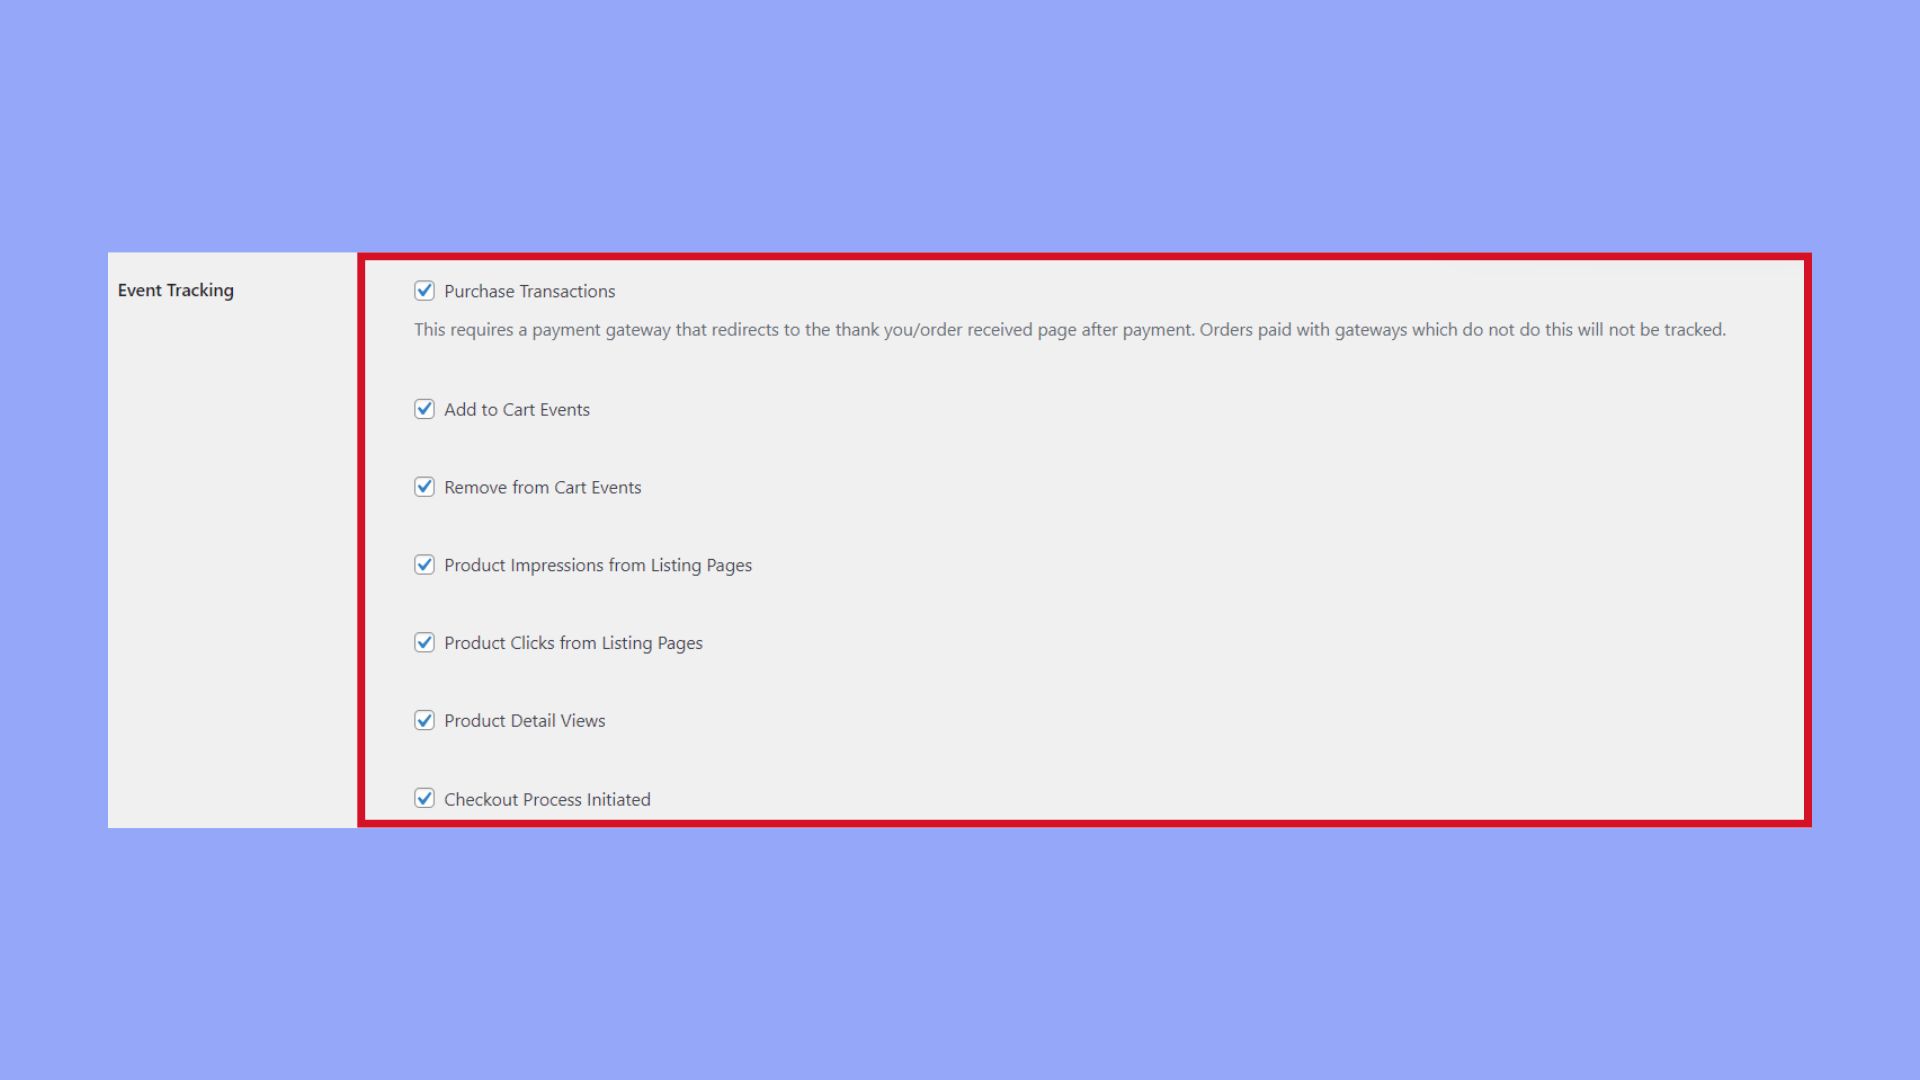
- Ensure you’ve installed the WooCommerce Google Analytics Integration plugin.
- In your WordPress dashboard, navigate to WooCommerce and choose Settings.
- Within the settings, head to the Integration tab.
- Scroll down to find Google Analytics and make sure both appropriate sections are checked.

- Save your settings and wait for data collection to begin.
By following these steps on how to add Google Analytics to WooCommerce, you’ve now set up a robust analytics platform that will provide a wealth of information about how users interact with your online store.
Conclusion
In conclusion, adding Google Analytics to your WooCommerce site is essential for tracking user behavior, conversion rates, and marketing effectiveness. By understanding how to add Google Analytics to WooCommerce through either the plugin method or manual integration, you now can make data-driven decisions to enhance your online store’s performance. This setup empowers you to monitor site traffic, optimize the user experience, and ultimately boost sales and customer satisfaction. With these tools at your disposal, your ecommerce site is well-positioned for continuous improvement and success.


