Product filters are vital in ecommerce, enhancing user experience by efficiently narrowing search results, which in turn, can boost sales and reduce bounce rates. Adding product filters in WooCommerce—ranging from price to brand—allow customers to swiftly locate desired items, often uncovering products that might otherwise remain hidden. Additionally, these filters contribute to better SEO, creating targeted landing pages that attract more specific traffic. This blog outlines the benefits and types of product filters and provides initial steps on setting them up in WooCommerce, setting the stage for a detailed exploration of their implementation and optimization.
FAQ
How do I add a product filter in WooCommerce without plugins?
How do I add a filter order in WooCommerce?
How do I filter by product attributes in WooCommerce?
How do I add a category filter in WooCommerce?
Benefits of product filters
Product filters streamline the shopping process by reducing the time spent searching for products. This is crucial for retaining customers and reducing bounce rates.
Filters help expose more of your inventory to shoppers, notably items that might otherwise be overlooked, thereby increasing the likelihood of sales.
Well-implemented product filters can lead to improved SEO as they help create more landing pages for specific search queries. Each filtered page can potentially rank for specific keywords related to the attributes, brands, or categories.
Create your custom online store in minutes with 10Web AI Ecommerce Website Builder and take your business online. 
Looking to sell online?
Overview of product filter types
Product filters in WooCommerce help users sift through products based on various criteria. Here are some common types:
Ajax filters: Allow users to apply filters without reloading the page, making the shopping experience quicker and smoother.
Price filters: Enable customers to view products within a specific price range.
Category filters: Help customers navigate through different categories of products, such as Men’s Clothing or Kitchen Appliances.
Attribute filters: These can include size, color, material, or any other custom attribute that a product might have.
Brand filters: Useful for stores carrying items from multiple brands, allowing users to shop by specific brands.
Setting up basic product filters in WooCommerce
Having effective product filters is key to enhancing the shopping experience on your WooCommerce site. By adding product filters, you enable customers to easily find the products they’re looking for.
Installing a product filter plugin
To begin, you’ll need to add the capability to filter products in your WooCommerce store, and installing a plugin is the quickest way to integrate this feature. For our purposes we will use the Husky Product Filter for WooCommerce.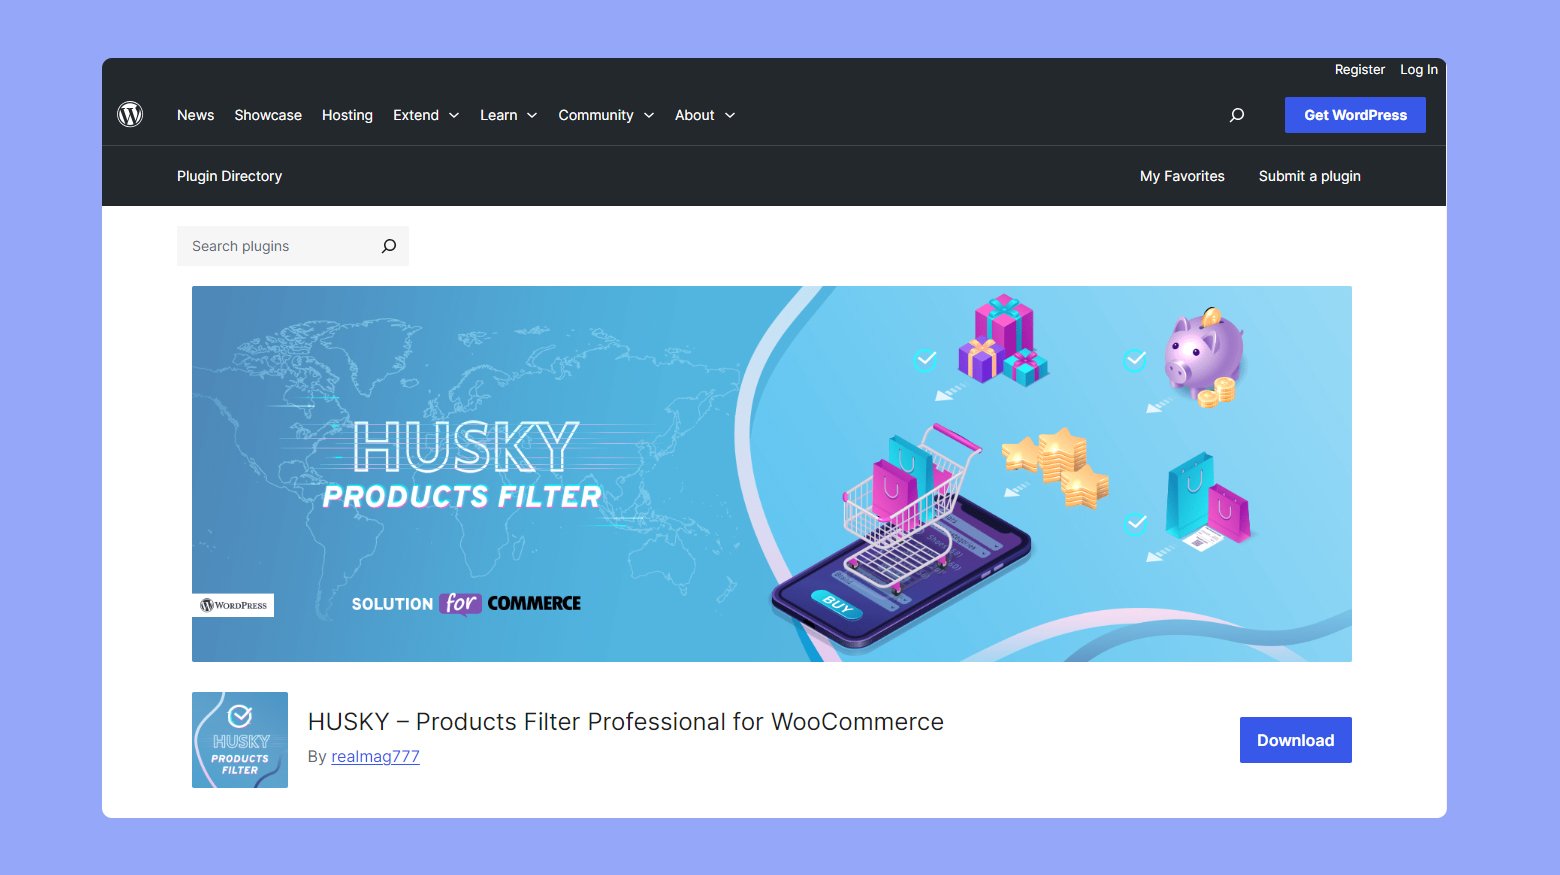
- Navigate to your WordPress dashboard and click on Plugins.
- Choose Add New and search for Husky Product Filter.
- Next click Install Now.
- After installation, make sure to click Activate to enable the plugin on your site.
Adding filters to WooCommerce pages
With your plugin activated, it’s time to add filters to your WooCommerce pages to improve product discoverability.
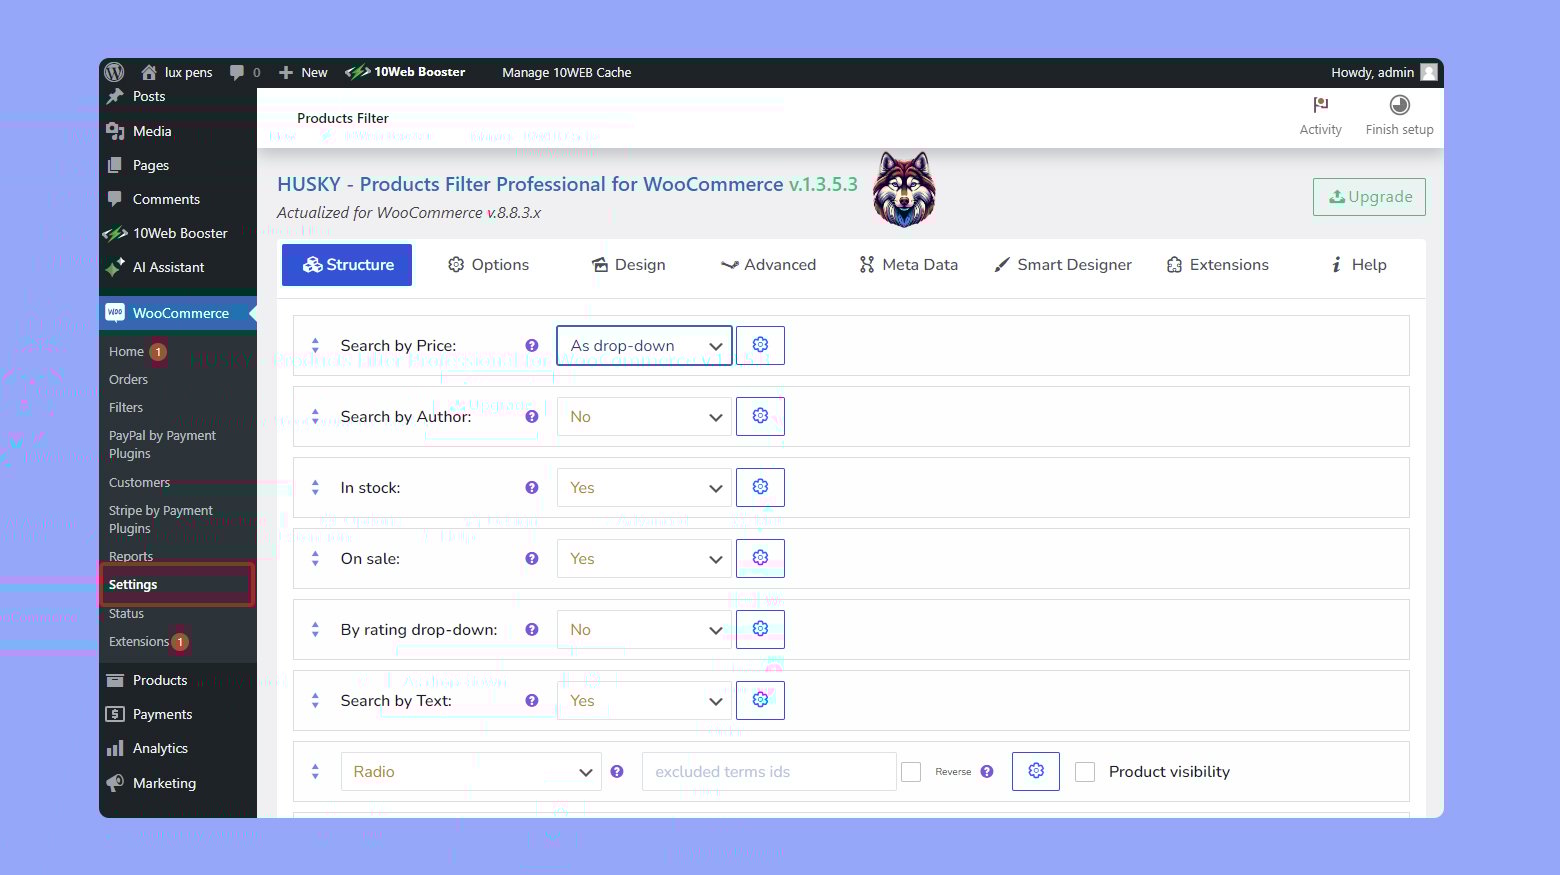
- Go to your WooCommerce dashboard and locate the menu item for the filter plugin you installed.
- Click on the plugin’s menu item, and you should see options to create new filter presets or widgets.
- Create a new filter or select a preset. You may need to name your filter, such as Filter by Category or Price Range, to make it clear what it filters.

- Configure your filter settings according to the options provided by the plugin.
- Save your new filter. Now, add your filter to your shop page or product category pages.
- Navigate to Appearance > Widgets in your WordPress dashboard.
- Add the filter widget provided by your plugin to the appropriate sidebar or widget area of your WooCommerce shop.

By following these steps, your customers will be able to sort and find the products they want with ease, providing them with a satisfying shopping experience.
Creating custom taxonomies for detailed filtering
Custom taxonomies allow you to create detailed categories for your products, which can be used for more sophisticated filtering options.
- Go to your WordPress dashboard and navigate to Products.
- Select Attributes to create new product attributes that reflect the specifics of your products, such as size, color, or material.
- Once you have created the attributes, add them to your products by editing each product individually and filling out the attributes section.
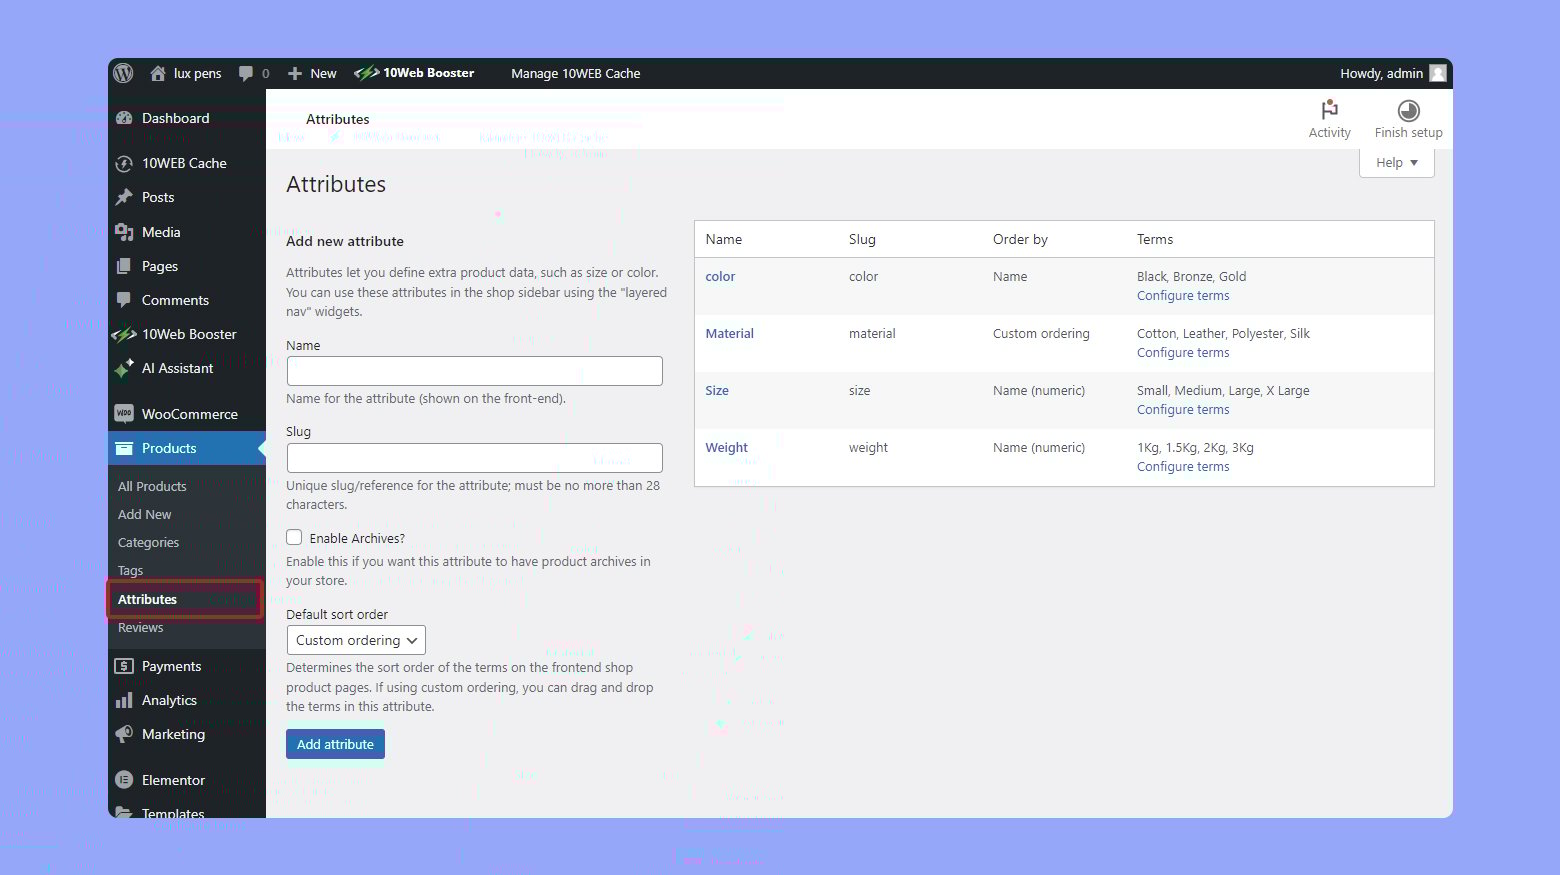
By using attributes and custom taxonomies, you can create tailor-made filtering solutions that can handle any variety of product options.
Create your custom online store in minutes with 10Web AI Ecommerce Website Builder and take your business online.
Looking to sell online?
10Web ecommerce solution
10Web’s ecommerce solution is designed to simplify the creation of online stores. This product integrates the backend power of WooCommerce with a user-friendly frontend, making it accessible even to users with minimal technical knowledge. Here’s an overview of the key features and benefits of 10Web’s ecommerce solution.
User-friendly templates and customization
One of the primary challenges in creating an ecommerce site is the availability of suitable templates. 10Web provides pre-configured store templates that are both easily editable and customizable. These templates come with additional widgets that allow users to tailor the design to their specific needs, ensuring that the end result matches their vision.
Simplified onboarding
The onboarding process for 10Web’s ecommerce solution is streamlined to guide users through the setup efficiently. Upon starting, users can choose between creating an ecommerce website or an informational one. This decision directs them to the appropriate setup flow, ensuring a customized experience from the outset.
Intuitive dashboard design
The dashboard design is intuitive and user-centric, offering a seamless experience for managing an online store. After users successfully upgrade to the Ecommerce plan, they will be redirected to the left menu main page. Here, they will find two tabs: Get Started and Overview. The Get Started page introduces users to the Ecommerce guide with five essential set-up steps:
Add business location – Because the 10Web ecommerce solution runs WooCommers as it’s backend, this information is fetched from the WooCommerce.
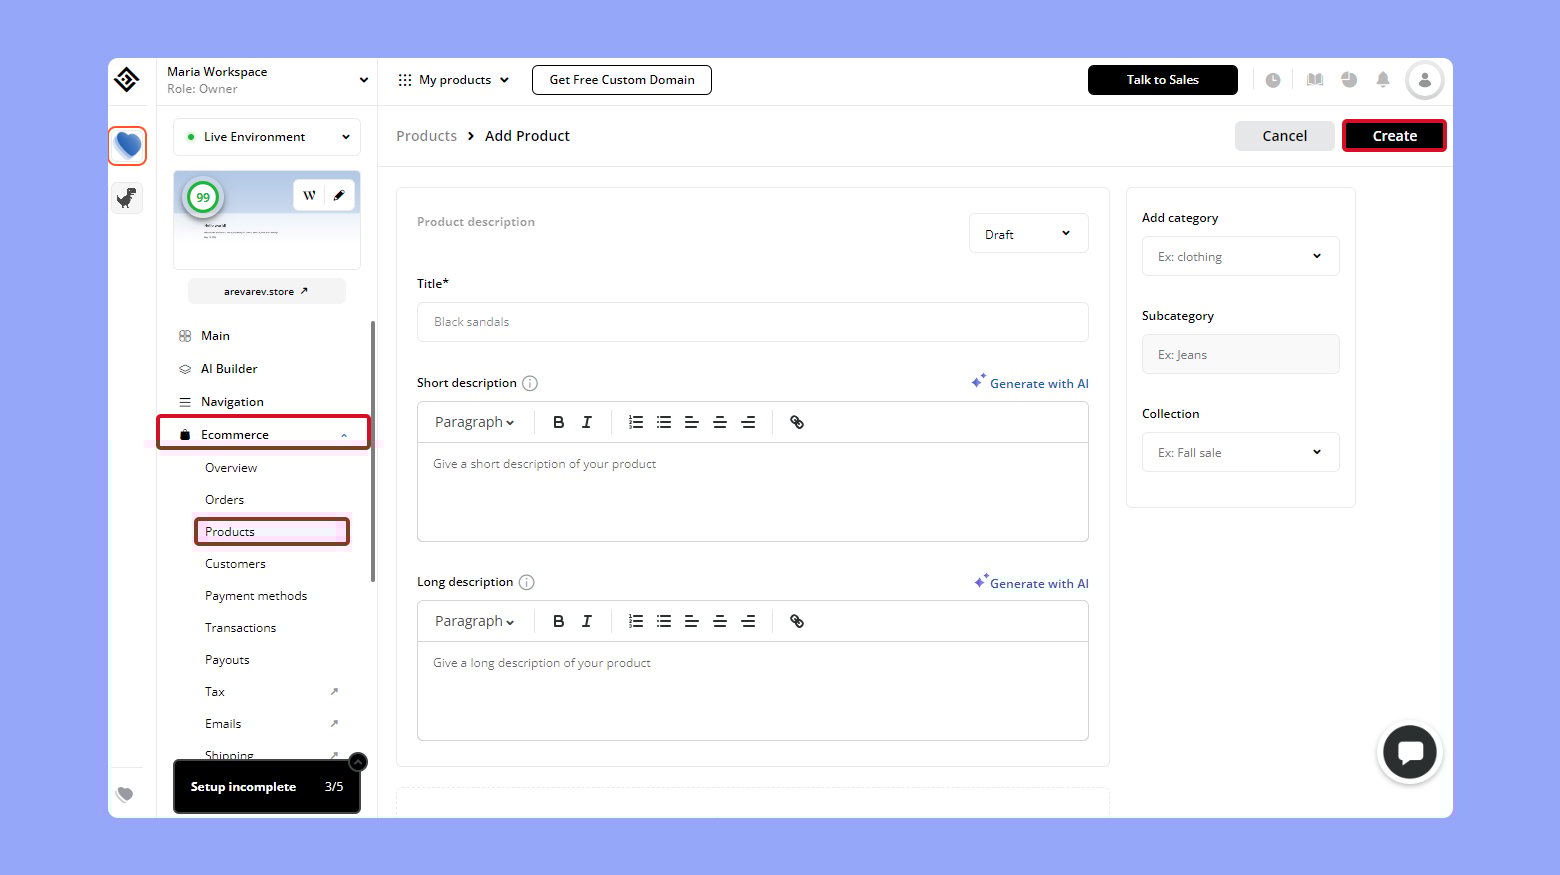
Add new product – Create a product by clicking the Add Product button. Once a product is created, this step is marked as done.
Edit your website – Clicking Edit takes users to the 10Web Builder page. Any changes made will mark this step as done.
Add your customer domain – Point your domain to complete this step.
Set up your payment – In the WooCommerce settings, under the Payment tab, users can activate Woo Payments. Completing the setup and enabling WooPayments will mark this step as done.
Ecommerce functionalities
Key ecommerce functionalities are organized under a dedicated menu, including sections for Orders, Products, Customers, Analytics, Marketing, Payment, Shipping, Tax, and Navigation. This organization ensures that users can easily manage all aspects of their online store from a single, user friendly interface. Below are the major aspects of the 10Web ecommerce solution and the actions you will be able to take from the 10Web dashboard.
Comprehensive product management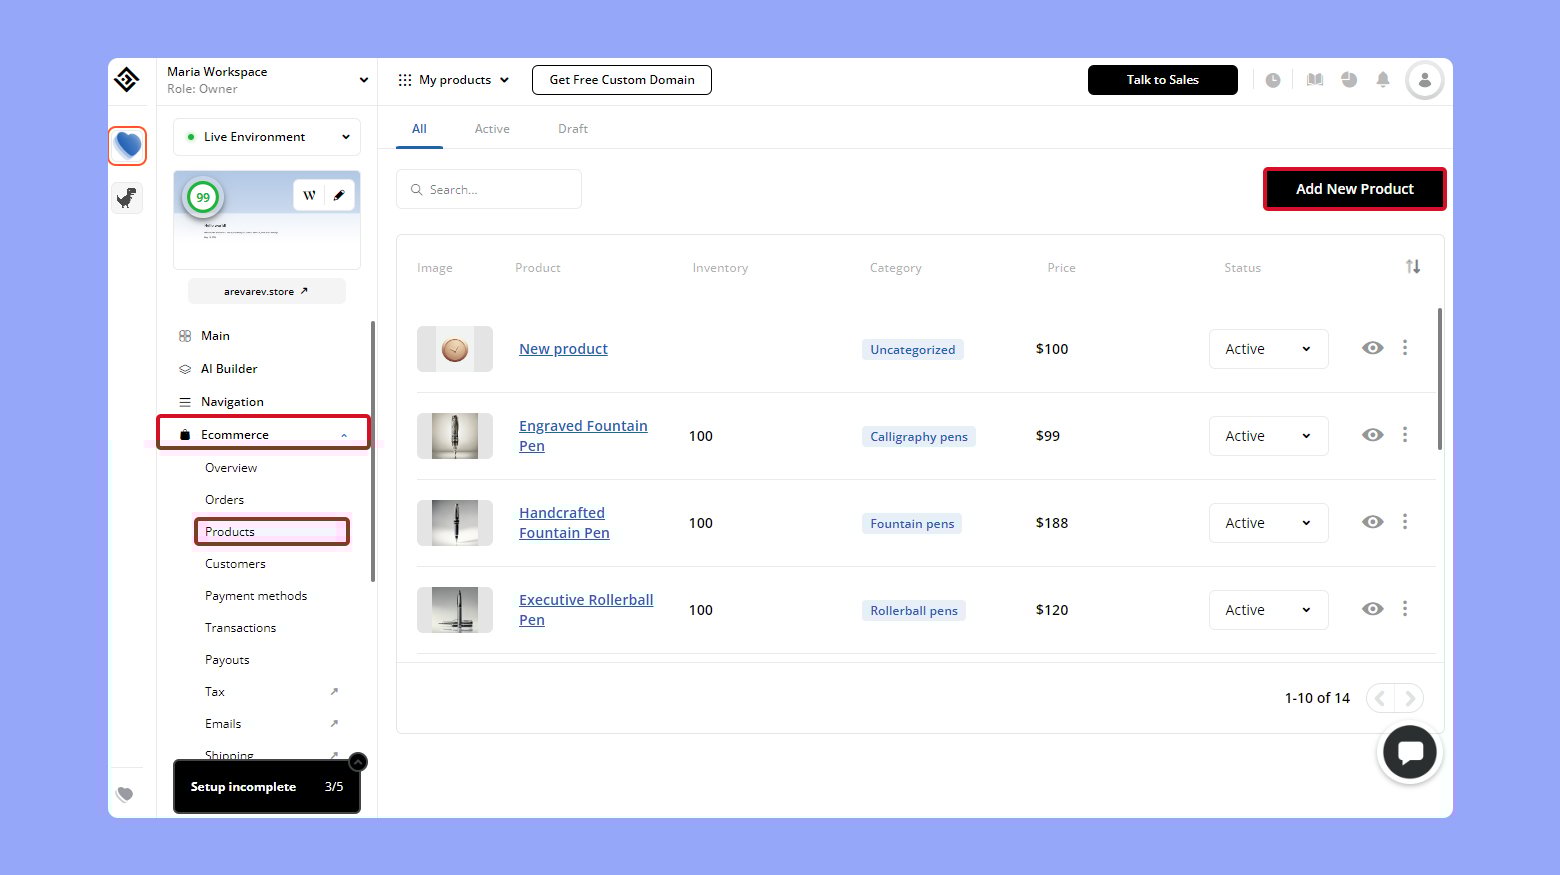
- Add, edit, and categorize products with ease.
- Include detailed product descriptions, media uploads, pricing variations, and inventory tracking.
- Link products to create upsell and cross-sell opportunities.
Order and customer tracking
- Robust tools for tracking orders and managing customer information.
- Monitor order statuses and payment details.
- Maintain customer records, including order history and total spend.
- Facilitates better customer service and effective marketing strategies.
Advanced analytics and marketing tools
- Track sales performance and identify trends.
- Integrated marketing tools for email campaigns, ad creation, and new customer acquisition channels.
- Designed to help users grow their business and increase revenue.
Seamless payment and shipping integration
- Support for popular payment options like PayPal, Stripe, Google Pay, and Apple Pay.
- The 10Web payment system, a stand alone feature, allows you to integrate all major payment methods on your store right from the 10Web dashboard.
- Define shipping zones and charges for accurate shipping costs and tax calculations.
- Integration with the Jetpack tax plugin for simplified tax management.
Creating product filters with 10Web
The 10Web ecommerce solution has integrated and simplified functionalities such as product filtering. If you are a 10Web user with an ecommerce website hosted on 10Web, you have the advantage of using these functionalities along with the 10Web builder, the drag and drop editor where you can create and customize your store. The 10Web product filter will be automatically installed when you create an ecommerce website.
To access the product filter functionality:
- Log in to your 10Web dashboard.
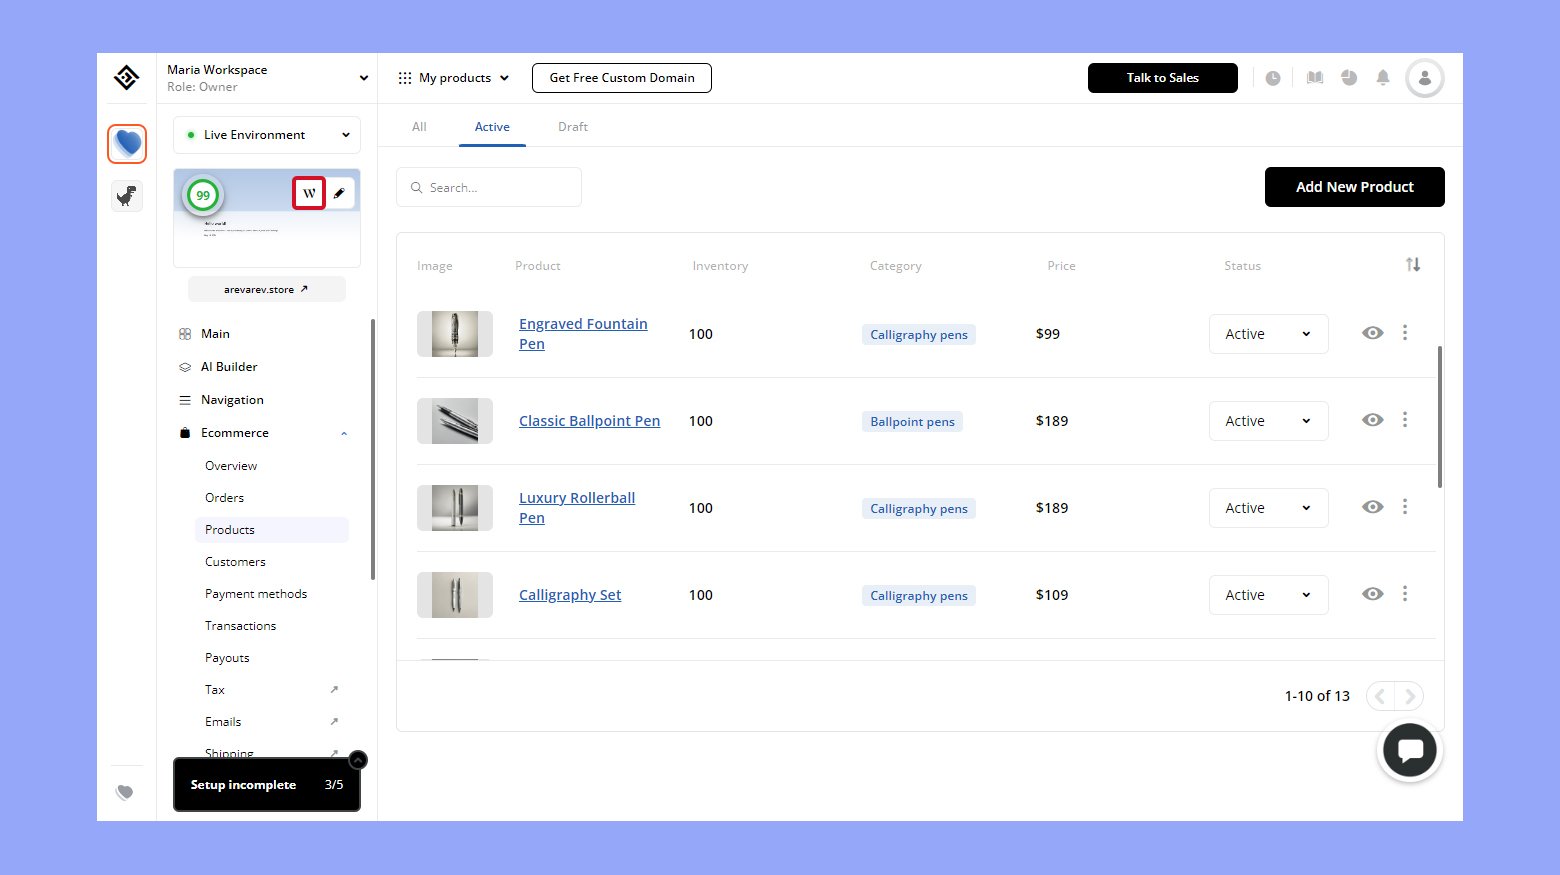
- Click on the website where you want to add/edit a filter.
- Click on the W icon to navigate to the WordPress admin page.
- Hover on WooCommerce and click Filter.
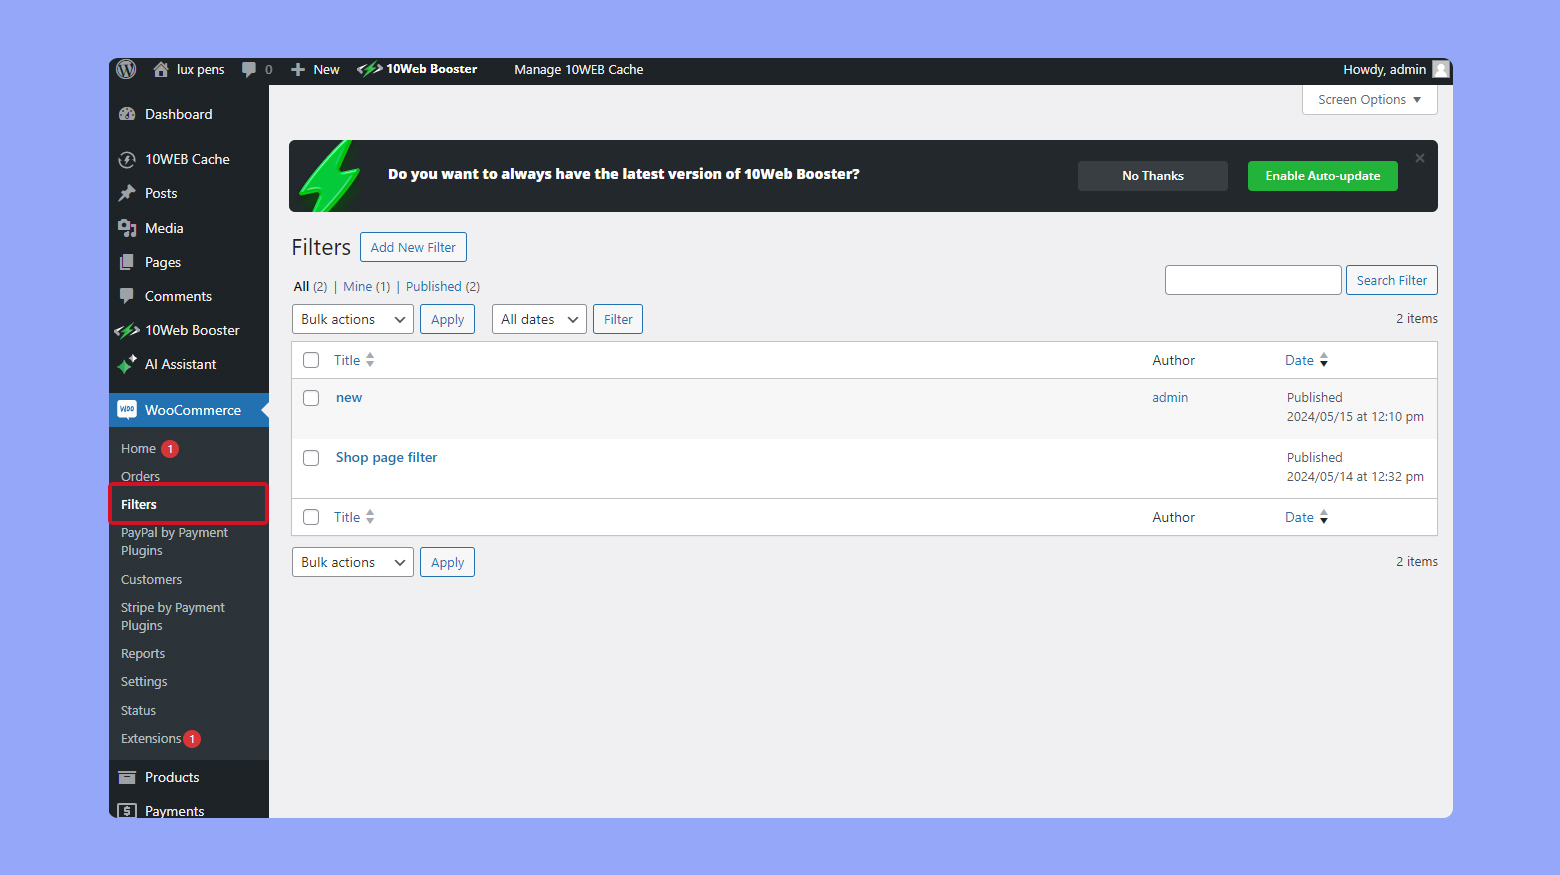
To create or edit a product filter:
- Click on an existing filter to edit it or click Add New to create a new filter. For the purpose of this article, we will add a new filter to our shop.
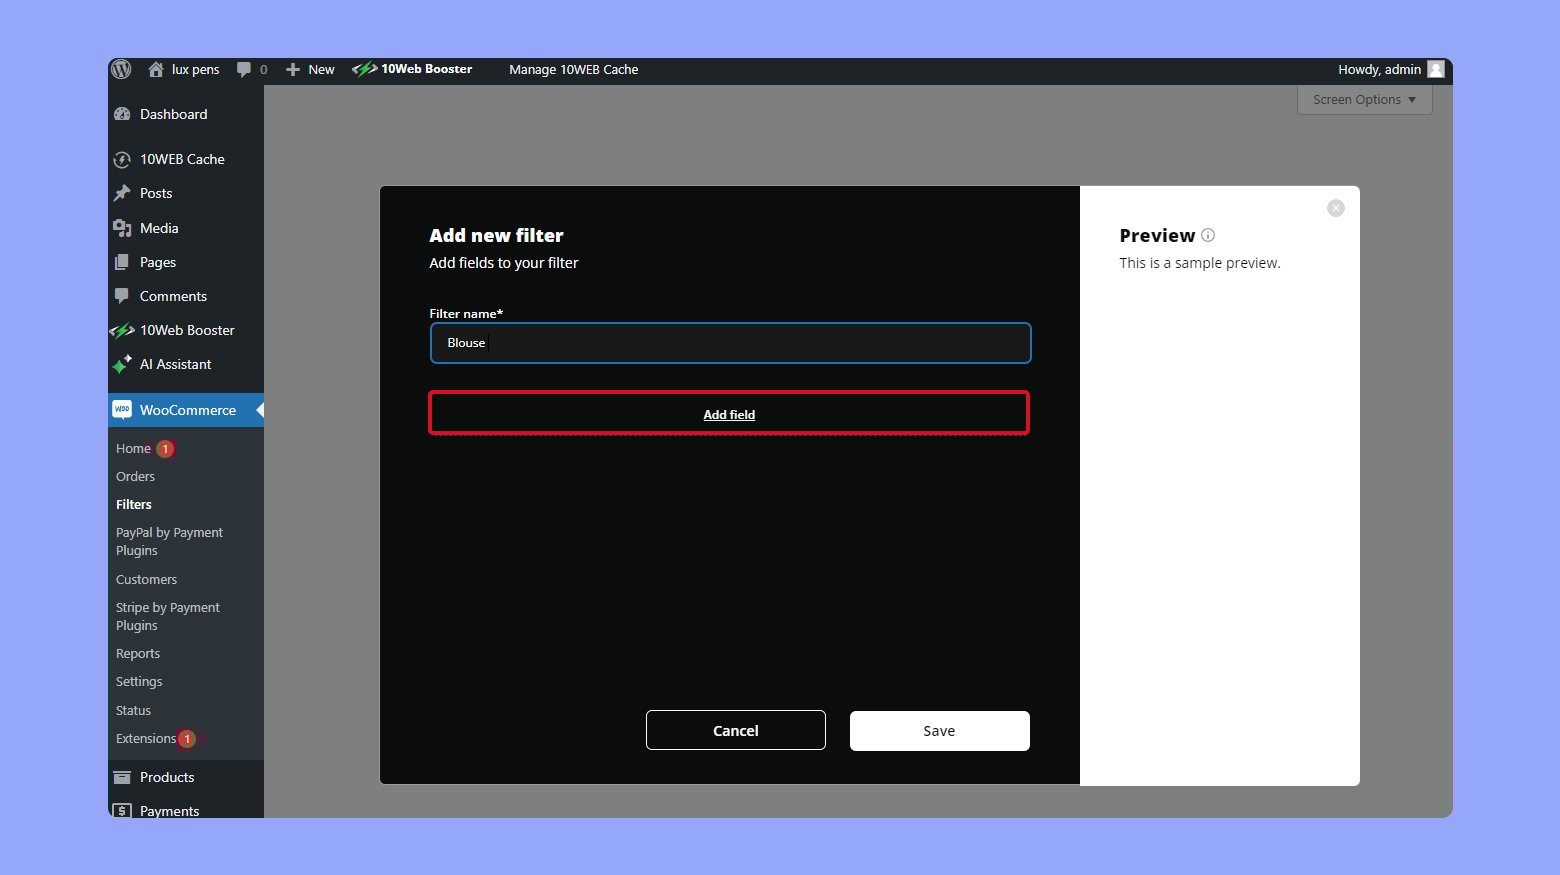
- In the add new window, enter the name of your filter.
- Click add field to add a filter.
- Choose the field type and click Next.
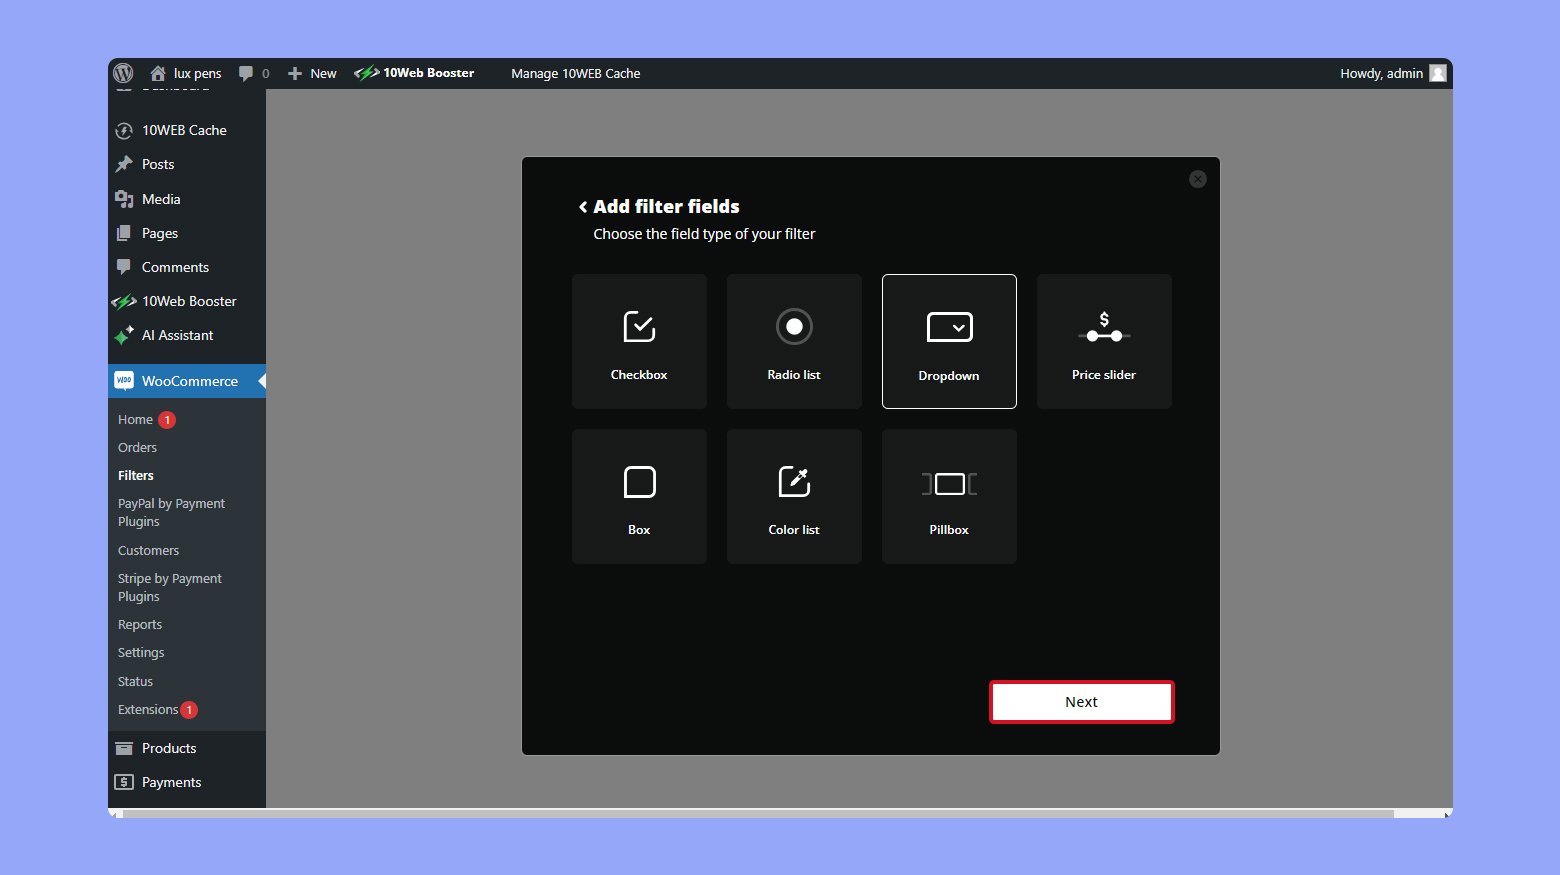
Checkbox field, Radio list, Drop down, Box, & Pill box
All of the above filter fields work in the same way. To add fields to your filter: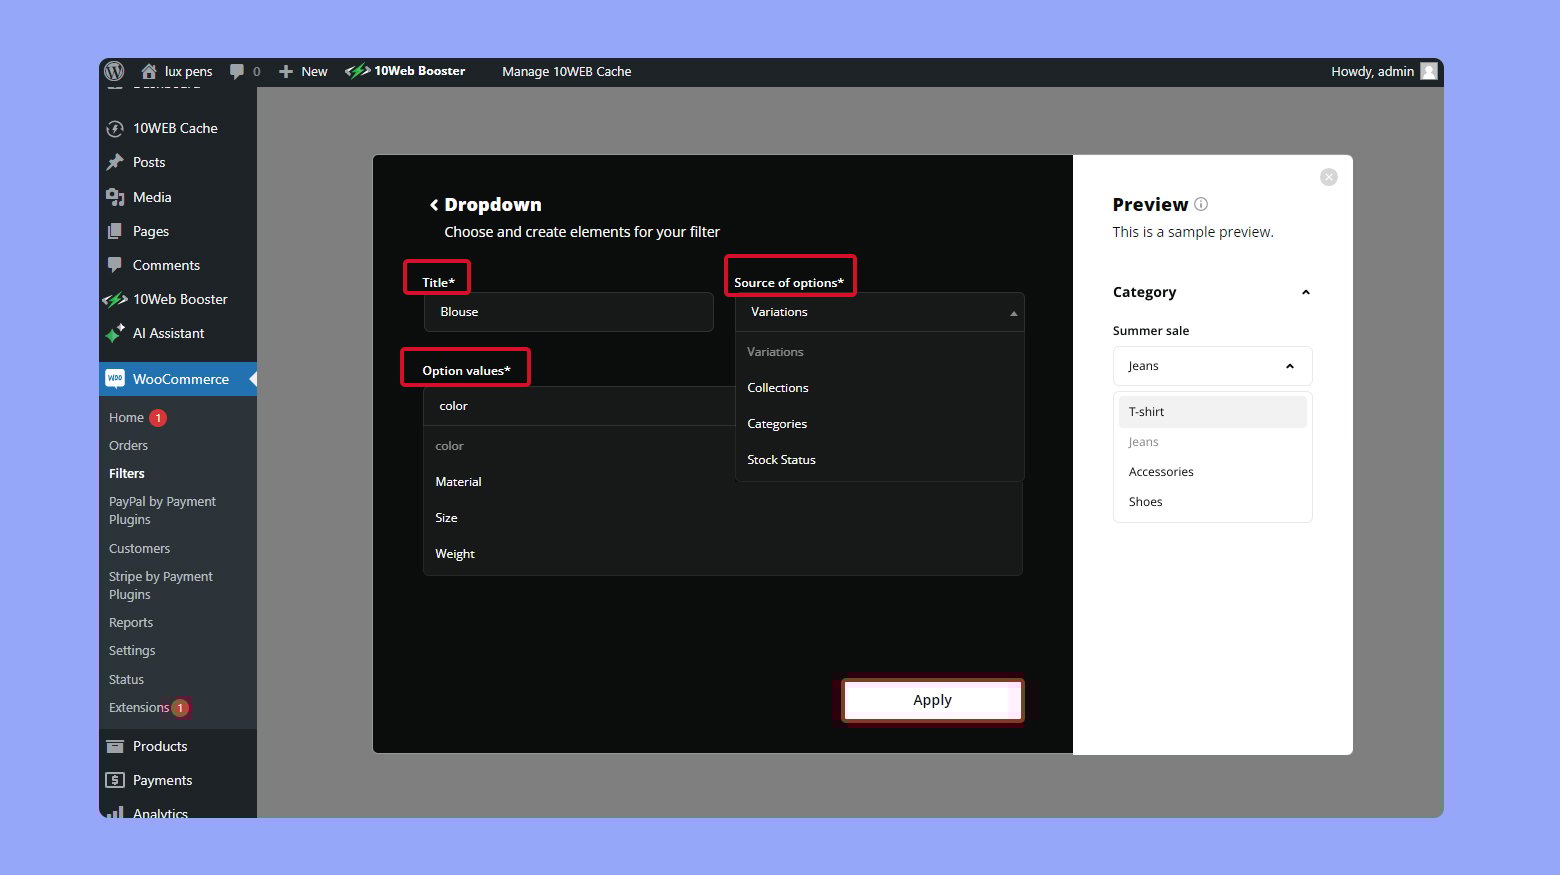
- Enter a title for the field.
- Choose the source for the options. (What is going to be filtered.)
- From the drop down, choose the values for the option. (The values that can be filtered for the chosen option.
- Click Apply to add the customized field to your filter.
Price slider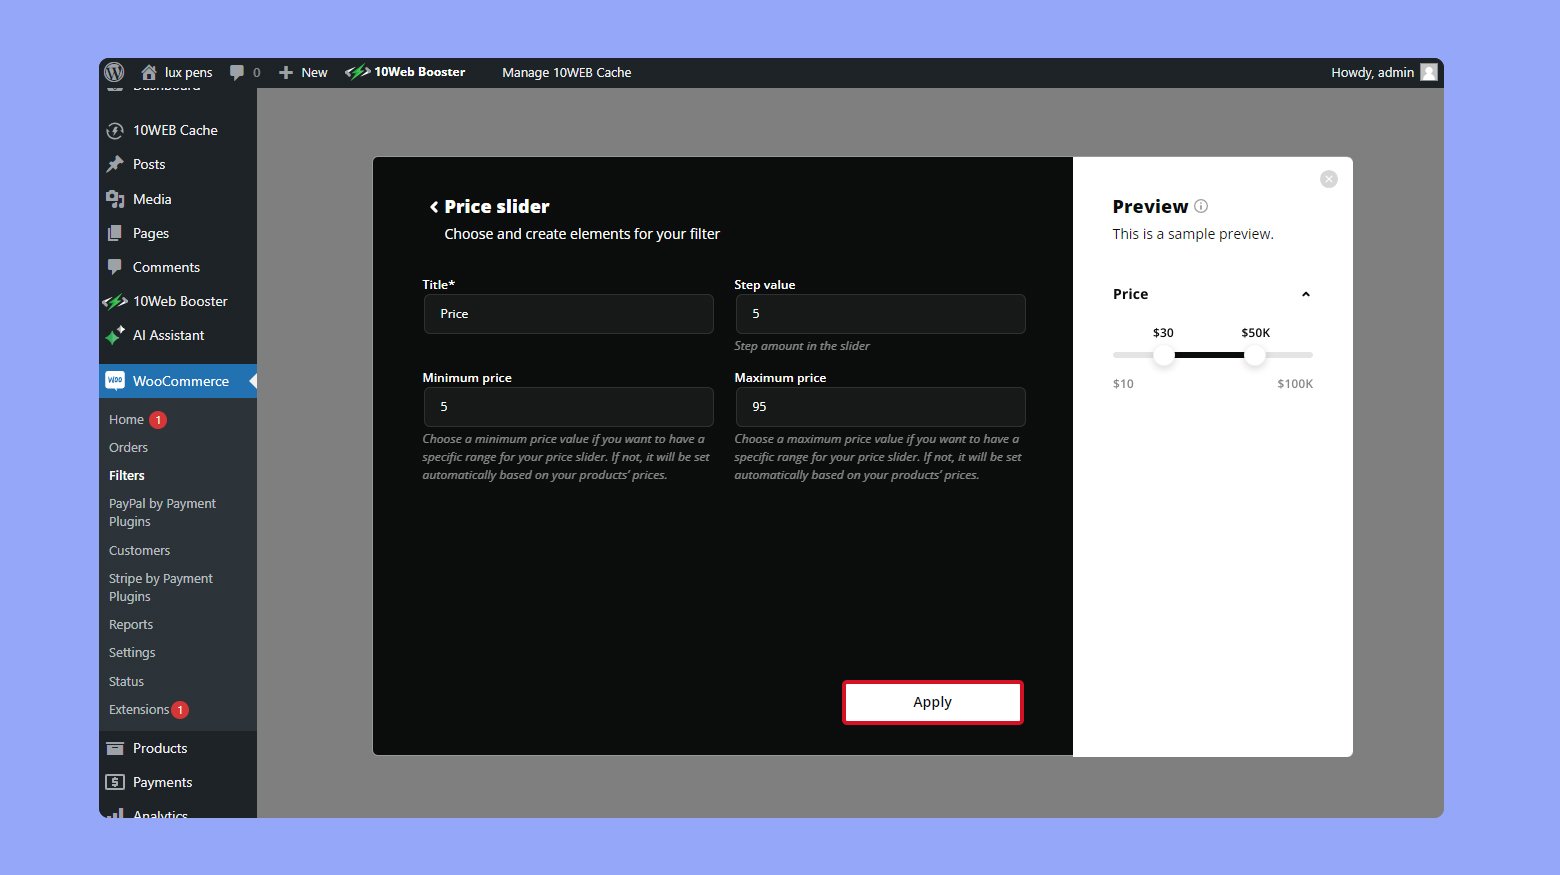
- Enter a title for the field.
- Enter a step value. (The increments by which the value will increase or decrease upon dragging the bar.)
- Enter a minimum and maximum price.
- Click Apply to add the price slider to your filter
Color list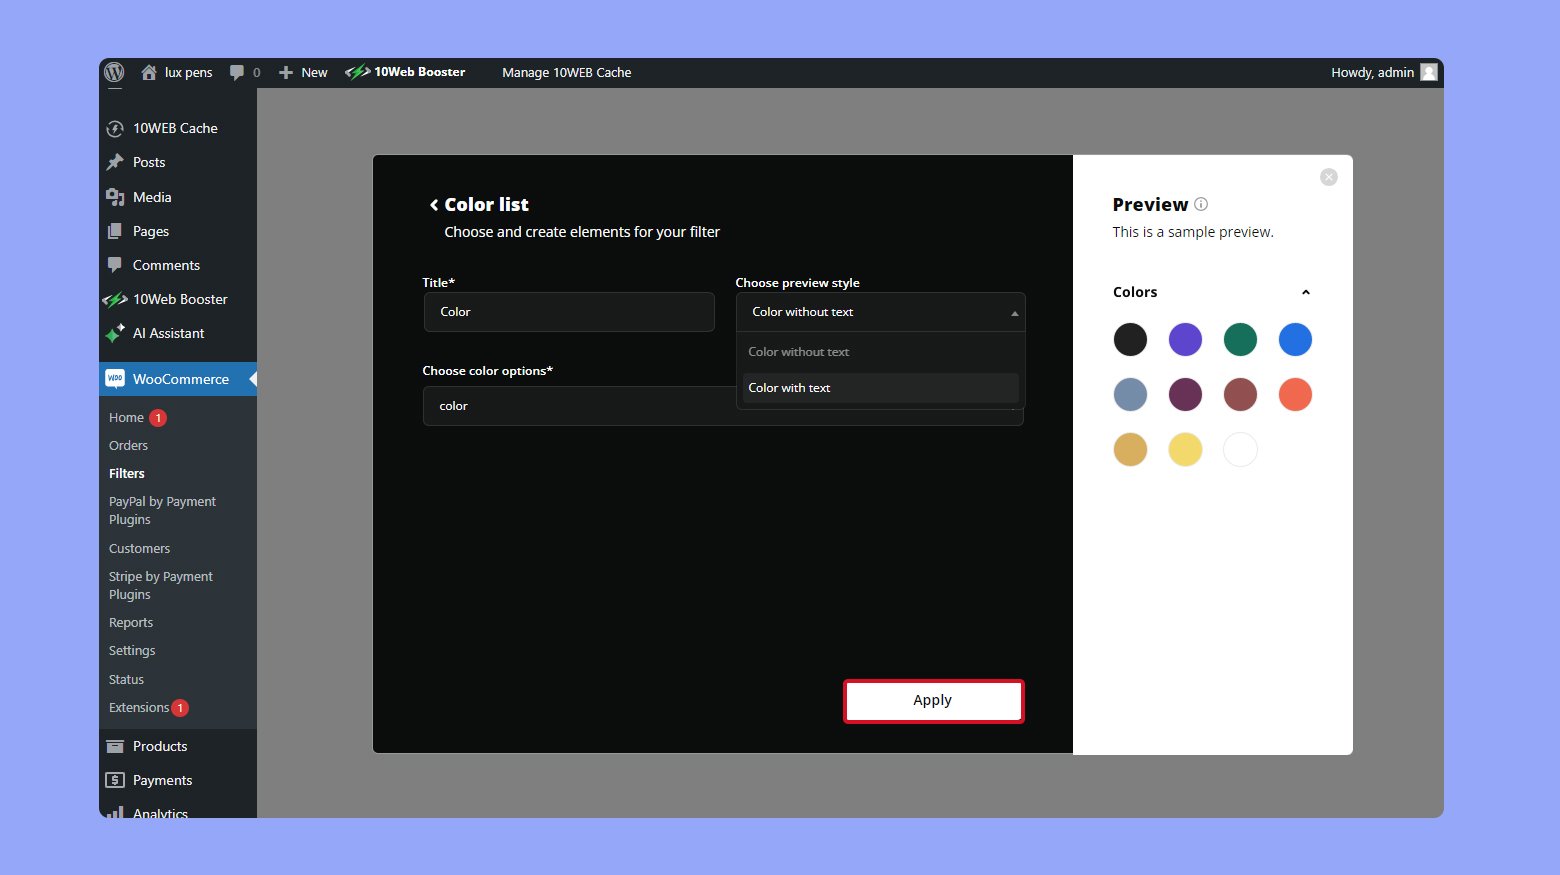
- Enter a title for the field.
- From the dropdown menu, choose a preview style.
- Choose the Color options.
- Click Apply to save the filter field.
When you are done adding and customizing the fields of your filter, click Save to save the filter.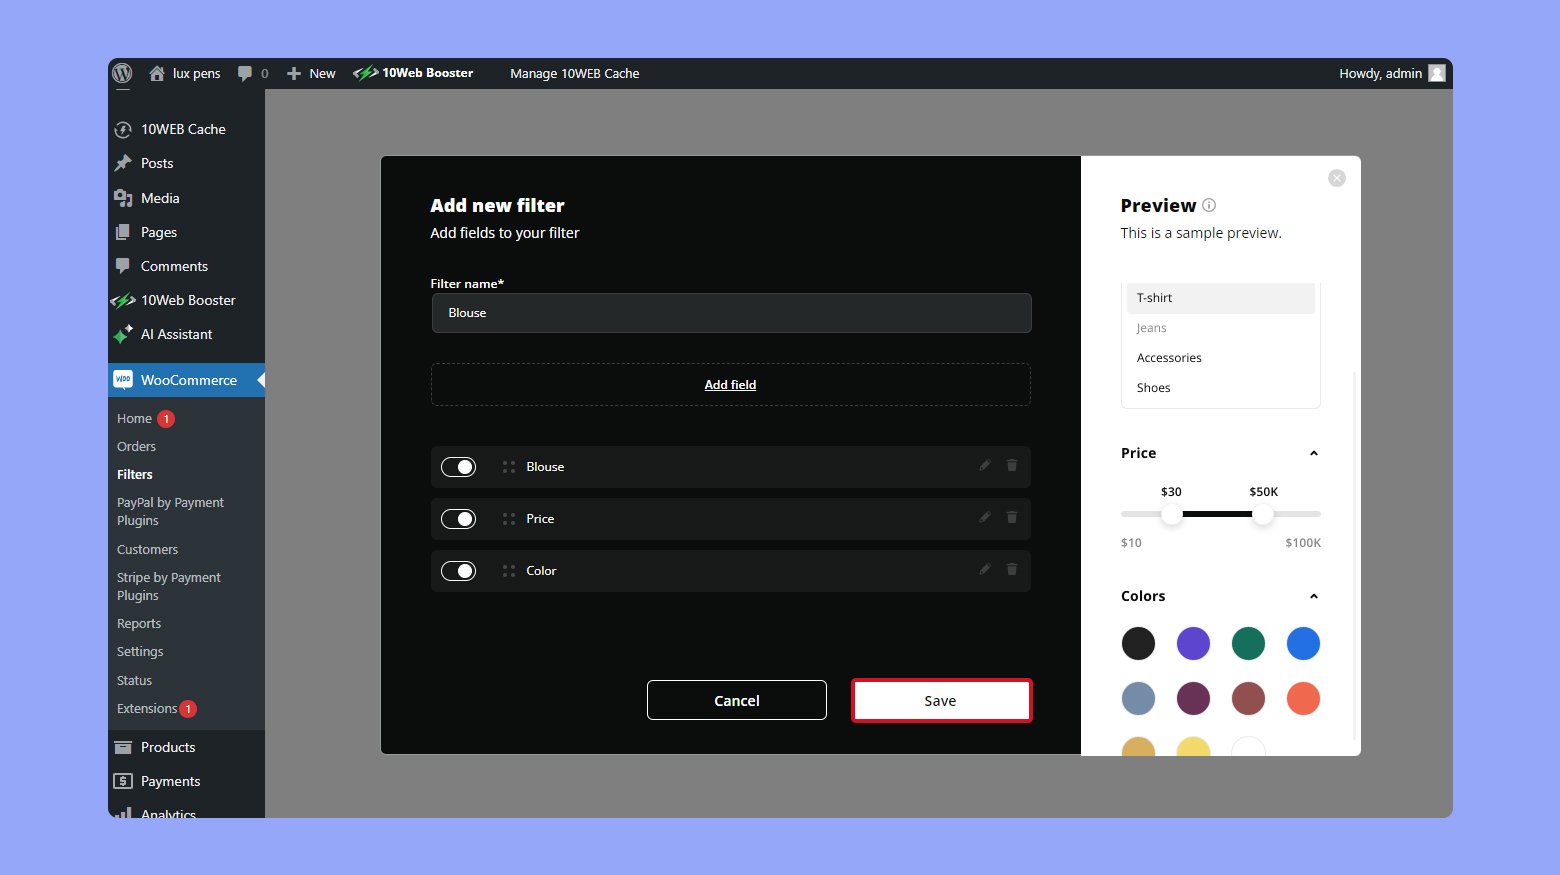
Applying the 10Web filter to your page
After building your product filter, you are now ready to apply it to your page.
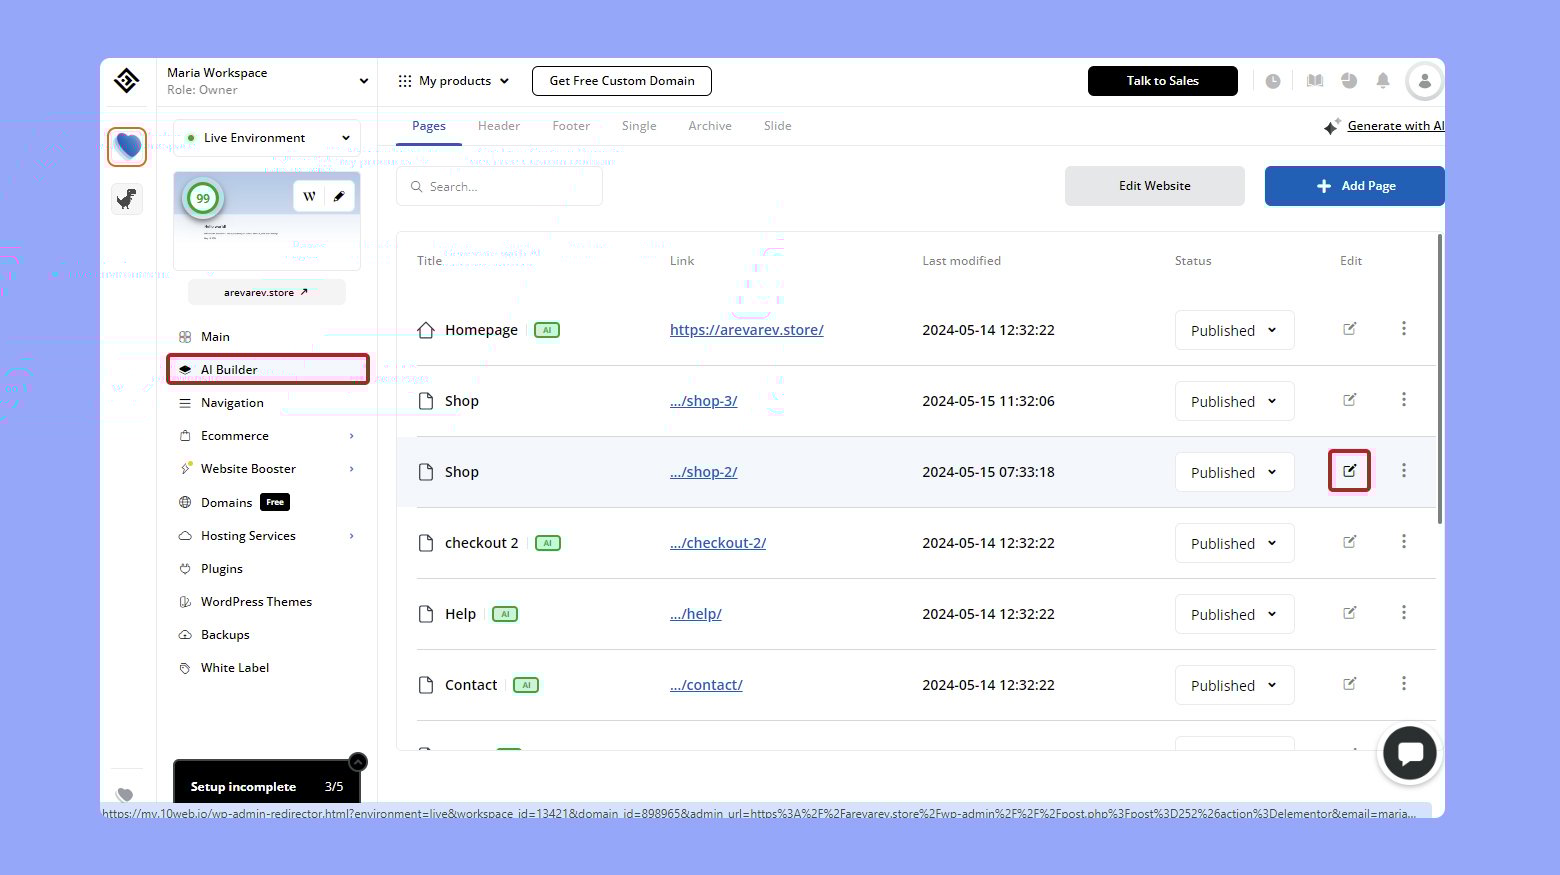
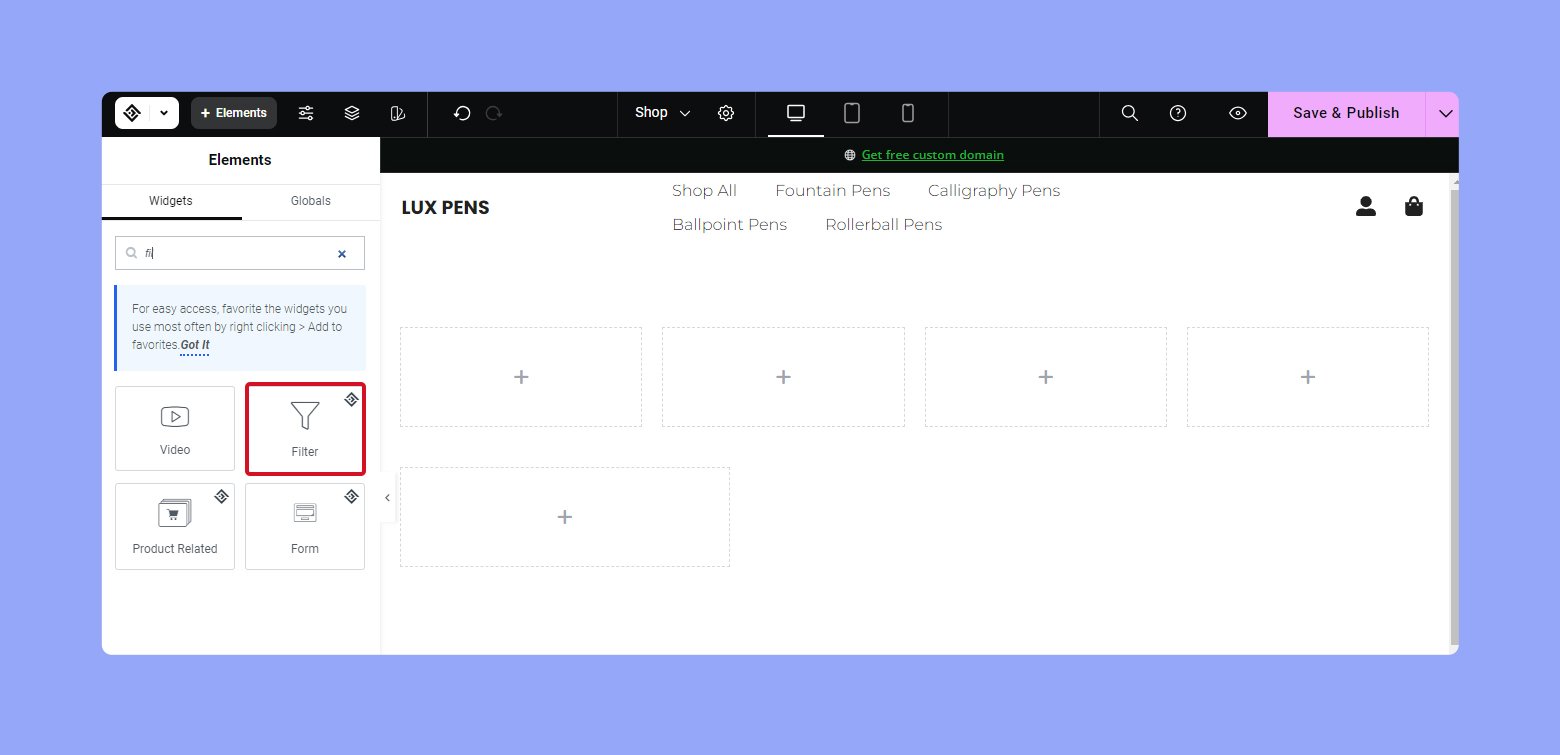
- From your 10Web dashboard go to AI Builder.
- Click on the edit icon next to the page where you want to apply the filter. Make sure you have the product widget on that page. You will be redirected to the 10Web Builder page.
- In the left column, search for the Filter widget.

- Drag and drop the widget onto the page.
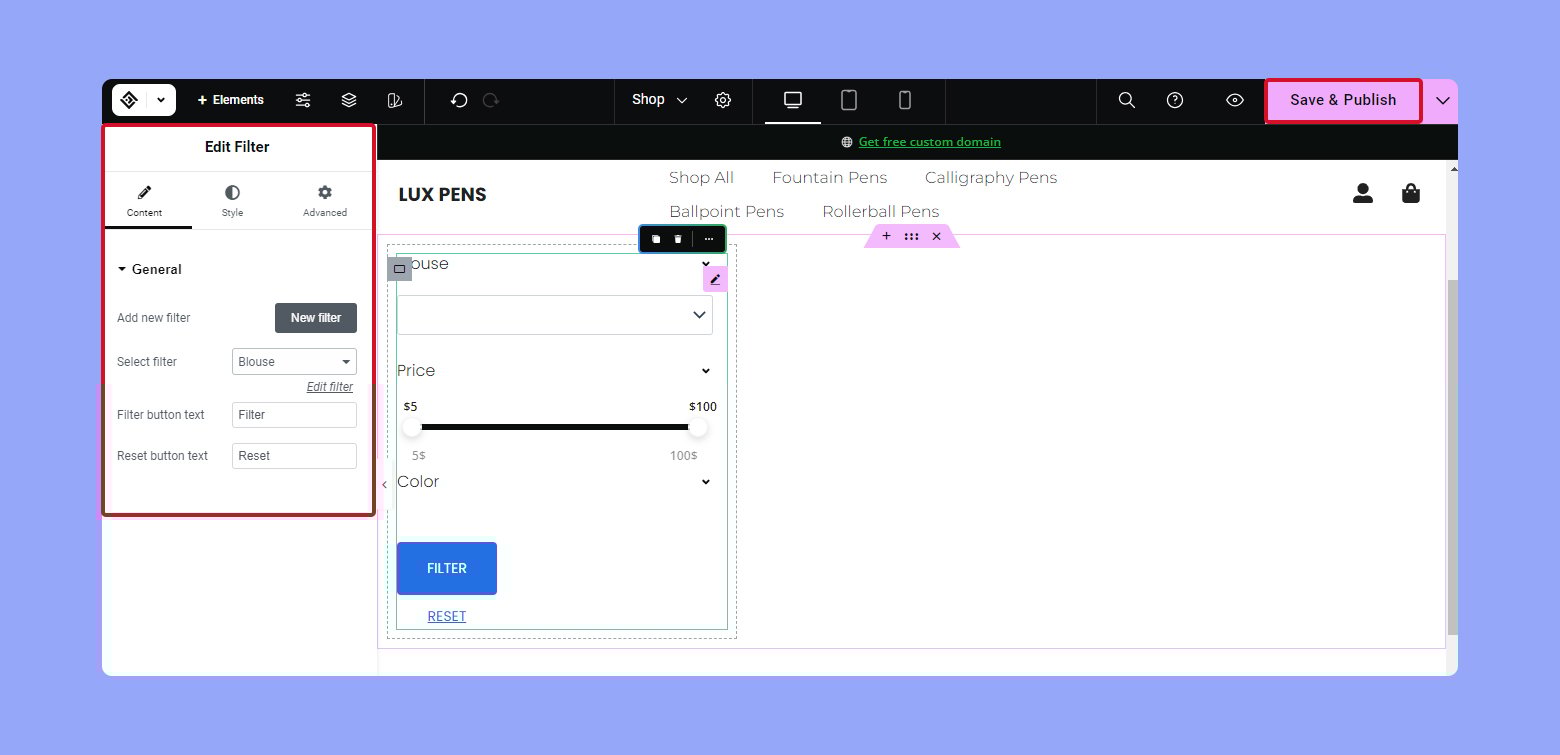
- Edit it as needed and click Save & Publish to save the changes.
Create your custom online store in minutes with 10Web AI Ecommerce Website Builder and take your business online.
Looking to sell online?
Enhancing filter functionality
When you add filtering capabilities to your WooCommerce store, it’s essential that these filters are not only functional but also enhanced for the best user experience. Let’s explore how to leverage advanced filter features and ensure optimal functionality for mobile users.
Utilizing advanced filter options
- Identify the needs of your audience by considering the types of products you’re offering. Implement multi-select options to let customers select multiple filter attributes simultaneously.
- Integrate dropdown menus, checkboxes, and toggle switches to provide a clear and easy navigation experience. Dropdowns are great for conserving space, while checkboxes can be used for selecting multiple options within a filter.
- Offer responsive filter widgets that adapt seamlessly to various screen sizes. This ensures that your filter options look good on both desktop and mobile platforms.
- Choose a product filter plugin that supports advanced filtering options like price ranges, ratings, or stock status. Plugins which allow you to create custom filters specific to your products can be particularly useful.
Optimizing filters for mobile users
- Prioritize responsive design in your product filter plugin choice to ensure filters work well on mobile devices. Filters must be easily accessible and navigable, even on smaller screens.
- Consider the placement of filters on mobile devices. The filters should be positioned in a way that they are easily reachable with the thumb, such as a slide-out panel or at the top of the screen.
- Simplify the interface with clear toggle or checkbox options. Over-cluttered mobile interfaces can overwhelm users, so keep the design clean and straightforward.
- Test the user experience on various mobile devices to ensure that filters are not only functional but also intuitive to use on different screen sizes and resolutions.
Improving store performance and SEO
Incorporating product filters in your WooCommerce store not only enhances user experience but can also boost your sales and improve SEO ranking. By analyzing filter usage and implementing SEO best practices for filtered pages, you’re setting up your store for better performance and conversions.
Analyzing filter usage for better insights
To optimize your store, it’s essential to understand how your customers are using the WooCommerce product filters. Start by tracking which filters are most popular and how they influence purchasing decisions. You can use analytics tools to gain these insights. For example:
- Navigate to your analytics tool and review the filter usage data.
- Identify the most frequently used filters and note any patterns you observe.
- Adjust your inventory and marketing efforts based on these patterns to enhance user experience and potentially increase sales.
By studying customer interactions with filters, you tailor your store to meet their needs and prompt a smooth journey from browsing to buying.
SEO best practices for filtered product pages
SEO is critical for ensuring your filtered pages enhance your WooCommerce store’s online visibility. Here are specific steps you can take to improve the SEO of these pages:
- Create unique and descriptive titles for each filtered page, which succinctly reflect the contents of the page.
- Use the right keywords in your product filter pages to coincide with what customers are searching for.
- Apply ‘noindex’ tags judiciously on filter combinations that are less important to avoid content duplication issues.
- Ensure your filtered URLs are clean and readable, which helps users and search engines understand your page structure.
Remember, while filters improve the shopping experience, their SEO implications are equally important. Properly optimized filtered pages can lead to better ranking, more organic traffic, and increased conversions.
Customizing product filter appearance
To enhance your online store, tailoring the appearance of your product filters can significantly improve the shopping experience for your customers. Here’s how you can make your filters not only functional but also visually appealing.
Styling filters with custom CSS
- Locate the CSS file responsible for your theme’s appearance. Typically, you’ll find it in the theme’s main directory, named style.css.
- Use CSS selectors to apply styles to your product filters. For example, to change the color of filter buttons, target the class associated with the buttons.
- Save the changes to your CSS file and refresh your website to see the new styles in action.
Add custom CSS rules to define the appearance. For example, to set the button color, you would add:
.your-button-class {

 background-color: #3498db; /* Custom color */

 border-radius: 5px; /* Rounded corners */

}
Managing advanced filtering techniques
When running an online store, the experience you offer can be greatly enhanced by giving customers advanced filtering options. This helps them find exactly what they’re looking for, quickly and efficiently.
Leveraging multi-select and color swatches
For a more visual and user-friendly filtering experience, you can leverage advanced features like multi-select options and color swatches.
- To implement multi-select, ensure that your filtering plugin or solution like YITH WooCommerce Ajax Product Filter supports it.
- Within the plugin settings, select the attribute you want to offer as a multi-select filter, such as sizes or colors.
- To add color swatches, first install a plugin that provides this functionality, such as Advanced Ajax Product Filters.
- Configure the plugin to replace standard color options with color swatches directly within the filter settings.
These techniques give your shoppers a dynamic and intuitive way to filter products according to their preferences, enhancing their overall shopping experience on your site.
Conclusion
Product filters are an essential feature for enhancing the shopping experience on your WooCommerce store. They help customers quickly find products by applying various criteria like price, brand, or attributes, which not only improves usability but also increases sales and SEO effectiveness. By setting up different types of filters, such as Ajax, price, and category filters, you allow users to navigate your inventory more efficiently.
Starting with a basic plugin installation and advancing to more sophisticated customizations and mobile optimizations, you can significantly enhance your online store’s performance and user satisfaction. Refine your WooCommerce setup, ensuring it meets the needs of your audience and leverages the full potential of product filters to boost both user engagement and search engine visibility.
Create your online store in minutes with 10Web AI Ecommerce Website Builder.Looking to sell online?
Create your online store in minutes


![]()