Understanding how to edit WooCommerce emails is essential for enhancing communication with your customers and reinforcing your brand’s identity. By customizing these emails, you can ensure they reflect your ecommerce store’s unique voice and style, providing a cohesive and professional customer experience. Whether you’re just starting with WooCommerce or aiming to improve your email strategies, this guide will help you effectively manage and personalize your email interactions.
FAQ
How to edit WooCommerce email content?
How do I change my WooCommerce email address?
Understanding WooCommerce emails
Before diving into how to edit WooCommerce email template, it’s important to understand the different types of transactional emails you’ll be dealing with and the significance of tailoring each to fit your ecommerce brand’s voice.
Types of WooCommerce transactional emails
WooCommerce comes packed with several transactional emails that are automatically sent to customers at various stages of the ordering process. These include:
- New order: Alerts you when a new order has been placed.
- Failed order: Notifies you when an order fails.
- Completed order: Confirms to the customer that their order has been completed.
- Customer invoice: Provides the customer with an invoice for their order.
- Customer note: Sends a note to the customer regarding their order.
- Order on-hold: Lets the customer know if their order is on hold.
- Canceled order: Informs the customer that an order has been canceled.
- Refunded order: Tells the customer that their order has been refunded.
Each email serves a crucial role in keeping the communication loop between you and your customers clear and professional.
Importance of WooCommerce emails
Effective communication plays a pivotal role in the success of your online store, and WooCommerce emails are an integral component of this communication strategy. Emails sent from your WooCommerce website act as the primary means of keeping your customers informed and engaged. Here’s why they’re essential:
- Order confirmation: Immediately after a purchase, an email confirmation reassures customers their transaction was successful. This builds trust and reduces post-purchase anxiety.
- Order status updates: Keep your customers informed at every step. Sending updates when an order is processed, shipped, and delivered keeps the customer in the loop, enhancing their shopping experience.
- Customer relationship: Personalized emails can foster a strong relationship. Transactional emails with a human touch position your brand positively in the minds of your customers.
- Marketing tool: Emails can be a subtle way to encourage repeat business. Promotions and related product suggestions in your transactional emails can trigger additional purchases.
- Legal compliance: Certain jurisdictions require that you provide electronic receipts and order confirmations. WooCommerce emails ensure you comply with these legal requirements.
Remember, understanding how to customize WooCommerce emails is key to standing out in your customers’ inboxes. It’s your opportunity to showcase your brand’s personality and attention to detail. By using the right tone, visuals, and information, you can turn a simple transactional email into a powerful touchpoint that enhances the customer experience and builds loyalty. Create your custom online store in minutes with 10Web AI Ecommerce Website Builder and take your business online.

Looking to sell online?
How to edit WooCommerce emails
Step 1: Accessing WooCommerce email settings
Before diving into the technicalities, it’s important for you to understand where your email settings reside within the WooCommerce interface. Making adjustments to these settings will allow you to tailor how your store communicates with you and your customers.
To begin customizing your email communications, you’ll first need to navigate to the WordPress Dashboard. This is the central hub for all your site management needs.
- Log in to your WordPress site.
- Once inside, look for the WooCommerce tab in the left-hand menu.
- Click on the tab titled Settings within the WooCommerce menu.
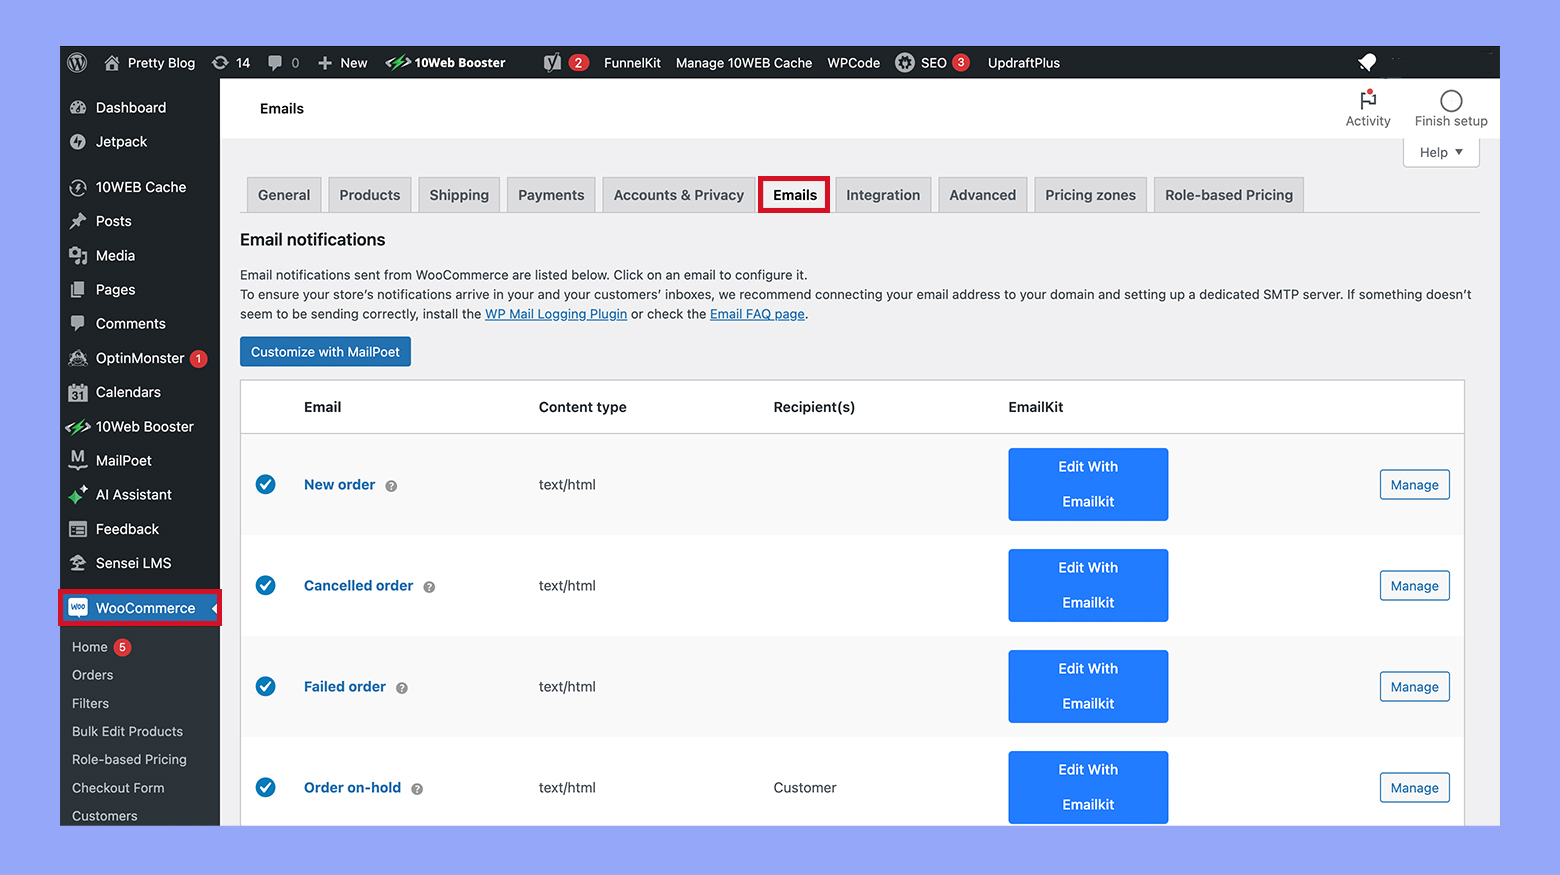
- A toolbar will appear at the top of the page. Look for and select the Emails tab to open your email settings.

- Here, you’ll see a list of different email notifications, each with a corresponding Manage button that leads to individual settings.
By following these steps, you’ll have robust control over WooCommerce email communications, from order confirmations to reset password instructions.
Step 2: Customizing email contents
Making changes to your WooCommerce email templates is a straightforward process. By tweaking the email header and footer, modifying the main email body, and adjusting order details and product information, you can create a cohesive brand experience right in your customer’s inbox.
Editing the email header and footer
- Go to WooCommerce > Settings > Emails to access your email settings.
- Click on the Manage button next to the email you wish to customize.
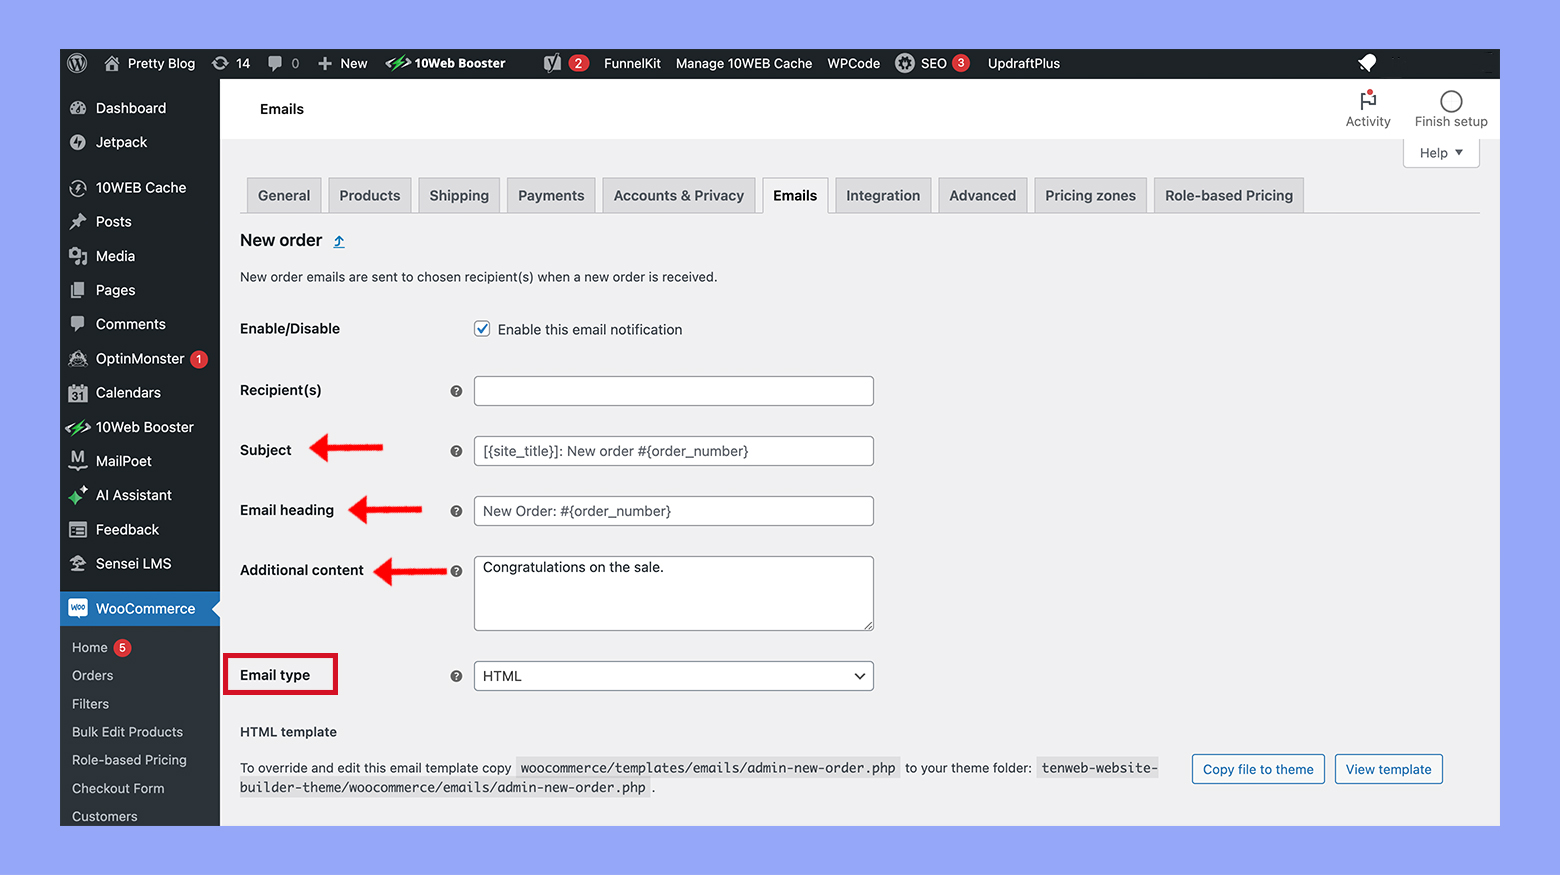
- When managing an individual email, use the Email type dropdown to choose whether the email is sent as HTML, plain text, or multipart.
- Customize the Email subject, Heading, and Additional content using the provided fields.
- Additionally, you can use the WooCommerce email customizer plugin to easily change the layout and visual style with a live preview.
Adjusting order details and product information
- To alter the order details section, locate the HTML template file usually named email-order-details.php within the WooCommerce plugin directory or your theme’s WooCommerce folder.
- For finer control, edit the file to adjust the layout of product listings or order information.
- Remember to use WooCommerce hooks to add or change content dynamically without directly editing template files, ensuring compatibility with future updates.
Step 3: Designing your emails
When customizing WooCommerce emails, the design is crucial to maintain brand consistency and grab the customer’s attention.
Changing colors and fonts
Your email’s look and feel should match your brand’s design language. To change the colors and fonts of your email to match your brand follow these steps:
- Navigate to WooCommerce > Settings > Emails to access email settings.
- Scroll to find Email template.
- Here you see the section for editing the base color, background color, body background color, and body text color.
- Click on the color picker for each element you want to change, selecting colors that align with your brand palette.
- To change fonts, you might need to add custom CSS in the Email template area. Seek theme support if necessary.
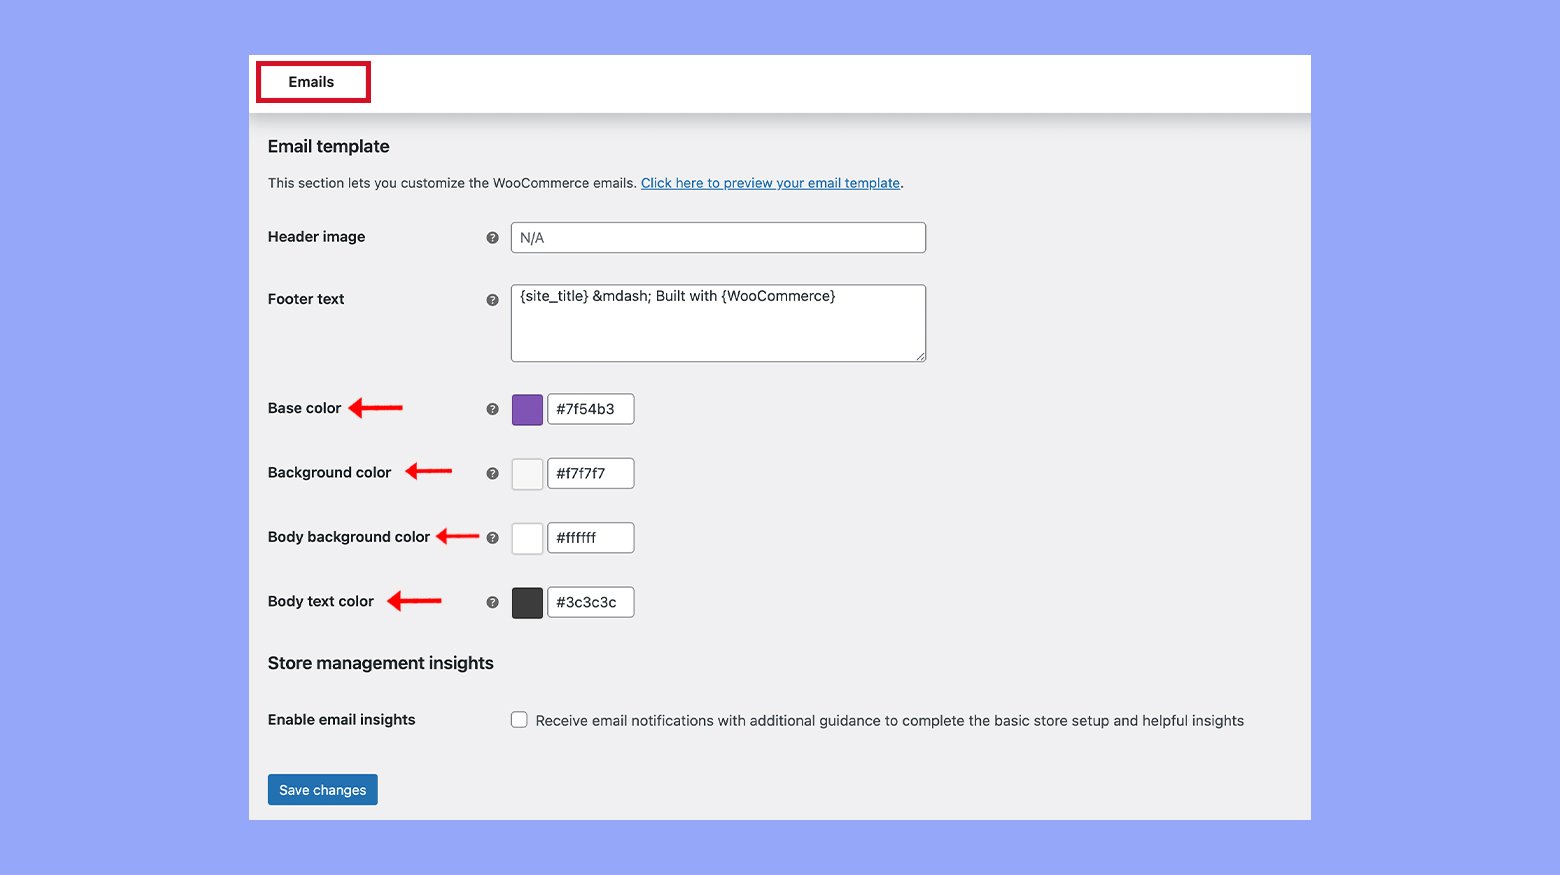
Incorporating your brand logo
A recognizable logo is a cornerstone of your brand identity. To learn how to add logo in WooCommerce email template properly follow these steps:
- In the email settings, look for the Header image field.
- Enter the URL of your logo image stored online – ensure it fits the recommended dimensions for email headers.
- Click Save changes at the bottom of the page to update your settings.
Adding images and buttons
Images and call-to-action buttons can increase engagement in your emails. To add images and CTAs to your emails, follow these steps to engage more effectively with your audience.
- When customizing a specific email, utilize the built-in WordPress editor to seamlessly insert images.
- For adding buttons, switch to the HTML editor mode and embed the HTML code for a button, linking it to your desired URL.
- Further personalize your buttons by adjusting colors and styles with inline CSS, ensuring they align with your brand’s aesthetic.
Step 4: Improving email deliverability
When dealing with WooCommerce emails, ensuring your messages actually reach your customers is crucial to maintaining good customer relationships. Let’s address some effective ways of enhancing email deliverability.
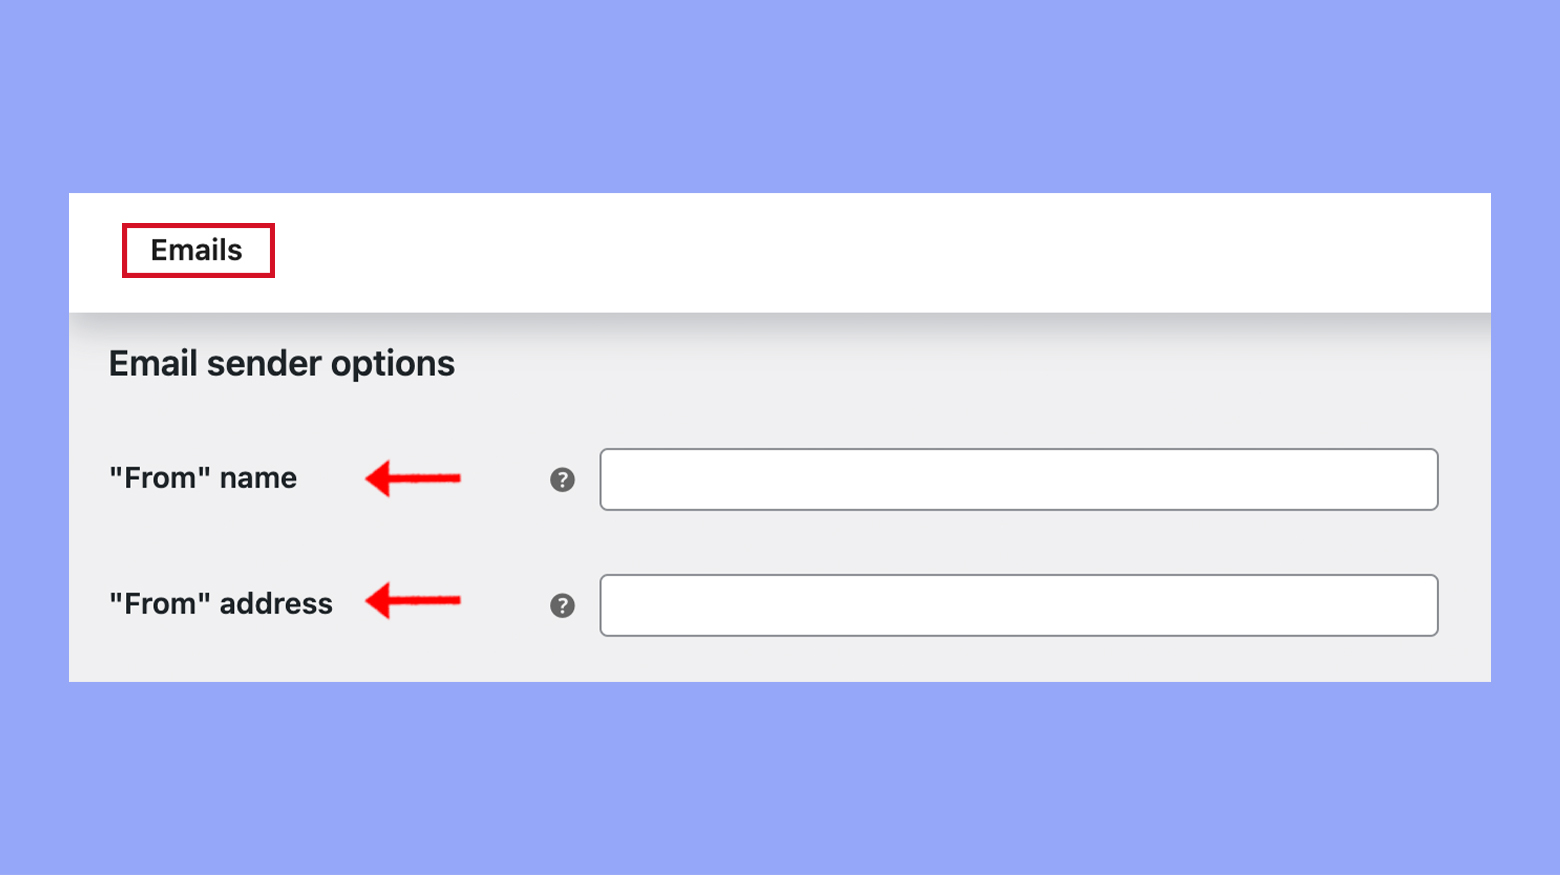
Configuring email sender options
Configuring your Email sender options within WooCommerce settings is an integral part in making sure your emails are not marked as spam.
- Navigate to WooCommerce > Settings > Emails, and select the Email sender options.
- Enter a recognizable From name to ensure recipients know who you are.
- Use a professional From address that matches your domain to build trust and encourage open rates.
Using personalized subject lines
Personalized email subject lines can dramatically increase your email’s open rate. By catching attention, you inform your customers that the content within the email is tailored to them.
- In the email settings, find the email template you wish to personalize and select Manage.
- Craft a subject line that addresses the recipient by name or includes details specific to their order.
Previewing and testing emails before sending
Before finalizing any changes, always preview and send test emails to check for errors, clarity, and visual appeal.
- Within the email template, find and click on the Preview link to see how your email will look to the recipient.
- Use the Send test email option to have a sample sent to your email address, ensuring everything looks as intended.
Step 5: Managing WooCommerce email templates
When you want to enhance your online store’s communication, it’s important to personalize your email notifications. WooCommerce provides email templates for various kinds of messages, like new order and processing order emails. You can tweak these to match your brand and messaging style by using hooks or plugins.
Overriding default templates with hooks
To tailor your WooCommerce emails, you can use hooks to insert custom content without editing core files. Follow these steps:
- Navigate to WooCommerce > Settings in your WordPress dashboard.
- Click the Emails tab and find the email notification you wish to customize.
- Note the PHP template file associated with this email at the bottom of the page.
- Copy this file into your theme’s WooCommerce directory to avoid losing changes on an update.
- Use WooCommerce hooks, such as woocommerce_email_header or woocommerce_email_order_details, to modify parts of the email.
Remember that working with hooks requires familiarity with PHP code and the WooCommerce template structure.
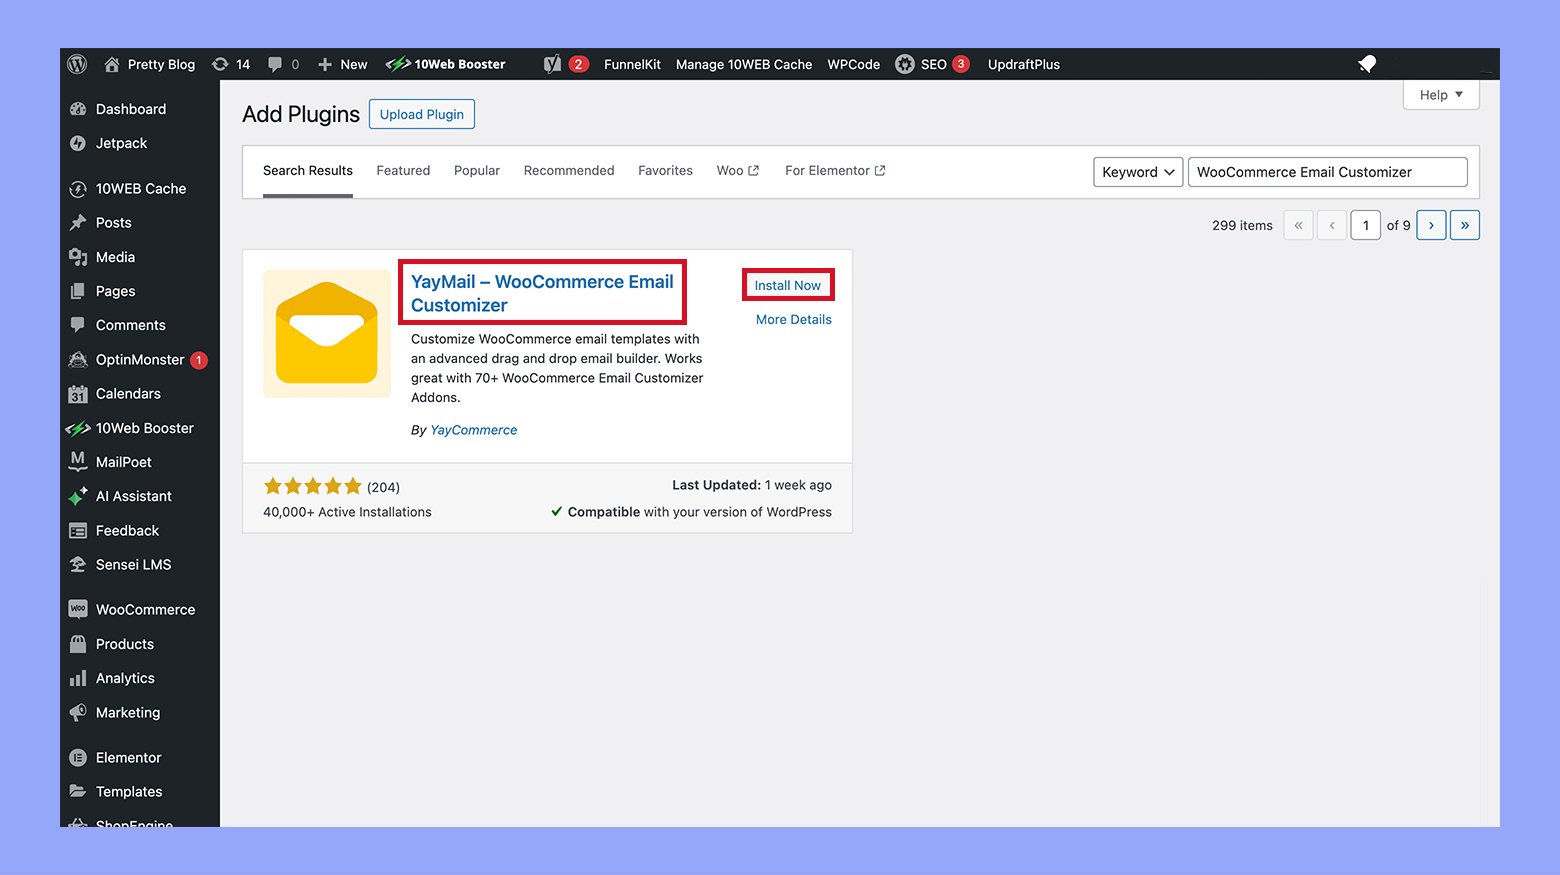
Utilizing email customizer plugins
If you’re not comfortable tweaking code, email customizer plugins can help:
- Choose a plugin like WooCommerce Email Customizer and install it on your site.
- Go to the plugin’s settings, typically under the WooCommerce menu.
- Select the email type you want to personalize.
- Use the plugin’s visual editor to add images, buttons, and text, customizing each element to reflect your brand.
- Preview your changes and once satisfied, save them to apply the customizations to your outgoing emails.
Plugins provide an intuitive interface for customizing WooCommerce emails, making the process accessible regardless of your coding skills.
Step 6: Extending email functionality
In this section, you’ll learn how to enhance your WooCommerce emails by adding order upsells and showcasing promotions and discounts, directly influencing your customers’ next purchase decision.
Implementing new order upsells and promotions
You can trigger customer interest by presenting new deals or products in the order completion emails. Start by identifying products that complement their purchase.
- Choose upsell products that relate to the original purchase to include in the email.
- Edit the Order completed email template by navigating to WooCommerce > Settings > Emails, and click the Manage button for the Order completed email.
- Insert a custom section in the email template where you can highlight new promotions or upsell products.
Providing discount codes and related products
Offering exclusive discounts and showcasing related products can encourage repeat business.
- Generate a unique coupon code under WooCommerce > Coupons; consider time-sensitive discounts to create urgency.
- Edit the appropriate email template similarly by going to the Emails tab in WooCommerce settings.
- Add a personalized touch by including a section that features products related to the customer’s previous purchase, along with the discount code.
By tailoring the emails your customers receive post-purchase, you promote continued engagement and drive additional sales through strategic promotions and personalized upsells.
Conclusion
Mastering how to edit WooCommerce emails is a vital step towards creating a more personalized and engaging shopping experience for your customers. By customizing your transactional emails, you not only reinforce your brand’s identity but also keep your customers well-informed at every stage of their purchase journey. With the insights and steps provided in this guide, you’re now equipped to enhance your email communications effectively, ensuring that each message your store sends adds value and builds lasting relationships with your customers. Create your online store in minutes with 10Web AI Ecommerce Website Builder.
Looking to sell online?
Create your online store in minutes


![]()