In the competitive world of ecommerce, effectively managing product pricing is crucial for the success of your online store. WooCommerce provides a variety of options for setting and adjusting prices that can help you implement dynamic pricing strategies tailored to your business needs. Whether you’re dealing with simple, variable, or subscription-based products, understanding how to change product price in WooCommerce is essential. This guide will walk you through the different methods to modify product prices in WooCommerce, ensuring that you can respond adeptly to market changes, optimize your sales, and enhance customer satisfaction.
FAQ
How to update variable product price on WooCommerce?
How to bulk edit products prices in WooCommerce?
How do I add different prices in WooCommerce?
Understanding WooCommerce product pricing
Before diving into the specifics, it’s important to recognize that WooCommerce offers flexible options for pricing your products. This versatility ensures that you can adapt to various pricing strategies and models that best suit your online store.
Your initial pricing strategy in an ecommerce setting like WooCommerce is crucial. It sets the stage for your product’s performance and market position.
- Decide on a pricing strategy that aligns with your brand and market expectations. Are you aiming to enter the market as a cost-leader or are you focusing on the high-end segment?
- Your regular price should reflect the product’s value and cover your costs, ensuring a profit.
Consider the use of psychological pricing – ending prices in .99 or .95, for instance – to make the prices seem lower than they actually are. And always keep an eye on your competitors: Understanding their pricing can help keep yours competitive.
By considering the types of products you’re selling and establishing a sound pricing strategy from the beginning, you’ll set a solid foundation for your WooCommerce store’s success.
Types of products and pricing models
In WooCommerce, you have the ability to set different types of pricing for different types of products. Whether you’re selling simple, variable, grouped, or affiliate products, the platform allows you to adjust pricing strategies accordingly. Here are the two options it provides:
- Regular price: This is the main price you set for your product.
- Sale price: Offer a discounted rate for a specific period.
Setting up sale prices can be a useful tactic to promote new products or to clear out old stock. Remember to take into account the value your product offers to customers, as well as the cost of goods when considering your sales strategy.
For businesses looking to implement more sophisticated pricing strategies beyond these two options, additional functionalities can be introduced through plugins. WooCommerce’s extensible nature means that you can add capabilities such as dynamic pricing, tiered pricing, membership-based pricing, and geographic pricing through a variety of third-party plugins. These plugins enhance the core capabilities of WooCommerce, allowing for a more tailored approach to pricing that can better meet specific business needs and market dynamics.

Looking to sell online?
Create your custom online store in minutes with 10Web AI Ecommerce Website Builder and take your business online.
Accessing WooCommerce product details
When you’re ready to manage your online store’s inventory, accessing product details in WooCommerce is a straightforward process. First, make sure you’re logged into your WooCommerce admin dashboard. This is where all the magic happens for your store’s backend, from product management to order tracking.
To find a specific product’s details:
- Navigate to the Products tab on the left side of your dashboard. This reveals a list of your current inventory.
- Click on the name of the product you want to view or edit. This action will bring up the product data section.
The product data panel is organized into several tabs, which include:
- General: Here, you set the regular and sale prices for your products.
- Inventory: This is where you can manage stock levels and product statuses.
- Shipping: Enter the product’s weight, dimensions, and shipping class.
- Linked products: Set up cross-sells and upsells to encourage more sales.
- Attributes: Manage custom product attributes like size or color.
- Advanced: Configure advanced settings such as purchase notes and menu order.
To update product information, you’ll make changes in each of these areas as needed. Once you’ve made all your desired changes, be sure to click the Update button to save your progress. Remember, keeping your product details accurate and up-to-date is vital for providing a seamless shopping experience for your customers.
How to change product price in WooCommerce?
Method 1: How to change the single product price in WooCommerce
- Go to your Dashboard, select Products, and click on the specific product you want to modify.

- Click on the Edit button to open the product’s data page where you can edit aspects like price, images, and descriptions, focusing here on price.
- In the Product Data Management section, scroll down to the General tab. You will find two pricing options; regular price and sale price. The regular price is the standard price of the product and the sale price is the discounted price, which must be lower than the regular price.
- After editing, click Update in the top left corner of the page to apply the changes.


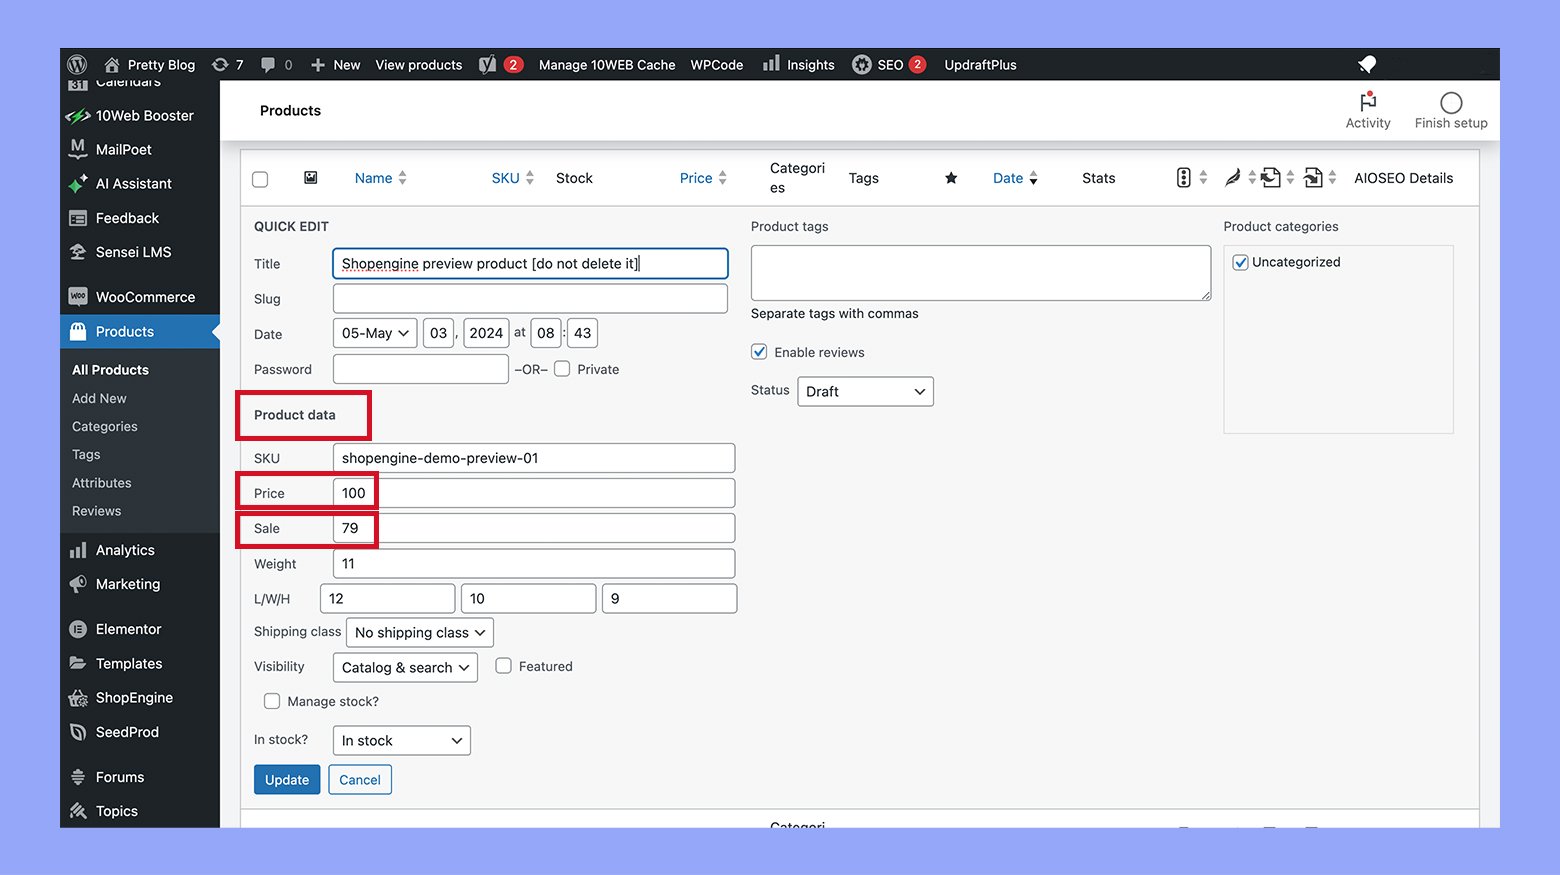
Quick edit method for changing the price of a single product
- Instead of the detailed edit, choose Quick edit which brings up a panel with similar data fields as the main product page.
- The steps to adjust the price here are identical to those in the standard method, allowing you to quickly change the regular or sale price.
- Confirm the adjustments by clicking on an Update button to ensure the new prices are set.
Method 2: How to change product price in WooCommerce in bulk
If you’re managing basic products in your WooCommerce store and need to change the prices of a few items, the default settings should suffice. However, be aware that these default settings are not suitable for variable products, grouped items, or subscriptions.
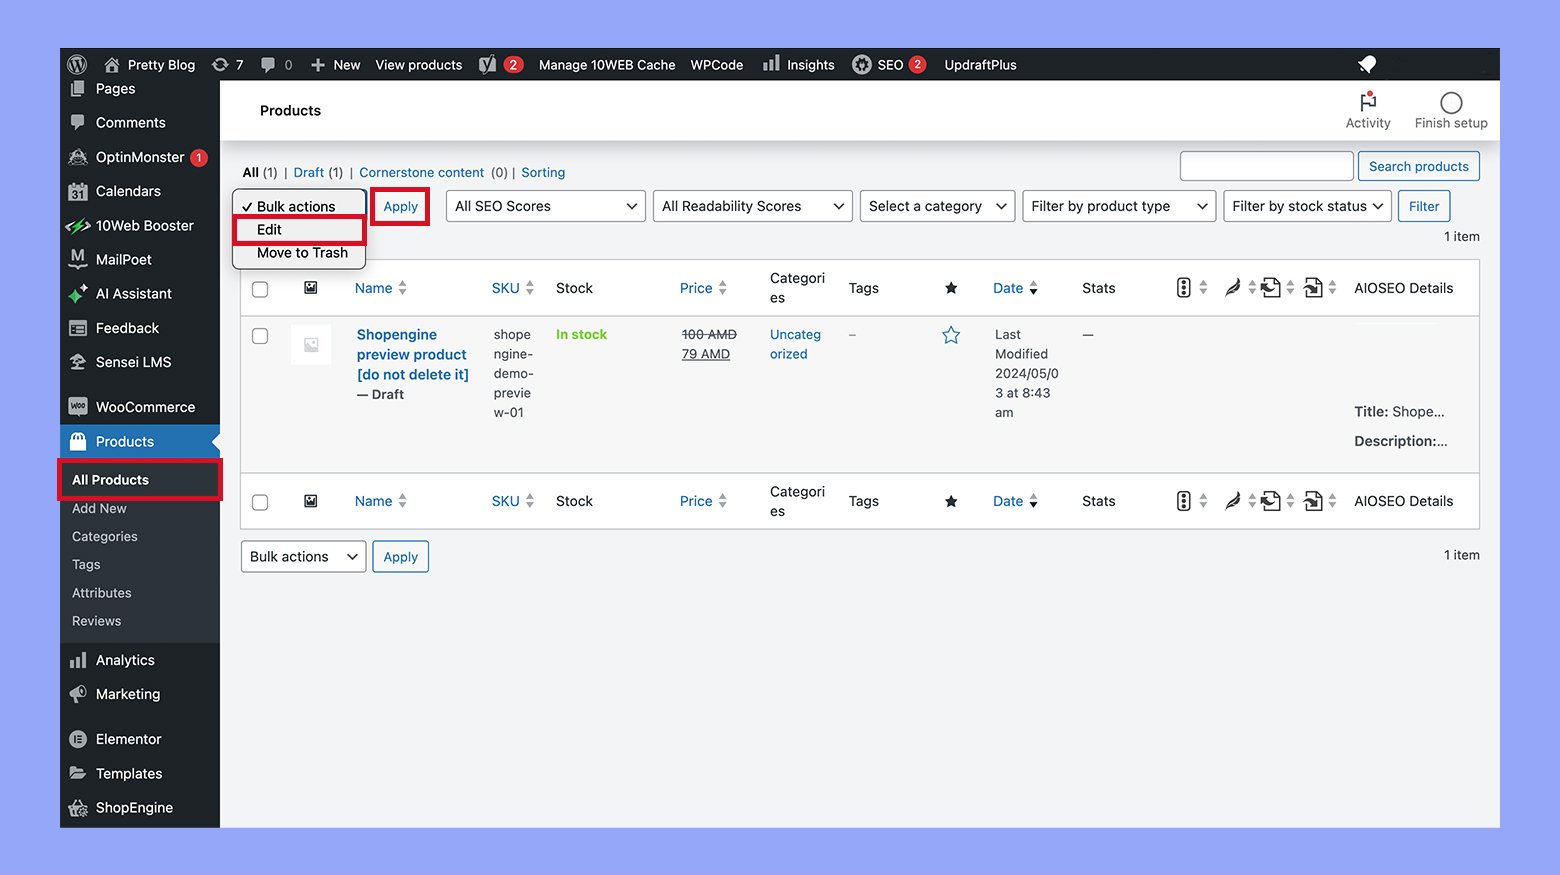
- Go to your WordPress admin panel, and navigate to Products > All products
- Use filters or manually select the products you want to edit, then choose Edit from the Bulk Actions dropdown menu and click Apply.
- Once the product editing form appears, navigate to the Product data tab and locate the Price and Sale options to make changes.
- Adjust pricing options:
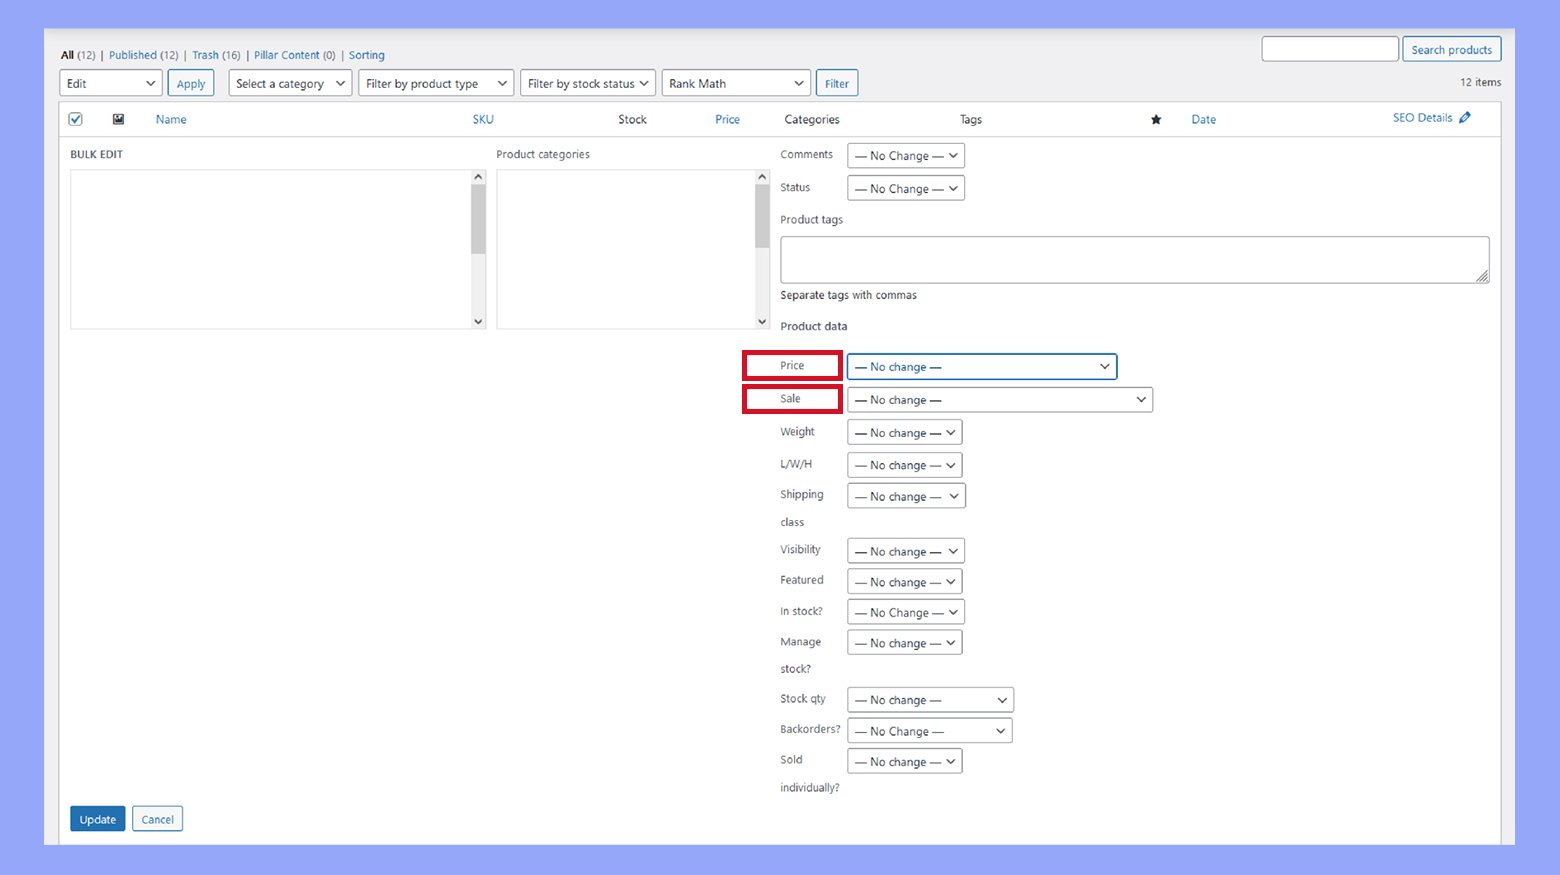
- Price: You can increase or decrease the current price by a specific amount or percentage.
- Sale price: You have options to either raise or lower the sale price by a fixed amount or percentage.
- Set sale price: Another option is to set the sale price at the regular price reduced by a certain amount or percentage.
- Scroll to the bottom of the page and click the Update button to confirm and apply your pricing modifications.
This method allows you to efficiently update the pricing for multiple products simultaneously directly from one location.
Method 3: How to change product price in WooCommerce using CSV import/export
To adjust prices across your WooCommerce store efficiently, you can import updated product information from a CSV file. Here are the steps to achieve this:
Step 1: Export your current product data to a CSV file
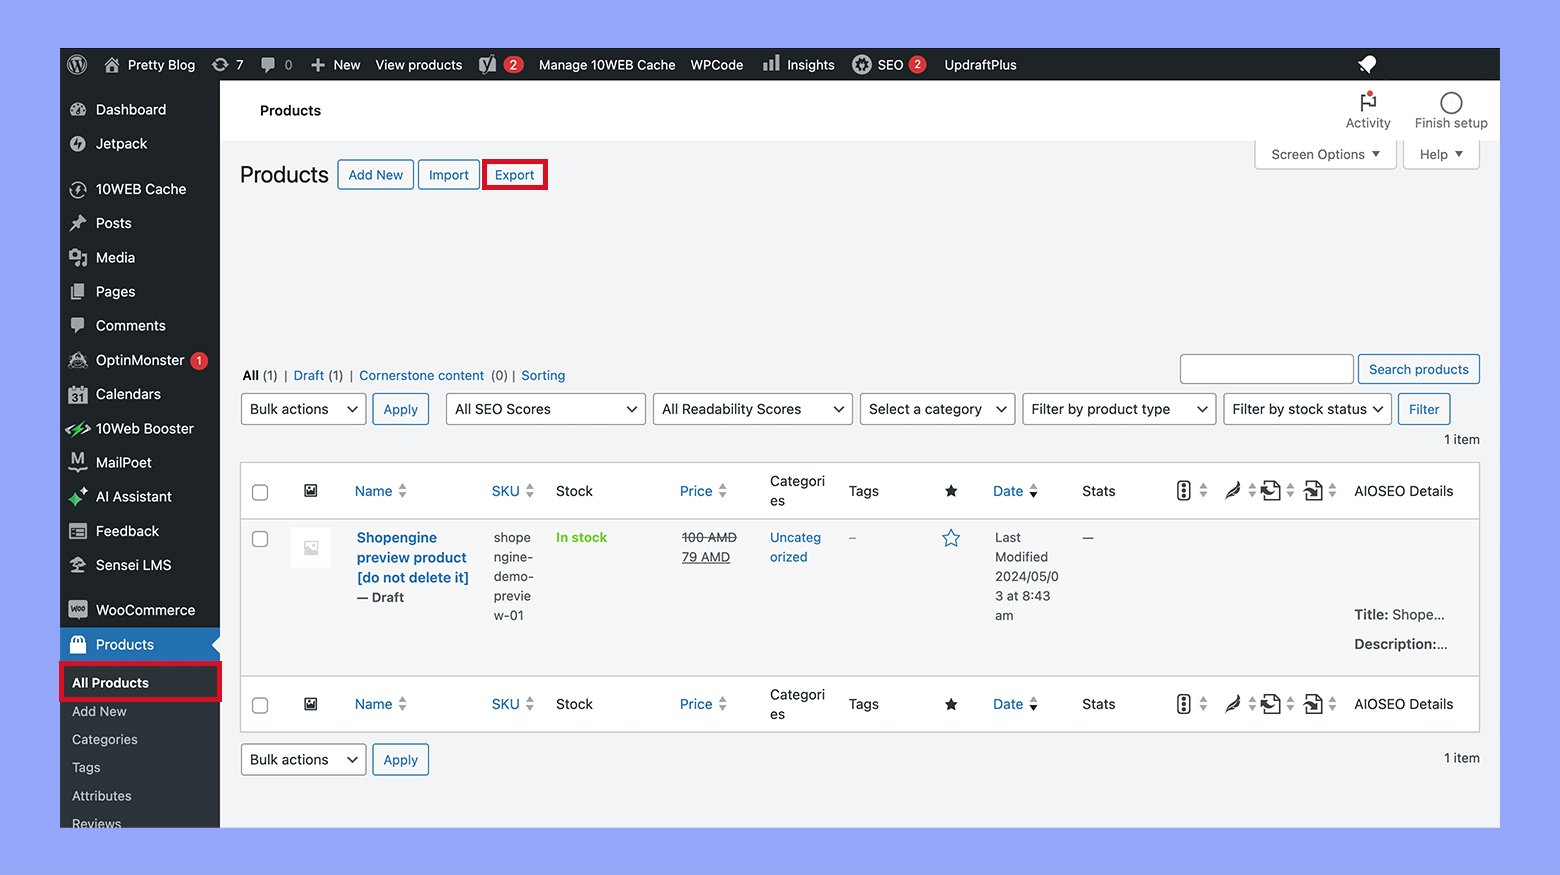
- Navigate to Products > All products in your WordPress Dashboard.
- Select the products you wish to export and click Export. This action opens the export wizard.
- Choose the product type and category for the export if necessary.
- Ensure you select Yes, export all custom meta to include all relevant product information, then click Generate CSV. This will create and download a CSV file containing the product data.

Step 2: Edit the CSV file
- Open the CSV file with a suitable program, such as Microsoft Excel.
- Locate the columns for the regular and sale prices.
- Update these columns with the new prices as needed. You can use formulas to apply a fixed or percentage discount, set uniform pricing for similar category items, and more.
- Save your changes to the file after making the necessary price adjustments.
Step 3: Import the updated CSV file back into WooCommerce
- Return to your WordPress Admin Dashboard and go to Products > All Products, then click Import.
- Choose the updated CSV file and select Update existing product to ensure your existing products are updated rather than creating new entries.
- Follow the prompts in the import wizard. Typically, you can leave most settings unchanged. Scroll to the bottom of the page and click Run the Importer.
- Upon successful import, a confirmation message will display indicating that all products have been updated successfully.
Now, the prices of your products should be updated, and you can verify the changes on your product page.
Method 4: How to change product price in WooCommerce using a plugin
To efficiently manage pricing for variable products and their variations in your WooCommerce store, you can use the ELEX WooCommerce Advanced Bulk Edit Products, Prices & Attributes plugin.
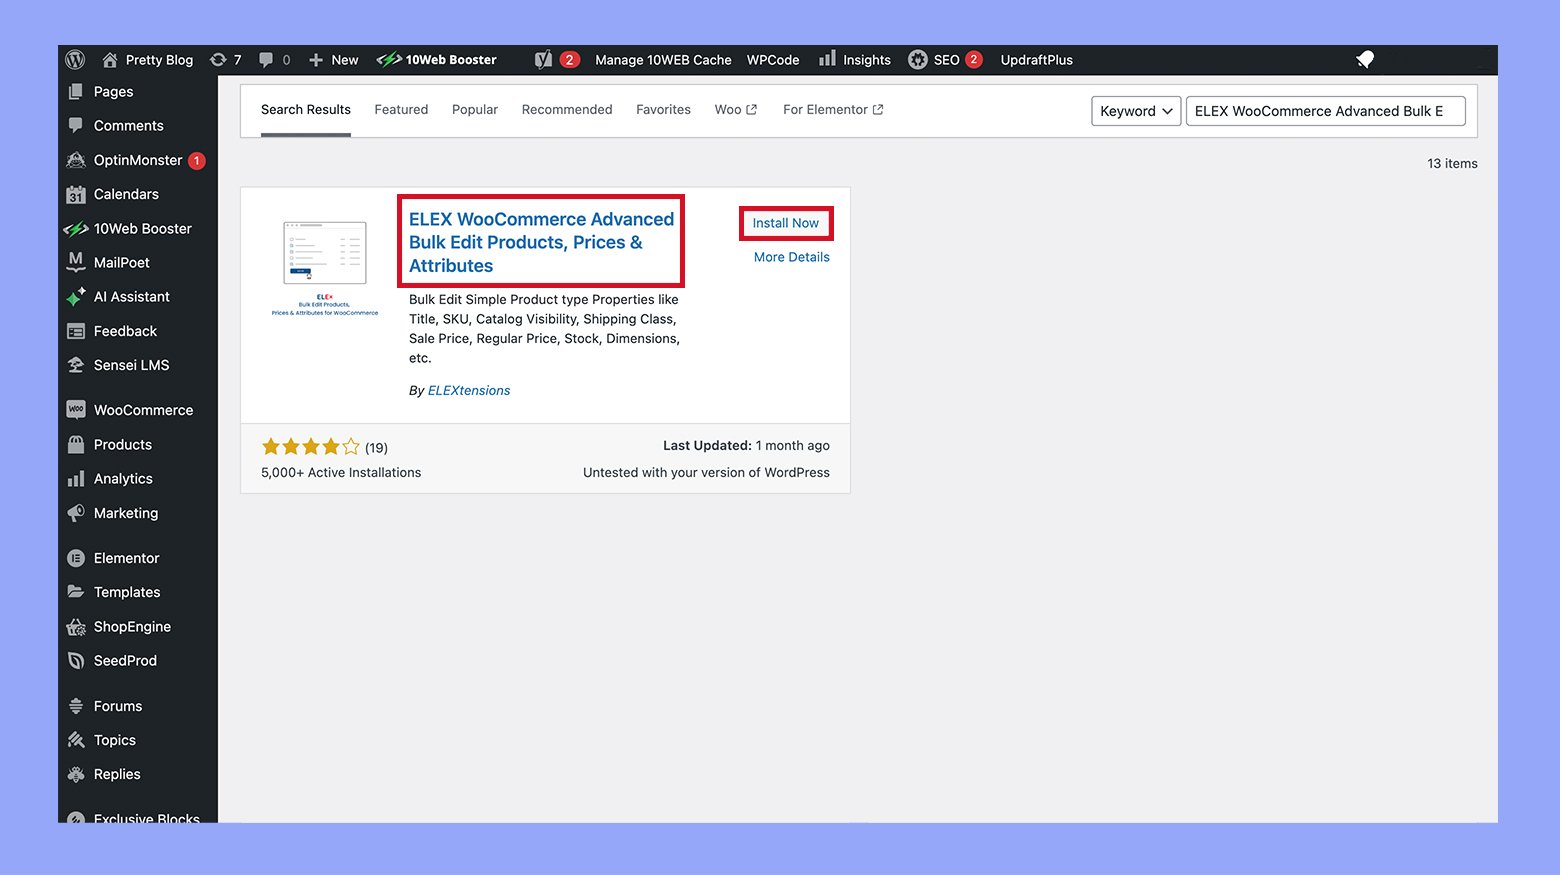
Here’s a step-by-step guide on how to bulk edit variable product pricing:
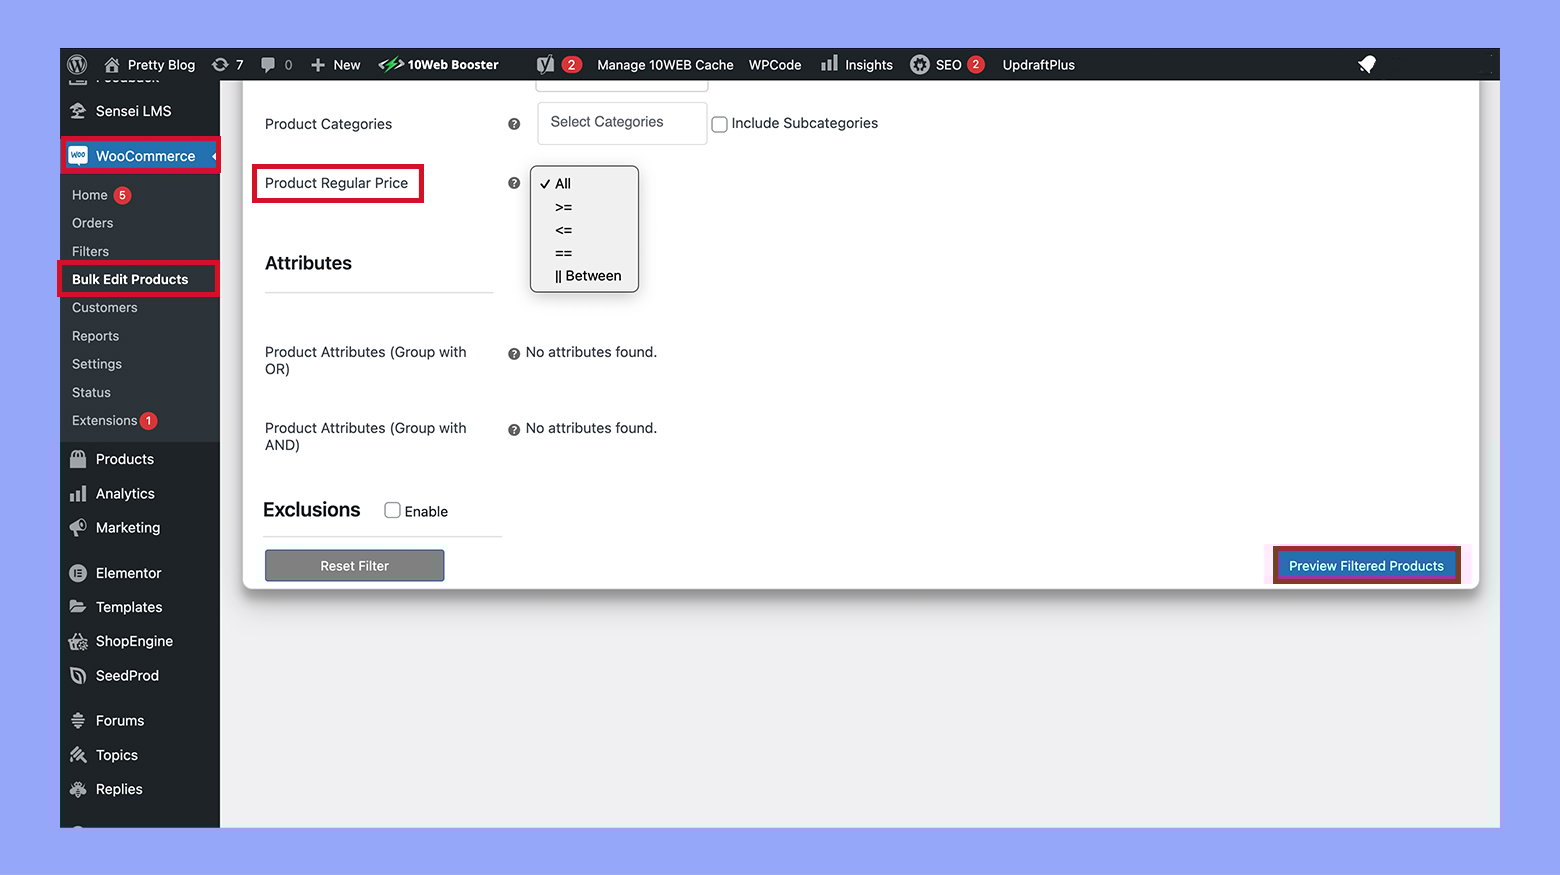
- After installing and activating the plugin, navigate to WordPress Dashboard > WooCommerce > Bulk edit products.
- In the Filter section, choose Variable (Variations) under the Product type. Set your filters for the regular price by selecting options such as greater than >, less than <, or equal to =.
- After applying the filters, click on Preview filtered products to see the variations that match your criteria.
- Move to the Edit products tab. Here, in the Price section, you can adjust the regular and sale prices according to your needs. Confirm the adjustments by previewing the changes to ensure they are applied correctly.
- Return to the Filter products section. This time, select Variable (parent) in the Product type area to focus on the main products which have variations like size or color.
- Follow the same steps as with the variations—adjust the pricing in the Edit products tab and preview the changes to ensure the new prices are correctly applied.
By following these steps, you can efficiently manage and update pricing for both the variations and the parent products in your WooCommerce store using the plugin. This method saves time and ensures consistency across your product listings.
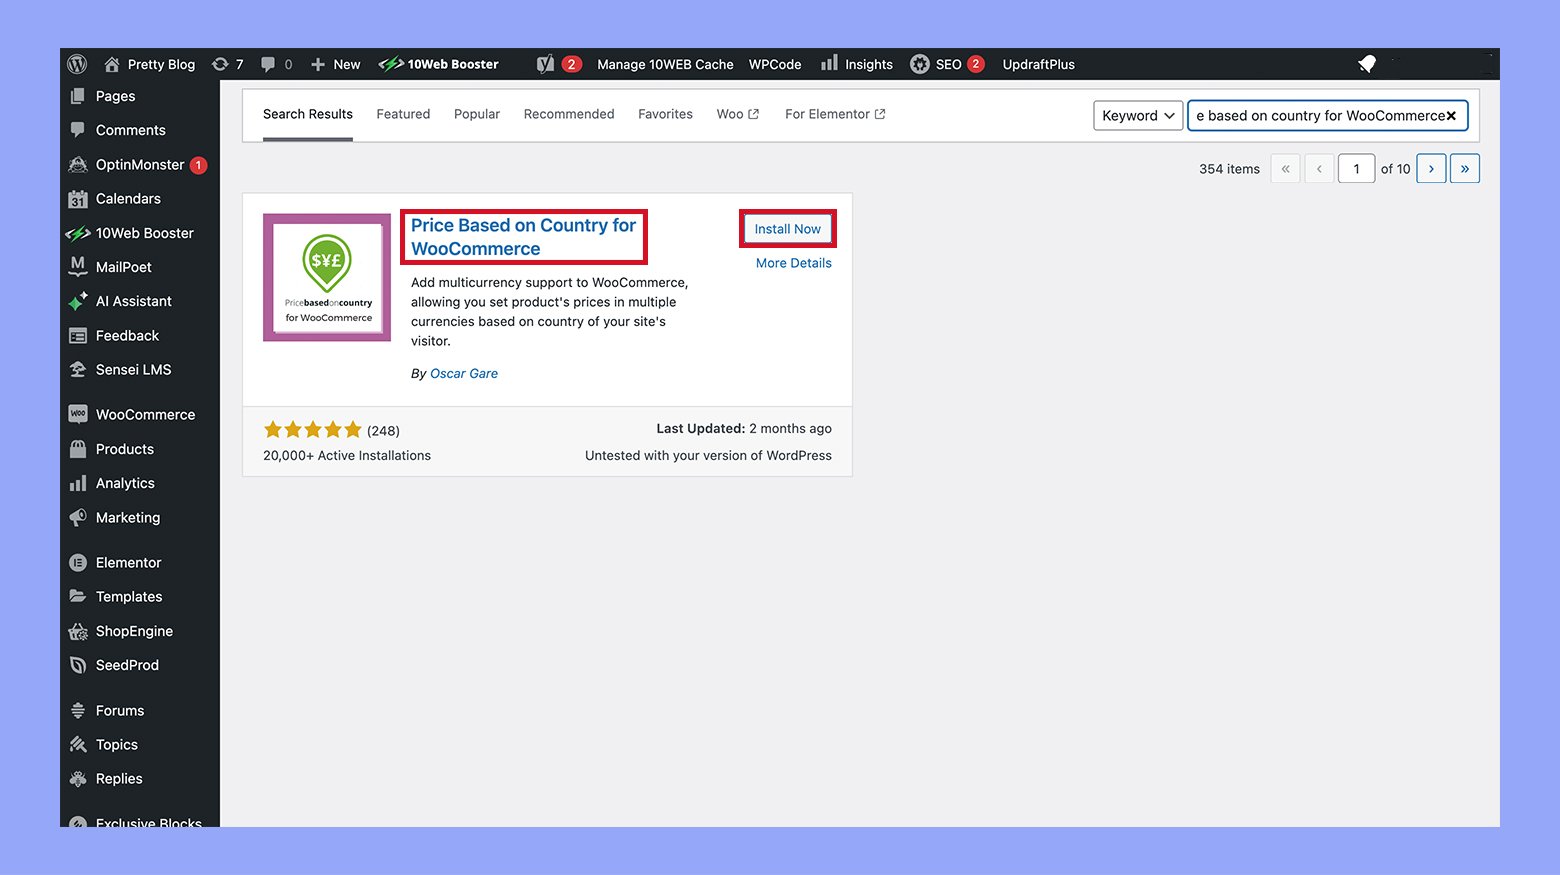
Method 5: How to change product price in WooCommerce based on country
- Start by installing the Price based on country for WooCommerce plugin as you would with any other WordPress plugin. Once installed, activate the plugin to enable its functionality.
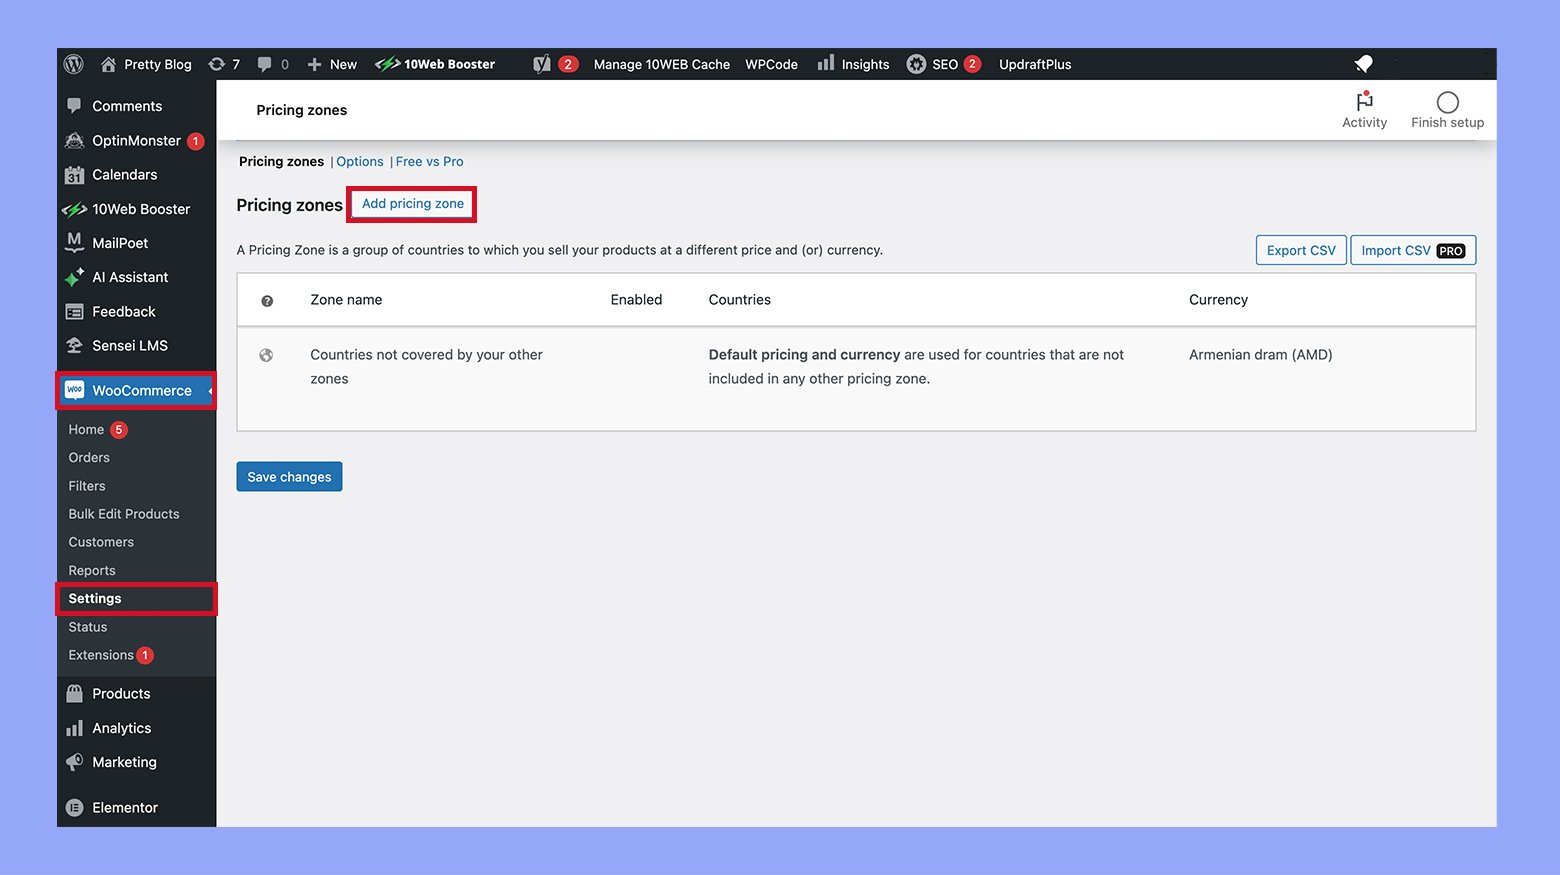
- Navigate to WooCommerce > Settings in your WordPress dashboard.
- From the settings menu, choose Pricing zones.
- Click on Add pricing zone. Fill in the necessary details such as the zone name (which typically corresponds to a country), the currency used, and the exchange rate.
- After entering all the details, click Save changes to apply the new pricing zone.
- Go to WordPress Dashboard > Products > All products, select a product, and click Edit.
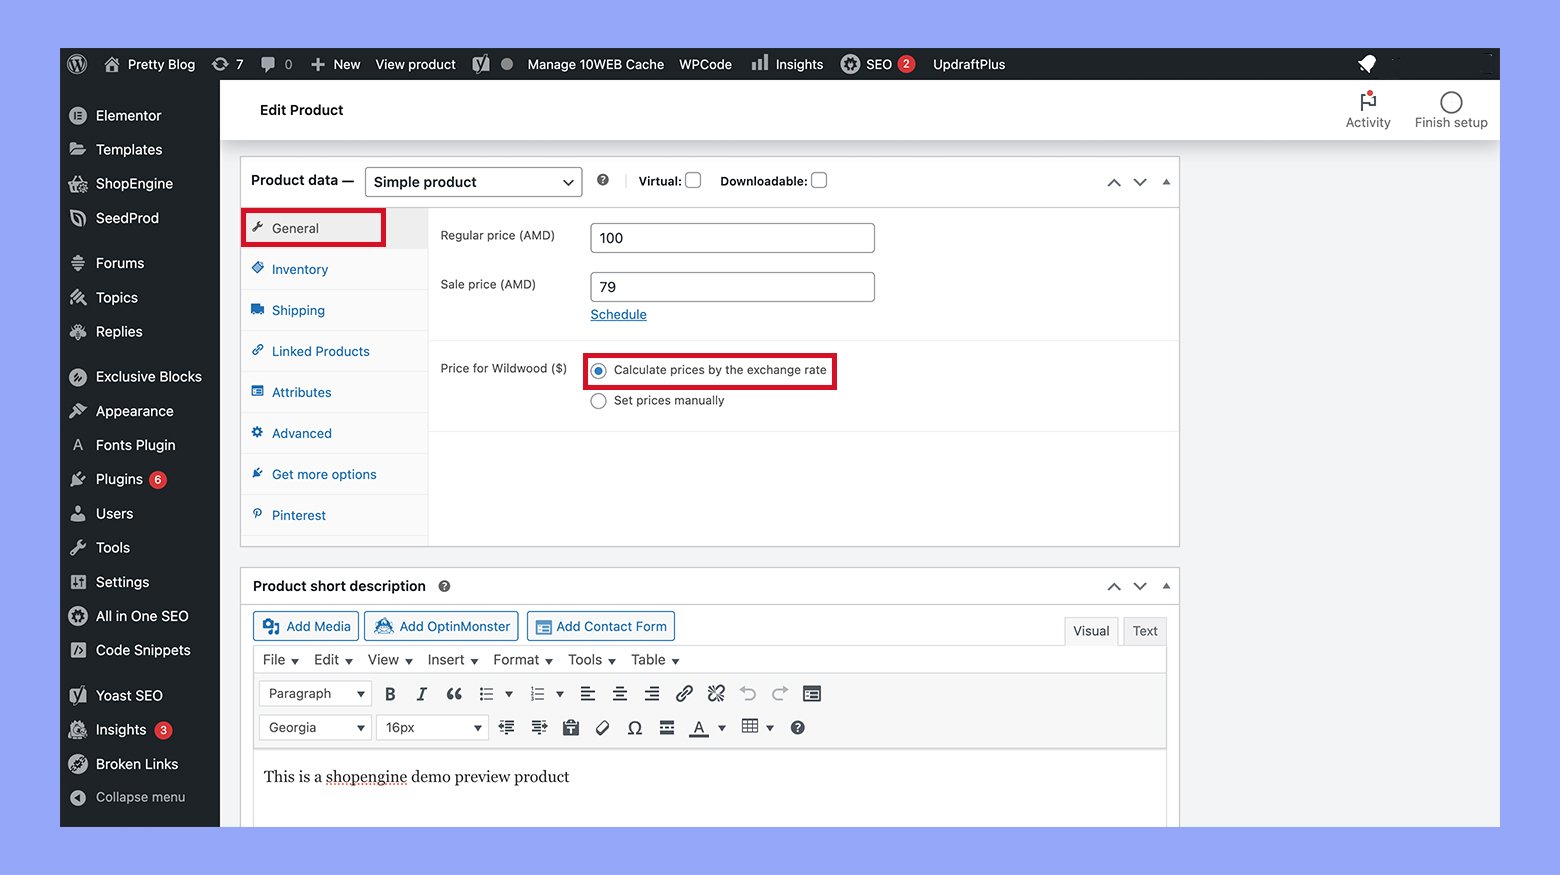
- Scroll down to the product data metabox and select the General tab.
- Here, you will see the option to enter a Regular price and a Sale price for the newly added country.
- You can manually set the price or enable the option Calculate prices by the exchange rate for the plugin to automatically adjust the price based on the current exchange rate. Additionally, you can set a specific date for sale prices by enabling Set specific date.
By following these steps, you can effectively manage and customize product pricing for different countries, making your products more accessible to international customers with appropriate pricing adjustments.
Method 6: How to change product price in WooCommerce by user roles
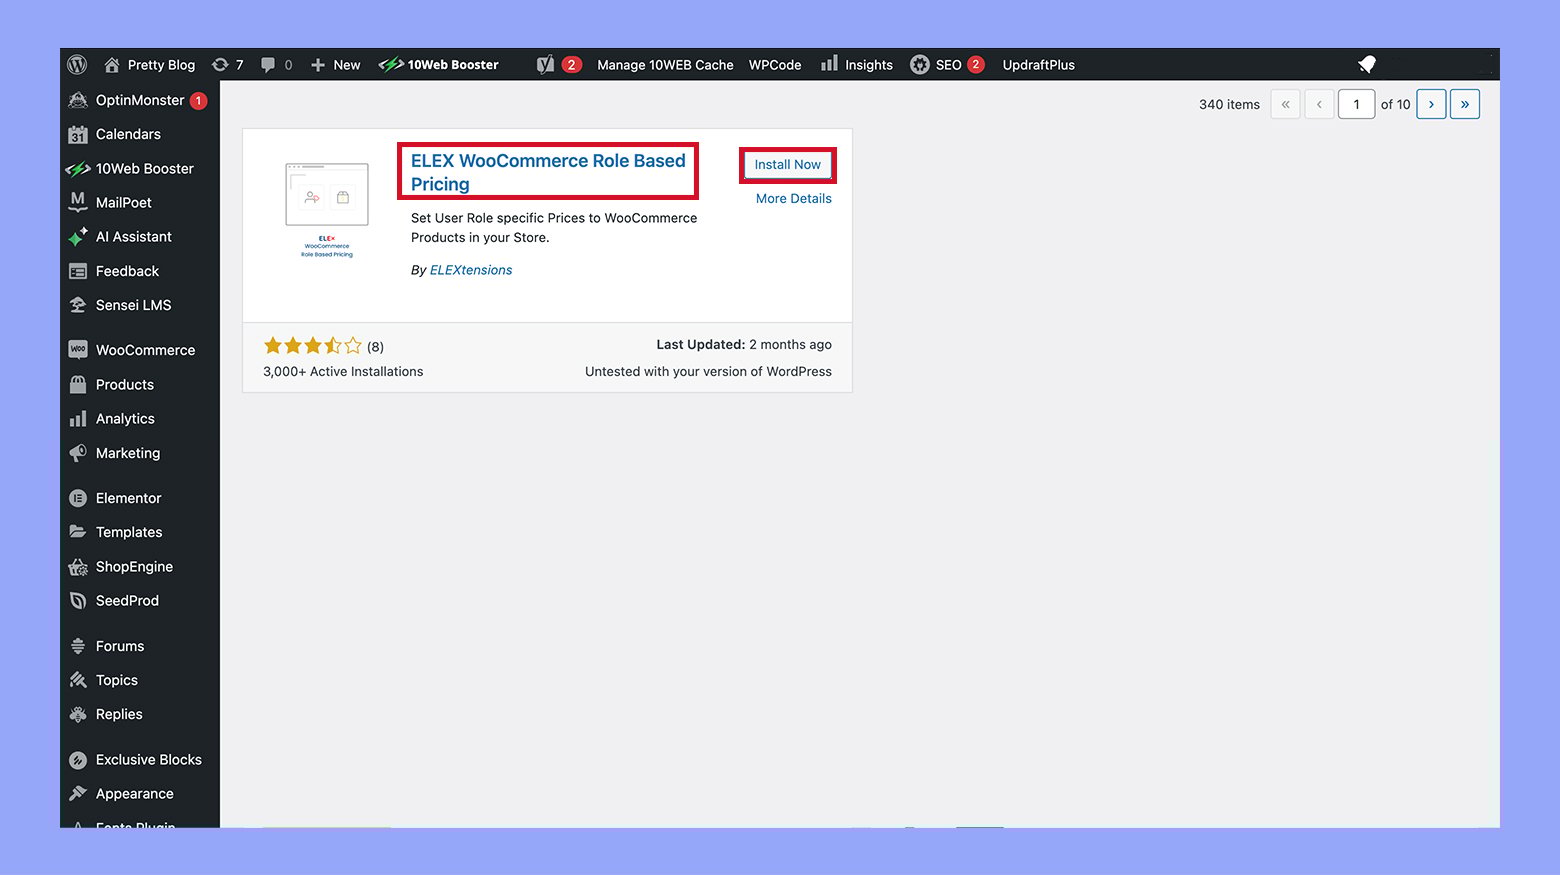
To price products differently for various user roles in WooCommerce, using a plugin can streamline the process. Here’s how to do it with a popular plugin, “WooCommerce Role Based Prices”:
- Navigate to your WordPress Dashboard, go to Plugins > Add new, search for WooCommerce role based pricing, install it, and then activate the plugin.
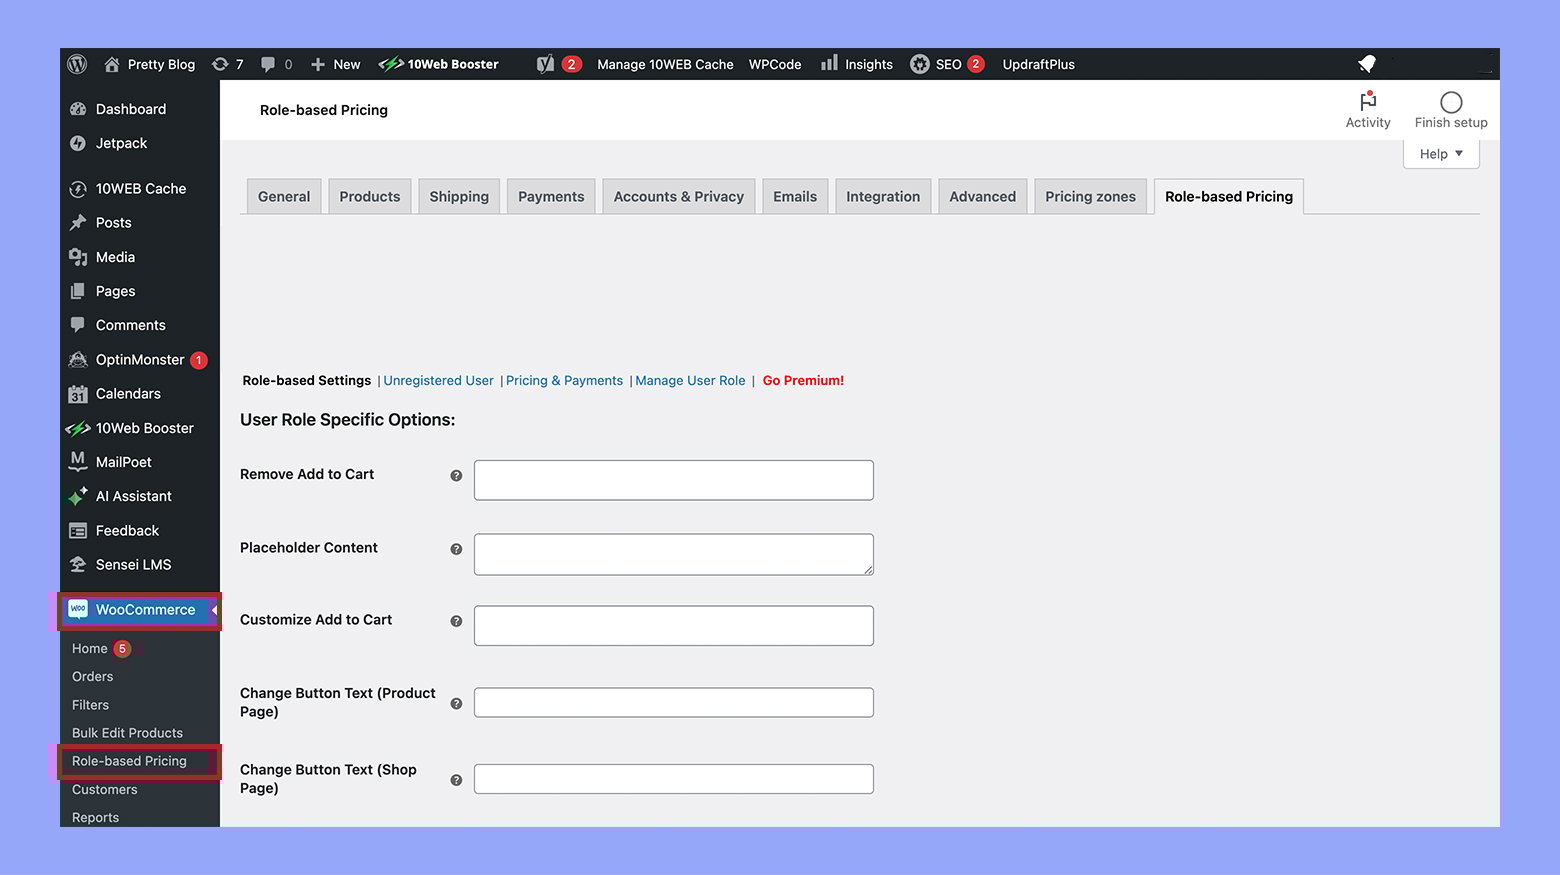
- Once activated, go to WooCommerce > Settings > Role based pricing to configure the plugin. Here, you can set up general settings or define specific role-based pricing rules.
- Go to the product edit page for any product in WooCommerce. Scroll down to the Product data > Role based pricing tab. Here, you can specify different prices for different user roles. Enter a price for each user role that needs a custom price.
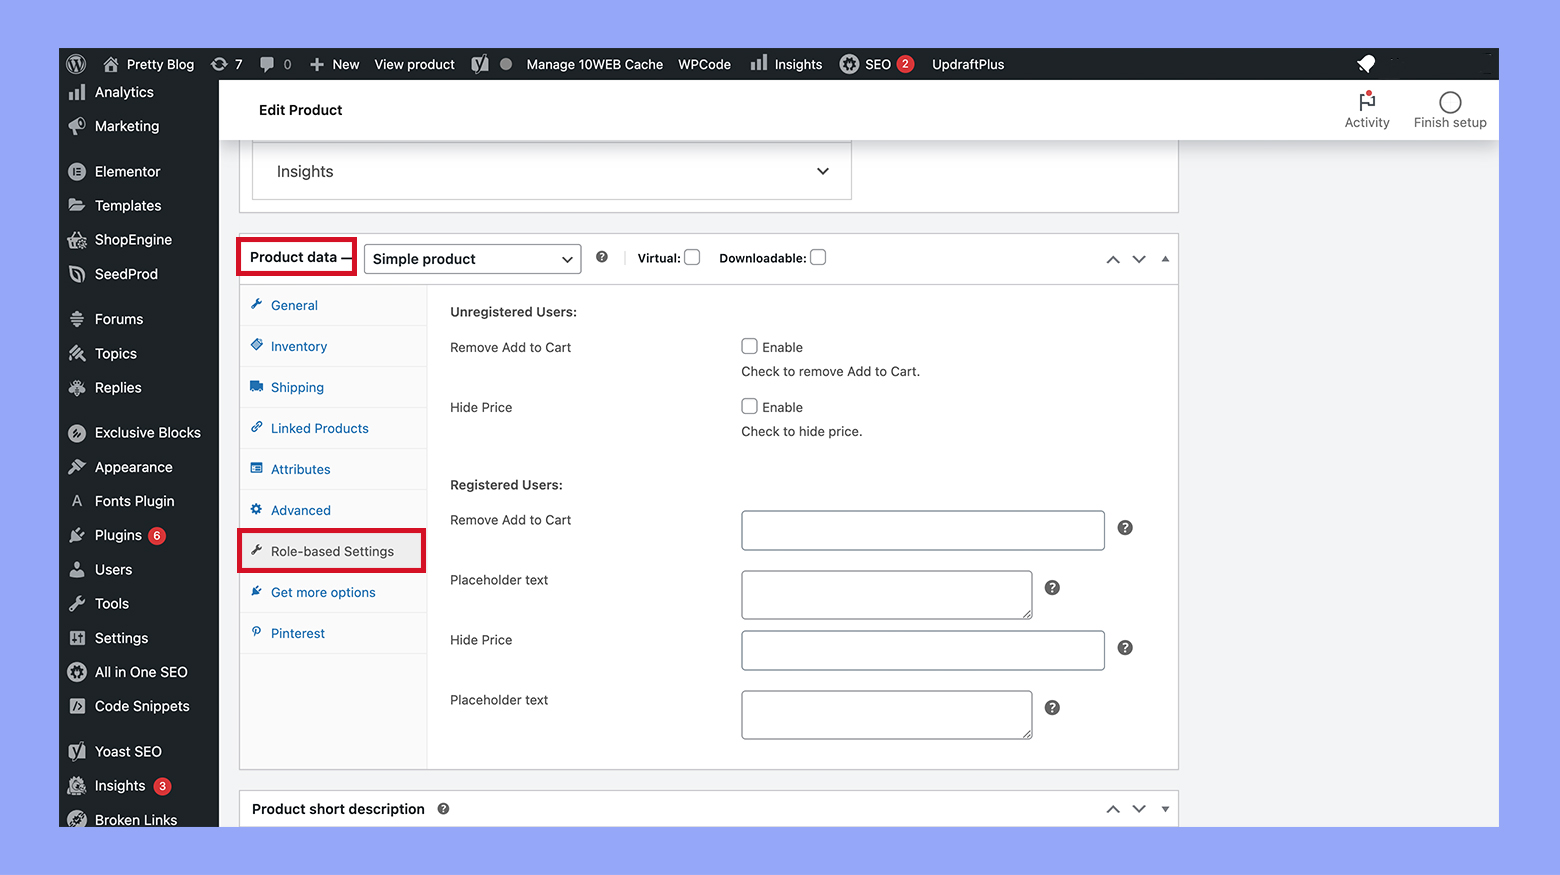
By using this plugin, you can easily manage and apply different prices for different user roles, allowing you to offer special pricing based on the customer’s role in your store.
Method 7: How to change product price in WooCommerce programmatically
Using woocommerce_get_price_html filter correctly:
- The woocommerce_get_price_html filter is used to change the displayed price HTML but does not actually alter the product’s price used in the cart calculations. If your intent is to show a different price visually but not affect the actual pricing logic (like discounts applied in the cart), this method is correct. However, if you need to change the price that impacts the cart’s total, you should look into hooks that alter the cart items directly, such as using the woocommerce_before_calculate_totals hook, which you also mentioned.
Modifying cart item prices properly:
- In the snippet using woocommerce_before_calculate_totals, you have correctly hooked into the cart calculation process. However, ensure that you use the correct method to set the new price. You should call $cart_item[‘data’]->set_price() correctly by providing the calculated price. Here is an enhanced version of your example:
add_action('woocommerce_before_calculate_totals', 'adjust_price_based_on_custom_attributes');

function adjust_price_based_on_custom_attributes($cart) {

 if (is_admin() && !defined('DOING_AJAX'))

 return;

 foreach ($cart->get_cart() as $cart_item_key => $cart_item) {
Assuming you have some logic to determine the new price, e.g., based on custom attributes
 $new_price = calculate_new_price_based_on_attributes($cart_item);

 $cart_item['data']->set_price($new_price);

 }

}

function calculate_new_price_based_on_attributes($cart_item) {
Implement your price calculation logic here
Return the new price
 return 20; // Example fixed new price

}
- Make sure to replace the calculate_new_price_based_on_attributes() function’s content with the actual logic for adjusting the price.
- Remember to replace placeholder names like your_custom_price_function with the specific function names that reflect their functionality. This helps in maintaining the code better.
Troubleshooting common pricing issues in WooCommerce
When managing your WooCommerce store, encountering pricing issues can be frustrating. This guide provides strategies to help you efficiently resolve common problems and ensure your store operates smoothly.
Updating prices doesn’t reflect on the site
- Clear cache: After updating prices, changes might not appear due to caching. Clear your site’s cache from your WordPress dashboard, check any server-side caching through your hosting provider, and ensure no caching plugins are interfering. Also, clear your browser cache and any CDN (Content Delivery Network) caches if applicable.
- Confirm updates: Ensure you click the Update button on the product page to save any changes you make to prices.
Incorrect tax calculation
- Configure tax settings: Navigate to WooCommerce > Settings > Tax. Check your tax rates and settings to ensure they reflect your business needs. Make sure the ‘Prices entered with tax’ setting aligns with how you input prices in WooCommerce.
- Check tax classes: Review tax classes assigned to each product. Ensure that products have the correct tax status, especially if some items are tax-exempt or subject to different rates.
Applying percentage discounts doesn’t work
- Check pricing classes: Verify that the correct product classes are targeted when setting up sales or discounts.
- Inspect discount rules: Ensure that the percentage discount is set up correctly under WooCommerce > Marketing > Coupons. Check for any date restrictions, usage limits, or other conditions that might prevent the coupon from being applied.
- Plugin conflicts: Look for conflicts with other plugins, especially those that manage dynamic pricing or memberships, as they can override coupon rules.
Prices change unexpectedly
- Review third-party plugins: Some plugins might update prices based on factors like currency rates. Check if any plugins have automatic updating features that might be impacting prices.
- Monitoring changes: Consider implementing logging or monitoring through plugins to track when and why prices change. This can help identify and address issues more quickly.
Additional recommendations
- Perform a conflict test: If issues persist, disable other plugins and switch to a default theme (such as Twenty Twenty-One) to see if the issue resolves. This can help identify if a third-party extension is causing the problem.
- Useful tools: Utilize tools for caching, logging, and monitoring. Plugins like WP Rocket for caching, Activity Log for monitoring changes, and UpdraftPlus for backups can enhance your site management capabilities.
10Web vs WooCommerce price customization
- Integration and accessibility:
- WooCommerce: Fully integrated within the WordPress environment; accessible directly through the WordPress dashboard.
- 10Web: Centralized platform that manages multiple WooCommerce sites; not native to WordPress but provides a unified management interface.
- Ease of manual updates:
- WooCommerce: Manual price updates are straightforward but can be tedious without plugins for complex strategies.
- 10Web: Simplifies the management and updating process, particularly useful for stores with large inventories or multiple sites.
- Bulk editing:
- WooCommerce: Basic bulk editing features are native; extended capabilities require additional plugins.
- 10Web: Offers more advanced bulk editing tools, making it easier to apply complex pricing rules across products.
- User interface:
- WooCommerce: Traditional WordPress interface, familiar to users of the platform.
- 10Web: More modern and user-friendly interface, offering a better experience for new users or those managing large-scale operations.
- Customization flexibility:
- WooCommerce: Extensive with plugins, allowing customization for dynamic, tiered, or group-based pricing.
- 10Web: Typically includes built-in tools for advanced pricing strategies, reducing the need for external plugins.
- Dependency on additional tools:
- WooCommerce: High dependency on plugins for advanced pricing functionalities.
- 10Web: Less dependency on plugins due to integrated advanced features.
- Automation and advanced features:
- WooCommerce: Limited to what plugins are installed; no native automation for dynamic pricing adjustments.
- 10Web: Offers automation features like AI-driven pricing suggestions and automatic adjustments based on analytics.
- Analytics and decision support:
- WooCommerce: Basic analytics available; enhanced insights require integration with additional analytics plugins.
- 10Web: Includes comprehensive analytics tools that help optimize pricing strategies directly within its platform.
While WooCommerce offers a familiar and direct approach for managing product prices within the WordPress environment, 10Web provides a more robust, centralized platform. The user-friendly interface and reduced reliance on additional plugins make 10Web a compelling choice for those looking to streamline their operations and leverage data-driven insights for optimal pricing decisions. Overall, if your goal is to maximize efficiency, scalability, and strategic pricing capabilities, 10Web clearly stands out as the superior option.
Conclusion
Managing product pricing in WooCommerce effectively involves understanding the platform’s features and aligning them with your store’s needs. Utilize WooCommerce’s capabilities to adjust prices for various product types and scenarios—individually, in bulk, programmatically, or based on geographic differences. We hope this guide has helped you understand how to change product price in WooCommerce in a way that best suits your needs. By staying proactive and adaptable, you can align your pricing strategies with market demands and maintain a competitive edge in the ecommerce space.
Looking to sell online?
Create your online store in minutes
Create your online store in minutes with 10Web AI Ecommerce Website Builder.