

When you find yourself tangled up in the frustrating issue where WordPress isn’t sending emails correctly, or worse, not at all, it’s easy to feel stuck. This problem can manifest in various ways, from missing notifications and password reset emails to order confirmations if you’re running an eCommerce site with WooCommerce. It’s crucial to note that most WordPress hosting services don’t include email hosting. Despite this, your WordPress site should still manage to send out transactional emails, which are essential for various site-related notifications.
In tackling the WordPress email sending issue, it’s essential to understand that the problem often doesn’t lie with the server. Instead, it’s more likely that the email functionality within your WordPress installation is set up incorrectly or there’s some form of incompatibility at play.
In this detailed guide, we’ll navigate through diagnosing why WordPress fails to dispatch emails to you or your users. Our journey will span from sites with daily bloggers to those with virtual storefronts powered by WooCommerce, aiming to restore your site’s ability to communicate effectively through email.
Moreover, we’ll delve into the intricacies of some of the most widely-used contact form plugins. By doing so, we aim to pinpoint the reasons behind their potential email delivery failures and provide you with actionable solutions to get your WordPress site’s email functionality back on track.
Variations of the Issue
The email sending problem in WordPress can manifest in various forms depending on the setup and plugins you’re using. Here are a few ways this issue might present itself:
- WooCommerce order confirmation emails not being sent.
- Contact form submissions not reaching your inbox.
- Failure to send out password reset emails.
- Missed notifications about new user registrations or comments.
- Email delivery failure from specific plugins.
Why does this happen?
Several reasons can contribute to WordPress not sending emails, including:
Server restrictions: Some hosting providers limit or block the use of the PHP mail function to prevent abuse and spam.
PHP mail function configuration: If the PHP mail function isn’t correctly configured on your server, emails won’t be sent.
Spam filters: Email service providers use sophisticated algorithms to filter out spam, and sometimes legitimate WordPress emails get caught in these filters.
Email server issues: A misconfigured server can be a silent saboteur of your email delivery efforts. If your server isn’t set up to send emails correctly, or if the PHP mail function is disabled or restricted, your WordPress site will struggle to send emails.
Emails going to spam: When your WordPress emails are sent but consistently land in spam folders, it suggests a problem with email deliverability and sender reputation. This situation often arises due to the lack of proper email authentication methods like SPF (Sender Policy Framework), DKIM (DomainKeys Identified Mail), and DMARC (Domain-based Message Authentication, Reporting, and Conformance) records.
Form plugin: Many WordPress sites rely on contact form plugins to communicate with visitors. However, problems arise when these plugins are configured to send emails that appear to be from the user’s email address, a practice known as “spoofing.” Email services are on high alert for spoofed emails, often marking them as spam or blocking them outright.
Initial troubleshooting
There are some initial steps you can take to understand where you will need to take a deeper look.
Test to see if your server is sending emails
A straightforward first step in this journey is utilizing the free Check Email plugin—a simple, yet effective tool designed to shed light on whether your WordPress installation and server are configured to send emails properly.
Using the Check Email plugin
- Navigate to the plugin section of your WordPress dashboard. Search for Check Email, install it, and activate the plugin.
- Once activated, go to Check & Log Email in your WordPress dashboard. Here, you’ll be prompted to enter an email address where the test email will be sent.
- Fill in a valid email address and click on Send test email.
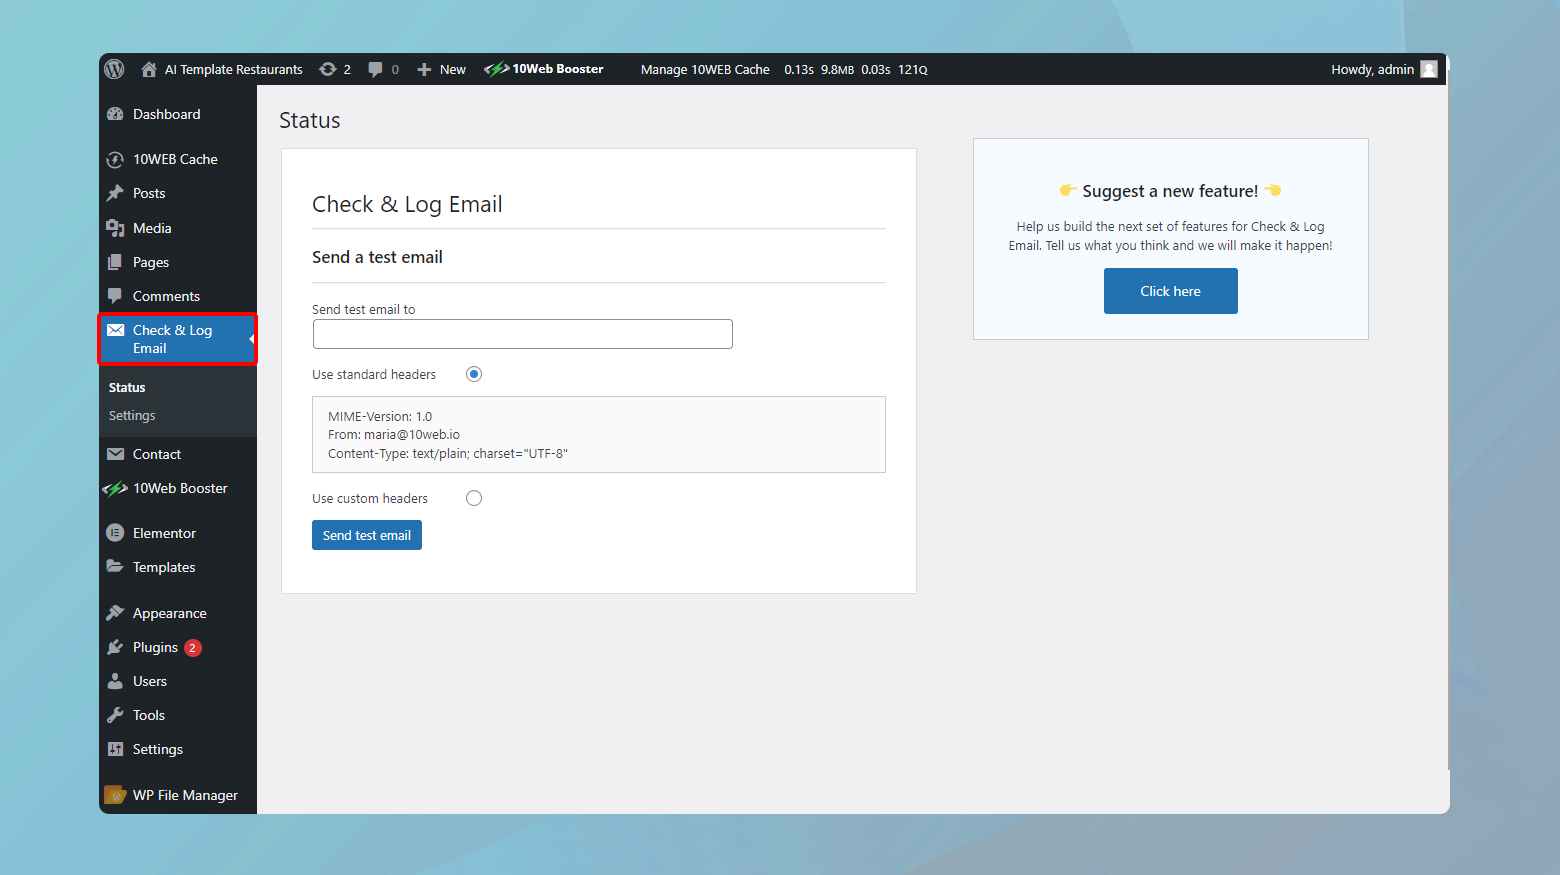
After sending the test email, the plugin will display a confirmation message. Next, check the inbox (and don’t forget the spam or junk mail folder) of the email address you used for testing. If you find an email with the subject line Test email from https://yourdomain.com, congratulations! Your WordPress site and server are capable of sending emails.
If the test email successfully lands in your inbox, this indicates that your WordPress and server setup for sending emails is functioning correctly. However, if emails are still not being received as expected (especially from contact forms), the issue likely lies within the contact form plugin itself or an incompatibility with another plugin or theme.
- Review the settings of your contact form plugin. Ensure that it’s correctly configured to send emails. Pay special attention to the “from” email address and SMTP settings if available.
- If you suspect a misconfiguration or incompatibility, don’t hesitate to reach out to the plugin’s developer or support team. Inform them about the successful email test with the Check Email plugin, as this information can help narrow down the issue.
Determine if your contact form is sending spoof
If your WordPress server is primed to send emails but you’re still encountering issues, it’s time to zero in on the real reason: the plugins, particularly those managing your contact forms. Contact form plugins are indispensable for interactive websites, yet they can inadvertently send emails that get flagged by email clients as suspicious or, worse, as spoof emails. This misidentification shares similarities with spam emails, leading to them being flagged and possibly never reaching their intended destination.
Understanding the spoof email issue
The core of the spoof email issue lies in the discrepancy between the email address displayed in the From: field and the actual sender’s email address. For example, if your contact form is set up to show the form submitter’s email address in the From: field, but the email technically originates from your site’s server, email clients can raise a red flag. They detect this mismatch and might classify the email as spoofed or fraudulent.
Another scenario that can trigger email delivery issues is when emails are sent from and to the same email address. If your contact form plugin uses your admin email address as the default sender and is also configured to send submissions to this same address, some email providers may balk at delivering these messages, although this is generally less of a concern than the spoofing issue.
Tackling the problem
Fortunately, with a few tweaks to your contact form plugin’s settings, you can navigate around these issues and ensure your emails are delivered as intended. Here are some strategies to consider:
Modify the “From” email address: Instead of using the submitter’s email address in the From: field, configure your contact form to use a generic email address from your domain, such as info@yourdomain.com. This maintains the integrity of the email while avoiding the mismatch that triggers spoof flags. You can still keep the submitter’s email address in the Reply-To: field, allowing you to respond directly to their inquiries.
Utilize an SMTP plugin: Implementing an SMTP plugin for WordPress can also circumvent these issues by configuring your emails to be sent through a reliable third-party mail server. This setup enhances the legitimacy of your emails and significantly reduces the chances of them being marked as spoof.
Test your adjustments: After making these changes, conduct tests by submitting entries through your contact form and monitoring the delivery of notification emails. This direct feedback loop allows you to quickly identify whether the adjustments have resolved the issue.
Addressing WordPress email sending issues
When dealing with the issue of WordPress not sending emails correctly, it’s crucial to understand that any contact form plugin could be the reason. Popular plugins like:
- Contact Form 7
- Gravity Forms
- Ninja Forms
- Happy Forms
- weForms
- Jetpack Contact Form
- Formidable Forms
are incredibly useful but not immune to the common pitfalls that lead to email delivery problems. Each plugin might require a slightly different approach to resolve these issues, yet there are overarching strategies that can effectively mitigate the problem across the board. Let’s delve into how to address WordPress’s email sending issues before diving into plugin-specific solutions.
Whitelist the email address
When your WordPress site’s emails consistently find their way into spam, it disrupts communication and may impact user engagement negatively. Encouraging your users to whitelist your emails is a straightforward and effective method to ensure your messages reach their intended inbox.
Adding to contacts: Advise users to add your email address to their contacts. This action signals to the email service that communications from this address are welcome and should not be marked as spam.
For Gmail users: They can click on the email, find the sender information at the top, hover over the sender name, and then click Add to Contacts to save your email address.
Moving emails from spam to inbox: If your email has already been flagged as spam, instruct users to navigate to their Spam folder, open the email from your site, and then click on the Not spam button. This action moves the current email to the inbox and helps train the email provider about the user’s preference.
In Gmail: Users can further ensure future emails are not marked as spam by opening the email within the spam folder and selecting the Report not spam option. Following this, moving the email to the inbox solidifies the user’s preference. As an added measure, they should also add the email address to their contacts.
Regular reminders: It might be beneficial to remind users periodically to check their spam folders for emails from your site, especially if you’re sending important notifications, updates, or responses to inquiries. These reminders can be subtly included in website notifications, footer messages, or social media posts.
Review and optimize your email address
Reviewing and optimizing the email address from which your WordPress site sends emails is a crucial step in ensuring your emails reach their intended recipients. The default configuration often uses the admin email address, which, depending on your setup, might be a generic address like info@, contact@, sales@, etc. While these addresses are convenient, they can sometimes trigger email providers’ spam filters, leading to your emails being marked as spam more frequently than you’d like.
A more personalized or professional-looking email address can significantly reduce the likelihood of your emails being flagged as spam. Use an email address that includes your name or a specific department within your company that directly relates to the email’s purpose.
To ensure you don’t miss any replies sent to your new professional email address, set up email forwarding or an alias that directs all incoming emails to your primary email inbox. Most hosting providers and email services offer straightforward options to configure this.
An email alias acts as a forwarder to your main email address, allowing you to manage emails from multiple addresses in a single inbox. This setup keeps your communication streamlined without the need to check multiple email accounts.
Authenticate your email
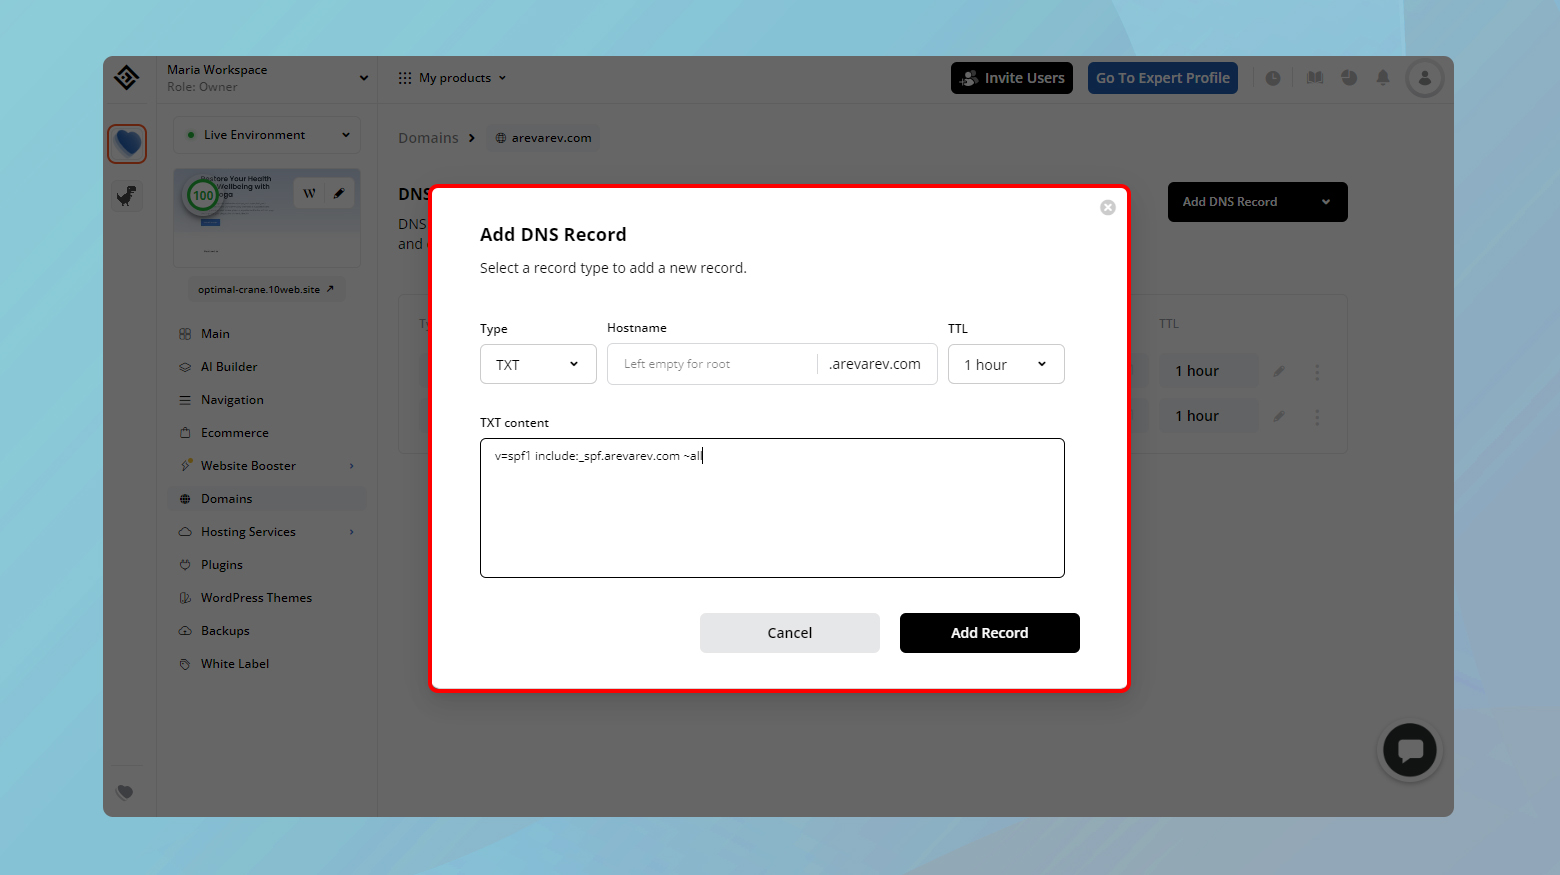
Email authentication plays a pivotal role in ensuring that emails sent from your WordPress site are delivered successfully to your recipients’ inboxes and not flagged as spam. Authentication methods verify your domain’s identity, proving to email providers that your emails are legitimate and authorized by the domain owner. This process significantly reduces the likelihood of your emails being marked as spam. To authenticate your domain for email, you’ll typically need to configure SPF, DKIM, and DMARC records in your domain’s DNS settings. Here’s a step-by-step guide to get you started:
SPF (Sender Policy Framework)
SPF helps to prevent spammers from sending messages on behalf of your domain. It specifies which mail servers are permitted to send email from your domain.
Access your domain’s DNS settings and add a new TXT record. The value of this record will specify the mail servers authorized to send emails on behalf of your domain.
A typical SPF record looks like this: v=spf1 include:_spf.example.com ~all, where _spf.example.com should be replaced with your email provider’s SPF record.
DKIM (DomainKeys Identified Mail)
DKIM adds a digital signature to every email, allowing the recipient to verify that the email was indeed sent from your domain and hasn’t been tampered with.
This requires generating a pair of cryptographic keys (public and private). The public key is added to your DNS as a TXT record, and the private key is kept on your email server. Your email service provider will typically guide you through generating these keys and setting up DKIM.
DMARC (Domain-based Message Authentication, Reporting, and Conformance)
DMARC uses SPF and DKIM to provide instructions to the email receiver on what to do if neither of those authentication methods passes. It also reports back to the sender about messages that pass and/or fail DMARC evaluation.
Add a DMARC record to your DNS settings as a TXT record.
An example DMARC record looks like this: v=DMARC1; p=none; rua=mailto:postmaster@example.com, where p=none specifies the policy (none, quarantine, or reject) and mailto:postmaster@example.com is where you’d receive reports about DMARC failures.
Additional tips
Use online tools: Tools like MXToolbox and Google’s Postmaster Tools can help you verify your SPF, DKIM, and DMARC settings and diagnose any issues.
Consult your email provider: Many email service providers offer detailed guides on setting up these records correctly for their service. Don’t hesitate to reach out to their support if you’re unsure.
Regular monitoring: Once set up, it’s important to monitor the effectiveness of your email authentication settings. Look out for DMARC reports or feedback from users about email deliverability.
Use an SMTP in WordPress for sending emails
If the standard email sending functions of your WordPress site are failing — as confirmed by the email test you’ve run — integrating a third-party SMTP provider can help solve the issue. SMTP, or Simple Mail Transfer Protocol, is the industry standard for sending emails. Utilizing an SMTP service can dramatically improve the reliability and deliverability of your emails, bypassing the limitations or configuration issues of your server. Even better, there are several free SMTP services available, such as the Gmail SMTP server, which means enhancing your email deliverability might not cost you anything beyond a bit of setup time.
Here’s a basic guide on how to integrate a free SMTP server with your WordPress site:
Choose an SMTP provider
While there are numerous SMTP services available, for beginners or those looking to minimize costs, the Gmail SMTP server is a great choice. It’s reliable, relatively easy to set up, and free for a certain volume of emails. Other free options include Sendinblue, Mailgun (with a limited free tier), and SendGrid (also offering a free tier).
Create necessary credentials
For Gmail, you’ll need a Gmail account. It’s recommended to create a dedicated account for your WordPress site rather than using a personal account. For other services, you’ll typically need to sign up and create an API key or SMTP credentials, which will be used to authenticate your email sending requests.
Install an SMTP plugin in WordPress
To integrate your chosen SMTP service with WordPress, you’ll need an SMTP plugin. Popular choices include WP Mail SMTP, Easy WP SMTP, and Post SMTP Mailer/Email Log. Install and activate your chosen plugin via the WordPress dashboard.
Configure the SMTP plugin
After activation, navigate to the plugin’s settings page in your WordPress dashboard. Here’s where you’ll enter the SMTP details provided by your SMTP service. For Gmail as an example, you would enter the following settings:
- SMTP Host: smtp.gmail.com
- SMTP Port: 587 for TLS/STARTTLS or 465 for SSL
- Encryption: Use TLS or SSL as recommended by your SMTP provider
- Authentication: Yes
- Username: Your Gmail email address
- Password: Your Gmail password (For Gmail, you might need to generate an App Password if 2-Step Verification is enabled)
Send a test email
Most SMTP plugins offer a feature to send a test email. Use this function to verify that your configuration is correct and that emails are now being sent successfully through your SMTP provider.
Monitor and adjust if necessary
After successfully setting up SMTP, monitor your email deliverability closely. Check for any feedback from users and be prepared to adjust settings if needed. For example, if you start sending a high volume of emails, you might need to switch from a free to a paid SMTP service to handle the load.
Integrating an SMTP service with your WordPress site can seem a bit technical at first, but it’s a highly effective solution to resolve email deliverability issues. By following these steps, you can ensure your site’s emails reach their intended recipients without getting lost or marked as spam.
How to tweak settings for popular forms plugins to improve email delivery
Experiencing issues with form entries not sending emails, despite your server being correctly configured and SMTP being added, can be a real head-scratcher. Especially after you’ve double-checked the spam folder and found nothing. There’s often a straightforward fix by tweaking the settings within your forms plugin. Below, we’ll dive into some adjustments for the most popular forms plugins out there.
WordPress Contact Form 7
The adjustment centers on enhancing the reliability and deliverability of emails sent from your WordPress site. By using an email address associated with your domain in the From field, you significantly increase the chances that your emails will be received and not filtered into oblivion by spam filters. It’s a small change with a big impact, ensuring your communications reach their intended audience every time. Let’s break down the steps to ensure your form’s emails not only send but land where they’re supposed to.
Fixing email sending issues in Contact Form 7
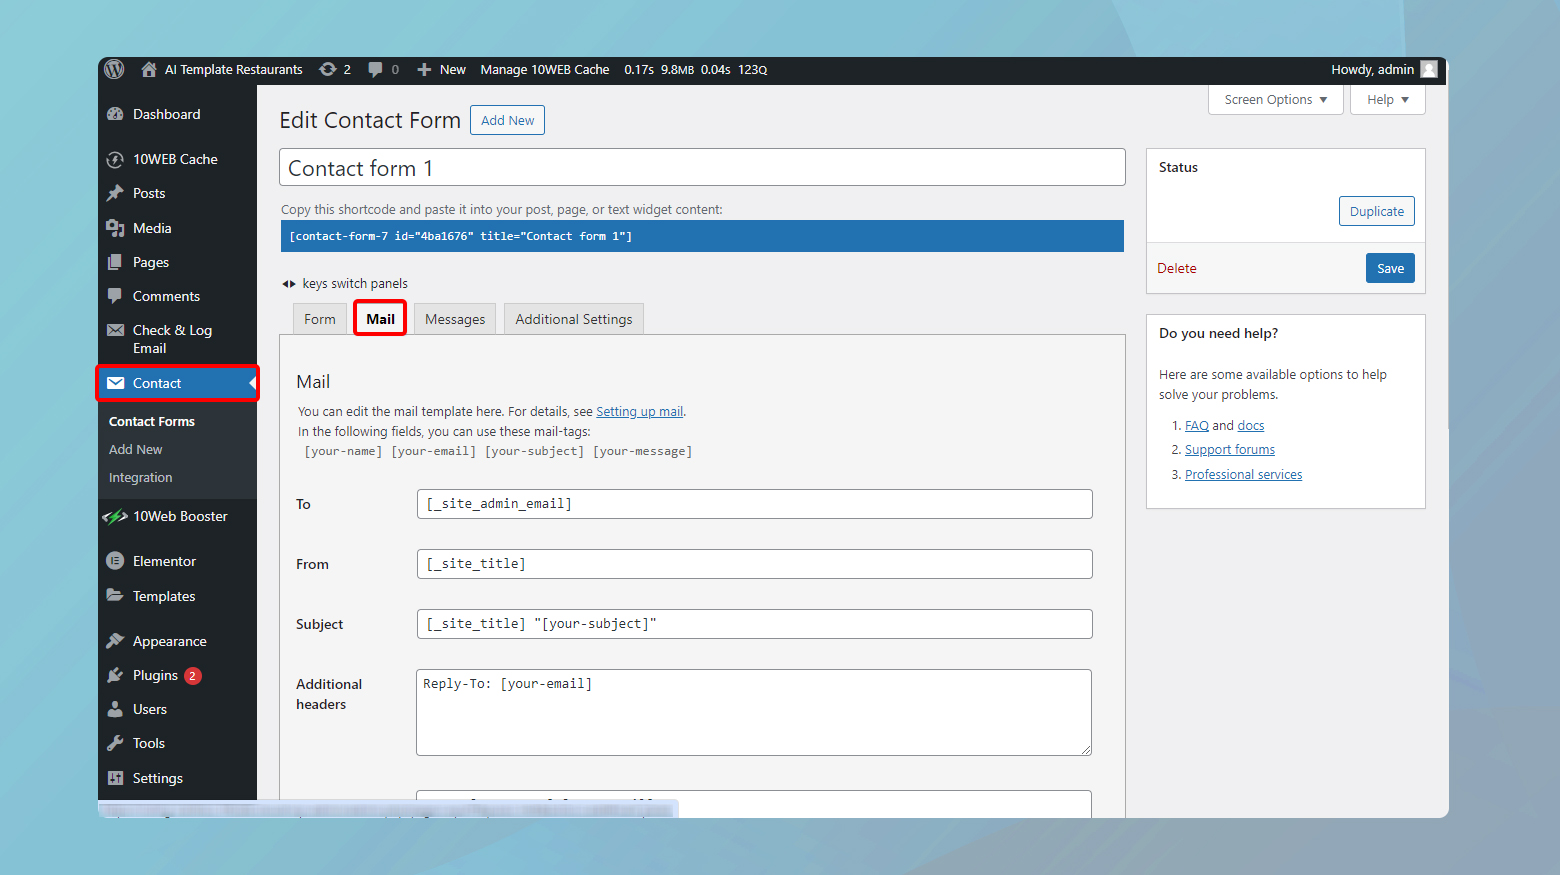
- Log in to your WordPress admin dashboard
- Hover on Contact in the sidebar and click Contact Forms.
- Identify the form that’s been giving you trouble. It might be the one you receive the most feedback on or perhaps a new form that hasn’t been properly tested yet. Once you’ve found it, click on it to access its settings.
- Click on the Mail tab to access the email settings for this particular form.
- Look for the From field.
- Set the From field to use the admin email address of your WordPress site. This address is typically something you have verified access to and is associated with your domain, lending credibility to your emails.
To further reduce the likelihood of email deliverability issues, ensure that the From and To fields use different email addresses. Preferably, neither should be an address that mimics a generic service (like Gmail or Yahoo) to avoid additional scrutiny from spam filters.
After you’ve made these changes, don’t forget to hit Save to apply them.
The final step is to conduct a live test of your form. Fill it out as if you were a visitor to your site, submit it, and see if the email arrives as expected. This will not only confirm that your adjustments were successful but also give you peace of mind that your form is functioning correctly.
Gravity Forms

Gravity Forms indeed stands out as a robust and widely admired premium plugin for WordPress, celebrated for its reliability and extensive functionality, including its email notification system. However, even with the most reliable systems, glitches can occur, potentially leading to issues with email notifications not being sent as expected. Here’s how you can methodically approach resolving email sending problems with Gravity Forms.
Firstly, it’s crucial to acknowledge that a multitude of factors can interfere with email deliverability. These range from server configurations and email settings within Gravity Forms, to the use of SMTP plugins for email routing. Recognizing the multifaceted nature of email issues is the first step towards a solution.
Troubleshooting guide
Begin by verifying the email settings for the notifications in question. Navigate to the specific form’s settings in your WordPress dashboard, then go to the Notifications area. Ensure that the email addresses, subject lines, and message bodies are correctly configured. Pay special attention to the From email address, as using a domain-associated email address here is best practice for deliverability.
Before diving deeper, take a moment to check the spam or junk folder of the email recipient. Occasionally, emails might be routed here by mistake, especially if the email content triggers spam filters.
Gravity Forms comes equipped with a logging feature that can offer invaluable insights into what happens when emails are sent. Enable logging from the Forms > Settings > Logging section. This log can help you pinpoint where the failure in the email sending process is occurring.
If the issue persists, consider using an SMTP service to send emails. SMTP plugins like WP Mail SMTP can help by routing WordPress emails through an SMTP server rather than the PHP mail function. This not only improves reliability but also adds a layer of authentication that can enhance deliverability.
Gravity Forms’ documentation is a treasure trove of solutions and guidance. If the above steps don’t resolve the issue, the documentation may have more specific advice tailored to your situation. It covers a wide range of topics, from basic setup to advanced troubleshooting.
Ninja Forms

Ninja Forms is a versatile plugin for WordPress that caters to a wide range of form creation and management needs, offering both free and premium versions along with numerous add-on plugins. It’s known for its user-friendliness and extensive functionality. However, like any software, it can sometimes encounter issues, particularly with email notifications not functioning as expected. Here’s a comprehensive approach to troubleshooting and resolving email issues with Ninja Forms, taking into consideration the recommended use of SendWP as well as alternative solutions.
Understanding the issue with Ninja Forms emails
The core of email deliverability issues often lies in the method used by your WordPress site to send emails. By default, WordPress uses the PHP mail function, which, unfortunately, lacks reliability and often results in emails landing in spam folders or not being delivered at all. SMTP (Simple Mail Transfer Protocol) provides a more reliable method for sending emails, which is where SendWP comes into play.
Using SendWP for Ninja Forms
SendWP is specifically designed to facilitate SMTP setup on your WordPress site, enhancing the reliability of email delivery from Ninja Forms. Developed by the same team as Ninja Forms, it ensures seamless compatibility.
While SendWP comes with a fee ($9 a month), it offers a straightforward setup and peace of mind for those less technical or seeking a hassle-free solution. It’s particularly useful if the root of your email issues stems from server-side limitations with the PHP mail function.
If you’re hesitant about the additional cost of SendWP or if you’ve identified that your email issues are not server-related, the Ninja Forms email troubleshooting guide offers a valuable resource for alternative solutions.
Check email settings in Ninja Forms
- First, ensure that all email notifications within Ninja Forms are correctly configured. This includes verifying that the To and From email addresses are accurate and that any conditional logic applied to email notifications is set up correctly.
- Choose an SMTP plugin and follow its setup instructions carefully. This usually involves entering SMTP server details provided by your email service (like Gmail, Outlook, or a transactional email service like SendGrid).
- After configuration, use the plugin’s test email feature to ensure emails are sending correctly.
The Ninja Forms documentation is an exhaustive resource that covers a wide range of topics, including email troubleshooting. If the above steps don’t resolve your issue, the documentation may offer additional insights. Additionally, premium version users can access dedicated support for more personalized assistance.
Happy Forms
HappyForms is another noteworthy contender in the realm of WordPress form builders, offering both free and premium versions to cater to various user needs. Despite its user-friendly interface and a plethora of features, users might sometimes encounter challenges with email notifications not being sent as expected. Adjusting the email settings for your forms can often fix email deliverability issues. Here’s a step-by-step guide on how to configure these settings effectively.
Guide to configuring HappyForms email settings
- Log into your WordPress dashboard.
- Hover on the HappyForms menu item and select All Forms.
- Identify and click on the form you wish to edit.
- Locate and click on the Email tab.
- The To address is where you want the form submissions to be sent. Typically, this will be your own email address or that of the department handling form responses.
- To avoid issues with email spoofing and to increase the likelihood of your emails reaching their destination, it’s crucial to set the From email address to one associated with your website’s domain.
HappyForms allows you to customize both notifications (emails sent to you when a form is submitted) and confirmations (emails sent to the form submitter). Ensure that both of these are set up correctly, reflecting the changes you’ve made to the To and From addresses. This step helps in maintaining transparency and trust with your form submitters, ensuring they receive a confirmation of their submission.
After making the necessary adjustments, don’t forget to hit the Update button located at the top of the Customizer interface. Saving these changes is crucial for them to take effect.
weForms

weForms is a versatile WordPress form plugin that caters to a wide array of user needs through its free and premium versions. It stands out with its ability to integrate seamlessly with various email providers, including the default WordPress mail function, SendGrid, and others. This flexibility allows users to enhance email deliverability and reliability by choosing an email service that best suits their website’s needs.
Understanding the configuration
Before diving into troubleshooting, it’s important to understand how weForms interacts with different email providers. This plugin allows you to configure your email settings directly within its settings page, enabling emails to be sent via your chosen provider. This setup can significantly improve email deliverability compared to the default WordPress mail function.
Troubleshooting
Start by ensuring that your email provider is correctly configured within weForms. Navigate to the weForms settings and look for the email or SMTP settings section. Verify that all the details (such as API keys for SendGrid, SMTP host, port, username, and password for SMTP providers) are accurately entered.
Within weForms, ensure that the notification settings for each form are correctly set up. This includes checking the “To” and “From” email addresses, as well as any specific settings related to email content and triggers.
If you’re using an external SMTP service and facing issues, try switching back to the default WordPress email function temporarily. This can help determine if the problem lies with the external service or within weForms itself.
Use the weForms troubleshooting guide
weForms provides a troubleshooting guide specifically designed to help identify and resolve email issues. This guide may suggest actions such as checking for plugin conflicts, ensuring your email service isn’t blocking emails, and verifying that emails aren’t being directed to spam folders.
Jetpack
Jetpack’s simplicity extends to its contact form functionality, offering a straightforward way to incorporate forms into your WordPress site without the complexities often associated with dedicated form plugins. While this simplicity is advantageous for ease of use and setup, it also means there are fewer knobs to turn when things go wrong, particularly concerning email delivery. Here’s how you can manage and troubleshoot email settings for the Jetpack contact form to ensure smooth operation.
Adjusting the email address for Jetpack Form submissions
- If you haven’t already, insert a Jetpack contact form into your desired page or post by adding a new form block.
- Once the form is in place, click on the form block within your editor. You’ll see an editing icon (often represented by a pencil or similar symbol) appear above or near the form block.
- Clicking the editing icon will reveal a dropdown menu or a sidebar depending on your WordPress editor version. Here, you can specify or change the email address to which form submissions are sent. This is the To address and should be an email you regularly monitor for incoming messages from your site visitors.
Unlike many dedicated form plugins, Jetpack utilizes the admin email address of your WordPress site as the default From address for emails sent through its contact form. If you’re encountering issues or simply wish to change the From email address, you’ll need to adjust your site’s admin email.
Troubleshooting email delivery issues
- Ensure that the To email address specified in the form settings and the WordPress admin email address are not the same. Sending emails to and from the same address can sometimes trigger spam filters or cause other delivery issues.
- Always check the spam or junk folder of your email account. Emails from your Jetpack form might be incorrectly flagged as spam.
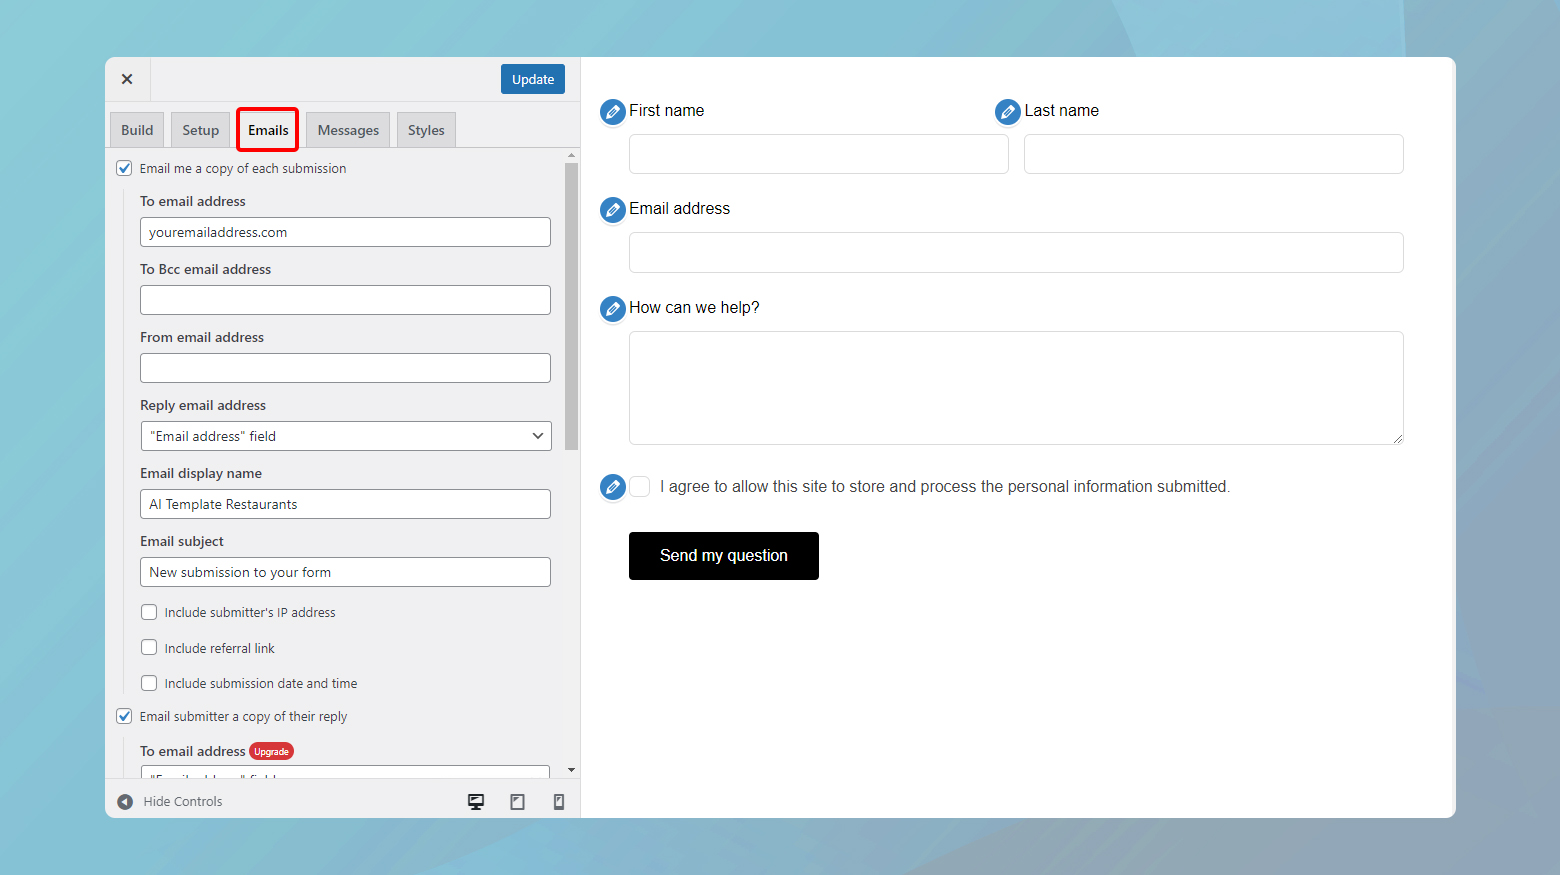
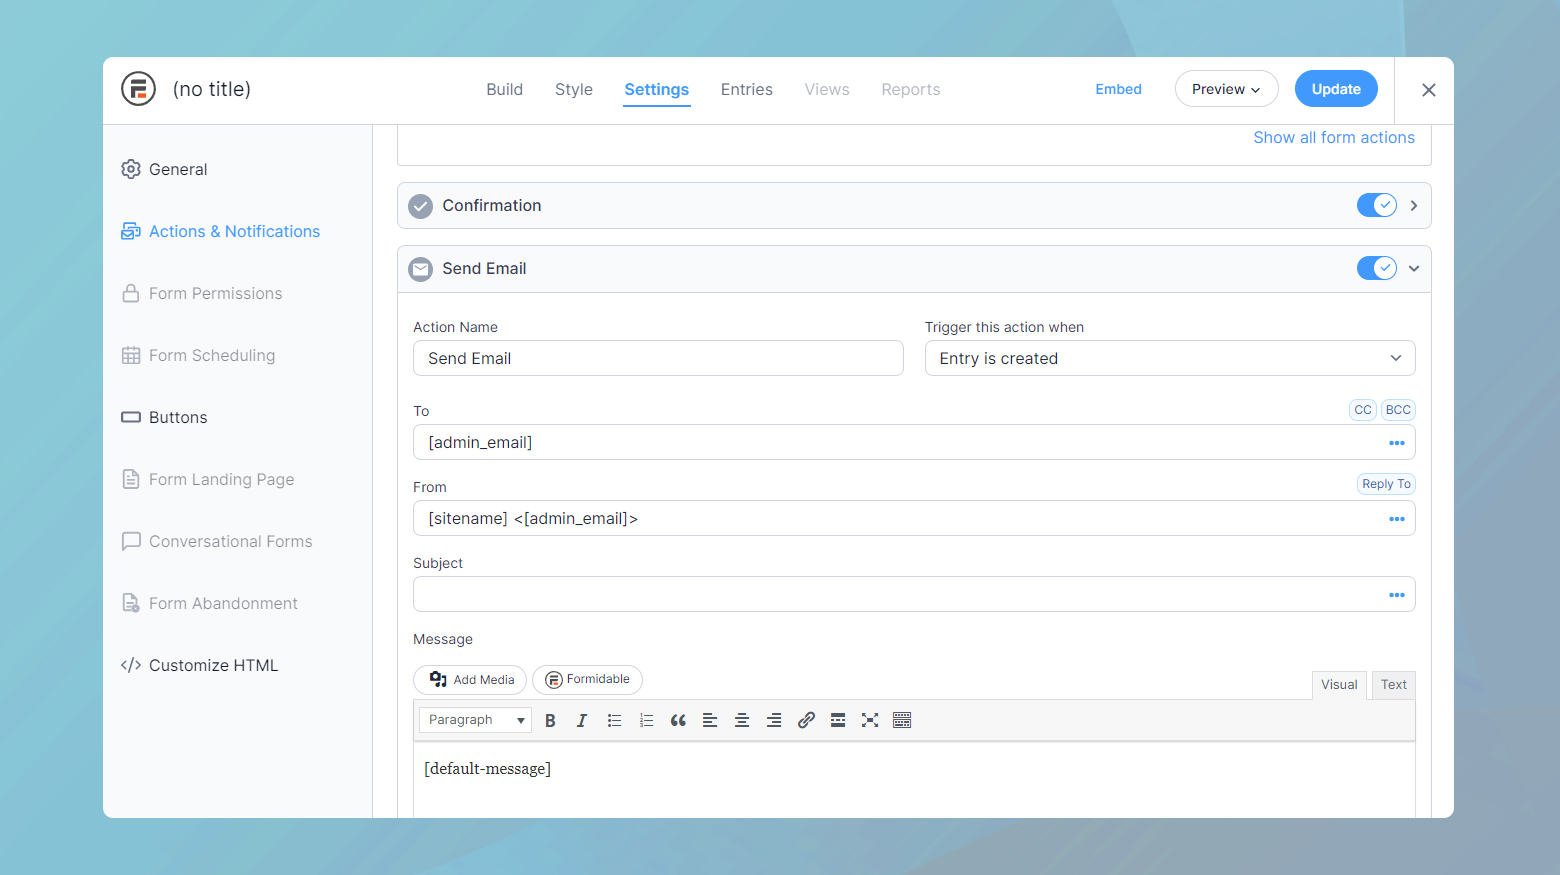
Formidable Forms
Formidable Forms, with its dual offerings of free and premium versions, stands as a comprehensive solution for WordPress users looking to integrate advanced form functionalities into their websites. This guide will help you navigate through the email settings in Formidable Forms to ensure your email notifications are both sent and received correctly, even after you’ve configured SMTP settings on your site.
Editing email notification settings in Formidable Forms
If adding SMTP hasn’t resolved your email sending issues with Formidable Forms, adjusting the From and To addresses in your form’s email notification settings might be the next step to take. Here’s how to do it:
- Log in to your WordPress dashboard.
- Navigate to Formidable > Forms from your WordPress admin dashboard. This page will list all the forms you’ve created with Formidable Forms.
- Locate the form you’re experiencing issues with and click on it to edit. This action will take you into the form’s settings.
- Within the form editor, you’ll see several tabs at the top of the page. Click on the Settings tab to access the form’s general settings.
- Look to the sidebar or the navigation menu within the Settings tab and find Actions & Notifications. Clicking this will reveal different actions that can be triggered upon form submission.
- Find and open the Email Notification meta box. This section is dedicated to configuring how and to whom the form sends emails upon submissions.
- Simply edit the To field to the desired email address where you wish to receive form submissions. This should ideally be an address that is regularly monitored.
- Edit the From field an email address that is associated with your website’s domain. This will reduce the chances of emails being marked as spoofed.
Changes made in Formidable Forms’ settings are often saved automatically, but it’s good practice to verify that all your modifications are correct and saved as intended. After adjusting the email settings, conduct a test by submitting the form yourself. This ensures that the email notifications are sent and received correctly with the new settings.
Troubleshooting tips
Check spam/junk folders: If emails are not appearing in your inbox, they might be getting filtered into spam or junk folders. This is common when email settings are not correctly configured.
Review SMTP settings: Even after setting up SMTP, it’s crucial to ensure that all SMTP settings are correct and that your email provider hasn’t made any changes that could affect sending emails.
Use email logs: Some SMTP plugins offer logging features that record every email sent from your website. If available, review these logs to see if emails are being sent successfully and to diagnose any issues.
Closing thoughts
Our blog on troubleshooting email delivery issues, configuring email settings for WordPress form plugins and addressing email delivery issues highlights a critical path to reliable site communication. We have covered key strategies which include ensuring SMTP configuration, setting correct email addresses, and utilizing third-party SMTP services to overcome deliverability challenges. By applying these insights across plugins like Contact Form 7, Gravity Forms, and others, WordPress site owners can improve the reliability of their email notifications. This focused approach enhances form-based communication, ensuring vital interactions with site users are not missed and maintaining effective engagement.
Say goodbye to website errors
Fix all the website errors in one click
Migrate your website to the world's best Managed WordPress Hosting.