When you’re updating a website, plugin, or theme on WordPress, encountering the “Installation failed: Destination folder already exists” error can be a real momentum killer. This error often leaves many scratching their heads, wondering what went wrong when everything seemed to be going smoothly. So, let’s break down this error, explore its origins, and, most importantly, find ways to resolve it.
Understanding the Installation failed: Destination folder already exists error
When diving into the customization of your WordPress website, selecting the perfect theme and plugins becomes a crucial part of the journey. These tools not only enhance the visual appeal of your site but also extend its functionality, covering aspects from security enhancements to website speed optimization and simplifying the design workflow. However, as you embark on this task, you might encounter bumps along the road, particularly during the theme or plugin upload process.
Upon a successful upload, WordPress typically takes the zip file of your chosen theme or plugin and extracts it into a newly created folder, naming this folder according to the uploaded tool. But, what happens if WordPress stumbles upon an existing folder with the same name designated for the new upload? This is where you hit a common roadblock – the “Installation Failed: Destination Folder Already Exists” error. This error halts the upload process in its tracks, keeping you from moving forward with the activation of your eagerly awaited plugin or theme.
Why does this error occur?
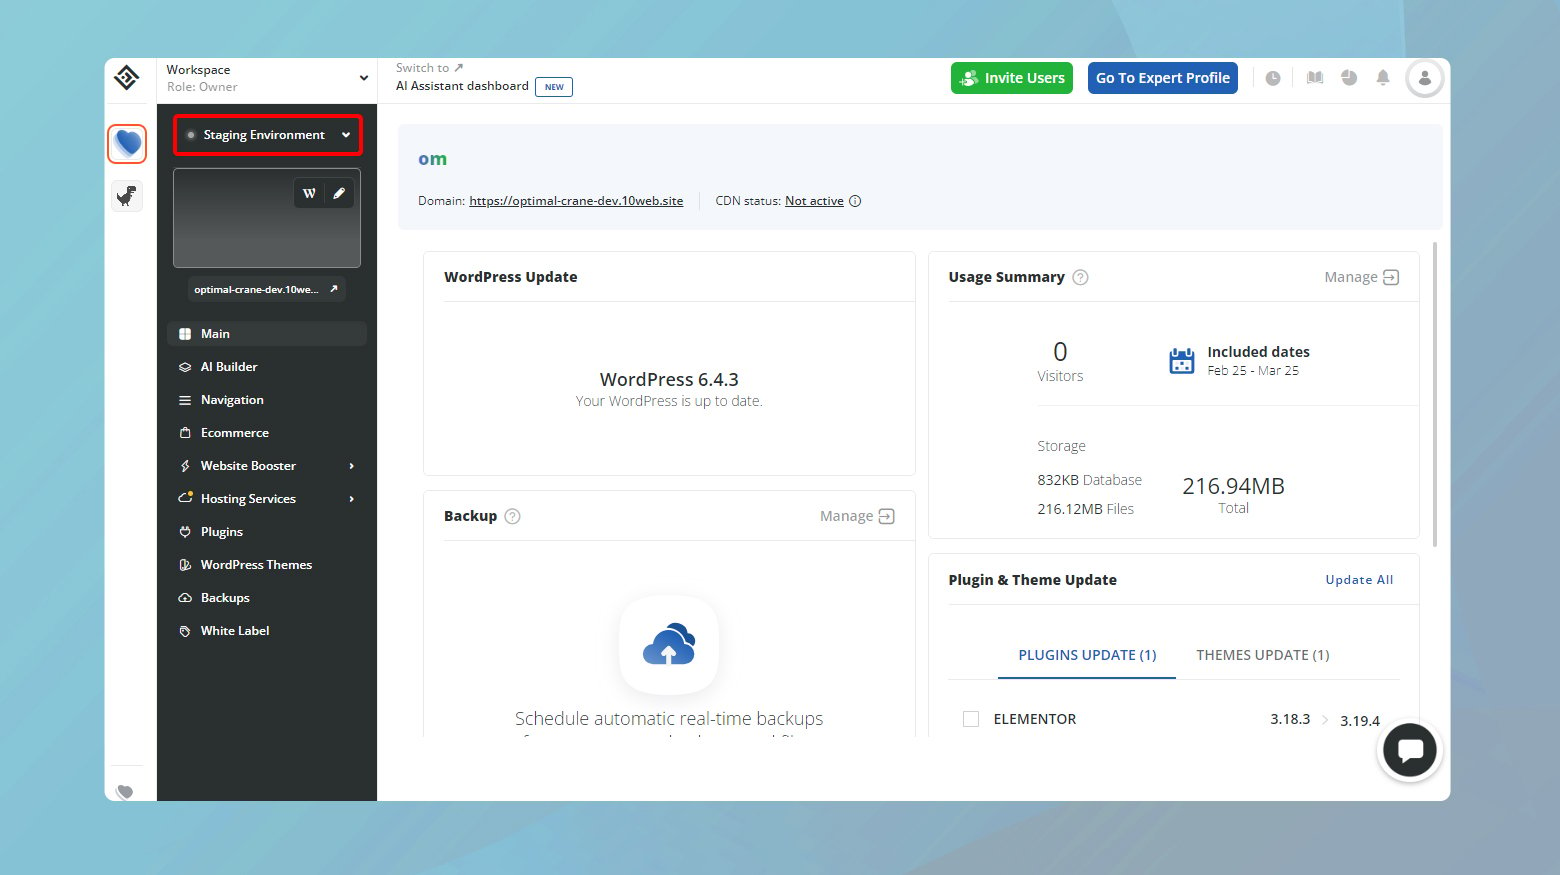
Before we delve into the specifics of what triggers this error, it’s essential to emphasize the importance of cautious experimentation with new plugins or themes. Testing them on your website beforehand can save you a lot of headaches. For those hosting their WordPress websites on 10Web, leveraging the staging environment provides a perfect playground to safely evaluate new tools without affecting your live site.
The heart of the matter
The core of this error lies in WordPress’s mechanism for installing themes and plugins. Essentially, WordPress creates a new folder to house the files of the theme or plugin you’re trying to install. If it finds that a folder with the intended name already exists, it stops in its tracks and throws up the error message. This error typically surfaces due to:
Existing software: Often, this error crops up because the theme or plugin you’re trying to install is, in fact, already installed on your site. This could happen if you’re installing an updated version but WordPress still recognizes the old folder.
Interrupted installations: Should the installation process of a theme or plugin get cut off midway, WordPress might leave behind an empty or incomplete destination folder. This ghost folder then becomes a blockade for any future attempts to install that particular piece of software.
Incomplete uninstallations: Even after uninstalling a theme or plugin, sometimes remnants of its folder persist. These leftovers can hinder future installation attempts.
Variations of the error
This error is quite straightforward and doesn’t vary much across different environments. However, the context in which it appears can differ slightly, whether you’re dealing with:
- A plugin installation or update.
- A theme installation or update.
- Manual installations through FTP where the folder was not completely removed before attempting a reinstallation.
Resolving the Installation failed: Destination folder already exists error
Having defined the error and the reasons why this error occurs, we can move forward to fixing it.
Compared to other WordPress errors, this particular error is easier to tackle. There are several strategies you can employ, but they all boil down to removing the current destination folder. Let’s explore some effective methods to address this situation.
Delete the plugin or theme via the WordPress dashboard
The most straightforward method to fix this error involves using your WordPress dashboard to delete the existing plugin or theme. Here’s how to do it:
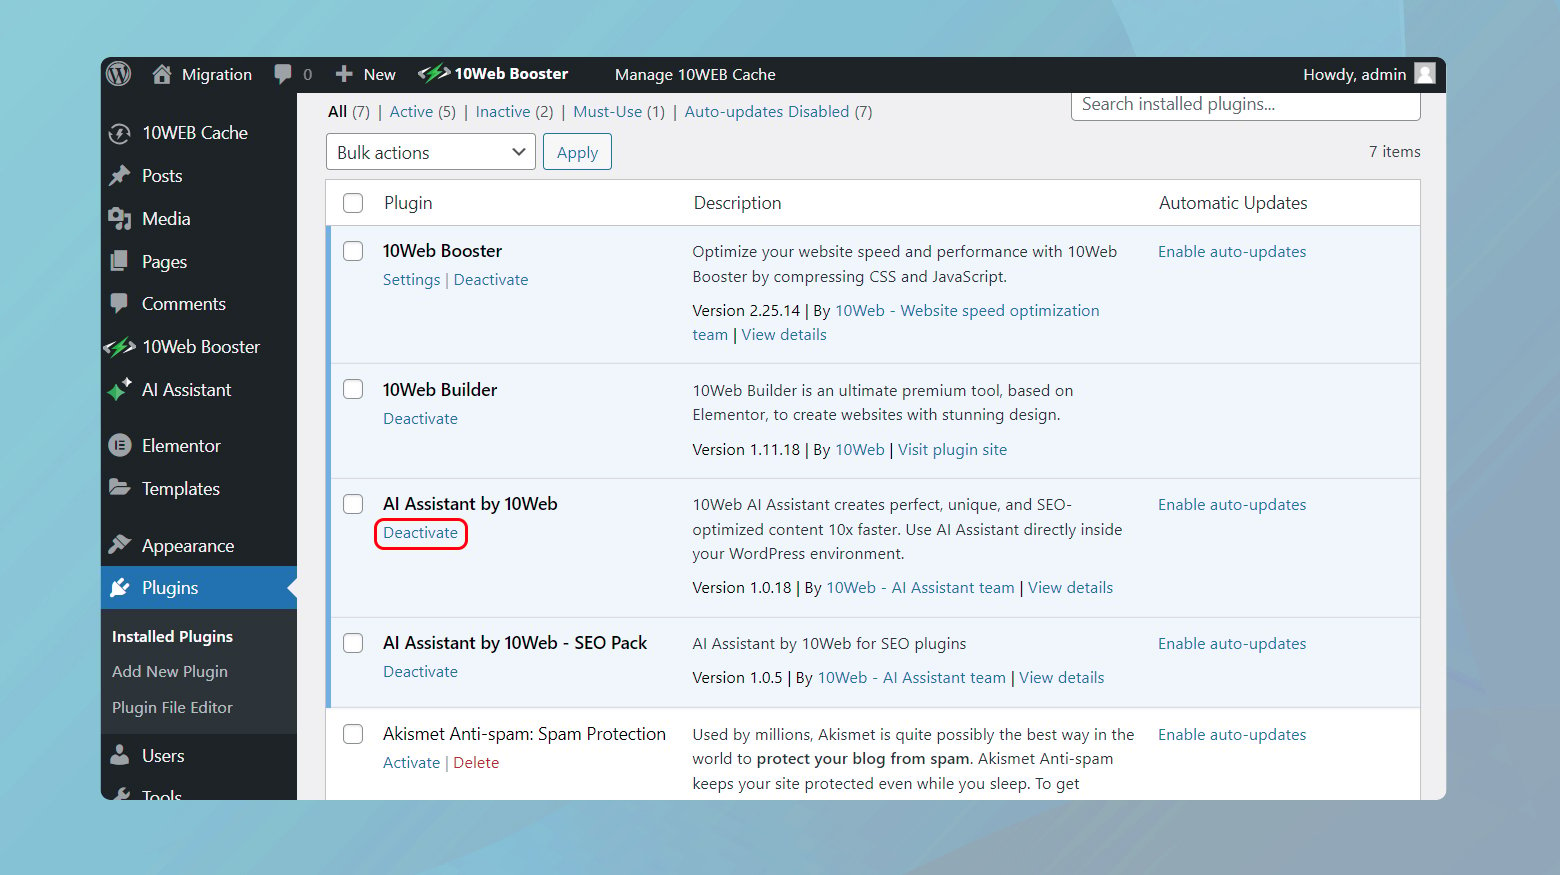
- From your WordPress dashboard, go to either Plugins > Installed Plugins or Appearance > Themes, depending on whether you’re dealing with a plugin or a theme.
- Find the plugin or theme that’s causing the error. Click Deactivate if it’s active, and then click Delete.
- For themes, you’ll need to activate a different theme first, then click on the theme causing the error and select Delete.
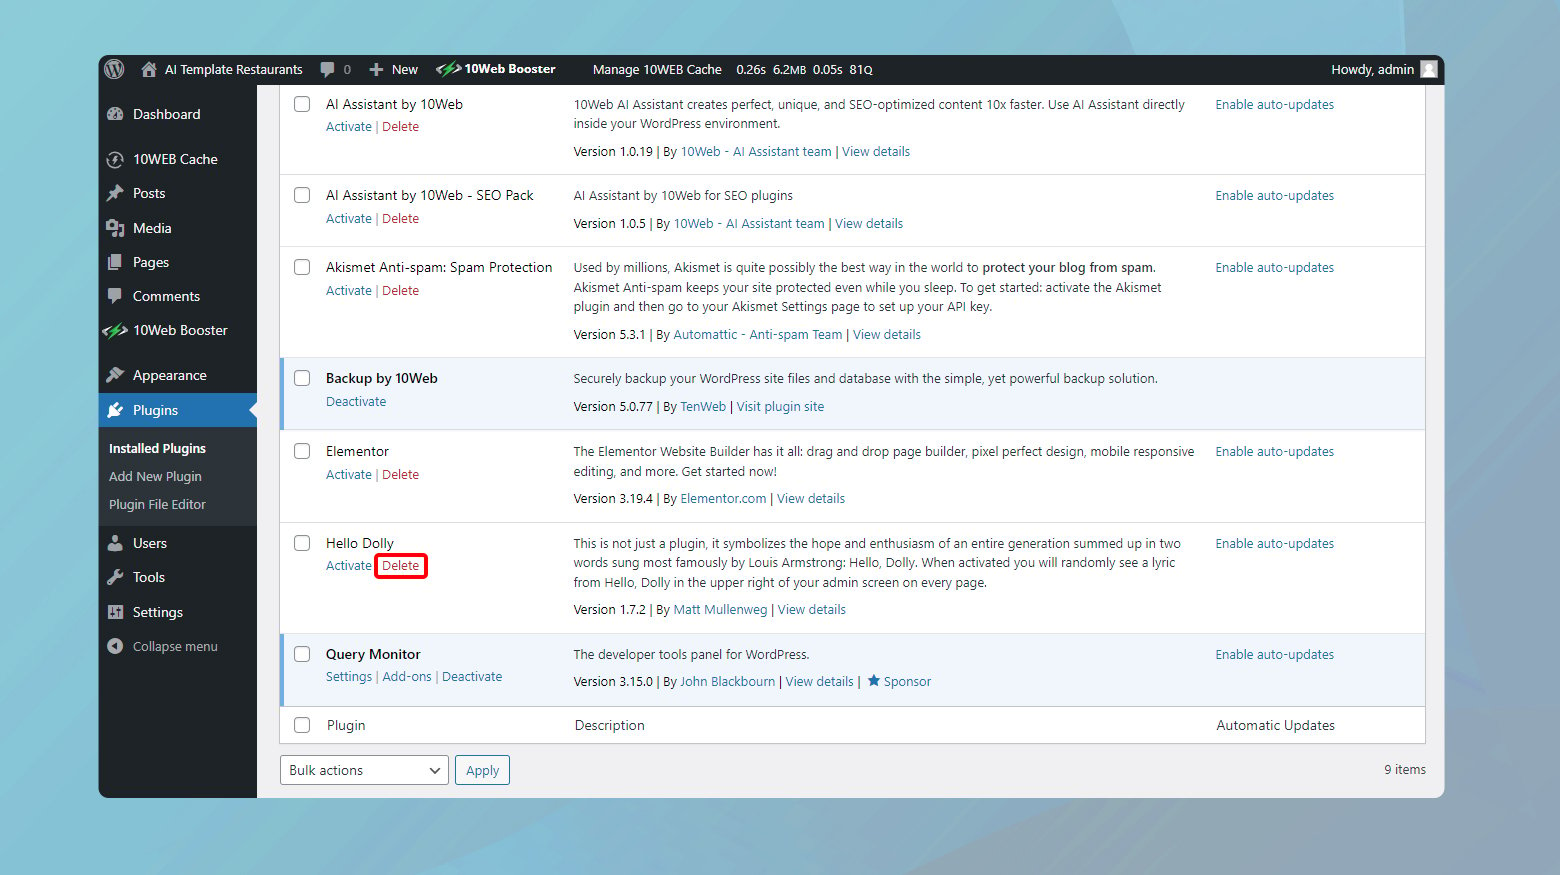
With the old version gone, you can now proceed to install the new version without encountering the Destination Folder Already Exists error.
This method is particularly effective because it ensures that you’re starting fresh, reducing the risk of conflicts between old and new files.
Manually deleting the folder via FTP
Backing up your website is a critical step before making any changes to its files or structure. This safety net ensures that, should anything go awry, you have a snapshot of your site that you can restore to its previous state, minimizing the risk of data loss or downtime.
If you are a 10Web customer, you can backup your website from the 10Web dashboard.
Backup in 10Web
- Log in to your 10Web account.
- Click on the website experiencing the error.
- Navigate to Backups.
- Go to the Settings tab and make sure that both Files and Database are selected.
- Click Backup Now to create a backup of your website.
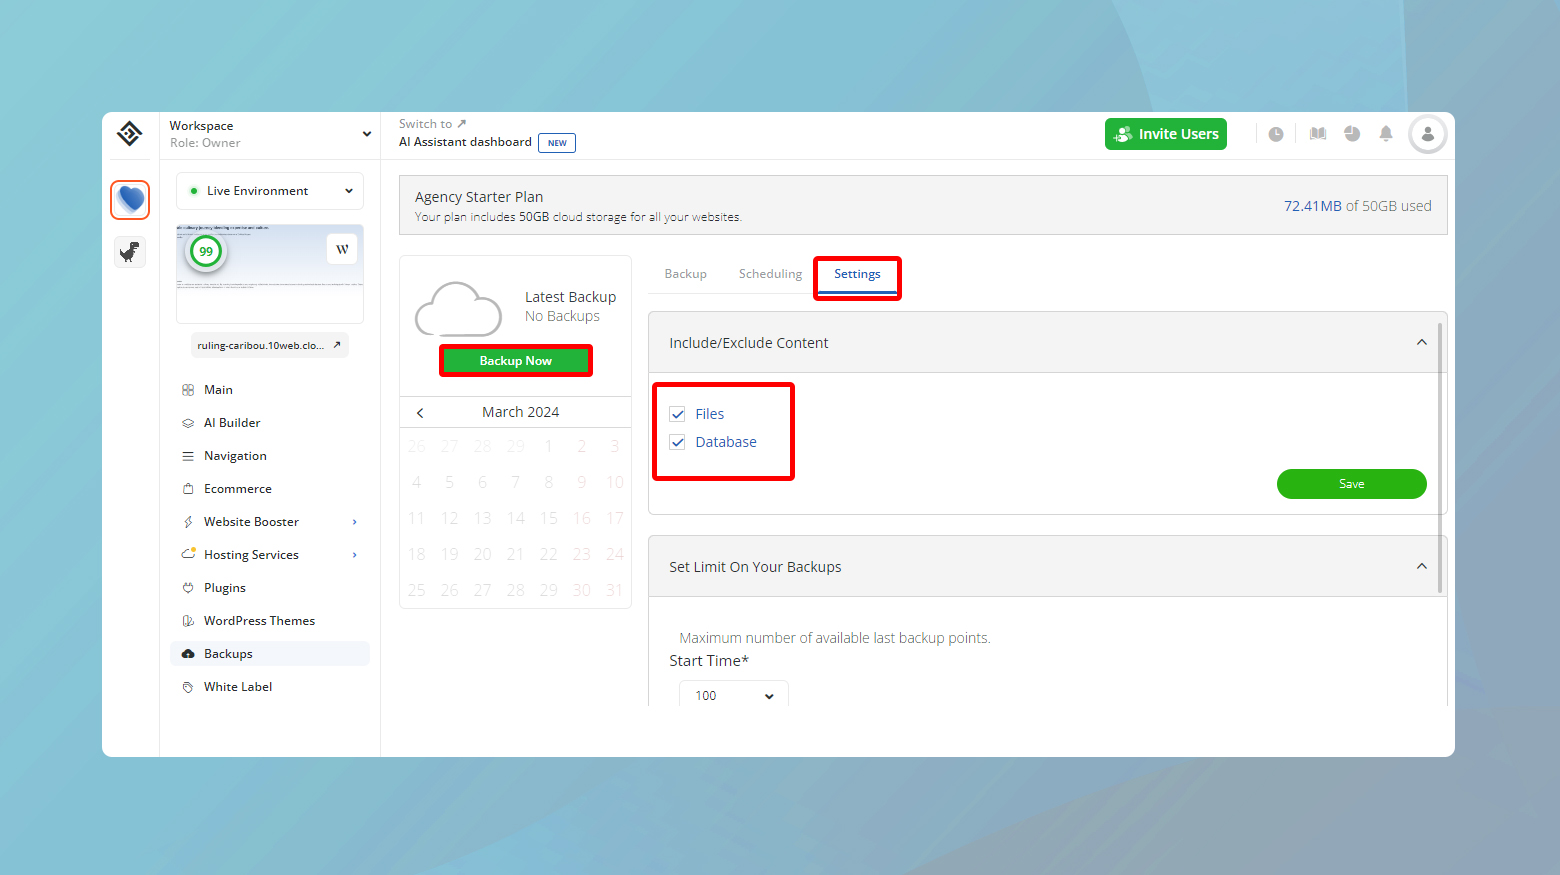
Once a backup is created, you can download the backup to your computer.
Use a WordPress plugin
There are several plugins available, such as UpdraftPlus, Jetpack Backup, and BackupBuddy, that make backing up your website straightforward. These tools can back up your site to a remote location, like the cloud, ensuring your data is safe even if your server encounters issues.
Consider storing your backup on an external drive or a cloud storage service like Google Drive or Dropbox. This adds an extra layer of security, ensuring that you have access to your backup even if your hosting service is temporarily unavailable.
How to delete a plugin or theme using an FTP client
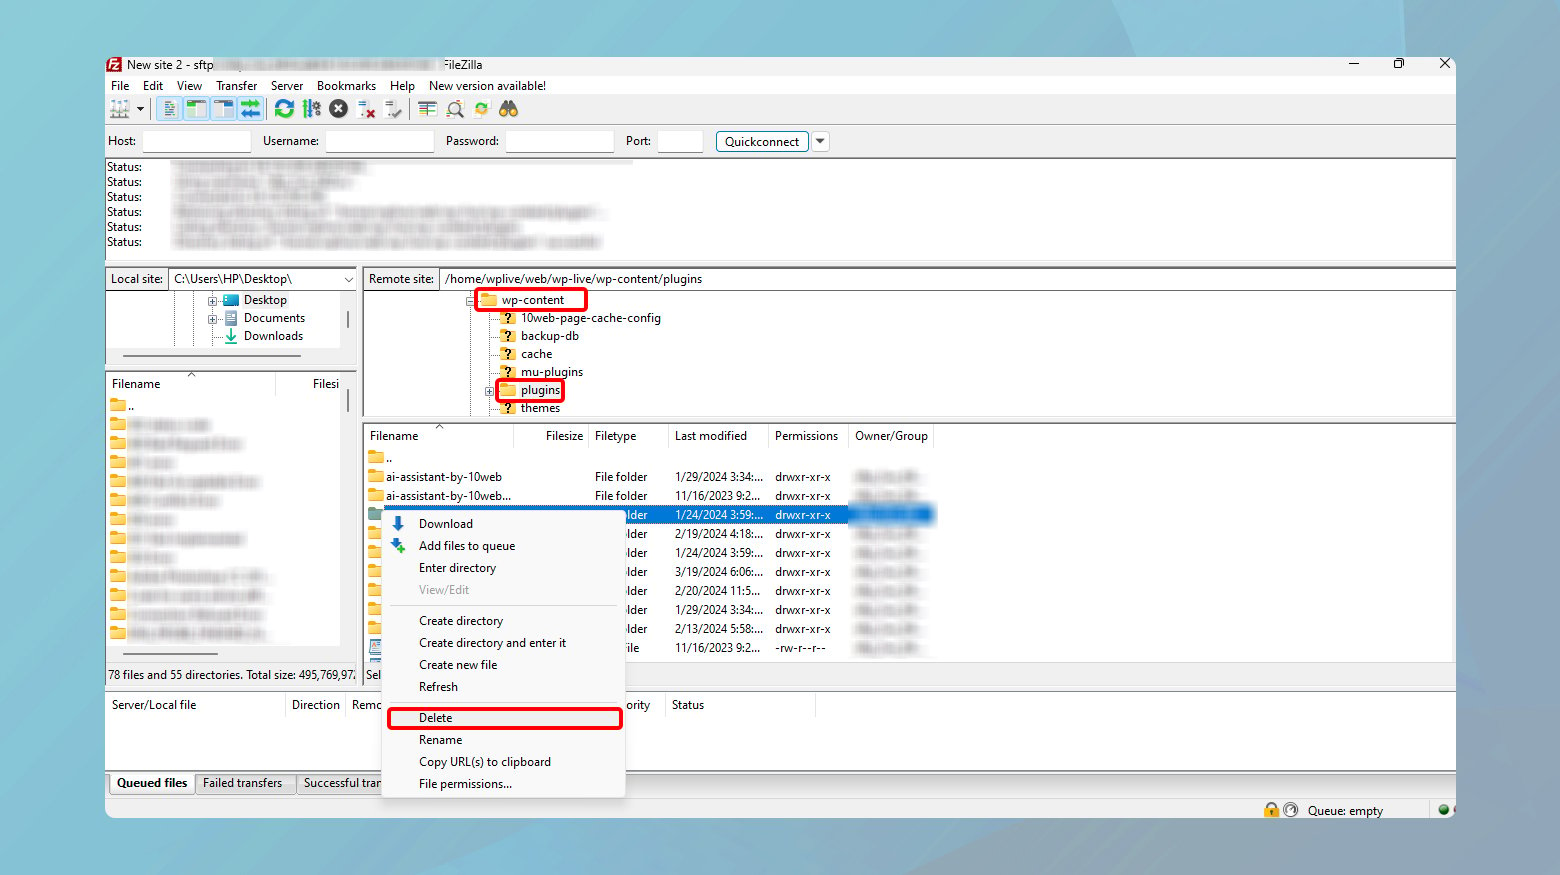
Once you have a backup of your site, you can troubleshoot the error by deleting the plugin or theme via an FTP client like FileZilla. In order to connect to your website, you will need to have the correct credentials usually provided by your hosting provider. If you are a 10Web customer, you can find your SFTP credentials under Hosting Services > Credentials.
To connect to your web server:
- Use an FTP client like FileZilla to connect to your web server. You’ll need your FTP credentials, which you can obtain from your hosting provider.
- Navigate to the wp-content/plugins or wp-content/themes directory. Depending on whether you’re dealing with a plugin or theme, navigate to the appropriate directory.
- Find the folder with the same name as the plugin or theme causing the error,
- Right click on the plugin/theme and choose Delete.
- You can now upload the new version of your plugin or theme directly through the FTP client.
Delete the plugin or theme folder using cPanel
cPanel strips away the complexity of managing website files, making it more accessible to clients with less technical skills. Here’s how you can use cPanel to address issues like the dreaded “Installation Failed: Destination Folder Already Exists” error by deleting a theme or plugin directly.
First things first, you will need to log into your cPanel dashboard. This is your command center, where you can control various aspects of your hosting environment with just a few clicks.
After signing up for a hosting plan, your provider should have sent you an email with your cPanel login details. If you can’t find this, most hosting providers also offer a cPanel access link from their customer dashboard.
You can also try entering:
- http://www.yoursite.com:2082 for unsecured access or
- https://www.yoursite.com:2083 for a secure connection
Just replace yoursite.com with your actual domain name.
Using cPanel to delete a plugin or theme
Once you’ve successfully logged into your cPanel dashboard:
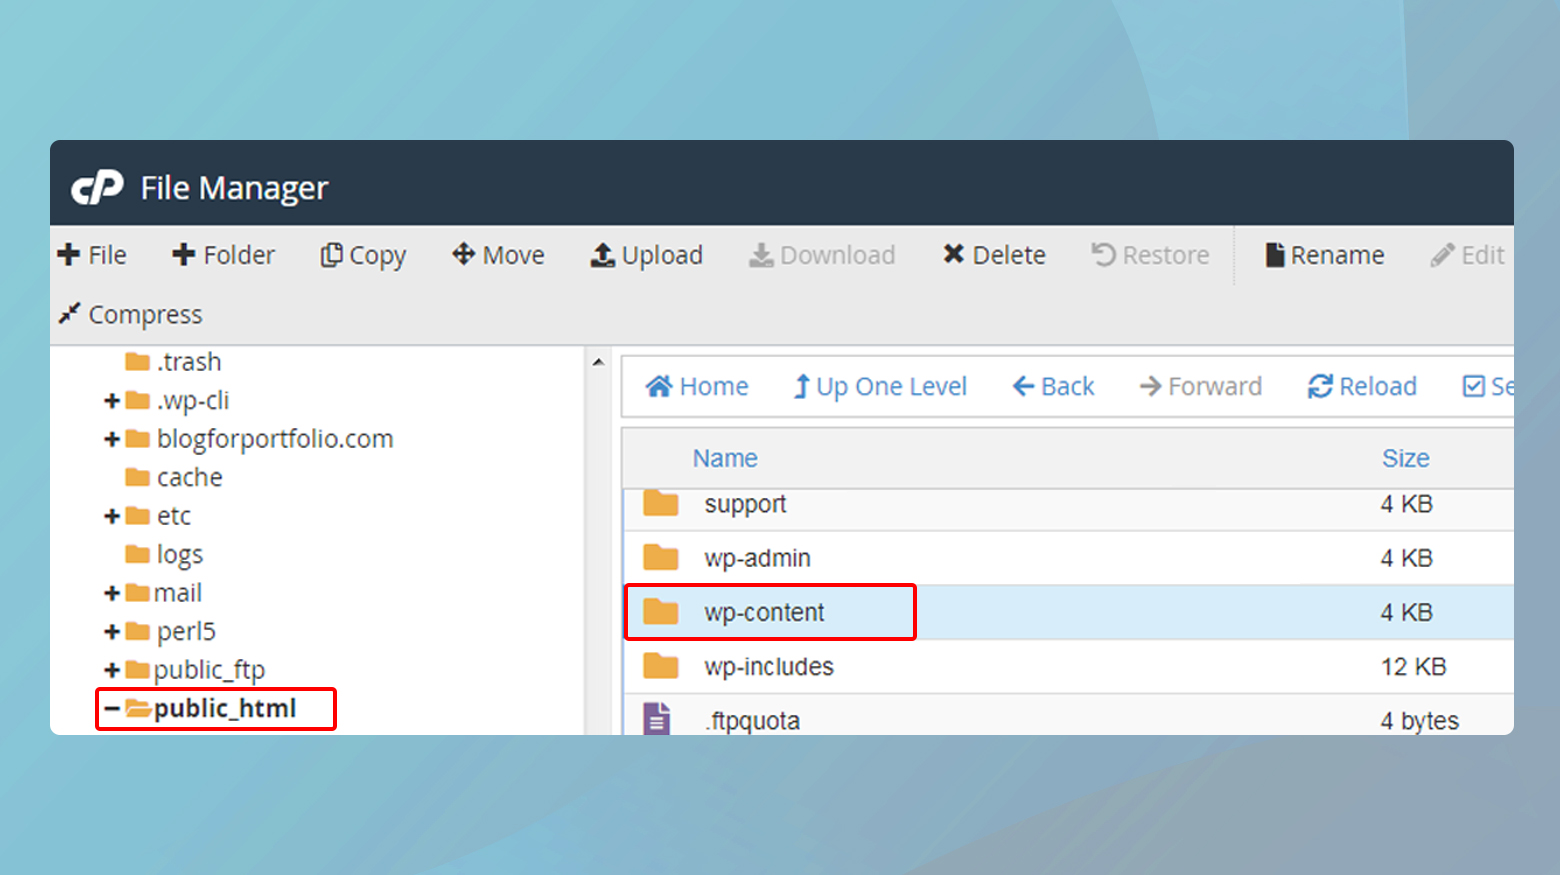
- Navigate to the public_html folder. This directory is the root of your website. It’s like the main folder of your site’s file structure on the web server.
- Inside public_html, look for the wp-content folder. This folder contains all your themes, plugins, uploads, and more.
- Now, decide whether you’re dealing with a plugin or a theme issue. If it’s a plugin, click on the plugins folder; for a theme, head over to the themes folder.
- Seek out the folder named after the plugin/theme causing the error.
- Right-click on the folder and select Delete. Ensure you’re only deleting the folder of the specific plugin or theme, not the entire plugins or themes directory.
After you’ve completed these steps, head back to your WordPress dashboard. You should find that the plugin or theme with the error has been deleted. If you wish to, you can now reinstall the plugin of theme.
Use WP-CLI to delete the plugin or theme
Embracing WP-CLI, WordPress’s command-line interface, marks a significant leap towards efficiency and control in managing your WordPress site. With WP-CLI, you gain the ability to execute a variety of tasks—from plugin management to user role assignments—directly from the command line, bypassing the graphical user interface altogether. This method shines in its speed and directness, particularly appealing to those who are comfortable with text-based commands. Let’s delve into how you can harness the power of WP-CLI to remove existing plugins or themes, thus addressing the “Installation Failed: Destination Folder Already Exists” error.
How to delete a plugin/theme with WP-CLI
Before diving into WP-CLI, ensure your hosting environment is compatible. You’ll need:
- A UNIX-like environment (Linux, macOS, etc.).
- PHP 5.6 or later.
- WordPress 3.7 or higher.
These requirements ensure that WP-CLI runs smoothly and is able to interact with your WordPress installation effectively.
Your next step involves accessing your site’s backend via Secure Shell (SSH), a network protocol that allows you to execute commands on a remote server securely.
If your website is hosted on 10Web, you can find these details in your 10Web dashboard. Navigate to Hosting Services > Credentials.
- Open your terminal application if you’re on macOS or Linux, or a terminal emulator like PuTTY for Windows users.
- Copy the SSH command from your hosting dashboard and paste it into your terminal. You’ll be prompted to enter your password.
- Once authenticated, you have direct access to your site’s files and can begin using WP-CLI commands.
- If a theme is causing the “Destination Folder Already Exists” error, you can remove it using the following WP-CLI command:
- Replace twentytwelve with the directory name of the theme you wish to delete. This command removes the theme from your WordPress installation, clearing the way for a fresh install.
bash
wp theme delete twentytwelve
Similarly, if a plugin is the culprit, use this command:
bash
wp plugin delete hello
Here, hello should be replaced with the plugin’s directory name that you intend to remove. Executing this command will delete the specified plugin.
After running the appropriate WP-CLI command, you’ll see a confirmation message in your terminal indicating the successful removal of the plugin or theme. This immediate feedback is one of the many benefits of working with WP-CLI—no need to refresh your browser or navigate through the WordPress dashboard to confirm the changes.
With the plugin or theme removed, you’re now set to proceed with a clean installation without encountering the “Installation Folder Already Exists” error. Return to your WordPress dashboard to install the plugin or theme.
Using the File Manager plugin
The File Manager plugin is versatile, easy to use, and lets you manage your site’s files directly from the comfort of your WordPress dashboard—no need to juggle multiple tools or navigate away from your site.
To install the File Manager:
- From your WordPress dashboard, head over to Plugins and click on Add New.
- In the search bar, type in File Manager.
- Click Install Now and then Activate once the installation completes.
With the plugin activated, you can now navigate through your site’s files as if you were using an FTP client or cPanel without leaving your WordPress dashboard.
Deleting a plugin or theme using File Manager
The WP File manager tab will be added to your WordPress dashboard. Clicking on it reveals a layout similar to what you’d see in a standard file management system, complete with folders and files that make up your website.
To delete a plugin/theme
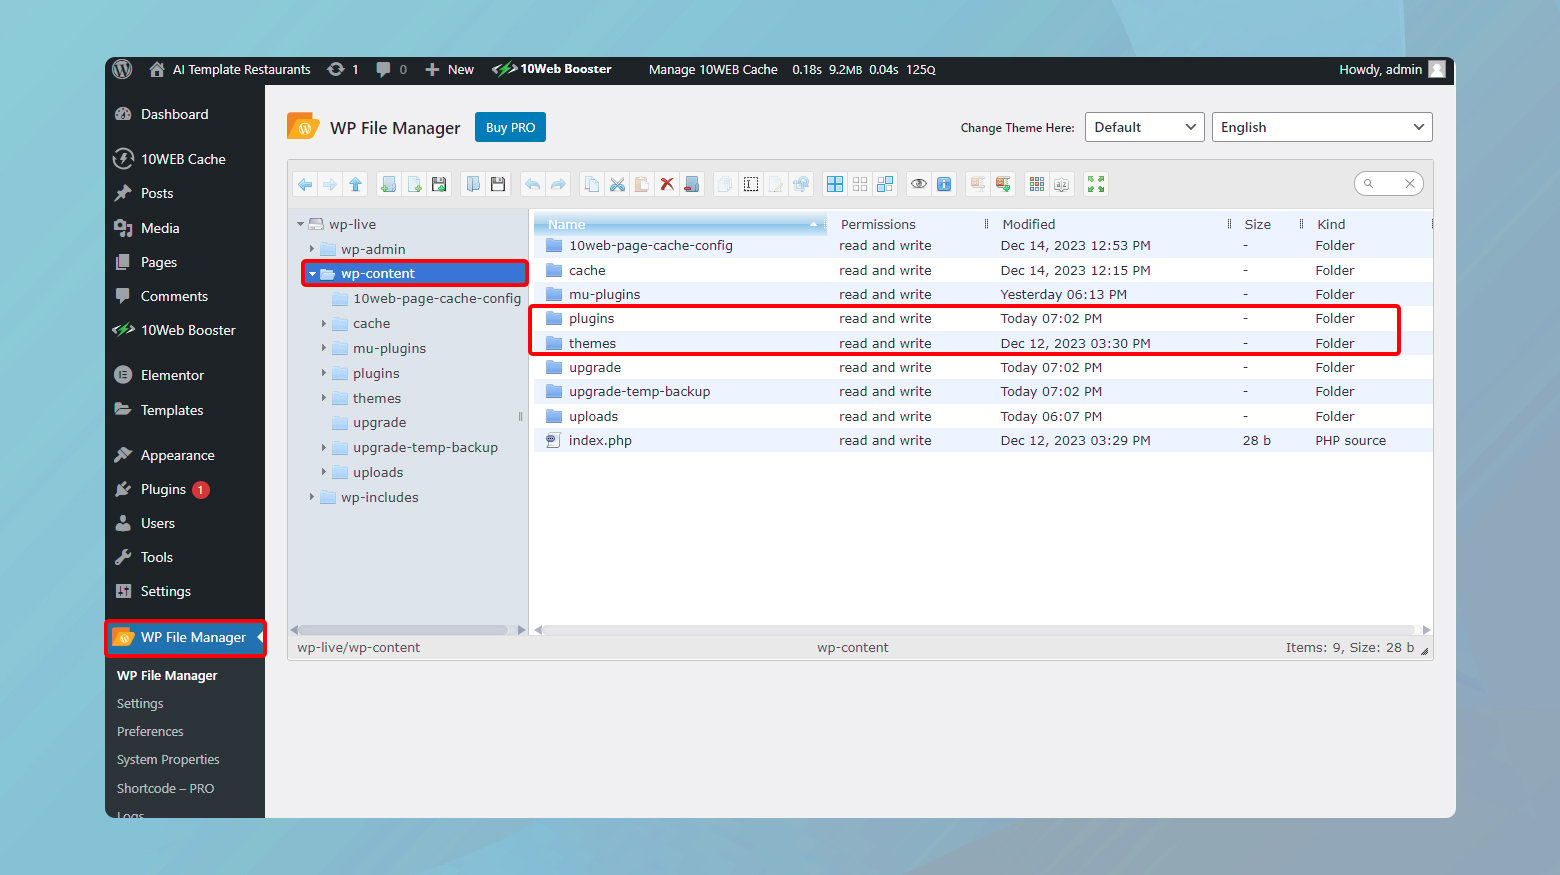
- Click on File Manager in your WordPress dashboard.
- Navigate to the wp-content folder. This is where WordPress stores all your themes and plugins.
- Double click on the plugins or themes folder.
- Locate the plugin/theme causing the error and right click on it.
- Select Delete from the context menu. Confirm the action to proceed with the deletion.
After deletion, return to your Plugins or Themes page within the WordPress dashboard. You should see that the plugin or theme has been deactivated and removed, clearing the error and allowing for a fresh installation.
Conclusion
In addressing the “Installation Failed: Destination Folder Already Exists” error in WordPress, we explored several solutions: using FTP or cPanel, leveraging WP-CLI, and utilizing the File Manager plugin. Each method offers a tailored approach to efficiently remove conflicting folders, emphasizing the importance of backups and post-change monitoring for optimal site health. This blog highlights the adaptability and maintenance essential for a smooth WordPress experience. Create a custom WordPress website tailored to your business needs 10X faster with 10Web AI Website Builder.
Accelerate your WordPress website creation with AI
No credit card required


