The Add to Cart button in WooCommerce is a critical component for online stores, influencing conversion rates significantly. Learning how to change the Add to Cart button link in WooCommerce can enhance user experience and streamline the shopping process.
This guide covers essential steps, from creating a child theme and backing up your website to customizing the button link using filters, redirecting to the checkout page, and using plugins for extended capabilities. Additionally, it addresses troubleshooting common issues to ensure seamless functionality and an improved shopping experience.

Looking to sell online?
Create your custom online store in minutes with 10Web AI Ecommerce Website Builder and take your business online.
FAQ
How do I change the Add to Cart button in WooCommerce?
How do I change the checkout URL in WooCommerce?
How to add a link in Add to Cart button in WooCommerce?
Understanding the WooCommerce Add to Cart button
When you’re looking to improve your online store, the Add to Cart button is a crucial component that can impact your conversion rate. Let’s explore the basics of this feature in WooCommerce.
Add to Cart button basics
The Add to Cart button is a fundamental feature on a product page that allows your customers to select items for purchase. In WooCommerce, this button plays a vital role in streamlining the shopping experience. By understanding how it functions and its essential attributes, you can learn how to change the Add to Cart button link in WooCommerce to better suit your business needs.
- Appearance: The button is usually styled to stand out and attract the user’s attention, often with a contrasting color or design.
- Placement: It’s placed prominently on the product page to invite interaction and facilitate a smooth shopping flow.
- Customization: WooCommerce allows for a high level of customization. You can change the button text, appearance, and even its functionality, such as directing to a different link.
- Impact on sales: A well-optimized Add to Cart button can significantly affect your store’s conversion rate, as it is one of the last steps before a customer proceeds to checkout.
Remember, the customization of the Add to Cart button should always aim to provide a seamless and friendly shopping experience, which in turn can help in building a loyal customer base and increasing sales.
Preparation and initial steps
Before you dive into how to change the Add to Cart button link in WooCommerce, it’s essential to get a few preliminary steps out of the way. These ensure your website’s integrity and give you a safe environment to make changes.
Setting up a child theme
A child theme in WordPress is a sub-theme that inherits the functionality, features, and styling of its parent theme. Creating a child theme is crucial before you make any changes to your website’s code. Here’s how to set up one:
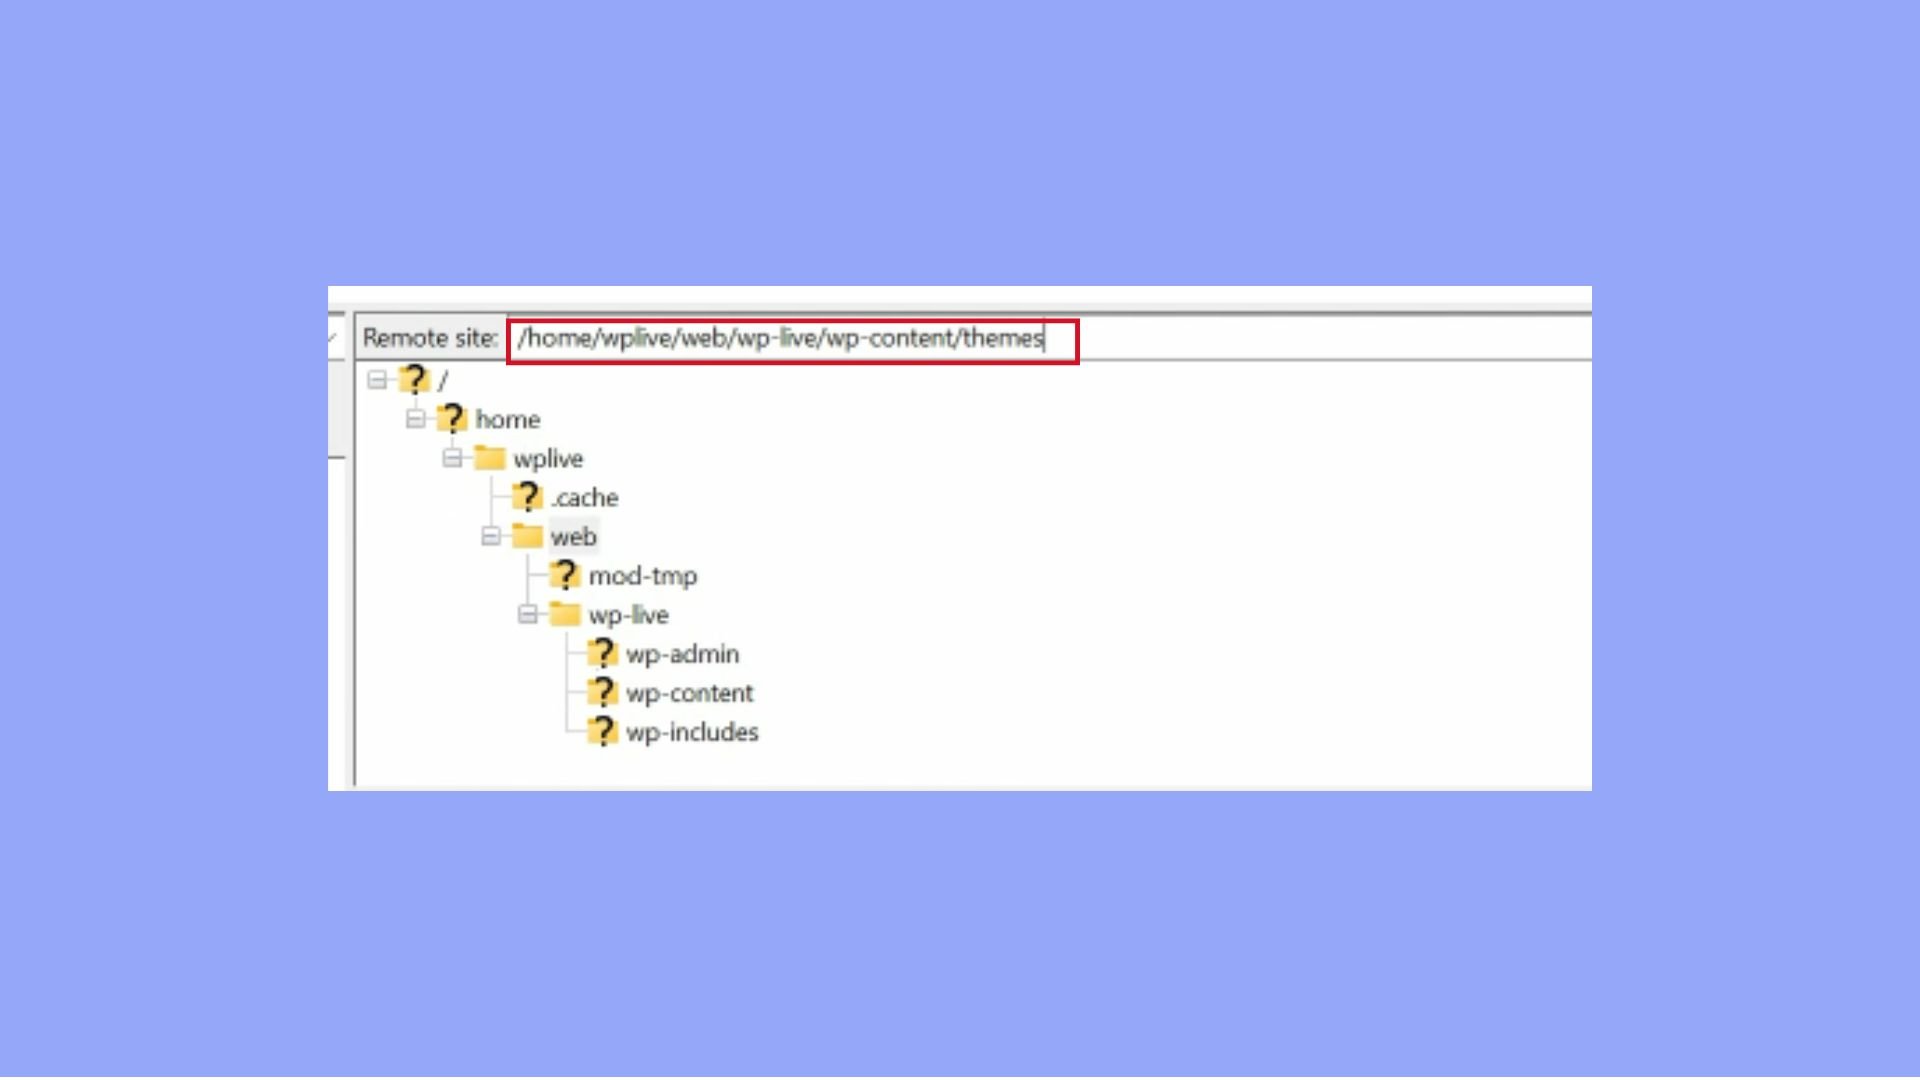
- Access your WordPress website’s files using an FTP client or the file manager provided by your hosting service.
- Navigate to the wp-content/themes directory.

- Create a new folder for your child theme, naming it logically, such as twentynineteen-child if you’re making a child of the Twenty Nineteen theme.
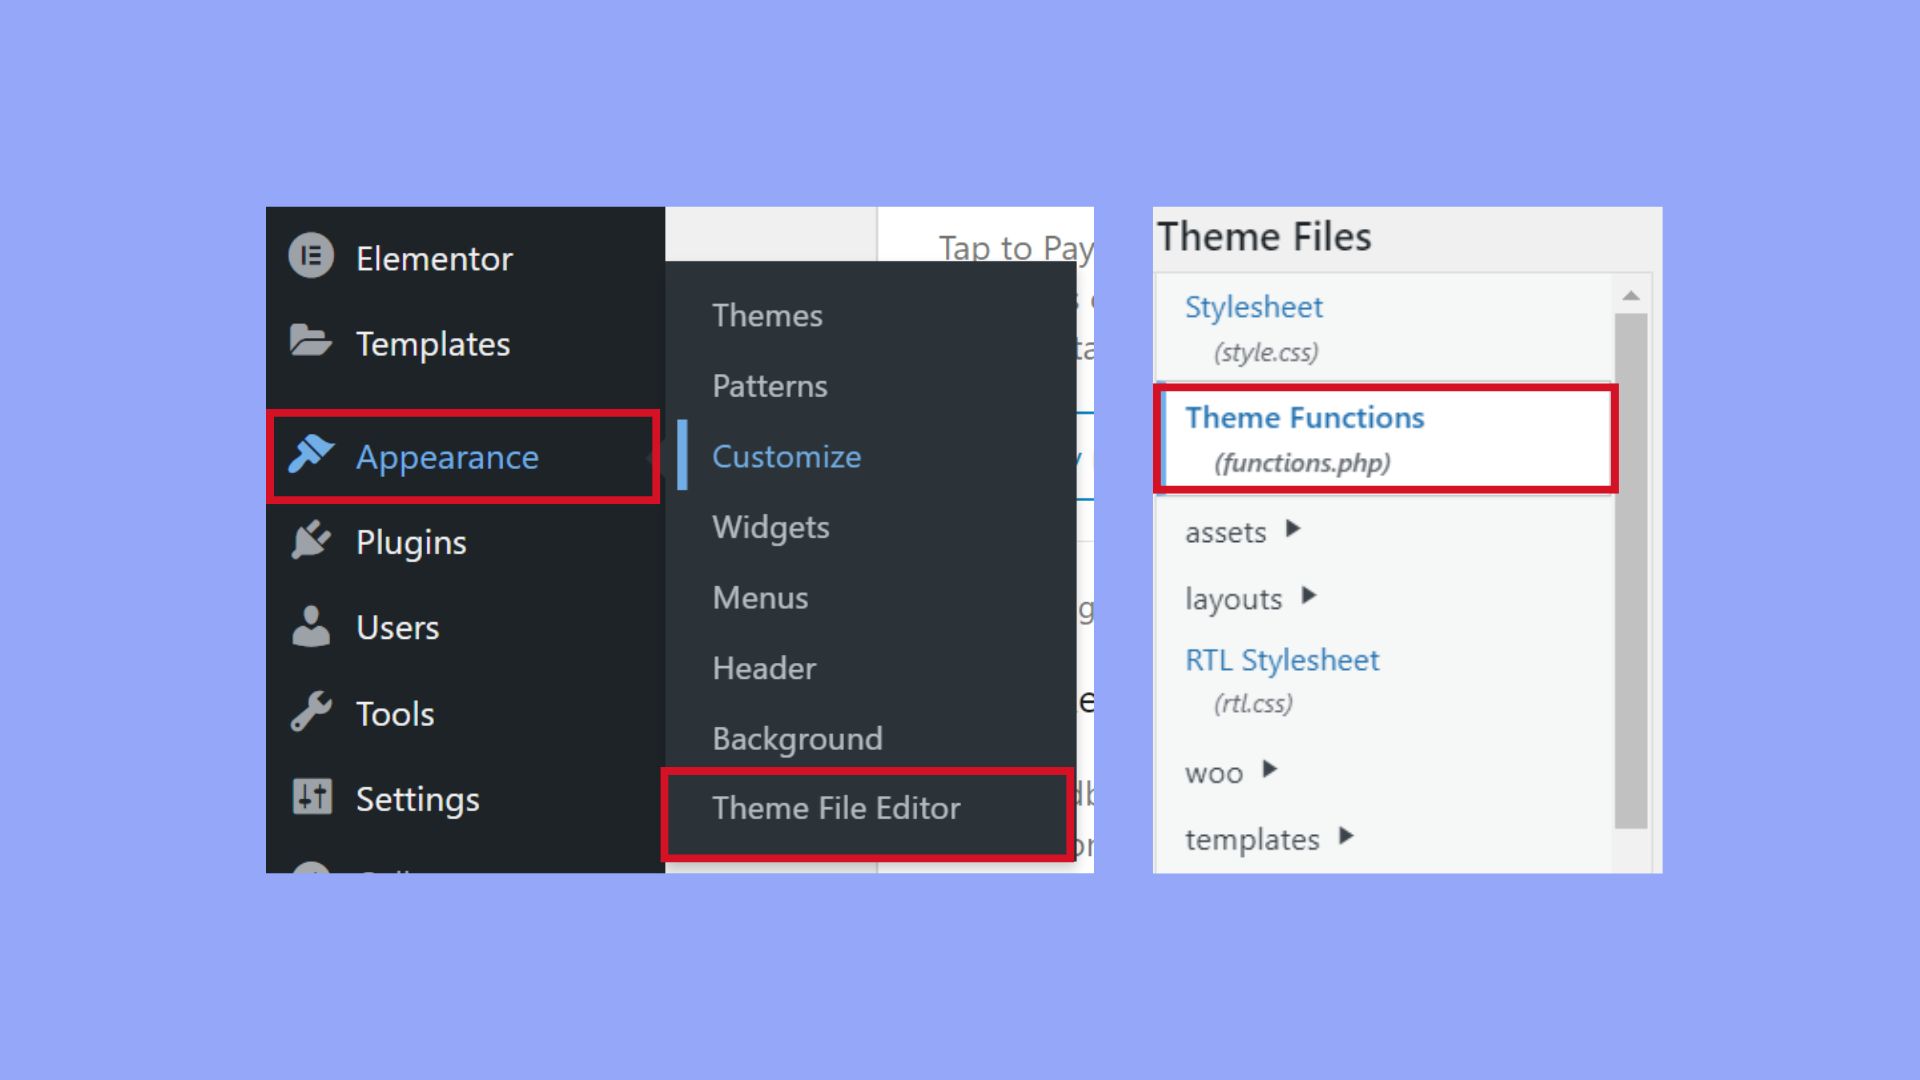
- Inside your child theme folder, create a
style.cssfile. - Add the necessary header comment at the top of your
style.cssfile to let WordPress recognize your child theme. - Enqueue the parent and child theme stylesheets by adding the appropriate action hook to your child theme’s
functions.phpfile. - Activate your child theme from the WordPress dashboard by going to Appearance > Themes.
Backup your WordPress website
Regular backups of your WordPress website safeguard your online business against data loss. Here’s how to create a backup:
- Choose a backup method—this could be a plugin like UpdraftPlus or your hosting provider’s backup feature.
- If using a plugin, go to Plugins > Add New and search for the backup plugin of your choice.
- Install and activate the selected plugin.
- Once activated, navigate to the backup plugin’s settings via your WordPress dashboard and configure your backup preferences (e.g., schedule, storage destination).
- Run your first backup by following the plugin’s process, usually found under a section labeled Backup Now or similar.
- Ensure your backup files are stored safely, ideally in multiple locations such as your server, a cloud storage service, and your local device.
If you are a 10Web user, your website is regularly backed up automatically, ensuring your data is always protected. Additionally, you have the flexibility to schedule backups according to your needs. 10Web’s Backup Service provides a robust layer of protection for your website’s security, incorporating multi-layered security measures and advanced backup options alongside automatic website backups.
Looking to sell online?
Create your custom online store in minutes with 10Web AI Ecommerce Website Builder and take your business online.
Taking the time to create a child theme and back up your site ensures you have a solid foundation to proceed with customizing the Add to Cart button link in WooCommerce.
Customizing the button link
If you’re looking to tailor the shopping experience on your WooCommerce store, customizing the Add to Cart button link is a strategic place to start. Not only can this improve user navigation, but it can also lead to a smoother checkout process.
Changing the URL with filters
To customize your Add to Cart button link, WordPress offers hooks and filters that provide a hands-on approach. Specifically, the woocommerce_add_to_cart_redirect filter allows you to specify a custom URL. Here’s how to change the Add to Cart button link in WooCommerce:
- Open your functions.php file.
- Add the following code snippet to the file:
add_filter('woocommerce_add_to_cart_redirect', 'custom_add_to_cart_redirect');
function custom_add_to_cart_redirect() {
    return 'https://yourcustomlink.com'; // Replace with your custom URL
}
- Replace
https://yourcustomlink.comwith the URL where you want customers redirected after they click the button. - Save your changes.
Redirecting the button to checkout page
To streamline the purchasing process, you might want to take customers directly to the Checkout page after adding a product to their cart:
- Access your functions.php file.
- Insert the code snippet below:
add_filter('woocommerce_add_to_cart_redirect', 'redirect_to_checkout');
function redirect_to_checkout() {
    global $woocommerce;
    return $woocommerce->cart->get_checkout_url();
}
- Save the file to apply the changes.
Direct purchase button implementation
If you’re aiming for an even more direct purchasing process, implementing a direct purchase button can be the solution:
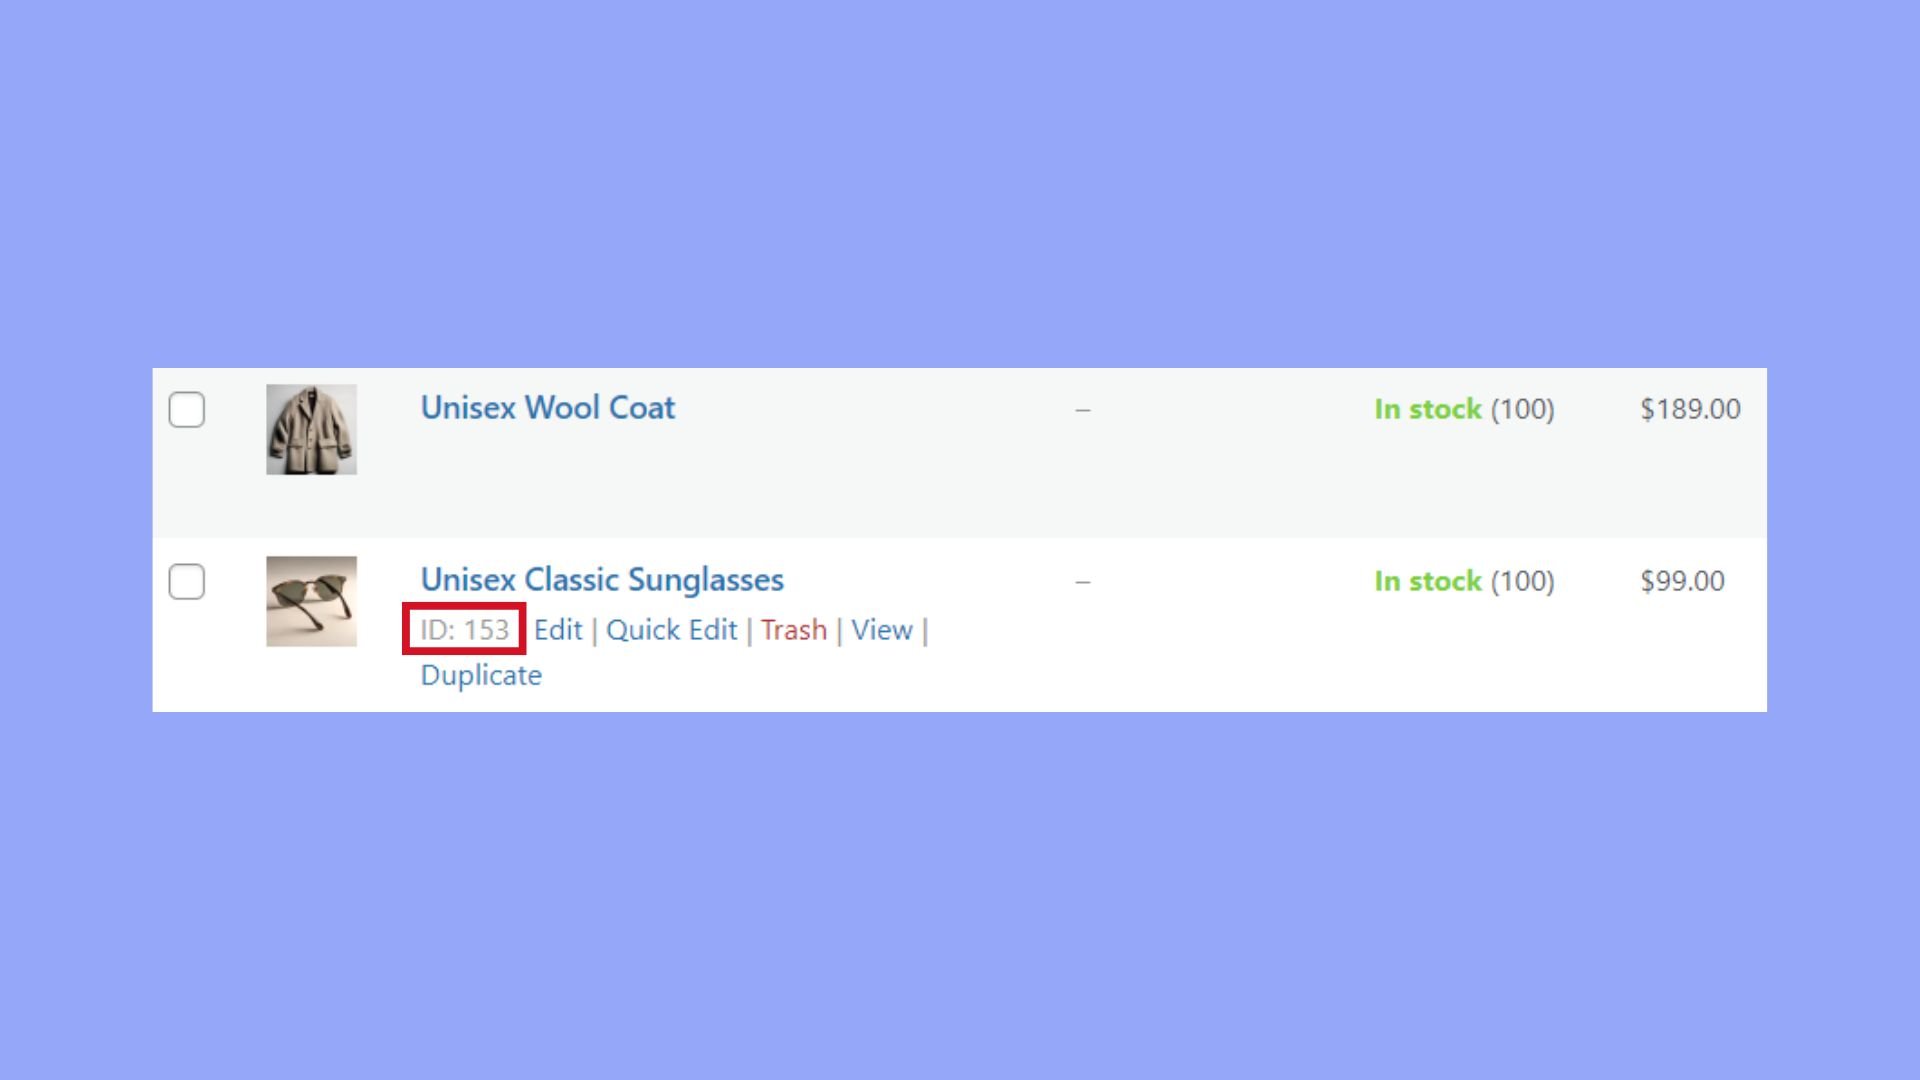
- Identify the product ID for which you want to create a direct purchase button.
- Use this URL structure in your button’s link:
https://yoursite.com/checkout/?add-to-cart=ID, whereIDis the product ID. - To place this URL, simply add a custom button on the product page with the modified link.
This approach lets customers skip the cart and proceed with their purchase with minimal clicks, potentially increasing conversion rates.
Enhancing functionality and user experience
Customizing the WooCommerce Add to Cart button is a simple way to enhance your online store. By improving this feature, you can tailor the shopping experience to meet your customers’ needs and encourage more sales.
Using plugins for extended capabilities
To extend the capabilities of your WooCommerce Add to Cart buttons, consider utilizing a plugin. Plugins can provide you with a variety of options to modify the button’s functionality and appearance.
- Navigate to your WordPress Dashboard.
- Click on Plugins and select Add New.
- Search for a plugin like Custom Add-to-Cart Button for WooCommerce.
- Install and activate the chosen plugin.
- Go to Appearance > Customize.
- Find the WooCommerce section and customize the button according to your needs.
Using a plugin not only simplifies how to change Add to Cart button link in WooCommerce but also offers additional features such as changing button text, styles, and actions after the item is added to the cart.
Improving the shopping cart interaction
Enhancing the user’s interaction with the shopping cart starts with the Add to Cart button itself.
- Access the theme’s custom CSS section, typically found under Appearance > Customize > Additional CSS in your WordPress Dashboard.
- Use the Inspect tool in your browser to find the CSS selector for the Add to Cart button on the product page.
- Write custom CSS to change the visual design of the button, like background color, font size, or border properties.
- For changing the button’s link, locate the Add to Cart PHP function in your theme files and alter it to direct to a different page or action as required.
Remember, a seamless shopping cart interaction not only involves appearance but also how the button responds after a customer clicks on it. The overall goal is to make the process from browsing to purchasing as smooth as possible.
Looking to sell online?
Create your custom online store in minutes with 10Web AI Ecommerce Website Builder and take your business online.
Troubleshooting common general issues
When customizing your WooCommerce store, it’s essential to know how to troubleshoot common issues you might encounter such as errors with your Add to Cart button or problems arising from theme and plugin conflicts.
Resolving button and text errors
If you’re experiencing errors with your Add to Cart button or the button text is not displaying correctly, the first step you should take is to identify any error messages that are displayed. Follow these steps for resolving button and text errors:
- Ensure your Product ID is correct as a wrong ID can cause the button not to function properly.
- Check if the button text matches your customization or if it has reverted to the default; this can indicate a deeper issue.
- Navigate to Appearance > Customize in WordPress and access the WooCommerce settings to see if you can correct the button text there.
Compatibility checks with themes and plugins
Compatibility issues between WooCommerce, your theme, and other plugins can also cause your Add to Cart button to malfunction. Here’s how you can perform compatibility checks:
- Deactivate all plugins except WooCommerce and switch your theme to a default WordPress theme like Twenty Twenty. This helps identify if a theme or plugin conflict exists.
- If the issue is resolved, reactivate each plugin one by one and switch back to your original theme, checking the button’s functionality each time. This will help you pinpoint the exact cause of the issue.
- Once identified, look for updates or support threads for your theme or the conflicting plugin that might address compatibility issues.
In following these steps for how to change Add to Cart button link in WooCommerce, you ensure your store runs smoothly and your customers’ shopping experience remains uninterrupted. Remember, careful troubleshooting is key to resolving issues quickly and effectively.
Conclusion
Mastering how to change the Add to Cart button link in WooCommerce enables you to tailor your online store’s user experience to better meet your business objectives. By implementing the customizations discussed, such as redirecting users to specific URLs, using direct purchase buttons, and enhancing functionality with plugins, you can streamline the shopping process and potentially increase conversion rates. These improvements ensure a seamless checkout experience, ultimately leading to greater customer satisfaction and higher sales.
Looking to sell online?
Create your online store in minutes
Create your online store in minutes with 10Web AI Ecommerce Website Builder.