Changing your WooCommerce theme can refresh your online store without losing custom settings. This guide explains how to change WooCommerce themes seamlessly, preserving your tailored configurations and minimizing disruption. We’ll cover steps to safely switch themes, ensure compatibility, and troubleshoot common issues, helping you maintain a polished and functional ecommerce site.

Looking to sell online?
Create your custom online store in minutes with 10Web AI Ecommerce Website Builder and take your business online.
FAQ
How do I change the template in WooCommerce?
How do I choose a theme for WooCommerce?
- Compatibility: Ensure the theme is compatible with WooCommerce.
- Responsiveness: Choose a theme that is responsive and works well on all devices.
- Customization: Look for themes that offer extensive customization options to match your brand.
- Reviews and ratings: Check reviews and ratings from other users to gauge the theme’s performance and support.
- Design and features: Select a theme that aligns with the aesthetic and features you need for your online store.
How do I change my WooCommerce storefront theme?
How do I customize my WooCommerce style?
- CSS: Use custom CSS to alter the appearance of elements on your WooCommerce pages. This can be added under Appearance > Customize > Additional CSS.
- Child theme: Create a child theme to make more extensive changes without losing them on theme updates.
- Plugins: Use customization plugins designed for WooCommerce to adjust layouts, colors, fonts, and other elements without coding.
- Theme options: Many themes come with built-in options to customize various aspects of your WooCommerce store directly from the theme customizer.
Preparation before changing themes
Switching your WooCommerce theme can give your online store a refreshing new look and feel, but it’s important to prepare carefully to ensure the transition is smooth. The following steps will help you safeguard your content and pick a compatible theme that aligns with your online store’s needs.
1. Backup your website
Before you make any changes, it’s crucial to back up your entire website. This includes your files, themes, plugins, database, and content. You can use WordPress plugins like UpdraftPlus or tools provided by your hosting company to create a complete backup. Store this backup in a safe location so that if anything goes wrong, you can restore your site to its previous state.
2. Evaluate your current theme
Take a close look at your current WooCommerce theme, including any customizations you’ve made. If you’re using a child theme, note the changes as you’ll want to replicate these in your new theme if possible. Assess the performance of your current theme as well by checking the loading speed and overall performance. This baseline will help you determine if the new theme is a better fit for your website.
Looking to sell online?
Create your custom online store in minutes with 10Web AI Ecommerce Website Builder and take your business online.
4 easy steps to learn how to change WooCommerce theme
Changing the theme of your WooCommerce store is a straightforward process that can significantly refresh the look and feel of your online shop. Here are four easy steps to guide you through switching to a new WooCommerce theme.
Step 1: Choose a new WooCommerce theme
Before diving into how to change WooCommerce theme, it’s important to select a theme that best suits your online store. Considering aspects like the theme’s responsiveness, how it handles your product catalog, and the customization features available will set the foundation for your site’s success.
Where to find WooCommerce themes
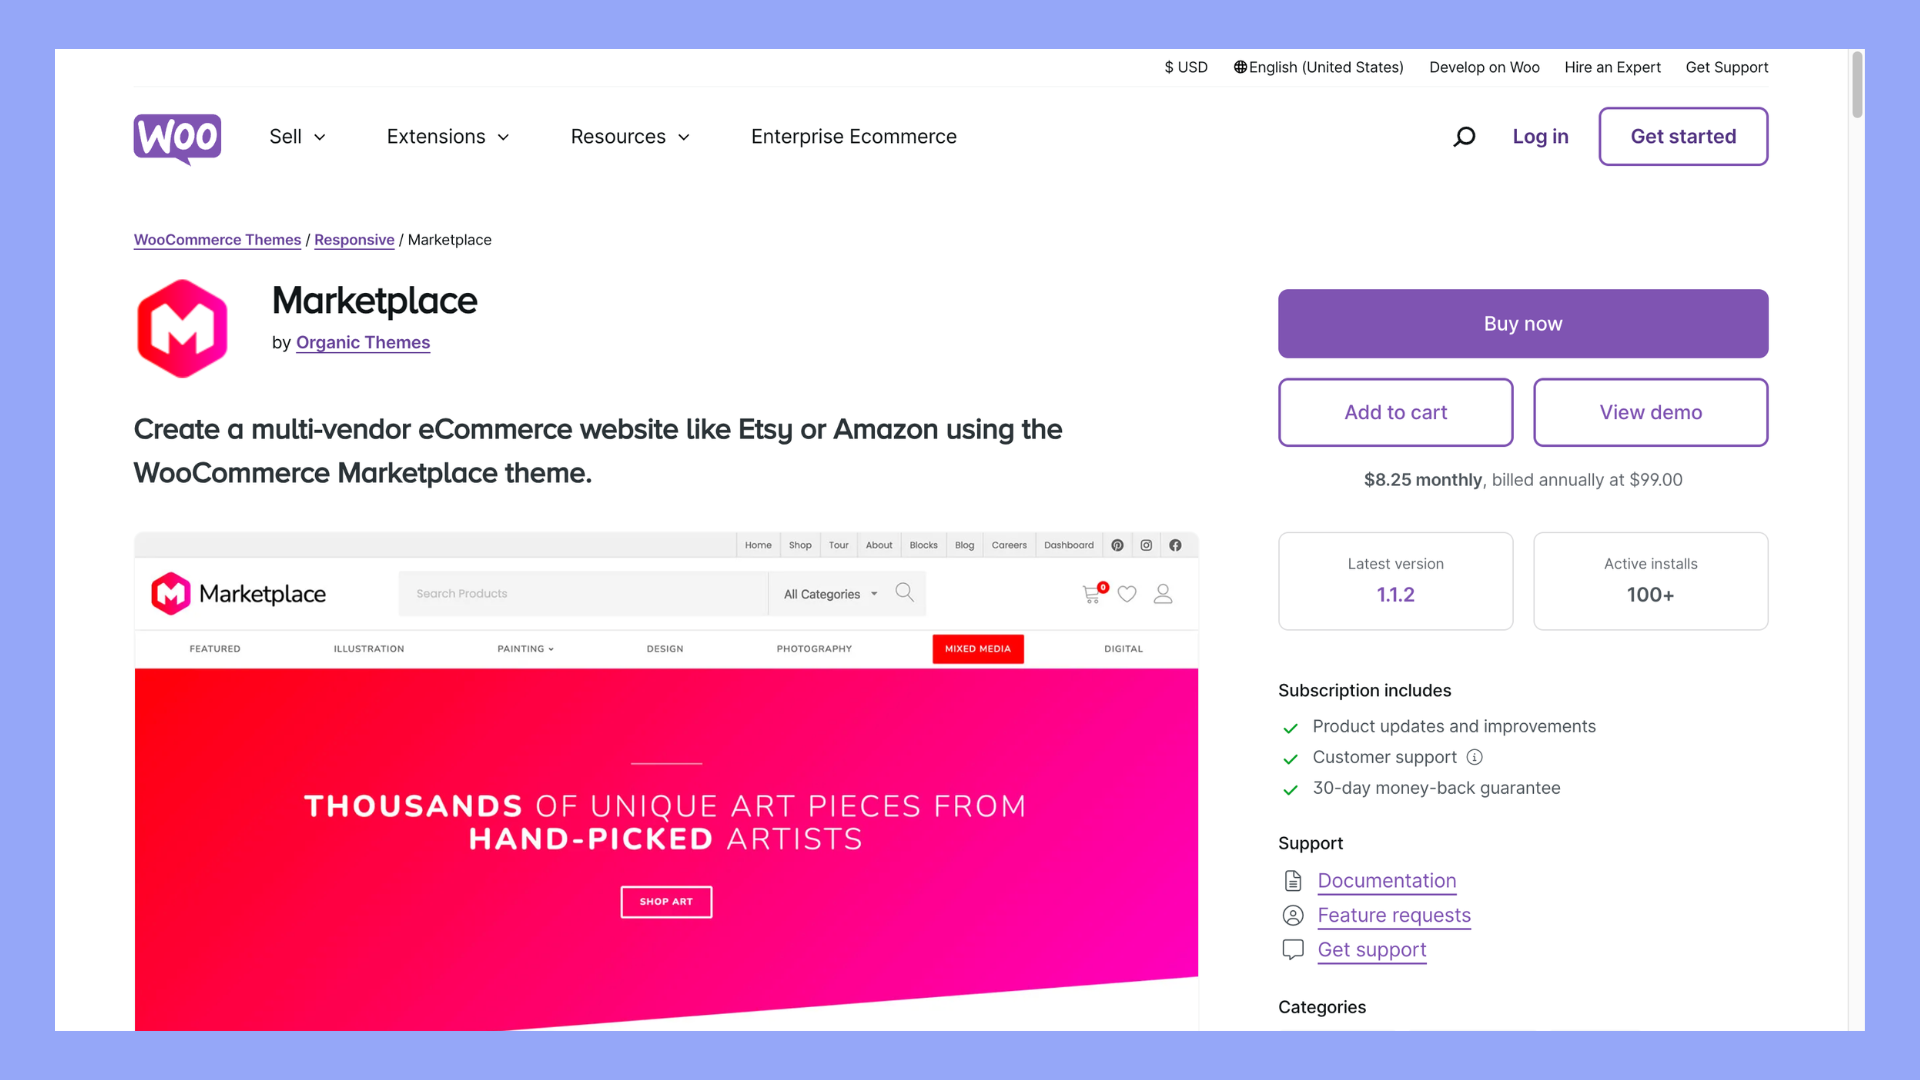
When you’re ready to give your WooCommerce shop a fresh look, a wide range of themes await you. Here’s how you can find the perfect one:
- Official WooCommerce marketplace: Start by visiting the official WooCommerce Marketplace, where you can find themes developed by Woo as well as third-party creators. Look for themes with positive ratings and reviews that fit your design preferences.

- WordPress theme directory: In the WordPress Theme Directory, you have access to free themes. Use filters to narrow down your search to WooCommerce-compatible themes.
- Theme developer websites: Reputable theme developers like Astra, Elegant Themes, or ThemeForest offer a variety of premium themes. You can view live demos on these sites to see how themes handle elements like navigation or typography before making a decision.
Make sure to consider the following features when choosing your theme:
- Responsive design: Ensures your store looks good on any device.
- Customization options: Look for themes that allow easy customization of the site title, typography, and other elements without needing to code.
- Product Display: How products are showcased is vital. Check if the theme supports various product types and if it makes browsing your catalog intuitive.
- Navigation: Easy navigation is key to keeping customers on your site. Preview the theme’s demo to get a feel for the navigation layout.
Download a theme that aligns with the vision for your store and check if there is sufficient support and documentation to assist you with setup and customization. Once you’ve made your choice, you’re ready to apply the new theme to your website.
Step 2: Install your new theme
Before diving into a new theme, it’s important to carefully install and activate it, ensuring that your WooCommerce store maintains its functionality and appearance throughout the transition.
Theme installation
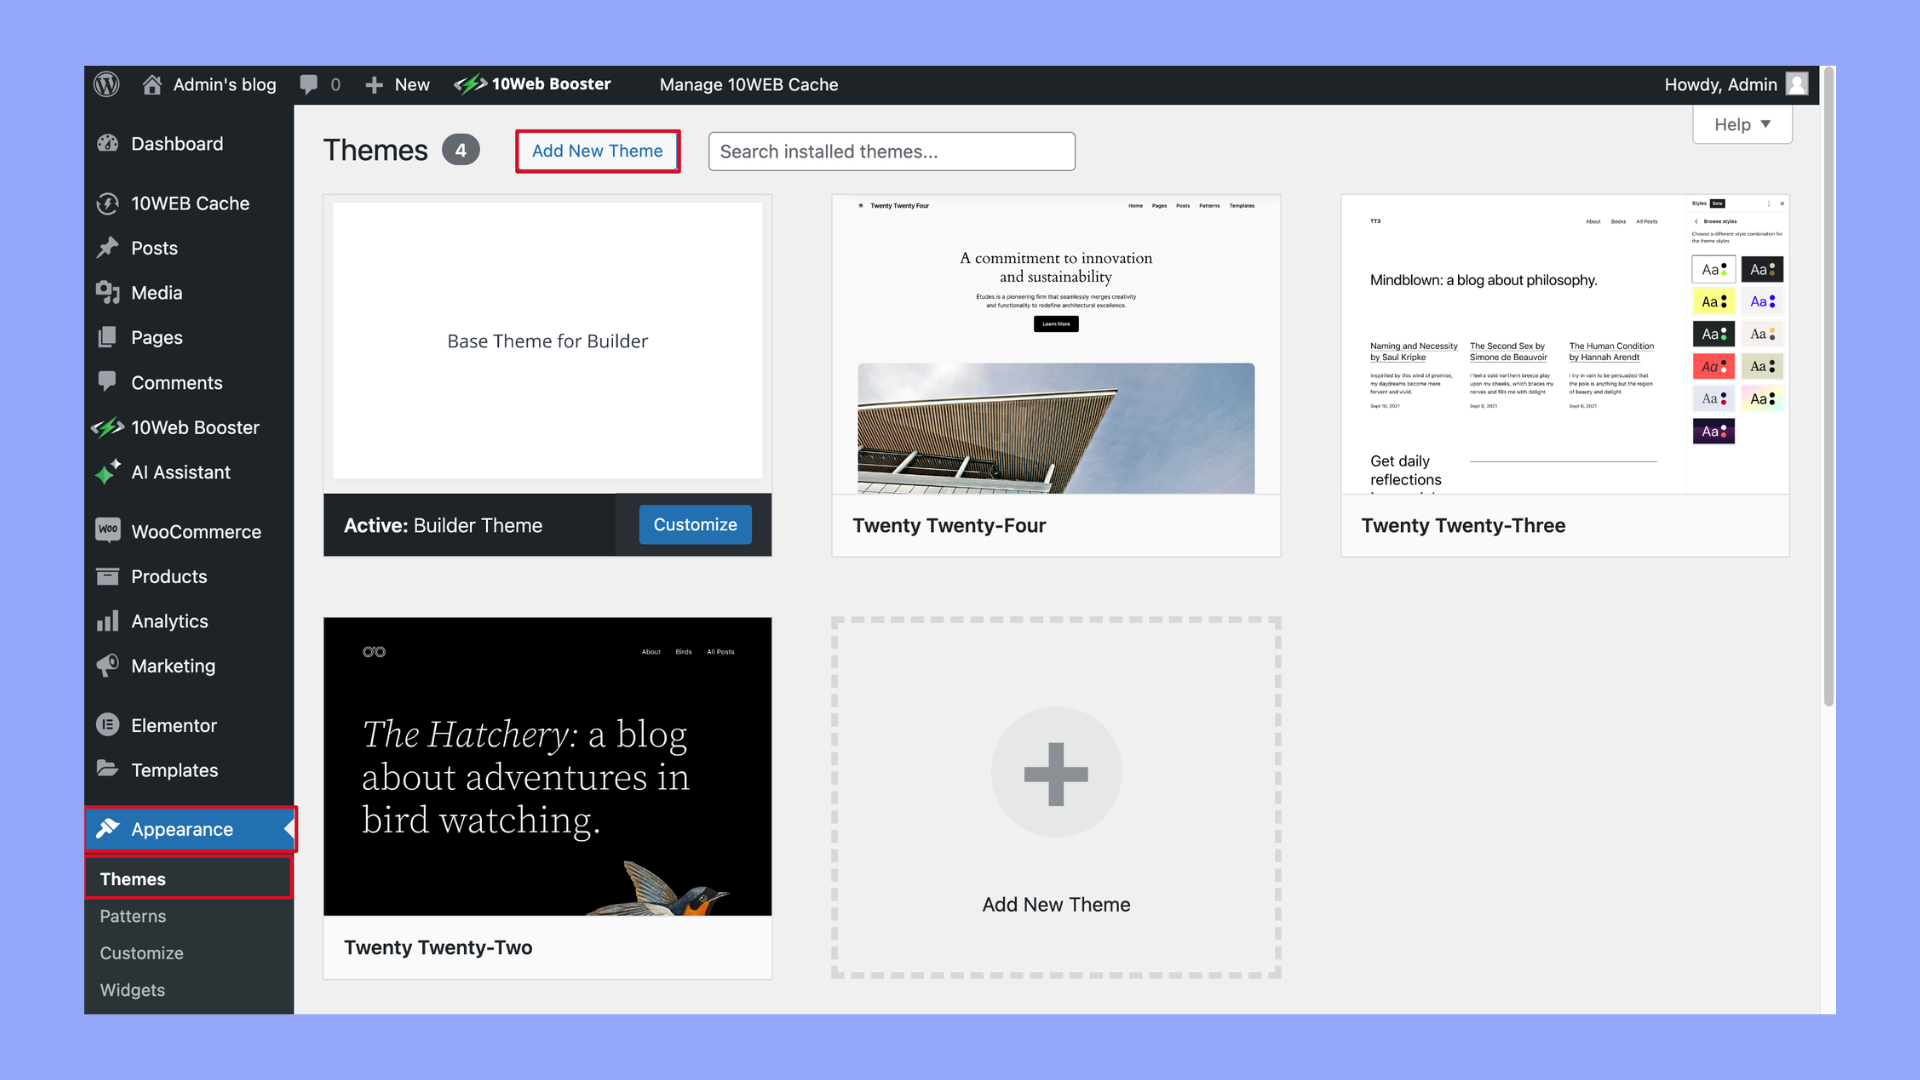
- To install a new theme, first, log in to your WordPress dashboard.
- Navigate to Appearance and then select Themes.
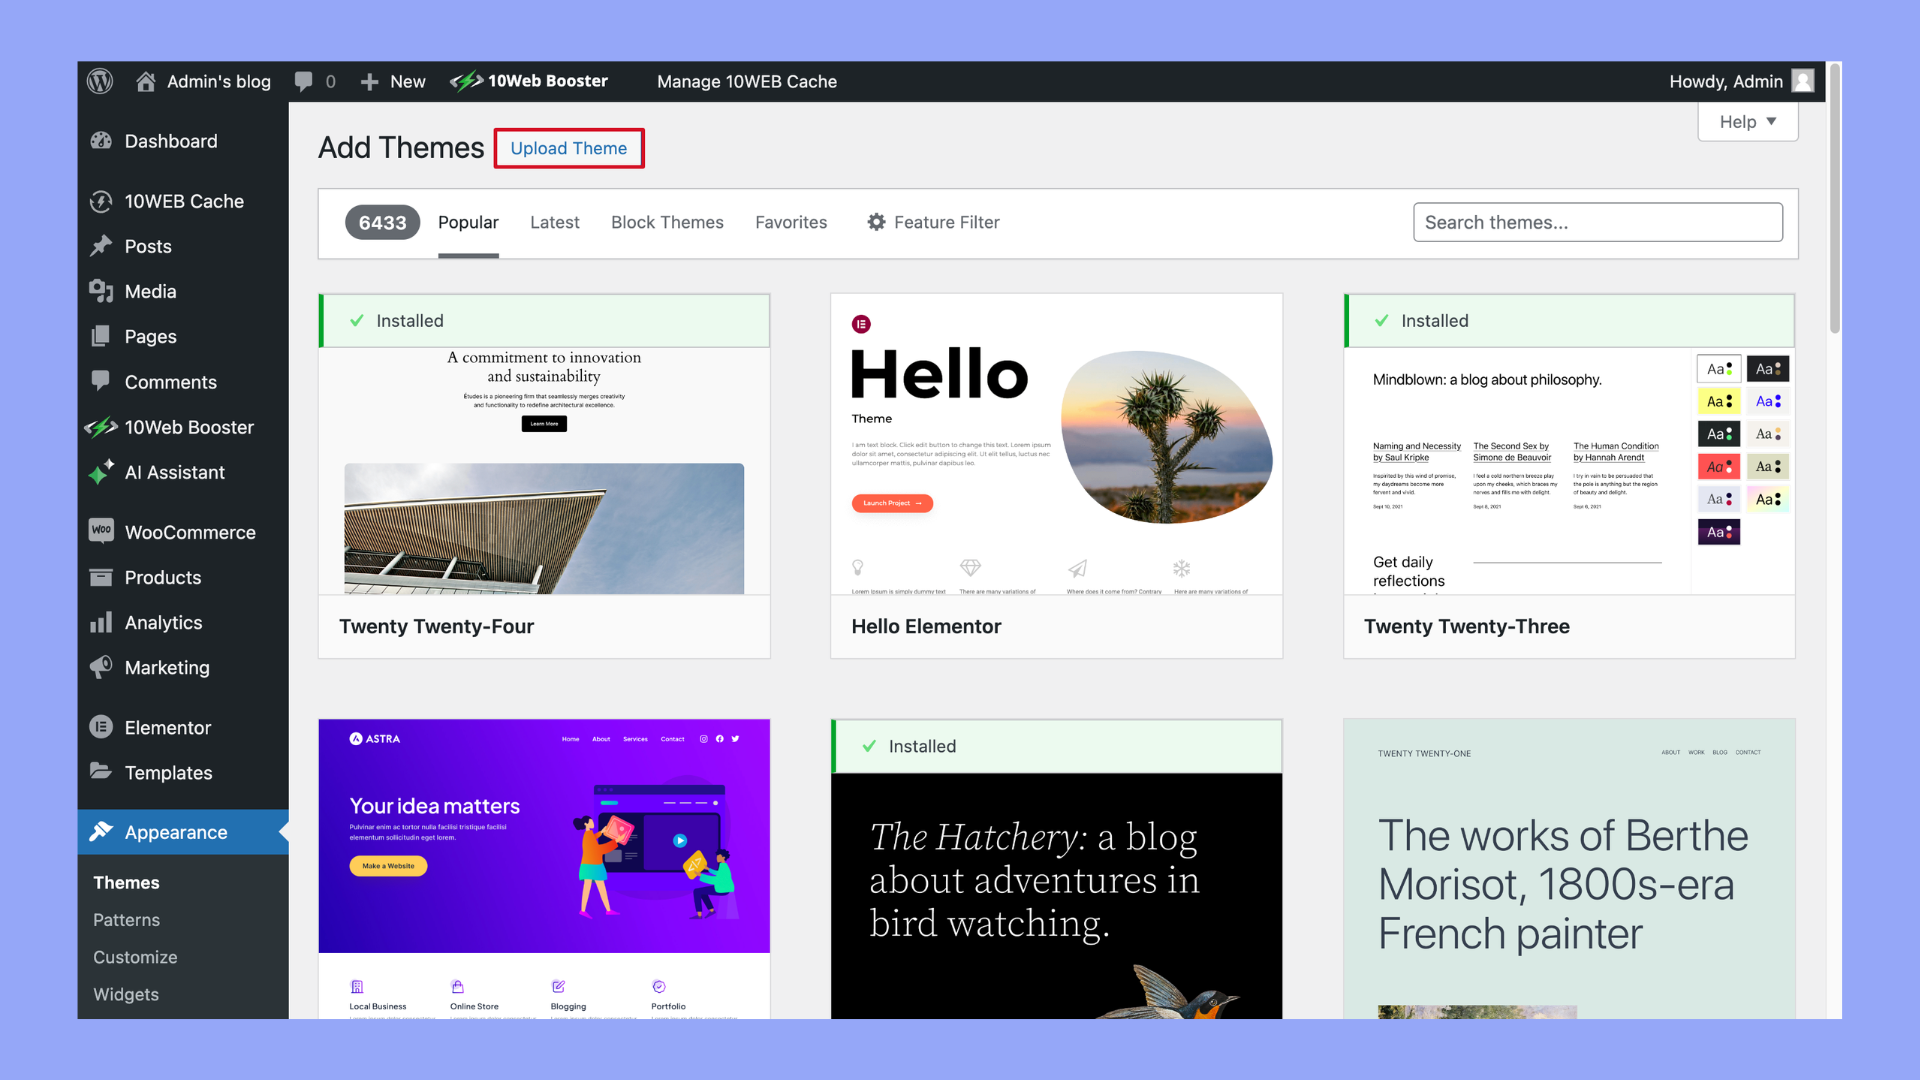
- Click the Add New button to explore available themes. If you’ve already chosen a theme, click Upload to add the theme’s .zip file to your website.
Remember to install themes that are compatible with WooCommerce for optimal store functionality.
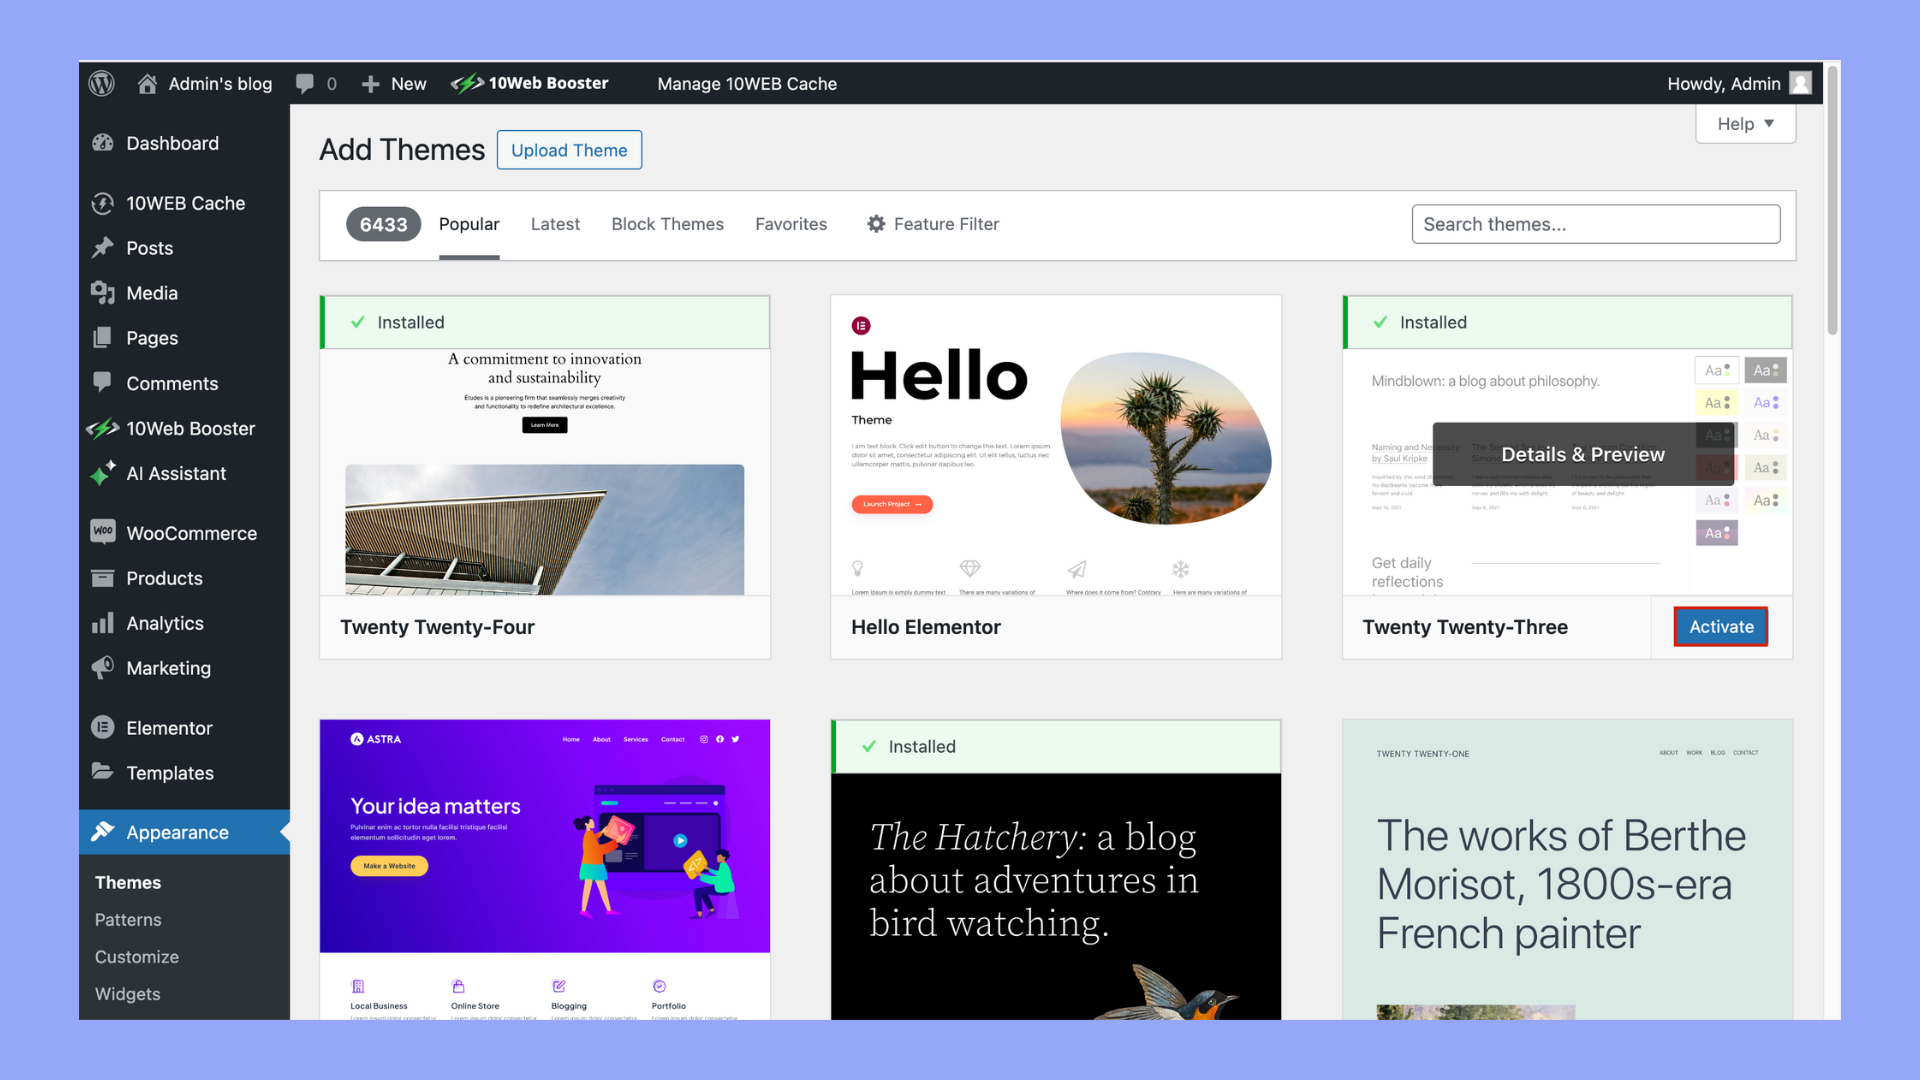
Activate the theme
After the upload is complete, you’ll see the theme among your other themes. Hover over the theme’s thumbnail and click the Activate button. This sets the theme as the current theme that your site visitors will see. Activating the theme does not automatically apply all settings or plug-in configurations related to WooCommerce, so additional steps may be necessary to get everything just right.
Configuring settings
Once your theme is active, go to WooCommerce > Settings in the dashboard to access the configuration options specific to your WooCommerce elements. Review each tab and subsection to adjust and Publish settings such as shop page displays, product image sizes, and checkout processes to match your new theme’s layout and style. Take time to go through each part so that all the elements of your online store look and function as intended.

Step 3: Customize the new theme
After selecting and installing your new WooCommerce theme, the next step is to make it your own. Customizing your theme involves changing elements to match your brand’s style and ensuring that the theme functions as you need it to.
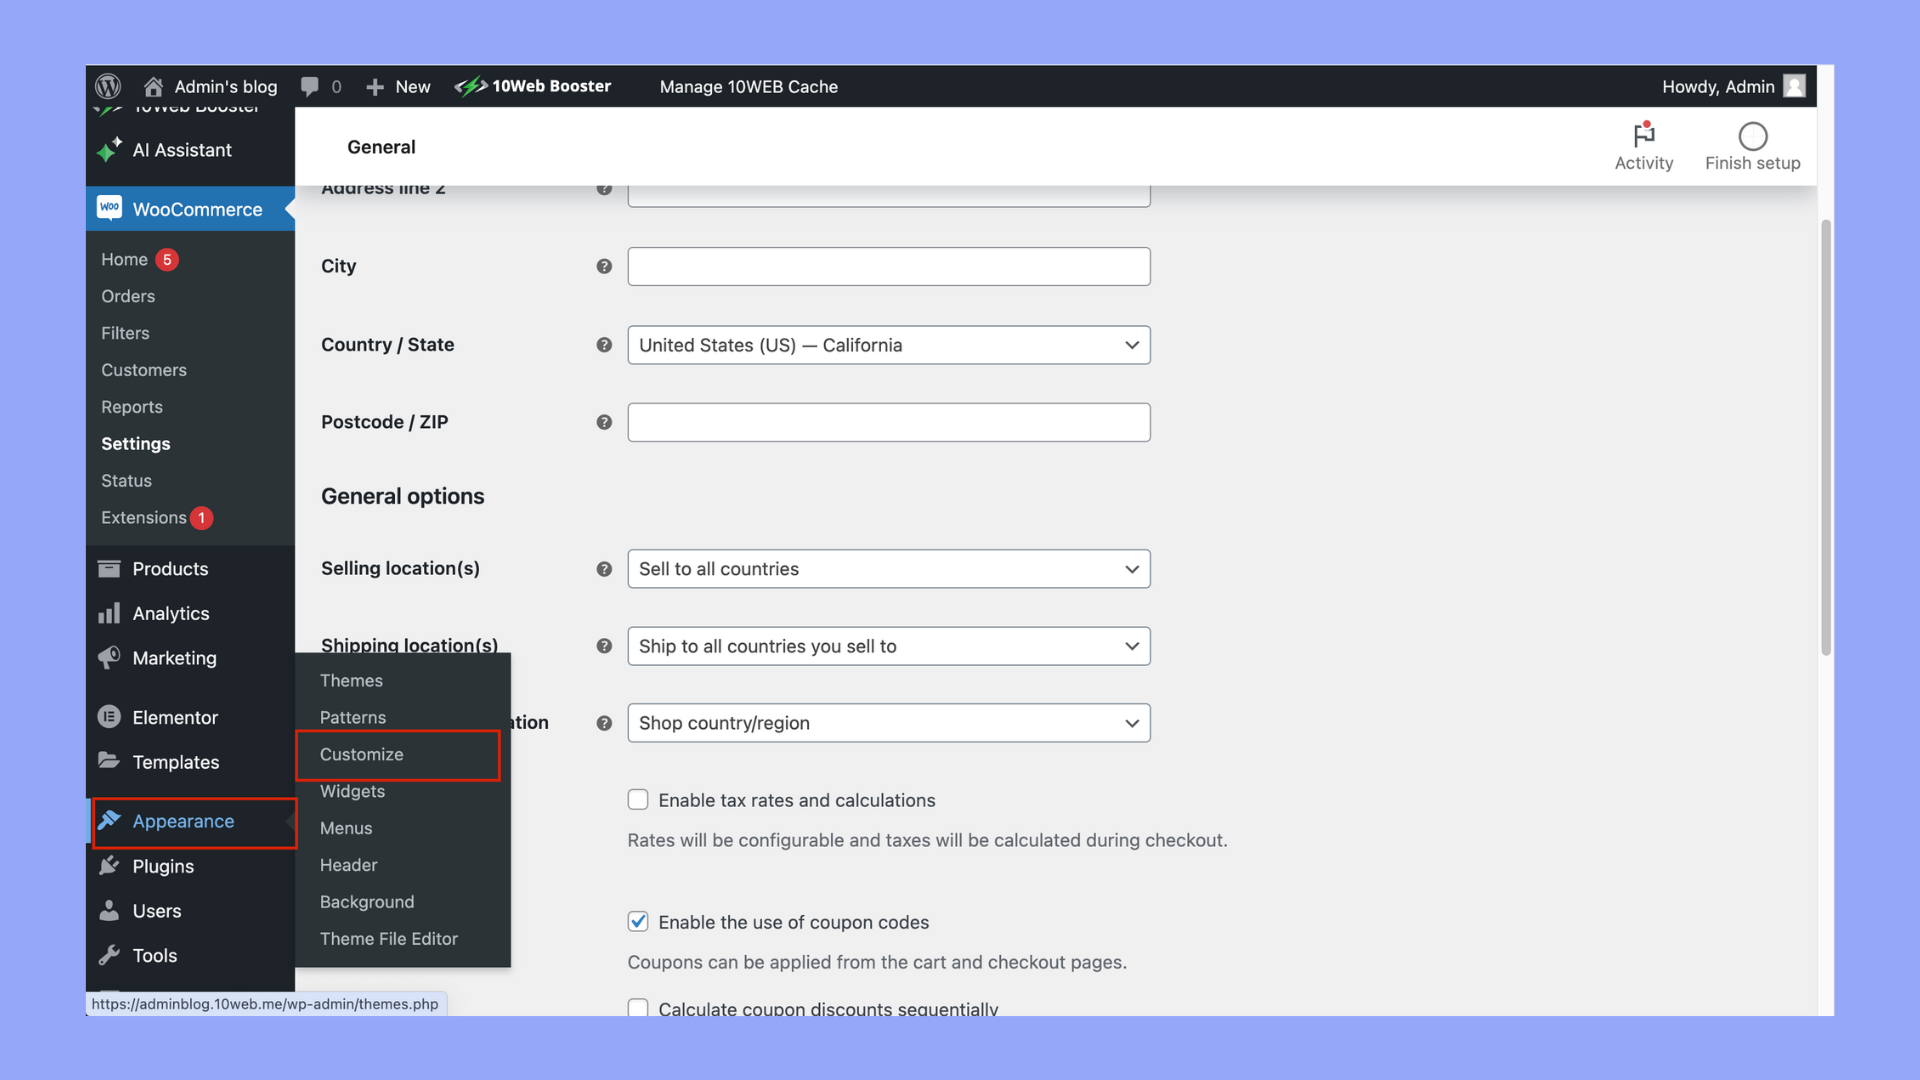
Accessing theme customizer
To begin customizing your new theme, navigate to Appearance and click on Customize. This will lead you to the WordPress Customizer, a powerful tool that offers a live preview of your changes. You’ll find different sections to modify various parts of your theme, such as colors, fonts, header, footer, and widgets.
Customization tips
- Typography and colors: Consistency in typography and colors is key to professional-looking design. Adjust your fonts and colors from the customizer to reflect your brand identity.
- Layout and navigation: Configure your layout settings to determine the positioning of sidebars and enable a dropdown menu for a tidy navigation experience. Remember to test your navigation menu for user-friendliness.
- Widgets: Add widgets to your sidebar or footer for extra functionality. Customize these with options like recent posts, product categories, or social media links.
- Header and footer: The header is the first thing users see, so ensure your logo is clearly visible. Likewise, tailor your footer with contact information or quick links.
- Product images and features: Set your product images to the optimal size for clarity and quick loading. Also, review any theme-specific features or custom fields that can enhance your product pages.
- Page builders: If your theme supports it, employ a page builder like Elementor for advanced customization. They provide a drag-and-drop interface to create unique layouts.
Testing functionality
Before going live, it’s crucial to test your theme thoroughly. Check different pages, product listings, and menus to ensure everything works correctly and is visually cohesive. Test the responsive design on multiple devices, and ensure that all default settings are adjusted to suit your needs. Don’t forget to save your work periodically while you make changes.
Step 4: Go live with the new theme
Once you’ve tested and customized your WooCommerce theme, it’s time to make it live so your customers can experience the updated interface.
Previewing changes
Before taking your new theme live, use the Live Preview function to see how your changes will appear on the actual site. It’s crucial to ensure that your shop page, product page, and featured products display correctly across all devices. To access the preview, go to Appearance, then Customize. Look especially at the responsiveness on mobile devices, as well as the functionality of the cart and checkout process.
Resolving issues
If you notice any issues during the preview, you’ll need to resolve them before going live. Go to the Theme Editor to make necessary customizations or modifications to code snippets and custom CSS. Check ecommerce support for your new theme and ensure that product categories and comments work as intended. Always keep the user experience in mind, making it as seamless as possible.
Final testing
Conduct a final round of testing to confirm that all aspects of your site are working as expected. Pay attention to:
- Responsiveness: Check how your site appears on various devices and screen sizes.
- Functionality: Click through the main navigation, test the search bar, and ensure that all links and buttons function correctly.
- Ecommerce features: Add items to the cart, use the checkout, view the product pages, and test any other ecommerce related features to confirm they’re operating smoothly.
Once you’re satisfied with the preview and tests, navigate to Appearance > Themes and click on the Activate button to apply the new theme to your live site. Now your customers can enjoy the updated look and feel of your online store!
Maintaining your website post-change
After successfully learning how to change WooCommerce theme, it’s crucial to focus on your website’s maintenance to ensure it remains user-friendly, secure, and performs optimally. Here’s how you should proceed:
Regular updates
Keeping your WooCommerce site up-to-date is essential for both security and functionality:
- Plugins and themes: Regularly check for updates to your WooCommerce core, theme, and plugins. Outdated components can be a security risk and might cause compatibility issues.
- Content features: Ensure your product presentation, including product quantity, sale badge, and other content features, is accurate. Update these regularly to reflect your current offerings.
Monitoring performance
Regular checks on your website’s performance will help maintain a seamless user experience:
- Speed tests: Run performance tests to ensure your site is not slowing down. Look into caching and image optimization plugins to maintain speed.
- User-friendly customization: Verify that all your customization, especially post-change, are improving the user experience. Check if buttons are easily clickable, settings are intuitive, and product presentation is clear.
Feedback collection
- Customer reviews: Keep an eye on customer reviews and feedback. It’s direct input from your audience about what’s working and what could be improved.
- Adjustments based on feedback: Use the feedback to make informed decisions about any further customization or tweaks to your site to ensure it meets your customers’ expectations.
By implementing these practices, you will maintain a strong, secure, and user-friendly online presence.
Looking to sell online?
Create your custom online store in minutes with 10Web AI Ecommerce Website Builder and take your business online.
Conclusion
In conclusion, changing your WooCommerce theme doesn’t have to result in the loss of your custom settings. By following the structured steps outlined—backing up your site, choosing a compatible theme, and testing thoroughly—you can ensure a smooth transition. This approach not only protects your settings but also enhances your store’s functionality and appearance, keeping your online presence fresh and engaging for your customers.
Looking to sell online?
Create your online store in minutes
Create your online store in minutes with 10Web AI Ecommerce Website Builder.