Customizing the text on your WooCommerce checkout button is more than just a minor detail—it’s a strategic business move that can directly influence your conversion rates. This quick customization guide will walk you through several effective methods helping you to understand how to change checkout button text in WooCommerce properly, enhancing not only the aesthetics but also the functionality of your ecommerce site.
FAQ
How do I change the text on my WooCommerce checkout page?
How do I change the text of the Buy Now button in WooCommerce?
Understanding Woocommerce checkout button customization
Customizing your checkout button text can significantly enhance the shopper’s journey and potentially increase your conversion rates. It’s a detail that adds to the overall customer experience and is worth considering in the customization of your WooCommerce store.
Role of checkout button in conversion rates
The checkout button plays a crucial role in the conversion rates of an ecommerce website. Here are some key points highlighting its importance:
- Visibility and design
- The checkout button must be highly visible and easily recognizable to encourage users to complete their purchases.
- An appealing design, typically featuring a contrasting color or distinctive shape, can draw attention and lead to higher conversion rates.
- Placement and accessibility
- The position of the checkout button on the page significantly affects usability. It should be placed where users expect to find it, usually near the shopping cart or at the bottom of the screen.
- Accessibility features, such as keyboard navigability and screen reader compatibility, ensure that all users can easily proceed to checkout.
- Simplicity and clarity
- A simple, clear call-to-action, such as Proceed to checkout or Complete purchase, removes ambiguity and directs users efficiently.
- Minimizing clutter around the checkout button helps to focus user attention on completing the transaction.
- Mobile optimization
- With the increasing prevalence of mobile shopping, the checkout button must be optimized for mobile devices.
- A mobile-friendly button is large enough to tap easily without zooming and is positioned to accommodate thumb reach on handheld devices.
- Speed and performance
- The loading time of the checkout page, including how quickly the checkout button becomes functional, can impact conversion rates.
- A fast, responsive button decreases frustration and potential abandonment.
- Security assurance
- Displaying security badges or encryption indicators near the checkout button can reassure customers that their transactions are secure.
- This perceived security can encourage hesitant shoppers to proceed with their purchases.
The text on your checkout button also impacts customer experience by setting clear expectations. It’s not just about what the button says, but also how it aligns with the rest of the user journey. For instance, changing a generic Checkout button to Secure checkout can provide an added sense of security, reassuring customers at a pivotal moment. Create your custom online store in minutes with 10Web AI Ecommerce Website Builder and take your business online.

Looking to sell online?
How to change checkout button text in WooCommerce
Method 1: Editing checkout button text via functions.php
Changing the text on your checkout button can give your WooCommerce store a personalized touch and align with your brand’s voice. By editing the functions.php file of your theme, you can insert a custom function that utilizes the add_filter hook to modify the woocommerce_order_button_text.
Accessing functions.php file
To begin customizing your checkout button text, first, you need to access your theme’s functions.php file. It’s the place where you can add your own custom code to tweak your website’s functionality.
- Navigate to your WordPress Dashboard.
- Go to Appearance and select Theme file editor from the submenu.
- In the right-hand pane, click on the functions.php to open the file for editing.

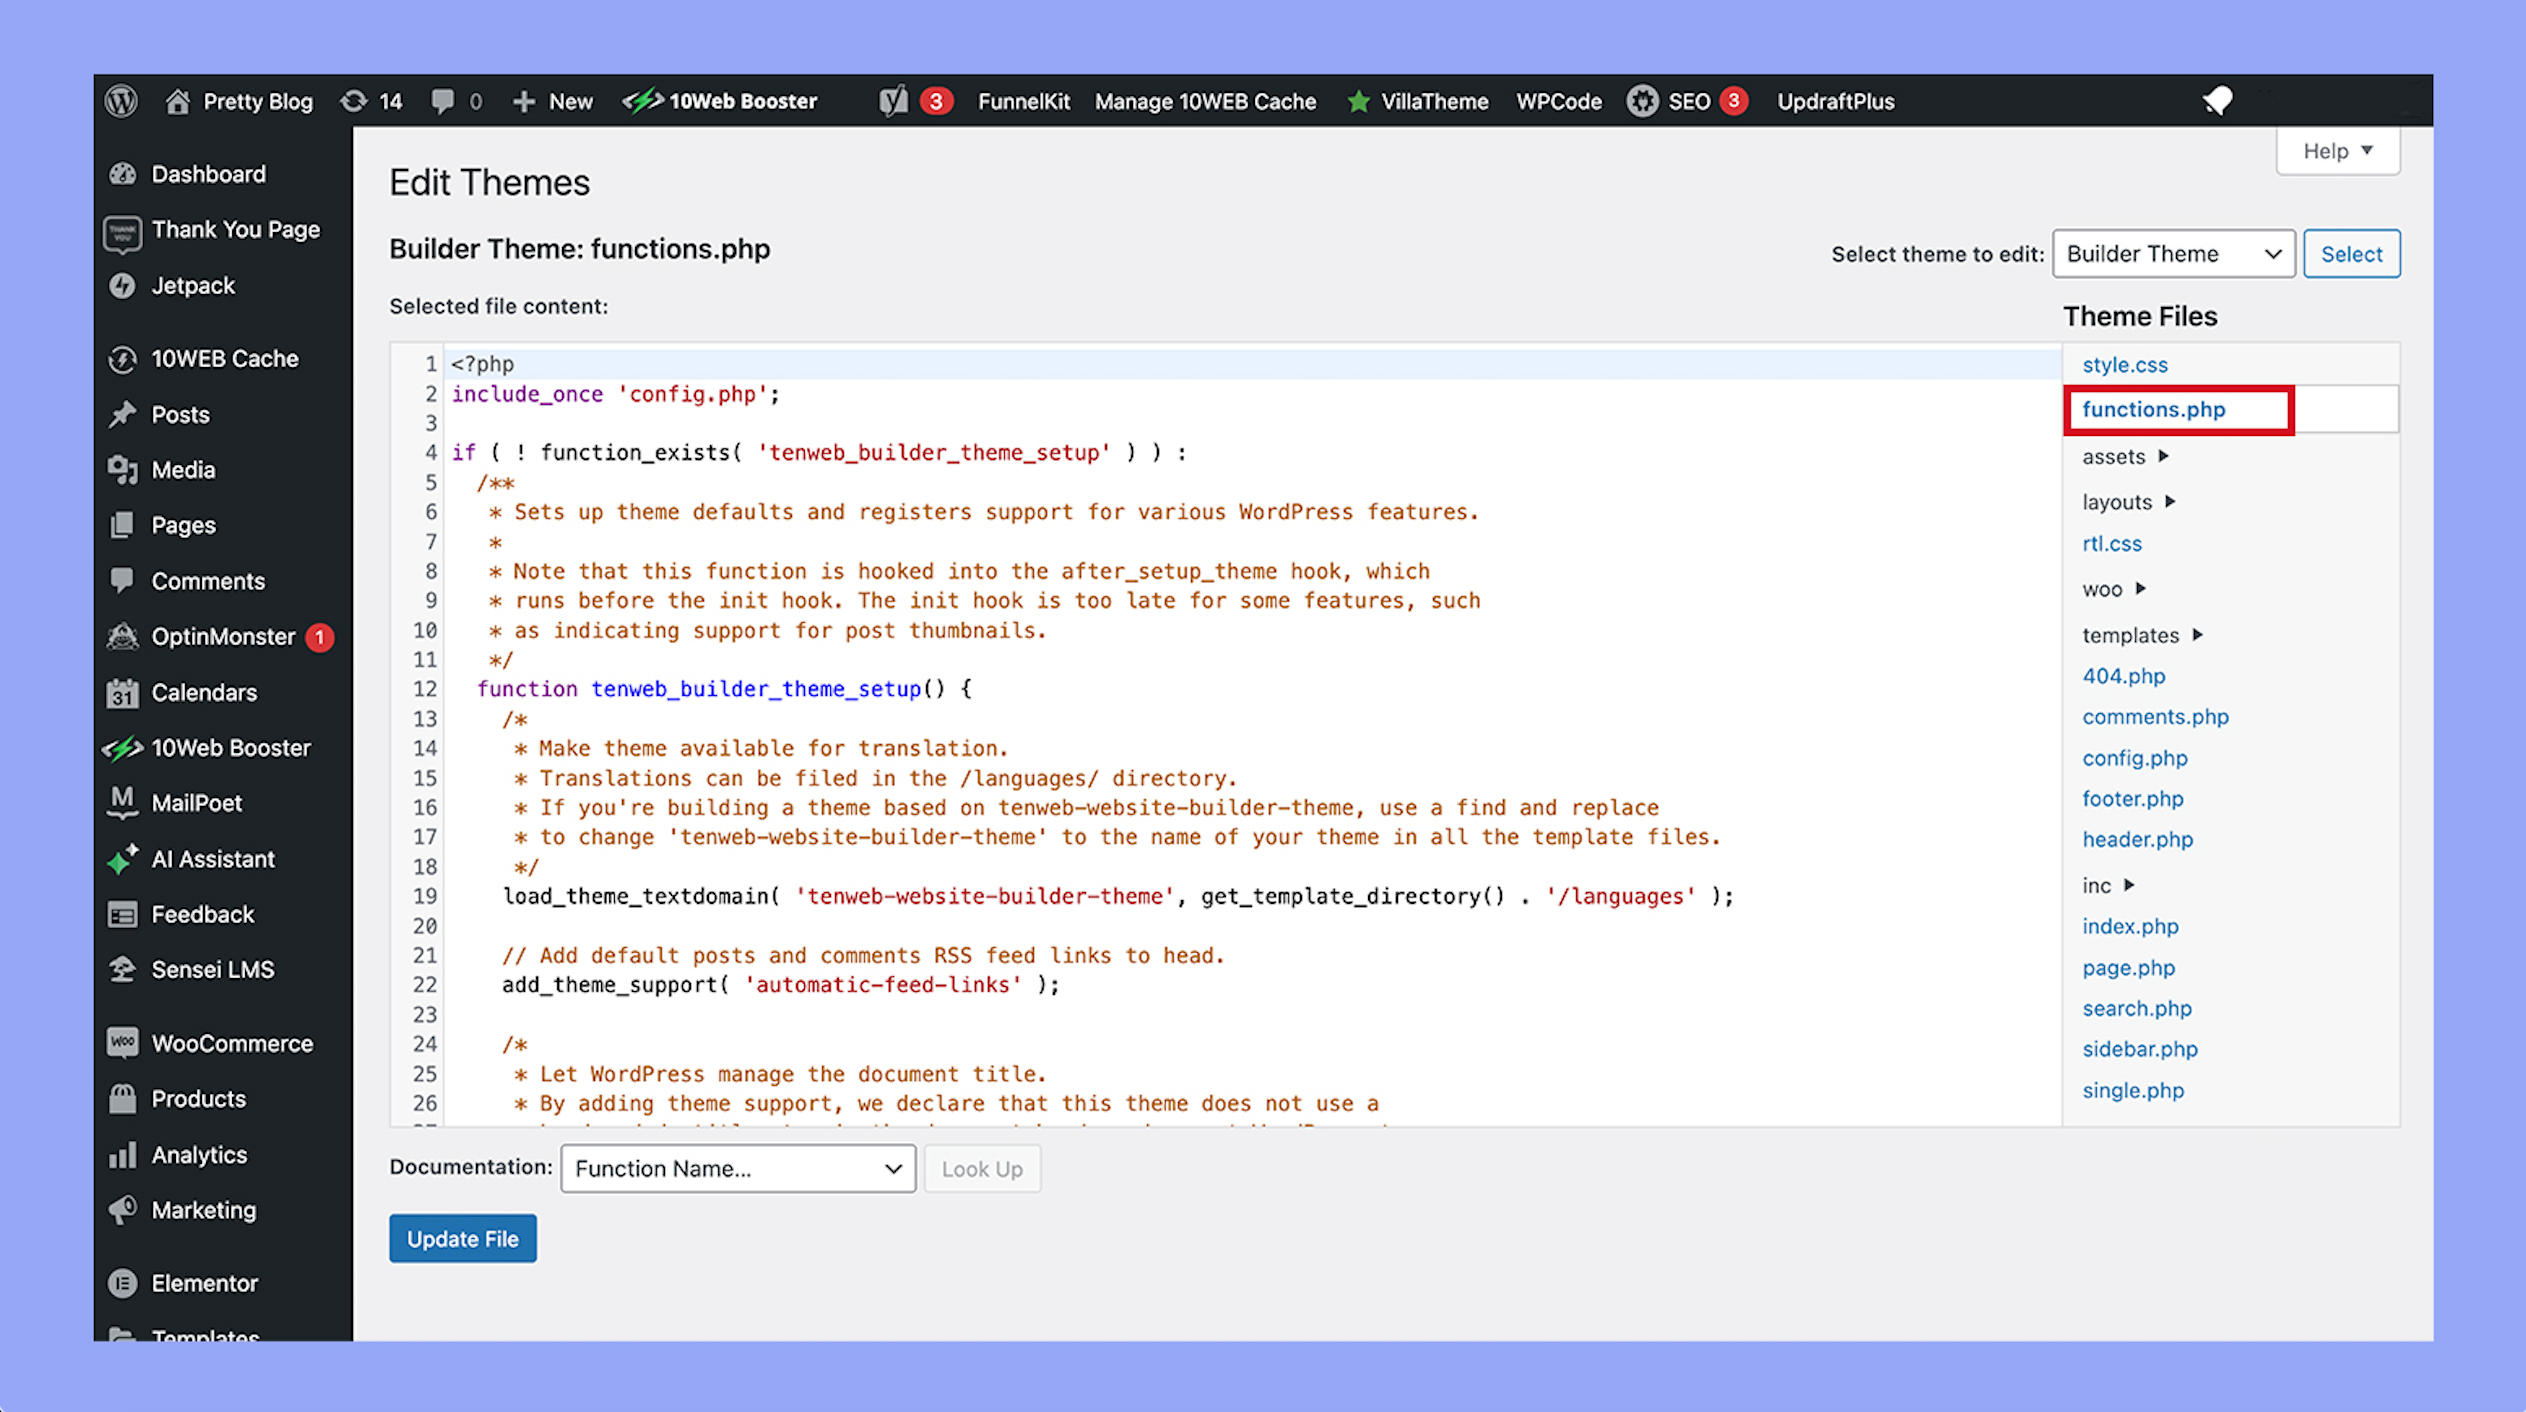
Inserting custom function for checkout button
Once you have the functions.php file open, the next step is to insert the custom function that will define your new checkout button text.
- Scroll to the end of the file to ensure your code doesn’t interfere with existing functions.
- Insert the following code snippet at the bottom of the file:
function change_checkout_button_text() {

 return 'Your New Button Text';

}
Replace Your bew button text with the text you desire.
- The final step is to tell WooCommerce to use your custom function for the checkout button text. Directly below your custom function, add the line:
add_filter('woocommerce_order_button_text', 'change_checkout_button_text');
- Click the Update File button to save your changes.
With these simple steps, you’ve successfully customized the text of the WooCommerce checkout button with a friendly, personal touch that’s all your own.
Method 2: Leveraging WooCommerce hooks for text change
In this section, you’ll delve into how to effectively use WooCommerce hooks to customize your checkout button text, giving your online store a more personalized feel. Hooks are a fundamental part of WooCommerce, allowing you to tap into and modify various aspects of the shopping experience without altering core files.
WooCommerce hooks come in two flavors: actions and filters. While actions enable you to insert custom code at specific points, filters allow you to alter text, values, and other aspects as needed. Understanding these hooks is key to customizing WooCommerce components like button text.
Applying woocommerce_order_button_text filter
To change the checkout button text, you’ll want to apply the woocommerce_order_button_text filter. This filter enables you to modify the label of the order button on the checkout page. To do this, you’ll need to add a snippet of code to your theme’s functions.php file or a custom plugin for site functionality:
- Access your WordPress site’s dashboard.
- Navigate to Appearance and click on Theme file editor.
- Locate the functions.php file on the right-hand side.
Insert the following code at the end of the file: function change_checkout_button_text() {

 return 'Your Custom Checkout Text';

}

add_filter('woocommerce_order_button_text', 'change_checkout_button_text');
- Replace ‘Your Custom Checkout Text’ with the text you want to appear on the checkout button.
- Click on the Update File button to save your changes.
By using the woocommerce_order_button_text filter, you can easily customize the checkout button text to better suit your brand or promotion, enhancing the user experience on your site.
Method 3: Creating a child theme for checkout customizations
When you want to change the checkout button text in WooCommerce, creating a child theme is a solid approach. This method ensures that your customizations are preserved during theme updates.
A child theme acts as a protective layer for your customizations. By using one, you ensure that any updates to the parent theme don’t overwrite your changes to the checkout button text or any other modifications you’ve made. Essentially, a child theme inherits all the functionality and styling of the parent theme, allowing you to modify files without directly altering the original theme files, maintaining the integrity of your site’s design.
Modifying theme files safely
To change the checkout button text through a child theme, you’ll need to delve into the theme editor. Here’s a safe method to do this:
- Access your WordPress dashboard and navigate to Appearance > Themes.
- Click on Add new and then select Upload theme.

- Choose your child theme’s .zip file and click on Install now.
- After the installation is complete, click on Activate to enable the child theme.
- Now, navigate to Appearance > Theme editor.
- Select your child theme from the right-hand side.
- Locate the functions.php file and click on it to add custom code.
- Carefully insert the code snippet that alters the text labels for the WooCommerce checkout page. Make sure to save the changes.

By following these steps, you’re able to customize your checkout button safely. The changes are made within the child theme, leaving the main theme untouched. This ensures that customization remains separate and doesn’t interfere with the parent theme’s core.
Method 4: Utilizing plugins for checkout button changes
In this method, you’ll discover how to alter your WooCommerce checkout button text using plugins. This is a straightforward approach that doesn’t require coding knowledge.
To customize your checkout button text:
- Visit the WordPress Plugin Directory or do a quick search within your WordPress dashboard under Plugins > Add new.
- Look for plugins specifically designed for WooCommerce checkout customization. For example, the Checkout field editor is a popular choice that can assist in changing button text with ease.
- Ensure the plugin is compatible with your version of WooCommerce and has good reviews for best results.
- After installing the plugin navigate to the plugin settings from your WordPress dashboard. Typically, this will be under WooCommerce > Checkout form.
- Add a field and enter your preferred text for the checkout button. This text could be Place your order or any call-to-action you deem suitable.
- Save your changes by clicking the Save changes button.

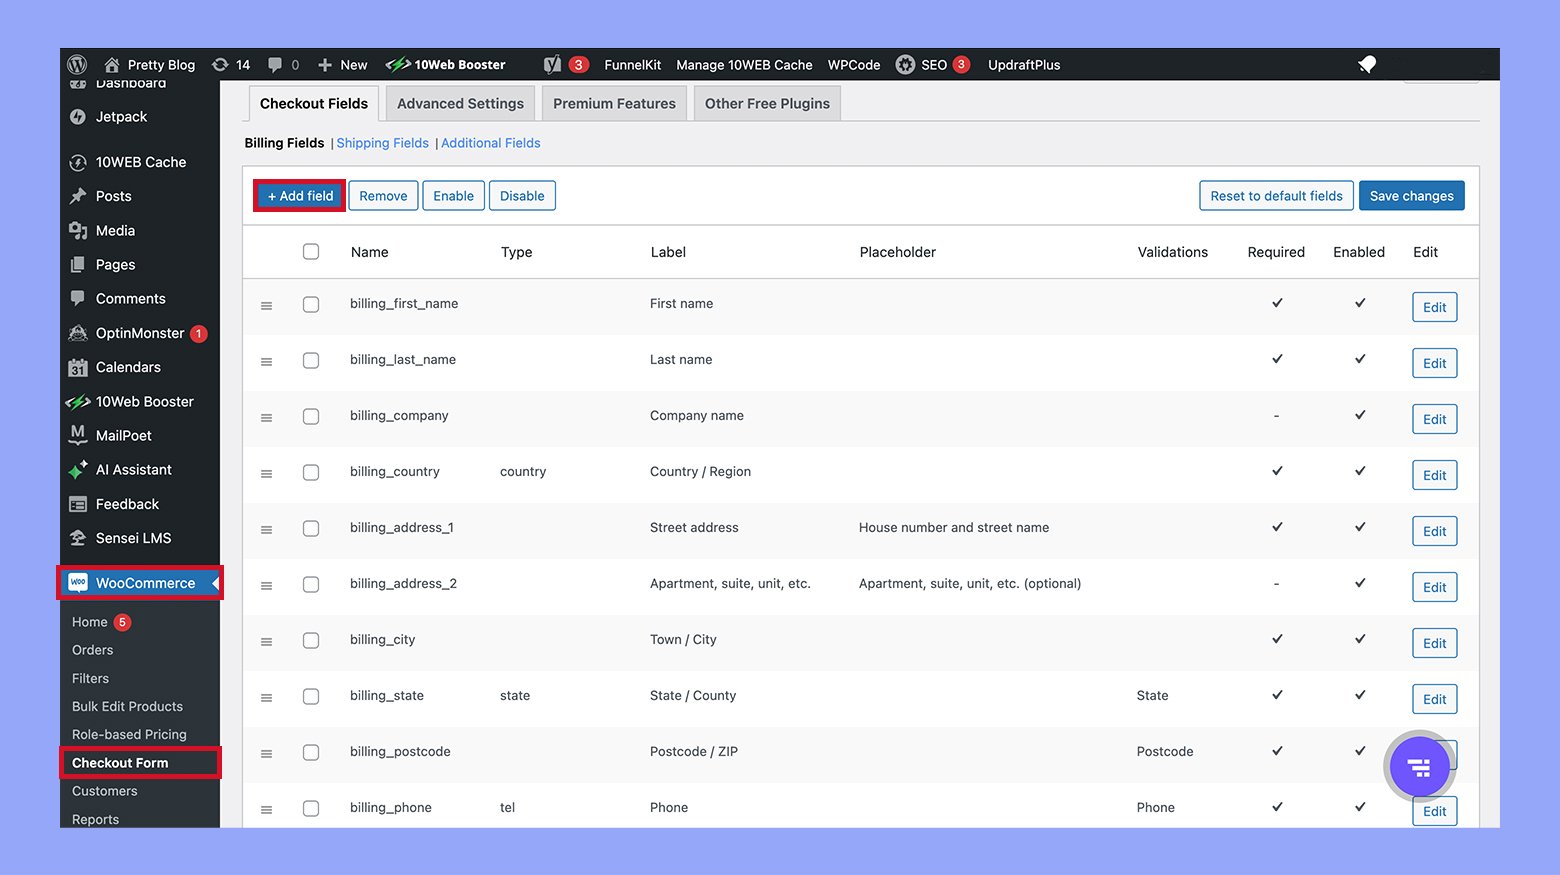
Using a plugin can greatly simplify the process of customizing your checkout page and changing button text, making it an ideal solution if you’re not familiar with coding.
Method 5: CSS and JavaScript adjustments for button customization
Adapting your WooCommerce Proceed to Checkout button with CSS and JavaScript can be a slick way to differentiate your online store. By leveraging these tools, you can align the button’s look and feel with your brand, and even refine the button text to better communicate with your customers.
Styling checkout button with CSS
CSS, short for Cascading Style Sheets, allows you to change the layout and appearance of elements on your webpage, including the Checkout button.
- Identify the Checkout button using its class or id attribute within your CSS file.
- Modify properties such as background-color, font-size, and padding to customize the button’s appearance.
- Use :hover to change the button’s style when you hover over it, ensuring you give shoppers a responsive experience.
For example:
.checkout-button {

 background-color: #ff4500;

 color: white;

 padding: 10px 20px;

}

.checkout-button:hover {

 background-color: #ff6347;

}
Using JavaScript to modify button text
JavaScript allows you to dynamically alter the content on your page, including the text of the Proceed to Checkout button.
- Use a script to select the Checkout button by its class or id.
- Change the button’s text content to your desired wording using the textContent property.
Here’s how you might do it:
document.querySelector('.checkout-button').textContent = 'Complete your order';
Remember, test your CSS and JavaScript adjustments to ensure they work across different browsers and devices. This way, you ensure all your customers enjoy a consistent shopping experience.
Best practices for custom checkout button text
Ensuring your checkout process is as clear and effective as possible is crucial for maintaining a high conversion rate. Here, we’ll explore the specific actions you can take to refine the checkout experience with better button text.
Consistent call to action
Your Proceed to checkout button is an essential part of guiding customers through the buying process. To be effective:
- Use an action-oriented phrase that encourages the customer to take the next step.
- Phrase your buttons consistently across your site to avoid confusing your customers. For example, if you use Proceed to checkout on your product page, use the same language on your cart page.
Testing text changes for conversion rates
Changes to the Checkout button text can impact your conversion rates. When making adjustments:
- Implement A/B testing to compare the performance of different versions of button text.
- Analyze the test results to determine which variant encourages more customers to complete their purchase.
- Continuously refine the button text based on data from these tests to improve conversion rates over time.
By focusing on clarity and consistency in your call to action and continuously testing your button text, you’re better positioned to optimize the checkout experience for your customers.
Troubleshooting common issues with checkout text changes
When customizing your WooCommerce store, changing the Checkout button text can lead to unexpected issues. Here’s how you can address common problems that might arise.
Resolving conflicts with themes and plugins
- Identify if the issue is caused by a conflict with your theme or a plugin by deactivating all your plugins except WooCommerce and switching to a default WordPress theme like Twenty twenty-one.
- If the Checkout button text reverts to normal, reactivate your theme and plugins one by one, testing the Checkout button each time to pinpoint the conflict.
- Once the conflicting theme or plugin is found, check for updates that might resolve the issue. If updates don’t help, you may need to contact the theme or plugin author for assistance.
Ensuring compatibility with payment gateways
- Verify that the changes you’ve made to the woocommerce_order_button_text don’t interfere with the instructions provided by your payment gateways. Each gateway might have specific requirements for the button text to initiate the transaction properly.
- Test the Checkout process after making text changes to ensure that transactions can be completed without issues. If problems persist, visit your payment gateway’s support pages or contact their support for guidance related to button text requirements.
Additional tips
How to change “Place order” button text in WooCommerce
Customizing the text on your Place order button can give your WooCommerce checkout a more personalized feel. Here’s a straightforward guide to help you update the button text to better fit your brand or the action you want your customers to take.
- Access your theme’s files: Go to your WordPress dashboard, then navigate to Appearance and click on Theme Editor.
- Locate the functions.php file: In the Theme Editor, find the functions.php file. It’s recommended to make changes in a child theme to avoid losing them when your theme updates.
Add the custom code: Insert the following snippet at the end of your functions.php file:
add_filter('woocommerce_order_button_text', 'custom_order_button_text');

function custom_order_button_text() {

 return __('Your New Button Text', 'woocommerce');

}
- Replace Your New Button Text with the text you wish to display on the Place order button.
- Save your changes: After you’ve added the code with your preferred text, click on the Update file button at the bottom of the page.
By following these steps, you can easily update the text on your WooCommerce Place order button. Remember to check the front end of your site to see your changes in action. For more detailed guidance, consider visiting how to Filter & Change WooCommerce Place order Text Button on Checkout Page or explore further customization options on Change Place order button text in WooCommerce Checkout.
How to change “Read more” button text in WooCommerce
If you’re looking to customize the Read more button text on your WooCommerce site, you can easily do so. This will help you tailor your shop’s look and feel to better match your brand or notify your customers with more specific instructions. Here’s how you can change the Read more button text for your products:
- Access your WordPress dashboard Start by logging into your WordPress site. Navigate to your WooCommerce settings by hovering over the WooCommerce section in the dashboard.
- Locate the text change option In the WooCommerce settings, click on the Products tab. Here you’ll find various options related to how your products are displayed on your site.
- Find the button text input Scroll down until you find the Display options. Look for the input field associated with the Read More button text. It might be labeled as Button text or similar.
- Update the button text Click into this field and enter your desired text that will replace the default Read more. This can be specific to your stock status, call to action, etc.
- Save your changes After you’ve entered your new button text, ensure you save your changes by clicking on the Save changes button at the bottom of the page.
Following these steps, you should see the new button text displayed on your WooCommerce product pages. If you encounter issues or you’re looking for a more advanced customization pertaining to out-of-stock products, consider checking out a guide on changing the Read more button text in WooCommerce for additional tips on custom code solutions.
Remember to test your site after making these changes to confirm that everything is displaying as expected. Happy customizing!
Conclusion
Modifying the checkout button text in WooCommerce is a straightforward yet powerful way to enhance the checkout experience and boost conversions. We hope this guide helped you to learn how to change checkout button text in WooCommerce and effectively personalize your store to better meet the needs of your customers. Each approach offers flexibility and control over how you communicate with shoppers at a crucial point in their purchase journey, ensuring that your checkout process is not only smooth but also perfectly aligned with your brand’s messaging and values.
Looking to sell online?
Create your online store in minutes
Create your online store in minutes with 10Web AI Ecommerce Website Builder.