Integrating WooCommerce with QuickBooks streamlines financial management for ecommerce businesses, automating crucial accounting tasks and ensuring accuracy. This guide provides a detailed roadmap if you are wondering how to integrate WooCommerce with QuickBooks without much worry. Through step-by-step instructions, businesses can enhance operational efficiency, reduce errors, and maintain up-to-date financial records, empowering entrepreneurs to focus more on growth and less on manual data entry. Let’s start discovering the whys and hows.
FAQ
Can I connect WooCommerce to QuickBooks?
Does QuickBooks integrate with WordPress?
Can I integrate QuickBooks with my website?
How do I connect QuickBooks to commerce?
What’s QuickBooks and why you need it
QuickBooks is an accounting software that has become a staple for small to medium-sized businesses. It allows you to manage business finances, keep track of expenses, generate invoices, and much more. The user-friendly nature of QuickBooks has made it crucial for business owners who need a reliable way to manage their financial data.
Why you need QuickBooks as a business owner:
- With QuickBooks, you can easily track your sales and expenses.
- Generate professional invoices for clients.
- Simplify tax filing with organized data.
- Create detailed financial reports to stay informed about the health of your business.
Integrating QuickBooks with your WooCommerce store automates the accounting process. The integration helps by syncing your sales data directly into QuickBooks, reducing manual data entry and minimizing errors.
How to integrate WooCommerce with QuickBooks
When learning how to integrate WooCommerce with QuickBooks, you’ll need to configure both platforms to communicate effectively for smooth synchronization.
Let’s begin by setting up your online store and accounting software.
Set up your WooCommerce
To make sure your WooCommerce platform is ready to connect with QuickBooks, follow these steps:
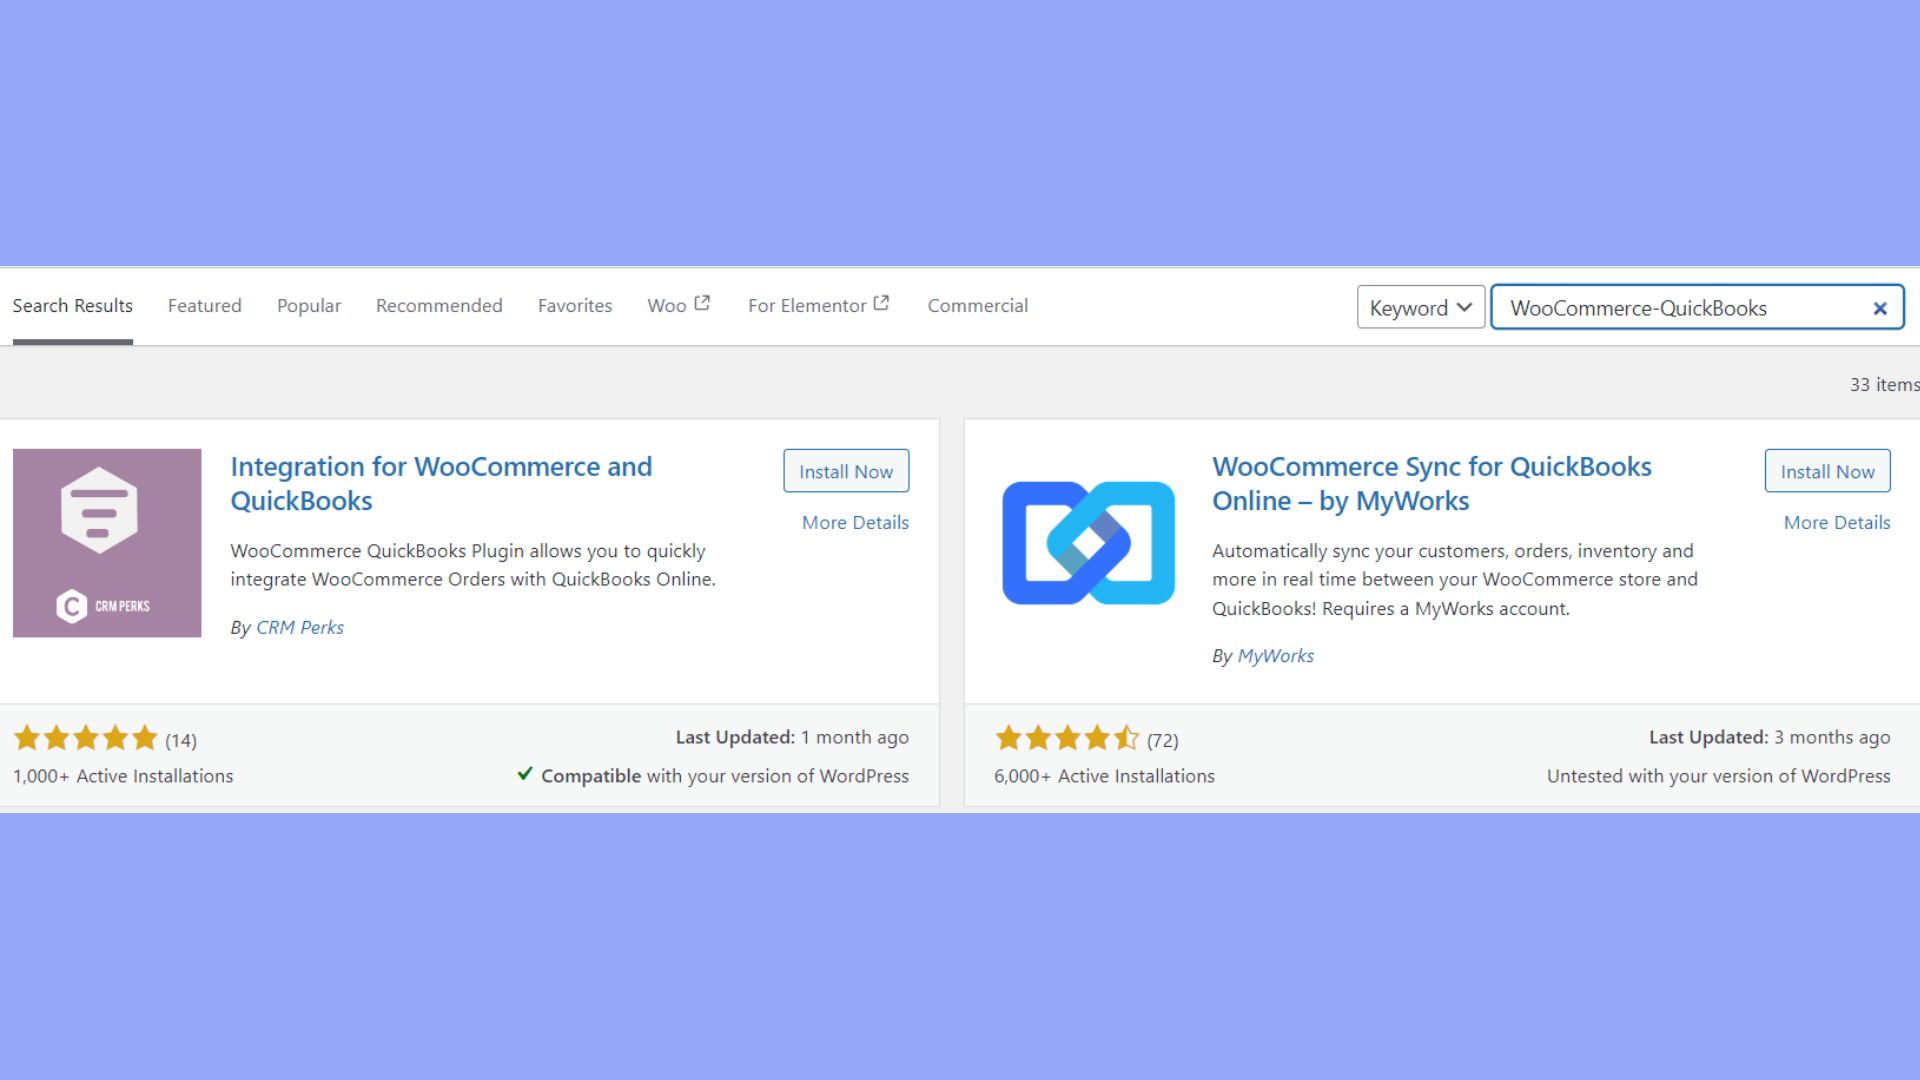
- In your WordPress admin dashboard, go to the Plugins > Add New.
- Search and select a WooCommerce-QuickBooks integration plugin.

- Install and activate the chosen plugin.
- Go to the setup page of the plugin, which you can typically find under a menu named after the plugin or within the WooCommerce settings section.
- Enter your company name and domain URL as required. This information will be used to sync with your QuickBooks account.
Set up your QuickBooks account
Next, prepare your QuickBooks account by following these instructions:
- Sign in to your QuickBooks Online account.
- Ensure that all company details are correctly entered, including your company name which should match your WooCommerce settings.
- Set your account preferences, such as account time zone and integration starting date, to match the data from your WooCommerce store.
- If there’s a specific URL to connect QuickBooks to WooCommerce, head to that link as the plugin instructs.
- Find the Connect Your Account button within the QuickBooks integration page and proceed with the authorization.
Now with both WooCommerce and QuickBooks accounts properly set, you have laid the groundwork for a successful sync between your online store and accounting software.
Align products and SKUs
When discovering how to integrate WooCommerce with QuickBooks, it’s essential to ensure that data flows correctly between the two systems. This involves setting up detailed mappings for products, customers, and orders.
To maintain consistency and accuracy in your inventory management, you need to align your WooCommerce products and SKUs with those in QuickBooks. With these steps, you will ensure proper mapping:
- In your WooCommerce dashboard, navigate to the Products section to view your product list.
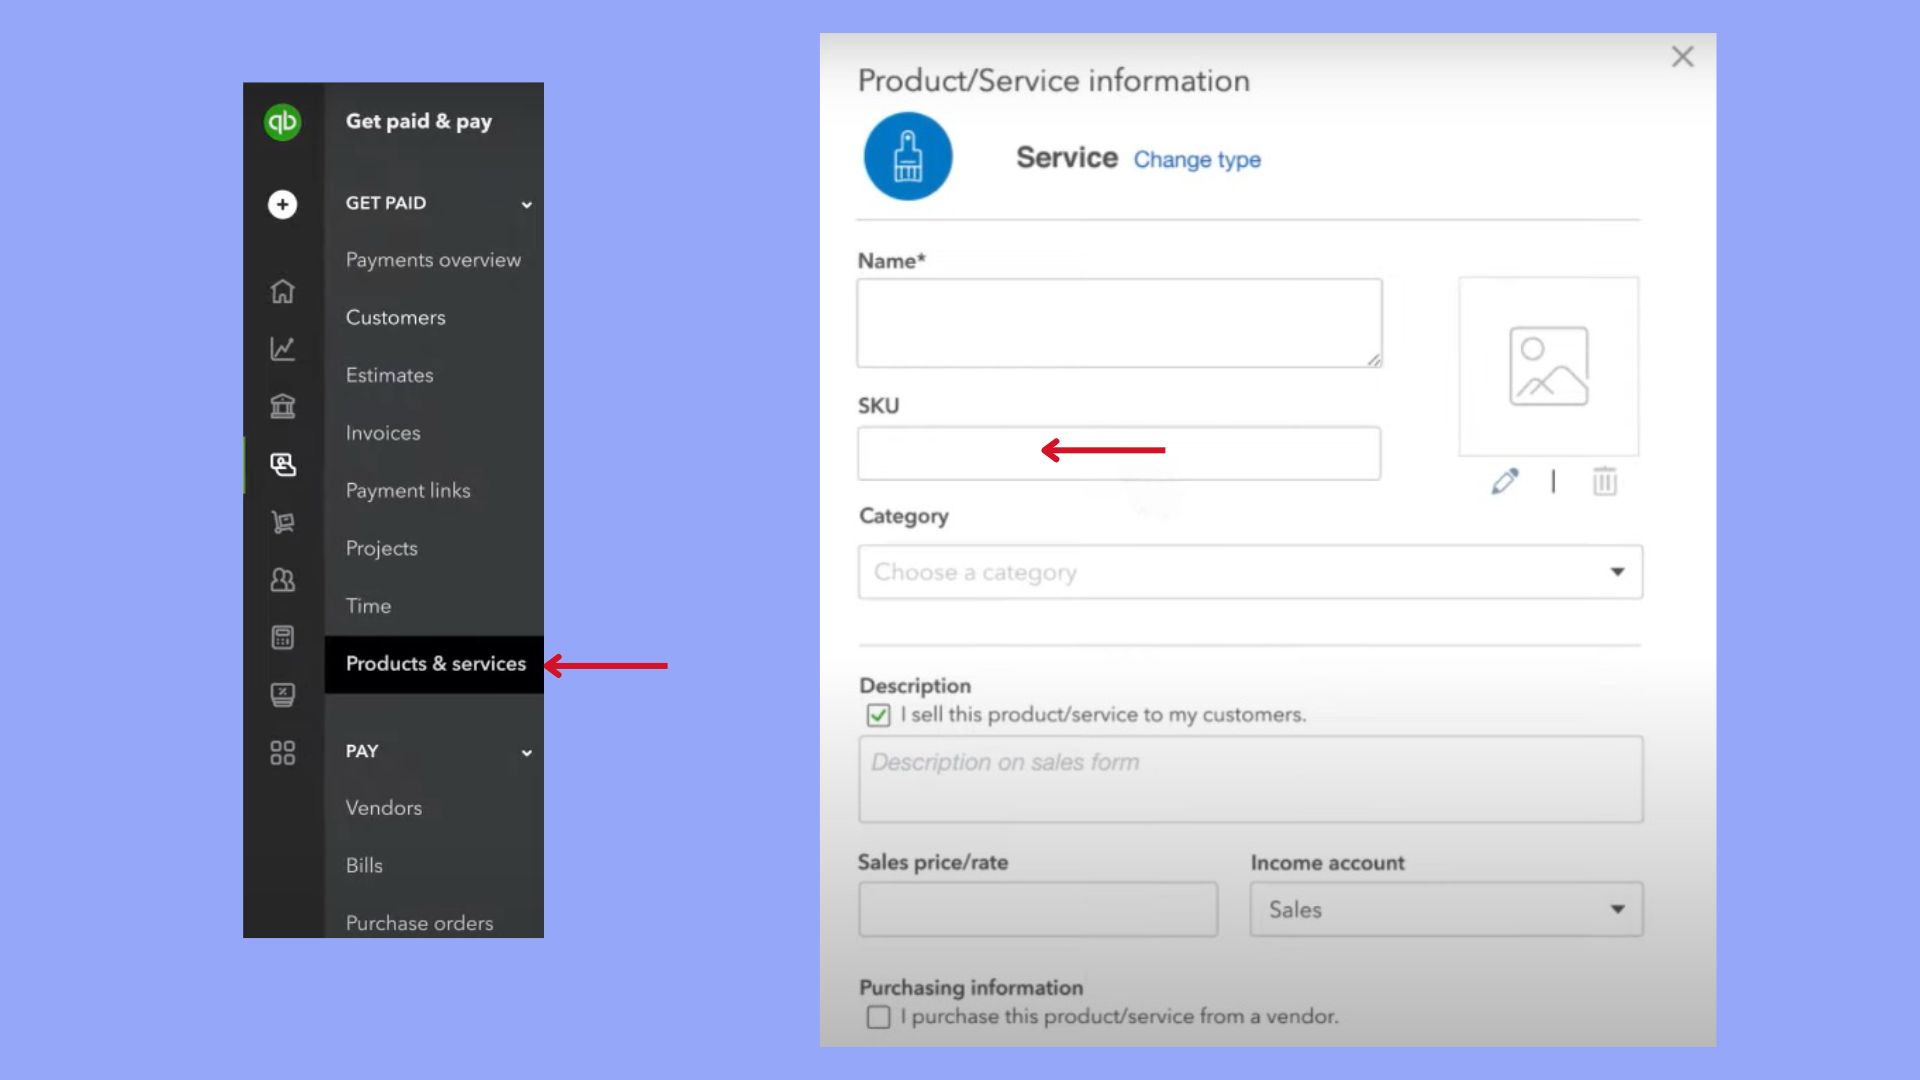
- Ensure each product has a unique SKU that matches those in QuickBooks. This SKU acts as a common identifier, making it essential for syncing.
- Go to your QuickBooks Online account and select the Sales tab, then click on Products and Services.
- Verify that the SKUs in QuickBooks match the ones in WooCommerce. If they don’t, update them so they align.
- Utilize a synchronization tool from your chosen integration plugin and map the product fields such as Name, Price, and SKU from WooCommerce to the corresponding fields in QuickBooks.
- For any custom fields, establish a clear mapping strategy that defines which WooCommerce fields correspond to specific QuickBooks fields.
Aligning your products and SKUs, you avoid discrepancies in your inventory data, which leads to accurate sales and inventory reporting.
Sync customers and orders
Customer and order synchronization is pivotal to your business as it ensures that sales data and customer information are up-to-date in both your ecommerce and accounting systems. Here’s how to integrate these entities:
- Start by confirming that the customer data fields in WooCommerce, like Name and Contact Information, have equivalent mapping in QuickBooks.
- In WooCommerce, when a new order comes in, check that the order information directly maps to the corresponding Invoice or Sales Receipt in QuickBooks.
- Adjust settings in your integration plugin to match WooCommerce order statuses to the relevant QuickBooks transaction types.
- Regularly sync orders to ensure that sales data is current in QuickBooks, which helps in maintaining real-time financial records.
- Address any custom fields for orders by setting up specific rules within the integration plugin to map these fields to the relevant areas in QuickBooks.
Syncing customers and orders between WooCommerce and QuickBooks keeps customer information aligned and financial records accurate.
You can even do this automatically. Here is how:
Set up real-time sync
Real-time sync is an automatic process to keep your WooCommerce and QuickBooks data aligned without delay. For seamless auto-sync capabilities:
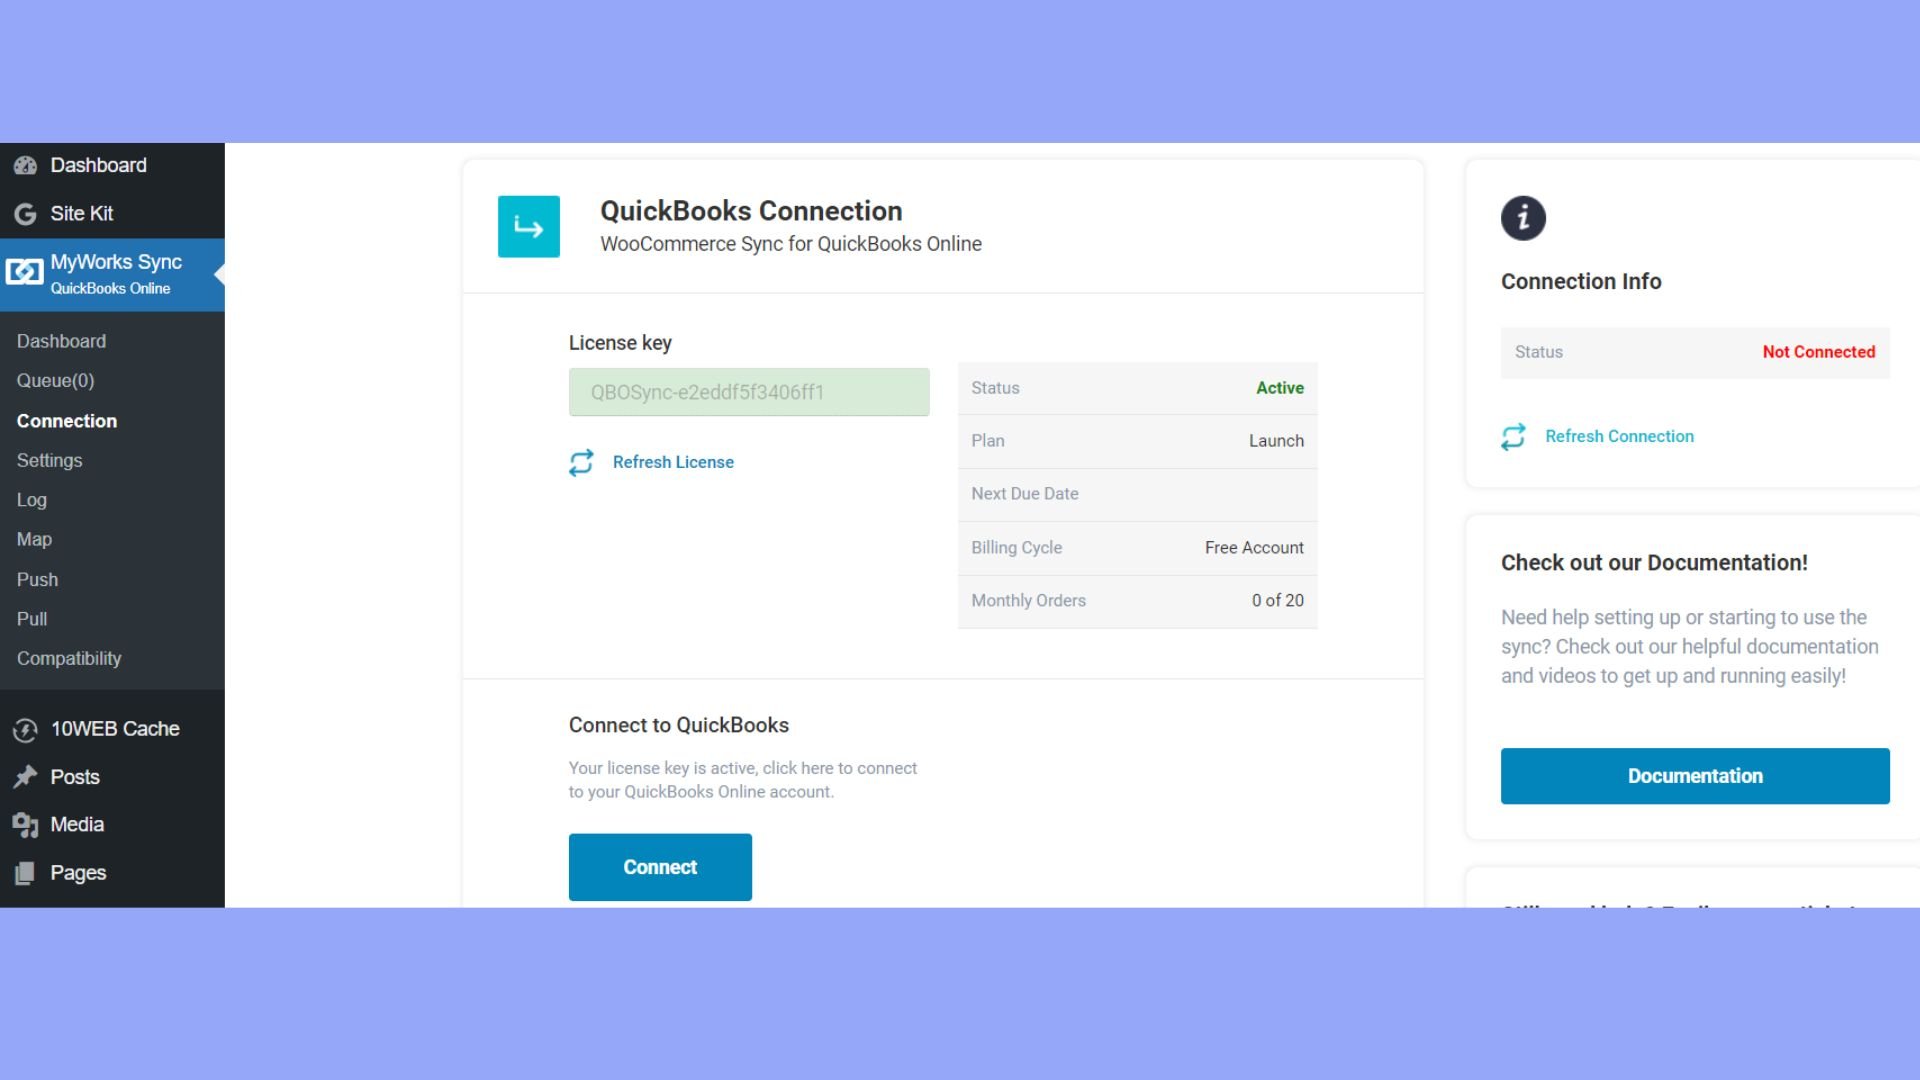
- Go to your WooCommerce admin panel and navigate to MyWorks Sync.
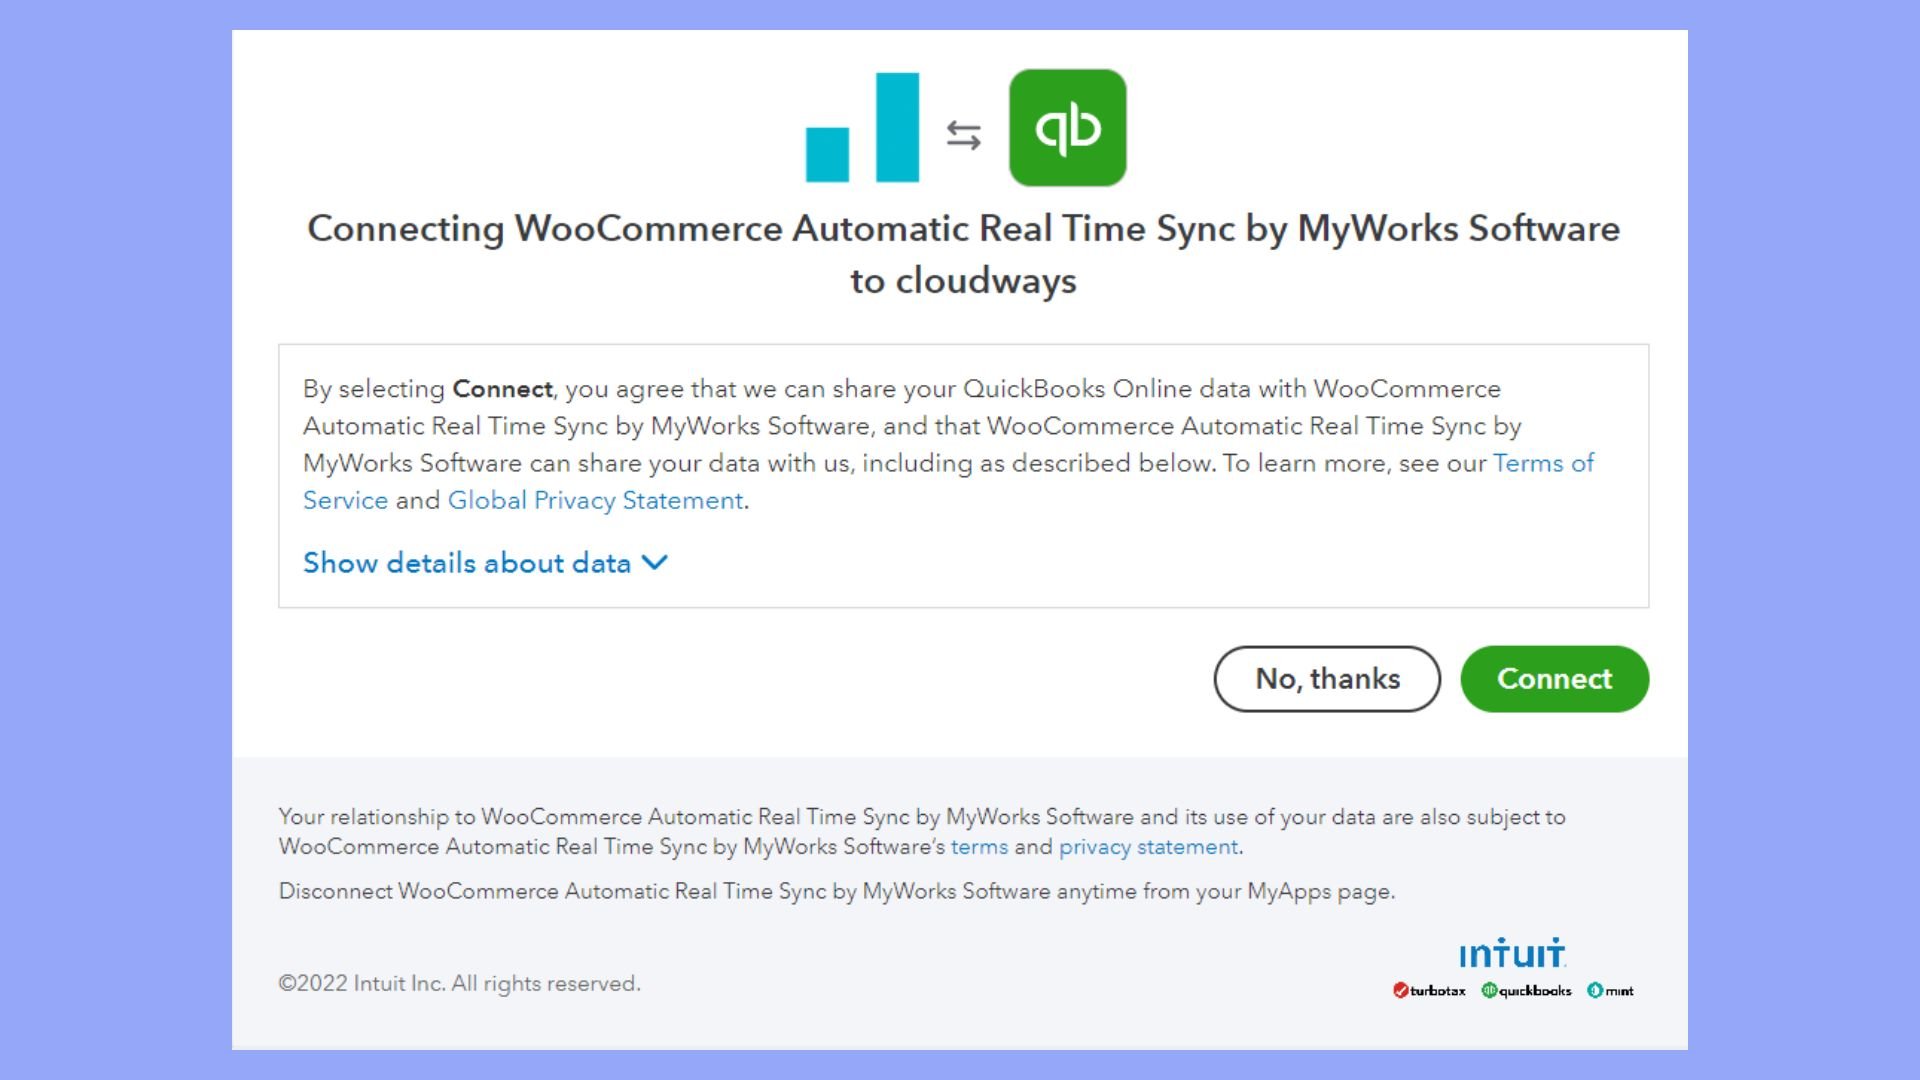
- Click on Connect to QuickBooks. This action will redirect you to sign into your QuickBooks account.
- Upon successful login, authorize the connection to establish a two-way sync between your WooCommerce store and QuickBooks.
By enabling real-time sync, you will enjoy instant sync of orders, inventory, and payment data, helping you maintain up-to-date records across platforms.
Manage scheduled syncs
For those who prefer to have data synchronized at set intervals, scheduled syncs offer a tailored solution:
- Access MyWorks Sync from the WooCommerce dashboard.
- Go to Sync Settings and look for the scheduling options.
- Specify the frequency of syncs—this could be every 5 minutes, hourly, or daily, depending on your preference.
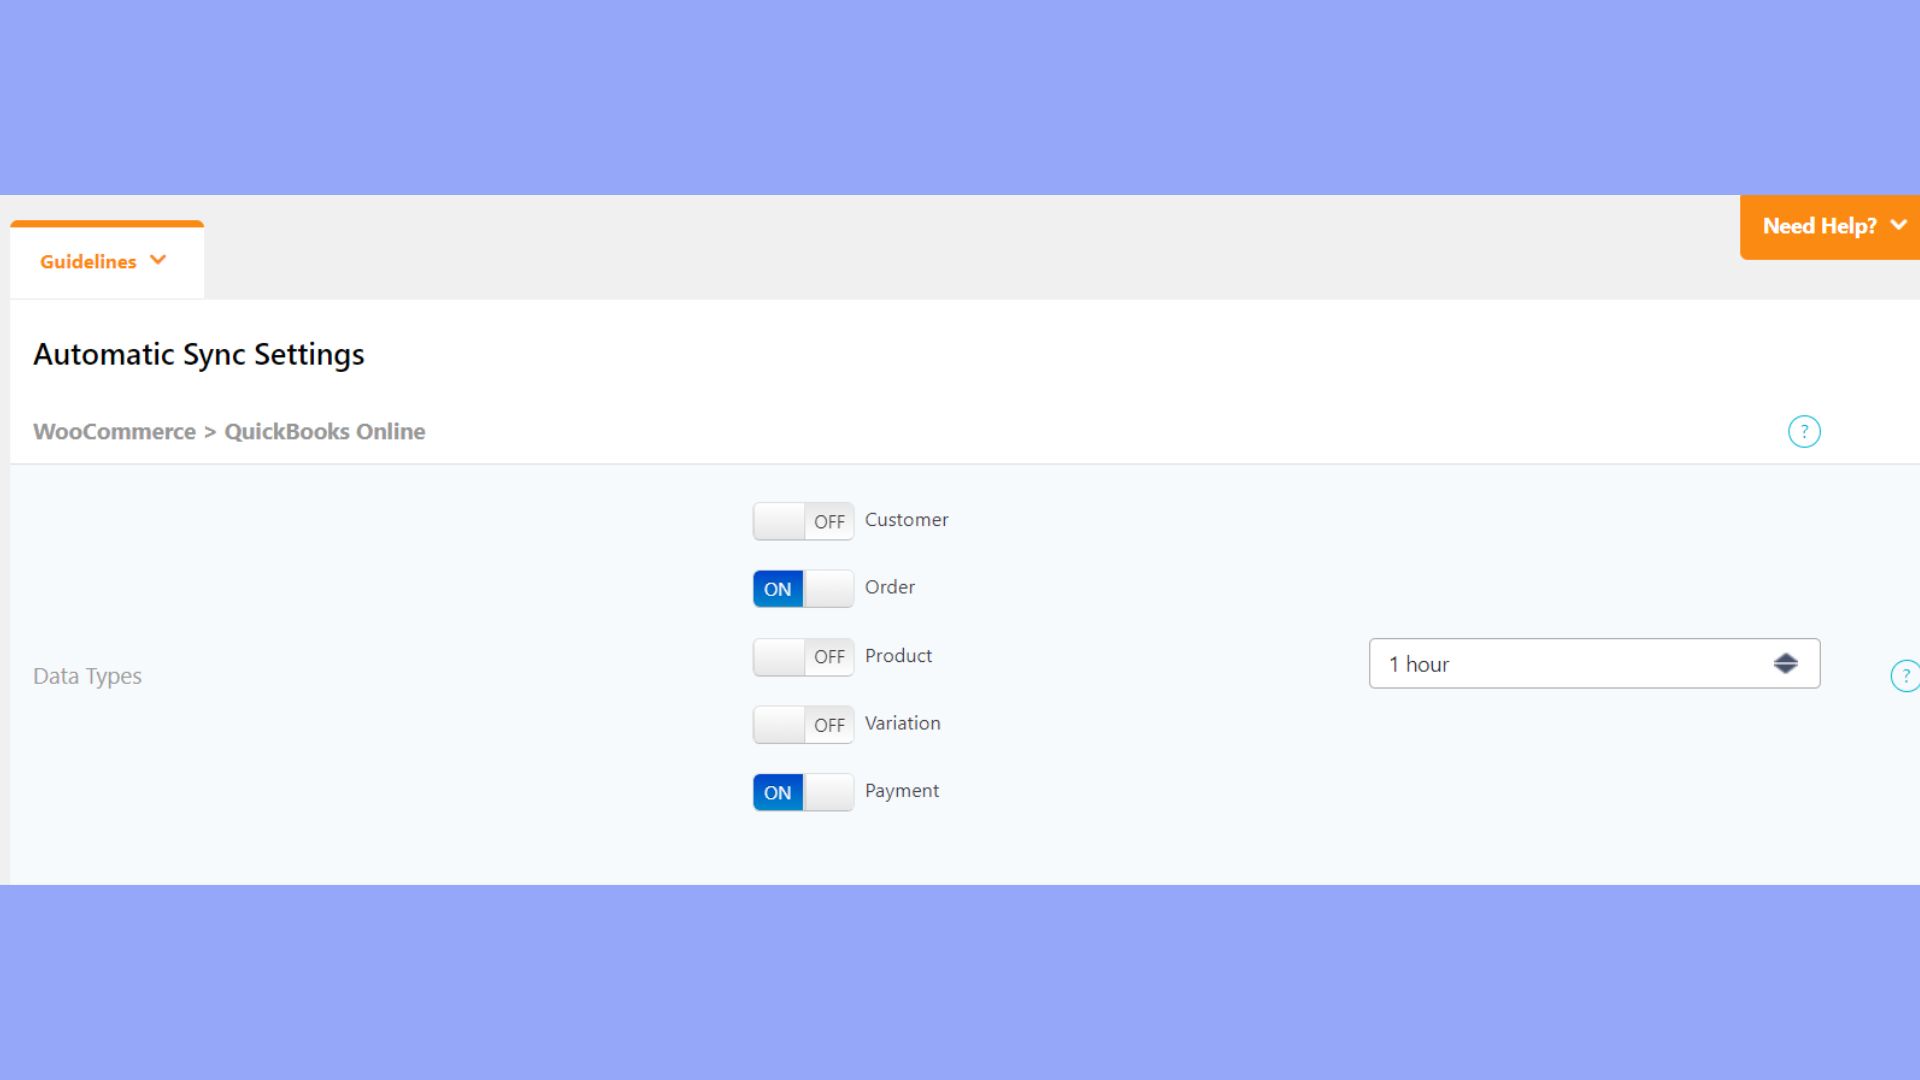
Use sync logs to review and ensure that the scheduled syncs are running as expected. These logs can be invaluable in troubleshooting should any sync issues arise. This feature will help you match the operational pace of your business.
Set up tax rates and discounts
Having accurate tax rates and applying discounts properly are crucial to maintaining your financial records. Here’s how to customize these settings in your workflow:
- In your Woocommerce settings, select the Tax tab to set up your tax classes.
- Configure your standard Tax rates and assign them to products.
- For discounts, go to the Coupons section under WooCommerce to create codes and define discount rules.
- In QuickBooks, ensure that these tax rates are mirrored. Go to the Taxes menu and select Add/edit tax rates and agencies.
- Define or import tax rates and ensure these match your WooCommerce setup.
- Upon integration, check that discounts are reflected correctly in QuickBooks by reviewing the Discounts field in your sales data.
It’s vital you ensure that tax and discount configurations align in both systems to prevent discrepancies in your financial reports.
Configure shipping and inventory
To customize the shipping workflow, follow these methods:
- Go to the Shipping tab in your WooCommerce settings and set up your shipping zones and methods.
- Adjust these settings to translate appropriately within QuickBooks under the Account and Settings and then Sales to configure shipping.
- For inventory, if you have QuickBooks Online with inventory turned on, choose the Products and Services option where you can configure your inventory settings to match with WooCommerce data.
- Make sure to map any custom fields related to shipping details or inventory descriptors that are relevant to your business processes.
Thus you ensure that shipping costs are accounted for and your inventory levels are accurately reflected between WooCommerce and QuickBooks.
Handling transactions and sales data
When you have mastered how to integrate WooCommerce with QuickBooks, your focus should be on ensuring that every customer transaction is accurately tracked. This enables efficient management of your sales data and financial records.
Invoices and sales receipts
Creating invoices and sales receipts in QuickBooks when you make sales through WooCommerce is essential for record-keeping. To make this process smoother, ensure your WooCommerce orders automatically generate corresponding invoices and sales receipts in QuickBooks.
- Go to your WooCommerce settings and select the QuickBooks Connector option.
- Ensure that the option to create feeds for your sales is turned on.
- For each order on WooCommerce, confirm that an invoice is created in QuickBooks (including a detailed list of the items sold, their prices, and applicable taxes).
- Check that for every payment received, a sales receipt is automatically generated in QuickBooks, providing evidence of the completed transaction.
Payments and expenses
Keeping track of payments and expenses is fundamental to maintaining an accurate picture of your income. WooCommerce sales need to be reflected as income in QuickBooks, while refunds and expenditures are recorded appropriately.
- Go to the QuickBooks Sync settings in your WooCommerce dashboard.
- Set up the workflow to ensure that payments made by your customers are updated in QuickBooks as income.
- For refunds, enable the refund receipts feature to ensure that when a refund is processed on WooCommerce, it’s also reflected in QuickBooks.
- Regularly review your expenses in WooCommerce to ensure they are correctly categorized and recorded as expenses in QuickBooks.
This will be immensely valuable during tax season and for keeping a clear financial picture of your business.
Conclusion
When learning how to integrate WooCommerce with QuickBooks, we also discovered that it is a strategic move for any ecommerce business. This accounting dashboard makes syncing and managing financial data easier than ever. By following the comprehensive steps outlined in this guide, you can ensure a seamless connection between your online store and accounting software.
This integration not only automates crucial accounting tasks but also significantly reduces the risk of errors, enhances operational efficiency, and maintains up-to-date financial records. This integration empowers entrepreneurs to focus more on growing their business and less on manual data entry, ensuring a more productive and successful ecommerce operation.
Create your custom online store in minutes with 10Web AI Ecommerce Website Builder and take your business online. Create your online store in minutes with 10Web AI Ecommerce Website Builder.
Looking to sell online?
Looking to sell online?
Create your online store in minutes


![]()