Embedding a Google Calendar in WordPress is a smart way to keep your visitors informed about events, schedules, or availability. Whether you’re running a community website, managing a local club, or just want to share your personal calendar, integrating Google Calendar with WordPress allows your users to see your schedule directly on your site. Understanding how to embed Google Calendar in WordPress ensures that your site remains a dynamic and interactive space, leading to a better user experience, keeping your audience informed.
FAQ
Can you embed a Google Calendar into WordPress?
How to add a Google Calendar to WordPress without a plugin?
Why embed Google Calendar in WordPress?
Embedding Google Calendar in your WordPress site offers numerous benefits, from improving how you manage events to enhancing visitor engagement. Here’s a closer look at why this integration could be a game-changer for your website.
- Streamlined event management: Embedding Google Calendar in WordPress automates the process of adding and updating events, which can significantly reduce the administrative workload. This integration ensures that any changes made in Google Calendar reflect immediately on your website, maintaining consistency without additional effort.
- Increased engagement: By incorporating Google Calendar, you keep your audience informed of upcoming events or availability directly through your website. This constant update can lead to higher visitor engagement, as users have a reason to return to your site to check for new activities or availability updates.
- Enhanced user experience: A dynamic and interactive calendar embedded on your site allows users to view events in different formats (day, week, month) and even search for specific events. This interaction is not just informative but also engaging, making the user experience more comprehensive and user-friendly.
- Time savings: When you integrate Google Calendar with your WordPress site, you can manage your scheduling and event announcements from a single platform that you are already familiar with, either for personal or professional use. This eliminates the need for separate event management tools, saving time and streamlining your workflow.
Setting up Google Calendar
Before embedding your Google Calendar into WordPress, you need to set up and configure your calendar settings properly. This involves creating a new Google Calendar, adjusting access permissions, and obtaining an API key to enable communication between your calendar and WordPress site.
Step 1: Create a Google Calendar
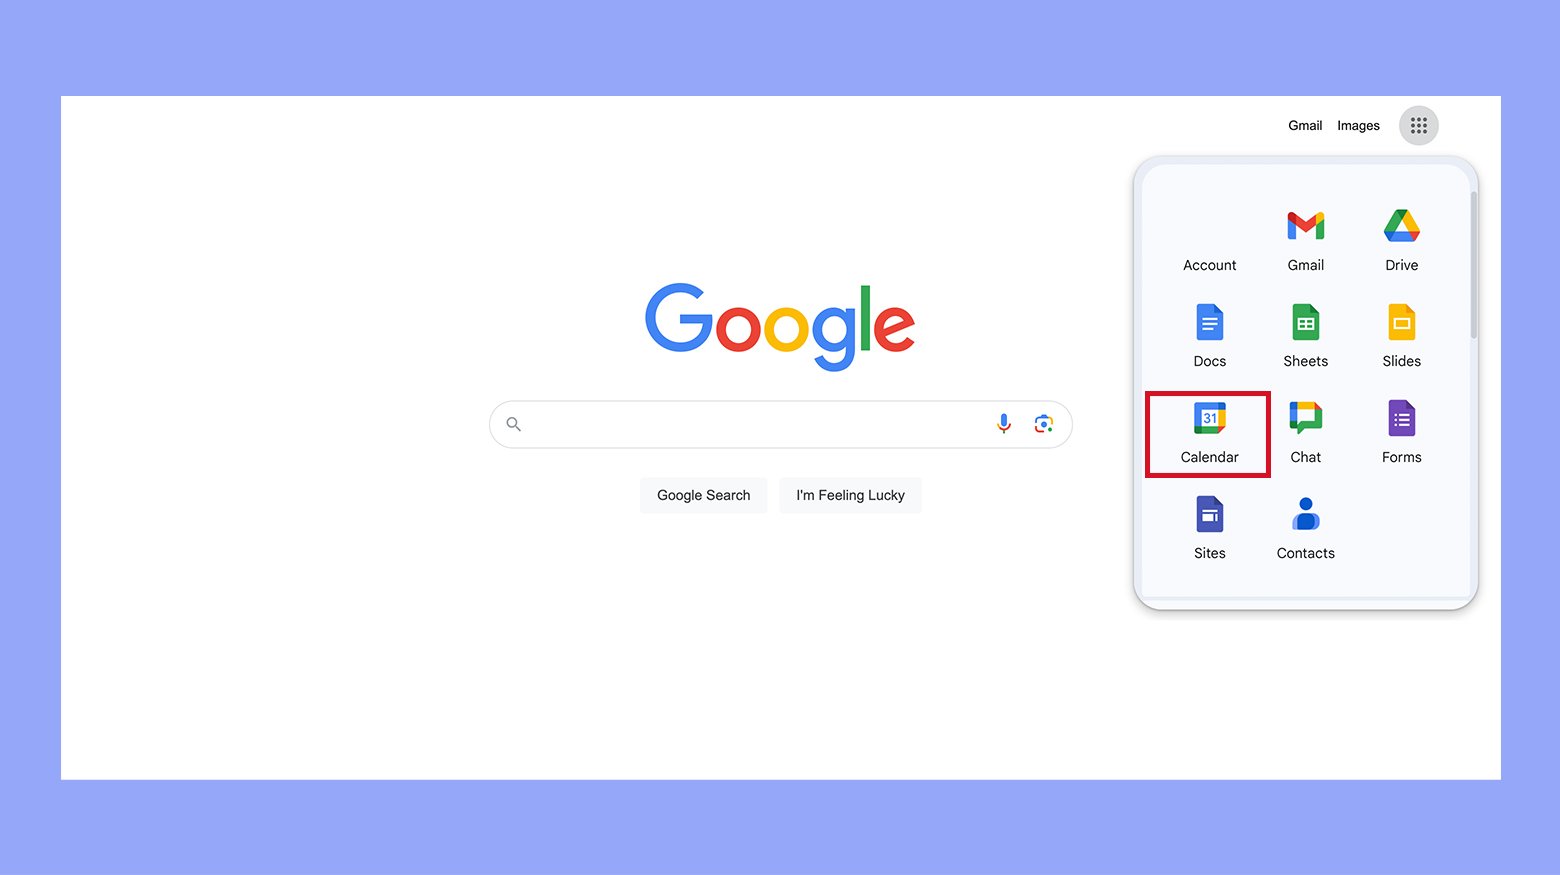
- To start, log in to your Google account and access Google Calendar from the Google apps menu, where you’ll find a calendar icon.

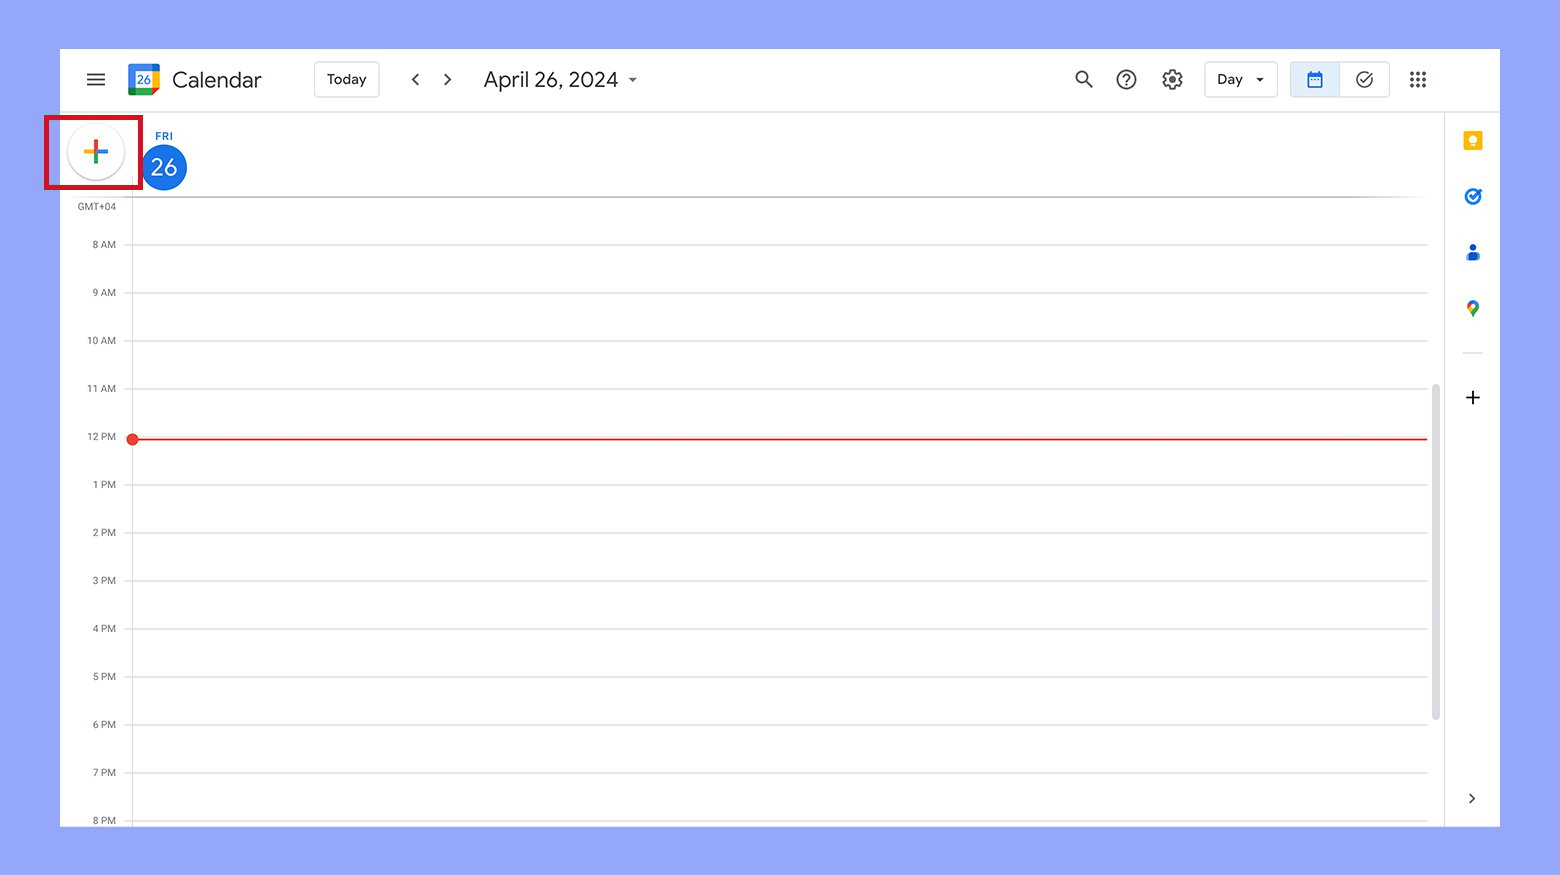
- Click on the + icon near the Other calendars section on the left and select Create new calendar.

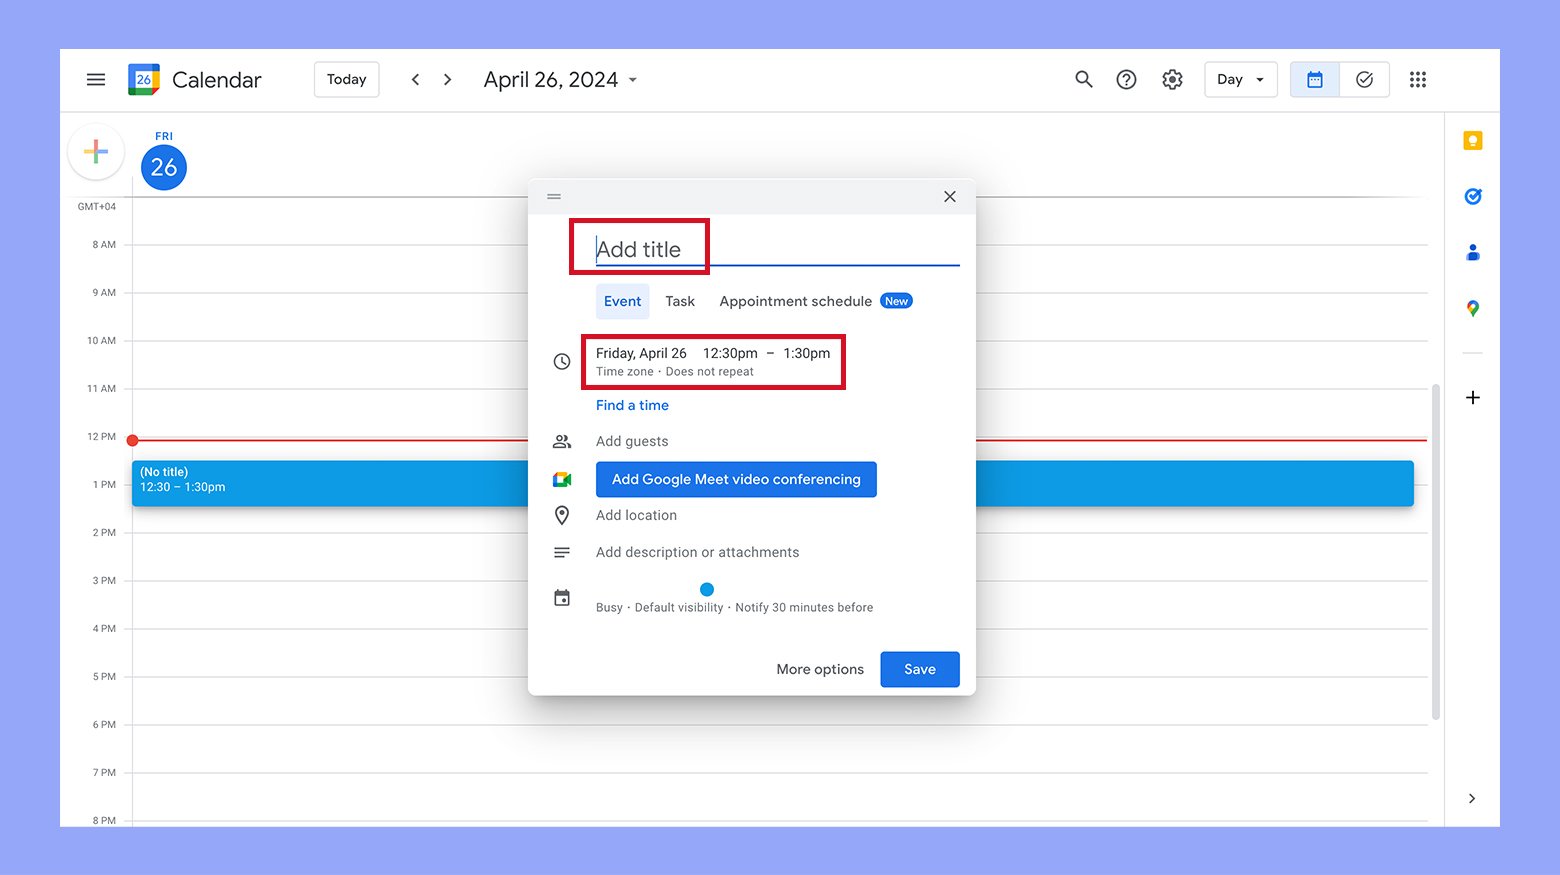
- Provide a name for your calendar and set the proper time zone.

Step 2: Access permissions
For WordPress to access your calendar, it needs to be public. In the Calendar settings set the visibility to public.
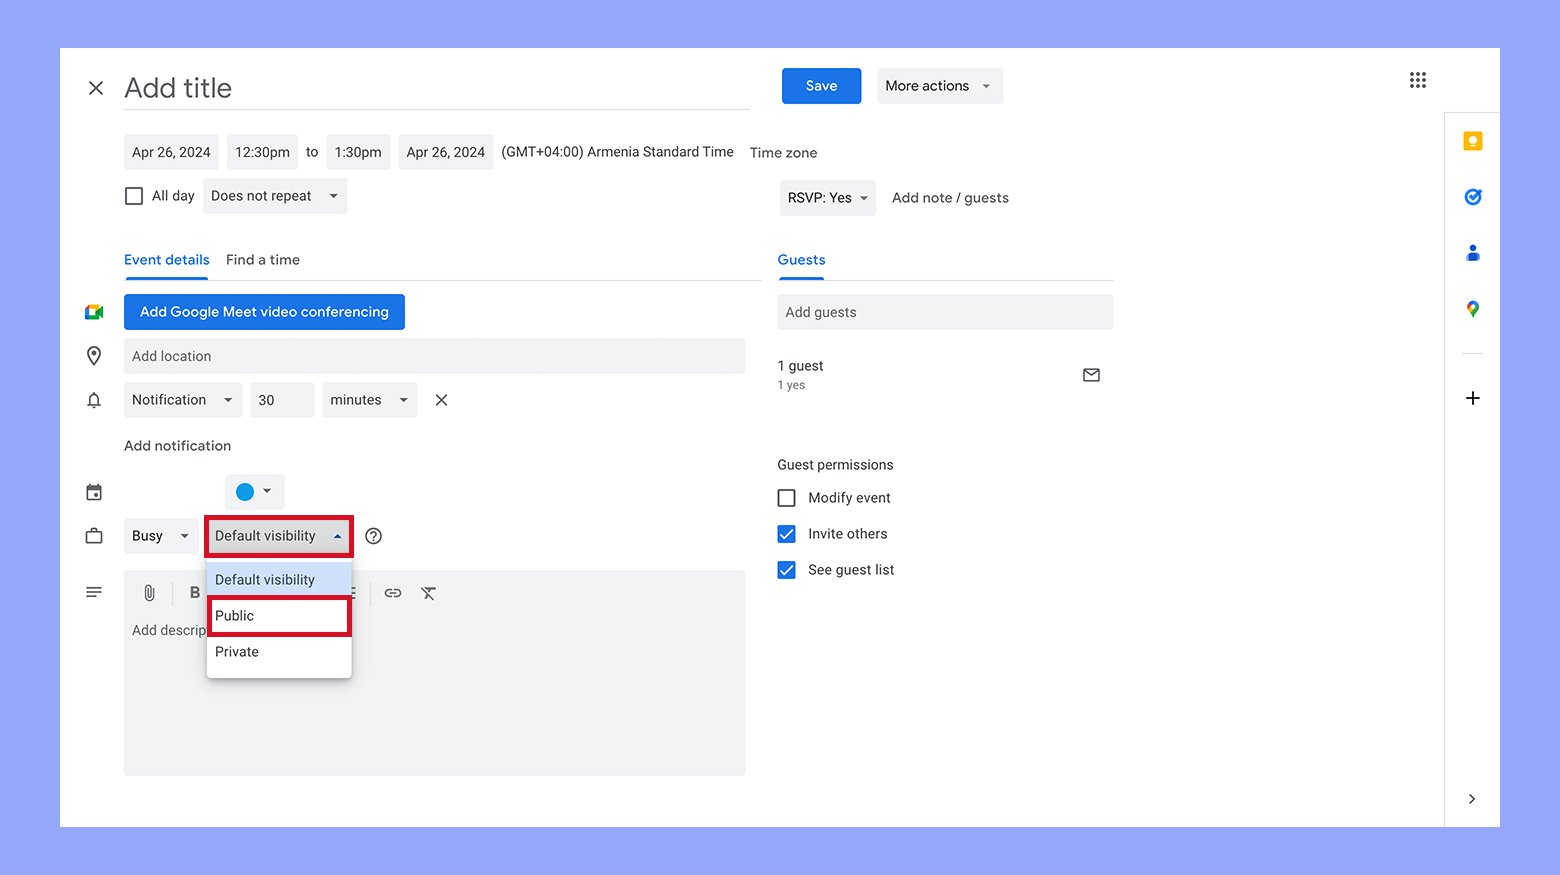
Step 3: Obtain Google API key
For WordPress to access your calendar, you’ll require a Google API key. Visit the Google Developers Console, start a new project, and enable the Google Calendar API. Once enabled, go to Credentials and create an API key. This key will be used in the WordPress plugin or theme that integrates with Google Calendar, so keep it secure. You can get your Google API key by following these instructions. Automate manual work with 10Web Managed WordPress Hosting and 10Web AI Website Builder. Optimize your WordPress website effortlessly.
![]()
Simplify WordPress with 10Web
How to embed Google Calendar in WordPress?
Integrating Google Calendar with your WordPress website can streamline your event management and keep your audience informed of your schedule. Whether embedding the calendar within a page or enhancing your sidebar with a calendar widget, these straightforward methods will connect your audiences directly to your upcoming events.
Method 1: Embed Google Calendar in WordPress with shortcode
To embed your Google Calendar into a page or post, you can use the Shortcode block feature in WordPress.
- First, make sure you have the Google Calendar’s embed code.
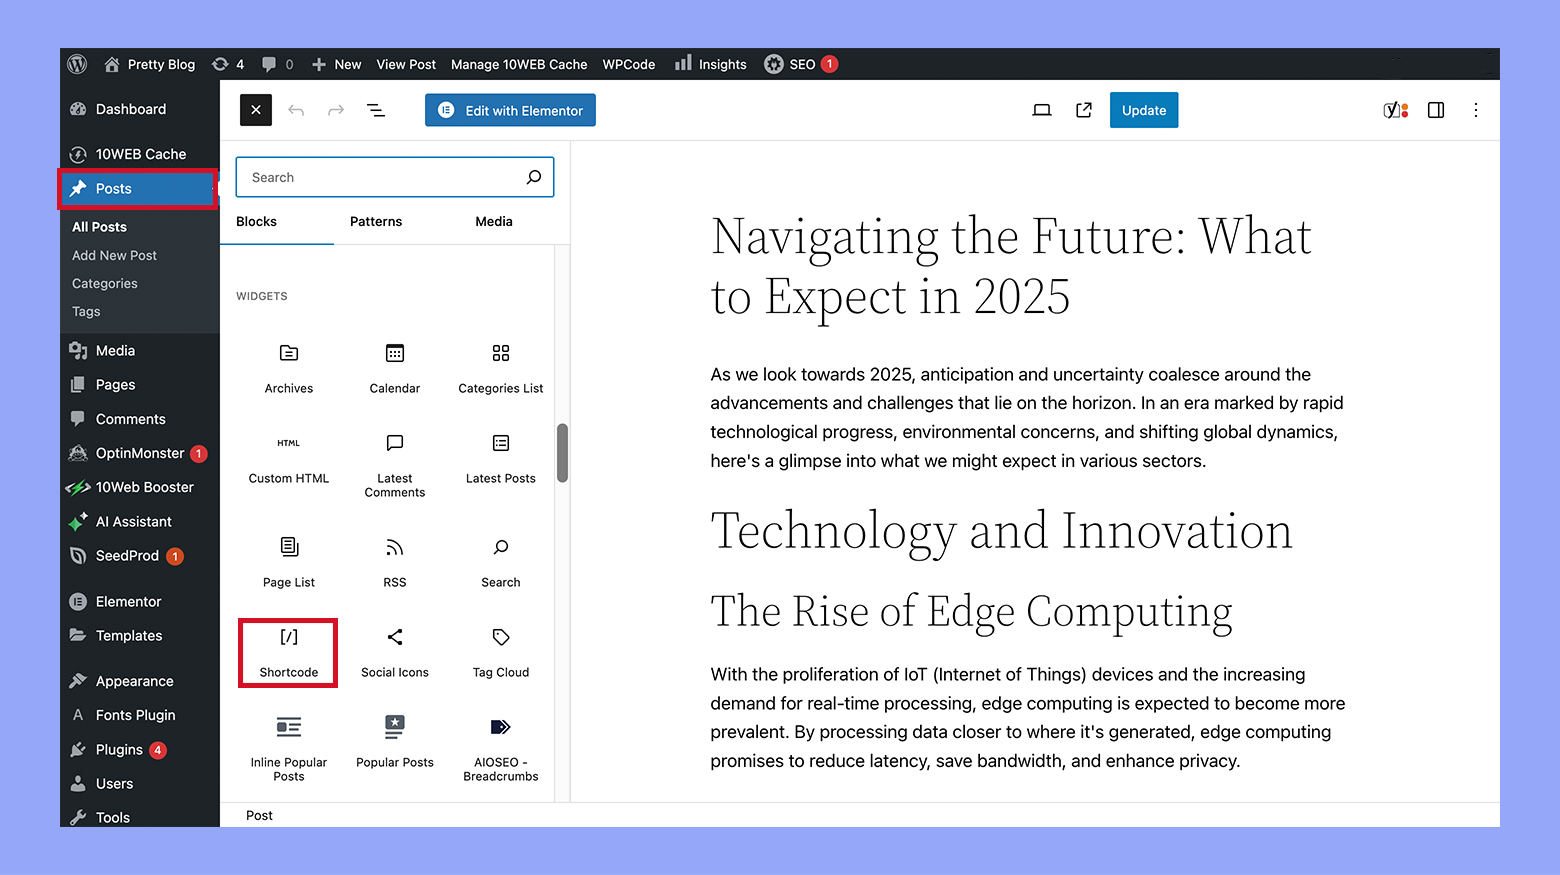
- On your page or post editor, click the + Add Block button and search for the Shortcode block.

- Here, you’ll simply paste the embed code provided by Google Calendar. For example, you would insert something like [google-calendar https://calendar.google.com/calendar/embed?src=your_calendar_id]. This shortcode will then render your Google Calendar right on your WordPress site.
Method 2: Embed Google Calendar in WordPress using a plugin
If you prefer having your Google Calendar on the sidebar of your WordPress site, you can achieve this through a widget.
- Access your WordPress dashboard and navigate to Plugins > Add new plugin. You’ll need a plugin like Simple Calendar – Google Calendar Plugin.
When deciding on a WordPress plugin to embed Google Calendar, it’s essential to consider ease of use, the range of features, and the level of support provided. Your choice can greatly impact how effectively you can manage and display your calendar on your website.
Simple Calendar Plugin makes it straightforward to integrate your Google Calendar with your WordPress site. With this plugin, you use a shortcode to add your Google Calendar to posts or pages. This flexibility means you can place your calendar anywhere shortcodes are accepted.
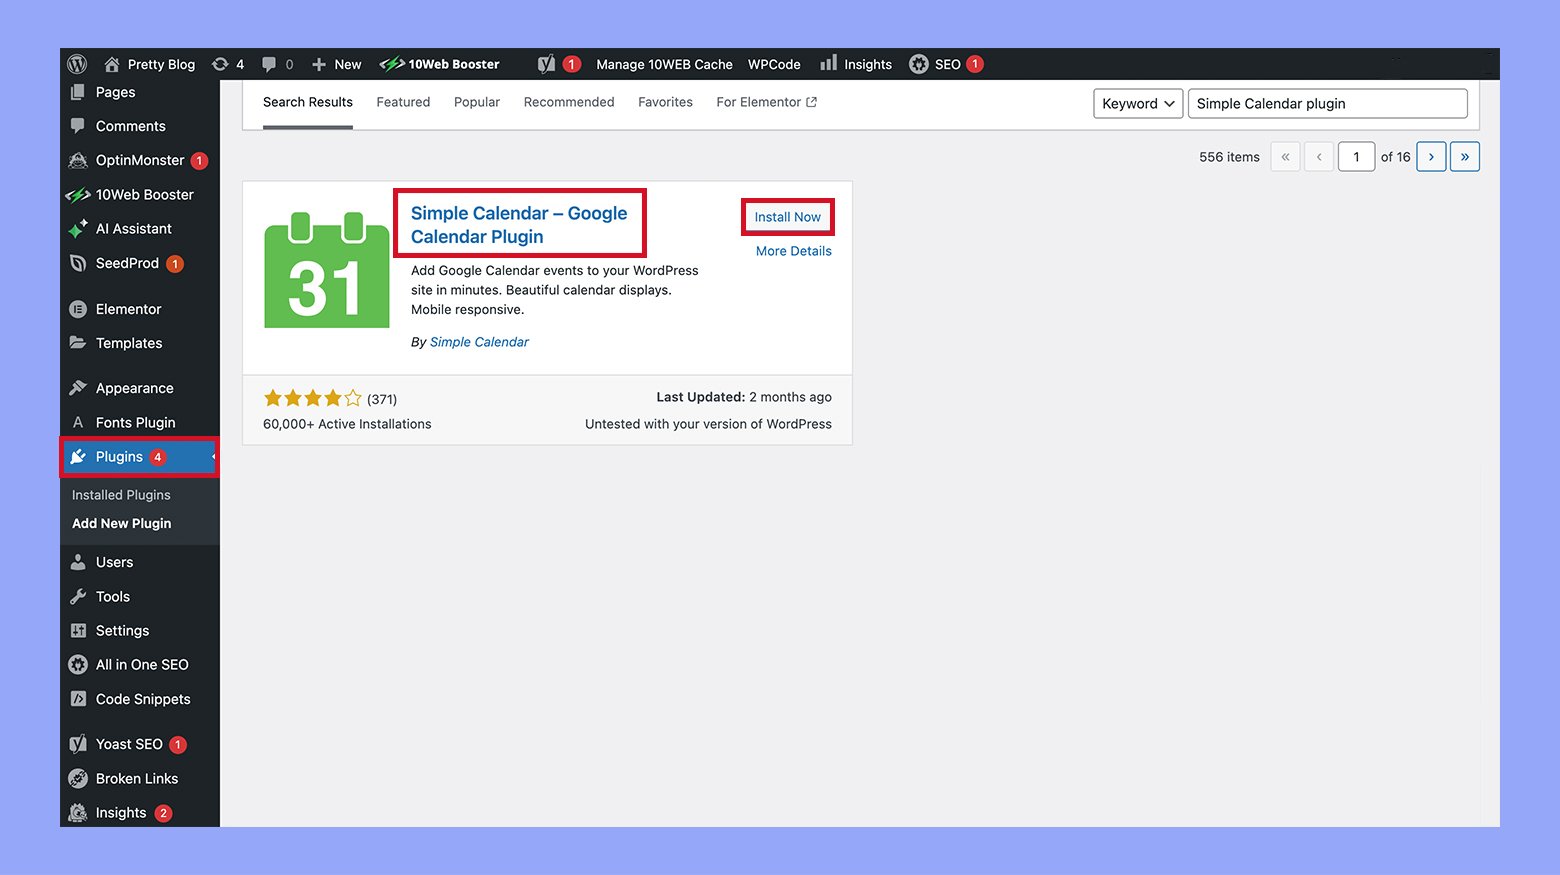
- Once installed and activated, go to your Widgets section, drag the Google Calendar Widget to your sidebar area, and configure it by adding your calendar ID in the settings.
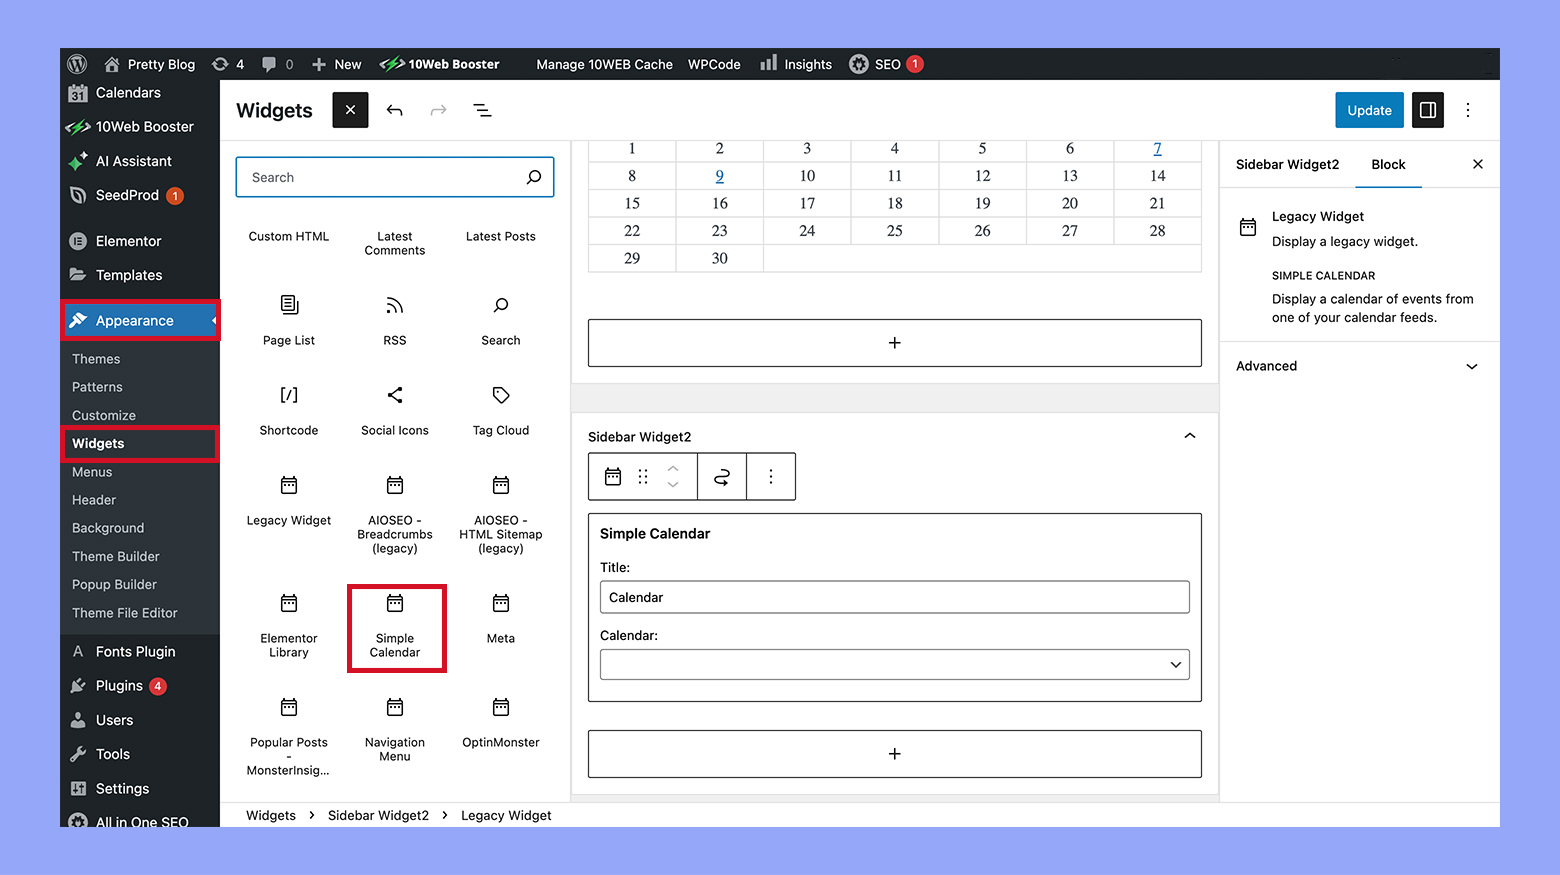
This will make your Google Calendar visible on every page that includes the sidebar, providing your site visitors with easy access to your event information.
Customizing the calendar appearance
When you embed Google Calendar in your WordPress site, adjusting its size, color, and style can make it blend seamlessly with your page’s design. You’ll have the flexibility to tailor the calendar’s look to match your website’s aesthetic, enhancing the user experience.
Adjusting size and view options
To ensure your Google Calendar fits perfectly on your page, you can adjust its width and height. When customizing your Google Calendar’s size, you’ll find these options by navigating to the Integrate calendar section of your calendar settings. Here, you can specify the dimensions to create a responsive design that adapts to different screen sizes.
- Width: Set a specific width in pixels or percentages to align with your page layout.
- Height: Define the height to ensure all relevant calendar details are visible at a glance.
By setting these values, you can control how the calendar appears in terms of size, whether you want it to take up the full width of a container or to occupy a specific portion of your webpage.
Styling with CSS
If you’re looking to further refine the appearance of your embeded calendar, applying CSS is an excellent way to add a touch of personalization. You can add custom CSS styles directly in your WordPress theme or via a custom CSS plugin. When styling with CSS, consider these aspects:
- Color: Alter background colors, event colors, and text colors to complement your site’s color scheme.
- Customization: Tap into CSS to tweak various elements, like buttons and date selectors, to reflect your brand’s style.
Here’s a basic example of CSS that changes the calendar’s background color:
iframe[src*="google.com/calendar"] {

 background-color: #f3f3f3; /* Your desired background color */

}
Remember to replace the color code with your preferred one to make your calendar pop or to have it merge subtly with the rest of your page.
Advanced functionality and management
In the dynamic world of managing your events and appointments within WordPress, you’ll need more than just the basics. Embracing advanced functionality allows for effective synchronization across multiple calendars and efficient management of your schedule.
Synchronizing multiple calendars
When you’re dealing with a busy schedule, keeping multiple calendars synced is crucial. You can integrate diverse calendars into your WordPress site, providing a unified view of all your events. Plugins like Simple Calendar can link various Google Calendars with your WordPress, ensuring that all your events are updated in real time. It’s a smart way to consolidate your business dates, personal appointments, and other important schedules.
- Step 1: Install a plugin capable of syncing, like Simple Calendar.
- Step 2: Configure the plugin settings to display all synced events from multiple calendars.
Managing events and appointments
To stay on top of your appointments and manage your events effectively, consider using tools that offer detailed controls and options. These functionalities help you oversee and adjust your schedule as needed. For instance, you may use the Google Calendar embed feature that allows for adjusting event details directly through WordPress, with changes reflected on all platforms connected to the calendar.
- Tip: Regularly review your event settings and RSVP settings to keep your calendar in check for any upcoming business or personal events.
- Remember: Use the Integrate calendar option within your Calendar settings to gain access to these advanced management features.
Conclusion
Embedding Google Calendar in WordPress offers a dynamic solution to manage and display events that can significantly enhance user interaction and site functionality. By following the straightforward steps outlined in this guide, from setting up your calendar to choosing the right plugin and customizing its appearance, you can effectively keep your audience informed and engaged with your schedule. Whether you embed Google Calendar in WordPress through a simple shortcode or a versatile widget, it is not just an improvement—it’s a transformation that brings your online presence to life, making it more interactive and responsive to the needs of your visitors.





![Featured image for 7 Best cPanel Alternatives [2022 Edition] article](https://10web.io/blog/wp-content/uploads/sites/2/2021/10/0_featured-2-742x416.jpg)
