
The “Eliminate render-blocking resources” warning can be a frustrating and alarming sight, and it can also signify that your website speed is suffering. To enhance your website speed, we must first identify the cause and the factors behind the “Eliminate render-blocking resources” issue.
One factor may be the myriad of plugins and themes that are installed and used on your WordPress site.
These plugins and themes come with external files from their source, which can cause issues and slow down your website speed. More specifically, these external files include CSS files and JavaScript files, which can directly cause render-blocking.
It is a common practice to install plugins that eventually become irrelevant or redundant, unfortunately, if not removed, they can also negatively impact the performance of your WordPress website.
Website speed is unmistakably crucial for SEO performance and is directly connected with your website’s SEO ranking. To retain or enhance your search engine ranking, you must resolve any issues that are standing in the way of optimal website performance. The first step to reaching your optimal website performance is to develop your website based on the guidelines provided by Page Speed Insights (now powered by Lighthouse). The next step is to develop a website in a precise way, reducing any extra external file requests.
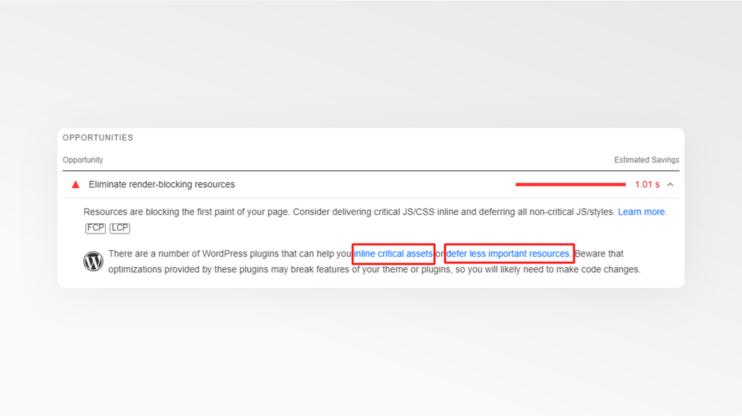
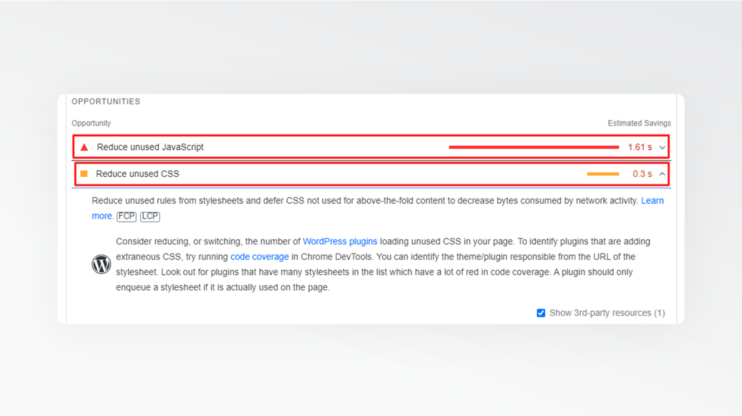
Let’s closely examine the “Eliminate render-blocking resources” list in the Lighthouse Report. It states that “resources are blocking the first paint of your website page”. To resolve this issue, we can inline the critical JS/CSS, defer the non-critical JS/CSS and remove any unused JS/CSS. This will positively impact your website’s FCP (First Contentful Paint), LCP (Largest Contentful Paint), FID (First Input Delay), TTI (Time to Interactive), and TBT (Total Blocking Time) metrics and will significantly enhance the loading performance of your website. On the other hand, correctly implemented critical CSS generation will not make CLS worse.
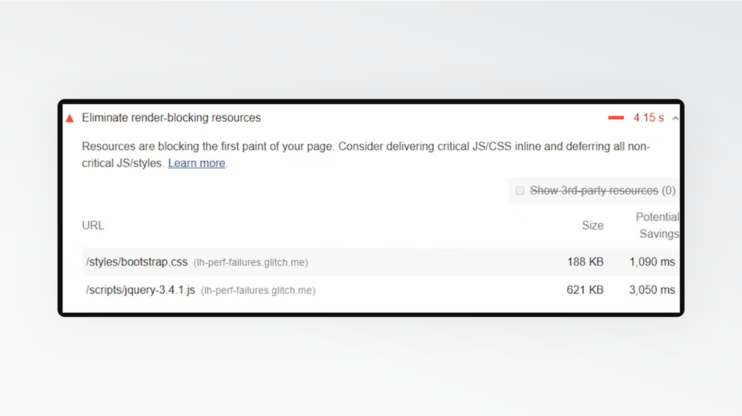
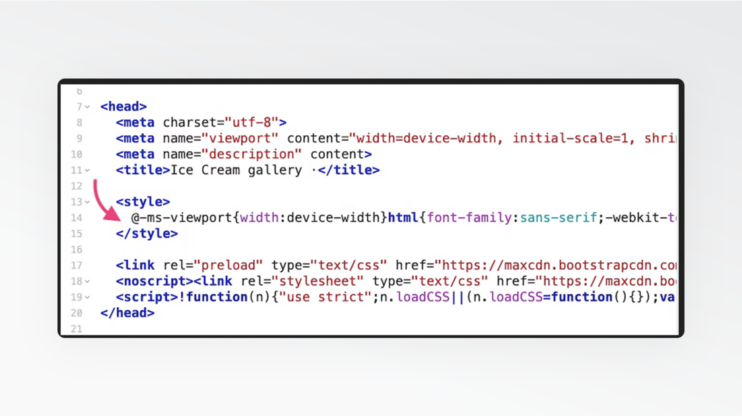
In the above image, the two flagged URLs, Bootstrap and jQuery, are both third-party resources, which host a lot of unused code. If we load these files without deferring, render-blocking will most certainly occur. Therefore, to load these files while avoiding render-blocking, we must follow Lighthouse’s recommended technique of async or defer.
If these steps seem painstakingly difficult and too technical, check the last section and see how 10Web Booster solves this problem automatically, without the need to write any code.
What is critical CSS?
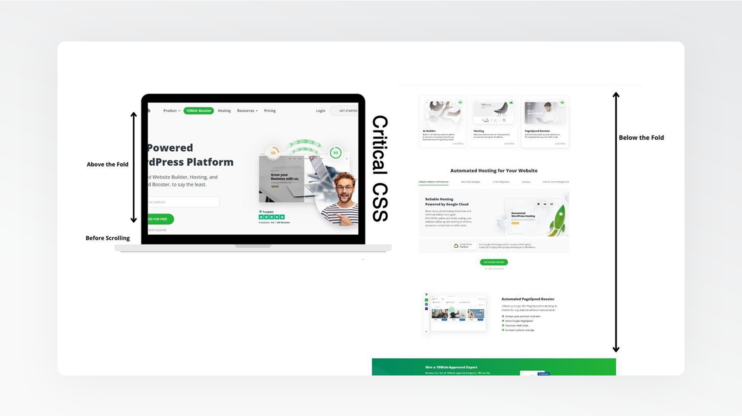
The faster your website displays its content to users, the higher the conversion rate of your website. Critical CSS refers to the essential files needed to load the “Above the Fold” part of the page. When a visitor enters your website, their browser begins to load all the files on that page, which is a time-consuming process. To avoid this long loading process, Critical CSS generation requests the browser to load only the CSS affecting the initially visible content and therefore improves the perceived speed of your website.
Here is the complete picture of ‘Above the Fold’ and ‘Below the Fold’. Critical CSS renders the initial display faster.
By delaying the loading of CSS files “Below the Fold”, we dramatically improve the website speed and the website’s SEO ranking. This is all quite logical. Why load something that the user cannot yet see? Loading CSS files “Below the Fold” only happens when they are about to be “Above the Fold”.
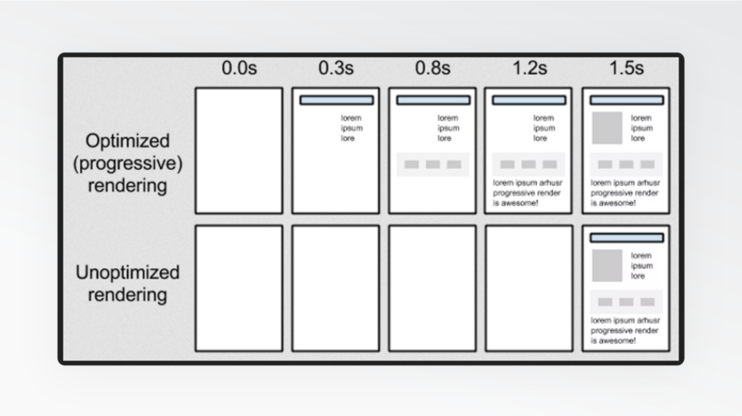
Fast websites just don’t happen out of the blue. They demand hard work. We, web developers, write markup, but the browser displays it in pixels. The code written in HTML, CSS and JavaScript, is displayed by the browser through the perfect sequence of pixels. Therefore, it is critical that the browser parses and renders the page resources as quickly as possible. This is where critical rendering comes in. By optimizing the critical rendering path, we can speed up website load time.
We can’t, however, speed up website load time by loading the content without proper styling as it will cause poor UX, cumulative layout shifts, flashes of unstyled text, etc. What we must do is locate the minimum styles required to render the “Above the Fold” content properly.
What is unused CSS?
As the name suggests, unused CSS are entirely useless CSS files and style sheets. Why do we even have them in the first place? Well, they might be added to provide styles for other pages or devices, or just because of a mistake and later were overwritten by a web developer. They might be inside a library and are used partially (usually we don’t implement all the features of CSS libraries).
Let’s take the example of adding bootstrap or font-awesome to our page. The process requires the loading of all the files of bootstrap and font-awesome. Unfortunately, most of the code will be useless, and unfortunately, it will also create a bottleneck in rendering, negatively affecting the loading time of the page. That’s just how it goes. Luckily, we can do something about these unused and useless files without any impact on the web application media. So please, don’t make the browser download, parse, and load unused CSS with the content and do all this extra work with absolutely no purpose. Your website certainly cannot afford the extra time.
For a speedy website with instantaneous loading “Above the Fold”, and to satisfy your moral duty as a web developer or owner, you must remove unused CSS to save users’ time. If this is something that goes beyond your skill, the WordPress plugin, 10Web Booster, the best in the market, is available to humbly serve your needs.
Why should you remove unused CSS?
Now if you take care of the useless CSS files, your website load time will increase, and your website users will be impressed by the instantaneous display and incredible speed, making their interaction with your site pleasurable. They will be happy. They will visit your website again and again. You will see your website’s bounce rate decrease and search engine rankings increase. All because you removed the persky useless CSS files.
Don’t wait any longer, there is no time to waste. Remove all the unused plugins, unused CSS files, and unused JavaScript files. We must keep nothing but the essentials.
Why should you inline critical CSS?
When you inline critical CSS, you “send a message” to the browser that no other CSS files need to be downloaded in order to show the page content “Above the Fold”. The browser will find the critical CSS available as soon as the DOM is parsed. Since style sheets block content rendering until they are fully downloaded, by removing unused CSS and using critical CSS inline, we can avoid the “eliminate render blocking” or ” reduce unused CSS” flags.
CSS files are render-blocking resources by default. This dictates that the browser will initially download and parse through all the CSS files in the head tag and execute them before visualizing the “Above the Fold” page content. The larger the CSS files the greater the slowing down impact of the page speed, which in turn will increase your website’s bounce rate and decrease your website’s conversions.
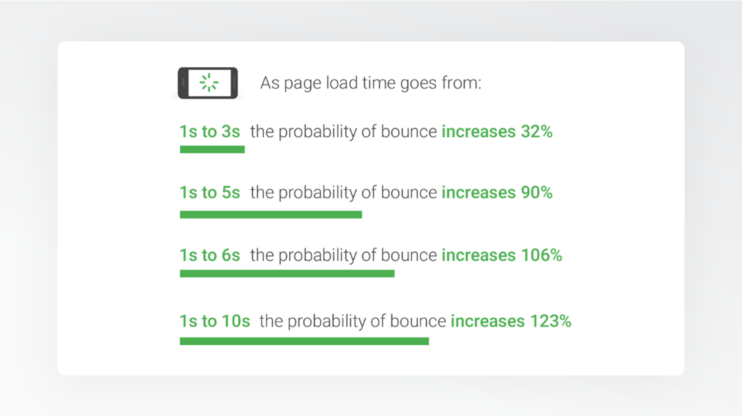
Here is a comparison of website speed and bounce rate:
When you inline critical CSS, you remove a number of unnecessary steps, for example, the browser no longer needs to render the entire page content to merely visualize the content “Above the Fold”. Furthermore, the browser will easily locate the inline critical CSS in the head tag and will no longer search for critical CSS in other locations. Furthermore, since inline CSS is loaded within the <style></style> tag in the <head></head> section, HTTPS requests are not required. As long as the user is viewing the content “Above the fold”, non-critical CSS can be displayed asynchronously “Below the Fold”. However, what is important to consider is that if all CSS files were to be loaded asynchronously or deferred without inlining the critical CSS, the broken HTML content would also show, confusing your visitors.
Now you see how inlining Critical CSS, if you need to use async or defer, can significantly improve user experience by reducing page load time. Visitors will instantaneously and perfectly see “Above the Fold” content, a critical component of the initial user experience.
How to Defer Unused CSS WordPress Without Plugin?
CSS files are render-blocking assets, which means they must be loaded and processed before the page can be loaded. WordPress themes and plugins host a great number of stylesheets, dragging load time. To resolve the load time issue, we have already explored inlining Critical CSS, now we will instruct how to defer the loading of non-critical “Below the Fold” content.
The loading of non-critical CSS too soon can slow down the website’s performance. It can affect FCP (First Contentful Paint), LCP (Large Contentful Paint), and TBT (Total Blocking Time) metrics. Deferring non-critical CSS will not necessarily improve website performance. However, styles must still be loaded, therefore we must identify them and load them asynchronously.
How to use non-critical CSS or unused CSS
Let’s find the non-critical and unused CSS files and load them asynchronously.
Async and defer are <script> attributes, so we need to add the following pattern below:
<link rel="preload" href="styles.css" as="style" onload="this.onload=null;this.rel='stylesheet'"></span>

<noscript><link rel="stylesheet" href="styles.css"></noscript>
- This approach is unlike adding a standard CSS file to an HTML document. Link with rel=”preload” and as=”style” will asynchronously download the non-critical CSS files. In terms of “async”: all external CSS files will be downloaded asynchronously and the code will be executed after the download. In terms of “defer”: a CSS file will be downloaded asynchronously and executed when the parsing of the document is completed.
The “Defer” is a Boolean attribute. It works only for external script documents. When it is present, the script is executed after the page performs the parsing. On the other hand, if “async” is present, the script is executed asynchronously with the rest of the page. In other words, “async” works while the page continues parsing, while “defer” works when the page finishes parsing. If we don’t use “async” or “defer” for the external scripts, the script will execute immediately before the browser continues parsing the page. This will create a “Render-Blocking” flag for that page. It is also important to note that “async” and “defer” will have no effect on the inline code. The best technique is to inline the “Above the Fold” content and defer the “Below the Fold” content.
- The “Onload” attribute on the link allows browsers to execute the code after the CSS file is loaded.
- “onload=null”: prevents the reuse of the CSS files
- The noscript tag holds that if the user disables the script or if the script is not supported in a browser, it will still run the script. NoScript tags are used on either the head or the body tag.
In the next section, we will explore how to find non-critical or unused CSS files. WordPress is riddled with these files, which is why their detection and deferring are critical.
How to detect unused CSS
The larger the number of external files used, the greater the likelihood and frequency of render-blocking. To reduce our chances of render-blocking, we must identify and separate critical and non-critical CSS and JS files. Chrome DevTools and PageSpeed Insights are the most common tools for the task.
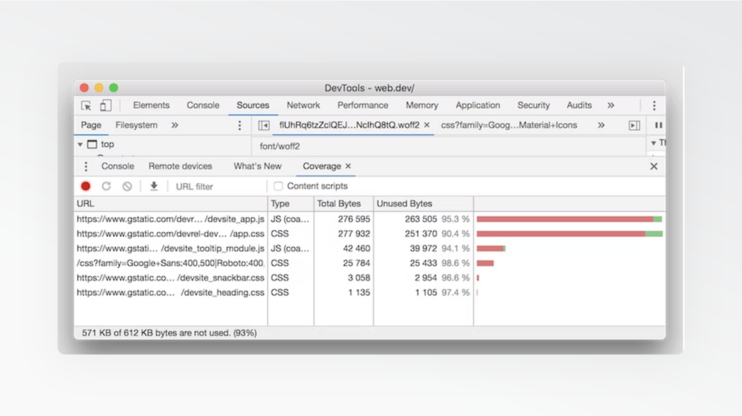
Through Chrome DevTools, we can easily identify critical and non-critical CSS and JS.
Let’s go through the steps.
- To launch Chrome DevTools press F12 or ctrl + shift + i (for Windows) or press cmd + opt + i (for Macs) or open the Chrome Menu from the right corner.
- Click on the three-dot icon “⋮” located on the right side. Open the dropdown and click on More Tools, click on Developer Tools and proceed to the Coverage tab.
- Press to Reload to start capturing coverage. The used and unused bytes filtered by URL, JS, and CSS will be visible.
PageSpeed Insights
Now we can explore the ways of PageSpeed Insights to remove non-critical CSS. First, we must conduct the performance test in “PageSpeed Insights” and identify the specific links that create the “Reduce Unused CSS” and “Reduce Unused JavaScript” flags.
Let’s go through the steps together.
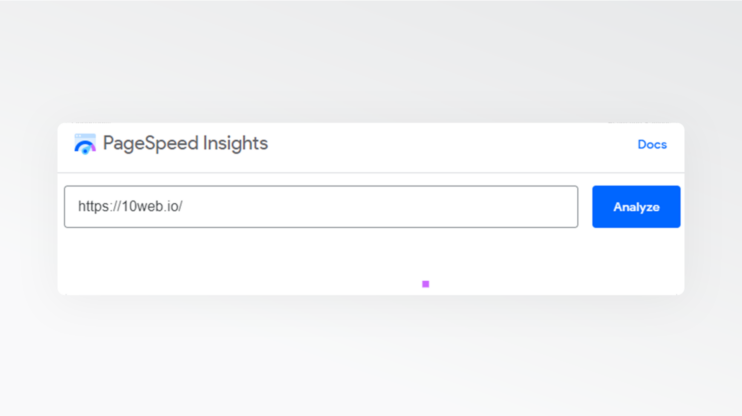
- Direct to the PageSpeed Insights website, enter your website’s URL and click Analyze.
- You will be directed to the Performance section. A complete report of our website’s loading performance and a complete guideline of the opportunities to improve page speed will be presented.
- Check for any warnings for “Reduce Unused CSS” and “Reduce Unused JavaScript”. The plugins or themes causing these issues will also be identified.
Locating the used and unused CSS through the above options requires time and a lot of technical work. PurifyCSS on the other hand can extract used and unused CSS within a few seconds.
PurifyCSS
The process is quite simple:
- Visit PurifyCSS
- Enter the URL of your website in the designated area
- Press Clean Up CSS.
- Wait for the list of the used and unused CSS per percentage (%)
- Press download combined purified, & minified CSS
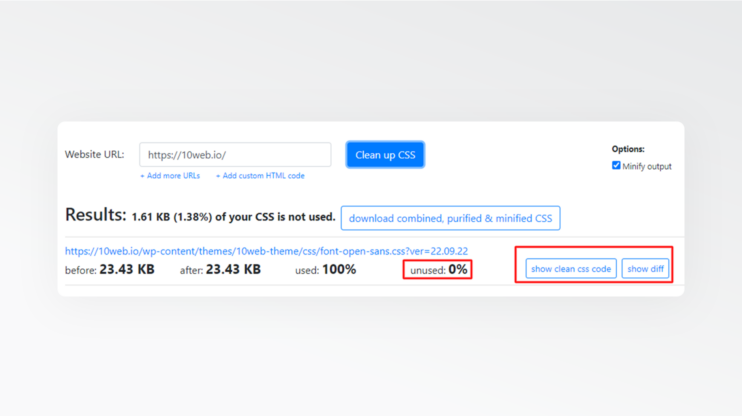
The use of PurifyCSS’s auto-generated code requires technical skills, otherwise, you may break your website. This was a brief on the use of PurifyCSS, we recommend following PurifyCSS’s complete instructions.
How to properly take into account mobile and other devices?
Mobile usage is skyrocketing. When working with CSS files, you should always account for mobile and other devices, and the importance of page speed load on these devices. Loading page code for all devices, mobile and tablet, can take a long time to download, parse, and render. We can overcome this problem by using media attributes. Employing media queries can significantly reduce CSS file size for mobile and other devices. Through this method we can load only the code essential for media, reducing the CSS file size. We can split the code between mobile devices and desktop devices, reducing CSS code rules and essentially loading the code required for the specific user’s device.
Critical CSS should be generated for each device type/size. At least two sizes for mobile and desktop. However many sites contain more fine-grained media queries that require generation of critical CSS for more than two media sizes. 10Web Booster generates critical CSS for five device sizes.
1. Inline critical CSS, remove or defer unused CSS
It was previously explained how to easily locate critical CSS and non-critical CSS using Chrome Dev Tools. After which, critical CSS should be inserted in the head section using the <style> tag and non-critical CSS should be removed or deferred. Content should also be synchronously tested to ensure no errors occur.
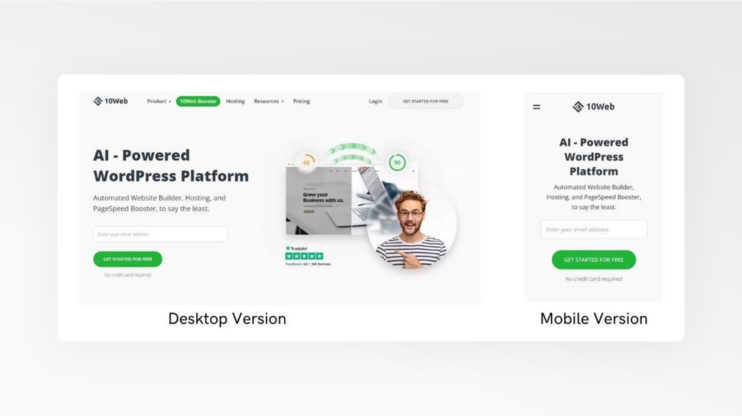
There is no universally defined height of the above-the-fold part for inline critical CSS. A website may have completely different critical CSS, depending on the viewport device’s specifications. If we look at the desktop and mobile versions of the 10Web.io website, we notice that the user interfaces of the desktop and mobile versions are completely different.
For this very reason, with specific device media queries, critical CSS must be used in the head section within the <style> tag, while non-critical CSS should be removed or deferred.
2. Preload the external stylesheets links on interaction
A website speed test on Page Speed Insight, may also indicate a “Preload Key Requests” flag, suggesting the need for preloading links on your website; preload <link rel=preload>. Stylesheets, document files, images, fonts, scripts, audio, and video files can be preloaded. Preload plays a helpful role especially in solving LCP issues of images and fonts. To remove the “Preload Key Requests” flag, Pagespeed Insights suggested links should be preloaded. To add a stylesheet to WordPress, the wp_enqueue_style function must be called and the relation preload of the stylesheet must be rel=”preload”.
For example:
wp_enqueue_style('preload-style', 'styles/main-style.css', false, null);

add_filter( 'style_loader_tag', 'preload_filter', 10, 2 ); function preload_filter( $html, $handle ){

 if (strcmp($handle, 'preload-style') == 0) {

 $html = str_replace("rel='stylesheet'", "rel='preload' as='style' ", $html); }

return $html; }
How to use the critical CSS on your WordPress website
Critical CSS can be used on your WordPress website through PHP by maintaining a clean header.php and inlining the critical CSS.
- First, add all styles to the style.css file for critical CSS within the theme.
- Then, include the style.css file in the <style> tag in the header.php file. At this point, all styles become inline CSS, and all CSS will be copied to header.php.
Handling critical CSS files is simple with PHP. We can use inline CSS by treating it as external CSS.
Here is an example with Twenty Twenty Two WordPress theme:
php include("wp-content/themes/twentytwentytwo/style.css");
If the wp_enqueue_style function were to be added, the URL would then be generated, causing render-blocking. For this reason, critical CSS should be included in header.php, avoiding the wp_enqueue_style function.
1. Separate critical and non-critical CSS for each media query
By separating critical CSS and non-critical CSS media queries for mobile devices, and by separating critical CSS and non-critical CSS media queries for desktop devices, we can reduce the size of the CSS file. In this case, when a page is called to load, the extracted CSS file will be loaded through CSS Media Queries – which will take into consideration the device – and will therefore reduce the loading time. Overall, by separating critical and non-critical CSS for each media query, the loading performance of the website will be faster.
2. Inline Critical CSS
As noted before, inline critical CSS is the inlining of the critical CSS of the website’s primary viewport. Critical CSS is the content a visitor is served on their device before scrolling. Critical CSS loads immediately with the DOM, speeding up the loading performance of the website.
Chrome DevTools displays critical CSS as green-marked CSS and unused CSS as red-marked CSS. To improve website speed performance, the green-marked CSS should be inlined, while the red-marked CSS should be removed or asynced or deferred. Of course, executing this process by copying the codes suggested by DevsTools, one by one, is very time-consuming. Luckily there are tools that can automatically generate critical CSS.
Here is how to generate critical CSS automatically
We have gone through the steps of placing the critical path CSS file as inline code within the <style> tag in between the head section. Now let’s go through the process of generating critical CSS automatically.
Note: Avoiding render-blocking with critical CSS is a technique that shows “Above the Fold” content as soon as possible to the user and rest CSS files can load ASYNCHRONOUSLY. Load them asynchronously on user interaction or after some time (if there is no interaction). On user interaction, e.g. on scroll, or mouse hover on the page, or key press, or touch. The idea is that if you open the page and don’t do anything yet, there is no need to load extra styles.
Web.dev offers some recommendations and useful tools for critical CSS extraction. Manual critical CSS extraction is of course difficult and resource-intensive. Automated extraction requires the selection of the right tools to extract the critical CSS codes of the initial viewport.
1. Critical
We can extract inline critical CSS from HTML pages by the use of certain tools. Critical is one such tool. It does require NPM installation. If you have NPM already installed, you can install Critical on your device by following the command prompt, and then generating inline critical-path CSS. It works perfectly with standard input as well. An advantage of this tool is that it automatically detects stylesheets. That’s right, there is no need to specify the stylesheets. Additionally, the tool can export dynamic CSS for multiple screen resolutions. For an example of a site using Critical Path CSS, examine the Critical Path CSS Demo on GitHub.
2. CriticalCSS
Another very good “Above the Fold” Critical CSS generator is CriticalCSS. It also works on the NPM command line. It locates “Above the Fold” CSS and delivers the output as a file. We direct you to their documentation for further detail.
There are automatic Critical path CSS generators that do not require the command prompt.
3. Automatic Critical Path CSS Generator: sitelocity.com
Sitelocity.com is an automatic Critical Path CSS Generator. It merely requires an entry of your web page to generate “Above the Fold” Critical CSS.
Follow these steps to generate your “Above the Fold” Critical CSS
- Enter the URL of your webpage, including HTTP or HTTPS.
- Click the Generate Critical Path CSS button. The tool will automatically generate the Critical Path CSS, the Minified and Unminified Combined CSS file, and Minified and the Unminified Critical CSS file.
- This step does require manual effort. Download or copy the Minified or Unminified Critical CSS file and paste all its contents in between the <head> tag including the <style> tag.
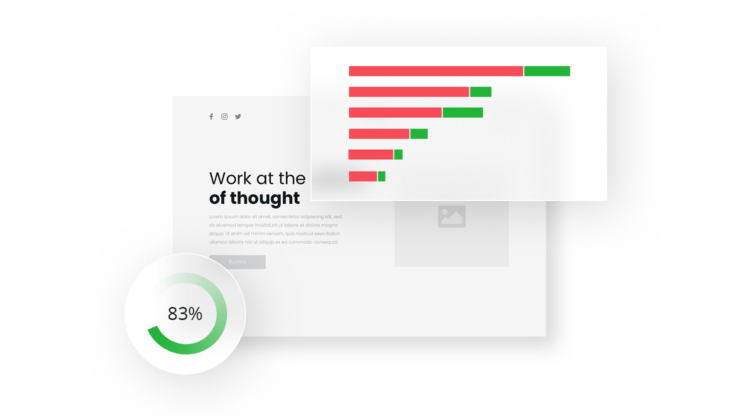
The below image is an example of a case without Inline Critical CSS and a case with Inline Critical CSS.

Caption: First test without Inline Critical CSS. Second test with Inline Critical CSS.
3. Add non-critical styles as an external stylesheet
You have received a warning to remove non-critical CSS from Google PageSpeed Insights while testing your web pages. You may want to do as recommended by removing the non-critical CSS. However, you should be warned, removing non-critical CSS can break your content. As we have discussed before, non-critical CSS should be async or deferred as external style sheets instead. Load non-critical CSS asynchronously or defer them to the document object.
Here is how to load CSS files asynchronously:
<link rel="preload" href="styles.css" as="style" onload="this.onload=null;this.rel='stylesheet'">

<noscript><link rel="stylesheet" href="styles.css"></noscript>
4. Remove all original stylesheets
Third-party CSS libraries for WordPress website themes and plugins are commonly used. However, only a small part of the code within these third-party CSS libraries are actually used on the website. The rest of the code remains unused and takes a long time to load, increasing the loading time of the website.
To remove these CSS files and increase page load time, use the wp_deregister_style function:
function wp_deregister_style( $handle ) {
_wp_scripts_maybe_doing_it_wrong( __FUNCTION__, $handle );
wp_styles()->remove( $handle );
}
5. Test your changes thoroughly
CSS files or CSS code that is considered non-critical, or to be removed from the website, may also be connected with the user interaction. The Ajax form, the modal dialog box, or the form validation message, are examples of such CSS files.
To ensure we do not remove such files check
- All click events to remove unused CSS
- The hover effect
- The sub-pages, buttons, and navigation menus, and
- Check the website on different browsers and different screen sizes and viewport displays.
6. Adjust critical CSS code
The critical CSS code should be adjusted on the website in case you locate any CSS missing during quality assurance of the website. Your website is a window to your business and venture. Flawless and fast website performance will ensure an irrefutable reputation and successful website enterprise.
The ultimate automated solution
The steps above should be done for each page of a website. Manual or automatic approach might work well for small websites with static pages. However WordPress sites are dynamic websites and contain many pages and templates, like search results or archives. One needs to generate critical CSS every time after important content changes. For example when adding a plugin, or adding new blocks to the content. This might become a nightmare.
There is an easy, user-friendly, no-technical-knowledge-needed alternative solution. The 10Web Booster is a WordPress speed optimization plugin that will automate critical CSS and all other speed optimization solution features for you. It generates critical CSS for five device sizes for each page. It also updates the critical CSS automatically, triggered by plugin activation/deactivation, post publishing/update etc.
It’s code-free and hassle-free.
With 10Web Booster you will receive automatic
- Critical CSS generation
- Page cache
- CSS & HTML minification & compression
- JS minification and compression
- Image optimization
- Defer JS and CSS execution
- Image lazy load
- Font swap
- Conversion of image format to WebP
- Iframe and video lazy load
- Automated updated
The 10Web Booster is a free plan that offers all these optimization solutions for up to 6 pages. 10Web Booster Pro, the premium version, has no limit to the number of pages to be optimized. 10Web Booster also works on multiple devices and up to 5 screen sizes.
10Web Booster Pro has Cloudflare integration to deliver enterprise-tier CDN to websites optimized through the plugin.
Cloudflare is one of the most popular and powerful CDN providers. It hosts the top largest worldwide network of over 275 points in over 100 countries, covering around 95% of the world’s population. Within their network, content can be delivered to visitors under 100ms.
Through the 10Web and Cloudflare partnership, your website will gain access to Cloudflare’s “reserved-for-enterprise” network and will receive automatic caching of all website’s static content, including non-image content like CSS/JavaScript files, file attachments, and others. Full-page caching will ensure the generation of a static HTML copy for your website, storage of the static copy, and delivery of the content through the largest global network. This means your visitors will receive your website content at ultra-fast speed from the server nearest to them, cutting down on the distance traveled, and ensuring the highest speed and lowest load time possible. What’s more, CSS and JS files, along with fonts and media, are also minified, optimizing your webpage speed even further.
10Web Booster and Cloudflare package will also mitigate any gaps experienced by your website due to your server limitations. A CDN ensures a serverless solution and eliminates the need for auto-scaling, load balancers, and configurations. Your traffic, no matter the surging size, will be directed and load-balanced through Cloudflare’s extensive CDN network, providing the scalability and reliability you need to keep your website running and at its optimal functionality. Your original server will not feel a thing, as the CDN will ensure minimal load while it distributes most of the traffic through its network.
Your website uptime will increase significantly, while downtime will dwindle into memory.
Even if your original hosting server experiences blackouts, the CDN will serve your optimized and cached pages and resources from the Cloudflare edge network, making them available to your visitors even when your server is not.
Your website will also be secure from any hackers, attacks, or bots, aiming to cause damage to your website and your visitor’s privacy. Cloudflare is equipped with the best web firewalls and DDoS (Distributed Denial-Of-Service) protection systems and handles bot mitigation, anomaly detection, custom CAPTCHAs, and threat response. Nothing stands in the way of your website’s protection with 10Web Booster and Cloudflare.
As always, 10Web ensures automation. All these features and benefits are yours with a single press of a button or two.
10Web Booster with the Cloudflare Enterprise package stands unreachable in the speed and performance optimization offered and is unbeatable in the security and protection services available to your website.
To recap, with 10Web Booster and Cloudflare you will receive the following CDN features:
- Automated activation and configuration
- Advanced and intuitive user interface
- Cache optimization including a full-page cache for static pages
- Static and dynamic content delivery with unparalleled speed
- Built-in image optimization and lazy loading for desktop and mobile pages
- Scalability and reliability
- Built-in DDoS protection
- Web application Firewall(WAF) and user-friendly dashboard for rule configuration
- Website, application, and network protection from attacks and bots.
- SSL capabilities or compatibility with your existing SSL without any additional configuration
- Excellent 24/7 customer support
10Web Booster may just be the comprehensive automated solution to your needs. It will deliver
- Full frontend optimization of your entire website
- Up to 7% boost in conversions
- Up to 40% boost in visitor engagement
- Up to 53% mobile traffic engagement boost
Want to speed up your website instantly?
Get 90+ PageSpeed Score automatically with 10Web Booster ⚡
On any hosting!
Want to speed up your website instantly?
Speed up your website automatically
Get 90+ PageSpeed Score automatically with 10Web Booster. On any hosting!


Speed up your website instantly
Speed up your website instantly
-
 Automatically get 90+ PageSpeed score
 -
Experience full website caching
-
Pass Core Web Vitals with ease
 Automatically get 90+ PageSpeed score


![Featured image for How to Make WooCommerce Faster [29 Tips and Tricks] article](https://10web.io/blog/wp-content/uploads/sites/2/2024/04/make_woocommerce_faster-742x416.jpg)


It is extremely helpful for me
I am happy to hear that!