
In This Article
- How are videos affecting your website now?
- 10 steps to optimize your website’s videos
- 1. Choose a right format
- 2. Compress the video
- 3. Choose fast hosting
- 4. Provide different formats for multiple devices
- 5. Specify video parameters
- 6. Make video resolution scalable
- 7. Make bitrate adaptive
- 8. Set up autoplay, lazy loading and preloading correctly
- 9. Use a content delivery network (CDN):
- 10. Use a customizable video hosting.
- What is video optimization in SEO?
Videos deliver a lot of information in a short amount of time, which is why when presented with the option, many will choose to watch a video rather than read text. Use of videos on landing pages can even increase conversion rates by 80%. Videos can lengthen the amount of time people choose to remain on a website, lowering bounce rates and leading to potential sales. And that’s not all. A recent survey conducted by Renderforest demonstrates some important and surprising statistics:
- 70% of businesses say that videos boost brand awareness
- 78% of businesses say that videos increase traffic
- 83% of marketers say that videos help to generate more leads
- 44% of people are more likely to buy a product after watching a video about it
These are all great reasons to add some videos to your website, right? Well, it’s important to keep in mind that the above statistics are only applicable when they are not slowing your website down. When videos aren’t optimized and your website’s performance starts to suffer, your content will end up sending users away instead of generating more conversions.
According to research from Unbounce:
Half of all people say they’d be willing to give up animation and video for faster load times.
When it comes to the speed of your website, there really isn’t a lot of room for compromise, as this is how Google defines speed:
- 1-49 (over 4 seconds): slow
- 50-89 (2.5 to 4 seconds): average, needs improvement
- 90-100 (under 2.5 seconds): fast
Despite speed being an absolute priority in Google’s algorithm and a necessity to pass Core Web Vitals, the average website still has a PageSpeed score between 40 to 50 for mobile and desktop. Google has confirmed that:
53% of visits are abandoned if a mobile site takes longer than three seconds to load
As this is essentially any website with a PageSpeed score of less than 90, you really can’t afford to have a video slowing down your website. If you’re now thinking it may be best to avoid including videos on your website, fear not! In this article, we’ll explain how to optimize videos so you can keep your website running fast, and your website visitors happy. Let’s dive right in!
How are videos affecting your website now?
To understand how a video is—or will, impact your website, it’s important to understand the status of your website as it stands now. Checking the current PageSpeed score, paying attention to Core Web Vital metrics, and of course considering your hosting are all necessary components in the bigger picture. Let’s review.
PageSpeed Score
Before you start optimizing your videos, it’s a good idea to run a quick Google PageSpeed score check. This will give you an overall idea of what exactly is slowing down your website and to figure out just how much of your media content needs optimization.
Core Web Vitals
When it comes to Core Web Vitals, Largest Contentful Paint would be the most relevant metric to pay attention to in terms of videos. Here’s a quick refresher on what exactly that is:
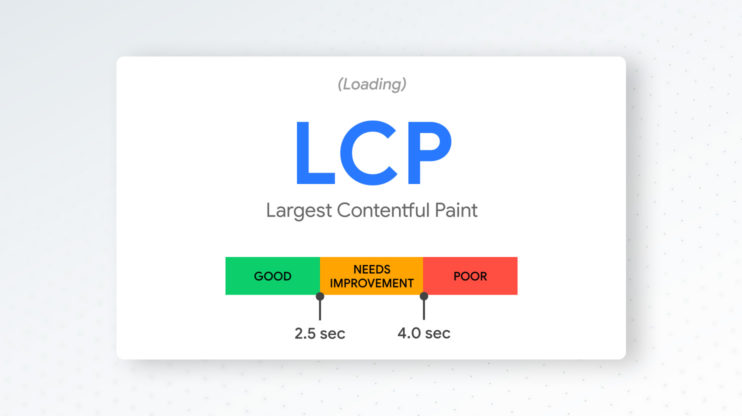
A good LCP score is achieved when the largest element—in this case, a video, loads in 2.5 seconds or less, and this must be the case 75% of the time. When the load time is between 2.5 and 4 seconds, the LCP is considered to be in need of improvement, and when the load time is more than 4 seconds, the LCP is considered to be poor.
You can measure the LCP of your page with PageSpeed Insights, Lighthouse, Search Console (Core Web Vitals Report), and the Chrome User Experience Report.
Want to speed up your website instantly?
Get 90+ PageSpeed Score automatically with 10Web Booster ⚡
On any hosting!
Hosting
Your website is truly only as good as your hosting, so it is imperative to take your hosting provider into consideration when it comes to website speed. Powerful hosting that prioritizes speed will really save the day when you decide to add a video or videos to your website. So if you’re still using shared hosting, the harsh reality is that not much can be done to save your website’s speed. And before you think about a caching or optimization plugin, remember that caching and optimization plugins cannot boost your website speed from the backend. This is because WordPress core entirely relies on your hosting solution to reach and maintain a superfast website.
Read:
10Web’s powerful and automated hosting solution ensures a smooth and fast performance for your website. All websites hosted on 10Web automatically get optimized frontend and backend speed, bumping them up to the 1% of the world’s fastest loading websites. With 10Web, your website will:
- Receive a 90+ PageSpeed score
- Pass Core Web Vitals
- Get optimized backend
And what does that mean for you?

So if you add a video to your website, 10Web’s powerful hosting works to keep your PageSpeed score in the “fast’ range—automatically.
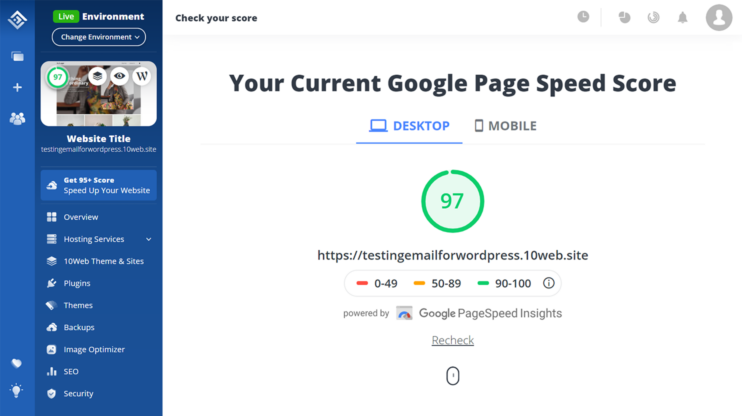
From your 10Web dashboard, you can also conveniently check your PageSpeed score along with comprehensive diagnostics on what affects your site speed.
Now that you have an average basis of your site’s pre-optimized performance, it’s time to apply a few staple optimization methods to your video content that will further help!
10 steps to optimize your website’s videos
When it comes to optimizing videos, there are two main approaches to take, which we will discuss in greater detail below:
- Make sure that your videos are optimized on your end before you upload them
- Have your website set up to properly embed or feature your videos on it
How to optimize your video file:
1. Choose a right format
Your video file needs to be compatible with HTML5, so that you’ll be able to feature your videos without the need to use any external plugins.
WebM and MPEG-4 (MP4) are the most commonly supported video file formats. While WebM is supported by Firefox and Chrome, MPEG-4 is much more widely supported by all browsers.
Since not all browsers and devices support all formats, it’s important that you encode your videos so that your users can view them regardless of their device or browser.
For example, converting samplevideo.mov to samplevideo.mp4 so you can play your video from your WordPress site. You can use any online video converter to convert your videos to the recommended formats.
2. Compress the video
You have to compress your videos prior to uploading them to your site. There are multiple tools to achieve this, but open source software HandBrake is a great option.
HandBrake’s interface is very easy to navigate and on top of compression, you can use it to convert your video files to a variety of modern codecs.
They have their own guide over here, but here’s a quick couple of settings to have your video ready for your WordPress site:
Launch HandBrake and select the video file that you wish to compress. From the below screen, right beneath the top bar, there’s the “Presets” menu. These are a bunch of preset settings that allow you to quickly format and compress your video based on what you want to use your video for.
For our purposes, choosing fast1080p30 should do well in most circumstances.
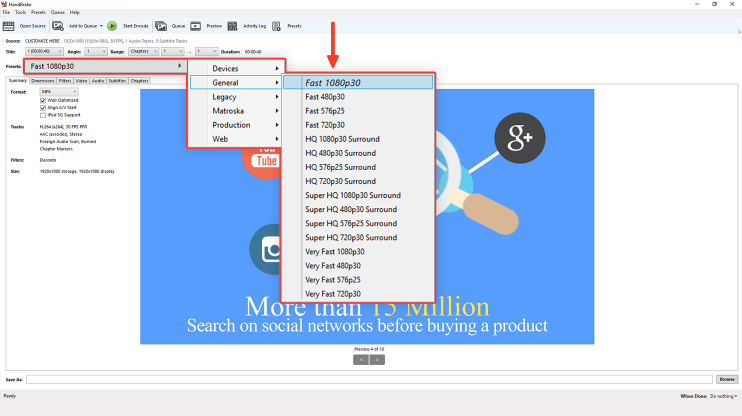
This will automatically format your video in MPEG-4 format, keeping the high source quality of the video and its size relatively small. Afterwards, in the “Summary” tab below, you need to check the box that says “Web Optimized.”
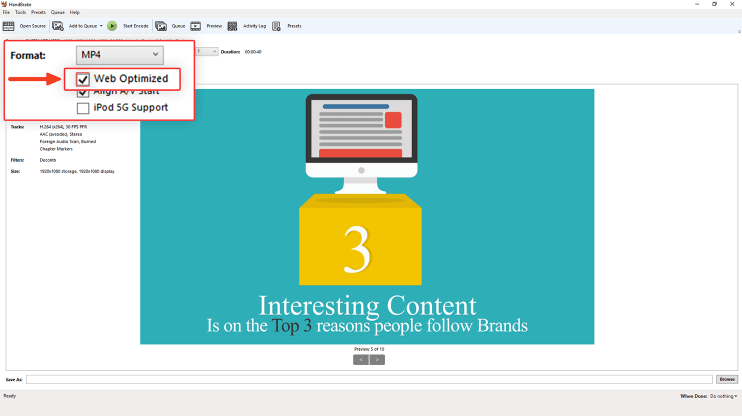
This will allow progressive downloading for your MPEG-4 formatted video, where its data is reorganized and rewritten after it’s encoded. This way your featured video will start playing immediately instead of downloading it first before playing it.
Finally, as an optional step, you can head over to the “Video” tab, over to the “Quality” slider.
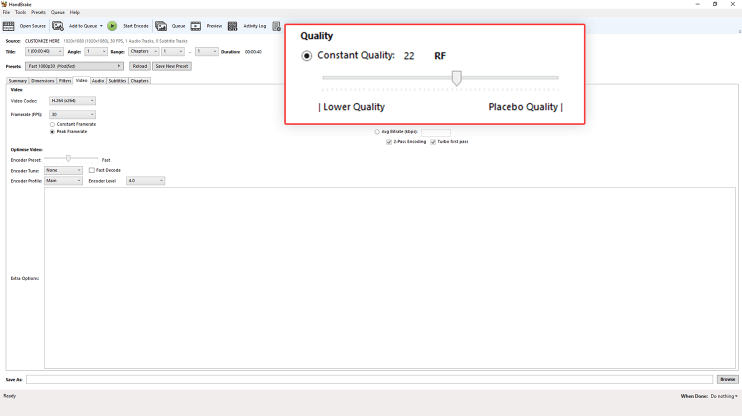
Through this slider, you can further fine-tune the balance between your video’s size and quality to your exact needs, and that’s all it takes!
You just need to add the directory folder at the very bottom, to specify where you want to save your video and then press the “Start Encode” button at the top.
How to optimize your website for video:
3. Choose fast hosting
Your hosting plan matters a great deal when it comes to self-hosting video files on your WordPress website. In general, unlike pages, videos take up quite a lot of space. Hosting your videos on other servers or even featured video platforms and then embedding them on your website will always do the trick. Otherwise, there are some things that you need to look out for when it comes to your hosting plan:
- Storage: First and foremost, videos take up space and depending on the length and quality of your video, you might run out of storage much quicker than you might think. That’s why when choosing a hosting service for your website, make sure your hosting plan provides you with ample solid-state-drive (SSD) storage so you can upload so you can host your videos without any problems. Note: make sure that when approaching the storage limit, the website does not become slower. If it is so, it means that there is a hard storage limit. Reconsider your hosting in such a case.
- Traffic: In accordance with the statistics above, hosting videos on your site is a surefire way of driving traffic to your website. It goes without saying that hosting videos on your own site is a massive resource hog, and as such you need your host to provide you with the necessary computational capabilities that would host your videos without any problems. Which is why it’s very important that your host provides you with some sort of scalability, such as, elastic scaling so that even in peak traffic you can rest assured that your site won’t go down.
You can get all of these features with 10Web’s AI-Powered Platform. Depending on your subscription plan, you’ll have all the necessary SSD storage space, scalability, data centers across the world, and much more. And most importantly, 10Web improves your website’s speed automatically, meaning you never have to settle.
4. Provide different formats for multiple devices
In the formatting section, we mentioned how important it is to encode your video in a format supported by as many devices and browsers as possible, such as MPEG-4.
Sometimes you might like to upload your videos in multiple formats and display them in a specific format that best suits the visiting user’s device or browser.
For example, in the case of a single format video, let’s say you’ve added your MPEG-4 video named samplevideo to your media library. Then, on whichever page or post you’d like to add the video, you’d add the WP shortcode for video (if for some reason you cannot add a shortcode, you need to add a plain <video> tag), switching samplevideo with the name of source video that is in your library:
.
Now to add other video formats so that they play on their respective compatible devices, you need to insert the following shortcode after adding the other video files to your media library:
.
”
You only need to specify the correct file format of the videos you’ve uploaded in your media library, such as, .MP4, .WEBM, .WMV, .FLV, .OGV, .M4v
The best part is that you don’t need to define all the specific devices that correspond to each format, WordPress automatically detects whichever video format the user’s device supports and loads the corresponding video on the device.
5. Specify video parameters
Specifying the size of the video is necessary as it allows the browser to understand what the video size will be when it is loaded. The browser then can correctly reserve that space on the webpage. This will help to avoid CLS issues (Cumulative Layout Shift). Simply add your desired width and height for the displayed video before or after src to the samplevideo shortcode mentioned earlier. For example:
.
”
This way your site will allocate the necessary space beforehand, instead of wasting precious load speed time and changing page appearance as the video player resizes itself to fit the user’s device.
6. Make video resolution scalable
One final thing that you can do in order to have your video be as responsive and catering to all the different needs of your users is to provide the functionality to have your videos scale their resolution based on your user’s device.
This step takes a little bit more effort than our previous steps, but if you’re willing to have that functionality then it’s all worth it.
First, you need to add your source video to your media library in multiple resolutions. Let’s name the smaller sized video samplevideolow, then simply add this code to your HTML:
<video controls>
   <source src="samplevideolow.mp4" type="video/mp4" media="all and (max-width: 480px)">
   <source src="samplevideolow.webm" type="video/webm" media="all and (max-width: 480px)">
   <source src="samplevideo.mp4" type="video/mp4">
   <source src="samplevideo.webm" type="video/webm">
</video>
This way, if a client is using a device with a smaller screen when visiting your site, your site will play the smaller video providing the best possible experience that optimizes based on their device. This is especially useful if you’re looking to optimize just a step further for mobile visitors. Another tip is that video resolution can be adjusted not only according to the device size, but also according to the speed of the connection. This is a part of the adaptive bitrate concept.
7. Make bitrate adaptive
Did you notice that Youtube loads the right copy of the video with the correct size/bitrate by taking into account the visitor’s network bandwidth? A similar thing can be done with any video on any website. Visitors should not wait because a higher quality copy of video is being loaded on a slow network, and then switch the quality to be able to watch the video. You can show a copy with lower bitrate to visitors who have a slow network. Lower bitrate can mean both lower quality or lower resolution. But how can the network bandwidth of a visitor be detected? One possible and simple approach is to detect it experimentally via some lightweight Javascript code that measures how fast certain resources are downloaded (e.g. images). Then the source of the video can be changed accordingly.
8. Set up autoplay, lazy loading and preloading correctly
Autoplaying videos when not necessary can consume bandwidth and slow down the entire page. Set the autoplay parameter of videos only when it should be played. Even so, often sound should be muted or autoplaying videos should not have sound at all.
Preloading videos can also positively impact your website speed while also ensuring a smooth user experience. This technique is particularly important for mouseover videos or slide show videos. It eliminates video load delay or pause. One can customize preloading so that only video metadata is retrieved and not its frames. It specifically improves LCP and FCP metrics.
When a visitor enters your webpage, your visitor’s browser begins to load all videos, including those not necessary at the moment. Lazy loading is a set of techniques that delay the immediate loading of all videos or iframes on a page until the visitor scrolls down or interacts with them. The technique decreases the number of requests on load and considerably speeds up load time. Lazy loading significantly optimizes website speed and improves all Core Web Vitals, especially FCP.
9. Use a content delivery network (CDN):
Adding a CDN to your site will not only increase the overall performance of your site but the responsiveness and seamlessness of your streamed videos as well, no matter where your users visit from. CDN will allow visitors to get a copy of the video from a server that is geographically closest to the visitor, ensuring it takes less time to download them.
10Web Booster with Cloudflare CDN cooperation offers caching and serving of video content to website visitors based on geo-proximity. This way, a CDN decreases the distance and the time videos travel. With 10Web Booster, videos will be served from Cloudflare’s “reserved-for-enterprise” network, the leading Cloudflare network with unparalleled speed and power compared to its other networks. Video optimization is done automatically through the 10Web Booster speed optimization solution.
10Web Cloudflare has the largest global network, hosting servers in over 275 cities in over 100 countries. The network offers 95% of worldwide visitors access to website content within less than 100ms. An unbelievably fast speed and load time for any website.
10. Use a customizable video hosting.
Fast website hosting is very important when the videos are hosted along with the website. However sometimes websites may contain many videos, with advanced need to manage them. In such cases it makes sense to have a special hosting for such videos. Not Youtube, which does not allow branded display of videos (Youtube logo cannot be removed from videos), but special services like Wistia. Such services provide advanced management, branding and customization options for videos and even allow advanced analytics for them. Videos from such platforms can be natively embedded in websites.
Fast website hosting is very important, especially when you have videos on your site. However, sometimes websites may have a lot of videos that will require an advanced set of tools specifically for video management. In such cases, it is optimal to have separate hosting for your videos. Unlike Youtube, services like Wista provide advanced management, branding, video customization, and advanced analytics of your videos. Also, videos from such platforms can be natively embedded into your websites.
What is video optimization in SEO?
Optimizing videos for SEO means increasing the frequency with which people stumble upon your website on search engines. However, it also means making sure that when they do see your video, they’re on their way to a potential conversion. Here’s what you can do to SEO-optimize your videos:
- Unless your website has a lot of videos, upload them to your own website. YouTube and Vimeo are great for putting your brand out there, but you don’t want people to Google something, go to YouTube, notice another blogger talking about the topic, and leave to browse YouTube instead. You want to send people to your website through the video. Luckily, with 10Web hosting, uploading videos won’t be an issue.
- Keep the title of the video short and to-the-point. What is the user getting out of it? Make the search to find your content as simple and straightforward as possible.
- Do some keyword research and elaborate on the topic of the video in the description using those same keywords. Don’t overdo it, but make sure people who are looking for the video can find the video.
- Never forget about metadata or search engines will ignore you entirely!
- Use an attractive and unique thumbnail.
- Perform these steps of SEO-optimization before you compress the video to save the metadata.
And there you have it! We hope this article gives you the knowledge, tools, and confidence to add video elements to your website if you so choose. Including videos on a fully optimized website can lead to tangible results for your business such as brand recognition, decreased bounce rates, and conversions. The extra effort is well worth results like those!
Want to speed up your website instantly?
Get 90+ PageSpeed Score automatically with 10Web Booster ⚡
On any hosting!
Want to speed up your website instantly?
Speed up your website automatically
Get 90+ PageSpeed Score automatically with 10Web Booster. On any hosting!


Thanks for the insights on optimizing videos for WordPress! Your tips will undoubtedly enhance our site’s performance and user experience. Excited to implement these strategies.
From what I understand from MDN about tag, The media attributes are not allowed when the parent element is video. Could you confirm please? https://developer.mozilla.org/en-US/docs/Web/HTML/Element/source#attributes
Yes, you are right. Media attribute does not work with video sources. One needs to use Javascript to change sources for different resolutions.
Super helpful – thanks for the tips!
Awesome article!! keep sharing.