In This Article
Ready for a harsh truth? No matter how great the content of your website is, or how unique and amazing what you’re selling on your website is, it doesn’t mean much if your website is not performing on par with Google’s standards.
To understand the importance of WordPress website performance, just consider the fact that Google continues to introduce metrics to determine the status of your website, such as the more recent Core Web Vitals. When it comes to website performance, Google is not playing around!
As a result, website owners (not just developers) are paying more attention to how their websites are viewed by visitors and algorithms, and performing necessary audits to learn more and improve in any lacking areas. And this brings us to the topic of today’s article: Google Lighthouse.
Whether or not you’ve used this handy tool before, this article will cover everything you need to know about it, along with some useful tips and tricks. Without further ado, let’s get right into it!
What is Google Lighthouse?
So, what is Lighthouse? Let’s start with a definition straight from Google:
Lighthouse is an open-source, automated tool for improving the performance, quality, and correctness of your web apps.
Any web page—public or requiring authentication, can be run on and audited on Google Lighthouse. The audit will include performance, accessibility, search engine optimization (SEO), and more of the given web pages.
And, remember the Core Web Vitals metrics that we mentioned earlier? In 2021, Lighthouse officially began offering insights into how to optimize the Core Web Vitals metrics, as “these metrics reflect loading, layout stability, and interaction readiness.”
Now that we understand what Google Lighthouse is, let’s look into how it works.
How Lighthouse works
There are a few different options on running Google Lighthouse, and we’ll cover them in detail below. Once you submit the URL of the web page you wish to audit into Lighthouse, it will begin to run a barrage of tests against the page, to formulate a report that details the page’s performance. Once the report is complete, a website owner or developer can use the failing tests as indicators for what can be done to improve the WordPress web page’s performance.
Google Lighthouse audits
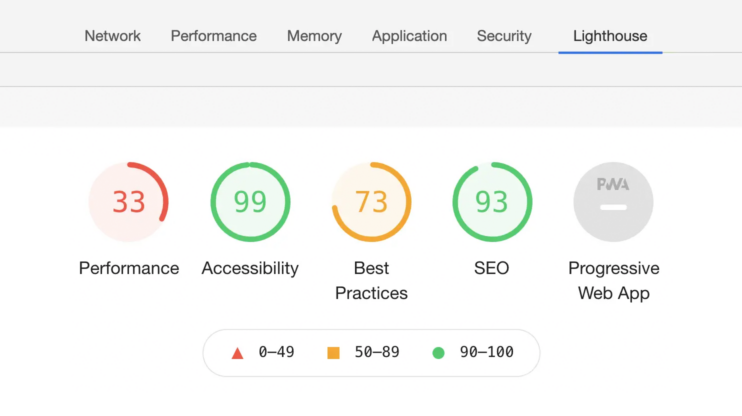
Google Lighthouse categorizes its audit into five different categories for the report:
- Performance
- Best Practices
- Accessibility
- SEO
- Progressive Web Apps
The choice for which (or all) categories to focus on is in the hands of the website owner or developer, depending on their goals. The scores given are numbers from 1 to 100, and the websites are tested against a simulated 3G connection. Let’s review what each of these five categories entails.
Keep in mind:
Performance
For the Performance category, Lighthouse is specifically looking at how fast a website (or app) loads. The importance here is on how quickly a user has access to the content of the given web page. To analyze this broad category, Lighthouse focuses on the following six metrics, including Core Web Vitals:
- First Contentful Paint: This metric indicates the time it takes before the first text or media becomes visible to users.
- First Meaningful Paint: This metric indicates the time it takes for the main content of a page becomes visible to users.
- Speed Index: The speed index provides a uniform metric to express how quickly the content of a page is loaded.
- Time to Interactive: This metric indicates the time it takes for a user to be able to fully interact with the page and its content.
- First CPU Idle: The value in this category measures when a page is minimally interactive, or when the window’s main thread activity is low enough to handle a user’s input.
- Estimated Input Latency: This metric is an estimate of how long your app takes to respond to user input during the busiest 5-second window of page load.
Lighthouse’s report on performance will include a section on ‘Opportunities’. Here suggestions will be offered on how to speed up a page’s load. What you can expect to find are recommendations such as cleaning up JavaScript, compressing images, deferring unused CSS, and so on.
Best Practices
Lighthouse has around 16 Best Practices it audits your website for, focused mostly on the security and safety of the website. Some examples here include analyzing whether HTTPS or HTTP/2 are used, if resources are coming from secure sources, whether there are incrawable links, and assessments of the vulnerability of JavaScript libraries. Again, Lighthouse will offer recommendations in this category as well.
Accessibility
Beyond performance and security, Lighthouse also looks at the accessibility factor of your website for those with impairments. Here important elements include whether buttons or links are appropriately labeled or described, if images have alt-attributes (for visually impaired visitors using assistive technology like a screen reader), and if there is enough color contrast to improve the legibility of the content.
SEO
Lighthouse has 13 different audits in the SEO category to determine if a page is optimized for search engine results ranking. Some of the factors looked at in this category include mobile-friendliness, tags, meta descriptions, and how well a web page can be crawled by search engines, ranking in search results.
Progressive Web Apps
The final category analyzes Progressive Web Apps (PWAs), checking them against a set of criteria. Here response code, working offline with internet access, fast loading on 3G, and more are looked at and evaluated.
What Is the Difference Between Lighthouse and PageSpeed Insights?
You may find yourself wondering, “what about PageSpeed Insights?” PageSpeed Insights is similar to Lighthouse in that it is also a tool that evaluates a web page’s performance. It also includes recommendations for improvements. There are however notable differences between the two.
One major difference centers around the data used by each tool. Lighthouse uses lab data to measure a website’s performance, whereas PageSpeed Insights uses both lab data and real-world data (from the Chrome User Experience report). Another major difference is that, as the name suggests, PageSpeed Insights centers around the performance/speed of a website. Lighthouse, as you can see by the categories listed above, goes beyond performance and incorporates other factors, such as accessibility, SEO, security, and more.
How to use Google Lighthouse to Improve the Score For WordPress Site
Now that we’ve outlined what Google Lighthouse is and what it brings to the table, let’s revisit the options on how to run the tests. The good thing is that there are more than a few ways to run the Lighthouse tests, so you’ll definitely find one that works for you!
Chrome DevTools
Once you’ve downloaded Google Chrome, the steps to check your webpage are as follows:
- Open a new browser tab in Chrome and open the page you would like to have audited
- Right-click on the page and choose the ‘Inspect’ option
- DevTools panel will open up and from the toolbar, select ‘Lighthouse’
- Choose the specific categories you wish to check (or all) then click on ‘Generate report’
- Once the audit is complete, you will see the results on your screen
Chrome extension
As is the case with Chrome DevTools, for this option you will need to download Google Chrome. After that, follow these steps:
- Visit the Chrome Web Store and add the Lighthouse extension to Chrome
- Once the extension has been installed, restart your browser to find the Lighthouse icon on the right of your address bar
- Open up the website you wish to audit, click the Lighthouse icon, and choose the ‘Generate report’ option, which will redirect you to the report page after the audit is complete
Web.dev
Another option is using web.dev. For this, follow these steps:
- Go to the web.dev page and enter the website you wish to audit and click ‘Run Audit’
- Once the audit is complete, the report will be presented
Node
Finally, you can use Node for Lighthouse reports. Once you install the Long Term Support option for Node, follow these steps:
- Run the following command line to install Lighthouse:
npm install -g lighthouse
# or use yarn:
# yarn global add lighthouse
- Then use the following command (replacing with the webpage you wish to audit) to get your Lighthouse report:
lighthouse <url>
Tips on making Lighthouse work for your WordPress site
While Lighthouse is a fantastic tool that can offer you great insight on the ‘health’ of your website, it’s only as effective as how you use it. Below are some tips to make this online tool get your website up and running and Google-approved.
Keep track of scores and improvements
This is helpful especially if you have a team of people working on your website. Keep track of your Lighthouse reports and what generally needs improvement in the different categories. Note how changes improve the score in order to keep track so you do not fall into the same habits repeatedly and risk lowering your score.
Test regularly
You may find yourself surprised at some of the scores your website receives based on the data analyzed by Google. Remember that when you or your team makes changes to your site – something even seemingly small or minor could have a real impact on your website’s score. Make sure to keep testing your website, especially after changes are made to it to keep your scores consistently high.
Follow the optional tips recommended
Once your report is complete, it will include recommendations on how to improve your score with tangible actions and changes. There will also be optional tips in the report, some of which don’t affect the score necessarily as they cannot be tested, so are easier to ignore. Carefully consider these optional tips as some of them can truly affect user experience in a way that lab data cannot show or is limited in doing so.
Use it in conjunction with other tools
Google Lighthouse truly looks at your website from a variety of different angles, providing an in-depth report that shares a lot of information and insight. However, in the end it’s just one of many tools you can use to help optimize your website. Earlier when we outlined the differences between Lighthouse and PageSpeed Insights, we did note that in the latter case, both lab data and real-world data are used, as opposed to just lab data. It’s still a good and useful idea to use other tools like PageSpeed Insights to get a nuanced view of your website from a user’s—and Google’s—perspective.
Optimize WordPress performance based on Lighthouse report with 10Web Booster
We can see the importance of a website’s performance and optimization when looking at what Google Lighthouse specifically pays attention to. While Lighthouse provides a score, diagnosis, and suggestions for your website, it can still be quite the struggle to maintain the high speed associated with an optimized website, and passing the Core Web Vitals assessment.
You can remove the guesswork as well as manual labor by opting for a powerful 10Web Booster that takes care of these important aspects for you, automatically. Through 10Web Booster, both your website’s frontend and backend are automatically optimized, meaning:
- 90+ PageSpeed score
- Improved Core Web Vitals and all other metrics
- Higher search engine rankings
- Up to 7% boost in conversions
- Up to 40% boost in visitor engagement
- Up to 53% mobile traffic engagement boost
- TTFB faster than 200ms
- Server performance acceleration
- WordPress performance booster
With results like these, Google Lighthouse (or PageSpeed Insights) won’t know what hit it!
10Web Booster offers two options: Free and Premium. In the Free version, the plugin automatically optimizes the front end of any WordPress site for a homepage and 5 additional pages, bumping your site to the 1% of the world’s fastest-loading websites that pass Core Web Vitals assessments.
With 10Web Boster Pro, the Premium plan, you will obtain excellent front-end optimization and Cloudflare CDN for websites hosted on any hosting. Through 10Web Booster Pro and Cloudflare partnership, you will gain access to all the CDN features automatically, with a click of a button, through the 10Web interface.
Cloudflare CDN provides a game-changing solution to speed optimization. Worldwide visitors will be able to access your website within less than 100ms. Through the CDN you will receive reduced latency, and speedy load times for static and dynamic content and will be able to reduce bandwidth costs by as much as up to 60%.
There are numerous advantages to Cloudflare CDN integrated within 10WebBooster, which can provide ultimate speed and website performance, they are:
- high-speed static and dynamic content delivery.
- Full page caching for static pages, served to visitors from the closest possible server, thus enhancing server response time and page loading.
- Solid security and protection from malicious attacks for your website, application, and network.
- Web application Firewall that vigilantly monitors, filters, and protects website data.
- Automated optimization of images taking into consideration device and network connection types.
These are just a few of the many CDN benefits in addition to 10Web Booster’s excellent features, which will provide:
- Page and file caching to further reduce load time.
- CSS, HTML, and JS minification and compression to reduce network traffic and boost file execution time, also expediting the general website frontend speed.
- Image, iframe, and video lazy loading to cut requests on load and enhance page speed.
- Image optimization and compression, delivered through Cloudflare CDN, to provide the fastest possible delivery time.
- Collection of all website CSS rules before generating critical CSS for the proper and safe rendering of the web page on load.
- Identification and separation of critical and non-critical Javascript files and the automatic delay of non-essential scripts until visitor interaction; all without breaking your web page.
- Font swap through the “font-display: swap” technique which first loads a default font, and once the download of the custom font is complete, swaps the default font with your custom font instantaneously, therefore improving page speed and eliminating the occurrence of Flash of Unstyled Text (FOUT) or Flash of Invisible Text (FOIT) issues.
with Cloudflare CDN today and see how your Lighthouse scores will not only improve but will be consistent as well. Your website speed and performance will be unmatched with 10Web.
Want to speed up your website instantly?
Get 90+ PageSpeed Score automatically with 10Web Booster ⚡
On any hosting!
And don’t just take our word for it, here’s what tech influencer Darrel Wilson had to say once he opted for the 10Web Booster:
Want to speed up your website instantly?
Speed up your website automatically
Get 90+ PageSpeed Score automatically with 10Web Booster. On any hosting!


Speed up your website instantly
Speed up your website instantly
-
 Automatically get 90+ PageSpeed score
 -
Experience full website caching
-
Pass Core Web Vitals with ease
 Automatically get 90+ PageSpeed score