
A blazing fast loading WordPress website with aesthetically pleasing fonts and an excellent user interface that makes your site visitors fall in love at first sight with your website. It sounds like a dream website, right? But dreams come true, and we must take the necessary steps to make our dream website. Font loading optimization is an important step that is often neglected but helps boost site performance (Core Web Vitals (CWV), Page Speed, etc.). Fonts are a fantastic way to grab the visitor’s attention, but only if they load fast enough and don’t cause any loading delays to your webpage. In this article, we will dive deep into a bunch of related font loading topics, understand why it is so important to optimize fonts, and the various strategies we can use to implement font loading optimization on our WordPress websites.
Table of Contents
We are all fascinated by seeing more readable fonts with incredible styles and appropriate sizes that give a beautiful look and feel. But do you know that fonts are often heavy files and can take a decent amount of time to load? What does that show us? That means that fonts can affect a site’s loading time and performance. Unfortunately, in the world of focusing on only Image and JavaScript optimization techniques for improving CWV and PageSpeed scores, we often neglect to focus on font loading optimization because those techniques are in the limelight and font loading optimization techniques aren’t.
We need a change in approach here as font loading optimization techniques have also turned out to be significant in improving CWV of a WordPress website.
Want to speed up your website instantly?
Get 90+ PageSpeed Score automatically with 10Web Booster ⚡
On any hosting!
Font Loading in WordPress: What You Should Know
Before diving deep into fonts, specifically Web fonts, let’s try to understand what fonts are in the most straightforward possible terms. We don’t need a highly complex definition here, as a font is simply the graphical representation of how a piece of text looks visually. Of course, the visual representation is not just for a visually cool look and feel but also has many user experience-related elements bonded with it. A readable font has proper styling, size, weight, and color, which makes life a lot easier for the end user or your site customer, so fonts go a long way in providing benefits in multiple ways.
A font is simply the graphical representation of how a piece of text looks visually.
Types of fonts
We can generally classify fonts into three major types, i.e., system fonts, device fonts, and external font files. Let’s dive a bit deep into each one of these in detail.
System fonts
A system font is also known as a web-safe font because it is assumed that most devices have this font built-in by default, so there is no need to download it. The list of system fonts is quite limited. Some common examples of system fonts include Arial, Times New Roman, Georgia, Verdana, Courier New, etc. Alternatively, if you use MS Word or any other system software, you can view its font family list to get a more detailed list of what fonts are usually considered system fonts.

Referencing to the system font is super easy. All you need to do is to set the font family CSS font property like this, font-family: system-ui
Device fonts
These are operating-system-supplied fonts generally used for the different visual text graphics we see on 4 major OS families: Windows, MacOS, Android, and iOS. As far as the desktop is concerned, there are generally two types of device fonts, MacOS and Microsoft Windows. Let’s briefly explore each of them without making it tedious or complex.
A. macOS
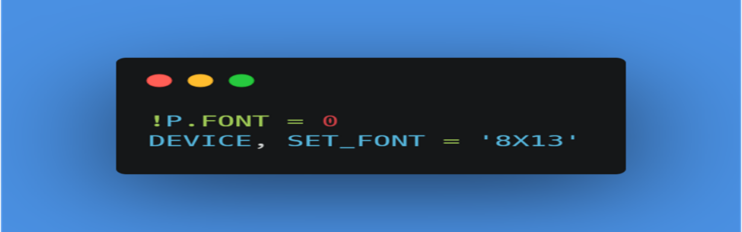
They are also referred to as X Windows fonts. Generally, windows provide a list of available system fonts in a font files directory. All of your system applications can use these fonts. The size of the vector-drawn text on your system is directly affected by the font size you select. You must be thinking about how to access these fonts, right? You can access the list of all the available macOS fonts using the xlsfonts command.
Let’s suppose I view the available list, but if I want to set a specific font, for example, 8X13, a type of macOS font, I will use the two-liner commands.
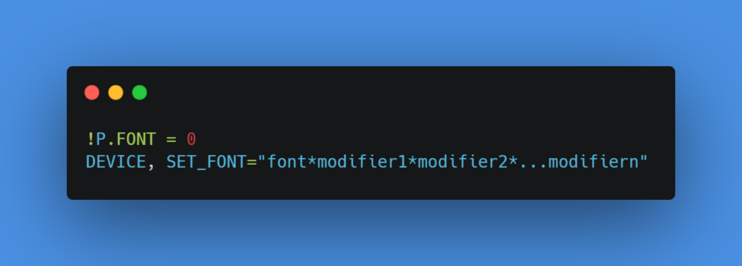
B. Microsoft Windows
They are simply device fonts available to your system, and you can view them in the fonts control panel. They can also be set in the same way as UNIX or macOS fonts using the same SET_FONT property. Let’s see an example of how we can set a Windows device font with the help of an example command snippet below.
External font files
These are neither system nor device fonts, and you need a third-party source to download and use them. Usually, these are referred to as CSS web fonts. You need these types of fonts in cases where the existing system fonts are not good enough for you, and you need something more visually appealing, which is better than the current system or device fonts.
Let’s dive into web fonts by first briefly looking at what they are and how we can host and deliver them.
Since we don’t know the variety of visitors’ devices and should not assume that a certain font is installed there or not. So best option is to use system font, second option is to provide the font (external).
What Are Web Fonts?
As the name implies, web fonts are designed or made for the web or website. They run on a web server, meaning that the browser downloads them while a webpage is being loaded, and after loading, they are applied to the relevant text.
Web fonts generally have four different types of files:
| TrueType Font (TTF) | It is the most common font format that Apple and Microsoft developed in the late `80s. |
| Web Open Font Format (WOFF) | This font format was generated in 2009 as an enhanced TrueType version with compression and additional metadata. |
| Web Open Font Format (WOFF2) | It offers even better compression than WOFF. |
| Embedded Open Type (EOT) | Microsoft designed it as a compact form of OpenType fonts to be used as embedded fonts on web pages. |
You must be wondering why we have these four types and not just one. Well, all of these are designed for different browsers, so you will need all four of these on your website to ensure that all of your fonts load properly on all web browsers, especially the old ones.
The interesting research here is that almost 97% of browsers support the WOFF2 format. That means that unless you need to support old browsers, you should choose WOFF2 as the preferred font format for your web fonts due to its amazing browser support. In addition, WOFF2 compresses almost 30% better than WOFF, making it very lightweight, so there is relatively less data to download or load, which results in an excellent performance.
Web fonts are not to be confused with regular desktop fonts, which you might find on MS Word, PowerPoint, or any other desktop software, since they are designed only for the web screen and are not used for printing.
There are two major types of issues happening when loading fonts:
Flash of Invisible Text (FOIT)
This is a concept where a web page loads without its type appearing, which means it loads even before the fonts are rendered to their respective typeface(s). This significant delay is caused because the web fonts are being downloaded to the user’s device.
If you’re starting to assume that FOIT should be avoided because of the delays it causes and could lead to a poor user experience, then you got it absolutely right. No one wants to see a blank screen loaded, right? Unfortunately, in the case of FOIT, since the fonts take some time to download and load on the user’s device, they cause all the written content on a loaded webpage to be blocked until the fonts are loaded completely.
Now that we have discussed how FOIT can act as a significant blocker and lead to a poor end-user experience, you may also be wondering about a possible way to eliminate the issues caused by this method, right? Well, there is a solution for it; the solution is a CSS font property called font display.
What the font display property does is that it defines how a font face (a CSS rule through which custom fonts can be loaded on a webpage) is displayed or loaded by the browser, depending on whether the font is downloaded and ready to use or not yet. It is to be added within the global font-face rules. Essentially, how it solves the issue of FOIT is that during the time the browser is downloading the web fonts, it displays the web content initially on the first render using the system fonts. Once the desired web fonts are downloaded and ready to be used, they are swapped and used accordingly.
The following code snippet gives you a small code demonstration of how to do so.
Flash of Unstyled Text (FOUT)
This font loading process is smarter and does the font loading trick quite efficiently. Want to know its secret recipe? Well, it’s nothing unknown or out of the world. When a website is loaded, the initially rendered fonts are slightly different and update within a flash, and you can see the changed fonts loaded. In this way, there are no blockers on the content loading of a webpage, and the end user doesn’t get bothered much since there is no lag or delay in the loading process except for a slight glitch or flash, which is still bearable.
The magic trick that FOUT uses behind the scenes is nothing but our all-time favorite CSS property font-display. It sets font-display to swap, essentially telling the browser to display the fallback font until our custom font is downloaded. Once our font is downloaded and ready to be displayed, it’s swapped and then displayed in a flash.
This practice is becoming more common and preferred since it is considered better for the user experience than FOIT. We can set the CSS display property to swap at several useful instances. Some of them might include the following:
- When trying to optimize google fonts
- When either the minify CSS or combine CSS is active
- When Load CSS Asynchronously property is applied
- When Remove Unused CSS is enabled
But the real question that arises into our mind is that even though FOUT doesn’t cause any content loading delays and loads the webpage in a timely fashion, is there any possible way to mitigate or reduce the difference between the initially loaded font and the desired one? Well, if you think smartly, then there is a straightforward way of doing so. You can try using a default fallback font that is very much similar to the actual desired font. That will try to eliminate as many styling differences as possible between the two loaded fonts. The end user won’t be able to feel much difference and might consider it normal font loading.
Web fonts are considered a render-blocking resource because they can block a webpage’s rendering, making working on their loading optimization a serious concern.
Want to speed up your website instantly?
Get 90+ PageSpeed Score automatically with 10Web Booster ⚡
On any hosting!
Fonts for Icon Packs
As the name implies, fonts for icon packs are simply web fonts explicitly designed for icons. They contain icon glyphs (a single representation of a character). Some common examples include Material Icons, Material Symbols, and Font Awesome.
You might be wondering why we need fonts to render icons. So why not just render icons without fonts, right? Well, that’s because icon fonts bring in a lot of benefits. Some of them have been listed below.
- Vector-based shapes make them indefinitely scalable, which means they provide you with screen independence and adjust themselves accordingly and quite smartly, unlike typical images.
- Everything is in a single file which is relatively lightweight compared to a collection of images.
- They offer brilliant browser support and can be positioned and colored simply via normal CSS properties. In short, they work very smoothly on the web.
- They offer incredible customizability when using variable icon fonts. You can customize them as close as any associated type.
Font Awesome is one of the most popular fonts (As of 2020, it was used by 38% of all sites, which makes it the second most popular font toolkit after Google fonts) and icon toolkit that provides a wide variety of different scalable vector icons that can easily be customized according to the style of your choices. It is built upon the foundation of CSS and LESS (a CSS preprocessor that enables customizable, manageable, and reusable style sheets for your website).
Hosting and Delivering Web Fonts
Now that we know what web fonts are, you might also be wondering about the method of downloading or importing web fonts into your website, right? This is exactly where web font hosting and delivery come into action.
Fonts can be classified into two major supersets: the fonts already present by default and the custom ones. You don’t need to install or download the default ones, as they are already available. But in case you want to use a custom font, then you need to follow the steps mentioned below.
1. Search and Download/Reference Font
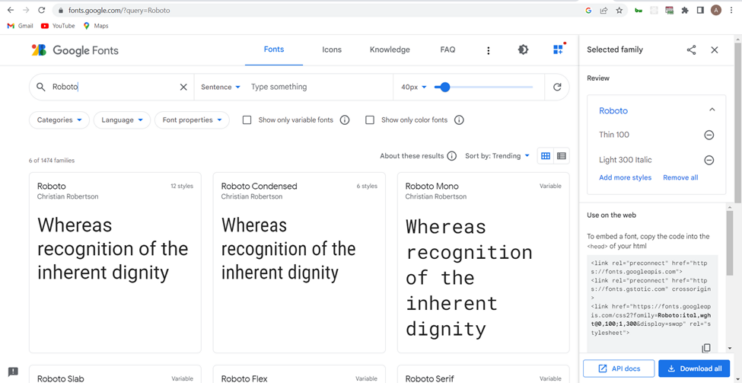
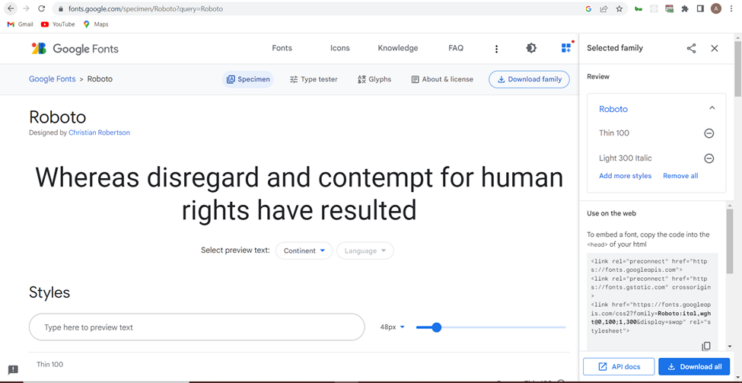
We’ll take the example of a website for which we need some custom font that’s not already available. Consider this process as simple as you do in your regular e-commerce shopping. We will first go to some popular font collection library such as Google Fonts. Then we will browse through the fonts (just in case we don’t have a predefined selection), select the font of our choice, and select the styles we want for that font, for example, Roboto Thin 100 and Roboto Light 300 Italic.
Now, we will have two options to use that font, which are mentioned below.
- Simply download its font family (this is the typical method by which you will download the font family file)
- Reference to the selected hosted font
Google Fonts or any other preferred online hosted fonts library also allows you to reference its available fonts and use them without manually downloading them. All you need to do is to select a font, select the font styles which you would like to add, and you will see some HTML script tags auto-generated by Google Fonts that you can add to the <head> and <styles> tags of your website HTML file, let’s say your index.html file.
The following images demonstrate the complete end-to-end process for this step:
- Open fonts library (Google Fonts)

- Search for font
- Select and View Selected Font Page
- Add/Remove Styles from that Font

- Download Font Family containing all selected font styles by clicking on the Download all button (Optional / Custom Method of downloading and using fonts)
- Use the provided HTML tags to link Google Fonts to your HTML file and import their styles.


2. Add CSS Font Face in CSS files to use the downloaded or referenced font
Now that we have our desired font either downloaded or referenced from a hosted fonts library, the next stage is to use that font. To do so, we use the Font Face rule of CSS, which we discussed briefly while discussing FOIT and FOUT. So, let’s see briefly how we can use the fonts in our HTML files both in the case of downloaded and referenced fonts.
A. Downloaded fonts
- Make a fonts folder inside your project, maybe inside the assets folder, so that you can place all downloaded fonts in a single defined place. This step’s purpose is to give a neater and more organized way of putting your downloaded fonts in a single place.
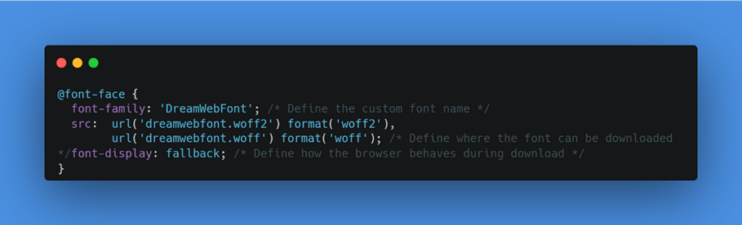
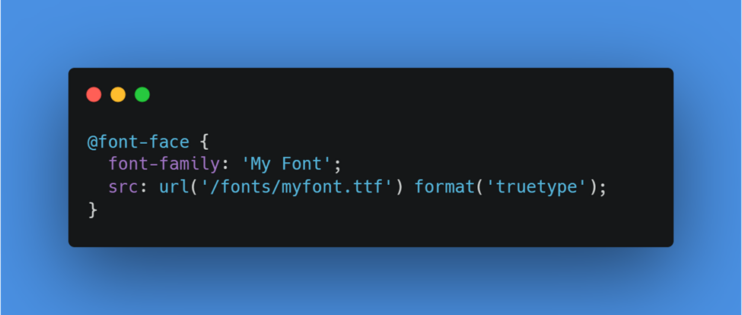
- In your CSS file, define a Font Face rule, add the downloaded font name to the font-family property, and define the source of the added font-family via the src property. The src property takes in two parameters; usually, one is the URL, which is the directory path of the selected font-family, and the second is the fonts file type defined by the type property. Let’s see a code snippet example of how to do so.

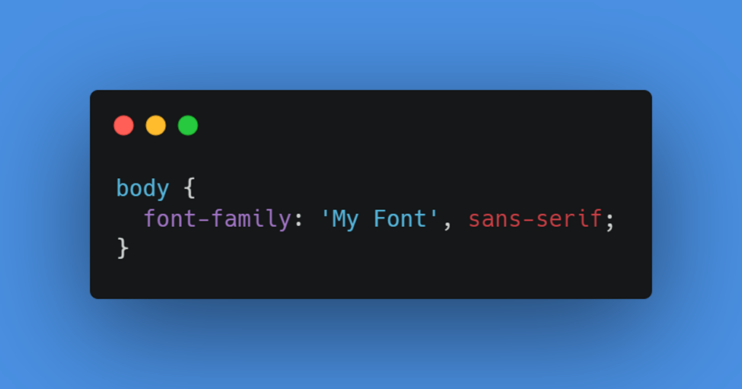
- Use the font in your HTML by specifying the CSS font-family property in the CSS of your desired HTML tags. Let’s take the example of the body tag; I would apply the downloaded font to the body tag. The following CSS file code snippet demonstrates how to do so.

B. Referenced Fonts
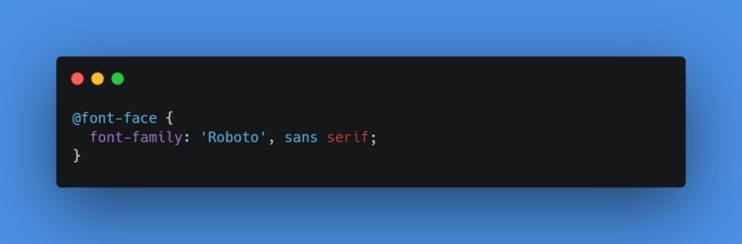
In your CSS file, define the Font Face rule, and add the font-family property and value. Note: Adding the src property is not required in case you have already referenced the font in the head tag of your HTML. The following code snippets provide a code-level demo of how to do so with and without the src property.
With src (In case you haven’t referenced the fonts in the head tag of your HTML via the link tag)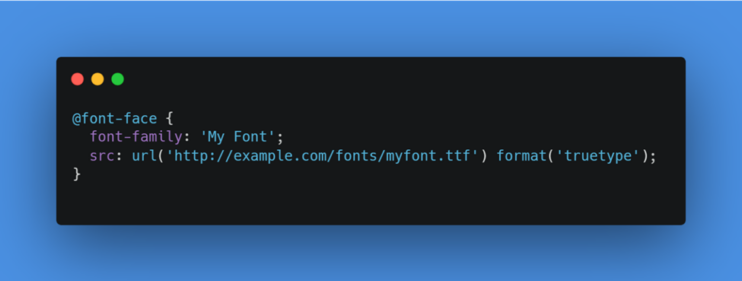
Without src (In case if you have referenced the fonts in the head tag if your HTML via the link tag)
Hosting downloaded fonts to your own website server
We learned how to use Google fonts by referencing their hosted fonts collection. But what if I told you that you shift all your manually downloaded fonts to your website server? Isn’t that something cool? To do so, you need to follow the following additional steps after downloading your desired font(s).
- Create a WebFont Kit
A WebFont Kit contains all your uploaded licensed web fonts in a single repository; you can consider it simply as a web font kit. This kit typically includes multiple file extensions such as (.eot), (.woff), (.woff2), (.ttf), and (.svg) so that complete browser support is achieved for the fonts. You can create this kit by simply uploading your .ttf or .otf font file(s) to the Webfont Generator and then downloading it.
- Upload the font files to your hosted website
Now you will upload all the font files present inside your Web Font Kit to your hosted website with the help of your FTP or file manager. The Web Font Kit also includes your CSS file, which shall be updated and uploaded again in Step 3.
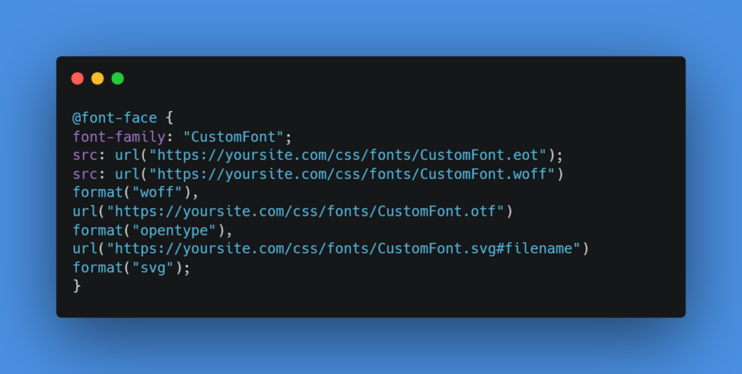
- Update and upload the CSS file
This step is almost the same font face rule declaration step that we’ve discussed before for the CSS of referenced fonts. The only difference is that it will now refer to our website server-hosted font URL. Let’s see this with the help of a code snippet below.
- Simply add the font in the CSS font-family property for any HTML tag(s)
This step is the same exact step that we’ve covered for downloaded and referenced fonts, so you can read those sections for reference.
How Font Loading Time Impacts Core Web Vitals
As we discussed at the start of this article, font loading optimization should be addressed while performing performance optimizations for a website. This section will see how font loading time can impact various Core Web Vitals metrics.
We will take into account three main metrics of Core Web Vitals: Largest Contentful Pain (LCP), First Input Delay (FID), and Cumulative Layout Shift (CLS) to see the impact of font loading time.
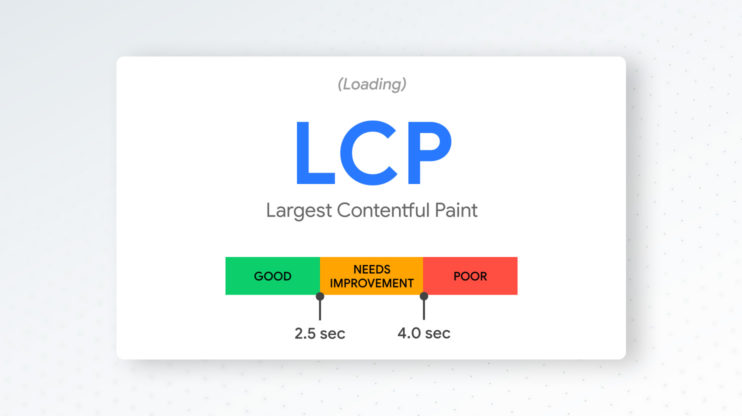
Largest Contentful Pain (LCP)
Let’s assume that you have a website with many custom fonts that take a significant amount of time to load; it can negatively impact the LCP metric of that website. LCP, by definition, refers to the amount of time it takes for the largest content element to load on a webpage. This largest content element may be an image or a video, but it also may be a text heading or paragraph. Therefore, if the fonts take a lot of time to load and the largest contentful pain is textual, there will be a significant delay in the rendering of the page, which, as a result, will increase LCP.
First Input Delay (FID)
This metric measures the time of first interaction of the user with the webpage, such as clicking a button or filling in an input field. If the fonts load super slowly and are render blocking (not async or delayed), it will increase the FID since it will delay the time it takes for the page to become interactive.

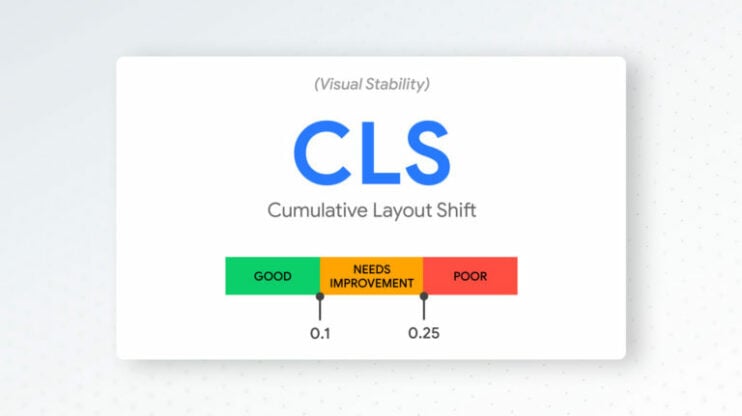
Cumulative Layout Shift (CLS)
As the name implies, CLS measures the amount of layout shift on a page as it loads. Slow loading of fonts will cause the page layout to shift as the fonts are rendered, which increases the CLS.
To sum it up, font loading time can impact CWV significantly, which is why font loading optimization should be an essential step when considering website performance, optimization, and user experience.
Avoid Layout Shifts When Loading Fonts (CLS)
We know how delayed font loading can cause layout shifts, right? Now, you might be wondering that we’ve discussed a lot about the issues, for example, this layout shift issue, but how can we work on solving them? If that is the case, just sit back and relax as we will now explore the solutions to all these issues. So let’s start by solving the problem of layout shifts when loading fonts.
There are several ways to avoid layout shifts when loading fonts, some of the most popular ones have been listed below:
- Use font-display: swap: This allows the browser to use a fallback font while the webfont is loading and then swap to the webfont when it becomes available. This can help prevent layout shifts caused by the browser reflowing the layout once the webfont is applied if the original and swapped fonts have similar sizes.
- Use font-display: optional: This tells the browser only to use the webfont if it is already cached or the user has a slow connection. If the webfont is unavailable, the browser will use the fallback font instead. This can help prevent layout shifts caused by the webfont not being available.
- Use the font-display property in a @font-face rule: This allows you to specify the font-display behavior for a specific font.
- Use a font loading strategy: There are various strategies you can use to optimize the loading of fonts, such as using font-display, preloading fonts, and using font-display with a timeout.
- Use a font loading library: Various libraries can help you optimize the loading of fonts, such as the Web Font Loader or the Font Face Observer. These libraries can help you implement a font loading strategy and handle the loading of fonts more automatedly.
- Use text-rendering: optimizeLegibility: This can help prevent layout shifts caused by the font rendering differently when the webfont is applied.
Using the techniques mentioned above, you can avoid layout shifts when loading fonts and improve your website’s CLS.
Want to speed up your website instantly?
Get 90+ PageSpeed Score automatically with 10Web Booster ⚡
On any hosting!
Ensure Your Fonts Load as Fast as Possible (LCP & FCP)
Who doesn’t want fonts to be loaded on their website as fast as possible, right? Faster font loading also helps improve the LCP & FCP of your website.
The following steps can be taken to ensure that your fonts load as fast as possible:
- Use a font hosting service: Hosting your fonts on a third-party service such as Google Fonts, or Adobe Fonts can improve the performance of your website. These services use fast servers and optimized delivery methods to serve your fonts, which can reduce the time it takes for them to load.
- Use font-display: The font-display CSS property allows you to specify how a font should be displayed while it is loading. One of the most popular font-display techniques is using CSS font swap technique. You specify different fonts for different devices or screen sizes. As the name of the technique itself suggests, the idea behind this technique is to use a font swapping mechanism which is pretty simple yet very efficient. We use a fallback font, which is a font that is pre-installed on a user’s device and does not need to be downloaded. Our web font will only be used in cases where our fallback font isn’t available on the user’s device.
This helps prevent any additional downloading or loading times as the font is already installed on the user’s device, and hence, it helps boost loading time and performance of the webpage.
- Use font-display with font-face: You can use the font-display property with the @font-face rule in your CSS to specify how a particular font should be displayed. This can be useful if you have multiple fonts on your website and want to control the font-display behavior for each one.
- Use web fonts sparingly: Using too many web fonts can increase the time it takes for your page to load. To improve performance, consider using web fonts sparingly and only for headings and other important text.
- Use system fonts: System fonts are already installed on the user’s device and do not need to be downloaded from the web. Using system fonts can improve the performance of your website because the fonts are already present on the user’s device and do not need to be downloaded.
- Optimize your font files: You can optimize your font files to reduce their size and improve their performance. This can be done using tools such as FontSquirrel’s Webfont Generator or Transfonter.
- Use font-subsetting: Font-subsetting allows you to include only the characters used in your content rather than the entire character set of a font. This can significantly reduce the size of your font files and improve the performance of your website.
- Use a content delivery network (CDN): A CDN is a network of servers that can deliver content to users more efficiently based on their geographic location. Using a CDN to deliver your fonts can improve their performance by reducing the distance they need to travel to reach the user’s device. The list of the best CDNs for WordPress is available in our related article.
- Remove unused fonts: Unused or extra fonts should always be removed as they are of no good use and removing them can help reduce the amount of data loaded by the browser and hence help achieve better website page loading and performance. Additionally, getting rid of them also helps reduce the amount of unnecessary http requests that are made by the browser which results in great website performance. You can either remove them manually or via a plugin like Asset CleanUp or by using web optimization tools such as Fontsquirrel or Fontspring.
- Specifying a fallback font stack: Providing the browser with a list of alternative fonts to use in case if the primary font isn’t available is a great technique to ensure that the content on your site is still readable and does not cause any issues even if the primary font doesn’t load on the user’s device for any known or unknown reason. So, you can simply consider it as a powerful backup of font substitutes which are ready to serve just in case if any primary font isn’t available on the user’s device. Specifying a fallback font stack is simple. The following code snippet demonstrates how you can simply add the fallback font stack within the CSS font-family property.

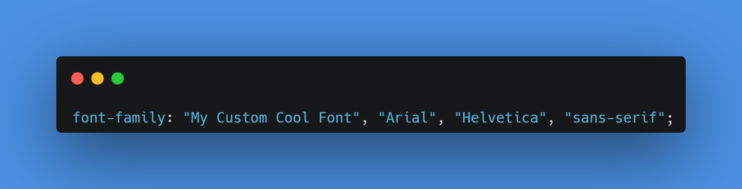
You might be confused about what font loads when amongst this pool of fonts, right? The order of execution is pretty straightforward. If “My Custom Cool Font” isn’t available, the browser will try using the next available font which is “Arial”, and if that font isn’t available, it will try to use the next one which is “Helvetica”, and even if that isn’t available, it will simply try using the last font, which is “sans-serif”.
How Plugins Help Optimize Fonts
Plugins always serve as a helpline service when dealing with WordPress issues. They make font loading optimization much easier and faster. They take away the duty of handling the code side of things from you so that you can just sit back and relax.
Some of the ways through which font optimization plugins help include but are not limited to the following:
-
- Reduce the size of your font files, resulting in increased performance. WP Optimize is a great plugin that can compress and optimize font files which reduces the font file size.
- Help load fonts more efficiently by using a CSS technique called font-display, which allows you to decide how your fonts should be displayed initially while loading. This can help prevent both FOIT and FOUT. Optimize Webfonts, LoadCSS plugin also known as OWS (Optimize Webfonts Speed) is a fine example of a plugin that uses font-display to help load fonts more efficiently.
- Some plugins also allow you to specify different fonts for different devices or screen sizes such as Easy Google Fonts, Use Any Font, Better Font Awesome, etc. This is particularly useful when you want your website to be all-screen responsive, as it improves readability and bandwidth.It is also useful because one would like to reduce the variety of fonts to just one font, for mobile devices, for the sake of speed.
There are a lot of amazing WP Plugins available, for example, 10Web, Autoptimize, W3 Total Cache, etc., that can help you optimize font loading on your WordPress website.
More Techniques to Optimize Font Loading in WordPress
This topic can get as long as you would like it to be but let’s just wrap up before things get boring. Let’s explore some of the other remaining ways through which we can optimize font loading on your WordPress websites.
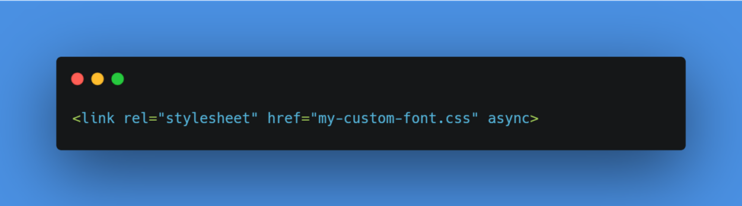
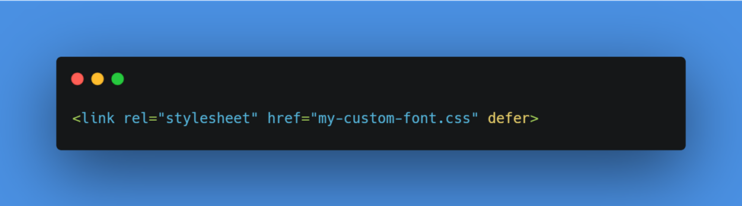
1. Asynchronous loading of web fonts
Asynchronous loading of fonts can also be quite handy. You can use ‘async’ or ‘defer’ attributes to instruct your browser to load your font files asynchronously. That essentially means that your font files will be loaded in the background while the rest of your webpage is being rendered to the browser. This will help us improve the performance of our site since now there will be no render-blocking of the webpage due to the font files.
The following code snippets demonstrate the usage of async and defer, respectively:
2. Choose a moderate number of typefaces
Ever heard of “Excess of everything is bad”? Well, if you did, you might just be able to link it with this point. Using a moderate number of typefaces is generally great and does not impact website loading and performance. But if you use too many typefaces, it will lead to poor website performance. Excessive typefaces cause a delay in webpage loading since the browser needs to load all of the various font sets, which as a result, leads to poor website loading and performance.
Therefore, you should always choose a moderate number of typefaces on your website.
3. Use a preload header
Using a preload header, you are instructing the browser to start loading font files as soon as possible. This can be a helpful technique if the font is used in the initial rendering of the webpage because it will reduce the time it takes for the font to be displayed.
Using the preload header is pretty straightforward; all you need to do is to add a ‘link’ element to the ’head’ of your HTML file with the ‘rel’ attribute set to ‘preload’, the ‘as’ attribute set to ‘font’, and the ‘href’ attribute to the path of the font that needs to be preloaded.
The following code snippet gives you a code–level demonstration of how to do it.
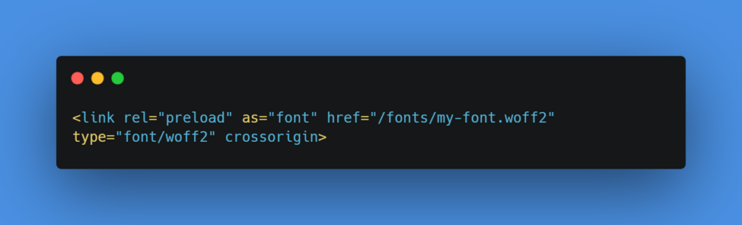
Note: While using preloaded fonts can be helpful in quickly displaying fonts that need to be rendered on the initial render, excessive preloading of fonts should be avoided as it may lead to poor website performance issues due to a lot of fonts being preloaded. Therefore, you should only use it for critical fonts to load faster enough on the initial render rather than for every other font.
4. Audit and Monitor Font Use
As the name implies, it is a process of auditing, reviewing, and monitoring fonts in a website or an application. It helps us identify any font-loading-related issues so that we can troubleshoot and resolve them.
Some of the ways through which Audit and Monitor Font Use can help optimize font loading include:
-
- Helps identify missing or improperly configured fonts by determining what fonts don’t load correctly on our website.
- Analyzing, auditing, and reviewing the usage of fonts can help a website boost performance. For example, when analyzing the site, you might decide that you don’t need to load one more font to style a single button.
- Help in ensuring consistent font loading across multiple devices and browsers. It helps us identify if fonts are loaded differently on any device and browser so that we can resolve the font inconsistent loading issue(s).
These are some of the ways through which you can optimize font loading on your websites.
How 10Web Can Optimize Your Font Loading on WordPress
10Web Booster helps you improve your WordPress website’s font loading time via its built-in font optimization techniques such as Font Swap, Caching, Optimization of files, etc.
We provide our valuable customers with some of the major font loading optimization techniques. 10Web Booster uses:
- Critical fonts load – enabled, this is the most effective technique and is enough. 10 Web Booster loads fonts that affect rendering of the above the fold content immediately, the rest is delayed (similar to critical CSS).
- Font swap – disabled by default (fallback)
- Font lazyload – disabled by default (fallback)
- Fonts preload
10Web Booster offers free and premium subscriptions. The free subscription offers you complete frontend optimization solutions, including:
- Minification and Compression of HTML, CSS, and JS
- Page Cache Frontend
- Image Optimization
- Defer JS and CSS Execution
- Critical CSS Generation
- Images, Iframes, and Videos Lazy Loading
- Font Swap
- Conversion of Image Format to WebP
- Container Specific Image Resizing
A premium subscription offers you a complete optimization package, frontend + backend + CDN.
A list of our backend optimization features includes:
- Upgrading to the latest PHP versions.
- MySQL Database optimized and updated to the latest versions for WordPress queries.
- Fast automated hosting on Google Cloud, with each site isolated from the other.
- Server performance benchmark to ensure both PHP and MySQL provide optimal performance.
- Partnered with Google for expertise, knowledge, and premium support.
Depending upon the type of your website, you can choose the desired subscription model. For connected sites, it is ideal only to perform frontend optimization, so a free subscription would do the needful. In the case of hosted sites, you need to perform both frontend and backend optimization to improve the performance of your website, so a premium subscription would suit you best here.
Want to speed up your website instantly?
Get 90+ PageSpeed Score automatically with 10Web Booster ⚡
On any hosting!
Want to speed up your website instantly?
Speed up your website automatically
Get 90+ PageSpeed Score automatically with 10Web Booster. On any hosting!


Speed up your website instantly
Speed up your website instantly
-
 Automatically get 90+ PageSpeed score
 -
Experience full website caching
-
Pass Core Web Vitals with ease
 Automatically get 90+ PageSpeed score


Best information blog
Absolutely GORGEOUS guys! Thank you so much for the post, it is so useful.
Is there a tool to see how many fonts a website uses? Right now I think that I might mess things up a bit and used way too many fonts (using the same family, but too many styles, like for example 8 different Roboto styles). And going line by line isn’t an option, haha (I’ll do it if there is no other option, for sure).
Also, using a great server like I do (10web!), do you recommend still using Google Fonts/Adobe… instead of uploading them to 10web server? Will work better in one way or another? I’m amazingly surprised by how well the site is optimized by your plugin, but if things can get better… let’s do it!
Thank you!
The simplest tools are Google Chrome (or any browser) dev tools.
Open the browser with Ctrl+Alt+I (Win + Linux) or Cmd+Opt+I (Mac), then select the “Network” tab and choose “Fonts” to load only font requests. Then do a hard reload of the page. You will see all the fonts that the current webpage loads.
You can use Google fonts from either Google or upload fonts to 10Web servers. In the second case, you will have more options to cache and optimize their distribution. For example, when you enable Cloudflare CDN in Booster Pro, they will become automatically distributed through it. You will immediately see a speed improvement.