
Using a page builder like Elementor can significantly simplify your design process, making it easier to create beautiful, responsive sites without needing to write a line of code. However, it’s not always smooth sailing. One common error users might encounter is the “Elementor not loading” error. This issue can halt your progress, presenting a frustrating screen where the Elementor editor refuses to load, leaving you stuck outside the creative process. Understanding this issue is the first step toward solving it.
This error can stem from various sources—ranging from plugin conflicts, memory limits, and server restrictions, to problems with your WordPress themes or even the browser you’re using. In this blog, we’ll analyze what this error means, explore where it originates from, and discuss the nuances of how it can vary across different setups. Our aim is to equip you with the knowledge to diagnose and resolve this problem, ensuring your workflow remains uninterrupted.
How the error may present itself
Several factors can contribute to the Elementor editor not loading properly. Here are the most common ways the error may present itself.
- The Elementor editor’s interface fails to load completely, leaving you with a blank screen.
- A never-ending loading screen within the Elementor editor, often accompanied by a spinning wheel or loading bar.
- A “500 Internal Server Error” message when attempting to access Elementor editor.
- Partial loading of the Elementor editor, where some elements or widgets are inaccessible or fail to render correctly.
- Errors or warnings in the browser’s JavaScript console related to Elementor, visible when using the browser’s developer tools.
Elementor requirements
This issue often traces back to server-side complications or plugin conflicts. Specifically, your server might not be fully aligned with Elementor’s operational requirements. When it comes to Elementor, there are specific system requirements that need to be met for it to operate seamlessly. These aren’t about storage space but rather the foundational tech stack of your WordPress environment. Here’s a breakdown of Elementor’s minimum requirements:
WordPress version: Elementor requires WordPress 5.2 or newer. This ensures compatibility with the latest WordPress features and security standards, which Elementor leverages for its functionality.
PHP version: PHP 7.0 or newer is required. PHP is the scripting language that WordPress is built on, and newer versions offer significant improvements in speed and security.
MySQL version: Your database should be MySQL 5.6 or higher. Elementor relies on MySQL for data storage and retrieval, and using outdated versions could lead to performance bottlenecks or compatibility issues.
WordPress memory limit: A minimum of 128 MB of memory is recommended for WordPress. Elementor, being a resource-intensive plugin due to its live preview and numerous features, necessitates this amount to run smoothly without crashing or slowing down.
While you might manage to install Elementor without meeting these prerequisites, you’re bound to run into performance issues, or it might not run at all. In Elementor’s scenario, not adhering to these requirements could manifest as the editor failing to load, among other potential errors.
Reasons why this error occurs
Here are the most common factors for the Elementor not loading error:
Plugin conflicts: Other WordPress plugins can interfere with Elementor, especially if they load conflicting JavaScript or CSS. This is often the case with caching, security, or optimization plugins that modify the page’s output.
Theme conflicts: Sometimes, the active WordPress theme can conflict with Elementor, particularly if the theme is poorly coded or not updated to work with the latest version of Elementor
Outdated software: Running outdated versions of WordPress, Elementor, or your theme can lead to compatibility issues that prevent Elementor from loading correctly.
Browser issues: Browser extensions, outdated browsers, or browser-specific behaviors can also be culprits, especially if they interfere with JavaScript execution.
Memory limit: WordPress has a PHP memory limit, and if your site exceeds this limit, it can cause Elementor and other plugins to malfunction. This is particularly common on complex sites with many plugins installed.
Server restrictions: Some hosting providers impose restrictions or specific configurations that are not compatible with Elementor, such as security rules that block the editor’s operations.
How to fix the Elementor not loading error
Resolving this issue involves a systematic approach to identify and address the underlying cause. If Elementor is not loading, the first thing to do is try reloading it before getting into more complex troubleshooting strategies. If Elementore still doesn’t load, then you should move forward with troubleshooting.
Update Elementor and WordPress
First and foremost, let’s make sure everything is up-to-date. This is crucial because outdated versions of plugins, themes, or WordPress itself can lead to compatibility issues, causing Elementor to hang up on the loading screen.
Elementor
- Log in to your WordPress dashboard.
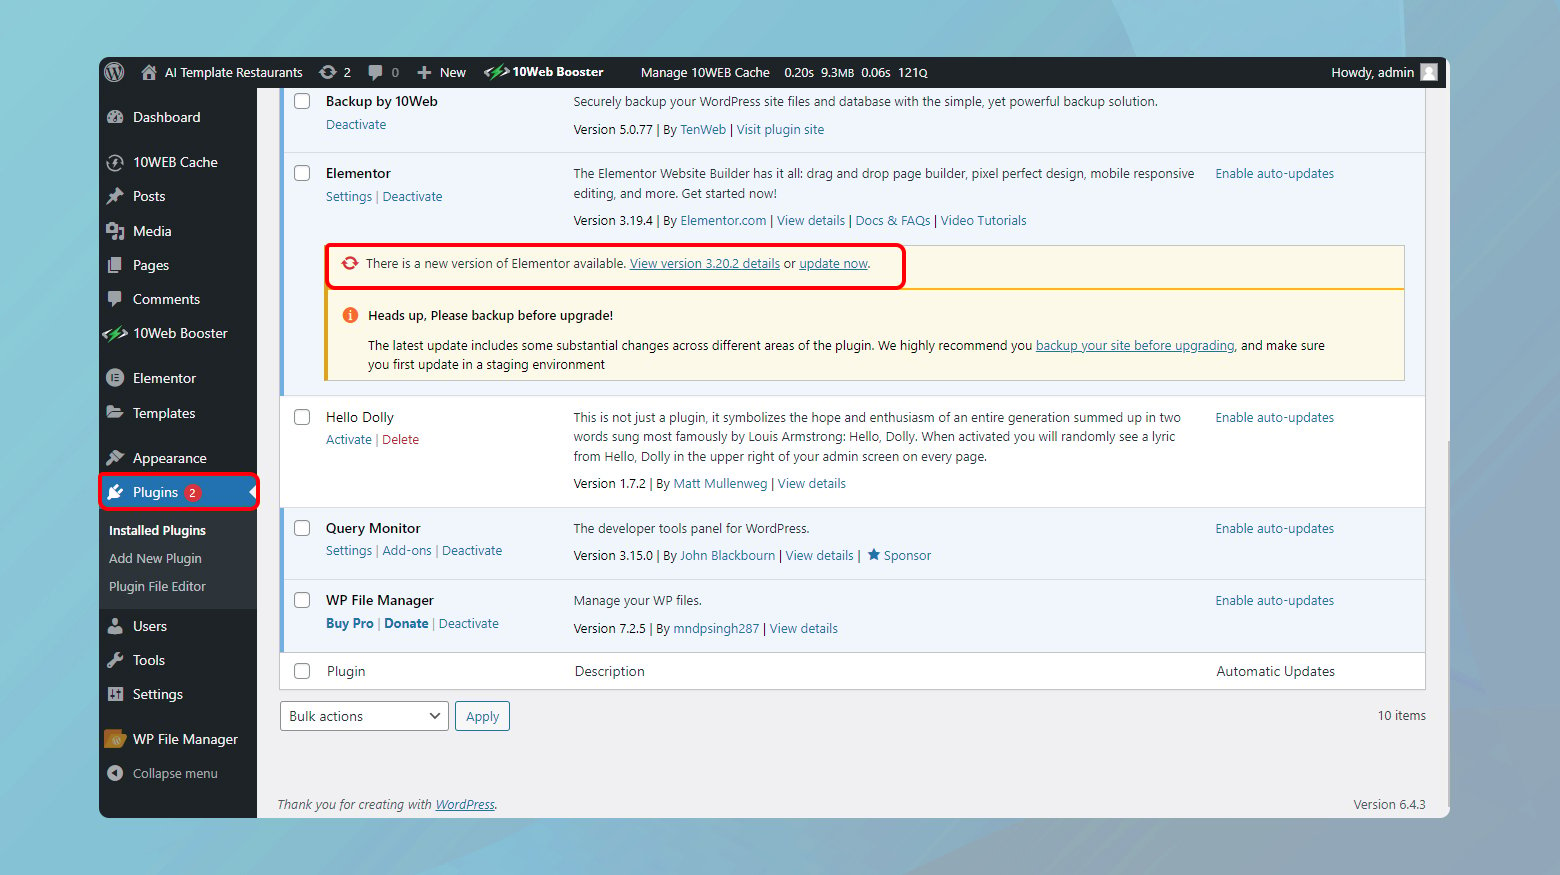
- On the left-hand side, you’ll see a menu. Hover over “Plugins” and click on “Installed Plugins”.
- Find Elementor and Elementor Pro (if you have the premium version) in your list of installed plugins. If there’s a new update available, there should be a notification beneath the plugin name.
- Click on the link to update the plugin.
WordPress
- Head back to your WordPress dashboard. You’ll usually see notifications for WordPress core updates at the top of the dashboard or in the updates section.
- Click on the notification and follow the prompts to update WordPress.
It’s important to always ensure you have a backup before doing this, just in case.
Check for plugin conflicts with Elementor
Navigating through the maze of plugin conflicts in WordPress can indeed be a daunting task, especially when it interrupts the flow of using a powerful tool like Elementor. The balance between maintaining functionality and ensuring compatibility is delicate. Here’s how to systematically approach diagnosing and resolving these conflicts, ideally minimizing disruption to your website’s operation.
Using a staging environment
A staging site is essentially a clone of your live site where you can test changes without affecting your real website. This setup is invaluable for troubleshooting issues like plugin conflicts without impacting your site’s visitors.
Many hosting providers offer staging site capabilities as part of their hosting packages.
There are also WordPress plugins available that can create a staging site for you. Just be sure to choose one that’s highly rated and updated frequently.
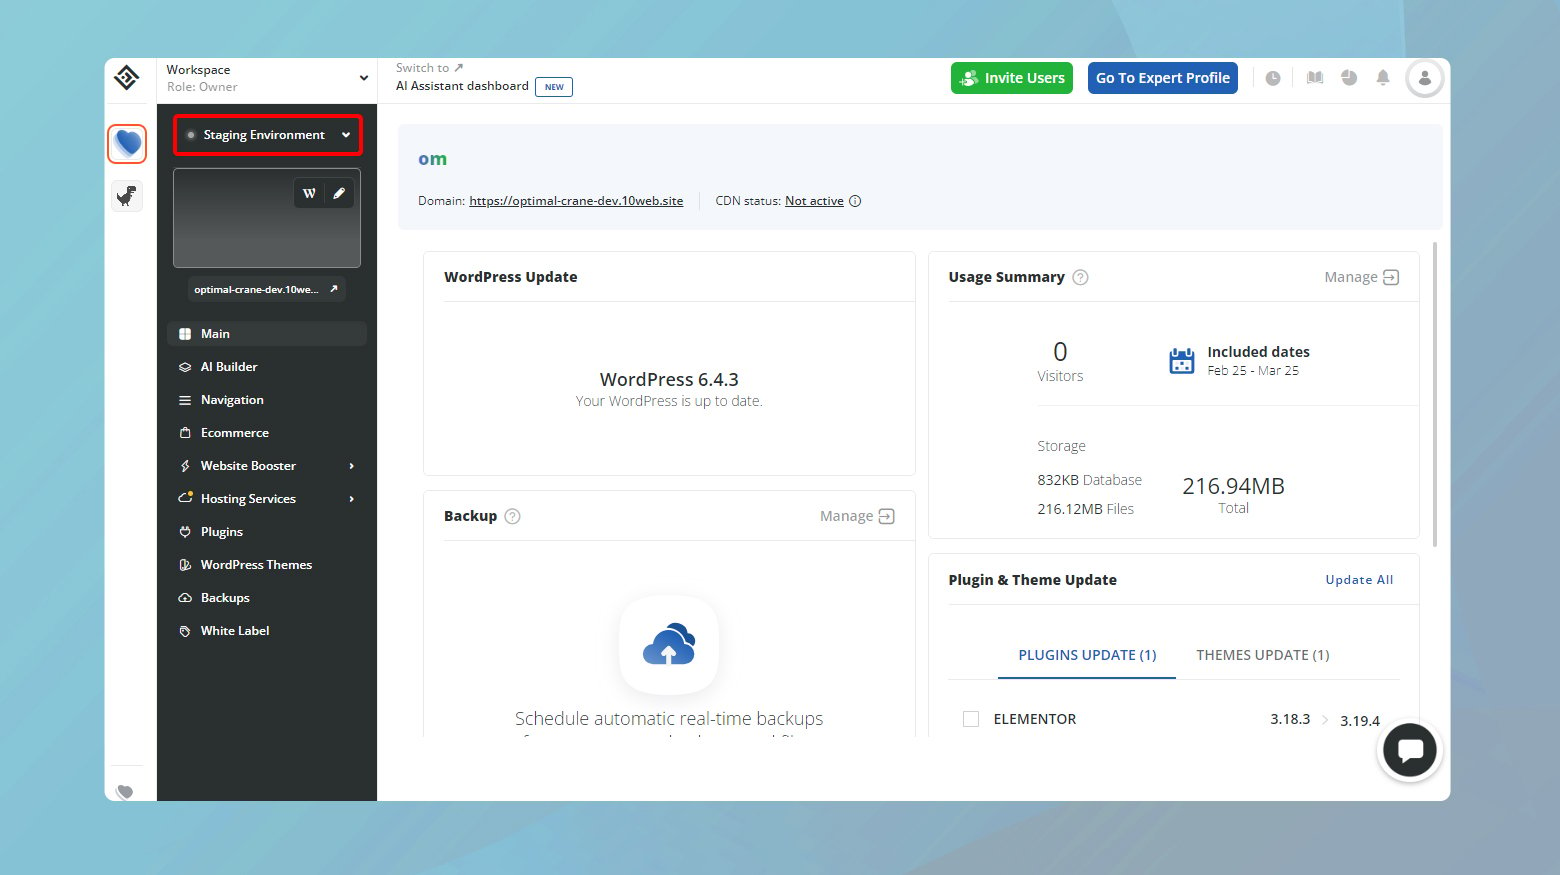
If you are a 10Web customer, you can enable your site’s staging environment from you 10Web dashboard. Take a look at our comprehensive guide on managing staging environments in 10Web.
Testing plugins one by one
Once your staging environment has been enabled, you can now test your plugins without impacting your live website. The goal here is to isolate the problematic plugin. Here is what to do:
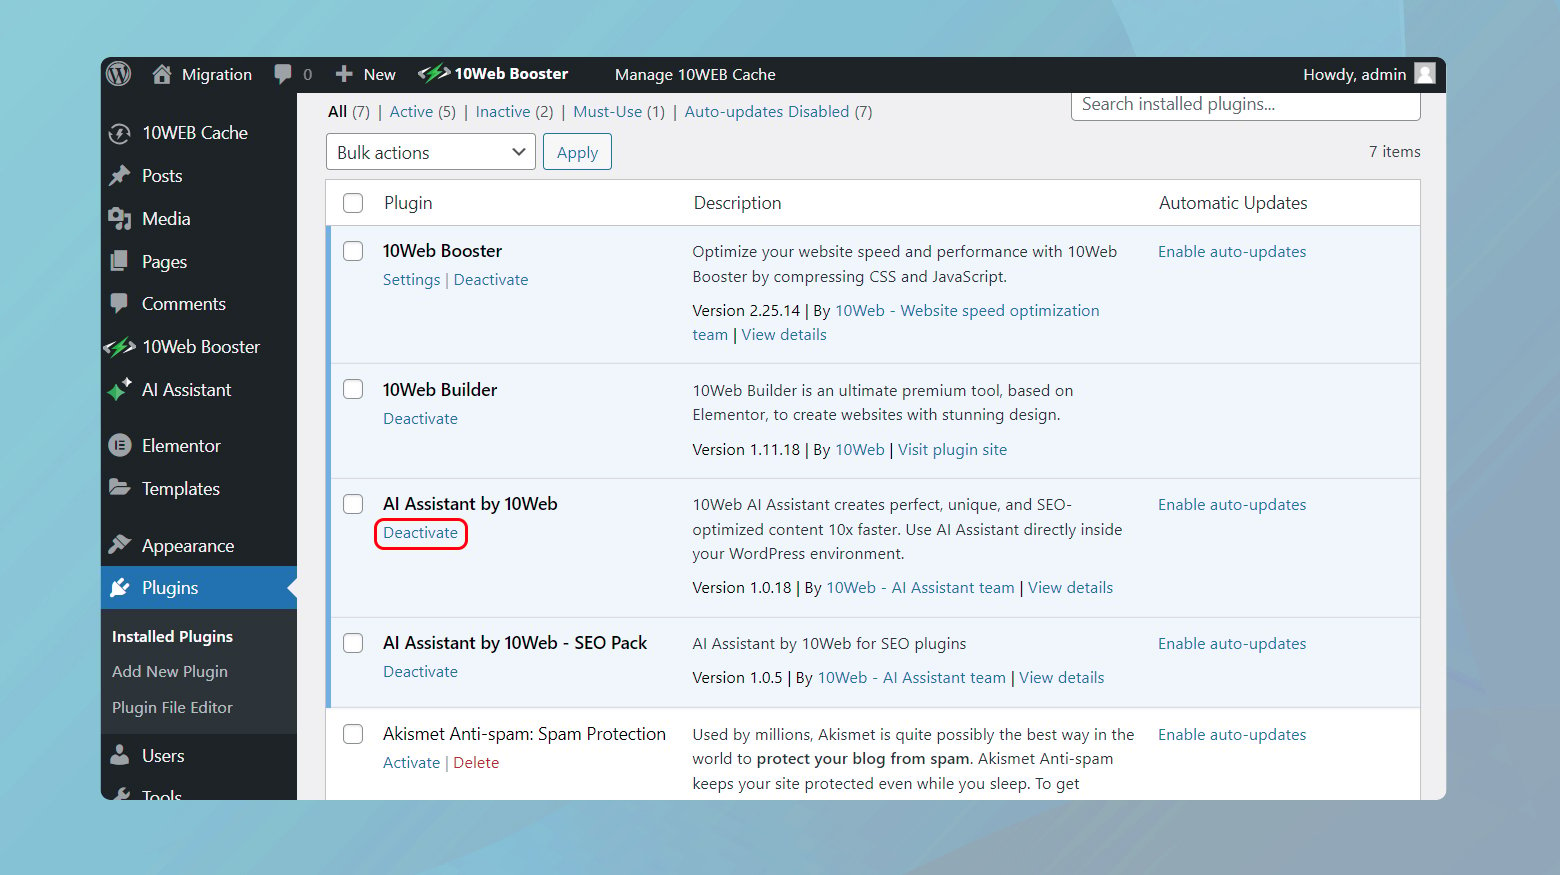
- Access your staging site’s WordPress dashboard and navigate to “Plugins” > “Installed Plugins”.
- Deactivate plugins one at a time, starting with any that offer similar functionalities to Elementor or are known to be complex or resource-intensive.
- After each deactivation, attempt to load the Elementor editor. If the editor loads successfully after disabling a particular plugin, you’ve likely found the source of the conflict.
- Document which plugins were tested and the outcomes. This information can be helpful if you need to contact support or troubleshoot further issues down the line.
Alternative approach: Bulk deactivation
Though not ideal for live sites, disabling all plugins except for Elementor and then reactivating them one by one can be another efficient way to identify the problematic plugin on a staging site.
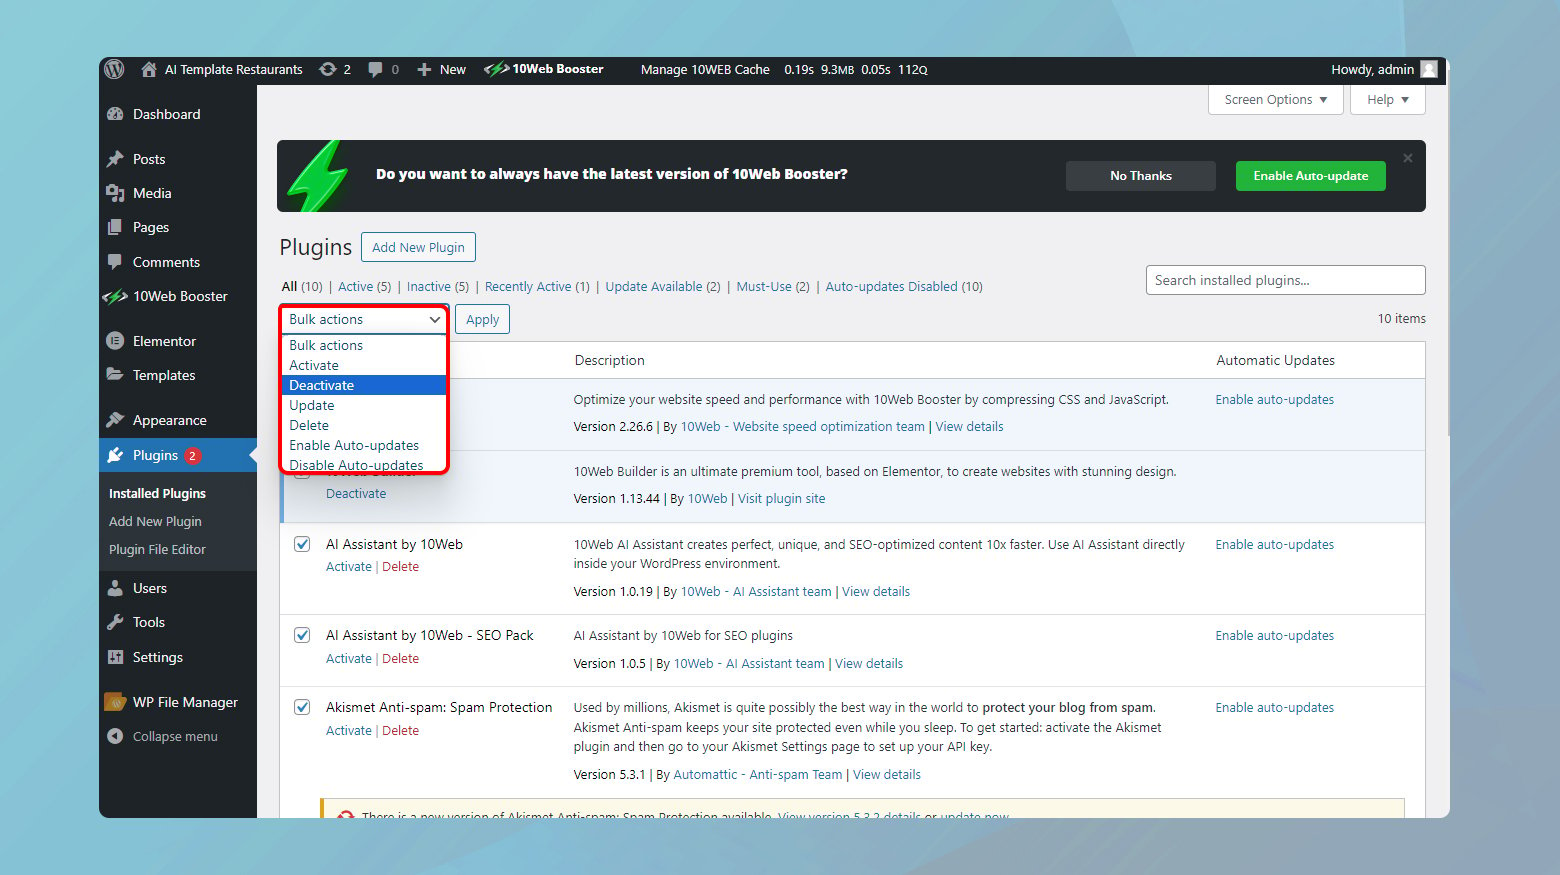
- Go to the WordPress admin dashboard of your site.
- Click on Plugins and make sure the checkbox next to Plugins is checked.
- Uncheck the box in front of Elementor and Elementor Pro.
- Click on the bulk actions drop down menu and choose Deactivate.
Check if Elementor loads correctly. If it does, then one of the plugins is definitely causing a conflict. Reactivate plugins one by one, loading Elementor after each activation. This method helps pinpoint the conflicting plugin faster but risks temporary functionality loss on your staging site.
Elementor add-Ons
Elementor add-ons enhance the builder’s capabilities but can also be sources of conflicts due to their deep integration with Elementor. Apply the same one-by-one testing approach to these add-ons. Given their close relationship with Elementor, start with these before moving on to unrelated plugins.
Update your PHP version
Elementor, like many modern WordPress plugins, requires a contemporary web environment to function smoothly. A crucial part of this environment is PHP – the scripting language that powers WordPress. With Elementor only supporting PHP 7 and newer versions, ensuring your site runs on an appropriate PHP version is not just recommended; it’s essential. Here’s how you can check and update your PHP version to maintain optimal compatibility with Elementor.
Checking your current PHP version
Before considering an update, you should first determine the PHP version your site is currently utilizing. WordPress makes this easy:
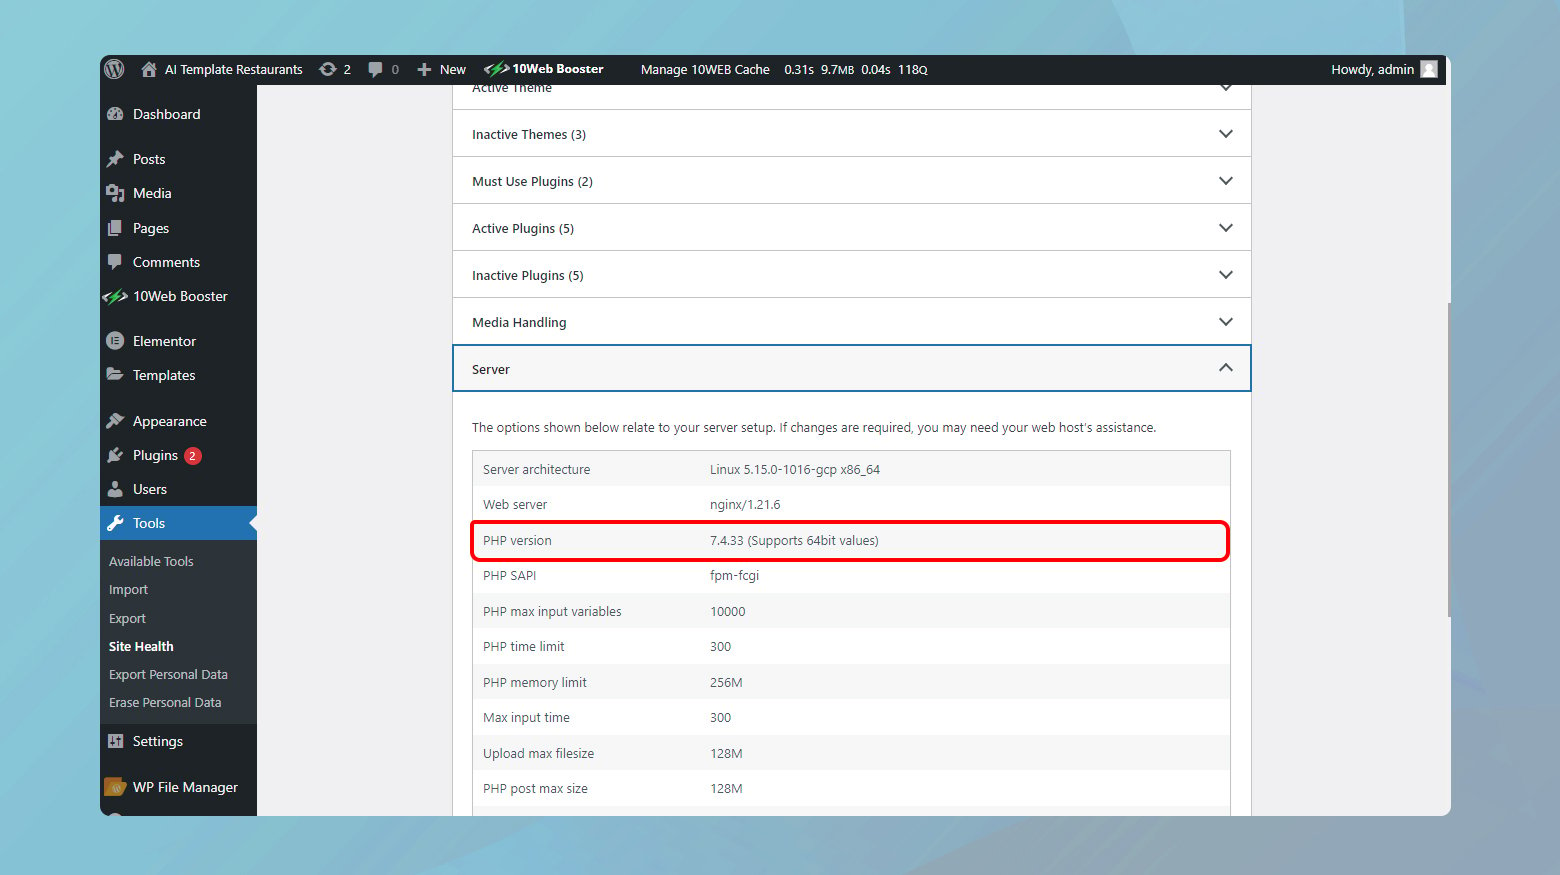
- Navigate to your WordPress Dashboard.
- From the left-hand side menu, select “Tools” > “Site Health”.
- Switch to the Info tab at the top of the Site Health page. This tab provides a wealth of technical details about your website.
- Expand the Server section. Here, you’ll find information about your web server, including the PHP version it’s running.
Ideally, this should be PHP 7 or 8, as these versions offer the best balance between performance and compatibility.
Updating your PHP version
If you’re not on an appropriate version of PHP, don’t worry. Many hosting providers make it straightforward to upgrade, often through your hosting control panel. The process can vary slightly depending on your host.
10Web users
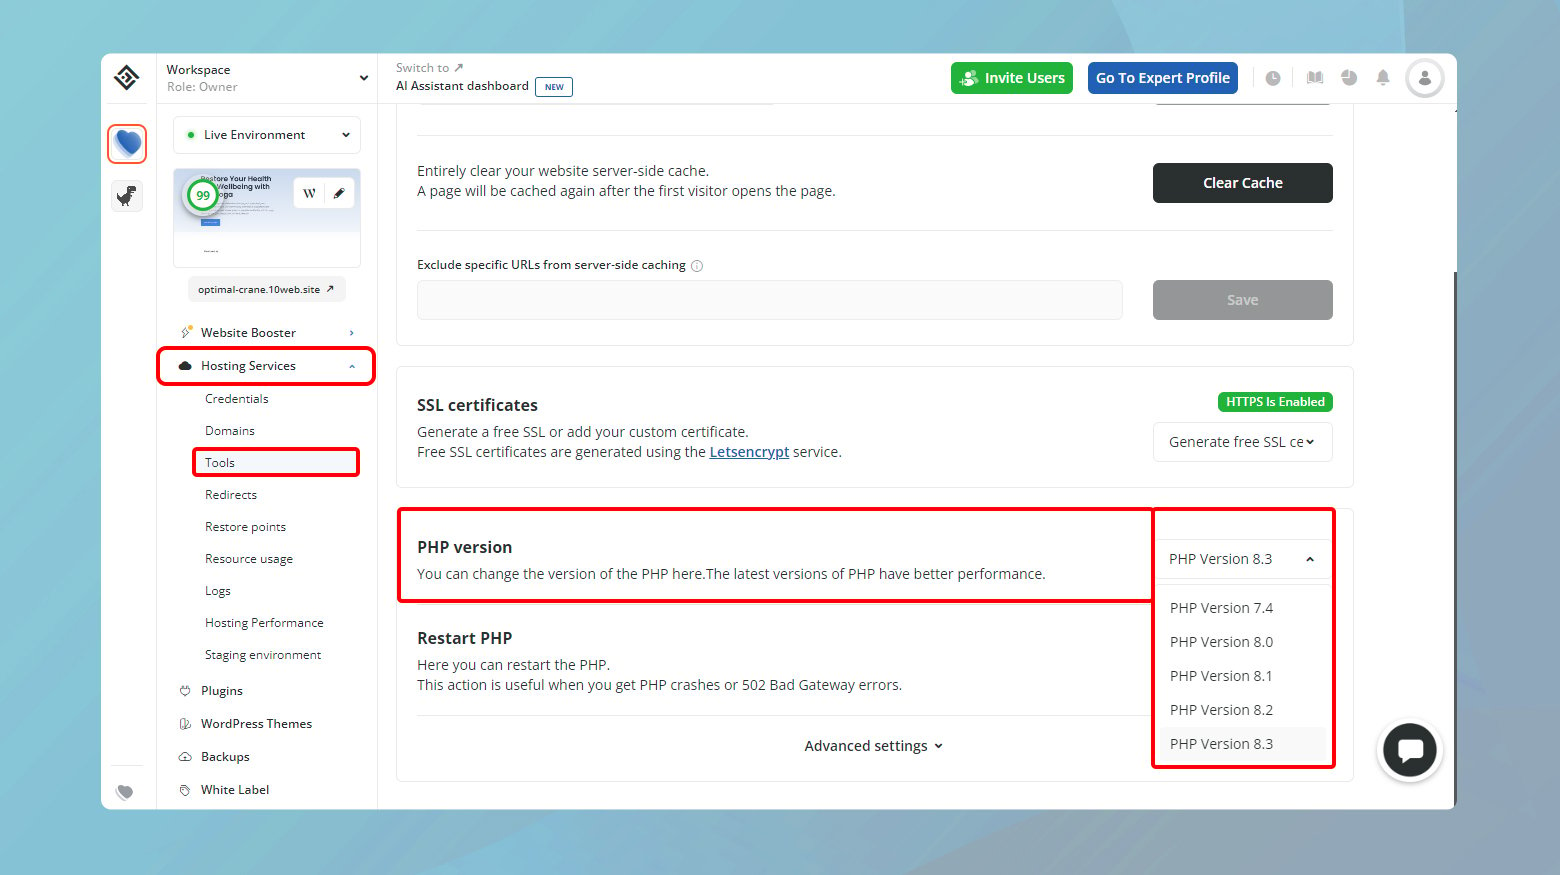
- Log in to your 10Web dashboard.
- Click on the site where you want to upgrade the PHP version.
- Click on “Hosting Services” > “Tools.”
- Navigate to the PHP version section.
- Click on the drop down menu to choose the version of PHP you want.
- Confirm changes to apply the PHP version to your website.
If your host doesn’t offer direct upgrades
Not all hosting providers offer a simple dropdown for switching PHP versions. If you find yourself in this situation, here are the steps you can take:
- Reach out to your hosting provider’s customer service. Most reputable hosts will assist you in upgrading your PHP version.
- If your current host does not support newer PHP versions or is unwilling to help you upgrade, it might be time to migrate to a more supportive and modern hosting environment. Look for hosts that actively support the latest web technologies.
Increase the PHP memory limit
The PHP limit affects everything from your site’s performance to its ability to run various plugins smoothly. For Elementor users, adhering to the plugin’s minimum requirement of 128 MB of memory is crucial, but aiming for the sweet spot of 256 MB can significantly enhance your site’s functionality. Here’s a step-by-step guide on how to check and increase your site’s PHP memory limit.
Checking your PHP memory limit
Before adjusting anything, it’s wise to know where you stand. WordPress’s Site Health tool conveniently lets you peek under the hood:
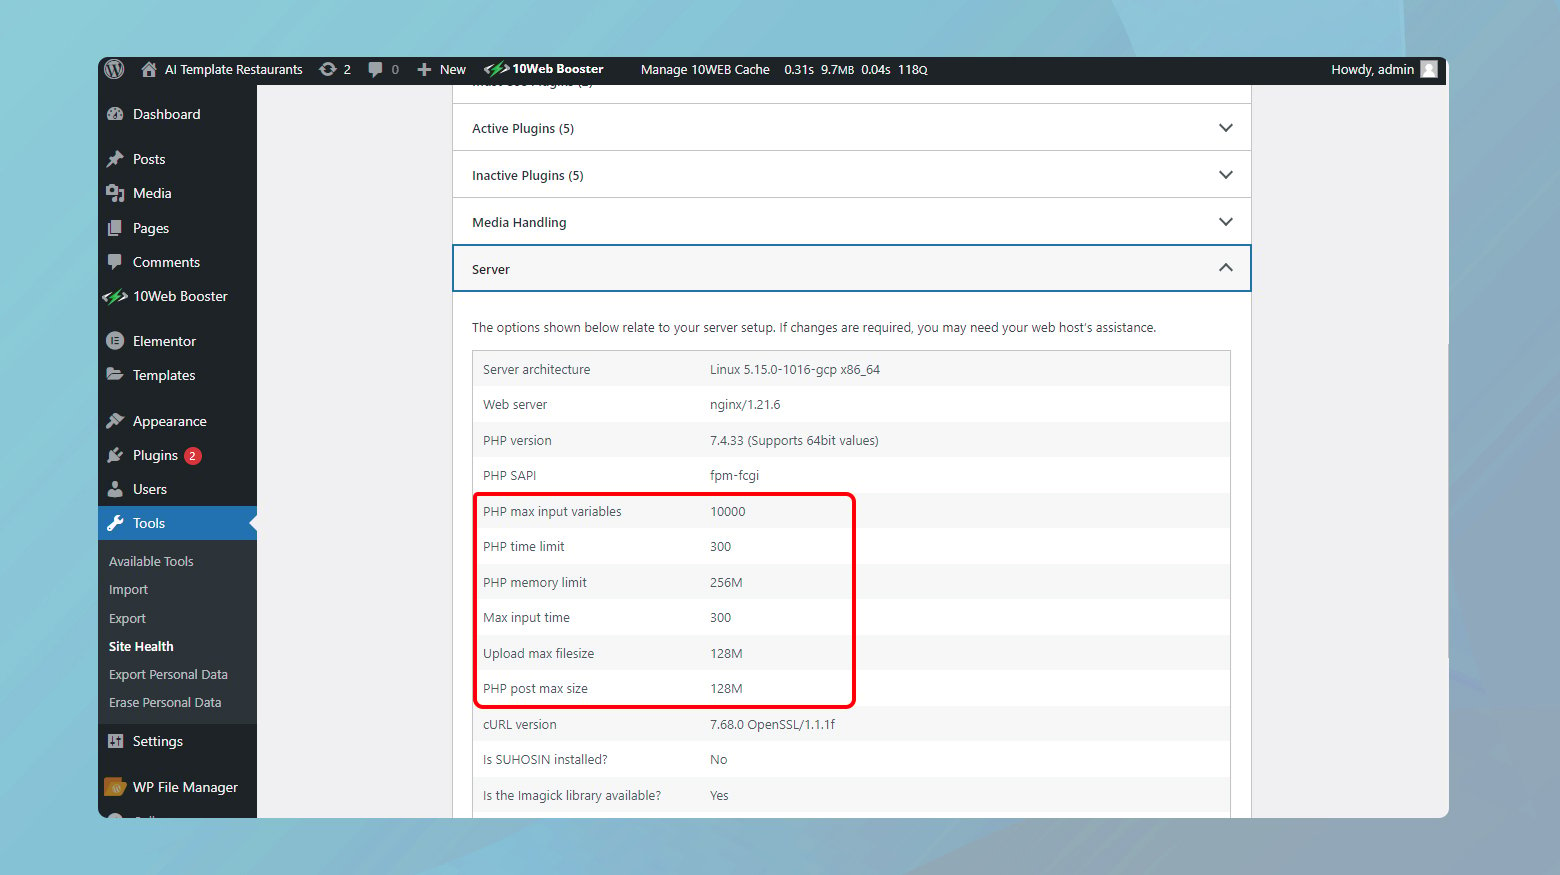
- Head to the WordPress dashboard and navigate to “Tools” > “Site Health”.
- Click on the Info tab to access a treasure trove of technical details about your site.
- Open the Server section and look for the “PHP memory limit” entry. This shows the current amount of memory your WordPress installation can utilize.
If you find your PHP memory limit below the desired threshold, it’s time for an upgrade.
Increasing the PHP memory limit via FTP
The most straightforward method to increase your PHP memory limit involves a bit of file editing via FTP. Here’s how you can do it:
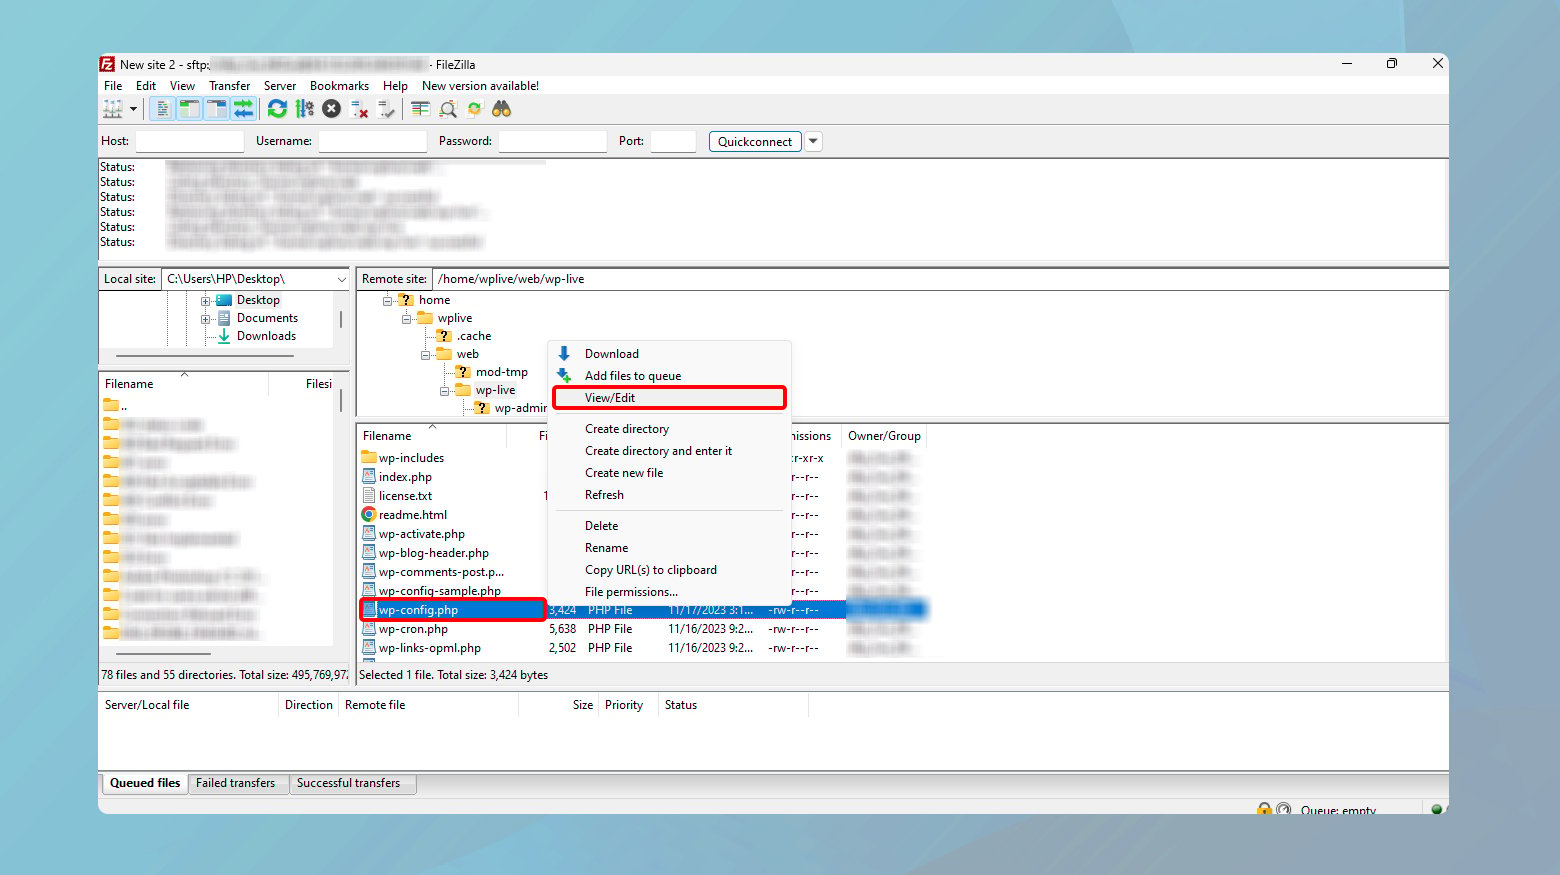
- Connect to your website using an FTP client like FileZilla or Cyberduck. You’ll need your FTP or SFTP credentials, which are usually provided by your web host.
- Navigate to your website’s root directory, commonly named www, public, or public_html.
- Locate and edit the wp-config.php file. This crucial file contains important settings for your WordPress site.
- Right-click the file and choose “View/Edit” to open it in a text editor.
- Search for the line `define( ‘WP_MEMORY_LIMIT’, ‘XXXM’ );` where “XXX” is your current memory limit.
- If this line doesn’t exist, you can add it just above the line that reads `/* That’s all, stop editing! Happy blogging. */`. Replace “XXX” with “256” to set the limit to 256 MB, like so: `define( ‘WP_MEMORY_LIMIT’, ‘256M’ );`.
- Save your changes and close the file. The FTP client should prompt you to upload the modified file back to the server. Confirm to overwrite the existing wp-config.php.
After making this change, revisit the Site Health page to confirm WordPress now recognizes the updated PHP memory limit.
10Web users
If your website is hosted on 10Web, you can adjust your PHP memory limit right from your 10Web dashboard.
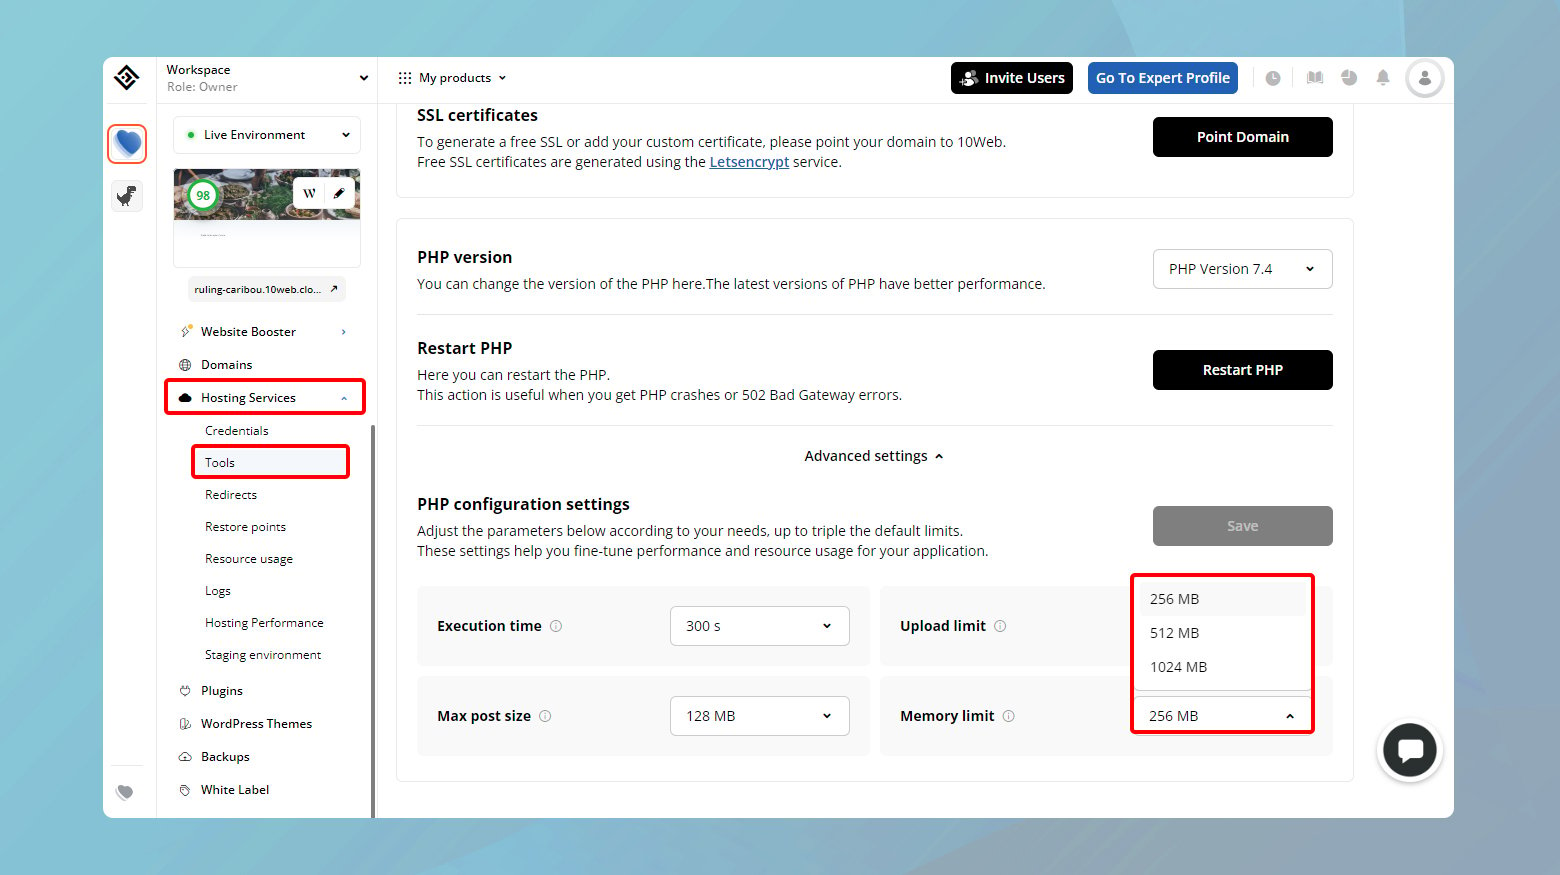
- Log in to your 10Web dashboard.
- Click on the website where you want to increase the PHP memory.
- Navigate to “Hosting Services” > “Tools.”
- Scroll down and click “Advanced settings.”
- Click on the drop down menu in front of “Memory limit” and choose the limit you need.
- Click “Save” to apply the changes.
When direct changes aren’t allowed
Sometimes, web hosts lock down the ability for users to manually adjust PHP settings for security and stability reasons. In this case, reach out to your web host’s support team. Explain your need to increase the PHP memory limit for your WordPress site. Most reputable hosting services are accommodating and can make this change for you upon request.
Change Elementor’s editor loader method
If you’ve been spinning your wheels trying to get Elementor’s editor to load without any luck, there’s one more trick you might want to try. Hidden within Elementor’s settings is an option that could potentially bypass whatever is causing your editor malfunction. This solution involves changing how Elementor loads its editor, a tactic that’s a bit unconventional but worth a shot.
Before we dive into the how-to, it’s essential to note that tweaking Elementor’s loading method is recommended only after you’ve exhausted the usual troubleshooting steps.
Here’s how to switch up the loader method:
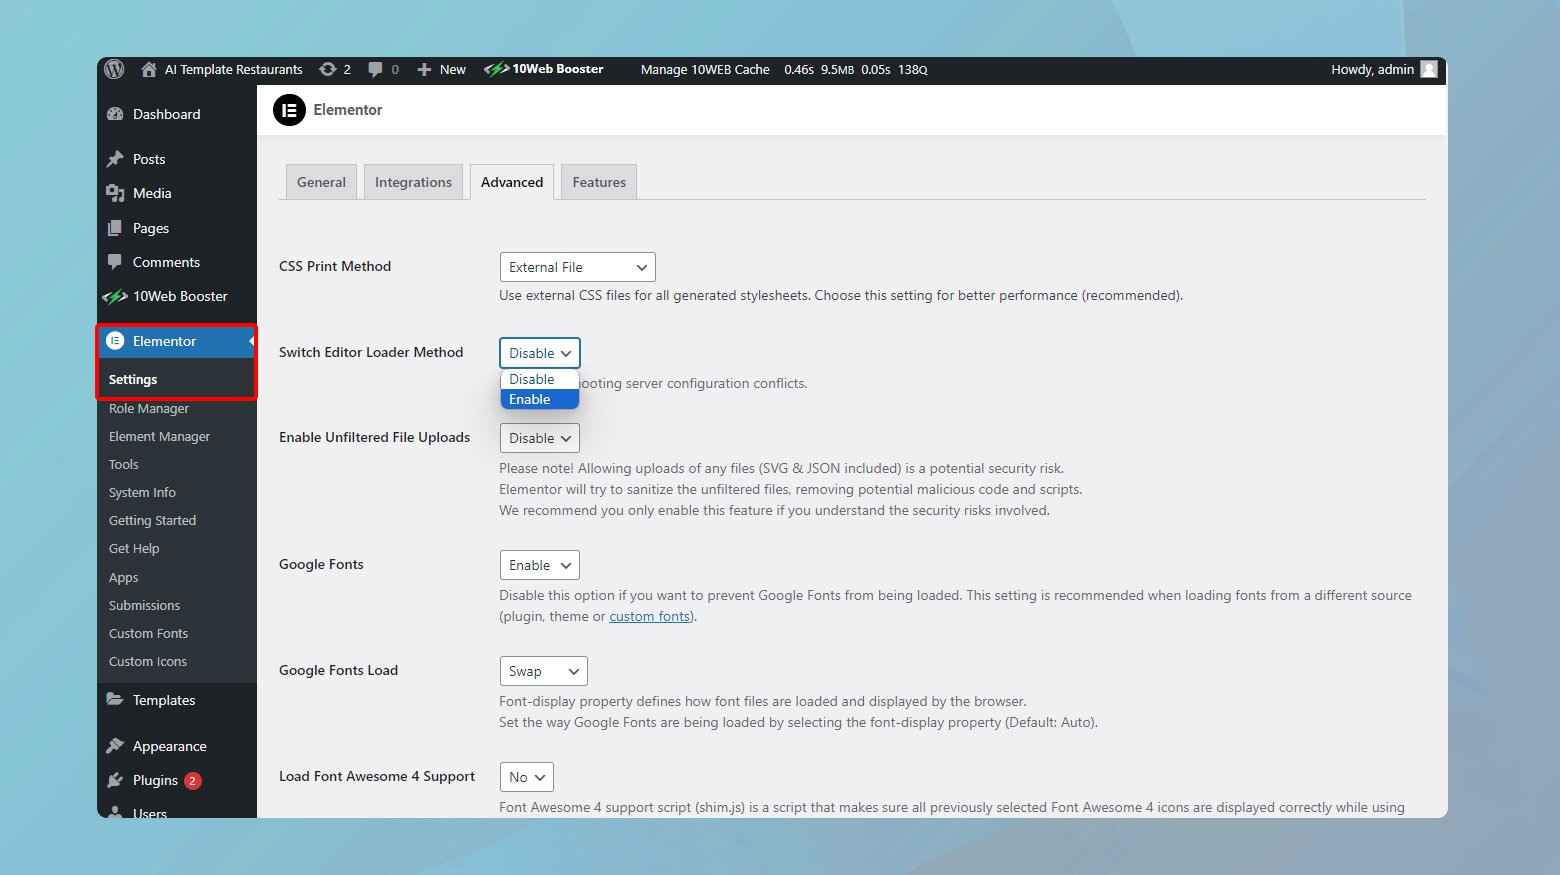
- From your WordPress dashboard, hover over the Elementor menu item and click on “Settings”. This will take you into the heart of Elementor’s configuration options.
- Within the Settings window, you’ll find several tabs running across the top. Click on “Advanced.” Scroll down until you encounter a setting labeled “Switch Editor Loader Method”.
- Next to this setting, click on the dropdown and select “Enable”. What you’re doing here is essentially telling Elementor to try a different route when loading its editor.
- Hit the “Save Changes” button to ensure that your new setting is applied.
Now, try accessing the Elementor editor once again. With a bit of luck, the change in loader method will have cleared the path, and you’ll find that the previously elusive editor is now ready to roll.
A few things to keep in mind
Changing the loader method is generally smooth and shouldn’t cause any disruptions. However, it’s always a good idea to keep a few things in mind:
This is a troubleshooting step: Remember, altering the loader method is recommended when other solutions haven’t resolved your issue. It’s not a first-line fix but rather a clever workaround for stubborn situations.
Monitor your site: After making the change, keep an eye on how Elementor behaves. While it’s unlikely to cause problems, it’s always wise to be observant after tweaking settings.
You can always switch back: If, for any reason, you want to revert to the original loader method, simply follow the same steps and deselect the “Enable” option. Elementor is flexible like that.
Switch to an Elementor-compatible WordPress theme
Given the vast ecosystem of WordPress themes, many are designed or optimized to work seamlessly with page builders like Elementor. Let’s delve into why picking an Elementor-friendly theme is crucial and how to make the switch without breaking a sweat.
A theme that’s compatible with Elementor ensures that:
Your design vision comes to life: Compatible themes offer the full range of Elementor’s features, allowing you to utilize its dynamic widgets and templates to their fullest potential.
Smooth performance: These themes are optimized for Elementor, meaning less conflict and better performance.
Regular updates: Elementor-compatible themes often receive updates that enhance their compatibility and introduce new features, ensuring your site stays fresh and functional.
Finding the right theme
When on the search for a new theme, keep an eye out for a few key indicators of Elementor compatibility:
Explicit mention: Theme descriptions that mention compatibility with Elementor are a green light. This acknowledgment means the developers have tested their theme with Elementor and confirmed that they work well together.
Check reviews and ratings: User feedback can be incredibly telling. Look for mentions of Elementor in reviews to gauge real-world compatibility.
Demo content: Themes that offer Elementor-built demo content give you a head start and confirm their compatibility.
Making the switch
Once you’ve selected a theme that promises a harmonious relationship with Elementor, switching themes is a straightforward process:
Before making any major changes, ensure you have a recent backup. This step is your safety net, allowing you to restore your site should anything go wrong.
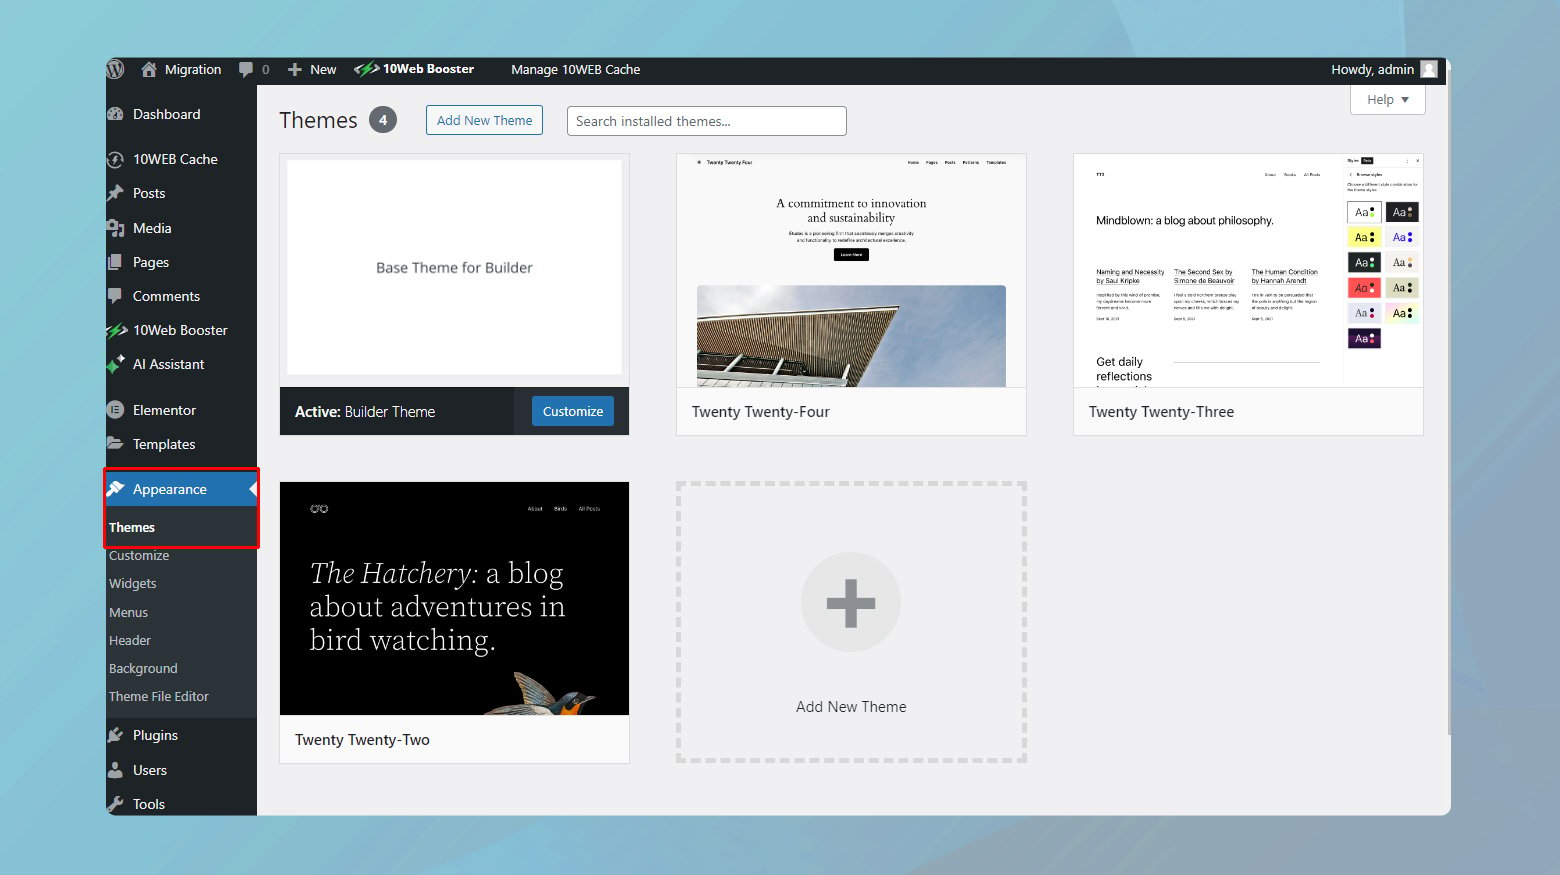
- Navigate to “Appearance” > “Themes” in your WordPress dashboard.
- Click “Add New” and either search for your chosen theme or upload it if you’ve downloaded the theme file.
- Click “Install” and then “Activate”.
With your new theme active, visit your pages to ensure everything looks as expected. Elementor-built content should remain intact, but some styling adjustments may be necessary to align with your new theme’s design.
Disable browser extensions
Those handy little add-ons that make browsing a breeze in many ways can sometimes get in the way, especially with complex web applications like Elementor. Let’s explore how to determine if a browser extension is to blame and what to do about it.
Testing for extension conflicts
The first step in diagnosing extension-related issues is to see if the problem persists in a clean browser environment.
Most browsers offer an “Incognito” or “Private” browsing mode that disables most extensions by default. Open a new incognito window and try using Elementor there. Alternatively, use a different browser that doesn’t have any extensions installed.
If Elementor works fine in this clean environment, there’s a good chance an extension in your regular browser setup is causing the problem.
Identifying the problematic extension
Once you’ve pinpointed that an extension is likely the cause, it’s time to find out which one.
Return to your regular browser window where the issue occurs. Access your browser’s extension settings and disable each extension one at a time. After disabling an extension, try using Elementor again.
It’s crucial to refresh the Elementor editing page after disabling each extension to ensure that changes take effect.
Once the errors stop and Elementor begins working as expected, you’ve likely found the extension causing the conflict.
Elementor loading issues with Cloudflare’s Rocket Loader
Cloudflare’s Rocket Loader is a powerful feature designed to improve the loading times of your website by optimizing the loading of JavaScript. It’s a great tool, but sometimes it can interfere with complex web applications like Elementor, leading to loading issues or even getting stuck on the gray loading page when trying to launch the Elementor editor. Here’s a step-by-step guide to tackle this issue, ensuring that you can enjoy both the speed benefits of Cloudflare and the powerful web design capabilities of Elementor.
Clear or deactivate your cache
Before diving into the technical adjustments, it’s crucial to start with a clean slate by clearing or deactivating your cache. Cached data can often interfere with the updates and changes you make, including those related to Elementor and Cloudflare settings. Here’s what to do:
- Often, a simple clearing of your browser’s cache can resolve loading issues. This ensures your browser is loading the most recent version of your site.
- Temporarily turn off caching in Cloudflare. This can be done through the Cloudflare dashboard under the Caching tab, ensuring that Cloudflare isn’t serving a cached version of your site that might include outdated scripts or files.
Adjust settings in Cloudflare
Once you’ve dealt with the cache, the next step is to make some adjustments in Cloudflare, particularly concerning the Rocket Loader feature. While Rocket Loader is beneficial for many sites, its aggressive optimization strategies can sometimes slow down applications like Elementor causing the error.
Creating specific page rules
The Rocket Loader feature in Cloudflare, which aims to improve your site’s load times by changing how scripts are loaded, has been known to occasionally disrupt Elementor’s editor functionality. The asynchronous loading of scripts by Rocket Loader can interfere with Elementor, leading to issues where the editor may not load properly.
Fortunately, this can be resolved by setting up specific Cloudflare page rules for pages that utilize Elementor. These rules instruct Cloudflare to bypass certain optimizations, like Rocket Loader, for Elementor’s pages and templates, ensuring smooth operation.
Here are the rules you can create in cloudflare to resolve the error:Elementor pages:
Site URL/*elementor*
Elementor templates:
Site URL/?elementor_library=*
Replace “siteURL” with your actual website URL.
Closing thoughts
In this blog, we navigated through various strategies to resolve the Elementor Not Loading error, emphasizing the importance of compatibility and performance optimization. From updating themes and PHP versions to adjusting Cloudflare settings and managing browser extensions, each step was geared towards ensuring a smooth and efficient Elementor experience on WordPress sites. This guide aimed to provide you with practical solutions to common Elementor challenges, helping you maintain an optimized web presence.
Accelerate your WordPress website creation with AI
Create a custom WordPress website tailored to your business needs 10X faster with 10Web AI Website Builder.
Say goodbye to website errors
Fix all the website errors in one click
Migrate your website to the world's best Managed WordPress Hosting.