Learning how to edit the WooCommerce Cart page with Elementor is important for a seamless experience customizing your online store. This blog will guide you through installing necessary plugins, locating the WooCommerce Cart Page, and using Elementor’s drag-and-drop functionality to enhance your cart page. Follow these steps to create a visually appealing and functional shopping cart tailored to your brand, leveraging both Elementor and 10Web Builder for an optimal eCommerce design experience.
FAQ
How can I find the WooCommerce Cart Page?
To locate the WooCommerce Cart Page:
- Go to the Pages section within your WordPress dashboard.
- Find the page typically named Cart, which is automatically created during WooCommerce setup.
- Click on Edit with Elementor to start customizing the page.
What widgets should I use to enhance my WooCommerce cart page in Elementor?
In Elementor, you can enhance your cart page using various widgets. Begin by opening the Elementor editor on your cart page. Use the WooCommerce Cart widget to add cart functionality. Additionally, explore widgets like Product Quantity Selector and others to improve the user experience. Customize these widgets by adjusting settings like product image sizes, font styles, and colors.
How do I apply custom styles to elements on my WooCommerce cart page using Elementor?
To apply custom styles:
- Open the Elementor editor and navigate to your cart page.
- Click on the cart element you wish to style.
- In the Style tab, modify margins, padding, and alignment.
- Adjust the border style or background color to align with your brand design.
- Click Update to save your changes. Consistent design unifies the look of your cart page, enhancing the overall shopping experience.
Can I use custom CSS and JavaScript to customize my WooCommerce cart page in Elementor?
Yes, you can use custom CSS and JavaScript for advanced customization. In the Elementor editor, click on the Edit Section handle of your cart page, then go to the Advanced tab to enter custom CSS. For JavaScript, drag an HTML widget into your cart page layout and insert your JavaScript code within <script> tags. Ensure to test your changes across different browsers and devices for compatibility.
Getting started with Elementor and WooCommerce
When embarking on your eCommerce journey, integrating Elementor with WooCommerce is a seamless experience. This blog will guide you through each step required to begin customizing your online store’s cart page using Elementor.
Elementor and WooCommerce integration
Elementor is a powerful page builder plugin that works seamlessly with the WooCommerce plugin, providing you with drag-and-drop functionality to design your eCommerce website without any coding knowledge. Together, they allow for a high level of customization and visual editing to enhance the shopping experience on your WordPress site.
Installing necessary plugins for cart customization
- Start by ensuring you have WooCommerce installed and activated on your WordPress dashboard. This is the foundational plugin for creating an online store.
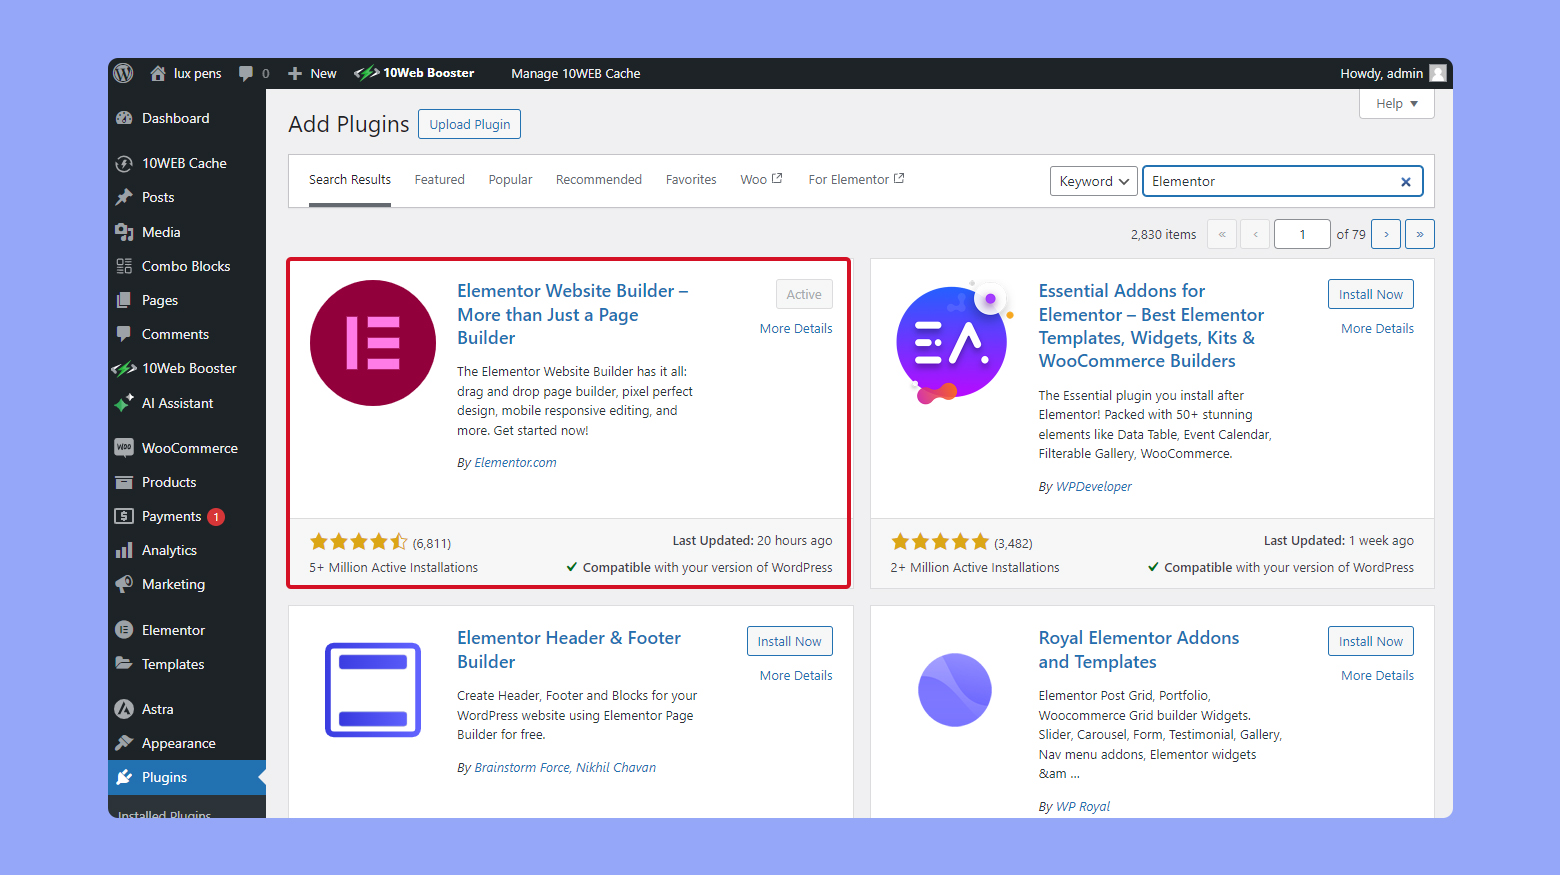
- Next, install the Elementor plugin by going to Plugins > Add New and searching for Elementor. Click on Install Now followed by Activate.

- To unlock all the features for a shopping cart, consider getting Elementor Pro, which provides additional WooCommerce widgets.
If you are a 10Web user, you can edit your WooCommerce cart page using the 10Web Builder. The 10Web Builder is based on Elementor free, however, it provides you with premium widgets to build your ecommerce site.
Locating the WooCommerce Cart Page in WordPress
The Cart Page is where your customers review their selected items before making a purchase. To locate it:
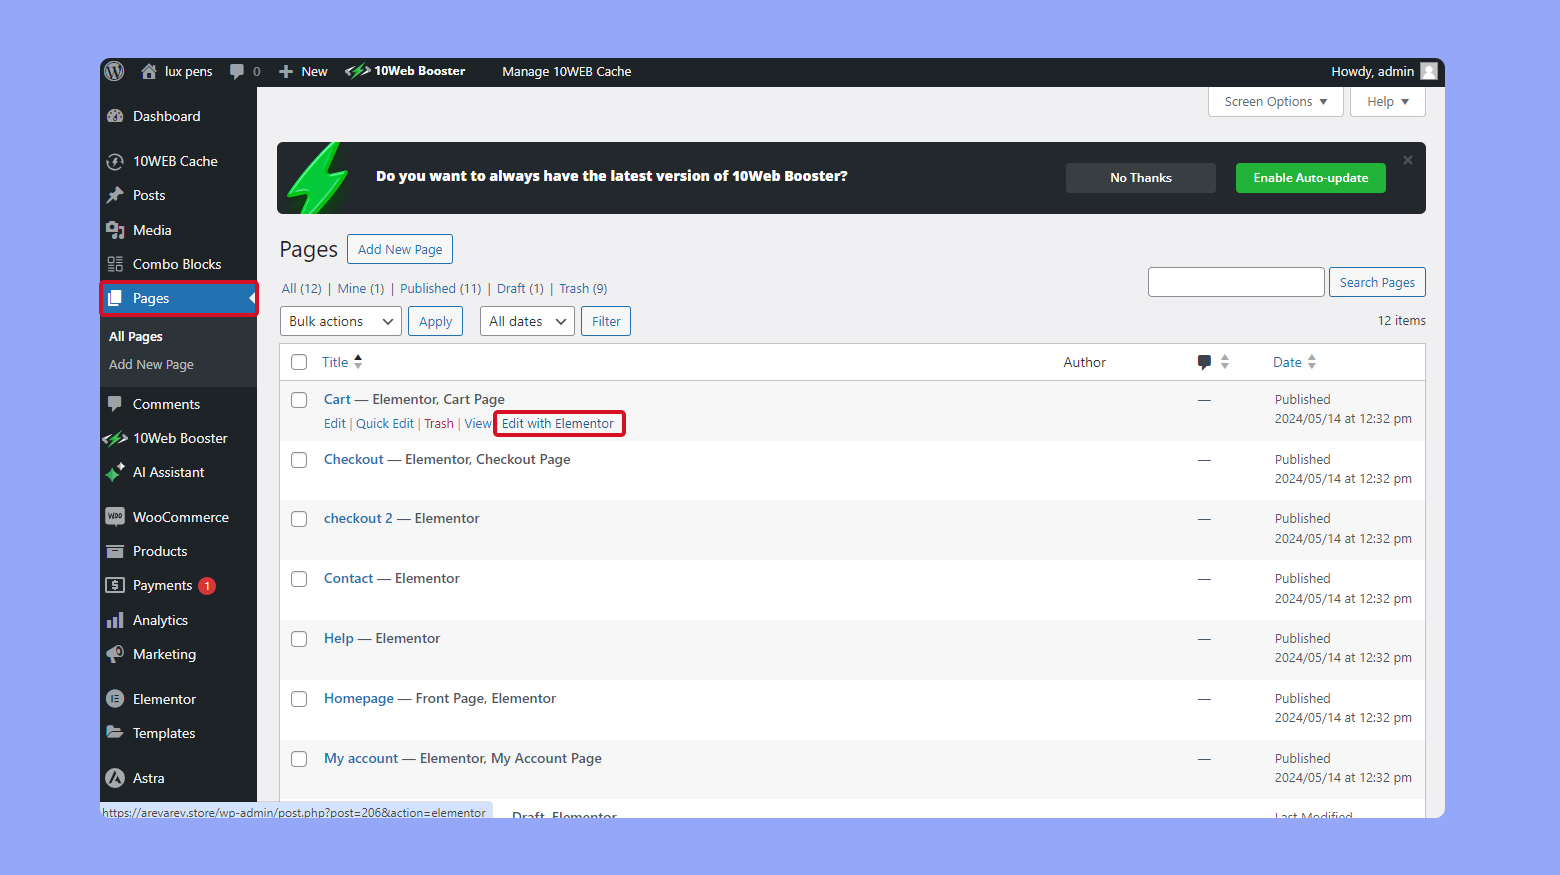
- Go to the Pages section within your WordPress dashboard.
- Look for a page typically named Cart which is automatically created when you set up WooCommerce.
- Click on Edit with Elementor to proceed with customization.

Navigating to the widget library and adding the Cart Widget
Elementor’s widget library includes a dedicated Cart Widget that can be added to your WooCommerce Cart page:
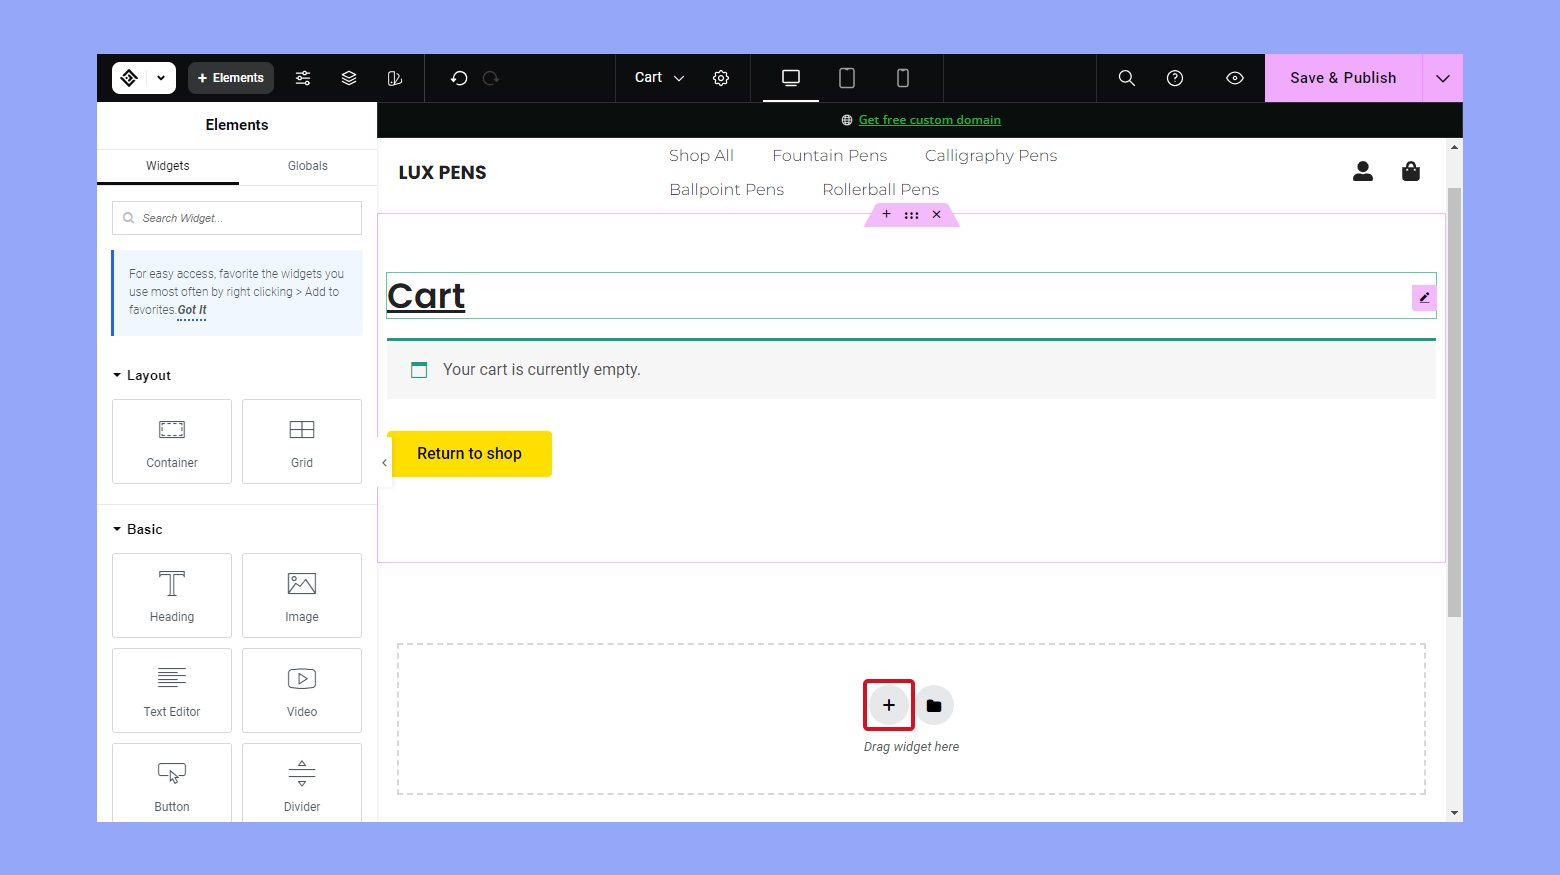
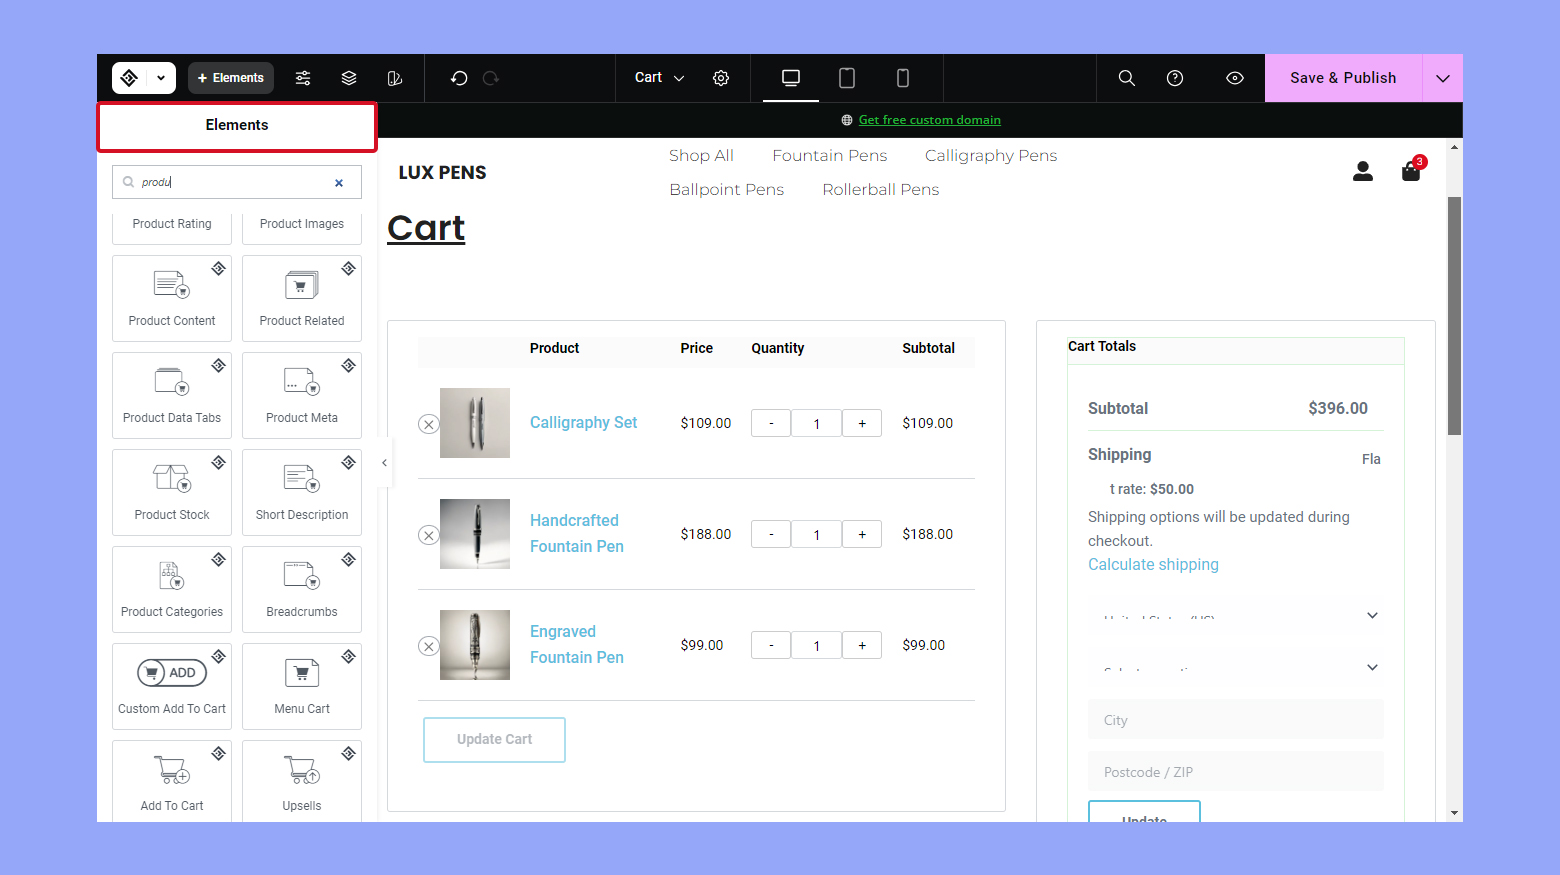
- In the Elementor editor, click on the Add New Section area.

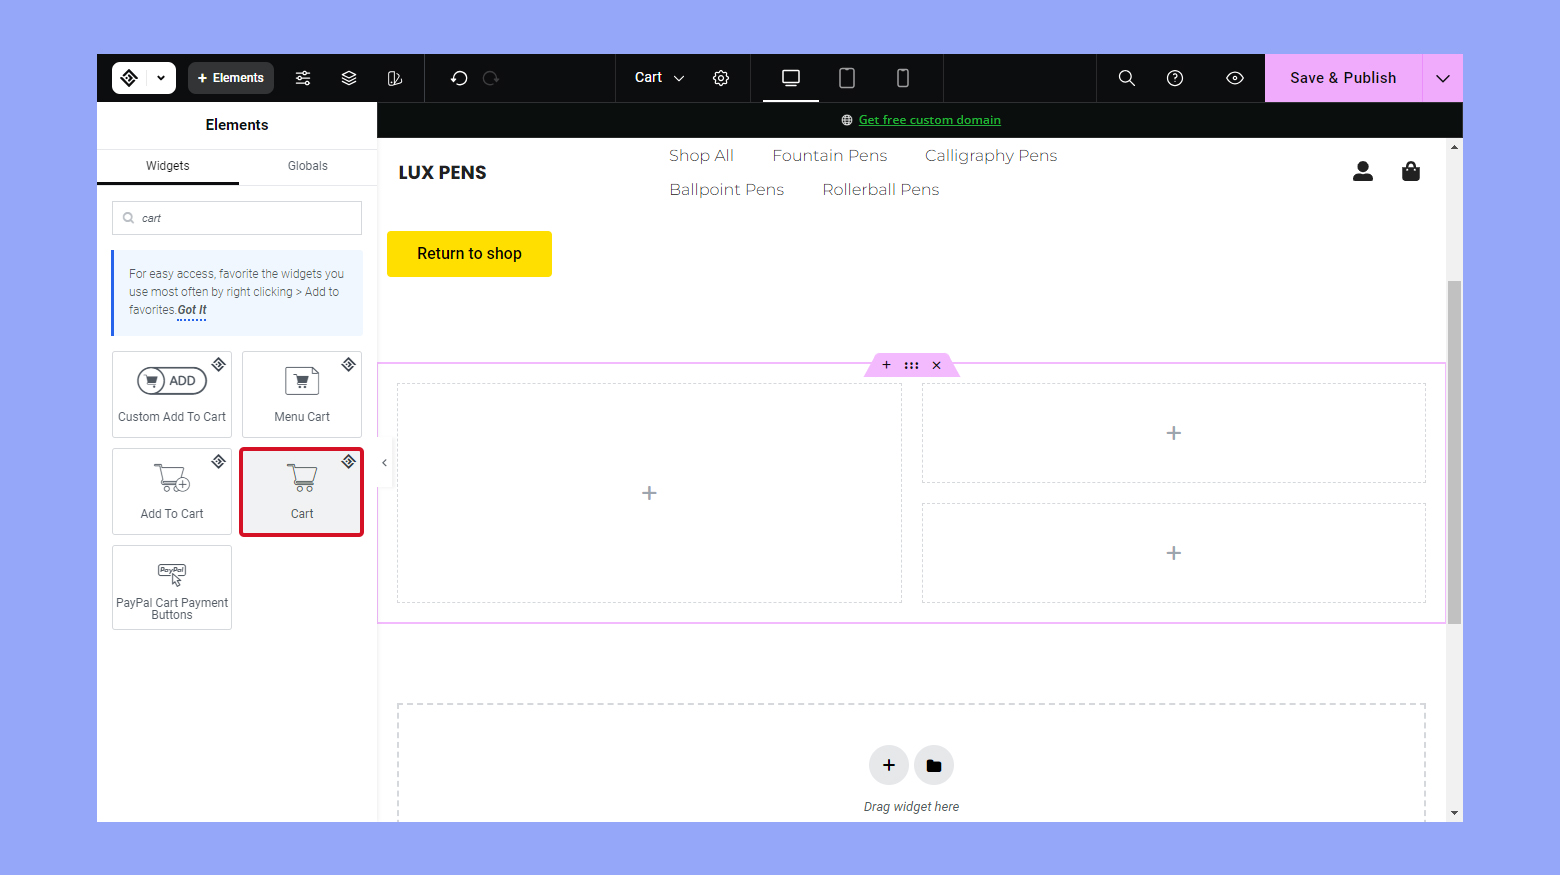
- Type Cart in the widget search bar to find the WooCommerce Cart widget.
- Drag the Cart Widget to your layout and begin customizing various elements such as titles, labels, and placeholders directly with the visual editor.

Create your custom online store in minutes with 10Web AI Ecommerce Website Builder and take your business online. 
Looking to sell online?
How to edit the WooCommerce cart page with Elementor
When you’re looking to revamp your WooCommerce cart page, Elementor makes it possible to apply a personalized touch with ease. Widgets play a crucial part in the customization process, allowing for a unique design suited to your brand.
Choosing the right widgets for your cart page
- Begin by opening your Elementor editor within the WooCommerce cart page.
- Explore the widgets panel; seek widgets that cater to cart functionality such as WooCommerce Cart, Product Quantity Selector, and others that enhance user experience.
- Drag your chosen widget and drop it into your cart page layout. Remember to consider user navigation and aesthetic appeal when placing your widgets.
- Customize each widget’s settings to align with your overall design. For instance, with the WooCommerce Cart widget, you can adjust product image sizes, font styles, and colors directly within the widget options.

- Preview the changes live to ensure widgets not only look good but also function correctly within your cart layout.
Adjusting cart page sections and structure
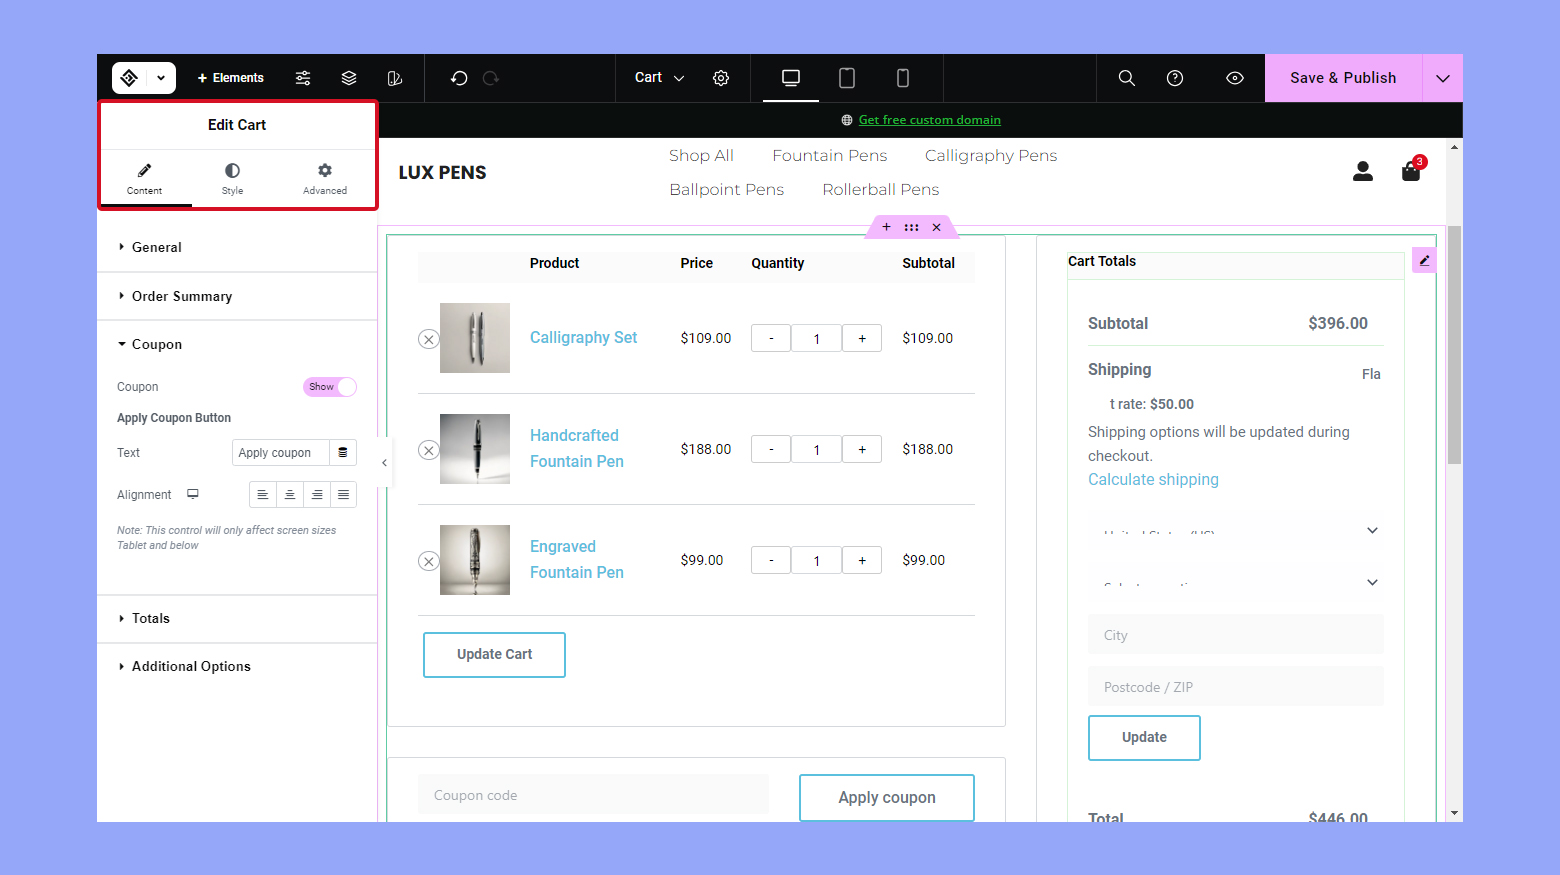
Identify the different Sections in your cart page within Elementor that need adjustment such as Cart Totals or Coupon Field.
- Use Elementor’s drag-and-drop feature to rearrange sections to your preferred layout. Aim for a structure that enhances shopper navigation and usability.
- For each section, click on it to bring up its individual settings. Within these options, you can modify dimensions, padding, and margin ensuring each part of the cart page feels balanced.
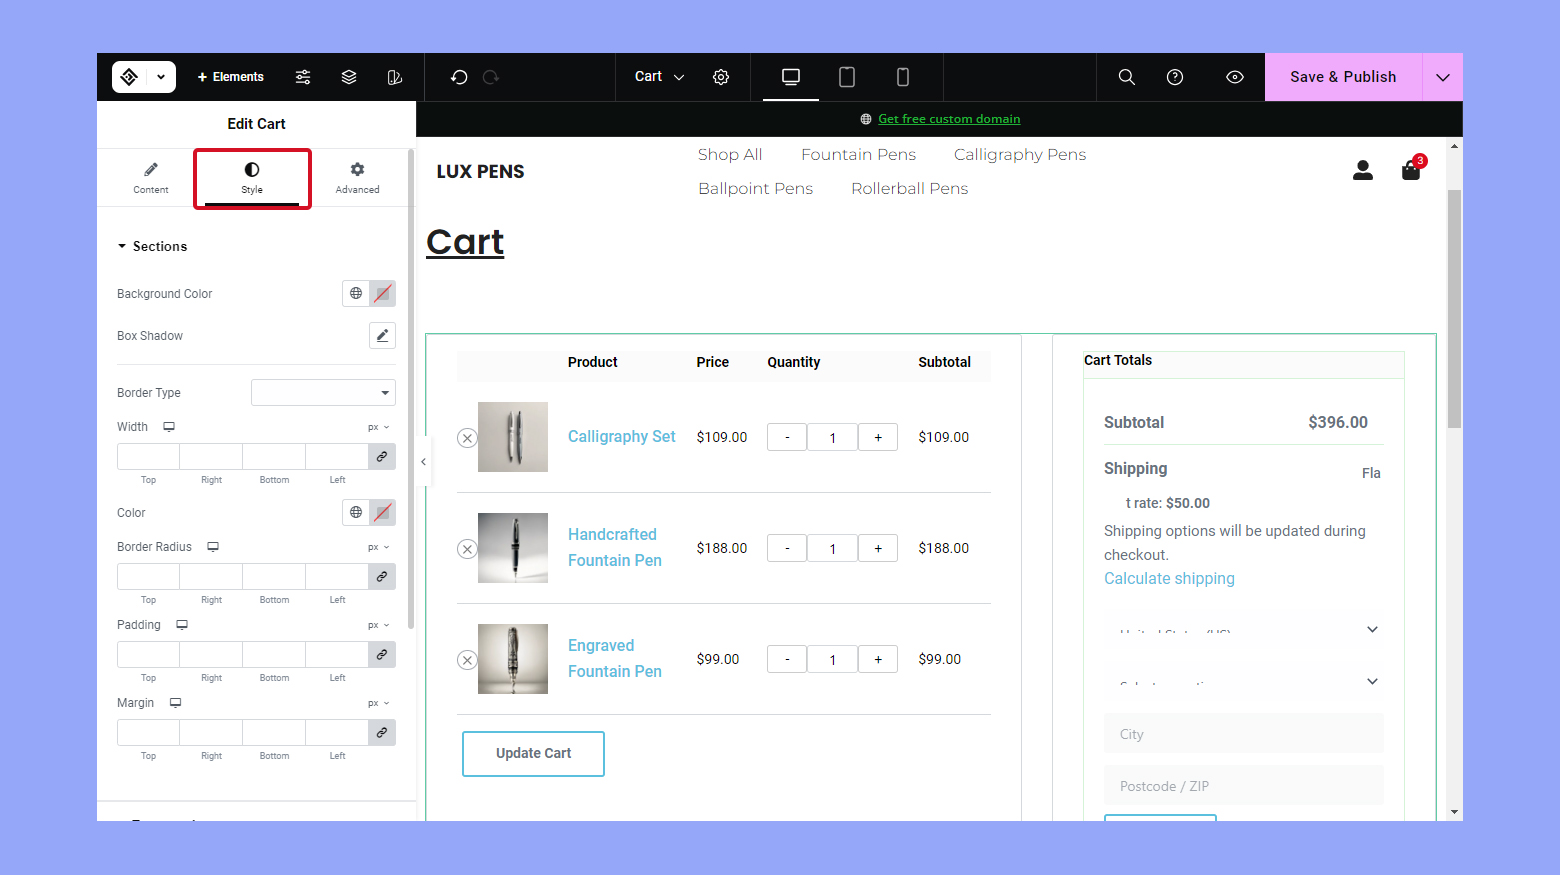
- Experiment with Design options to find the right look, adjusting typography, color, and border styles to match your brand image.

- Regularly save your progress and view your cart page from the front end to ensure your adjustments create a cohesive and functional cart page.
Enhancing cart page visuals and styles
When you customize your WooCommerce cart page with Elementor Pro, applying specific design elements can significantly enhance the overall shopping experience.
Applying custom styles to cart elements
To give your WooCommerce cart page a unique look, start by selecting the cart elements you wish to style. Here’s what you can do:
- Open your Elementor editor and navigate to the cart page.
- Click on the specific cart element, such as the product image or description.
- In the Style tab, you will find options to modify margins, padding, and alignment.
- Adjust the border style or background color to make certain elements stand out or align with your brand design.

- To save your changes, click on the Update button.
By being mindful of consistency in design, these customizations can unify the aesthetic of your cart page, leading to a more professional look and feel.
Improving typography and color schemes
Typography and color are vital in creating a visually appealing and readable cart page:
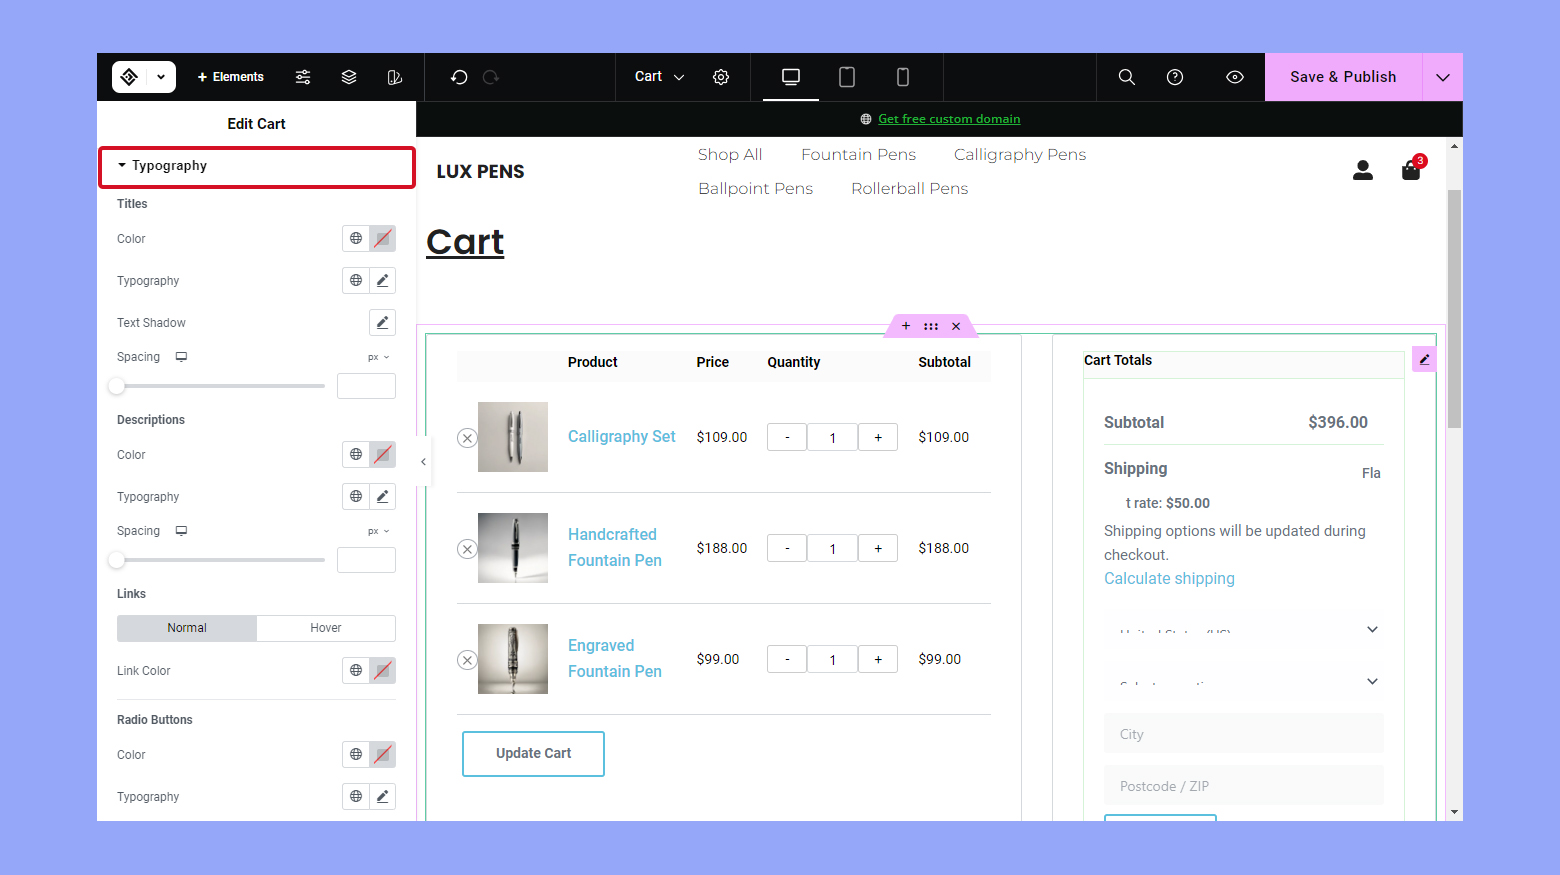
- Access the Typography section under the Style tab to change font styles, sizes, and weights.
- For colors, pick a palette that complements your brand and enhances the readability of product names and prices.
- Use bold, italic, or different font sizes to differentiate between product titles, attributes, and prices.

- Ensure that your buttons such as Update Cart or Proceed to Checkout have distinctive styles and colors to easily catch the user’s eye.
- Preview your changes in real-time and once satisfied, click on Update to apply the new styles.
By updating the typography and color schemes, you’re not only improving the cart’s functionality but also the way customers perceive your brand, possibly leading to increased sales.
Remember, consistency in your visual and typographic design across all pages, especially the WooCommerce cart, reinforces your store’s identity and can make the checkout process more inviting and straightforward for your customers.
Create your custom online store in minutes with 10Web AI Ecommerce Website Builder and take your business online. 
Looking to sell online?
Advanced techniques for cart page customization
When you’re ready to take your WooCommerce Cart page to the next level, these advanced techniques using Elementor can help you create a more effective and personalized shopping experience.
Using shortcodes and custom widgets
If you’ve explored the basics of Elementor, you might be excited to learn that you can further extend your cart page functionality with shortcodes and custom widgets.
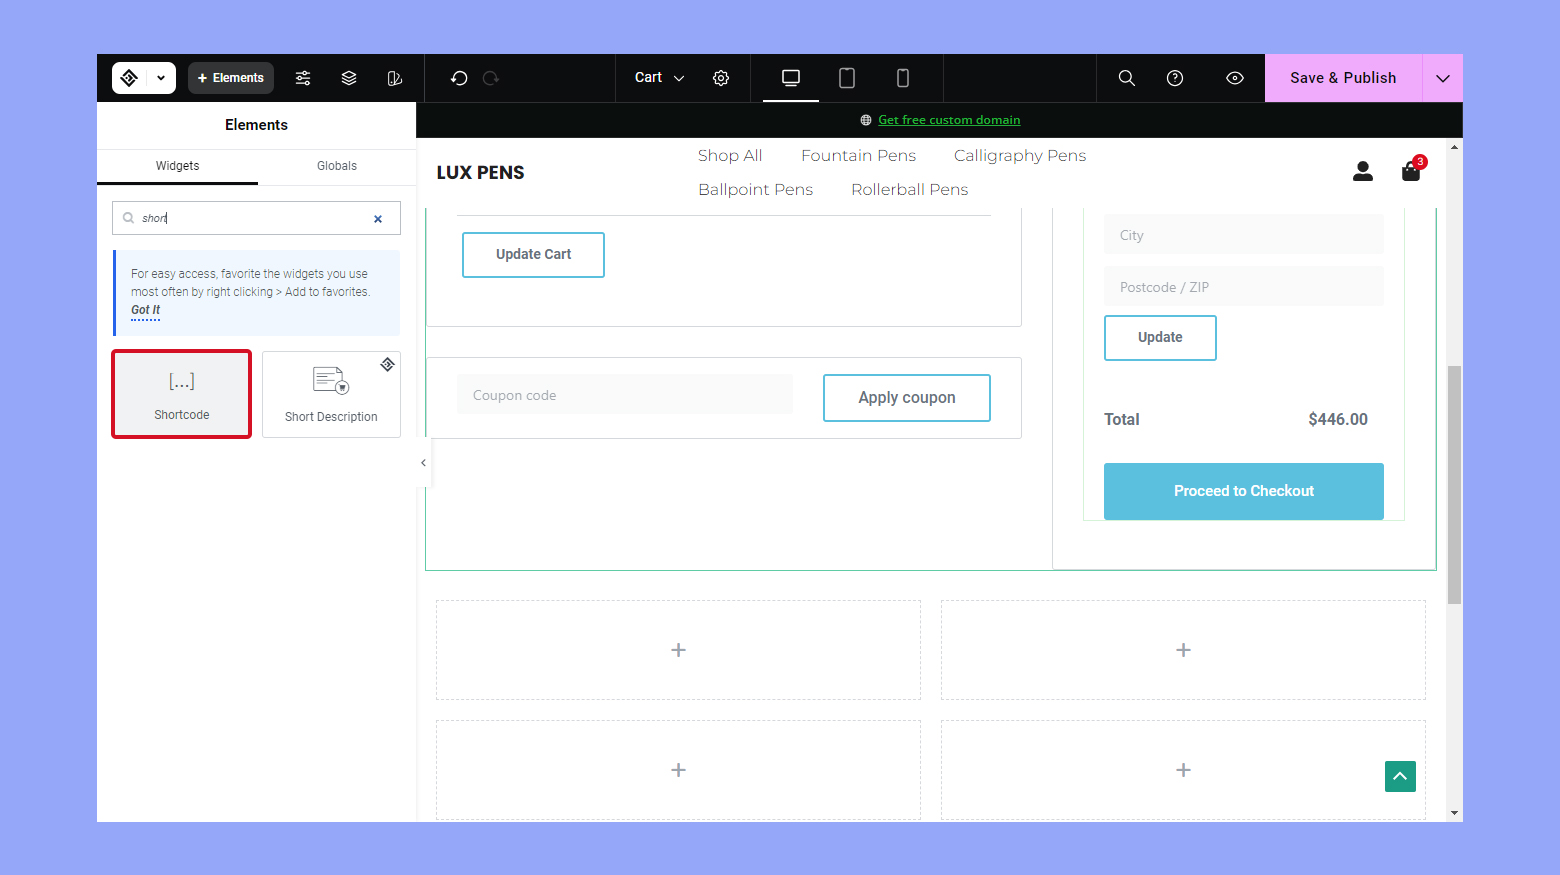
- Search for the shortcode widget within Elementor’s panel and drag it into your Cart page layout.
- Enter the WooCommerce-related shortcode that meets your specific need, such as [woocommerce_cart] — this dynamically displays the user’s cart content.

- To add a custom widget, navigate to the section where you want to add the widget in Elementor.
- Click on the Add New Section button or select a column in a pre-existing section to add your widget.
- In the Elements pane, locate your custom widget, which you can identify by the addon pack’s name you installed for extra functionality.
- Drag your custom widget into the desired column.
- Customize the widget options to suit your page’s needs. Depending on the widget, you may be able to tweak settings or add custom CSS directly within the widget settings.
Remember, utilizing these addons and widgets often requires a good handle on coding knowledge, as you may need to troubleshoot or tweak certain aspects for optimal performance.
Incorporating custom CSS and JavaScript
For those finer details and precise styling control, you can test your coding skills with custom CSS and JavaScript.
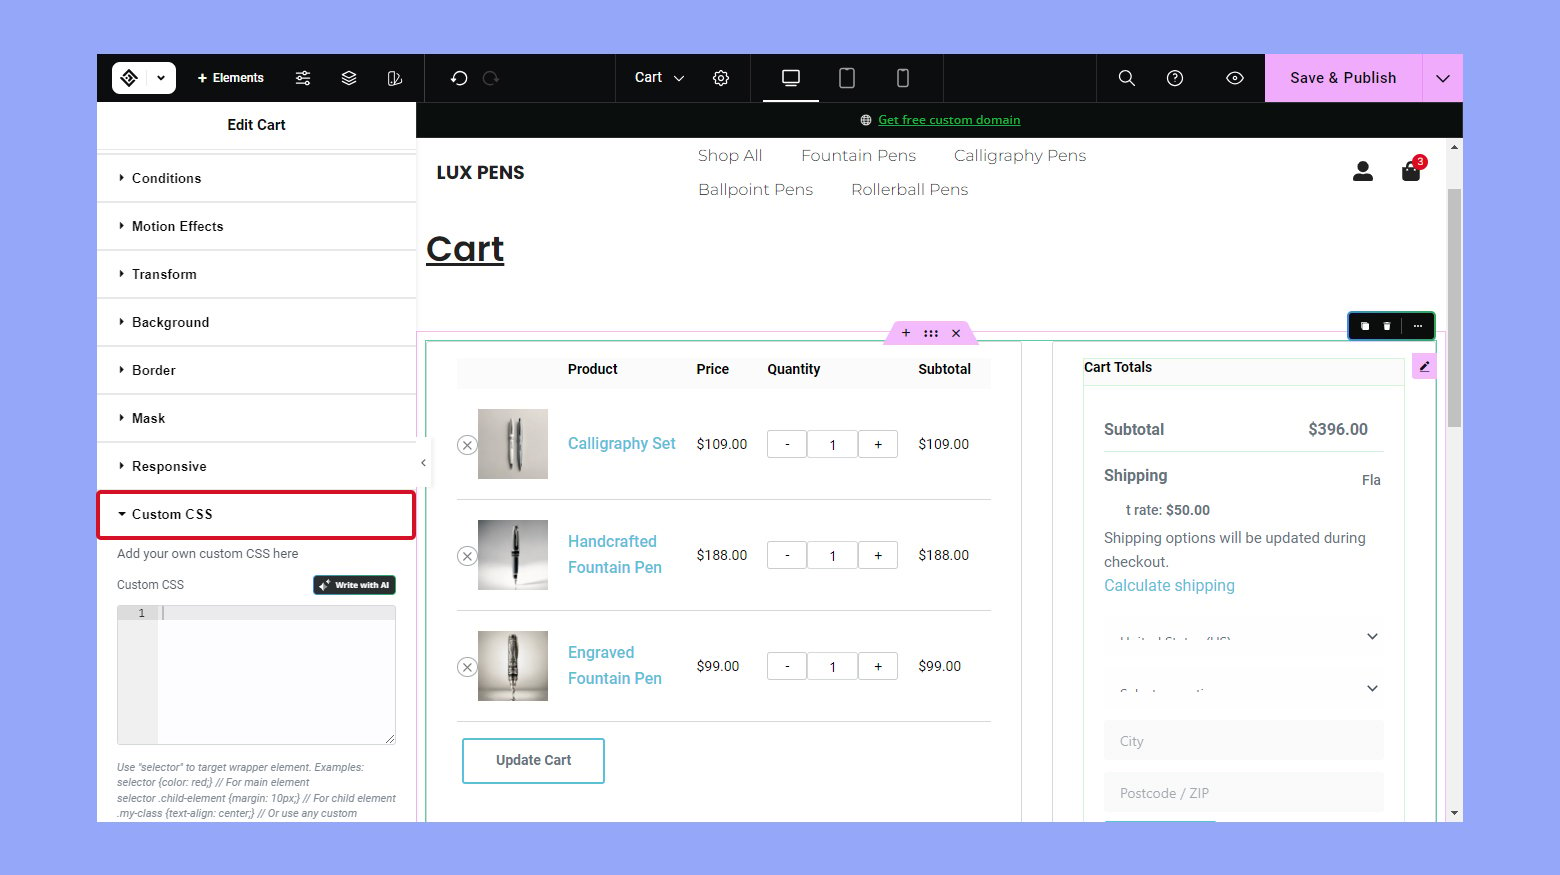
- Open the cart page with Elementor and click on the Edit Section handle.
- Navigate to the Advanced tab where there is an option for Custom CSS.
- Enter your custom CSS codes here. For example, .elementor-button { background-color: #123456; } can change the button colors.

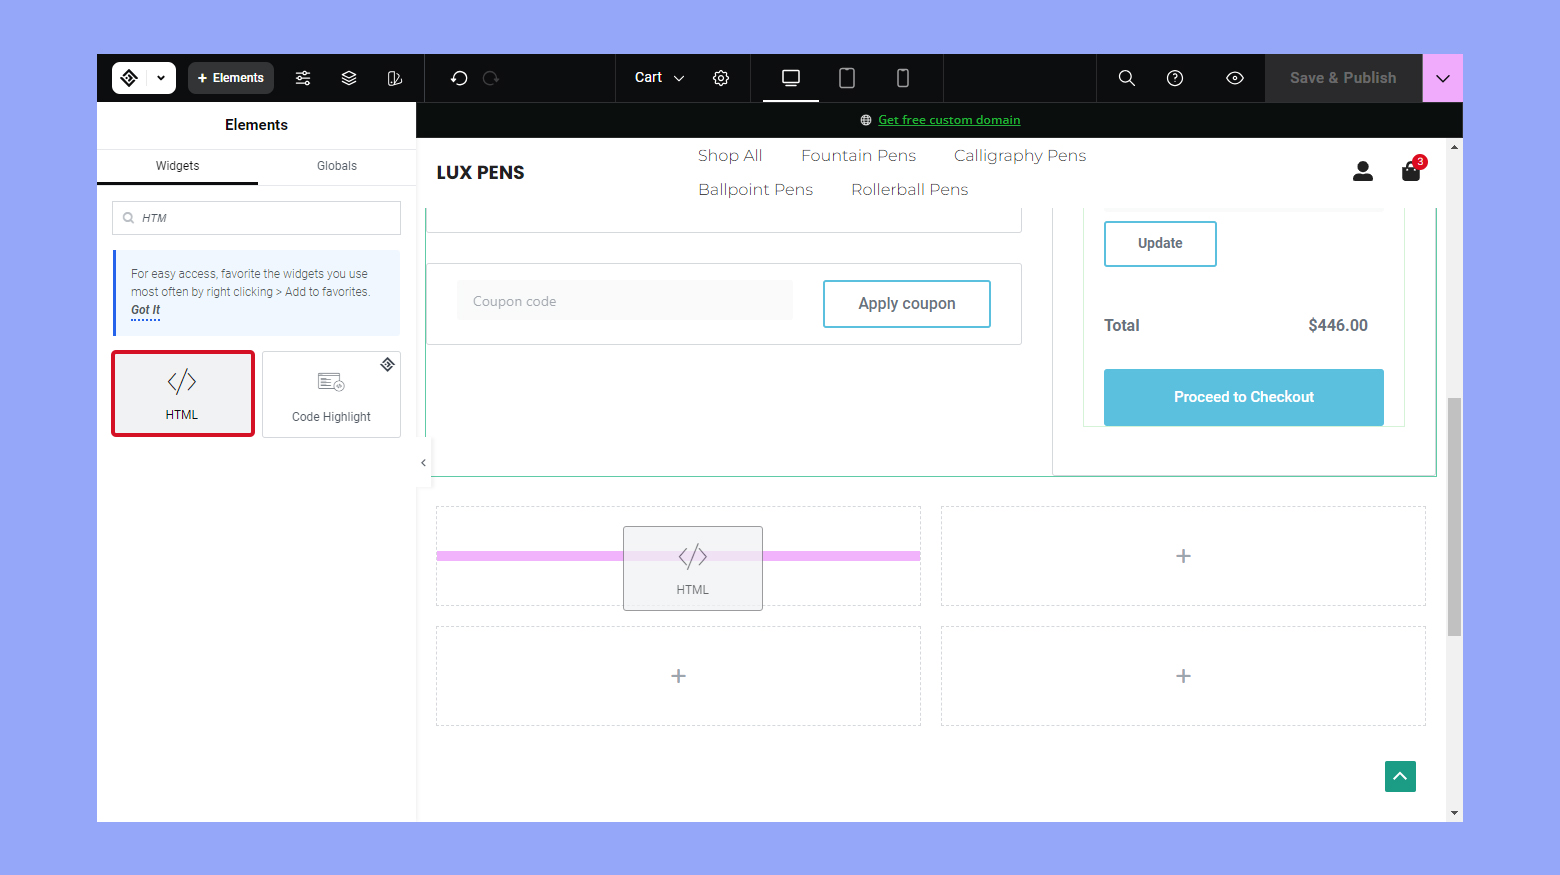
- To include JavaScript, search for the HTML widget and drag it to your cart page.
- Insert your JavaScript code within the HTML widget. Make sure you enclose your code with <script> tags for proper execution.

- Always test your changes thoroughly across different browsers and devices to ensure compatibility and responsiveness.
With these techniques, you have the power to create a unique and sleek Cart page that stands out. It’s a dynamic way of combining Elementor’s ease-of-use with the potency of shortcode and coding functionalities to enhance your online store.
Conclusion
Integrating Elementor with WooCommerce allows you to create a customized, visually appealing online store. This guide covers the essential steps, including installing necessary plugins, locating the WooCommerce Cart Page, and using Elementor’s drag-and-drop functionality for design. By following these steps, you can tailor your shopping cart to match your brand, enhancing the shopping experience for your customers. Utilize this knowledge to build a professional and user-friendly cart page, leveraging advanced customization techniques like custom CSS and JavaScript for a truly unique ecommerce site.


