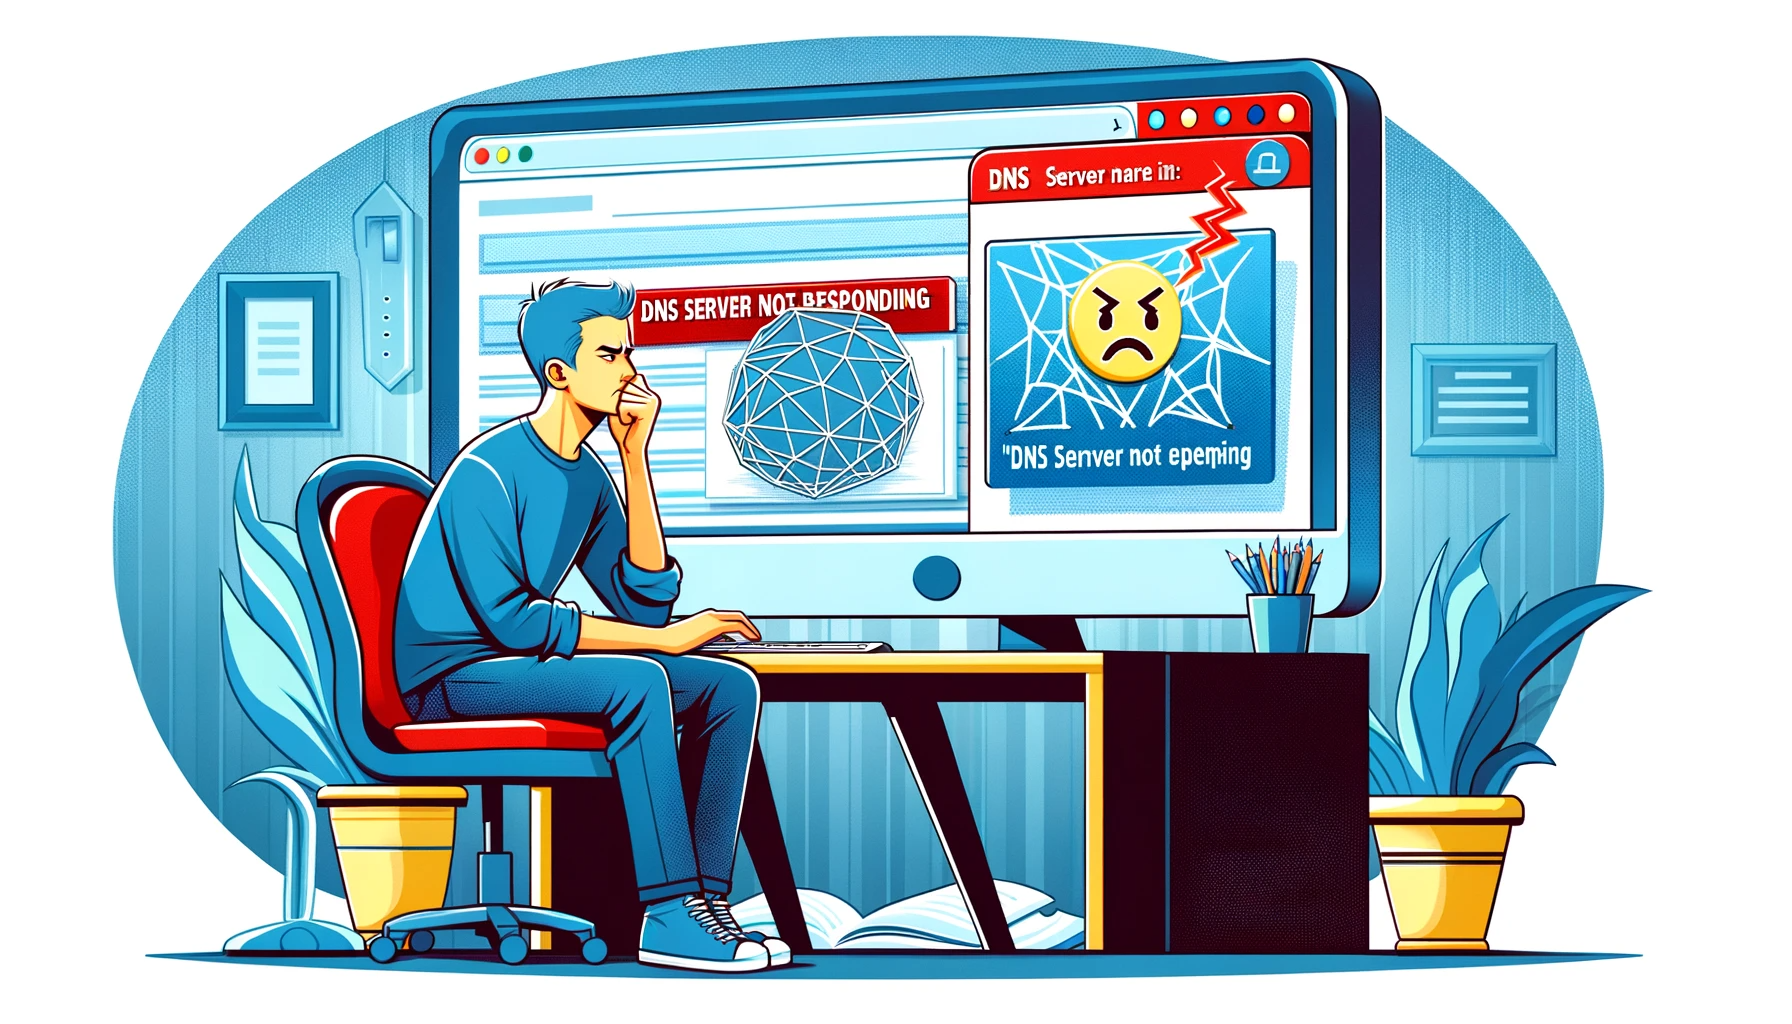
The ERR_NETWORK_CHANGED error is Chrome’s way of telling you it can’t maintain a stable connection to the internet because something about your network just changed. It’s not Chrome being finicky; it’s the browser reacting to a shift in your network environment. This error hints at a disruption between your device and the internet, making it impossible to load web pages until the connection stabilizes or the issue is resolved. The sources of this disruption are varied, ranging from changes in the network configuration, issues with the router or modem, to software conflicts within your system that affect its network capabilities.
Achieve peace of mind with 99.99% uptime on 10Web Managed ![]()
Say goodbye to website errors
WordPress Hosting, powered by Google Cloud.
Understanding this error requires a grasp of how devices connect to and communicate over the internet. Every time you try to access a website, your computer sends a request through your local network to the wider internet. If, for any reason, this request cannot be completed—perhaps due to a sudden change in the network settings, hardware malfunctions, or even software issues—an ERR_NETWORK_CHANGED error may appear. This error is a way of your browser telling you that it can’t maintain a stable connection to the target server due to these changes.
Variations of the ERR_NETWORK_CHANGED error
This error can manifest in several different ways, depending on the browser or device you are using. However, the core issue remains the same: something has interrupted your device’s internet connection. Some common variations of this error message include:
- ERR_NETWORK_CHANGED
- Your connection was interrupted
- A network change was detected
- Error code: ERR_NETWORK_CHANGED
- The device is not connected to the internet
Regardless of the specific wording, these messages all point to the same underlying problem—a hiccup in the network connection that needs addressing.
The core of the issue
At the heart of this error is your IP address, a unique identifier for your device on the internet. If, for some reason, this address changes suddenly (which can happen for a variety of reasons, like restarting your router or switching networks), Chrome gets confused. Without a stable IP address, Chrome can’t establish a reliable route to the server hosting the website you’re trying to visit.
Then there’s the DNS, or Domain Name System, which plays a crucial role in how we navigate the internet. DNS translates the web addresses we’re familiar with (like www.google.com) into IP addresses that computers use to communicate with each other. If there’s an issue with the DNS—maybe it’s down, or there’s a misconfiguration—your browser might struggle to resolve the IP address of the website you’re trying to access.
Here is a list of several factors that can trigger the ERR_NETWORK_CHANGED error. Here are some of the most common reasons:
Wi-Fi or router issues: A simple disruption in your Wi-Fi connection, such as temporary signal loss or router rebooting, can cause this error.
Network configuration changes: Changes in your network settings, like switching from a wired connection to Wi-Fi or modifying your IP configuration, can disrupt the connection.
VPN or proxy services: If you’re using a VPN or proxy and it disconnects or switches servers, your browser may display the ERR_NETWORK_CHANGED error.
ISP or external network changes: Sometimes, the problem lies outside your home network. Your Internet Service Provider (ISP) might be making changes or experiencing issues that affect your connection.
Antivirus or firewall interference: Security software can sometimes interfere with your network connection if it mistakenly identifies normal internet traffic as a threat.
Say goodbye to website errors
Achieve peace of mind with 99.99% uptime on 10Web Managed
WordPress Hosting, powered by Google Cloud.
Possible ways to fix the ERR_NETWORK_CHANGED error
Resolving the ERR_NETWORK_CHANGED error involves a series of troubleshooting steps aimed at identifying and addressing the source of the network disruption. Here’s what you can do:
Restart your router and computer
Often, a simple restart of your router and computer can resolve temporary connectivity issues. Let’s dive into one of the simplest yet effective ways to troubleshoot this problem.
Restarting your router and computer gives your devices a fresh start. This method is surprisingly effective for a range of issues, including temporary connectivity glitches. When you restart your router, you’re essentially clearing its memory and allowing it to re-establish a clean connection to your ISP. Similarly, rebooting your computer clears temporary configurations and forces your network adapter to reconnect under fresh parameters.
Power down your router
- Locate the power cord connected to your router.
- Safely unplug the cord from the router or the electrical outlet, effectively turning off the device.
- Wait for at least one minute. This brief period allows the router’s internal memory to clear and any residual charge to dissipate, ensuring a true reset.
Restart your computer
- While your router is unplugged and resetting, take this opportunity to restart your computer.
- On Windows, you can do this by clicking on the Start menu, selecting the Power icon, and choosing “Restart.”
- For Mac users, click on the Apple menu in the top left corner and select “Restart” from the dropdown options.
Power up your router
- Reconnect the router’s power cord to the electrical outlet or back into the router itself.
- Allow a couple of minutes for the router to fully boot up. This process can vary slightly depending on your router’s make and model, but generally, you’ll see a series of lights that indicate the router’s status. Look for steady or blinking lights that signify a stable connection to your ISP and local network.
- Once your router is fully operational, and your computer has rebooted, take a moment to check if you can connect to the internet.
If the “ERR_NETWORK_CHANGED” error persists, you might need to delve into more advanced troubleshooting techniques. But in many cases, this simple restart process does the trick.
Reboot your network settings
When you’ve tried restarting your router but the “ERR_NETWORK_CHANGED” error still haunts your browsing experience, it’s time to consider resetting your network configuration. This method is a bit more thorough and involves refreshing your computer’s IP address and clearing out the local DNS cache. Just as clearing your browser cache can solve webpage loading issues, flushing the local DNS cache helps your computer quickly resolve domain names into IP addresses without stumbling over outdated information.
Windows
The process on Windows involves a series of command-line instructions that reset various network settings back to their defaults. Here’s how to dive in: 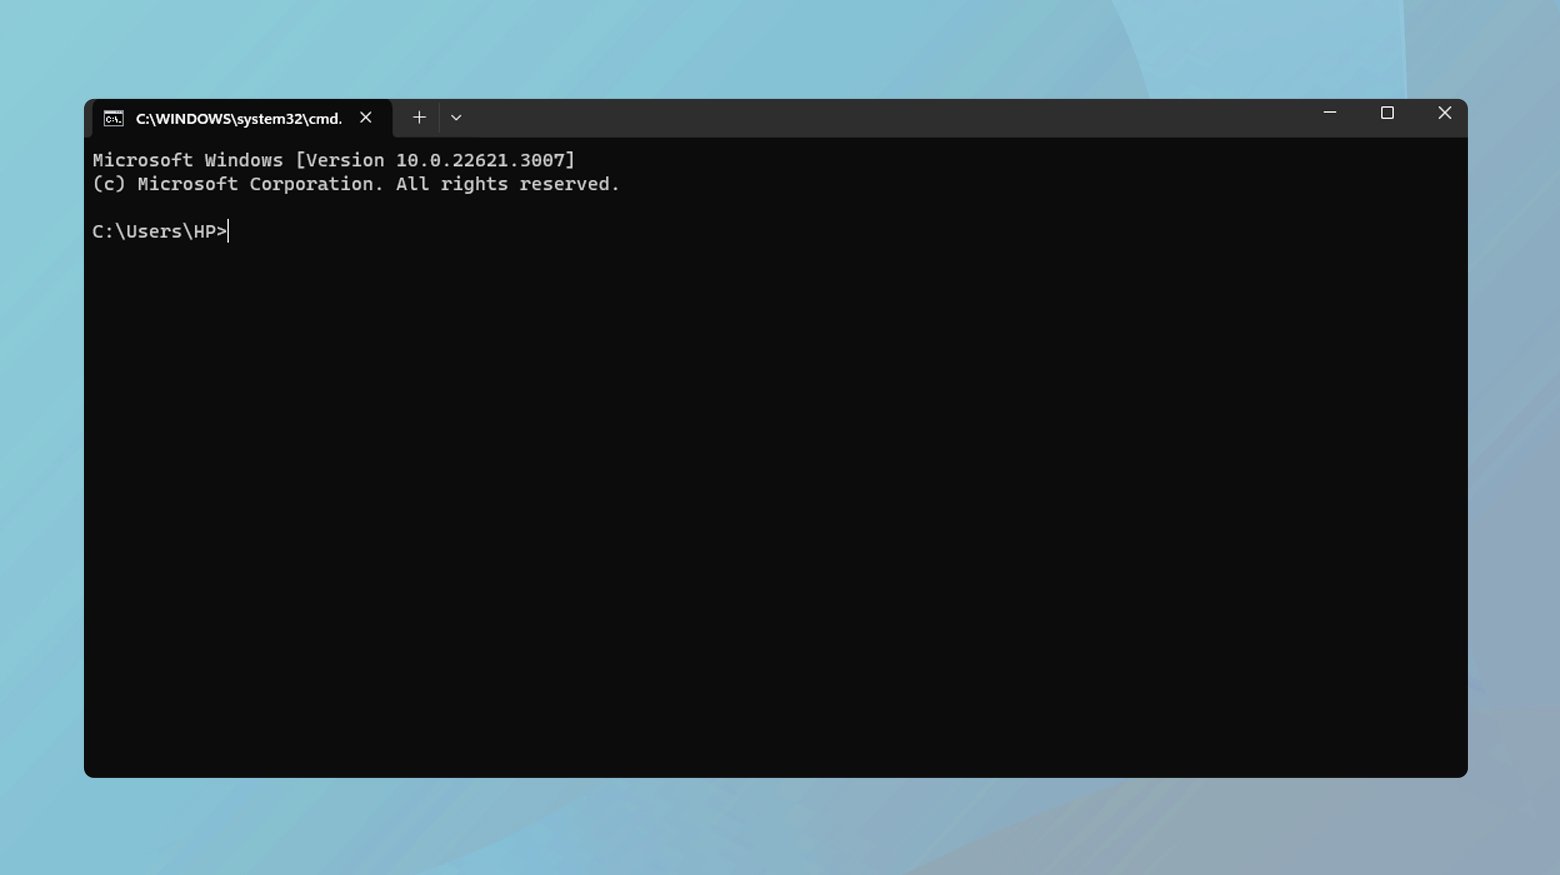
- Press `Windows + R` to open the Run dialog.
- Type `cmd` and press Enter or click “OK” to launch the Command Prompt.
- In the Command Prompt window, you’ll need to type the following commands. After typing each command, press Enter to execute it:
ipconfig /flushdns
This command clears the DNS cache. Your computer will forget any domain name to IP address mappings it had learned, forcing it to acquire fresh information from DNS servers.
nbtstat -R
This command refreshes the NetBIOS names cache. NetBIOS handles local network name resolution for older applications.
netsh int ip reset
This resets the IP settings. If you’ve manually set any IP configurations, they’ll be wiped, and your computer will revert to obtaining an IP address automatically from your router.
netsh winsock reset
Resets the Winsock catalog to its default setting. Winsock handles input/output requests for Internet applications in Windows. Resetting it can resolve issues with connectivity.
After executing these commands, a restart is often necessary to apply the changes and fully reset your network configuration.
macOS
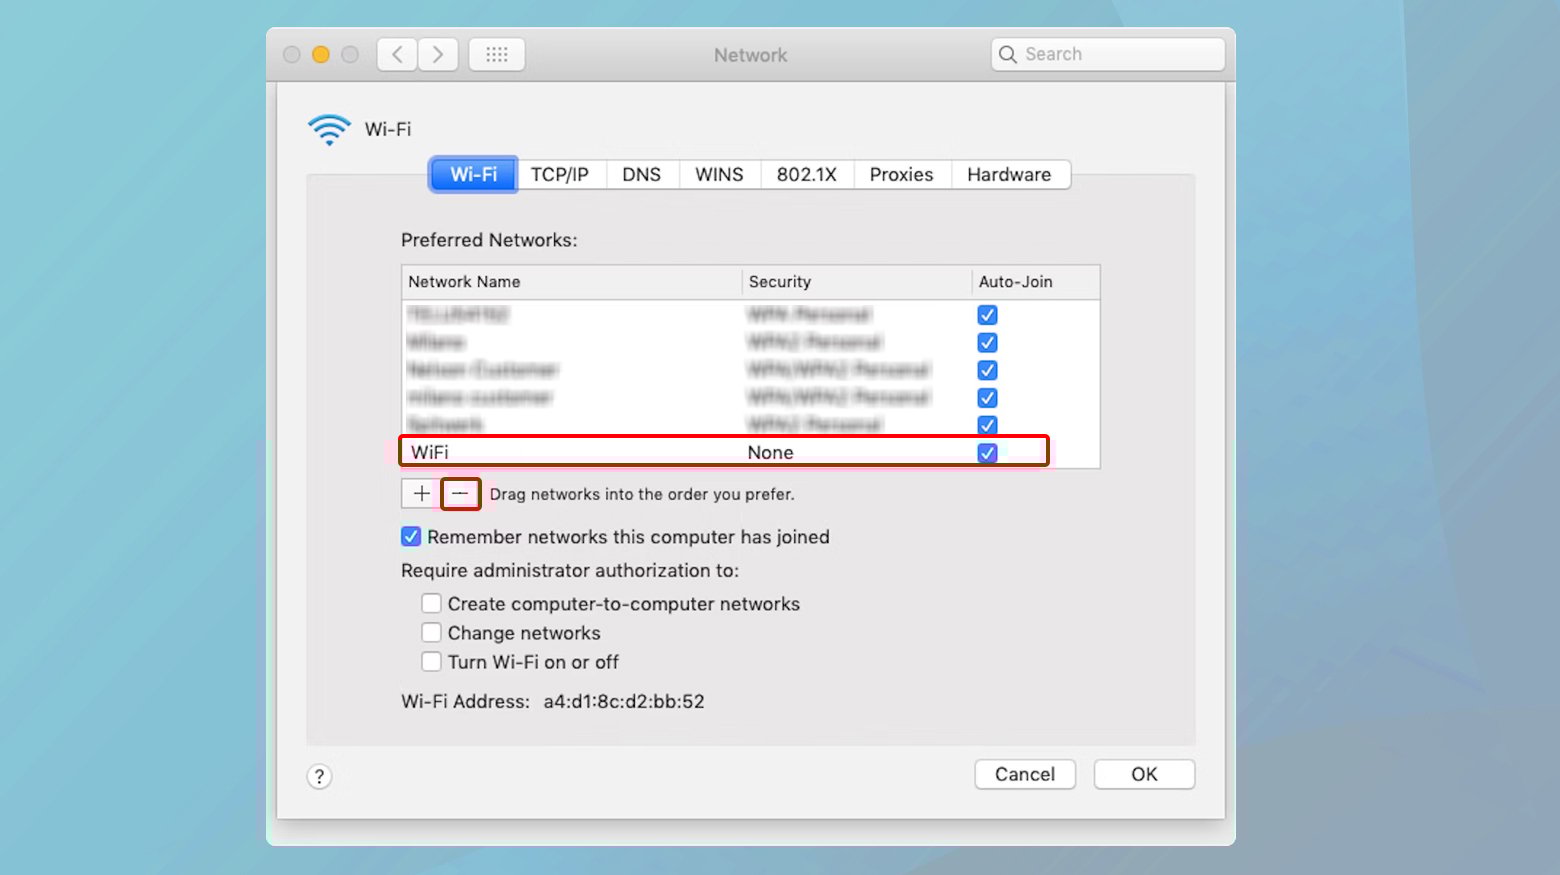
For macOS users, the process involves adjusting settings within the System Preferences:
- Click on the Apple menu and select “System Preferences.”
- Go to “Network” to view your network settings.
- Select the network service you’re having issues with (e.g., Wi-Fi or Ethernet) from the list on the left.
- Click the minus (-) button to remove the selected service. Confirm if prompted.
- Now, click the plus (+) button to add a new network service. Select the same service type you just removed, give it a name, and create it.
- Reconfigure your network settings as needed, such as re-entering Wi-Fi passwords or setting up a new VPN.
- Click “Apply” to save your changes and re-establish the connection with the updated settings.
Resetting your network configuration can be a powerful step in troubleshooting persistent “ERR_NETWORK_CHANGED” errors. This process gives your computer a clean slate for network connections, potentially resolving issues caused by misconfigured settings or cached data.
Disable your VPN and proxy services
Both VPNs and proxies act as intermediaries between your computer and the internet, anonymizing your activities or bypassing geo-restrictions. However, they can sometimes interfere with your network connection.
Understanding VPNs and proxies
VPNs create a secure and private tunnel between you and the internet, encrypting all your data. This setup is ideal for protecting your online privacy and securing your connection on public Wi-Fi networks.
Proxies, on the other hand, don’t encrypt your connection but can redirect your internet traffic. This can be useful for accessing region-restricted content or managing internet usage in a corporate environment. The quality of the proxy also matters, since slow or unreliable services can cause connection errors, blocked requests, or unstable browsing. Comparing the best proxy providers can help you choose an option that fits your speed, privacy, and reliability needs.
Disabling VPN and proxy on Windows
If you’re running a VPN, disable it through the application interface. Most VPNs have a simple toggle switch to turn the connection on or off.
To adjust proxy settings:
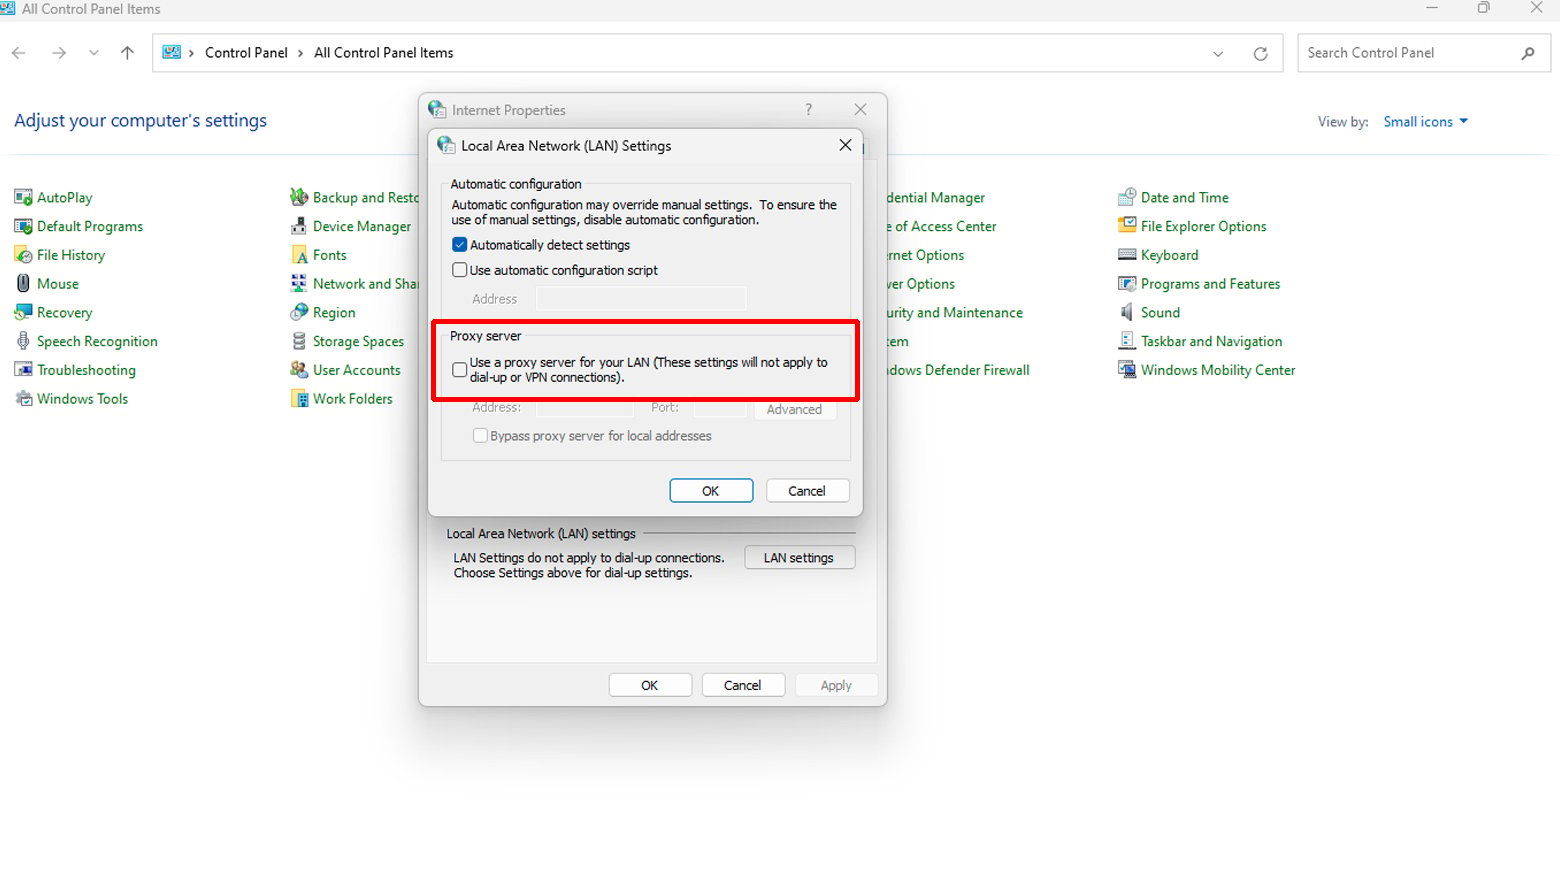
- Press the Windows key, type “internet options,” and select the corresponding result.
- Navigate to the “Connections” tab, and click on “LAN settings.”
- If “Use a proxy server for your LAN” is checked, uncheck it to disable your proxy. Also, ensure “Automatically detect settings” is checked for good measure.
- Click “OK” to apply the changes.
Disabling VPN and proxy on macOS
If you use a VPN, disable it from the VPN service’s application or from the System Preferences > Network section by selecting the VPN service and clicking the “Disconnect” button.
To adjust proxy settings:
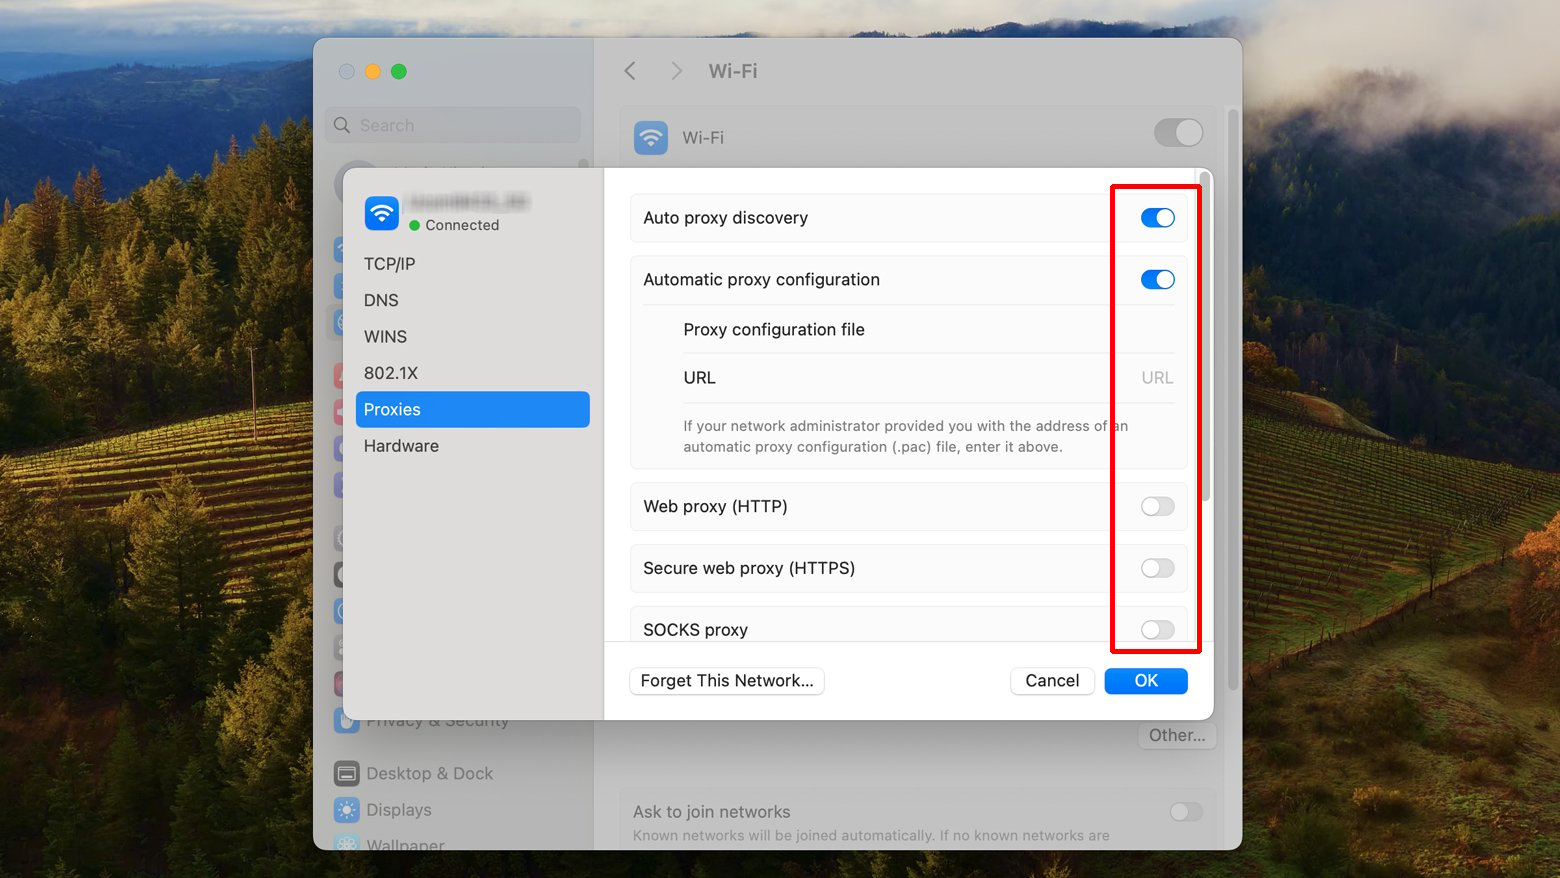
- Open System Preferences and go to “Network.”
- Select the network service you’re using (e.g., Wi-Fi or Ethernet) on the left panel and click on “Advanced.”
- Switch to the “Proxies” tab.
- Here, you can uncheck any proxies that are currently enabled, whether manual or automatic configurations.
- Click “OK,” then “Apply” to save your changes.
Once you’ve disabled your VPN and proxy settings, try accessing the internet again. If the “ERR_NETWORK_CHANGED” error disappears, the issue is likely related to these services interfering with your network connection.
Check and adjust your DNS settings
DNS, or Domain Name System, acts like the internet’s phonebook, translating human-friendly domain names into IP addresses that computers use to communicate with each other. If there’s a malfunction in this process, you might encounter connectivity issues. Let’s take a look at how you can adjust your DNS settings to troubleshoot this error.
Why your DNS settings matter
Your device typically uses DNS servers provided by your ISP (Internet Service Provider) by default. This setup works well for most users, but if you’re facing persistent network errors like “ERR_NETWORK_CHANGED,” tweaking your DNS settings could be a game-changer. Custom DNS servers not only potentially resolve such errors but can also offer benefits like improved speed and enhanced privacy.
Adjusting DNS settings on Windows
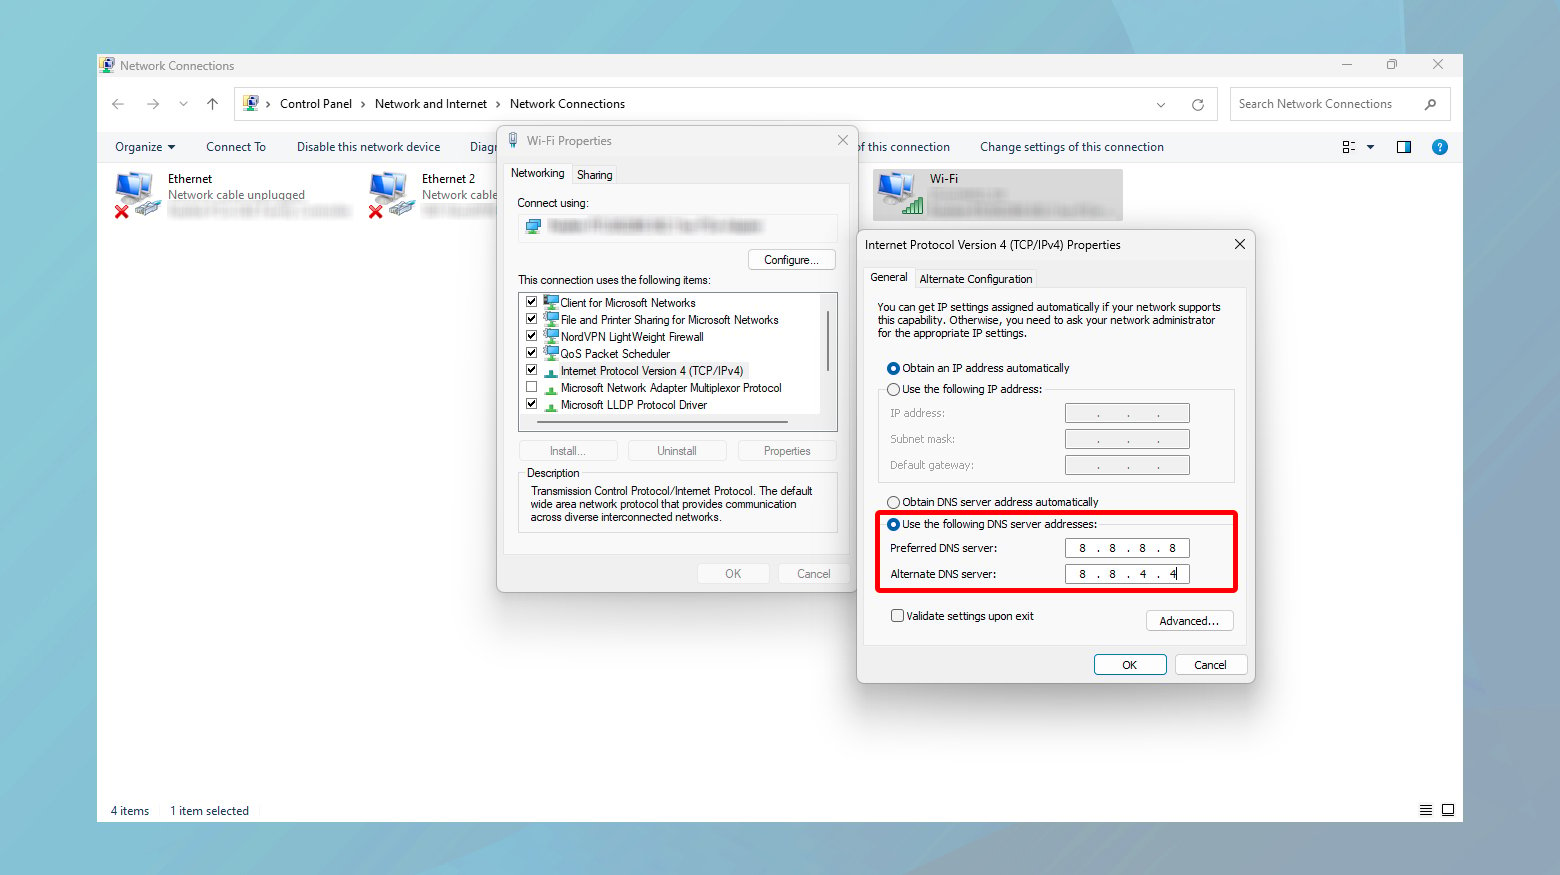
- Press `Windows` and type `Control Panel`.
- Click on “Network and Sharing Center.”
- Choose “Change adapter settings” to open a window displaying your network connections.
- In the “Network Connections” window, look for the connection that’s currently active. If you’re on Wi-Fi, it’ll typically be the one with your network’s name.
- Right-click on your active connection and select “Properties.”
- Scroll down to “Internet Protocol Version 4 (TCP/IPv4)” and double-click it to open its properties.
- By default, both “Obtain an IP address automatically” and “Obtain DNS server address automatically” should be selected.
- If you’re troubleshooting, first try selecting “Obtain DNS server address automatically” if it isn’t already. This step ensures you’re using the default DNS settings provided by your ISP.
- Alternatively, to use custom DNS settings, select “Use the following DNS server addresses.” Enter the addresses of your preferred DNS servers. Public DNS servers like those from Google (8.8.8.8 and 8.8.4.4) or Cloudflare (1.1.1.1 and 1.0.0.1) are popular choices for their reliability and speed.
- After making your changes, click “OK” to save them.
It’s a good idea to restart your browser or even your computer to ensure all settings are fully applied. Open Chrome and navigate to a website to check if the “ERR_NETWORK_CHANGED” error has been resolved.
Adjusting DNS settings on macOS
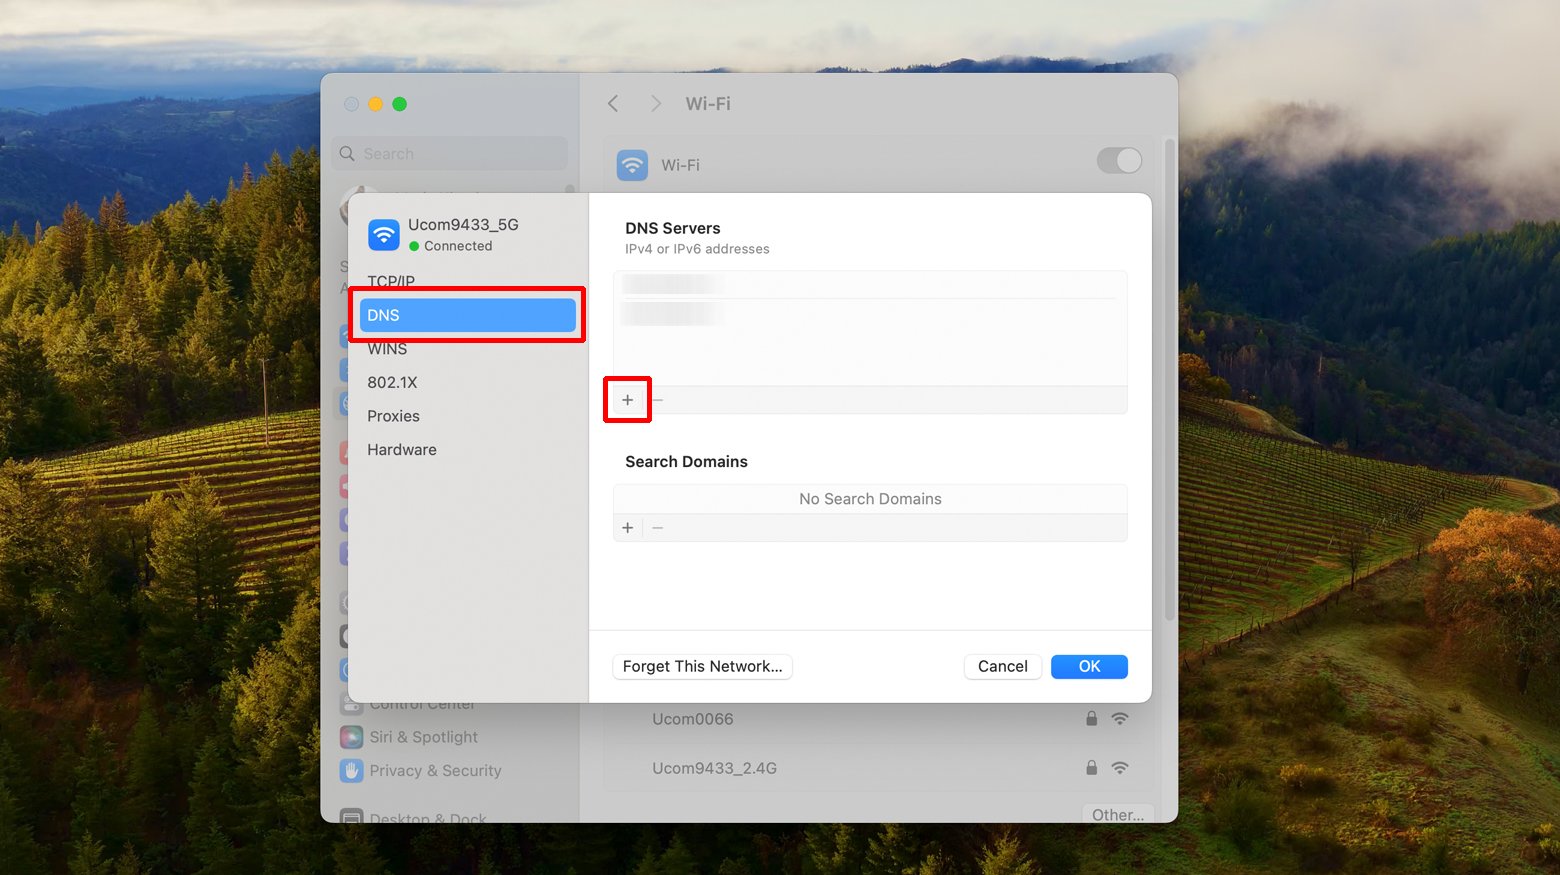
- Click on the Apple menu at the top left corner of your screen and select “System Preferences.”
- Find and click on the “Network” icon within System Preferences to access your network settings.
- On the left panel, you will see a list of available network connections. Click on the one you’re currently using, such as Wi-Fi or Ethernet, to highlight it.
- With your network connection selected, click on the “Advanced” button located towards the bottom right of the window.
- In the Advanced settings window, find and click on the “DNS” tab to view your DNS settings.
- To add a new DNS server, click the “+” button under the DNS Servers list. Enter the IP address of your preferred DNS server. Common public DNS servers include Google DNS (8.8.8.8 and 8.8.4.4) and Cloudflare DNS (1.1.1.1). To remove an existing DNS server, select it from the list and click the “-” button.
- After adding or removing DNS servers, click “OK” to close the Advanced settings window, then click “Apply” on the Network window to save your changes.
Closing thoughts
In our discussion, we explored solutions for the “ERR_NETWORK_CHANGED” error, focusing on practical steps for Windows and macOS users. We began with restarting routers and computers to refresh network connections, then moved to temporarily disabling VPN and proxy services to eliminate interference. We also covered resetting network configurations by renewing IP addresses and flushing DNS caches, and concluded with adjusting DNS settings to ensure optimal connectivity. These steps offer a comprehensive approach to troubleshooting network issues, emphasizing user-friendly instructions for enhancing internet browsing experiences.
Say goodbye to website errors
Achieve peace of mind with 99.99% uptime on 10Web Managed
WordPress Hosting, powered by Google Cloud.
Say goodbye to website errors
Fix all the website errors in one click
Migrate your website to the world's best Managed WordPress Hosting.