Managing multiple authors on your WordPress blog can significantly enhance the variety and volume of content, enriching the reader’s experience.
When you open your website to contributions from diverse individuals, you create a dynamic environment where fresh perspectives are shared regularly. This collaborative approach keeps your audience engaged and shares the workload among several users, making it more manageable for you to maintain consistent publishing frequency.
This article shows you how to add authors in WordPress so that you have control over who can draft articles, upload media, and publish posts on your website.
FAQ
How do I change the author name for a post in WordPress?
Then, locate the Summary box under the Post settings on the right and select the desired author from the dropdown list.
How do I add a custom author name in WordPress?
In your WordPress dashboard, go to Users, find the profile you want to alter, and change the Nickname and Display name publicly as fields as needed.
How do I add a second author in WordPress?
Plugins like PublishPress Authors can enable you to assign additional authors to your posts.
What is the process to edit an author's page in WordPress?
Click on the Edit option under the author’s username. Here, you can change user details and the biographical information that typically appears on an author’s page.
Where are authors in WordPress?
Here, you can view all users with different roles, including the Author role. You can also add or edit users in this section.
How do I add an author block in WordPress?
Understanding user roles in WordPress
When managing a WordPress site, it’s crucial to understand user roles and permissions to maintain order and security. Proper understanding helps you delegate tasks efficiently while ensuring users only have access to the functions necessary for their role.
Role definitions
In WordPress, there are several predefined user roles, each with its specific capabilities and permission levels. When you add authors in WordPress, you’ll set the user’s permissions by choosing an appropriate role.
- Administrator: Has absolute control over the entire website, including the ability to manage other users’ roles and capabilities.
- Editor: Can publish, edit, or delete any posts, including those written by others, and manage categories, tags, and links.
- Author: Can publish and manage their own posts only.
- Contributor: Can write and manage their own posts but cannot publish them.
- Subscriber: Can manage their profile and has the least capabilities, mainly reading posts.
In addition, you can create custom roles with specific capabilities using plugins like User Role Editor. This gives you a high level of control over specific permissions for each user.
Some plugins automatically create custom roles. For example, WooCommerce creates the Customer and Shop Manager roles.
User permissions
User permissions denote what each role can or cannot do within your WordPress site. These are integral in maintaining a secure and well-organized site.
Permissions can be adjusted when:
- You need to limit or grant access levels for certain tasks.
- You are assigning a role that aligns with the user’s responsibilities.
- You are customizing roles to create a more granular level of access.
For example, while an Editor can modify posts, a Contributor does not have permission to publish them. Each role is tailored to fit the necessary tasks without overextending access.
How to add authors in WordPress
To expand your site’s content creation capability, it’s essential to understand how to add authors in WordPress.
The process is manageable through the WordPress dashboard.
Using the WordPress dashboard
To add new authors in the WordPress Dashboard, navigate to the Users section and select Add New.
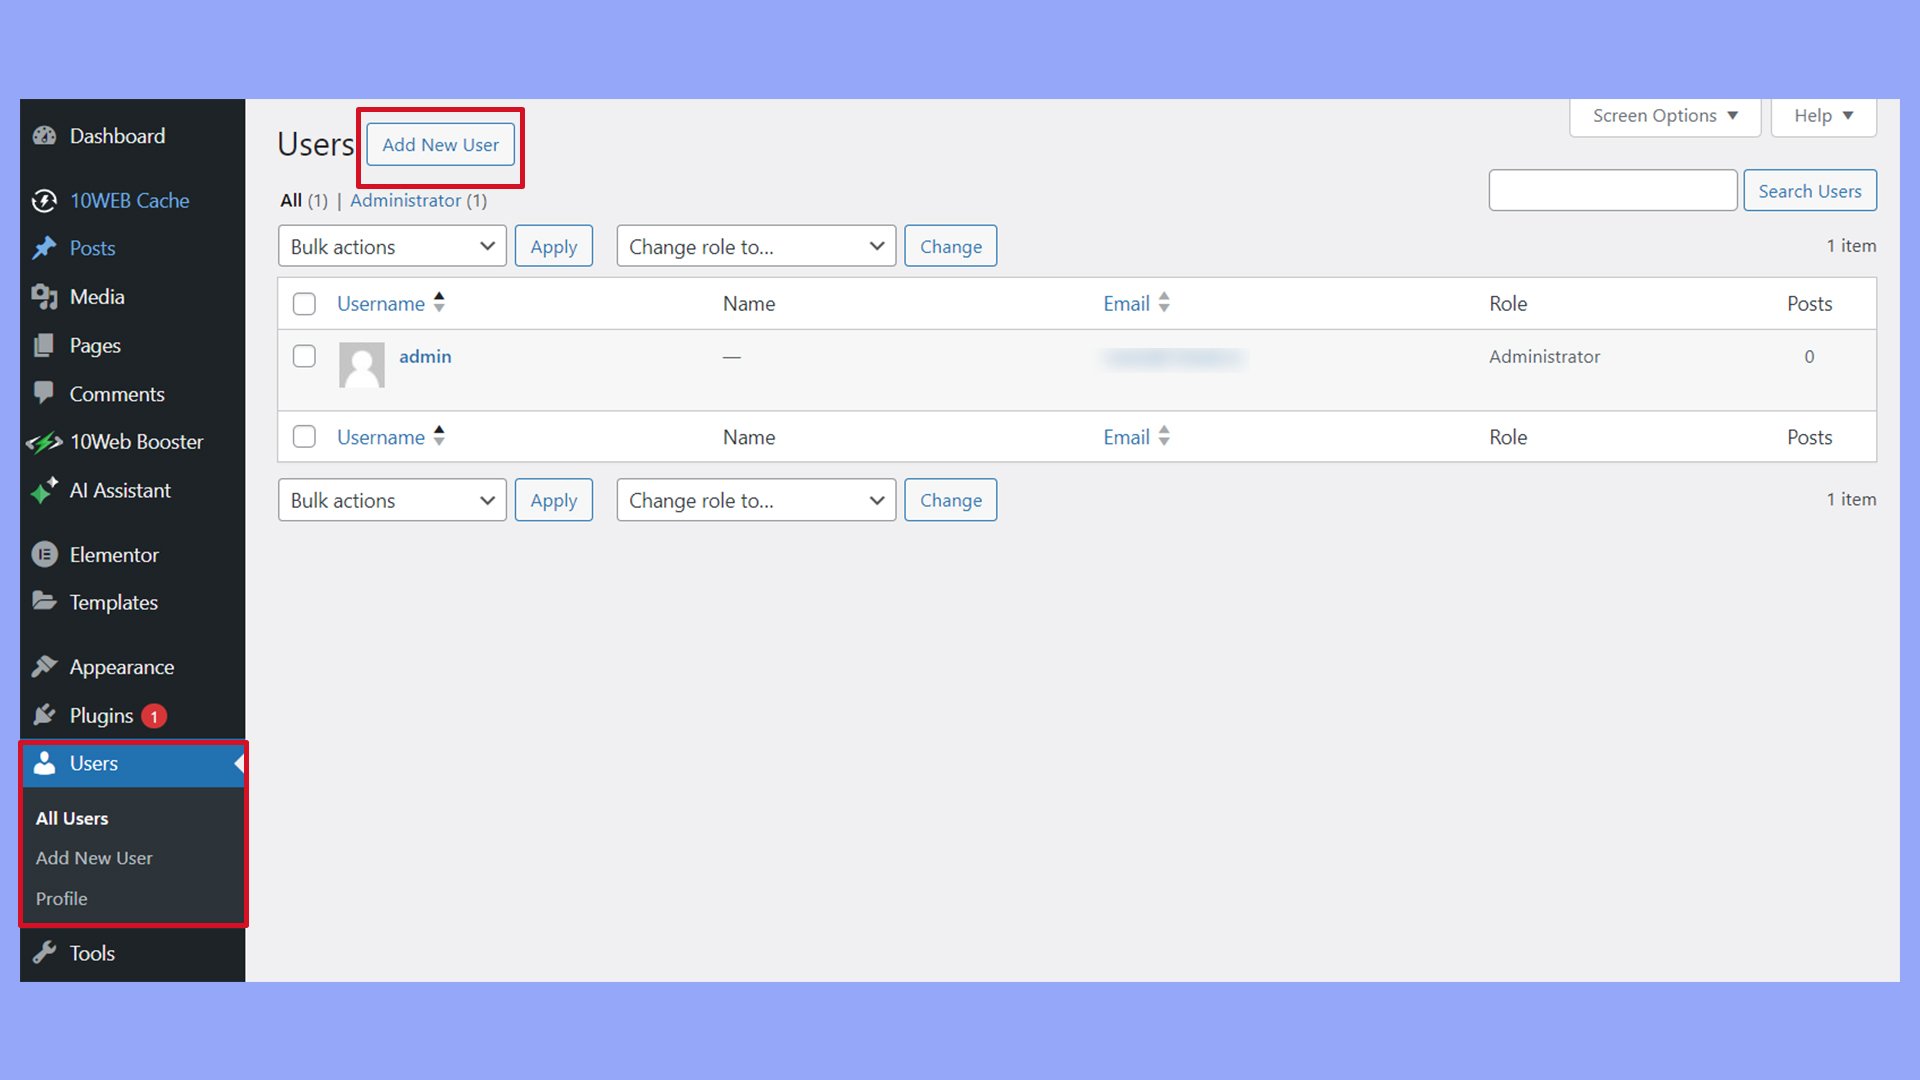
Here, you will be required to fill out essential information for the author’s user profile:
- Username: Choose a unique username for the new author.
- Email address: Enter a valid email where the author can receive notifications.
- Password: Automatically generate a strong password, which you can then share securely with the user.
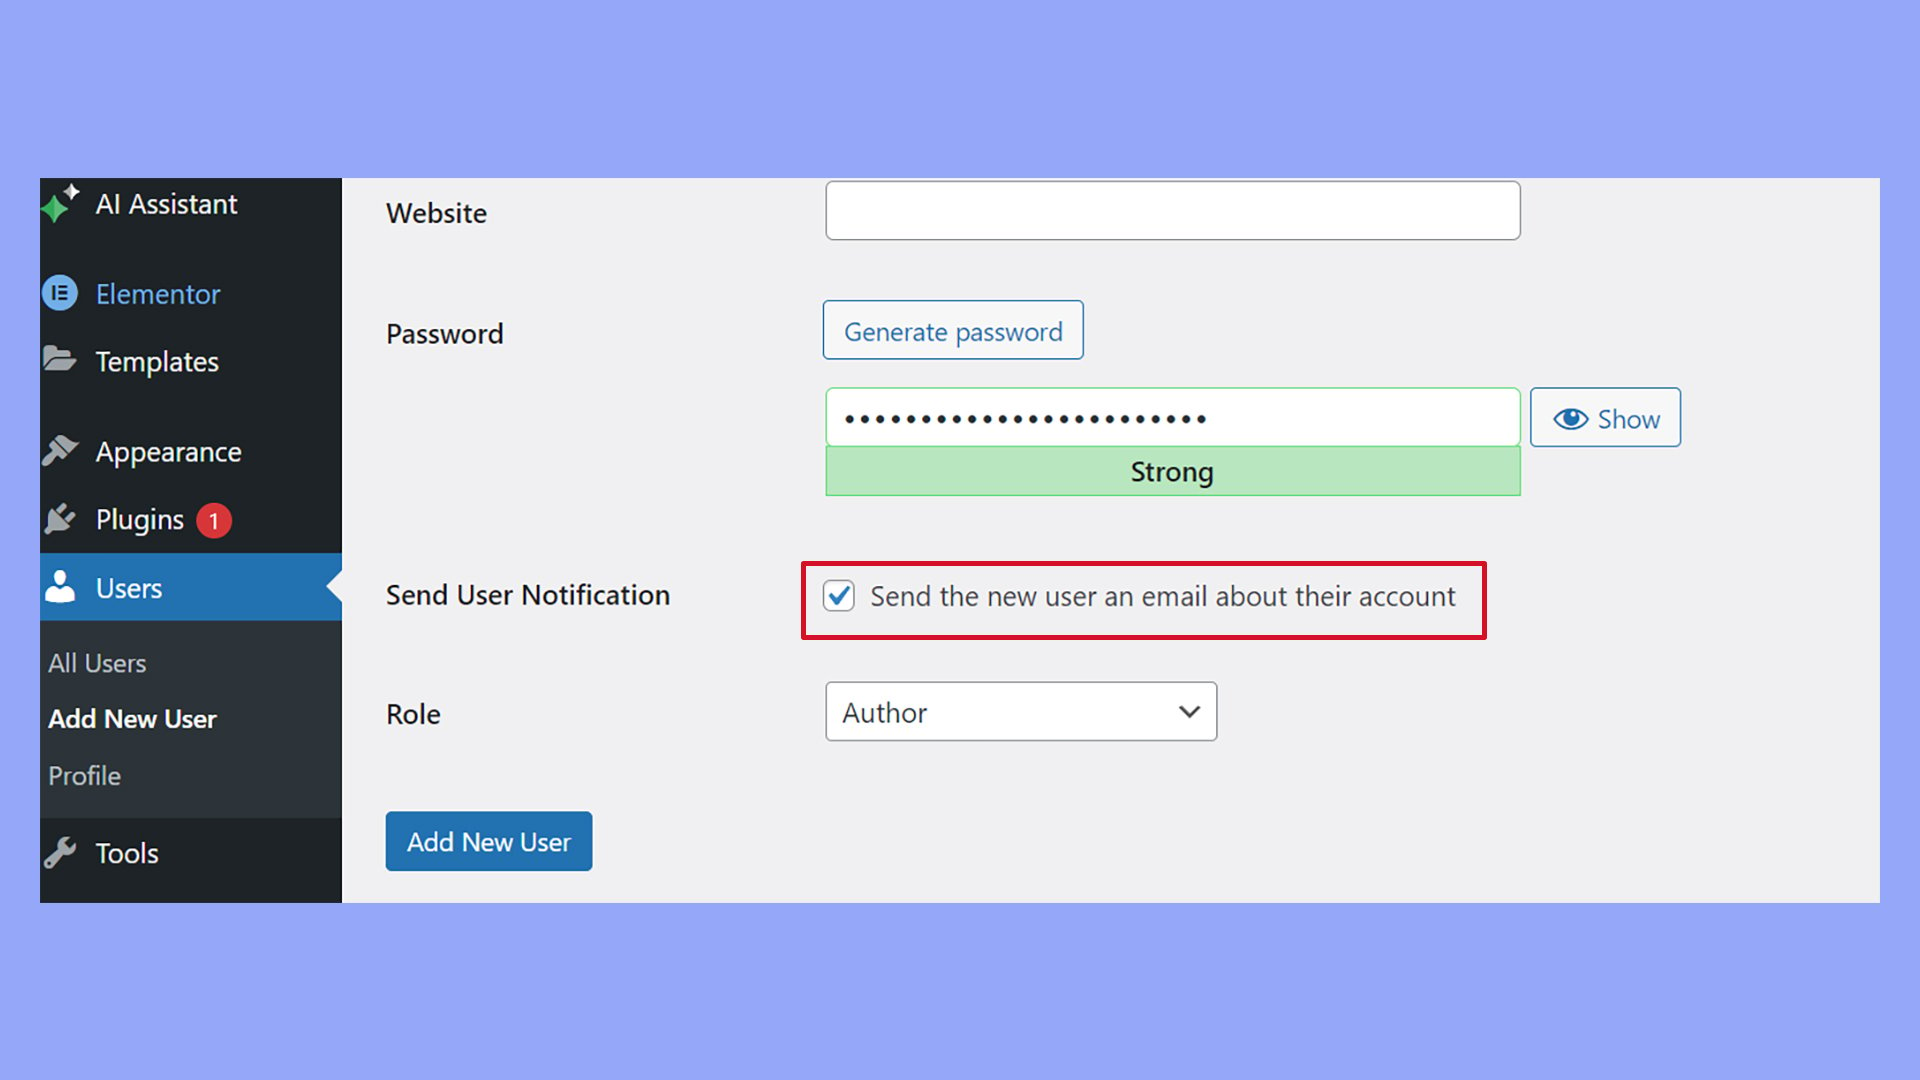
- Role: Set the user role to Author to give the appropriate permissions for content creation.

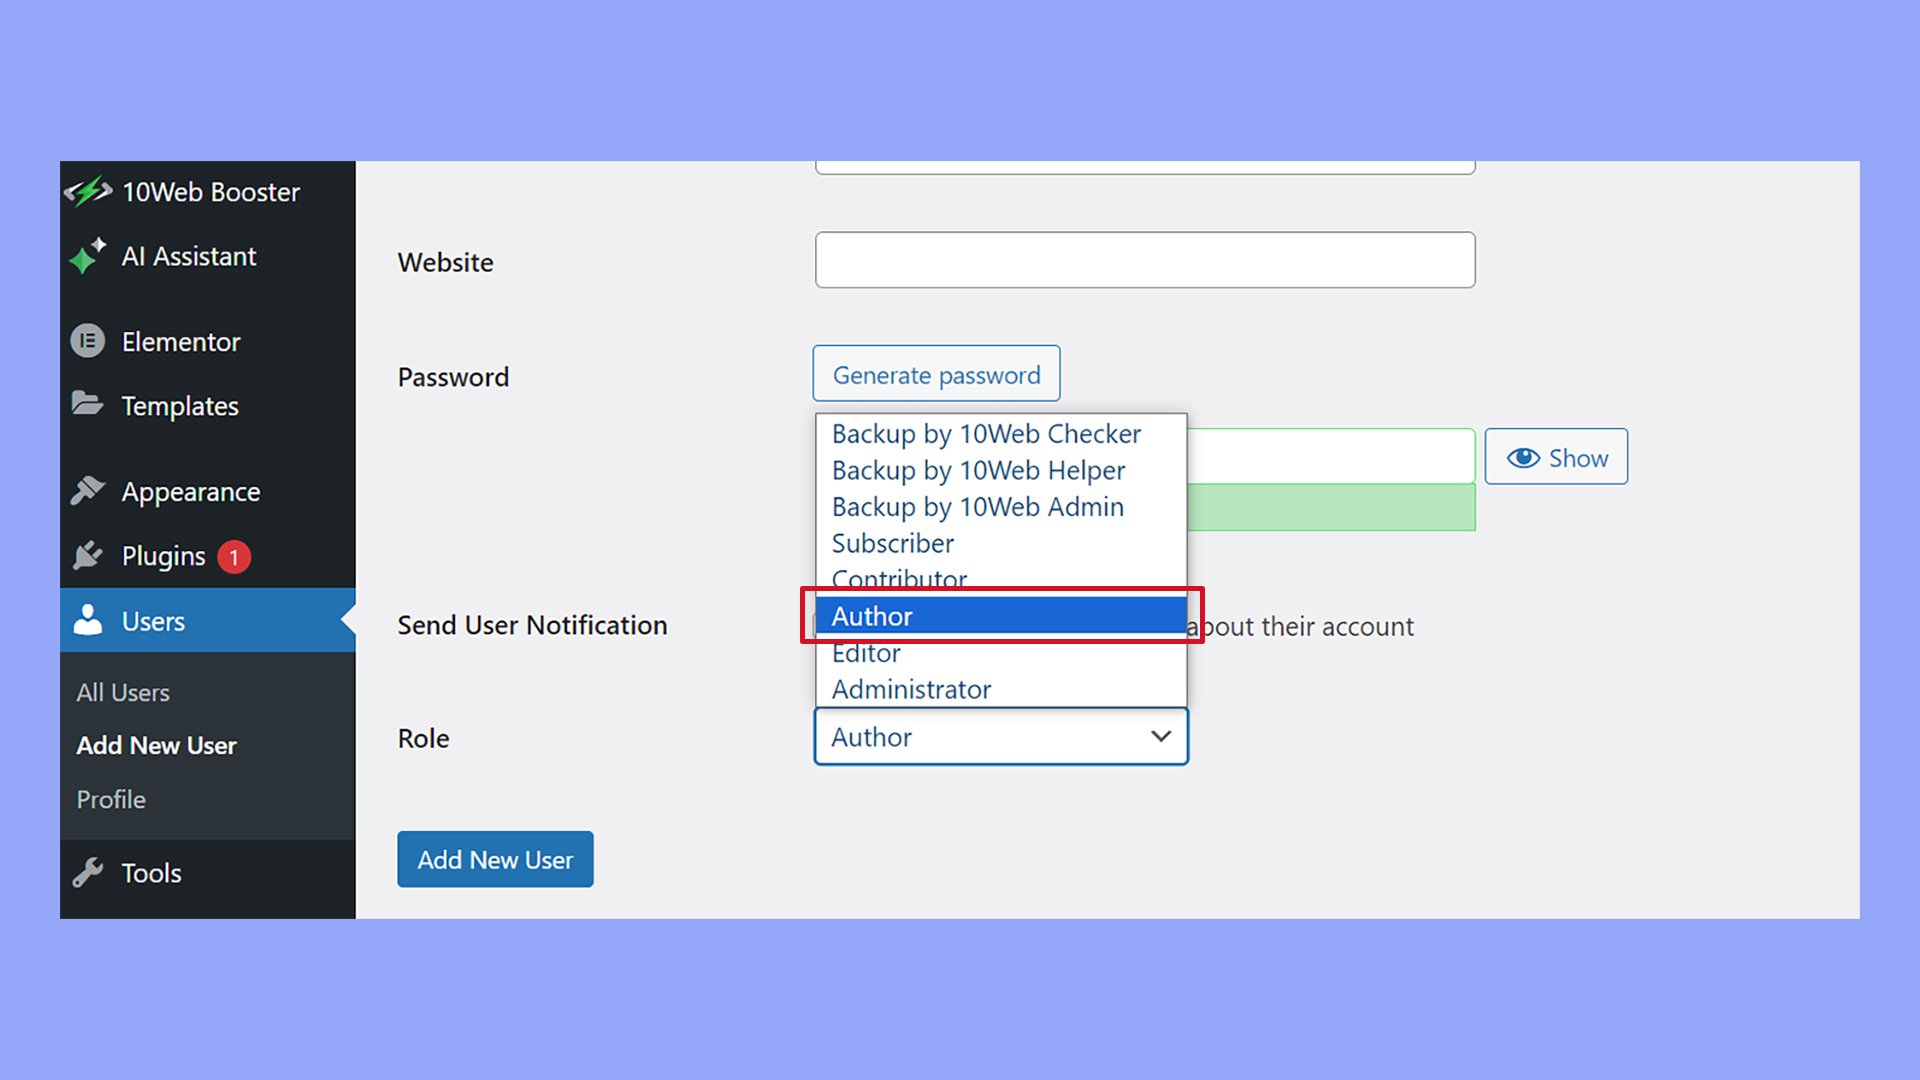
After providing the details, click the Add New User button to add the new author in WordPress.
When you manually add a new user at Users > Add New User, you’ll have the option to send the new author an email notification about their new account.
Simplify WordPress with 10Web
Automate manual work with 10Web Managed WordPress Hosting and 10Web AI Website Builder. Optimize your WordPress website effortlessly.
Customizing author profiles
Customizing author profiles in WordPress is essential to showcase your writers effectively. This involves personalizing display names, biographical information, and author pages to create a more engaging reader experience.
Editing author information
When you’re ready to update your author’s information, navigate to Users > All Users in your WordPress dashboard.
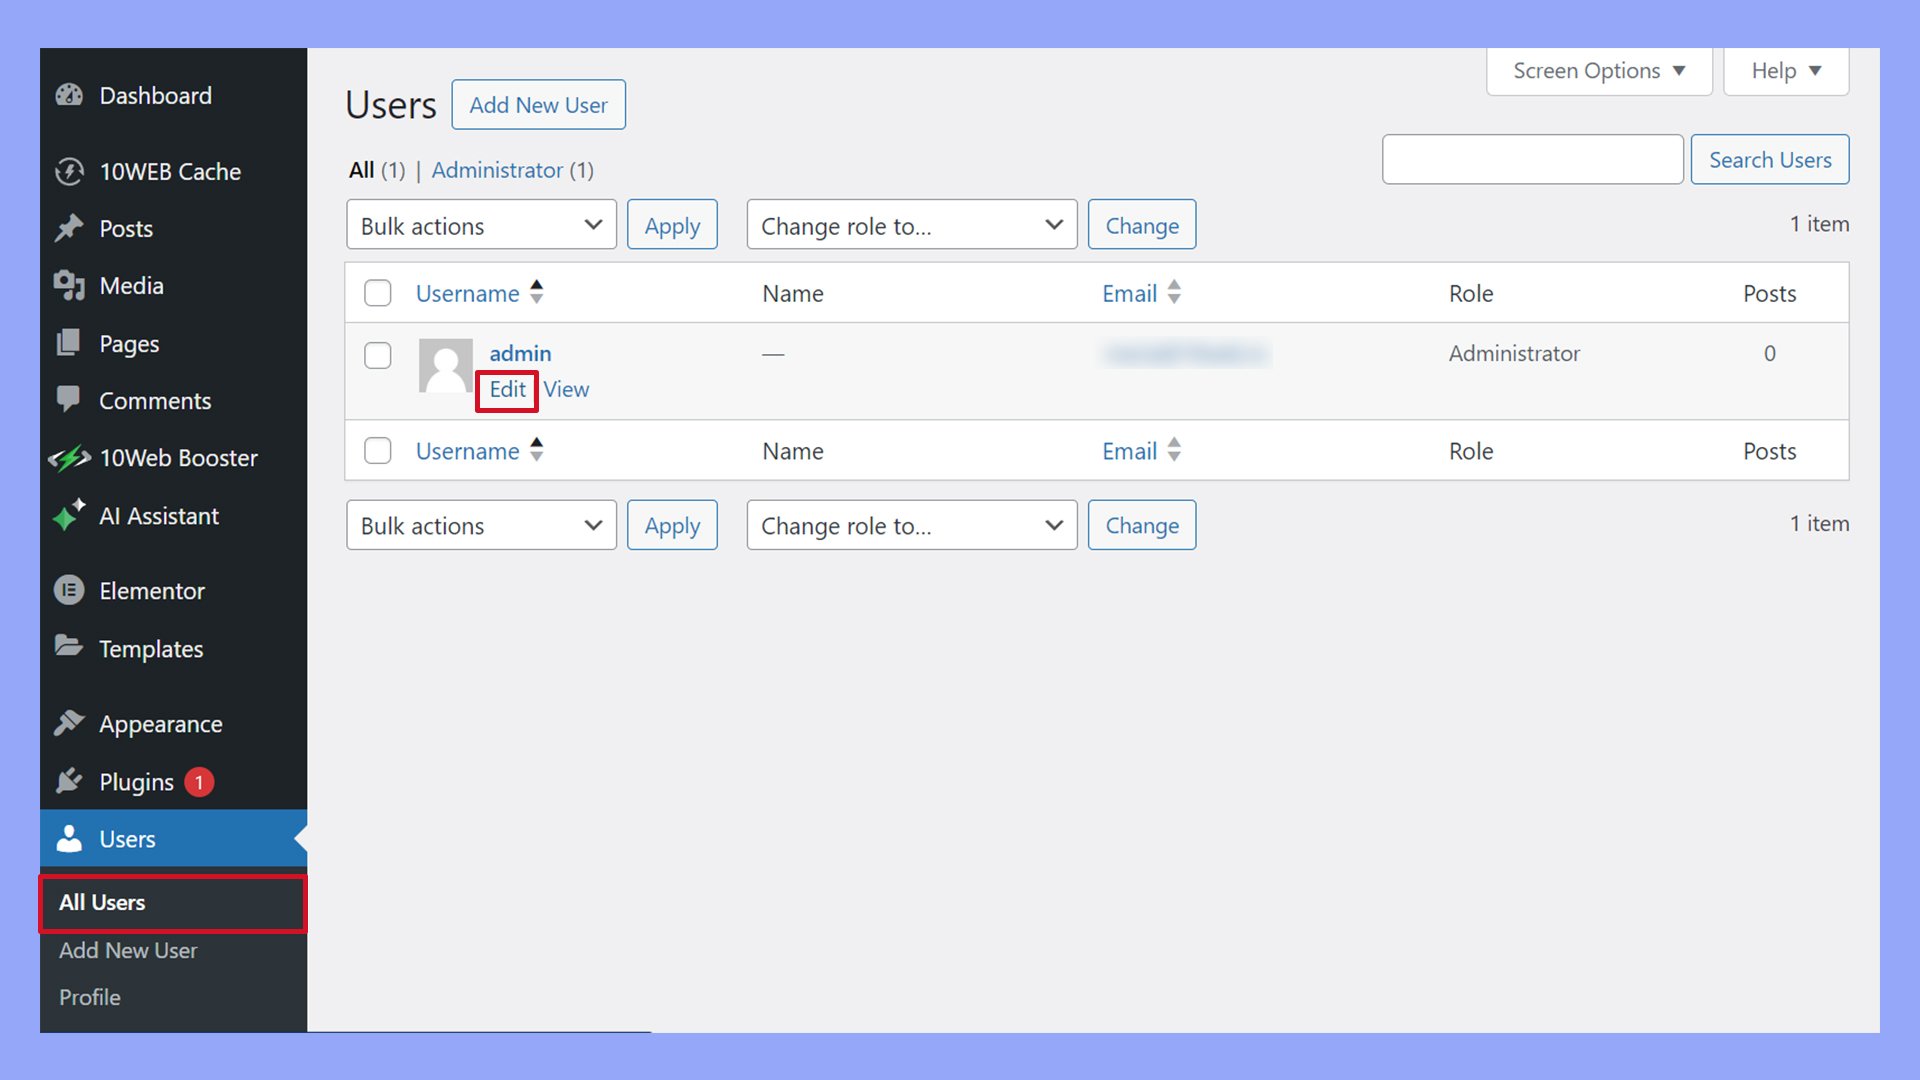
Click Edit under the author’s name you want to customize. In this area, you can change various details, including the following:
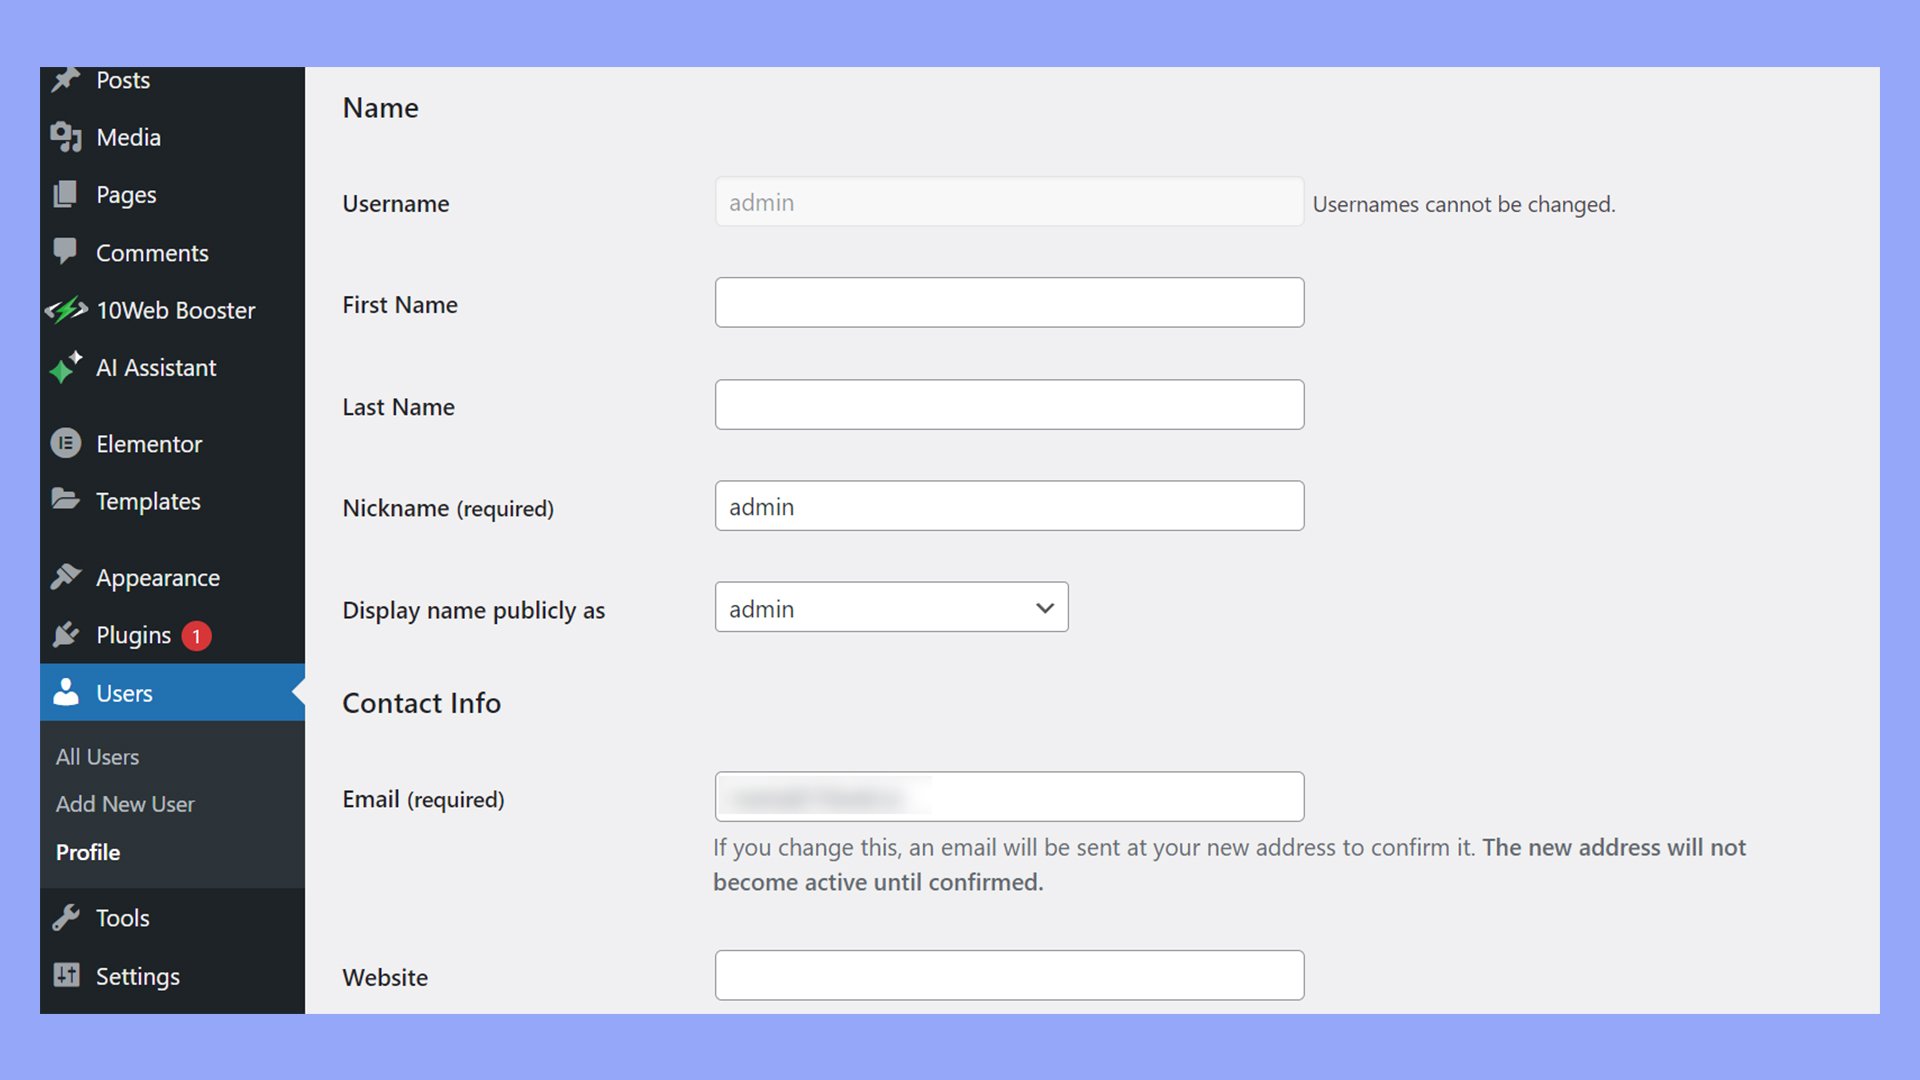
- First Name and Last Name: Enter the author’s real name.
- Nickname: This could be a pseudonym or another name they are known by.
- Email: A valid email address to which the user will be associated.
- Website: Add a URL to the author’s personal website or portfolio.
WordPress links the email address to a Gravatar account to display a profile image. Ensure the email used for the WordPress user is the same as the Gravatar account to show the author’s image accurately.
Author profile pages
Your author’s profile page is a space that collects and displays all their contributions in one place.
To enhance the default author page, consider using a plugin like Ultimate Member or Simple Author Box.
Ultimate Member helps design a unique look for author profiles that stands out from the basic WordPress author profiles.
The Simple Author Box plugin is also handy for a more sophisticated display. It allows you to add additional details and social media profiles to the author’s info box that appears with their posts.
Display name and bio
You’ll find an option to select a display name publicly within the author’s user profile.
This can be their real name, nickname, or any combination you have added to their profile.
Below that, you’ll have a large text area for Biographical Info. Here’s what to keep in mind:
- Keep bios concise and relevant, including professional credentials or personal tidbits that add to the author’s identity.
- Format the bio with headers or lists if necessary to ensure readability.
- Remember to click the Update Profile button when you’re done editing to update the author’s profile on your site.
How to add multiple authors in WordPress
With the right strategies and tools, you can maximize the potential of a multi-author blog by giving due credit to each author, facilitating smooth collaboration, and effectively managing co-authors.
Author credit and visibility
It’s crucial to ensure that each piece of content properly credits its author(s) to foster a sense of ownership and accountability.
- Assign specific roles, such as Contributor, Author, or Editor, within your content management system, giving appropriate permissions and responsibilities.
- Display author profiles with their social media links and bio to enhance visibility and personal branding on the blog.
- When applicable, include multiple authors in a single post to showcase the collaborative effort.
Collaboration tools
For a multi-author blog, maintaining consistent content quality requires effective coordination. Here are some tips:
- Utilize editorial calendars to align the publishing schedule and avoid content clashes or gaps.
- Implement style guides and content strategies that authors can refer to, ensuring a unified voice and standard quality.
- Encourage communication platforms like Slack or Trello to discuss drafts and provide feedback before publication.
Co-author management plugins
Leveraging plugins can be immensely beneficial in streamlining and managing multiple authors.
The PublishPress Authors plugin is particularly effective; here’s how you install and configure it:
Step 1: Install the plugin
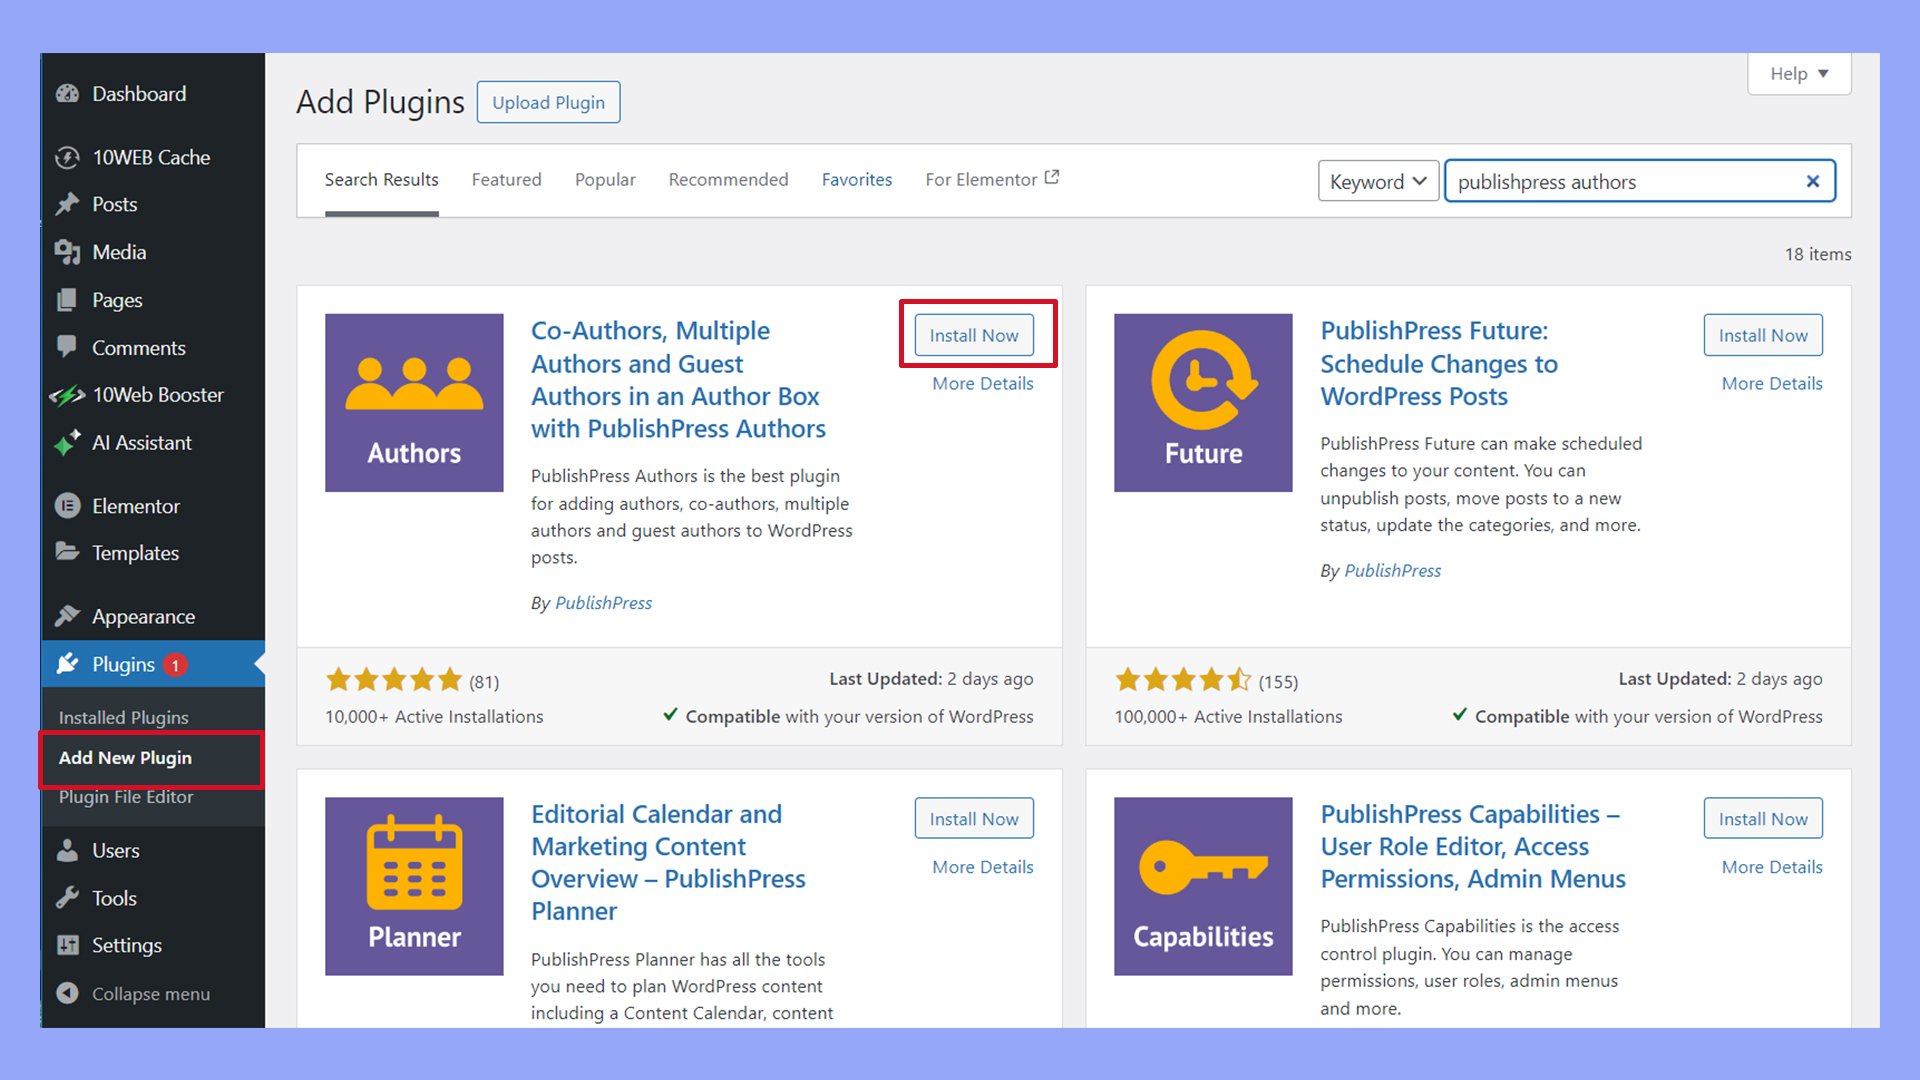
- Navigate to your WordPress admin panel.
- Click Plugins > Add New.
- Search for PublishPress Authors.
- Click Install Now, then Activate.
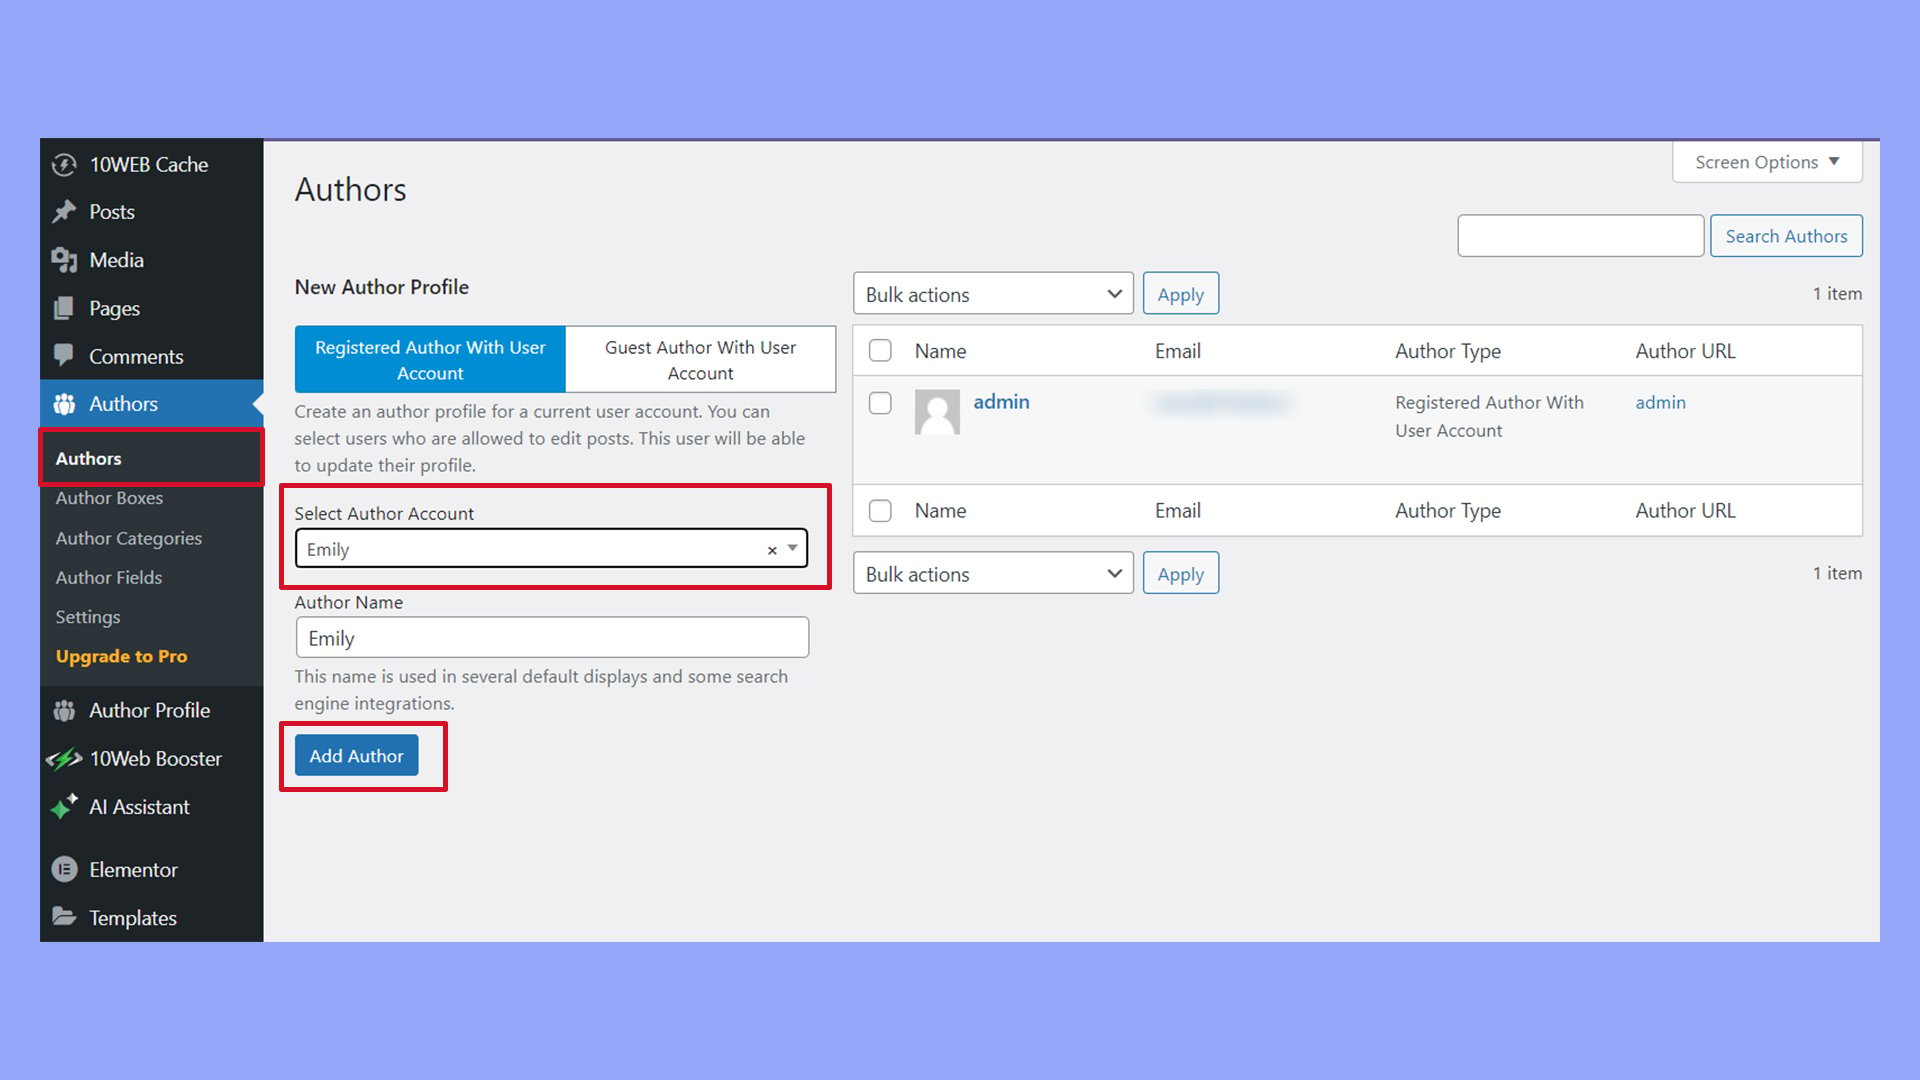
Step 2: Configure the plugin
- After activation, go to Authors > Authors.
- Select Registered Author or Guest Author.
- Select the author’s user account from the dropdown menu and click Add Author.
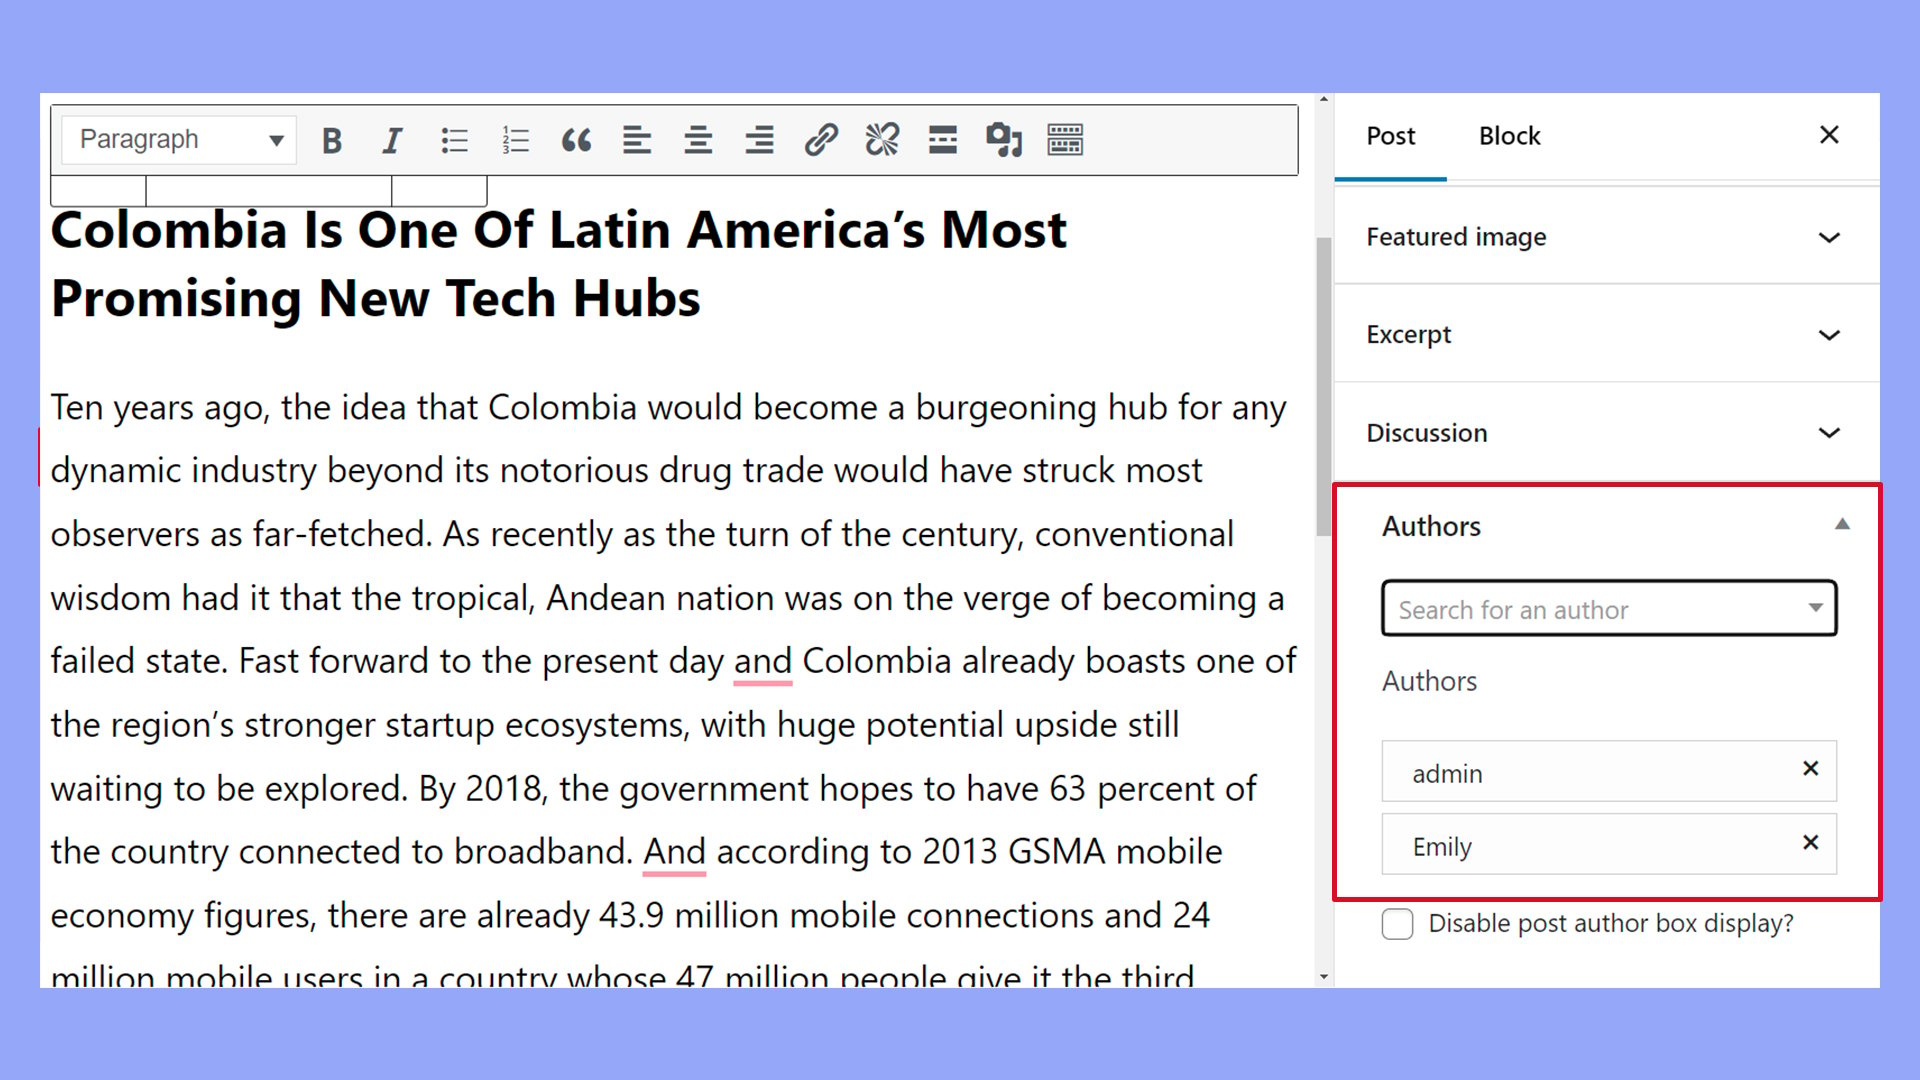
Step 3: Add multiple authors to posts
- Open the desired post in the editor.
- Under the Post tab on the right, use the dropdown menu in the Authors section to select the appropriate authors.
Managing and maintaining author data
Effective management of author data is crucial for maintaining a professional and organized WordPress site. This includes when you add authors in WordPress, but don’t forget to also keep author profiles up to date and remove authors when necessary. This ensures data preservation while your website’s team and content continue to grow and change.
Simplify WordPress with 10Web
Automate manual work with 10Web Managed WordPress Hosting and 10Web AI Website Builder. Optimize your WordPress website effortlessly.
Updating author profiles
As an administrator of a WordPress site, you can update author profiles through the Users section in the WordPress dashboard.
Navigate to Users > All Users, hover over the author’s name, and click Edit. You can update the author’s name, email, biographical information, and password here.
To change the username, which is not directly editable in the WordPress dashboard, follow this comprehensive guide on how to change WordPress username.
It’s important to keep author profiles current to reflect their current role and contributions.
Delete or unassign authors
To delete an author, go to Users > All Users, hover over the user, and click Delete.
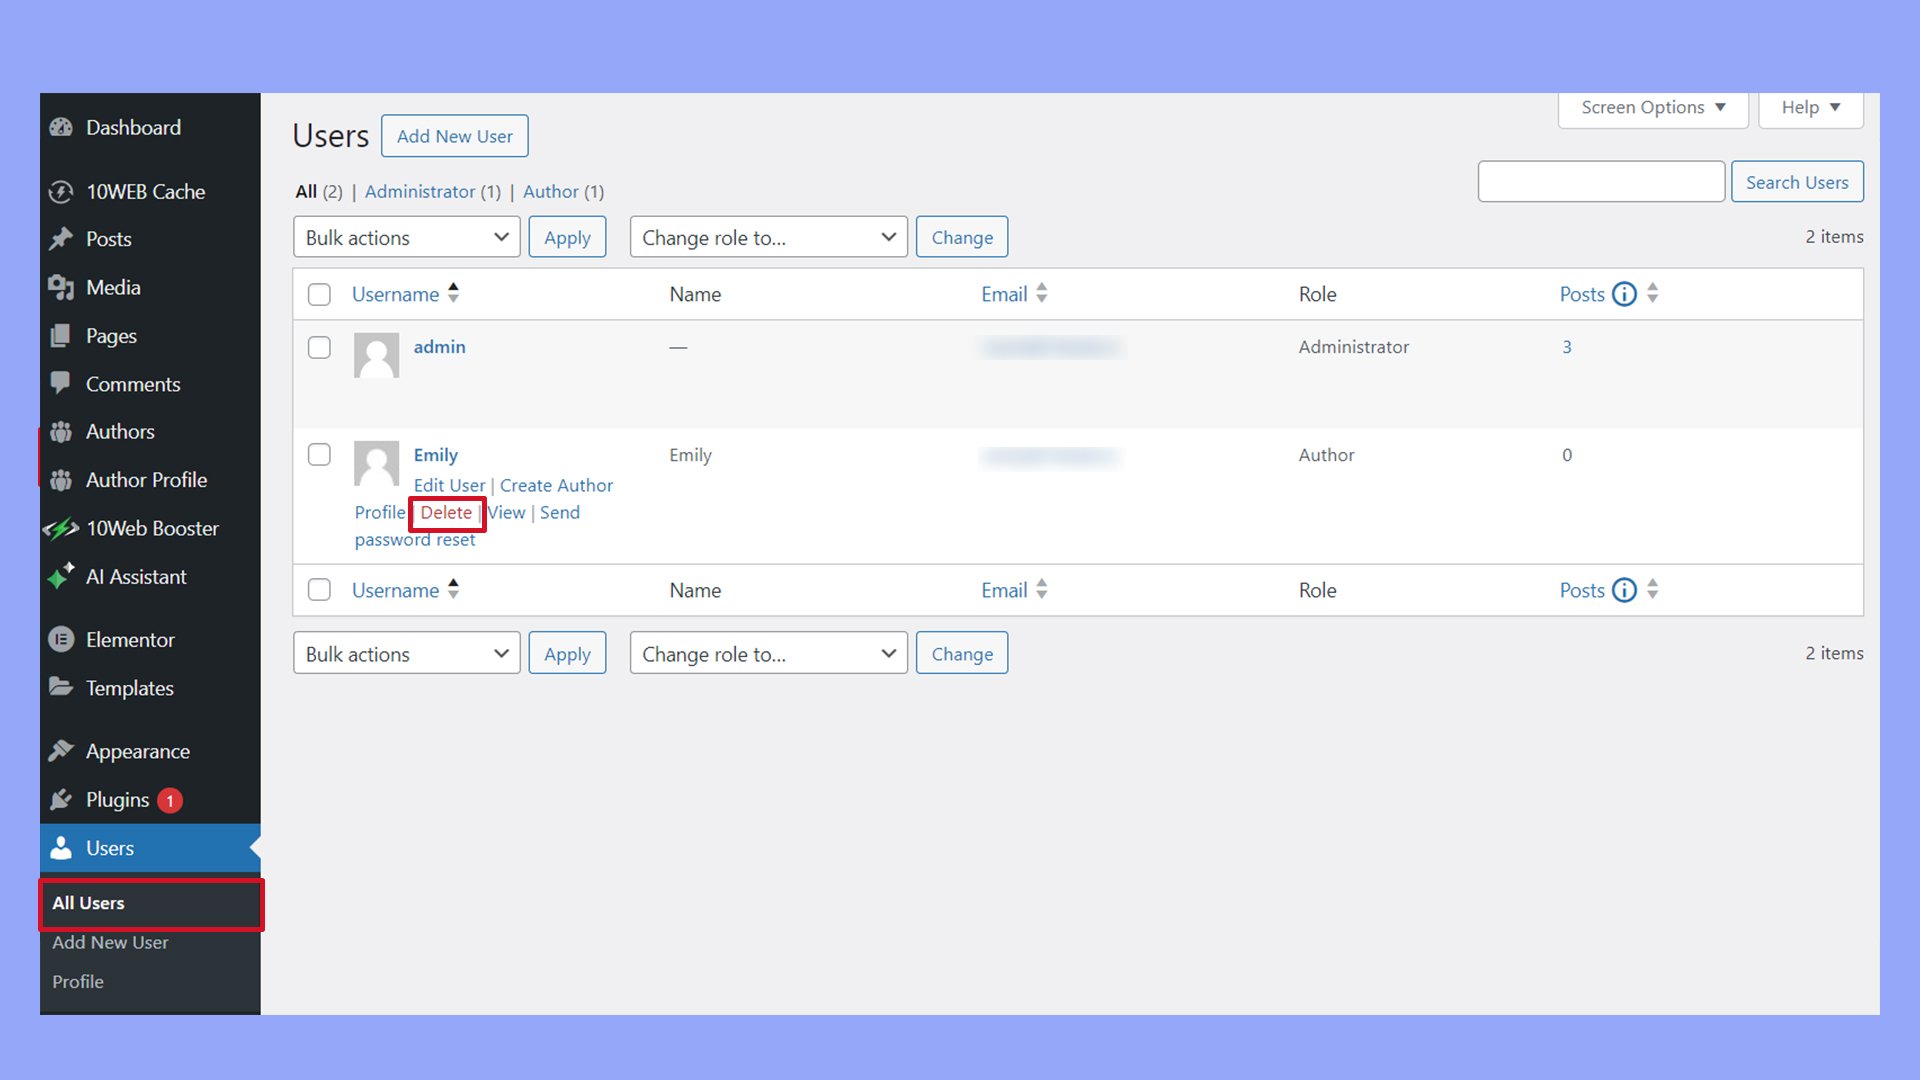
If an author has content on the site, WordPress will prompt you to either delete all content or assign it to another user.
Contributors who have yet to publish content can delete their profiles without affecting existing content. However, be cautious when deleting users, as this may impact your content strategy and site history.
Author data preservation
Preserving their content is essential when an author leaves or their role changes.
Before deleting them, you can reassign their posts to another author via the bulk actions feature in Posts > All Posts.
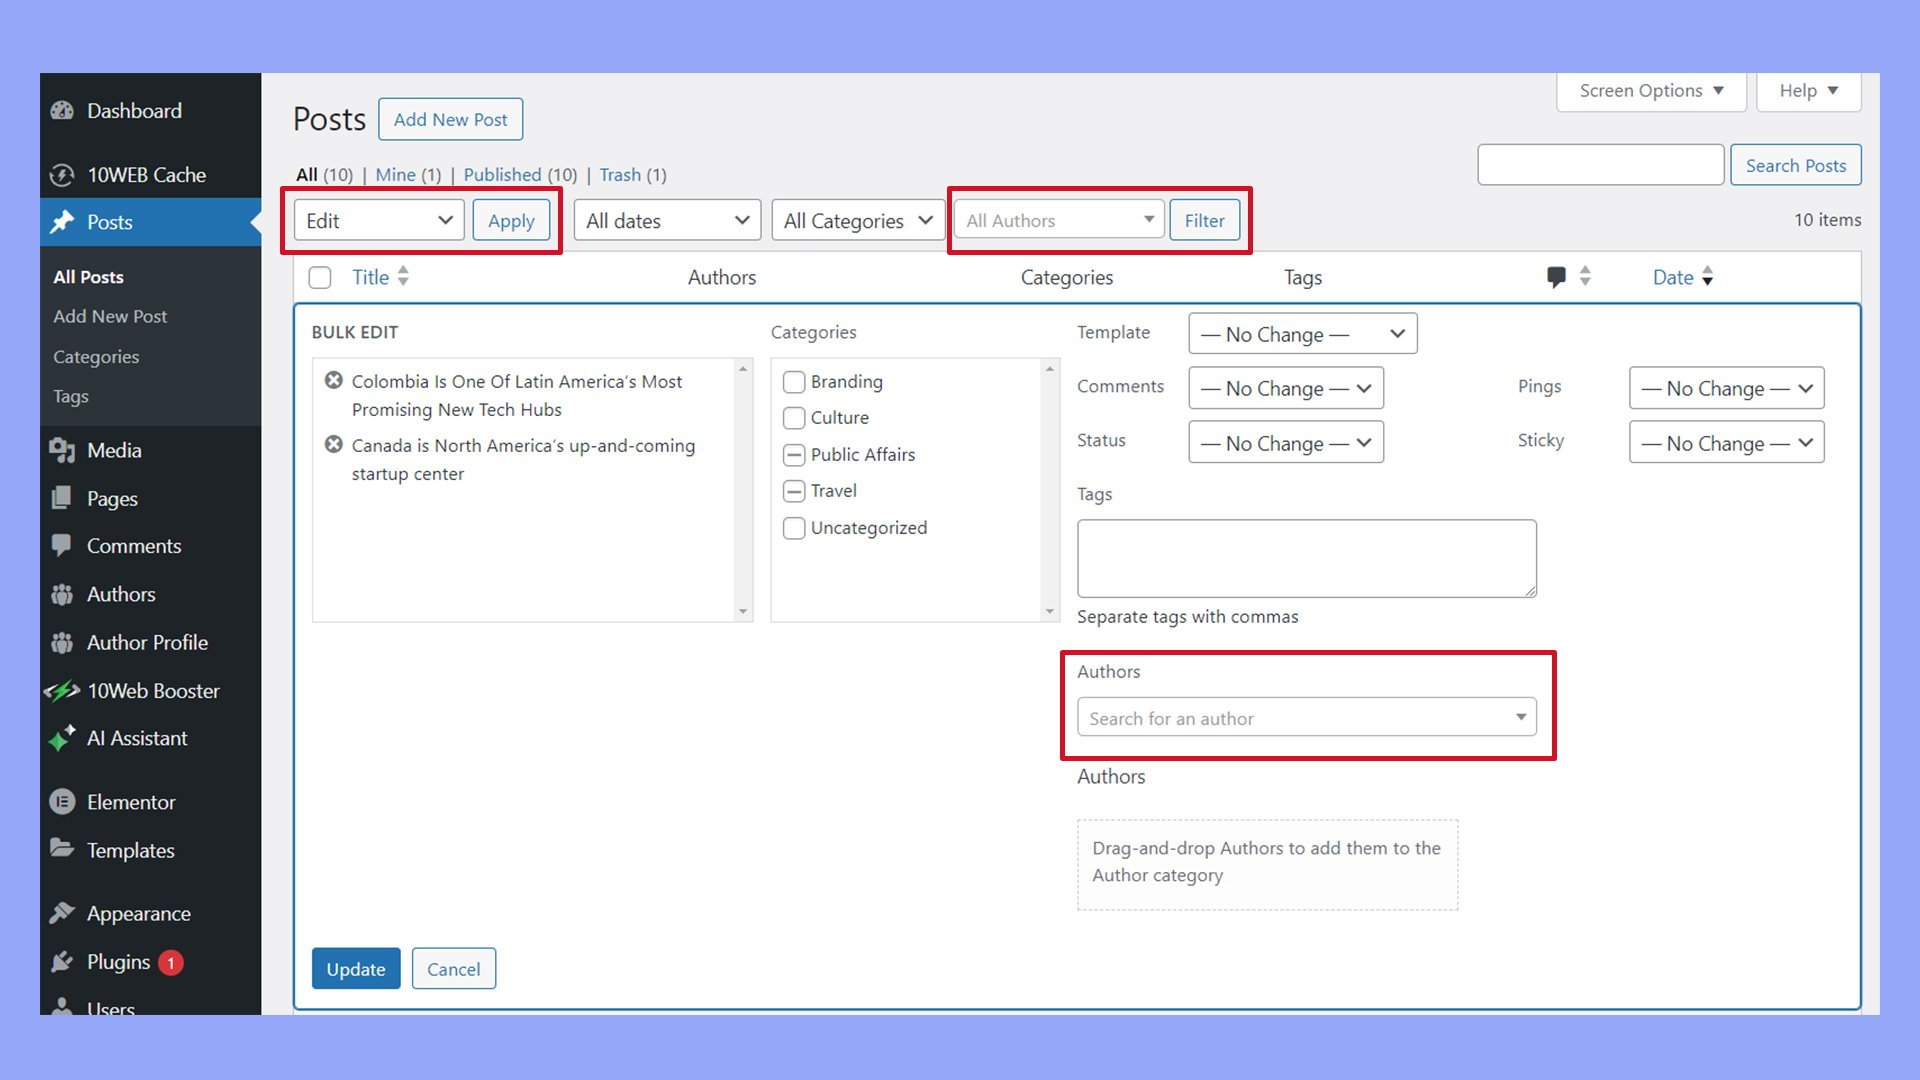
For authors with valuable content, create a guest author profile to retain their work without maintaining an active user account.
Always back up your site before significantly changing user roles or deleting users to prevent data loss.
This preserves the integrity of the site’s content and author attributions.
Conclusion
When you learn how to add authors in WordPress, it not only enriches your content offering but also fosters a vibrant, collaborative publishing environment. By effectively utilizing WordPress’s robust user role management, you can streamline the process of adding authors and ensure that each contributes their best work under the appropriate permissions.
Whether adjusting author details, adding new user roles, or integrating author-focused plugins, the steps outlined ensure that your site maintains both quality and security. Embrace these practices to enhance your site’s dynamic, cater to a broader audience, and keep your content fresh and engaging.
Simplify WordPress with 10Web
Simplify WordPress with 10Web
Skip and automate manual work with 10Web Managed WordPress Hosting and the 10Web AI Website Builder.