Enhancing your product pages with color variations in WooCommerce can significantly improve the shopping experience for your customers. When running an online store, offering diverse product variations is crucial for attracting a wide audience. Specifically, by understanding how to add color variations in WooCommerce, you can create a more engaging and visually appealing product catalog that caters to different tastes, ultimately boosting customer satisfaction and sales.
FAQ
How do you add color variations in WooCommerce?
How to add custom variation in WooCommerce?
Is Variation Swatches for WooCommerce free?
Introduction to color variations in WooCommerce
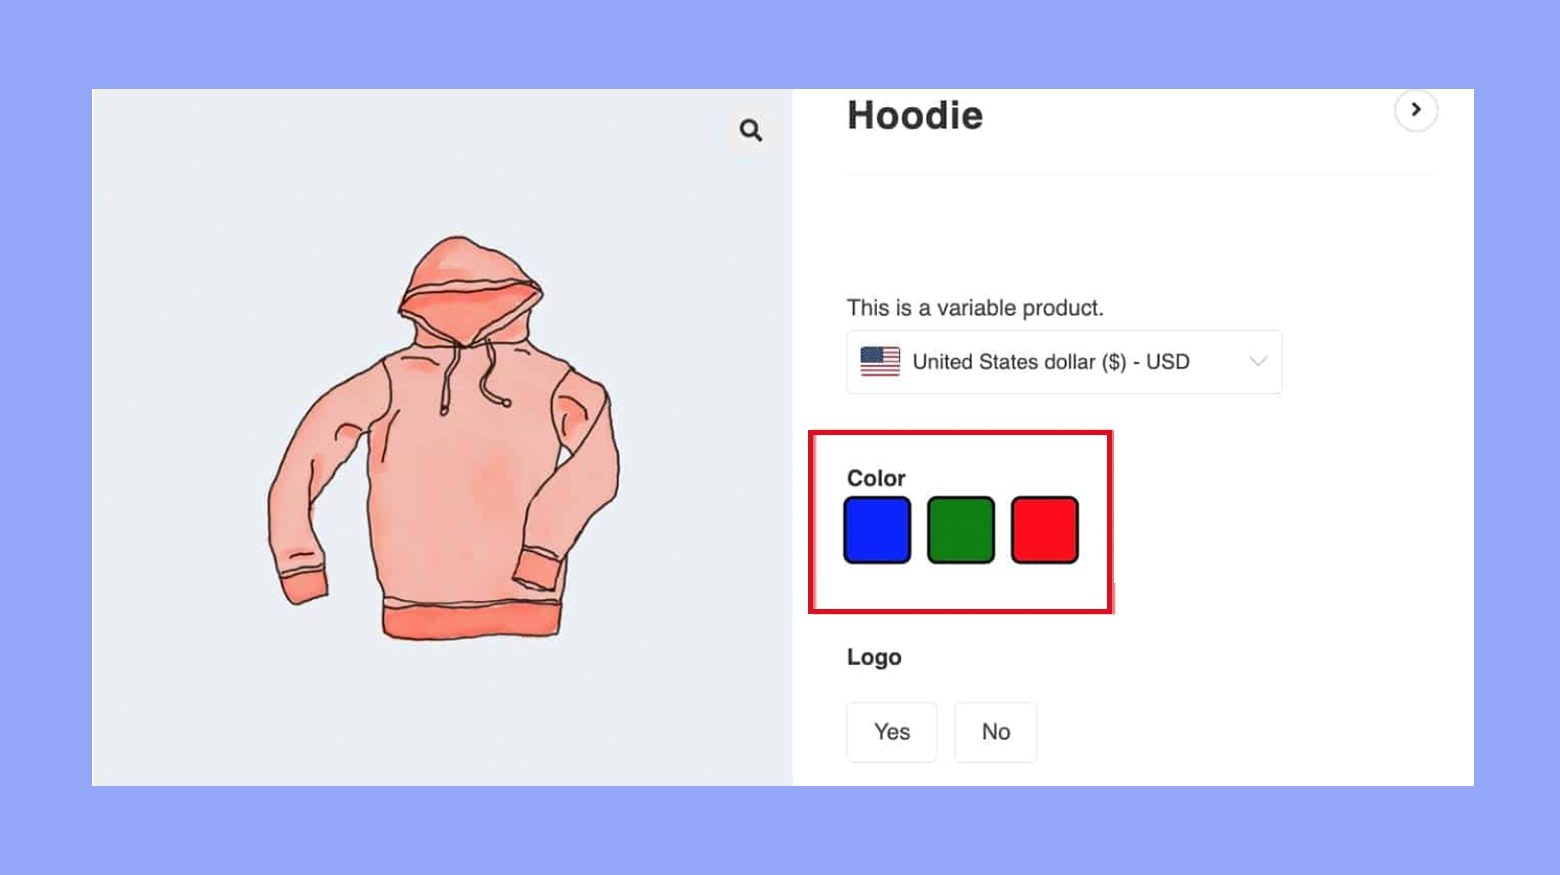
When you’re running an online store with WooCommerce, offering product variations is key to attracting a wide customer base. Specifically, adding color variations to your products can enhance the shopping experience and meet diverse customer preferences. Here is an example of a product with color variations:
Understanding variable products
Variable products in WooCommerce are a product type that allows you to offer a set of variations on a product, with control over prices, stock, image, and more for each variation. They can be used for any kind of product that comes in different variations, like size or color. To create variable products, you begin by adding attributes to a product via the Attributes tab, and then you can define variations on the Variations tab.
Importance of color variations for products
Color variations give your customers the option to choose from different colors for the same product. Here are some key factors of color variations:
- Enhanced user experience: Providing multiple color options improves the shopping experience by allowing customers to find products in their preferred colors. This can lead to higher satisfaction and increased likelihood of purchase.
- Increased sales and conversions: Offering color variations can attract a broader audience. Some customers may be interested in a product but only if it comes in a specific color. By catering to these preferences, you can increase overall sales and conversion rates.
- Better inventory management: Color variations help in managing inventory more effectively. By tracking which colors are more popular, you can make informed decisions about restocking and future product designs.
- Competitive advantage: Offering a wide range of colors can set your store apart from competitors who might have limited options. This can be a significant selling point, especially in fashion and lifestyle industries.
- Improved SEO and visibility: Each product variation can have its own unique URL and attributes, which can be optimized for search engines. This can improve the visibility of your products in search results, driving more traffic to your site.
- Accurate product representation: Accurately representing product colors helps in reducing returns and customer complaints. When customers receive products that match their expectations, it builds trust and encourages repeat business.
- Personalized marketing: With data on color preferences, you can tailor marketing campaigns and promotions to target specific customer segments, enhancing the effectiveness of your marketing efforts.
Create your custom online store in minutes with 10Web AI Ecommerce Website Builder and take your business online. 
Looking to sell online?
How to add color variation in WooCommerce
Step 1: Setting up attributes for variations
Before adding variations such as colors to your products in WooCommerce, you’ll need to set up attributes properly. Attributes are key to offering different variations and ensuring your customers have the best shopping experience.
Adding the color attribute
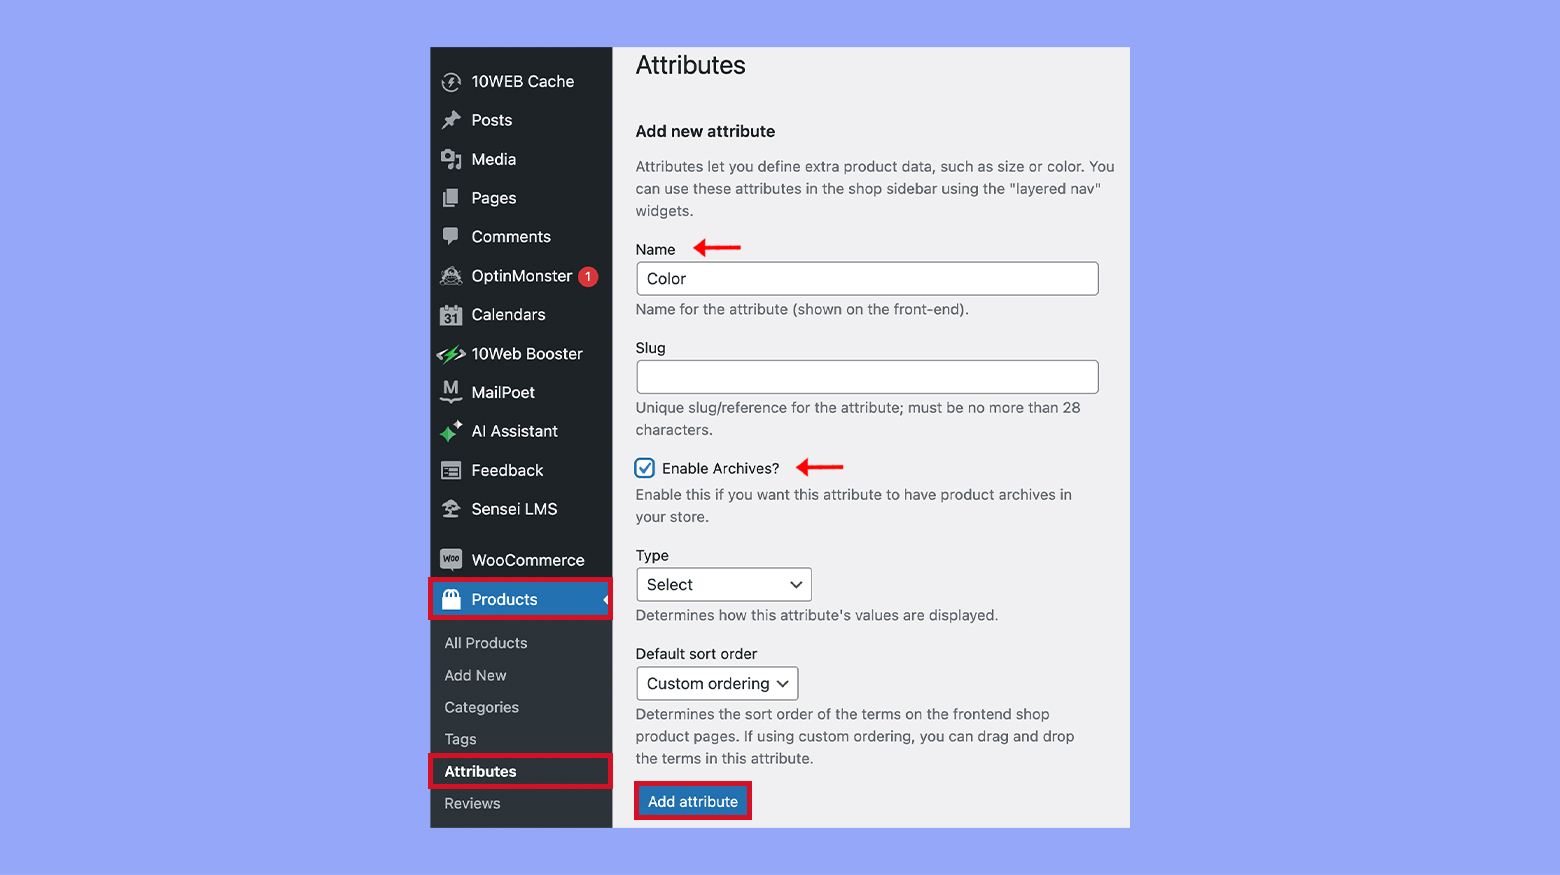
- Go to your WordPress admin area, and navigate to Products > Attributes.
- Here, click on Add new to create one for colors.
- Enter Name as “Color,” and enable the checkbox to Enable archives if desired.

- Click on Add attribute to save it.
Configure global attributes
- Once you’ve added your color attribute, it’s time to configure your terms—or the actual colors.
- Find the Color attribute you just created in the table and click on Configure terms.
- For each color you want to offer, click on Add new color.
- Provide a Name for your color, such as “Red” or “Blue.”
- Click on Add new color to save each color.
- Repeat this process for all the colors you want to associate with this attribute.

Step 2: Using the Variation Swatches plugin
The Variation Swatches plugin enhances your WooCommerce product options by converting dropdown menus into visual elements such as color swatches, images, and labels, making your online store more interactive and visually appealing.
Installing the plugin
To get started with Variation Swatches for WooCommerce, follow these steps:
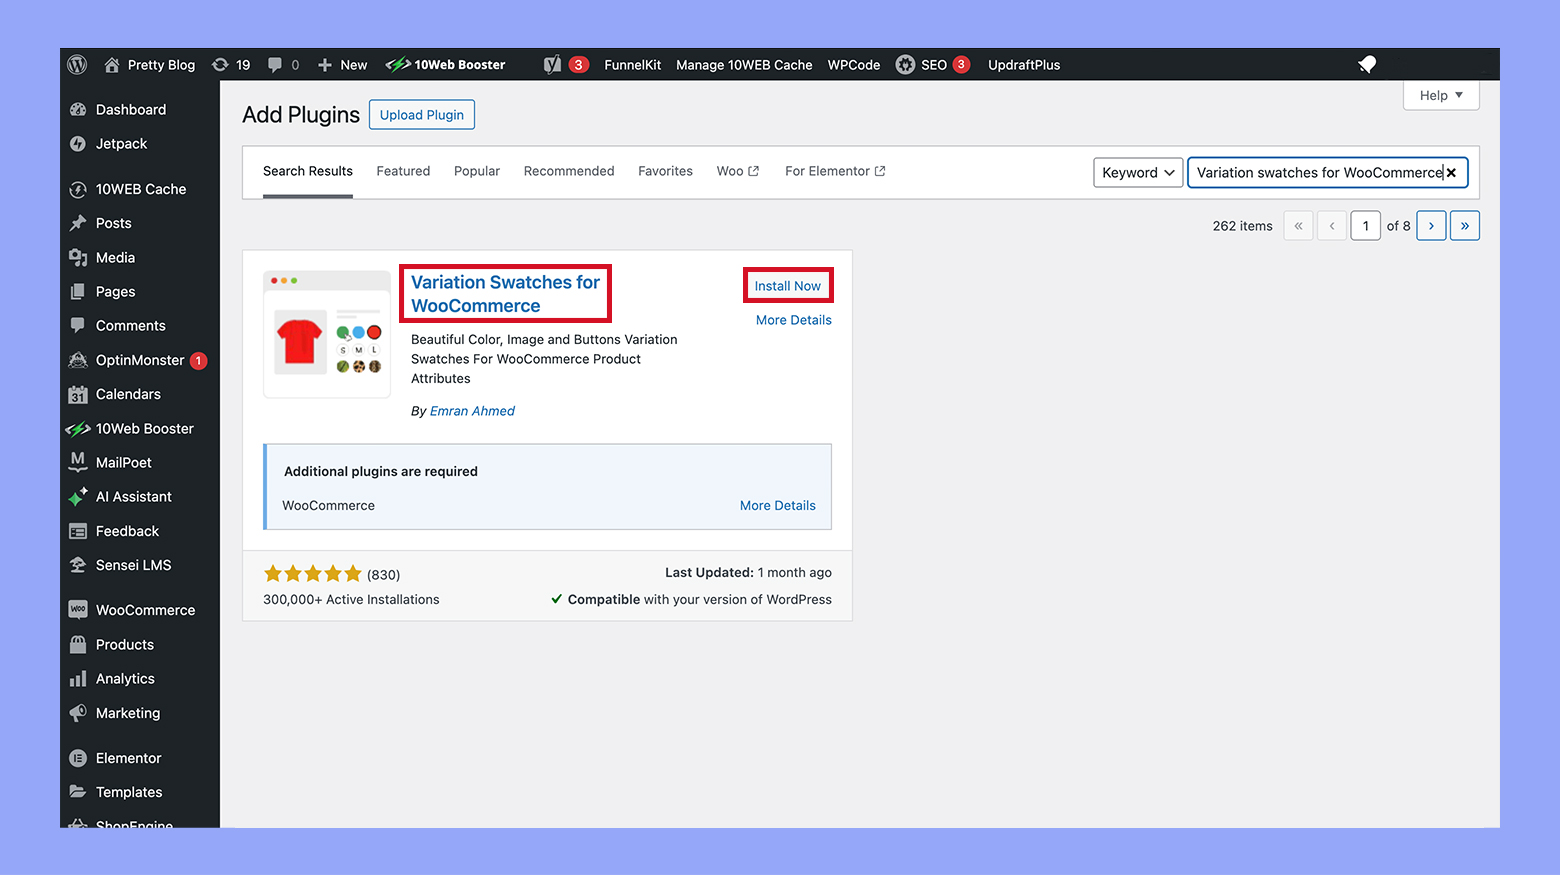
- Navigate to your WordPress dashboard.
- Go to Plugins and select Add new.
- In the search field, type Variation Swatches for WooCommerce.
- Find the plugin in the search results and click Install now.
- After the installation completes, click on the Activate button to enable the plugin on your site.
Variation Swatches settings
Once the plugin is activated, configure it to display color swatches:
- Go to WooCommerce and select Settings.
- Click on the Products tab and then choose Variation Swatches.
- Here, customize the swatches to match your store’s style, including size, shape, and tool-tip display settings.
- To apply color swatches, navigate to Products > Attributes.
- Set the attribute type as Color.
- For each color term listed, click on the Configure terms link.
- Click the color option, for example “Red”, and choose the desired color using the color picker.
- Click Update to save your changes.

By adjusting these settings, you can improve the user experience of your shop by making it easier and more intuitive for customers to visualize their options.
Step 3: Creating product variations
In WooCommerce, creating product variations allows you to offer options like colors and sizes for your products. With a few steps, you can tailor your store to better fit the needs of your customers.
Adding new variations
To begin adding new variations to your Variable product, start by selecting Add new from your dashboard’s Products section.
- Navigate to Products and select Add new product to create a new item.
- Enter your product name and ensure the Product data dropdown is set to Variable product.
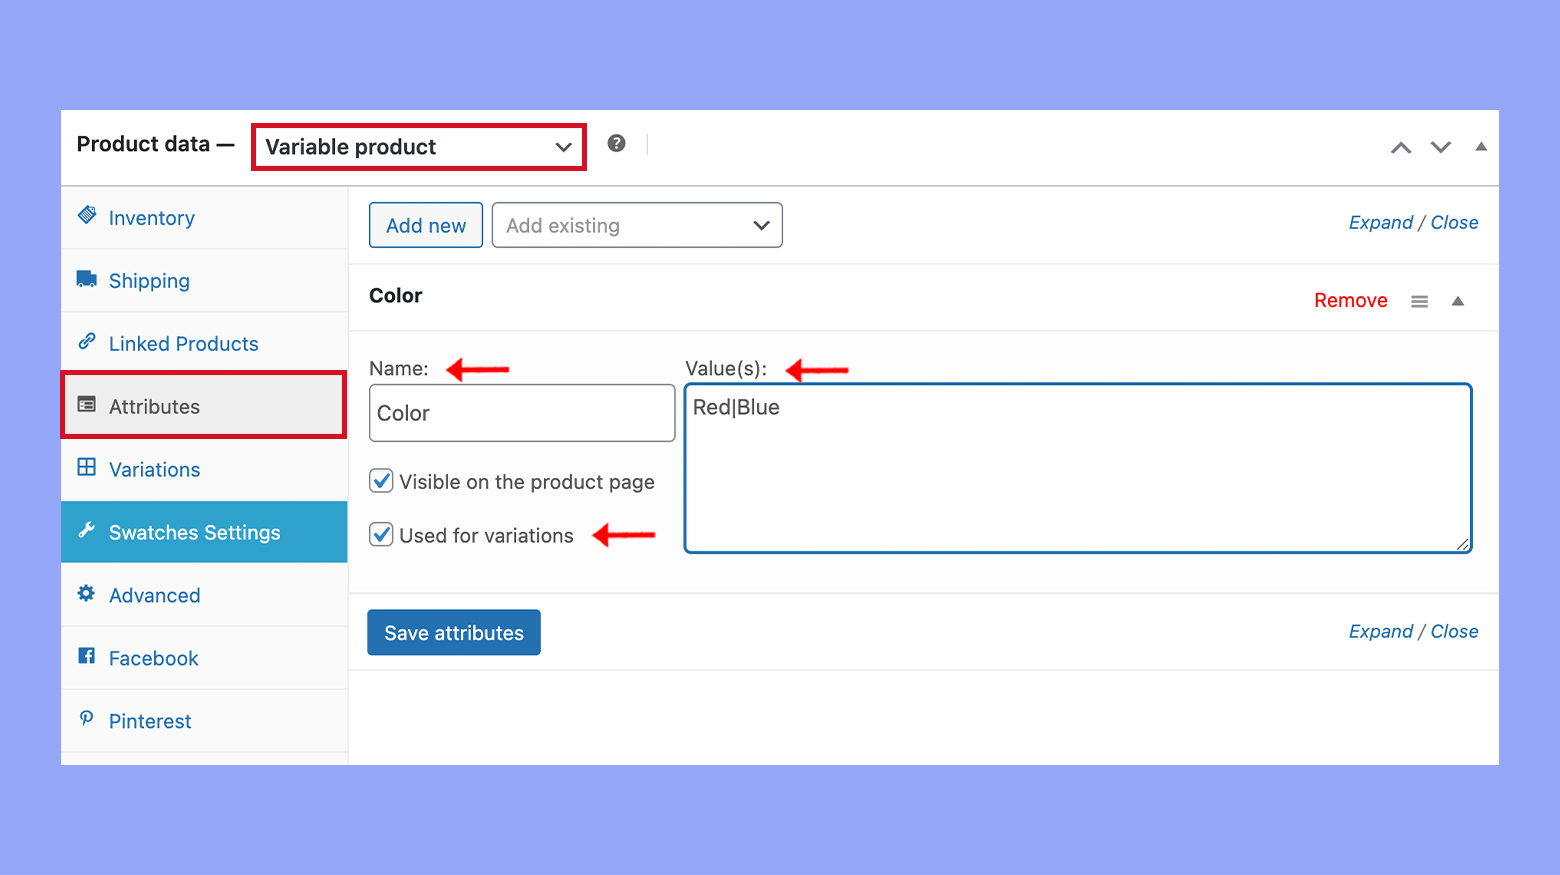
- Under Product data, click the Attributes tab.
- Here you’ll input the attributes for your product (like size or color), making sure to check the box for Used for variations.
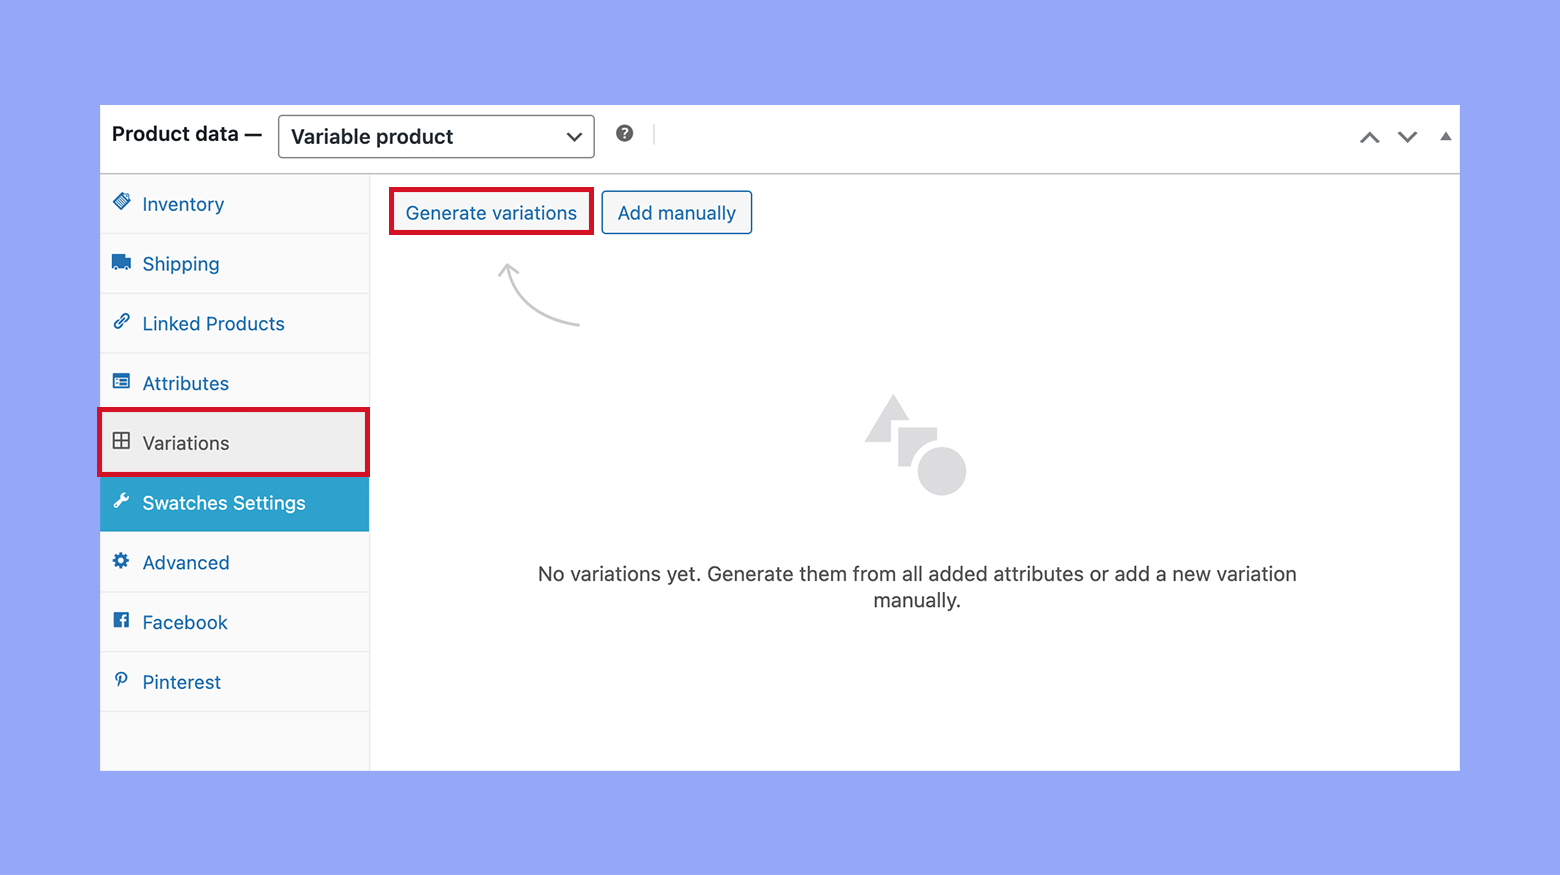
- After adding attributes, move to the Variations tab.
- Select Add variation from the dropdown menu; click Generate variations.
Setting default variations
You may want to set a default variation that will initially be selected when a customer lands on your product page.
- In the Variations tab, you can choose a specific variation as the default selection for your product.
- Click on the desired variation; then find the option Set as default.
- Fill in any necessary details such as pricing and inventory for the variation.
- Be sure to click Save changes to preserve your settings.
By following these steps, your Variable products will display properly with all the available options, giving your customers a more dynamic shopping experience.
Step 4: Enhancing user experience with swatches
Introducing color and image swatches to your online store can significantly boost your users’ shopping experience by allowing them to visually navigate through various product variations.
Display options for swatches
When you add swatches to your WooCommerce store, you give customers a more interactive and visual way to view the options available for a product. Follow these steps to set up attractive display options:
- Choose the type of swatch: Decide on using either color swatches or image swatches for your product variations.
- Configure the swatch display: In your product settings, navigate to the Attributes section and define your attributes to be used with swatches.
- Link swatches to product variations: In the Variations tab, ensure each variation is linked with the correct color or image swatch.
With user-friendly display options, shoppers can quickly find what they want, enhancing the overall usability of your WooCommerce store.
Customizing swatch styles
Personalizing the look of your swatches can align them with your website’s design and improve user experience. Here’s how to customize your swatch styles:
- Select your swatch style: Under the product’s Swatch settings, choose a style that complements your shop’s aesthetics.
- Adjust swatch size: Specify the size of your swatches for optimal visibility on different devices.
- Choose a swatch shape: Determine the shape—square, round, or custom—that fits your design scheme.
- Customize the border: Apply a border to your swatches for a crisp, finished look on each product page.
By tailoring the swatch styles, you provide a cohesive and appealing visual guide, making product selection smoother for your customers.
Step 5: Advanced swatches customization
When you’re ready to take your WooCommerce product displays to the next level, advanced swatches customization allows you to present your product variations in the most attractive and user-friendly way. Let’s enhance your customer’s shopping experience with custom color and image swatches.
Using image swatches
Image swatches are ideal for showing patterns, textures, or intricate designs that a solid color cannot represent. With image swatches, you give your customers an exact preview of what to expect.
- First, you need to upload the desired images for your variations.
- Under Products > Attributes, link each attribute to a specific image.
- Assign these images as swatches within the Variations tab of the product editor.
- Customize swatch size, shape, and labels to match your store’s branding.
- Save your changes and review how the image swatches display on the product page.
Through these detailed image swatches, you’re empowering your customers to visualize the product variation they’re interested in, thereby giving them confidence in their purchasing decision. Remember, rich visuals can significantly influence the shopping experience, and your attention to detail here can make all the difference.
Step 6: Managing out of stock variations
When dealing with variable products in WooCommerce, it’s important for you to have a strategy for handling options that are no longer in stock. You can manage out of stock variations through either automatic settings that hide these products or through manual adjustments that provide more control.
Automatic visibility settings
Your WooCommerce store has built-in features that help you automatically hide variations that are out of stock. Enabling these settings ensures that your customers see only the options available for purchase.
- Go to WooCommerce and click on Settings.
- Navigate to the Products tab and select the Inventory section.
- Find and tick the checkbox to Hide out of stock items from the catalog.
- Remember to click the Save changes button at the bottom of the page to apply the update.
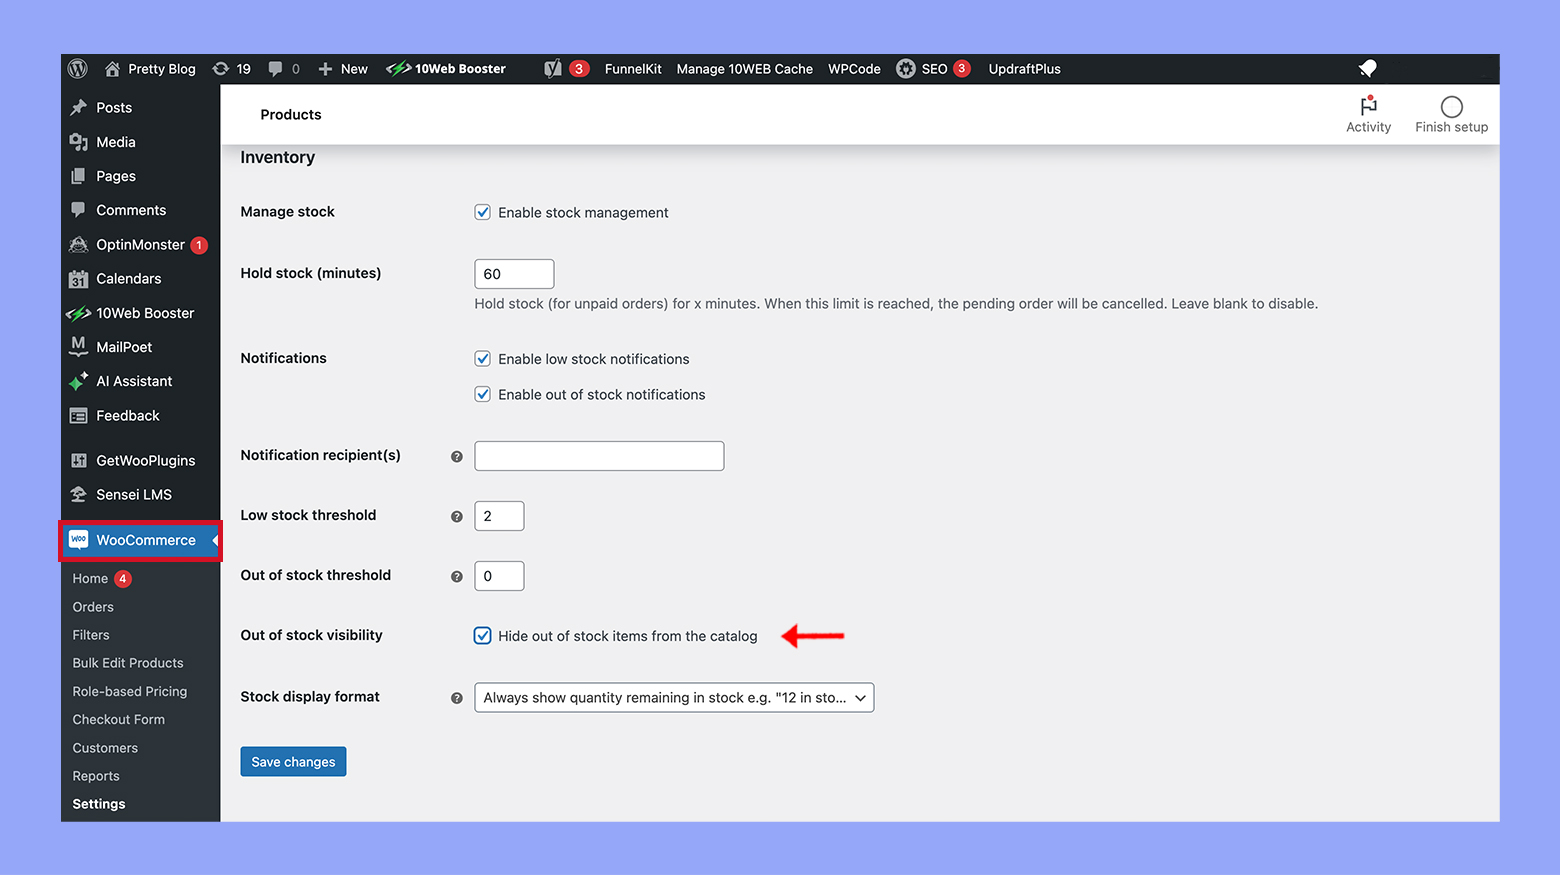
Now, any product variations that run out of stock will be hidden from your shop’s pages automatically.
Manual configuration for stock
Sometimes, you may prefer to manually handle how out of stock variations are displayed. This is useful when you want to apply specific rules or exceptions for certain products.
- Open the product page by going to Products and selecting the product you want to edit.
- Scroll down to the Product data panel, make sure Variable product is selected, and go to the Variations tab.
- Click on the variation you want to manage. Here you will see the option for stock status.
- Change the stock status to Out of stock.
- If you want to keep the out of stock variation visible to customers, ensure that the Out of stock visibility option under the Inventory tab is unchecked.
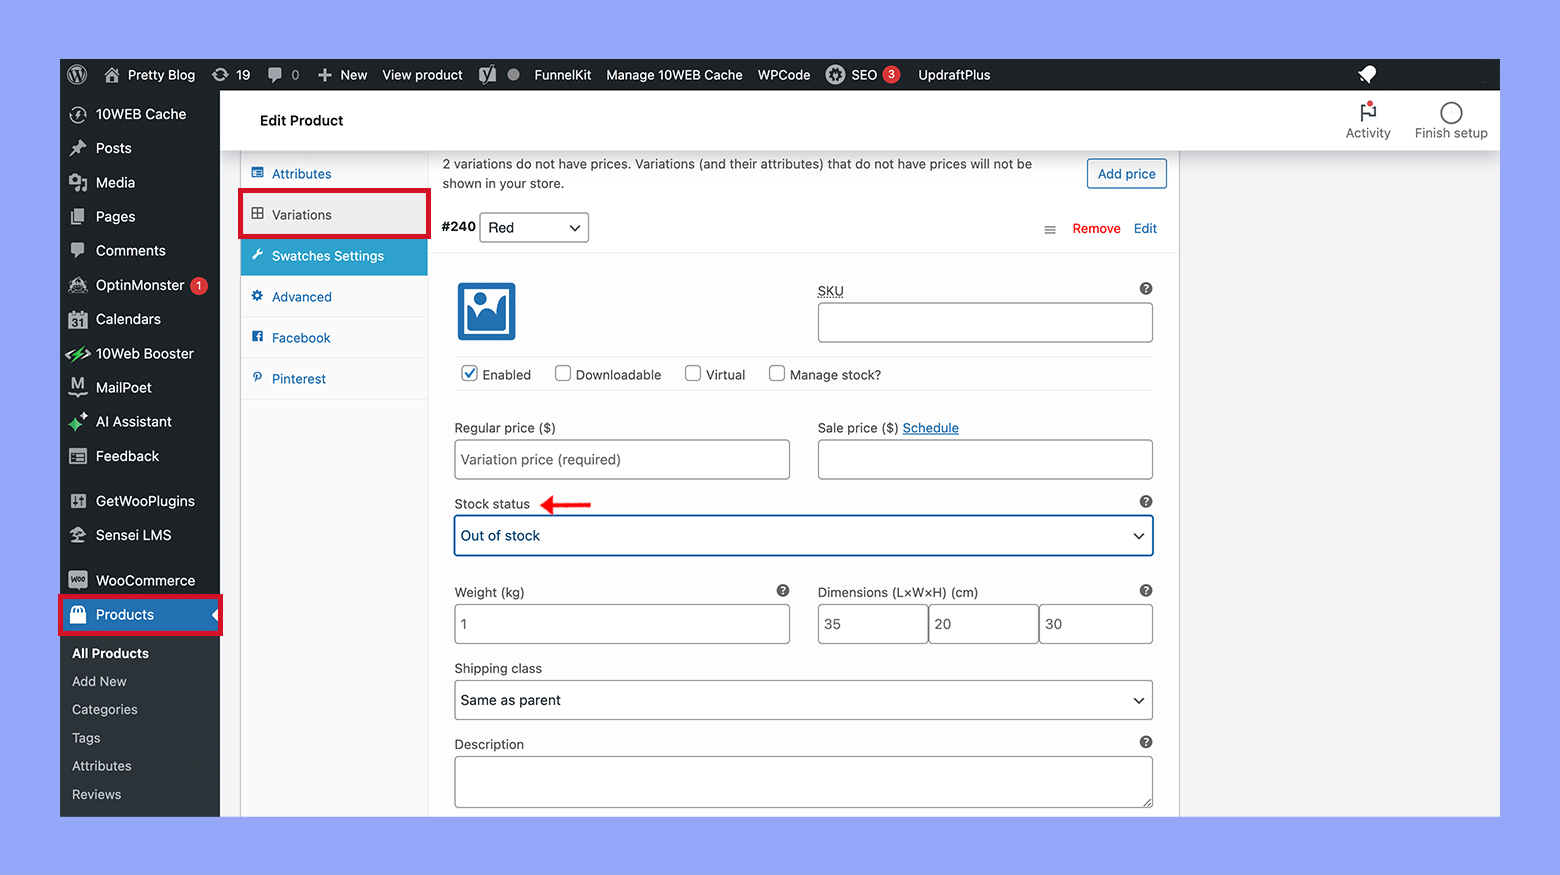
By doing this, your specific variation remains visible on the product page, even when it’s not available for purchase.
Step 7: Optimizing your product page
When you’re running an online store, the product page is where the magic happens. This is where your customers make their purchasing decisions, so it’s crucial to ensure it is as appealing and functional as possible to boost your sales and conversion rate.
Improving conversion with swatches
Enhancing your product pages with color swatches can significantly boost your conversion rates by making the shopping experience more intuitive and visually appealing.
- Add color swatches: Replace the standard dropdown menu for color selection with color swatches. This visual representation can make it easier for customers to choose and can lead to a higher conversion rate on your product pages. See how to make attributes visible and use them for creating variations WooCommerce shop page.
- Optimize swatches for mobile: Ensure your color swatches are touch-friendly for a better mobile shopping experience. This can help improve conversions from customers shopping on their phones.
Quick view and product pages
Implementing a quick view feature can streamline the shopping process and boost sales by allowing customers to access product details without leaving the current page.
- Implement a quick view feature: This allows customers to see product details in a popup window without having to leave the current page. It’s a handy feature that can help increase sales by simplifying the shopping process.
- Enhance the quick view dialogue: Ensure the quick view shows all necessary product details, including color variations and swatches. This provides customers with enough information to make a buying decision without navigating to the full product page.
Troubleshooting common issues
When adding color variations in WooCommerce, you may encounter some display issues or need to fine-tune your variation settings. Here’s what you can do to resolve these problems effectively.
Fixing swatches display problems
If you’re struggling with color swatches not appearing correctly on your product pages, follow these steps:
- Check your theme compatibility: Ensure your theme supports WooCommerce variation swatches.
- Clear cache: Sometimes your browser or a caching plugin may retain old versions of your pages. Clear the cache to see if the swatches display correctly afterward.
- Inspect for plugin conflicts: Deactivate other plugins briefly to identify any that might be causing the swatches to malfunction. If you find one, consider seeking alternative plugins or contacting support for assistance.
- Update WooCommerce: Occasionally, updating WooCommerce can resolve issues due to outdated code or compatibility.
- Check swatches configuration: Navigate to the product edit screen and ensure that for each attribute in the Attributes tab, the “Used for variations” box is ticked.
Warning: Always backup your website before making significant updates to avoid data loss.
Updating variation settings
For updating WooCommerce variation settings to reflect new or modified color variations:
- Access the product settings: Go to the All Products page, choose the product, and click Edit.
- Navigate to the attributes section: Click on the Attributes tab.
- Add or update attributes: Add new attributes for colors or edit existing ones and ensure they are correctly configured for variations.
- Adjust the variations: Move to the Variations tab, apply the changes to attributes, and save.
- Check the front end: Always preview your product page to confirm that the changes are visible and correct.
If an update doesn’t take effect, double-check the configurations for errors and ensure that you’ve clicked Save changes after any modification. Remember that proper configuration is vital for settings to reflect accurately on your store.
Conclusion
Adding color variations in WooCommerce is a powerful way to enhance your product pages and improve the shopping experience for your customers. We hope this guide helped you to learn how to add color variation in WooCommerce effectively. With the steps outlined, you can effectively manage and display color variations in your WooCommerce store. Implement these strategies to not only boost customer satisfaction but also drive sales and grow your online business.
Looking to sell online?
Create your online store in minutes
Create your online store in minutes with 10Web AI Ecommerce Website Builder.