Learning how to add a contact form in WordPress is essential to provide a secure and convenient way for users to interact with you. It enhances the professionalism of your site and helps you manage inquiries, feedback, or any other user-submitted data.
You can easily add a contact form in WordPress using various plugins that offer customization options and configuration settings for notifications and auto-responses.
FAQ
How do I add a contact form to my WordPress site? After installing your chosen plugin, head to the plugin’s section in the WordPress admin area and choose the option to Add New. From there, use the plugin’s interface to create and insert the form into your website.
How do I create a contact form in WordPress without plugins? Craft your form code and insert it into a page or a post using the WordPress Text Editor. Then set up form handling in functions.php. This will require some coding knowledge to ensure the form is functional and styled appropriately.
How do I create a free contact form in WordPress? Install the plugin, navigate to the Add New section under the plugin’s settings, and select a template or build your form from scratch.
How do I add contact info to my WordPress site? For more dynamic contact options, integrate a contact form as outlined in this guide or use a plugin specifically designed to showcase contact information stylishly.
Choosing the right contact form plugin
To add a contact form in WordPress, you’ll need to install a form plugin. Selecting the right plugin is critical. Consider factors like ease of use, customization options, and whether the free version meets your needs or if a premium upgrade is necessary for advanced features.
Several contact form plugins stand out in the WordPress ecosystem:
- Form Maker by 10Web offers a drag-and-drop interface for creating responsive forms. It’s suitable for both beginners and developers, allowing you to construct multi-functional forms. You can select from built-in themes or use custom CSS to style your forms.
- WPForms is known for being user-friendly and comes with pre-built form templates that can be easily customized.
- Contact Form 7 is a widely used, free plugin that provides simple form-handling features and straightforward markup.
- Ninja Forms allows you to build beautiful forms with a professional look without any coding knowledge.
- Formidable Forms is a solution for those who need more complex form actions like calculations and conditional logic.
- Gravity Forms offers a range of add-ons for integrating with other services and creating complex form-based solutions.
Comparing free and premium versions
Free version offerings:
- Form Maker by 10Web, available on the WordPress Plugin Repository, can be used to add various types of forms, from basic contact forms to complex surveys and application forms with payment options.
- WPForms Lite includes essential features for creating basic contact forms.
- Contact Form 7 provides barebone contact forms that can be extended with knowledge of HTML and CSS.
- Ninja Forms and Formidable Forms offer free versions suitable for general form building with some limitations compared to their premium versions.
Premium version advantages:
- Form Maker by 10Web offers 12 powerful extensions, including Google Drive, Dropbox integration, and MailChimp integration, to improve form capabilities.
- WPForms’ premium versions allow access to more advanced features like form abandonment, user registration, and payment integrations.
- Upgrade options for Ninja Forms and Formidable Forms provide advanced field types and marketing integrations.
- Gravity Forms is a premium-only plugin concentrated on developers and professional sites requiring advanced form functionality and integrations.
Installing the contact form plugin
The plugin installation process begins by accessing the WordPress plugin directory. Then, you install and activate your chosen plugin.
To start, log in to your WordPress dashboard. From here, navigate to the Plugins menu.
Click on Add New to open the WordPress plugin directory, where you can find various plugins serving different purposes.
One recommended plugin for contact forms is Form Maker by 10Web. It is a drag-and-drop contact form builder suitable for any purpose, from adding a contact form to complex surveys.
Within the plugin directory’s search bar, type in Form Maker to locate the plugin.
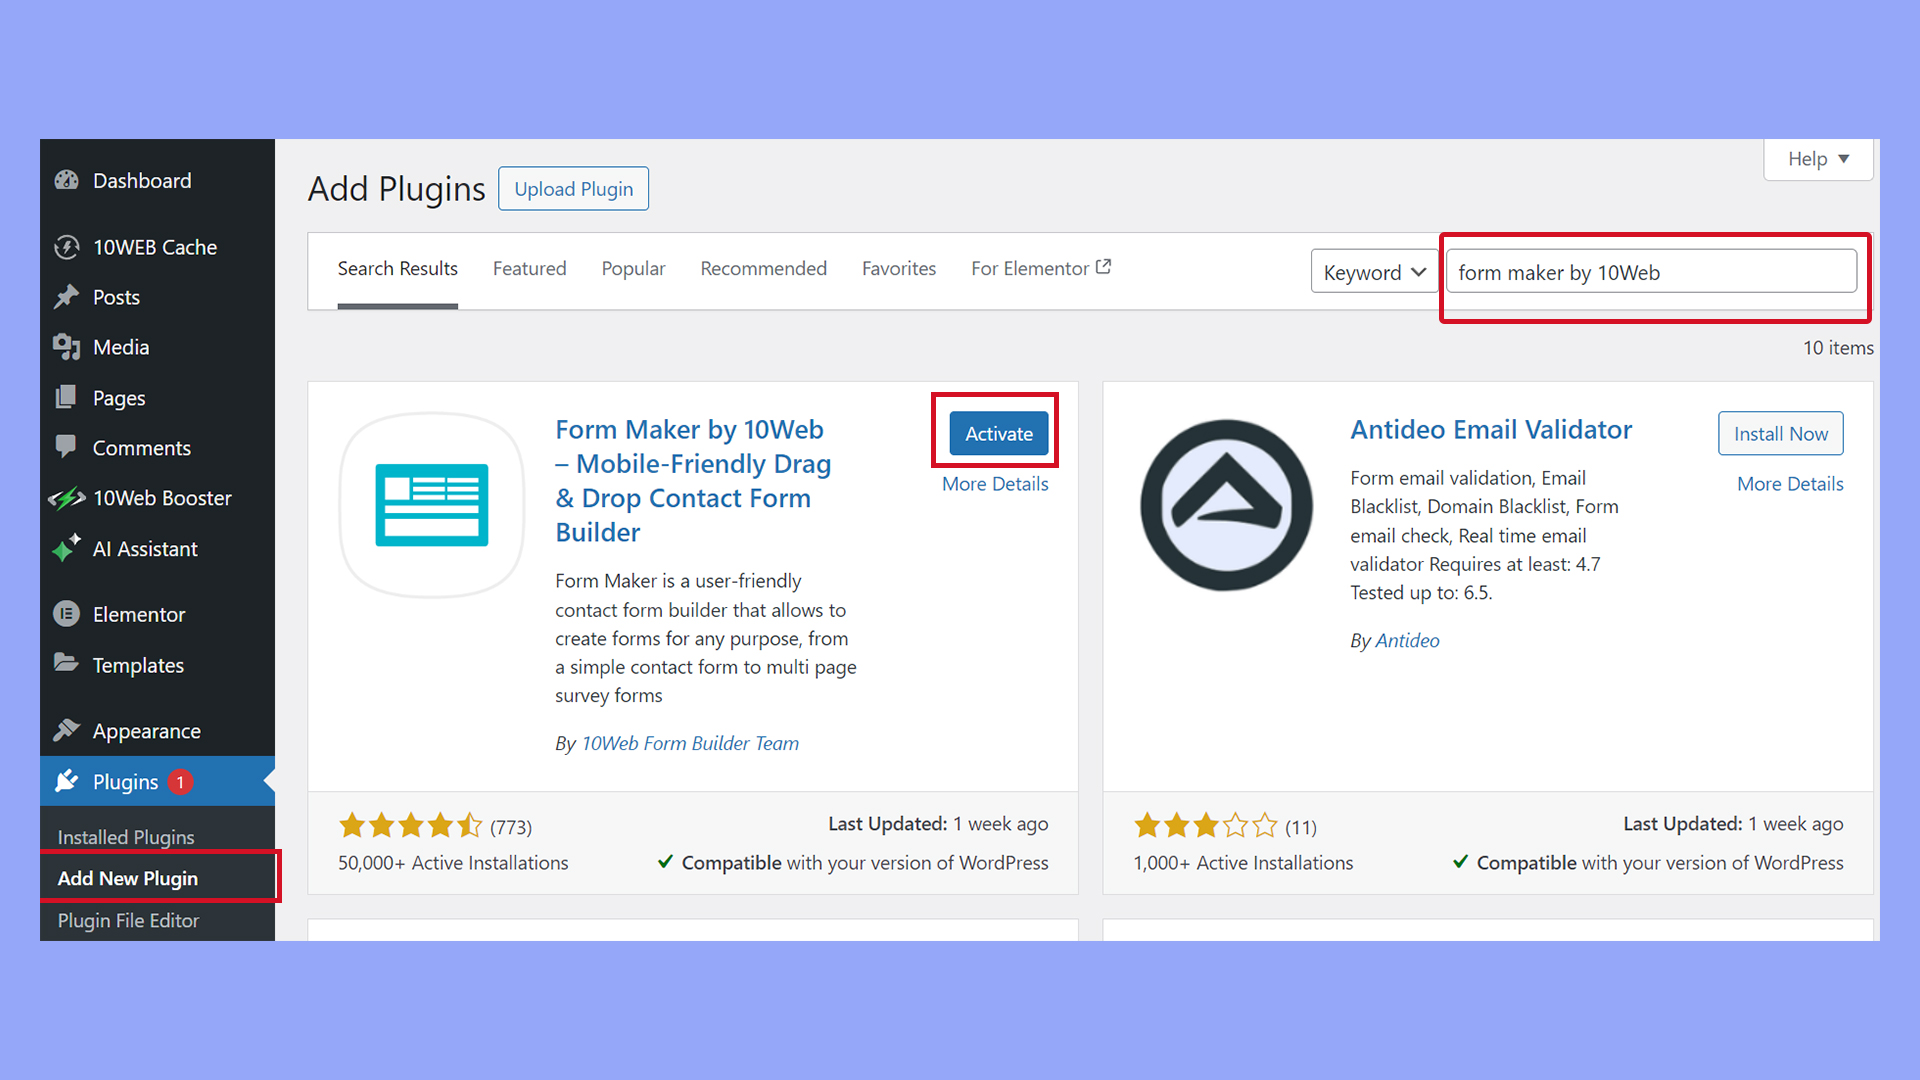
Upon finding it, you’ll see an Install Now button; click it to begin the installation process on your site.
After the installation is complete, you will see an Activate button appear. Press this to enable the plugin’s functionality on your WordPress site.
Creating a new contact form
To add a contact form in WordPress, you have the choice to either use pre-built templates for a quick setup or create a custom form from scratch. Form Maker by 10Web provides both these options with an intuitive interface.
Using pre-built templates
Form Maker by 10Web offers a variety of templates tailored to different needs. To use a pre-built template:
- Navigate to Form Maker on your WordPress dashboard.
- Browse through the templates and select Contact Us or one that fits your requirements.
- Click on the chosen template to load it into the form editor, where you can customize it to suit your needs.

Building a blank form
If you prefer a more hands-on approach, Form Maker allows you to create a form from scratch:
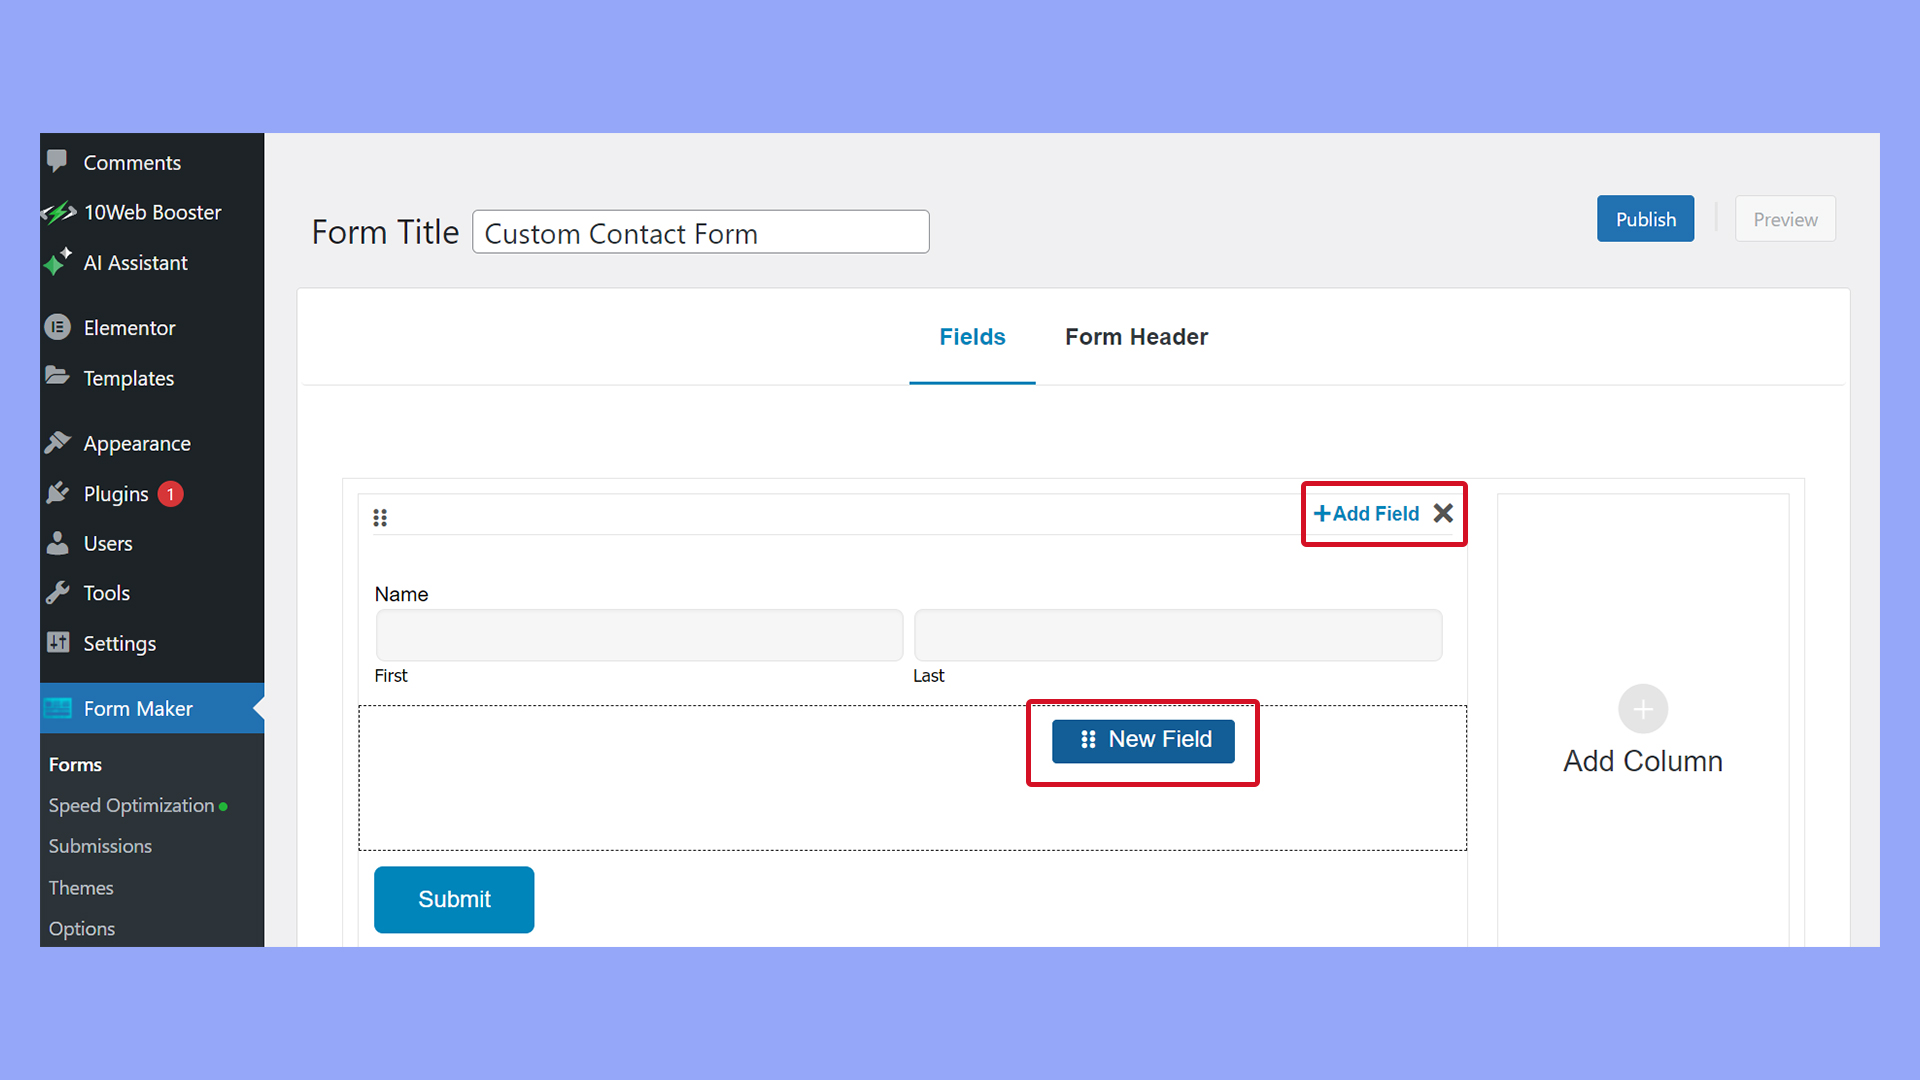
- Go to Form Maker and select New Form.
- Add fields by dragging them from the available field panel to your form layout.
Adding basic fields
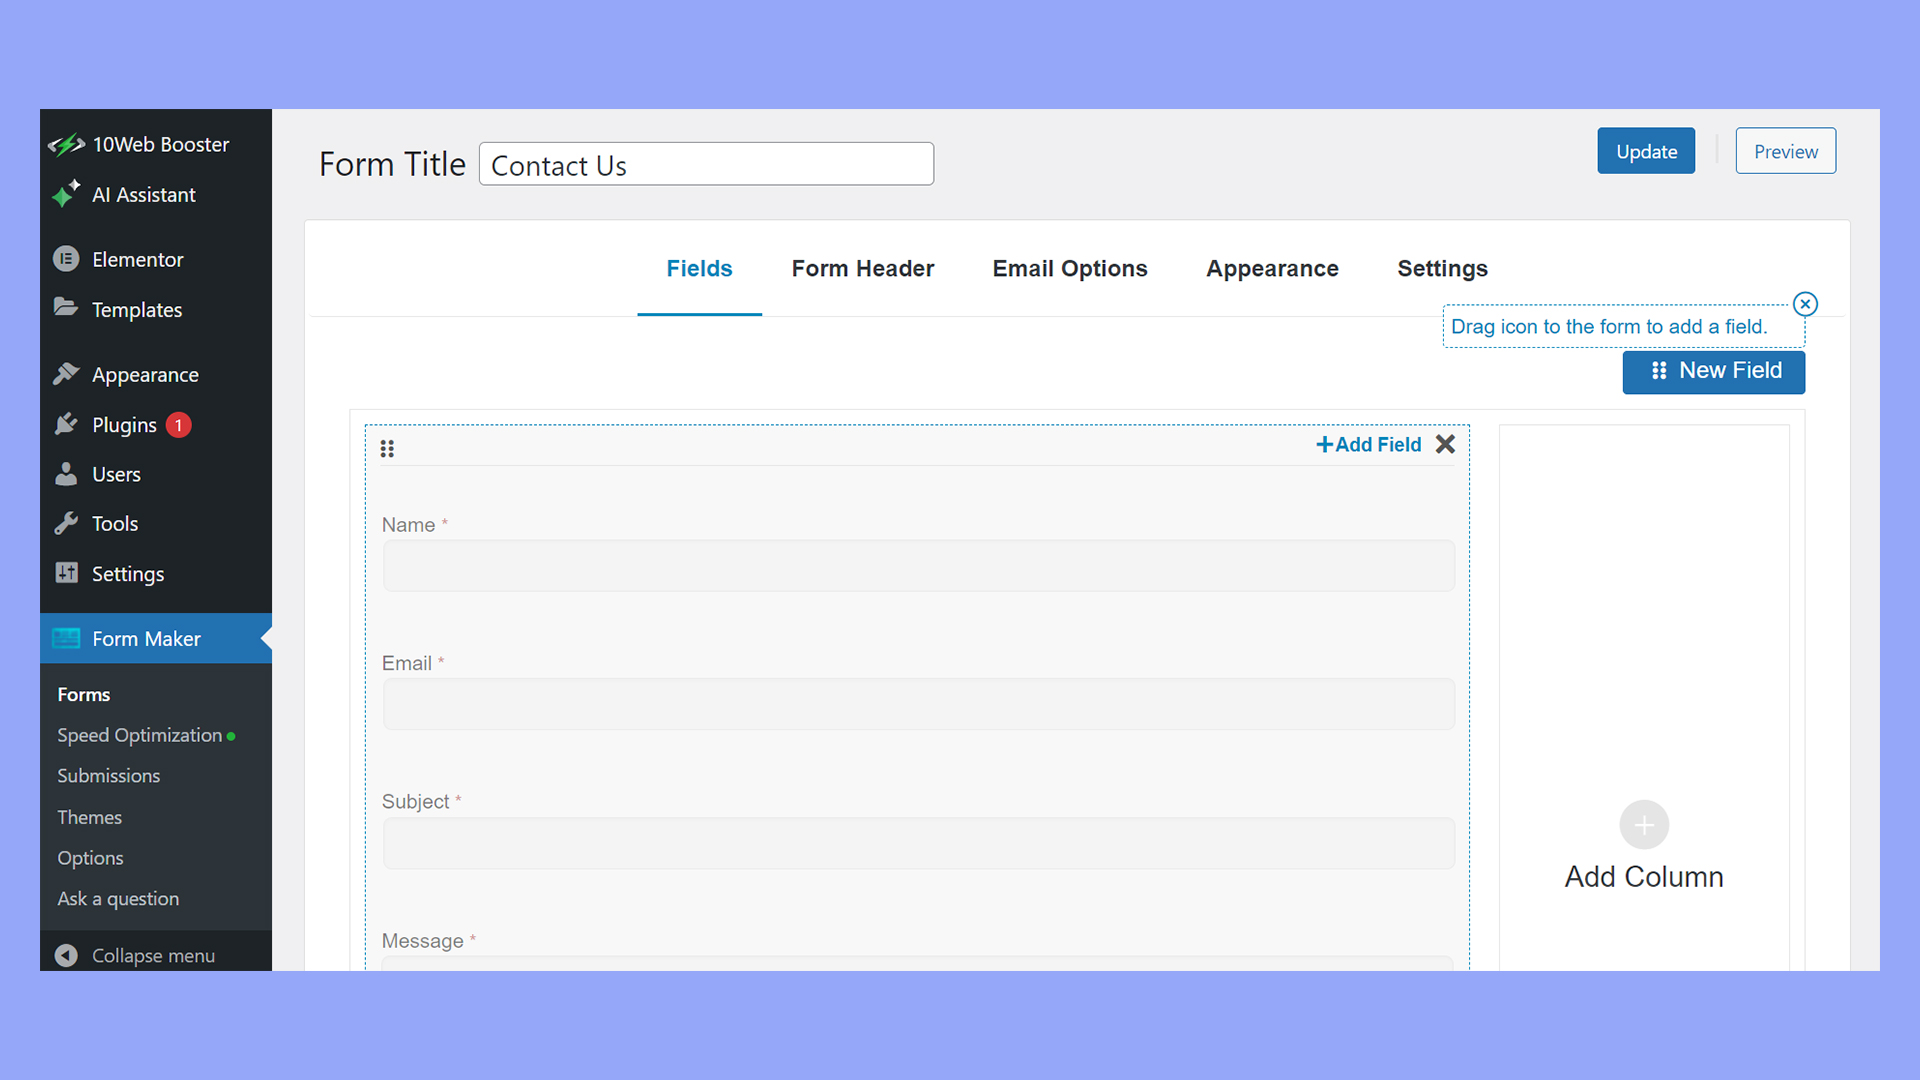
A standard contact form typically includes fields for the user’s name, email address, and message. Here’s how you add these in Form Maker:
- Click Add Field or drag the New Field icon onto the form.
- Add the Name and Email fields to collect contact information.
- Include a Text Area field for the message.
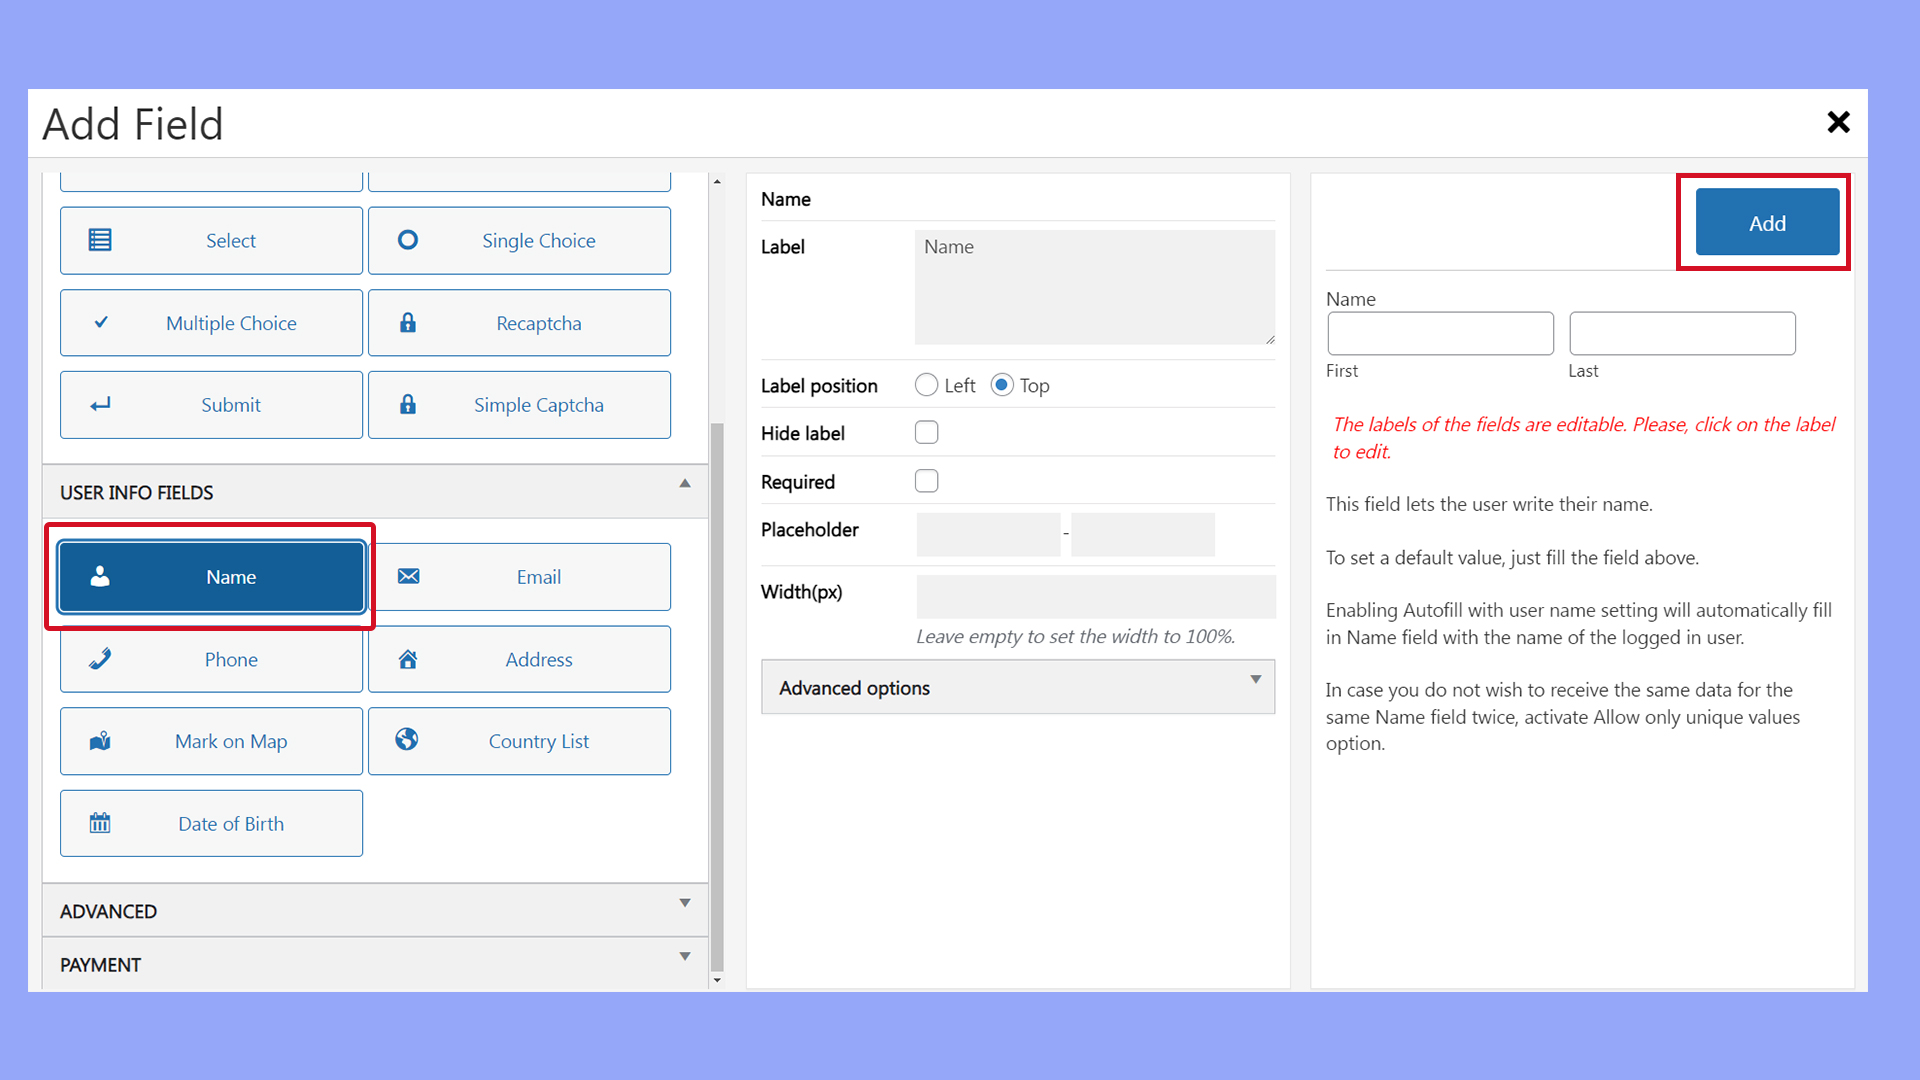
Customizing form fields
Customizing your fields is essential to capture the specific information you need:
- Hover on any field and click the pencil icon to bring up options for labeling and configuring.
- Utilize additional field options like Checkboxes or File Uploads depending on the data you want to gather.
Configuring form settings
Once your form is ready, configure the settings to manage how submissions are handled and how users receive confirmation. For detailed guidelines on how to implement these settings, How to Configure Form Confirmations and Notifications offers further information.
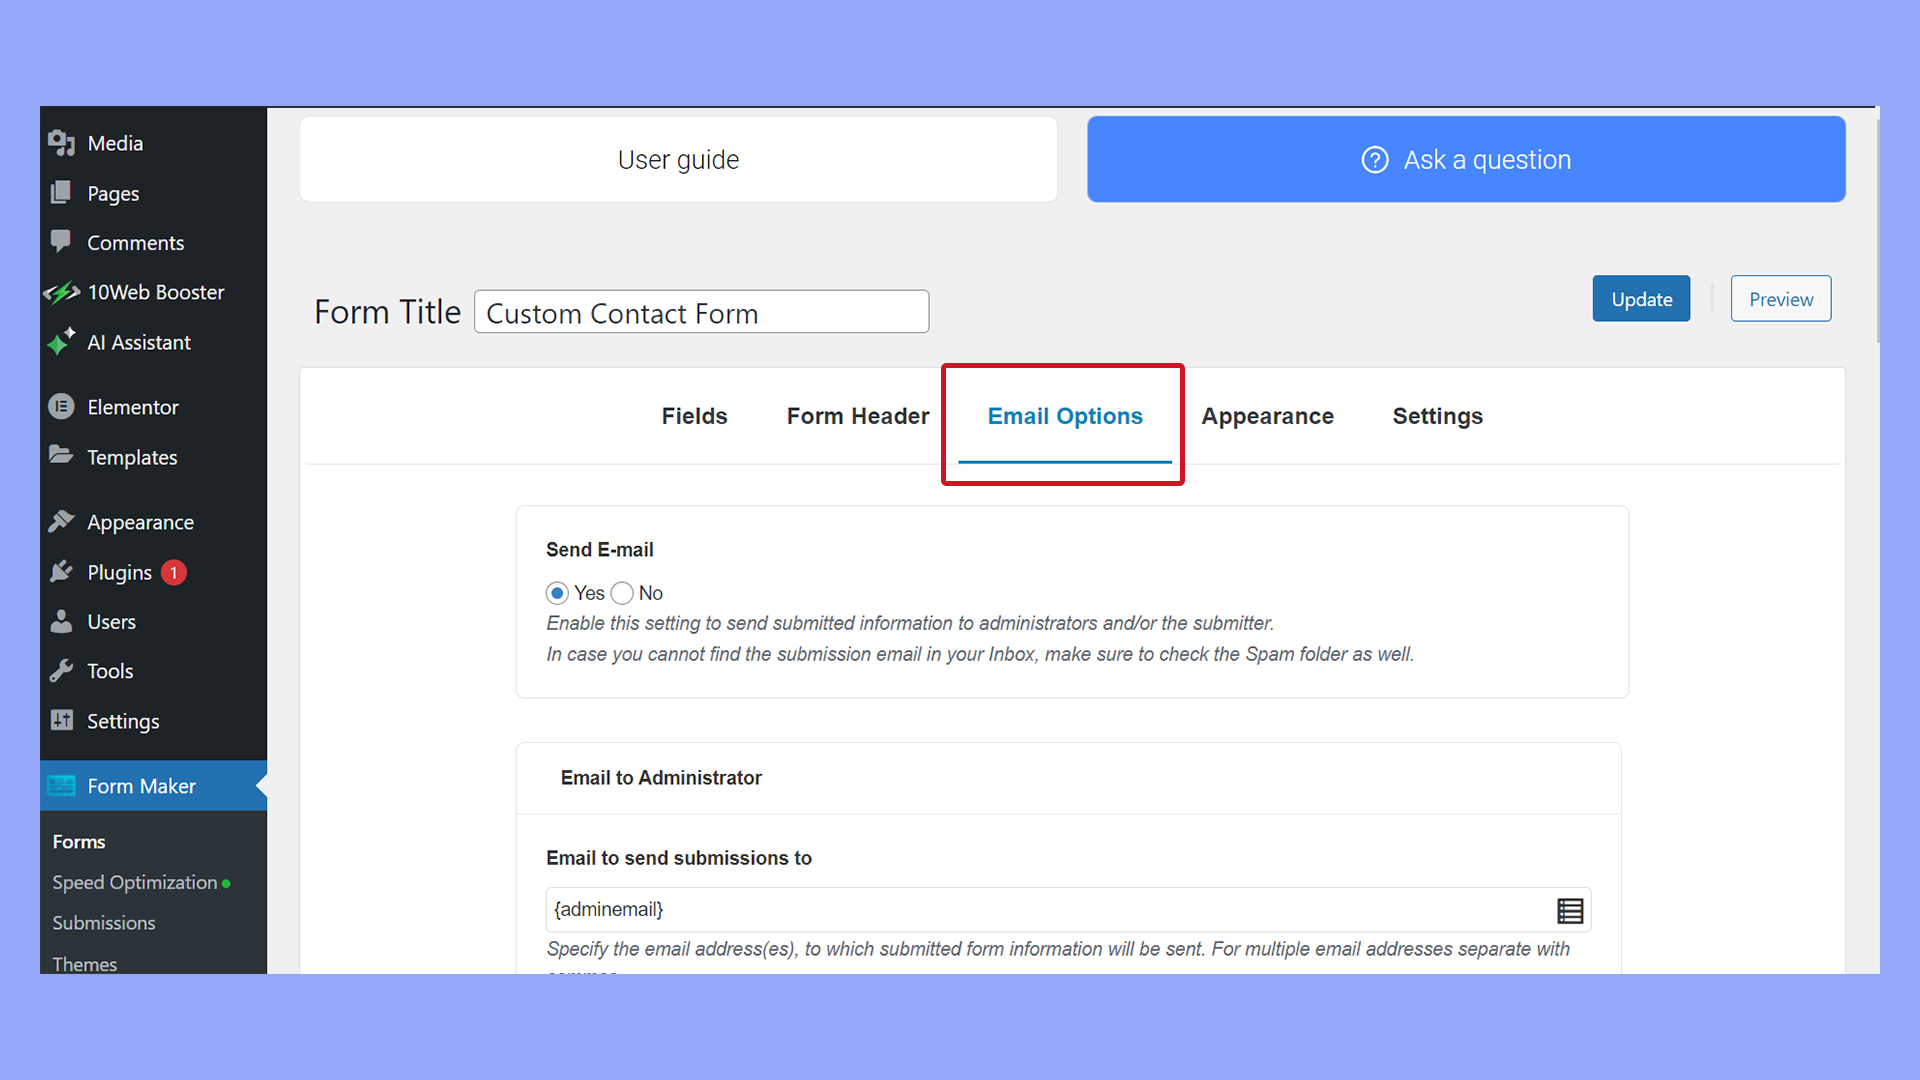
Notification configuration:
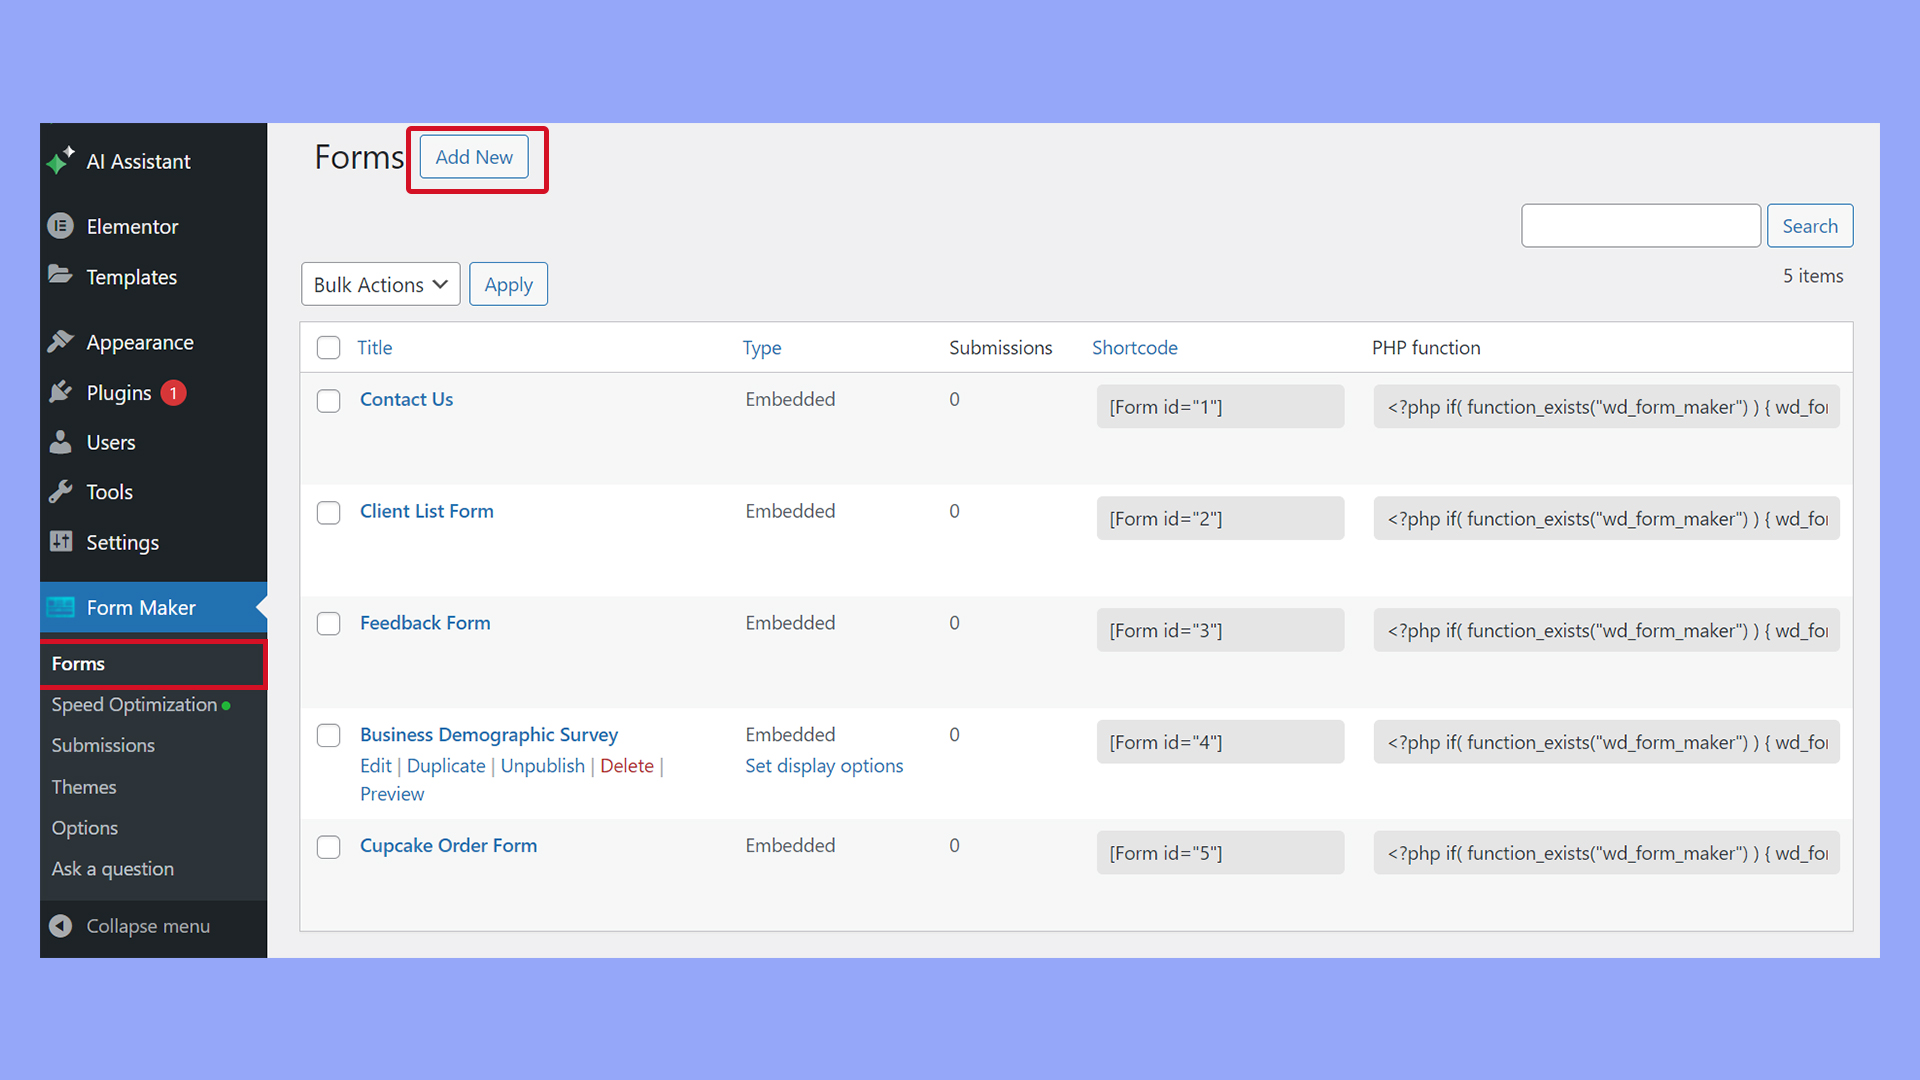
- Go to Form Maker > Forms and select a form to edit.
- In the Form Maker form editor, select Email Options to set up notifications.
- Adjust the recipient settings and customize the form’s email content.
- Adjust the Email to User settings and customize the response email settings.
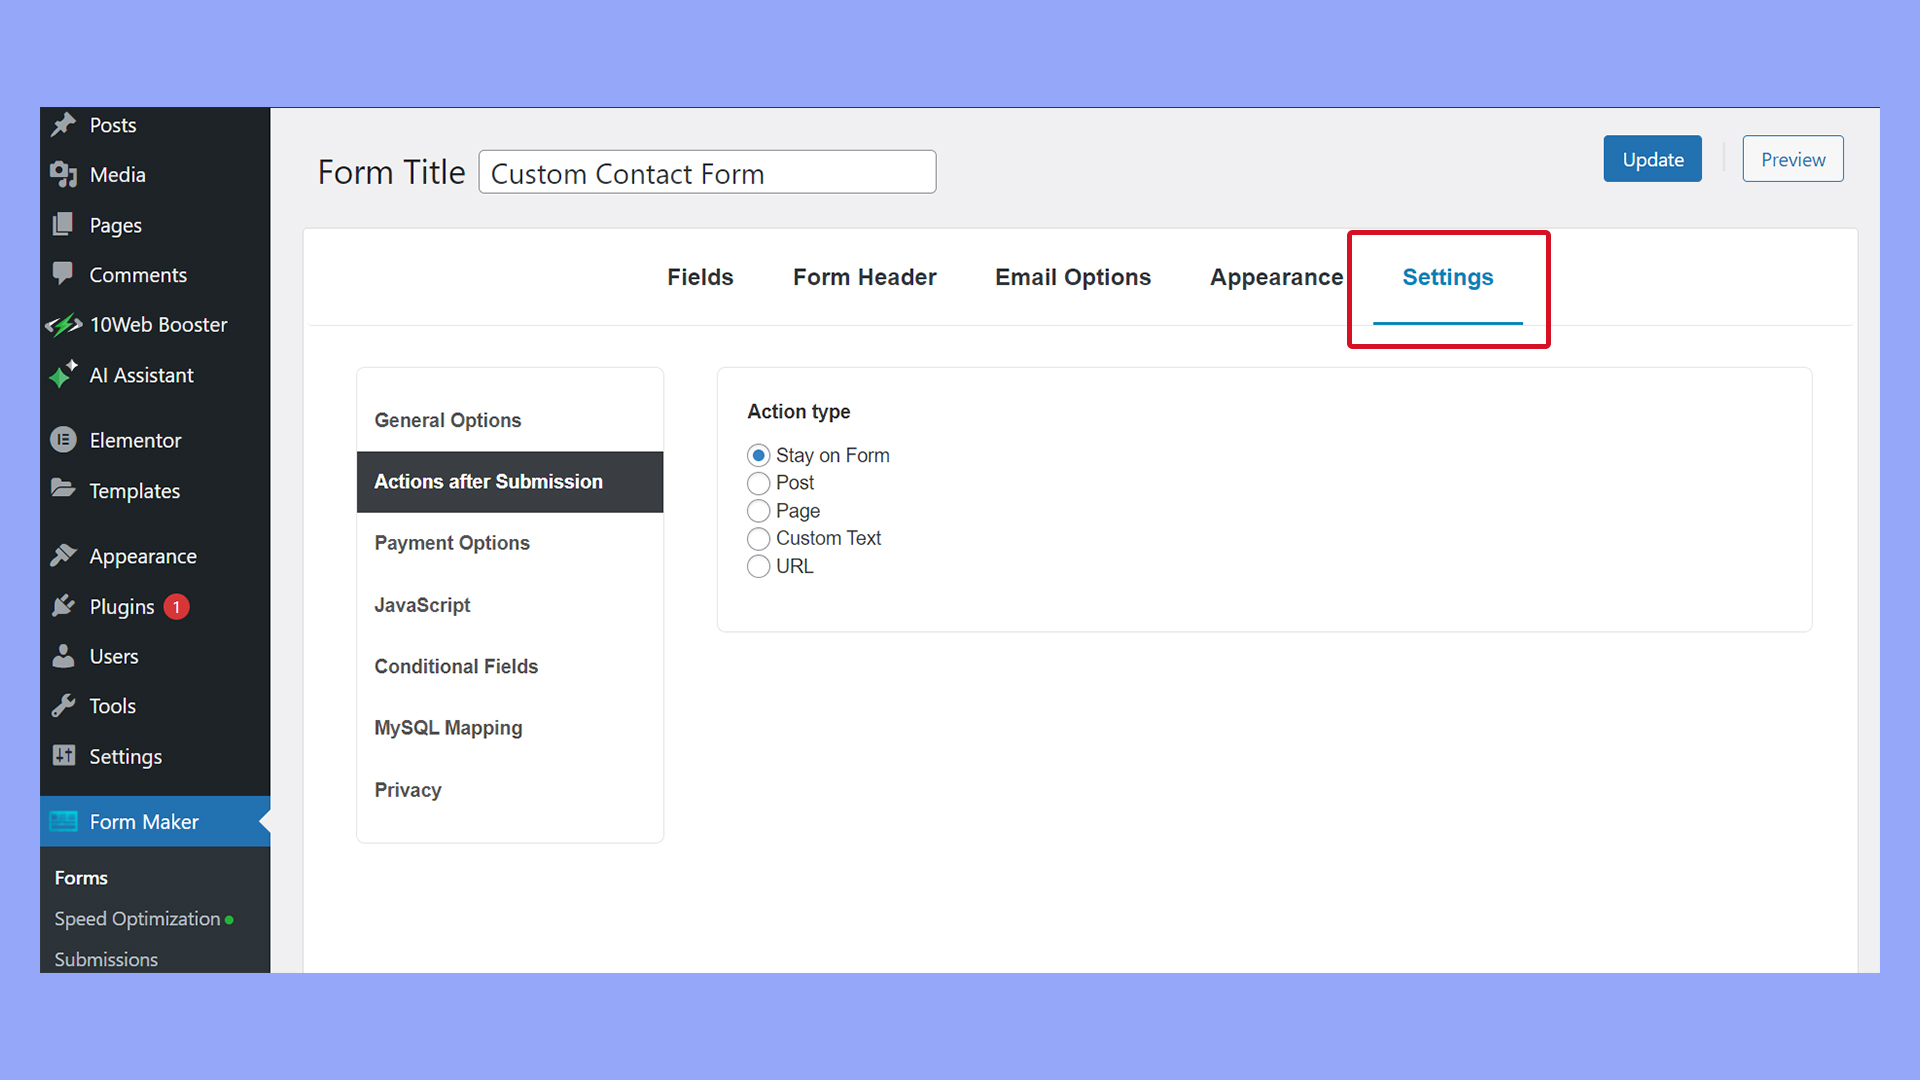
Confirmation settings:
Under Actions after Submission in Settings, choose from several post-submission actions like displaying a custom message or redirecting to a specific page.
How to add a contact form in WordPress
Once you’ve created your contact form using a WordPress plugin, it’s time to publish it on your website so that your visitors can start to reach out to you. The following subsections guide you through adding a contact form using shortcodes, adding it to the sidebar, and managing the submissions you receive.
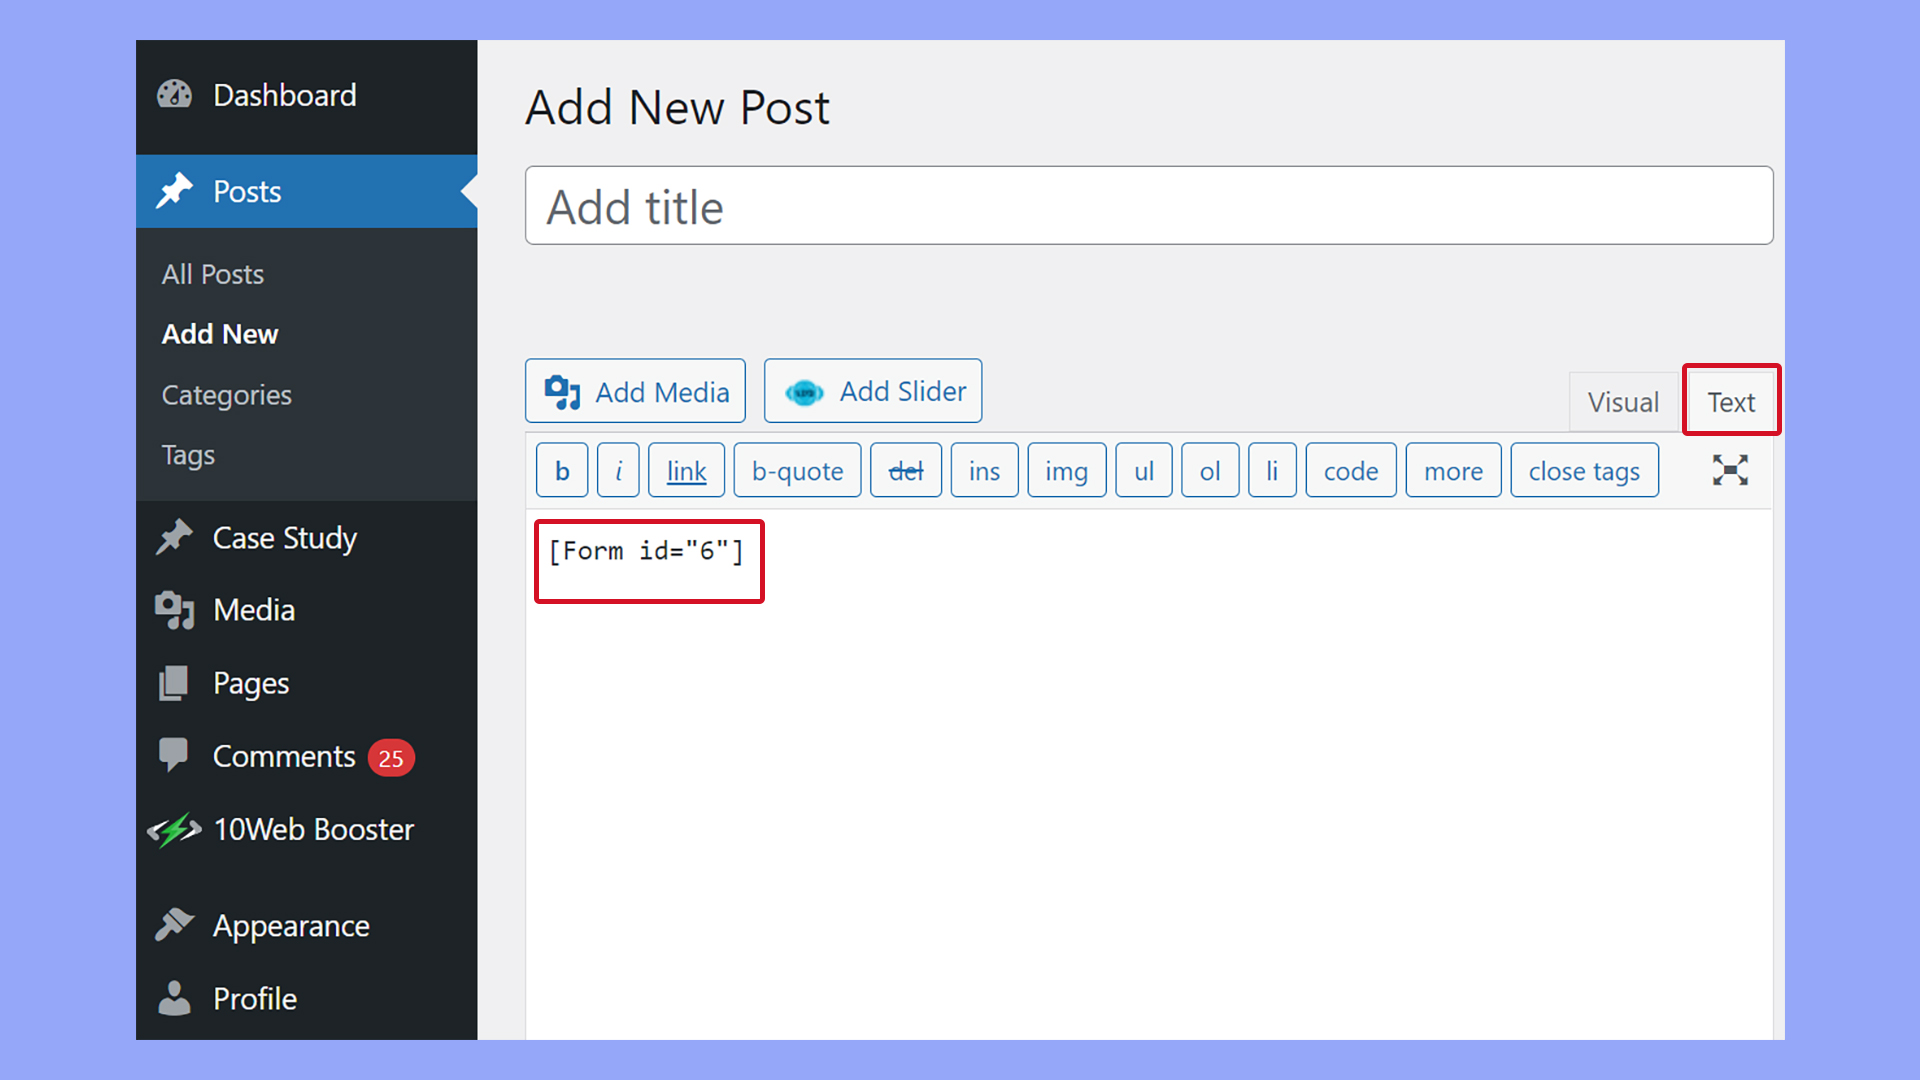
Adding a contact form using the Classic Editor
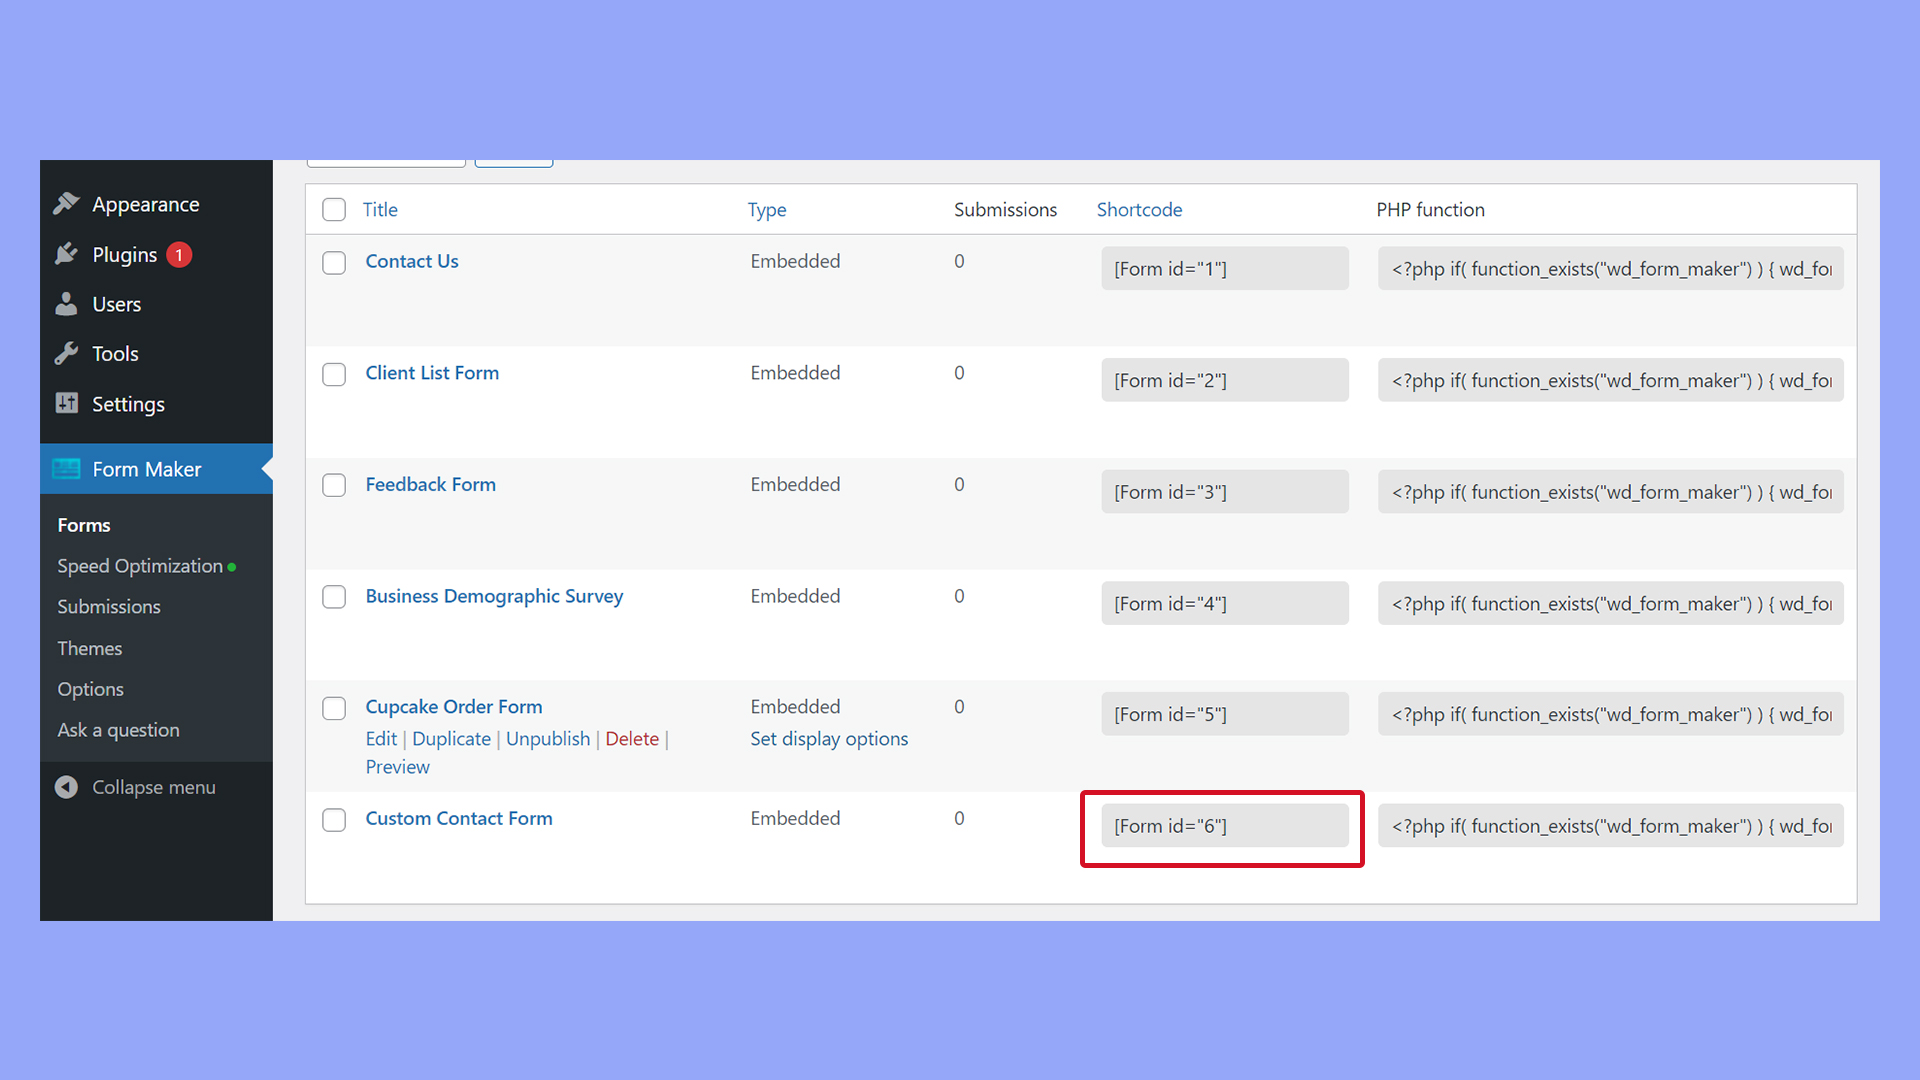
- Go to Form Maker in your WordPress dashboard.
- Find the form in the list and copy the shortcode associated with it.
- Open the page or post where you want to insert the form using the Classic Editor.
- Insert the shortcode where you want the form to appear in the content area.
- Click Update or Publish to save the changes.
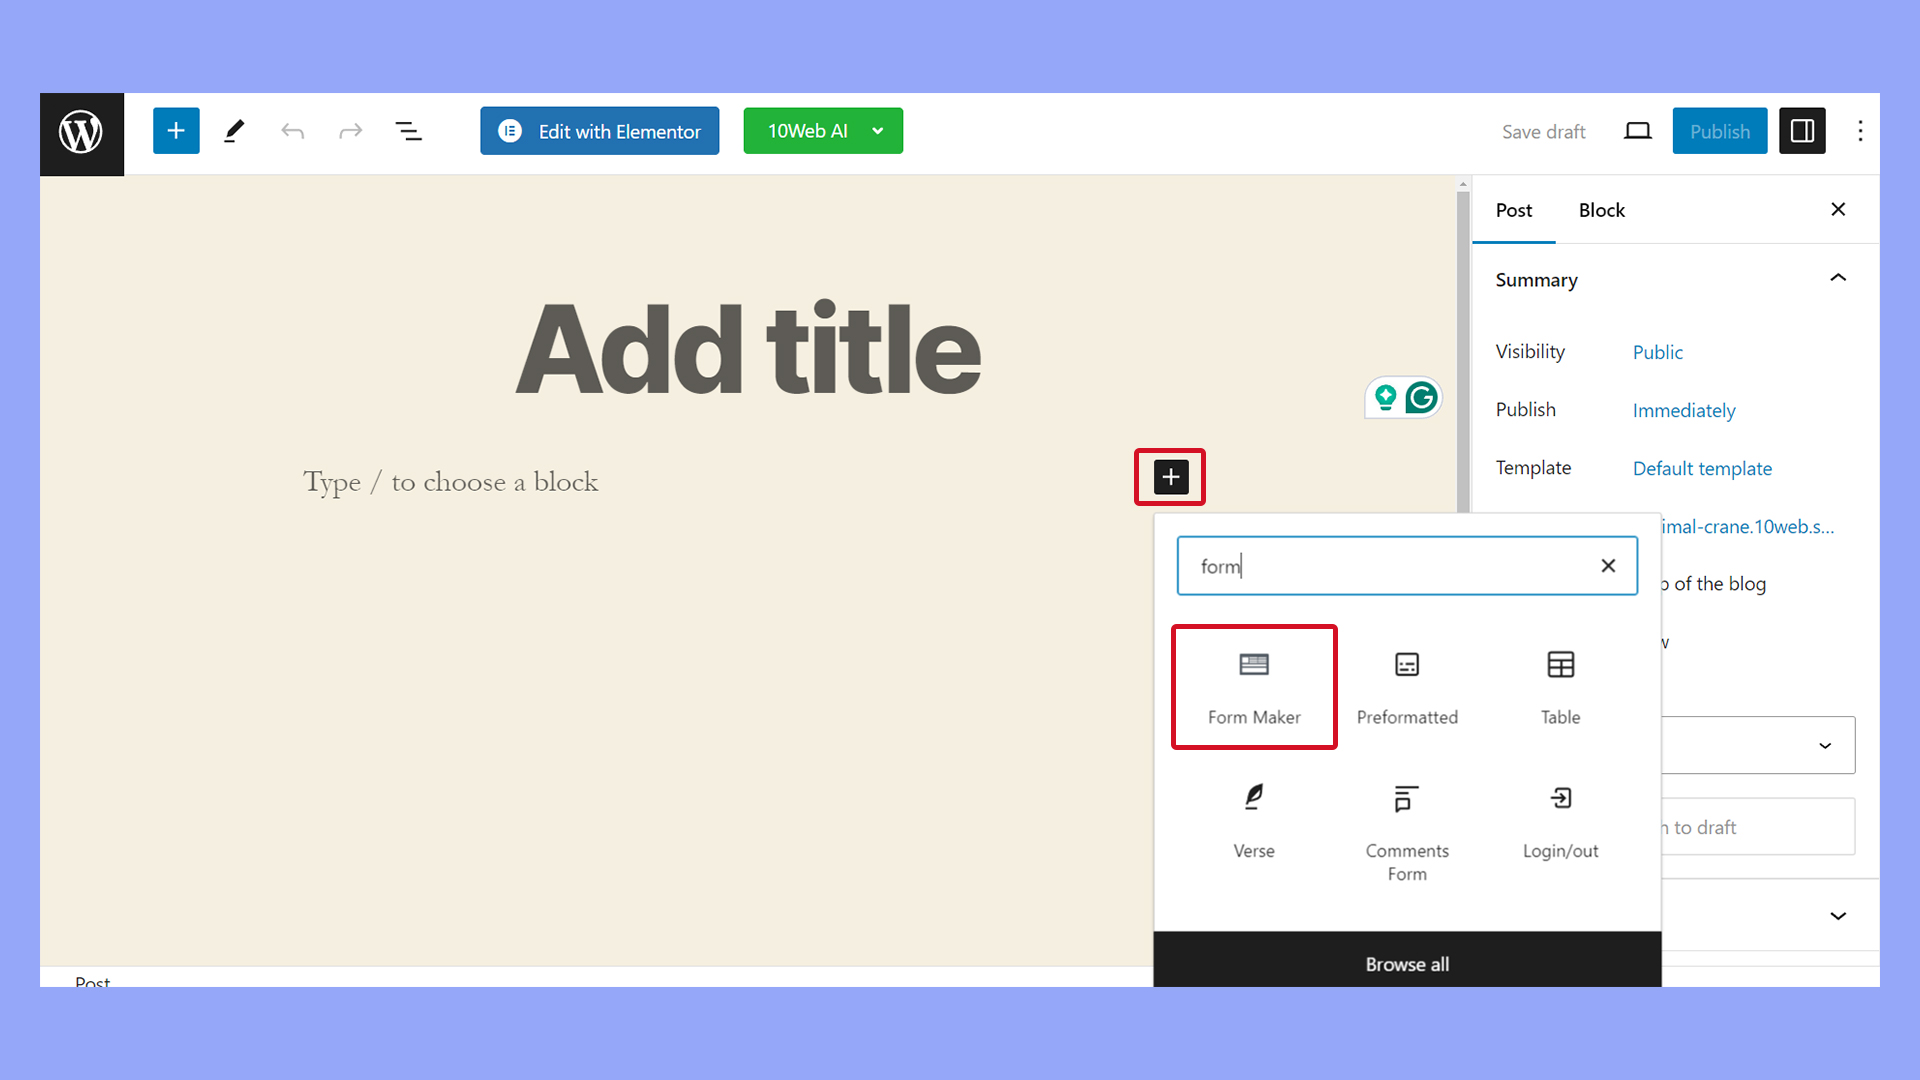
Adding a contact form using the Gutenberg Editor
- Navigate to the page or post where you want to add the form.
- Click the + (plus) icon to add a new block and search for Form Maker.
- Click to add the form block to your post.
- Select the desired form from the dropdown menu.
- Make sure to save your changes by hitting Publish or Update.
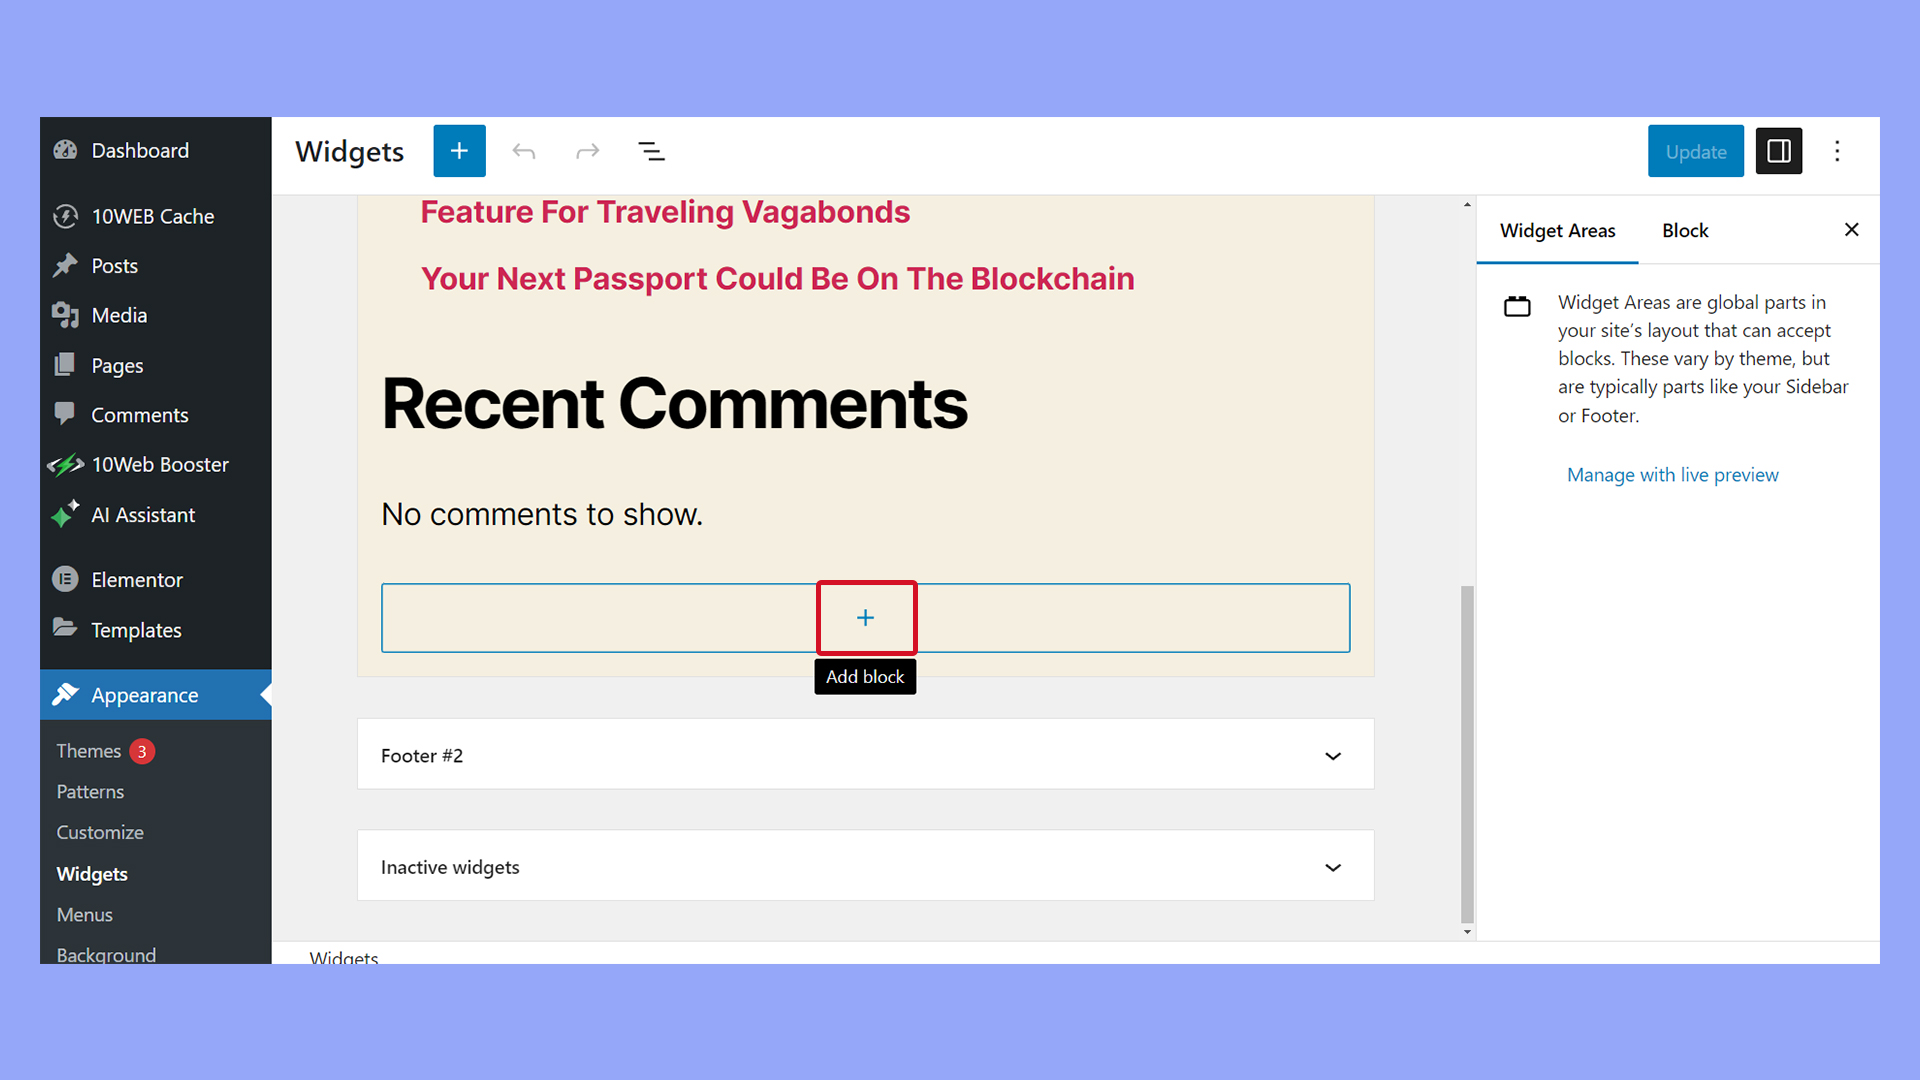
Adding a contact form in the sidebar
- Go to Appearance > Widgets in your WordPress dashboard.
- Click the + (plus) icon to add a Form Maker widget to your desired sidebar.
- Select the desired form from the dropdown menu.
- Click Update on the widget to save and publish the form in your sidebar.
Adding a contact form using a shortcode
- Access Form Maker, select your form, and copy the provided shortcode.
- Paste this shortcode into any post, page, or widget area that accepts shortcodes to display the form.
The Gutenberg editor allows you to insert the shortcode block, while the Classic editor accepts shortcodes in the Text area. You can also add the form using the shortcode by inserting a Text Widget.
Ensuring form security and spam protection
Security is paramount when handling form submissions to prevent spam and unauthorized entries. Here’s how you can secure your forms using Form Maker by 10Web.
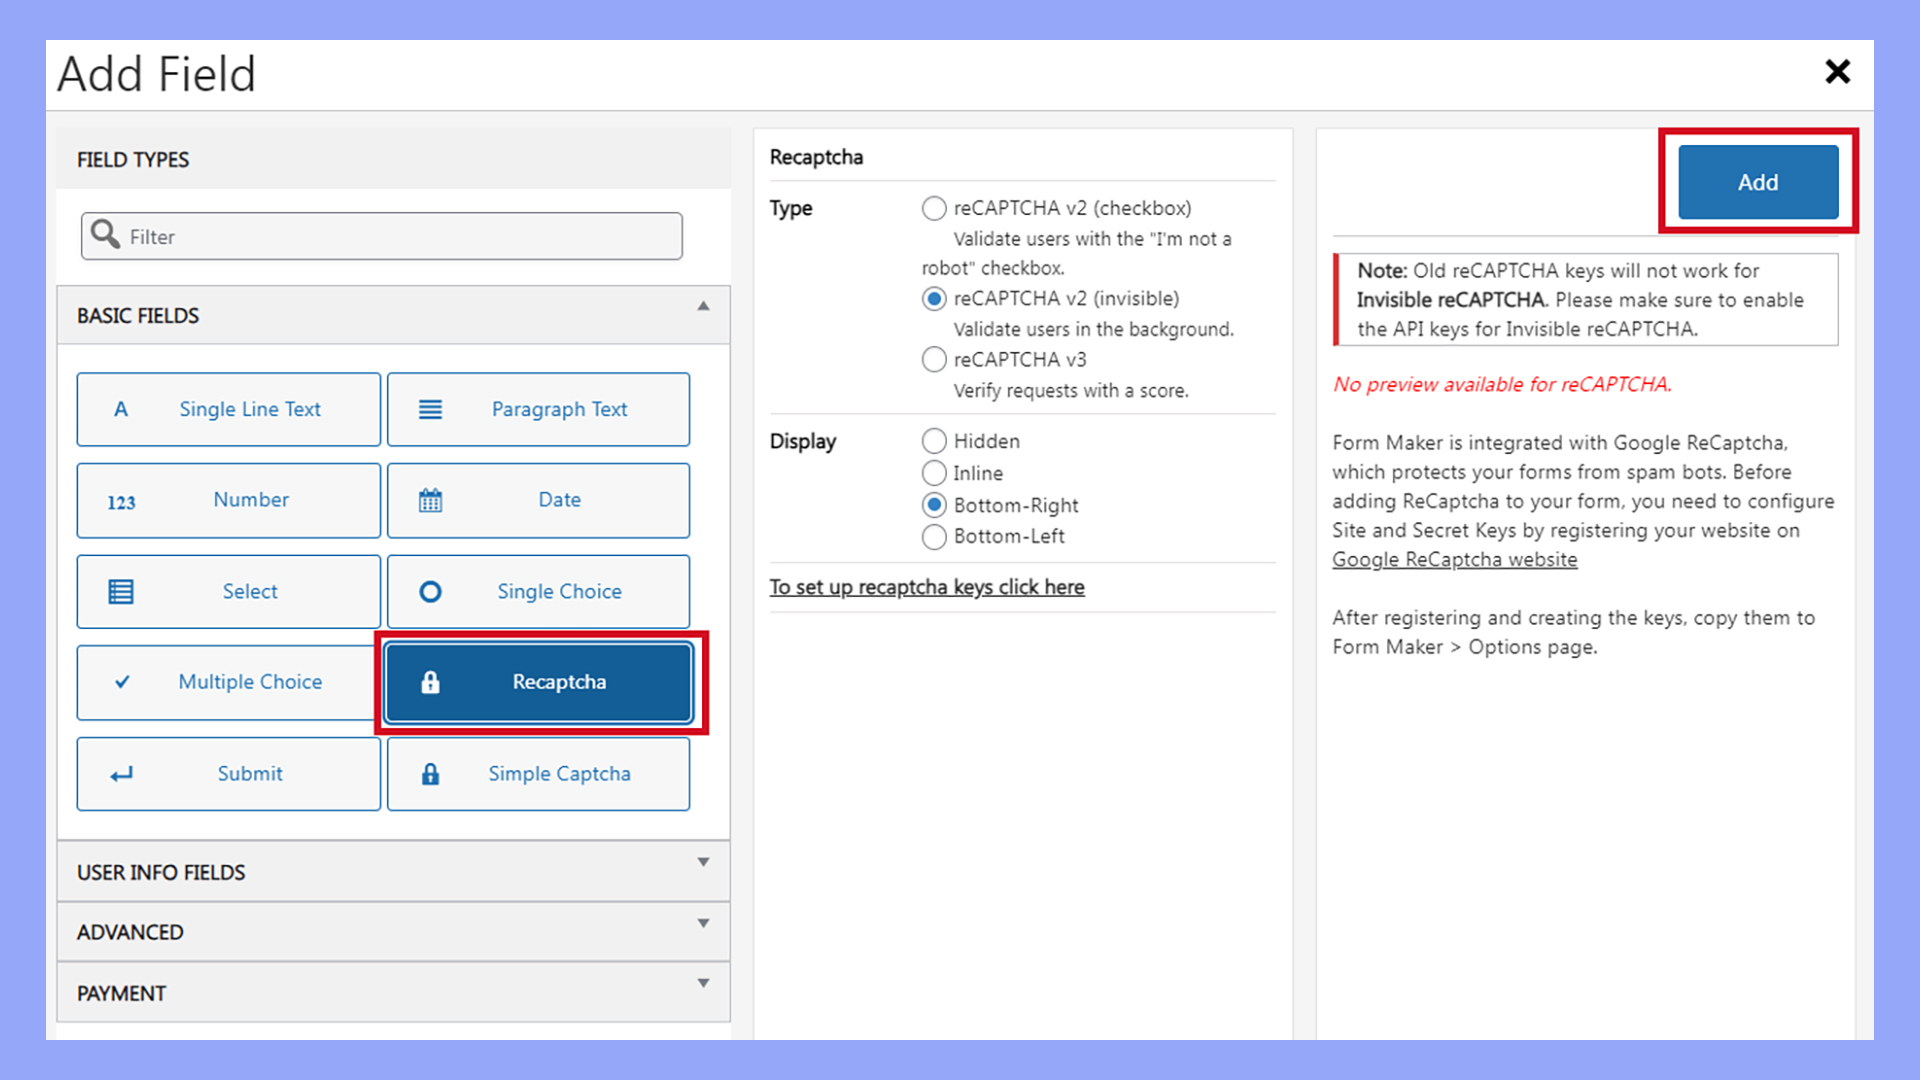
Add ReCaptcha verification:
- In the Form Maker dashboard, select your form and click Edit.
- Click Add Field
- Click the Recaptcha field.
- Select either ReCaptcha V2 or Invisible ReCaptcha, depending on your preference.
- You will need to register your site with Google to obtain the necessary site key and secret key for ReCaptcha.
- Click To set up recaptcha keys, click here and enter the keys in the designated fields.
- Click Add to add the Recaptcha field.
Integrating with other services
Integrating with other services, such as CRMs and email marketing tools, to automate processes and enhance functionality can expand your form’s capabilities.
For instance, if you’re using a contact form to gather leads, you can connect it directly to your CRM system. This means that every form submission can create a new contact in your CRM, allowing you to follow up efficiently and track those interactions.
Form Maker by 10Web offers various extensions that allow you to connect your forms to services like Google Sheets, Mailchimp, and Dropbox.
These integrations mean that with the right add-ons, you can transform simple contact forms into versatile tools that support your business processes, all from within your WordPress dashboard.
Summary
In conclusion, learning how to add a contact form in WordPress is a crucial step toward enhancing user experience and professionalism. By utilizing plugins that offer customizations and configuration settings, you can easily integrate this feature and manage inquiries, feedback, and user-submitted data.
This simple addition can significantly contribute to the growth and reliability of your online presence, making it a vital asset for any website owner. So, if you haven’t already, be sure to add a contact form to your WordPress site today!
Simplify WordPress with 10Web
Simplify WordPress with 10Web
-
 Experience automated website management
 -
Keep your site up-to-date with automatic updates
-
Forget about security threats and malware
 Experience automated website management