Displaying product attributes effectively in WooCommerce is key to providing customers with clear, essential information about the products you offer. This guide will walk you through various methods to showcase attributes like size, color, material, and more on your WooCommerce shop page, ensuring that your customers have all the details they need to learn how to display product attributes in WooCommerce effectively. This article will explore both global and custom attributes and the best practices for ensuring they are useful and engaging for your customers.
FAQ
How to display product attributes in WooCommerce shop page?
How do I display custom product attributes in WooCommerce?
Understanding WooCommerce product attributes
Product attributes in WooCommerce are essential for detailing the features of products you sell. They allow you to specify additional product data such as size, color, or anything else that may be relevant to your products.
Attributes in WooCommerce serve as identifiers that help your customers differentiate between various product options. They can be thought of as qualities or characteristics of a product. For instance, a T-shirt might have attributes for size and color.
When managing attributes, it’s important to access your WooCommerce settings. You can go to the Products section, and under it, you’ll find Attributes for global settings.
Types of attributes in WooCommerce
In WooCommerce, attributes can be systematized into:
- Global attributes: These are site-wide and can be applied to multiple products. They’re ideal for values you use often across a range of products. You create and manage these under Products > Attributes. They are not only reusable but can also be quickly added to a new product with the correct taxonomy.
- Custom attributes: Created at the product level, these are used for one-off entries. They offer you the flexibility to define attributes on the fly while you’re working on product listings.
It’s important to know that attributes can be crucial for a customer’s decision-making process, and WooCommerce offers various ways to display and utilize them effectively.
Importance of product attributes in WooCommerce
Product attributes in WooCommerce play a crucial role in defining and differentiating the products in your online store. They are essential for several reasons:
- Detailed product information: Attributes provide specific information about a product, such as size, color, material, and more. This detail is vital for customers who rely on accurate descriptions to make informed purchasing decisions. By clearly listing these attributes, you can significantly reduce customer uncertainty and questions.
- Improved search and filter capabilities: Attributes enhance the functionality of search and filtering tools on your site. Customers can easily filter products based on specific attributes, helping them find exactly what they’re looking for more efficiently. This functionality is especially important in stores with a large inventory, where navigating through many products can otherwise be overwhelming.
- Enhanced user experience: By using attributes effectively, you can improve the overall shopping experience. Attributes allow for the comparison of products based on key features and enable customers to make choices that best meet their needs. This tailored approach can lead to higher satisfaction and loyalty.
- Support for variations: In WooCommerce, attributes are fundamental for setting up product variations. For example, a single t-shirt design can be sold in multiple sizes and colors, each variation defined by its attributes. This not only simplifies the management of inventory but also provides customers with a variety of options to choose from.
- Boosts SEO: Properly used attributes can also enhance your store’s search engine optimization (SEO). By including relevant attributes that potential customers might search for, you can improve the visibility of your products on search engines, leading to increased traffic and sales.

Looking to sell online?
Create your custom online store in minutes with 10Web AI Ecommerce Website Builder and take your business online.

How to display product attributes in WooCommerce
Step 1: Adding and creating attributes in WooCommerce
In WooCommerce, attributes add extra data to your products, which can be important for customers when choosing products. Attributes can be used for size, color, material, and more.
Using the WooCommerce dashboard
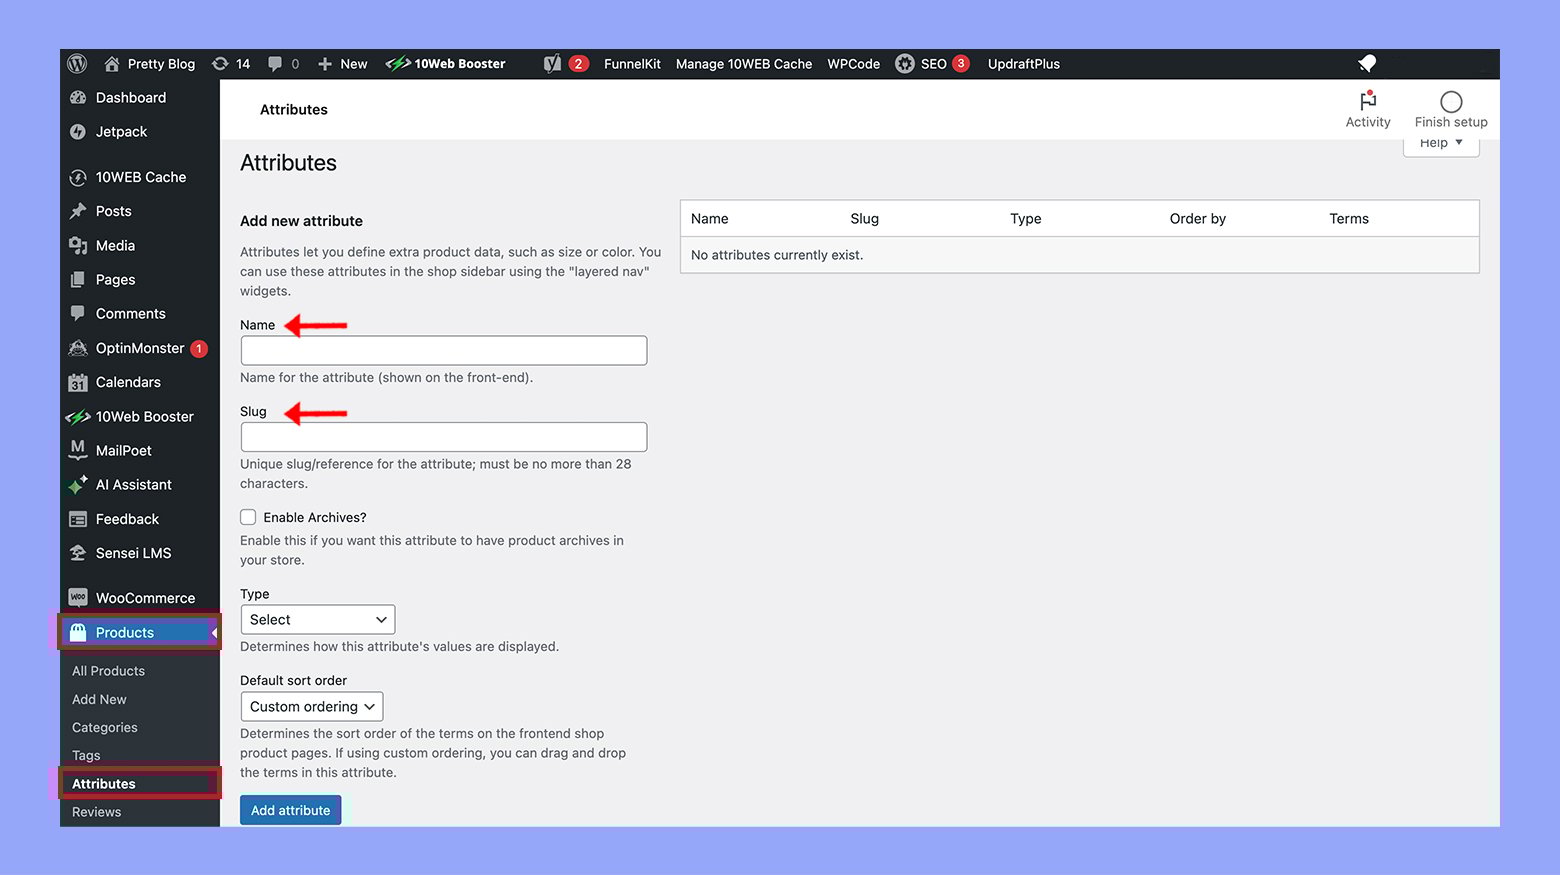
To begin adding attributes in WooCommerce, start from your Dashboard and locate the products section.
- Navigate to Products > Attributes in your WooCommerce Dashboard.
- Start adding a new attribute. Enter a Name for your attribute, like Color or Size.
- The Slug is an URL-friendly version of the name, usually auto-generated.

- Choose the Default sort order of your attribute terms.
- Press the Add attribute button to save your new attribute.
Adding global attributes
Global attributes apply to multiple products and are helpful when you sell products with common features.
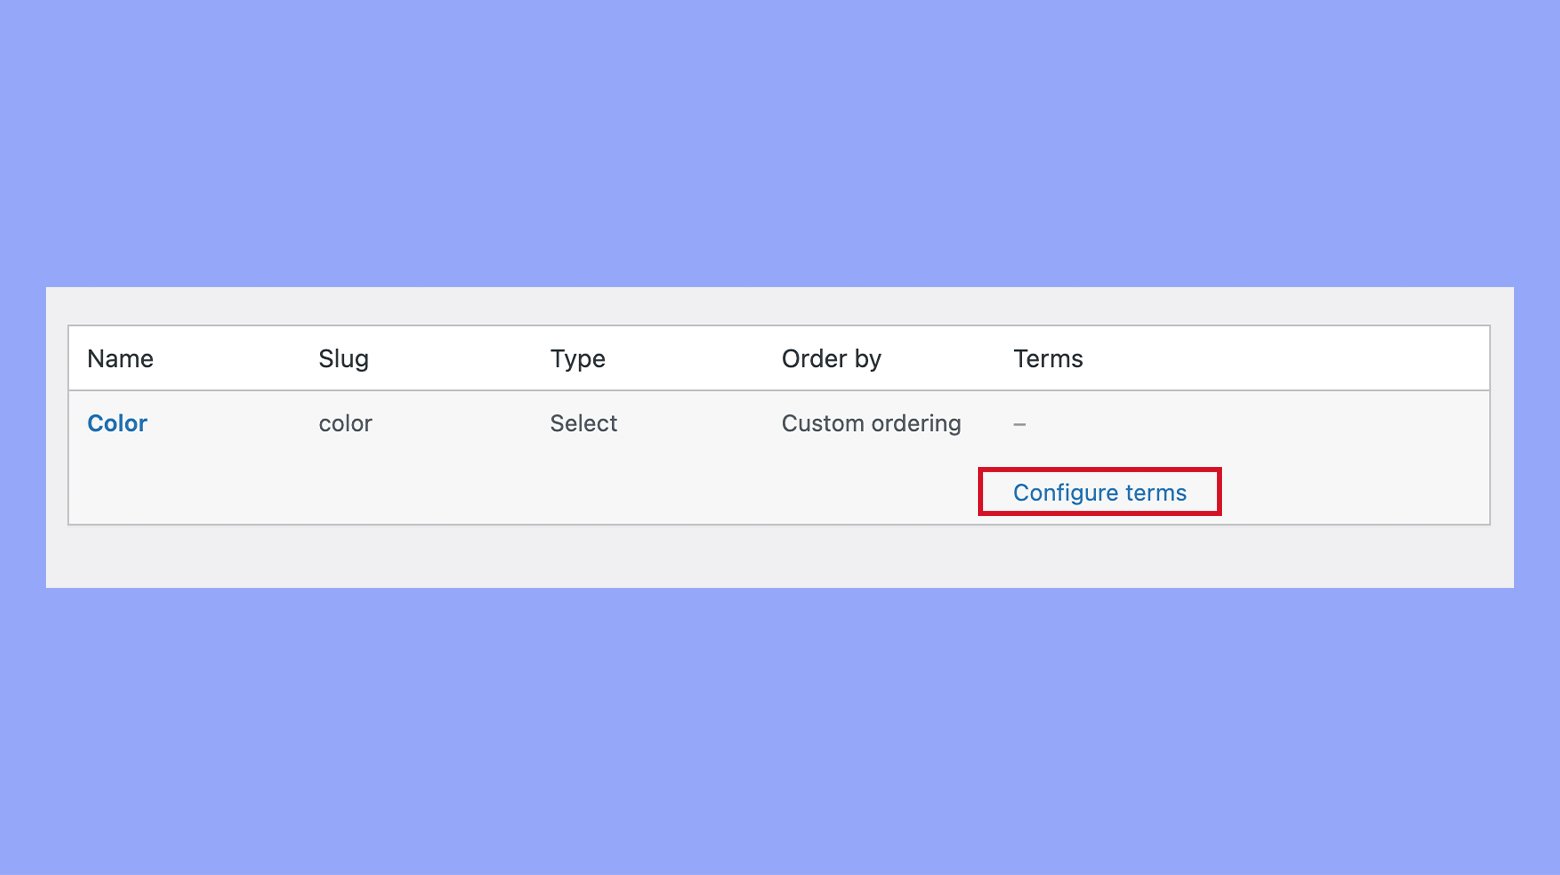
- Follow the steps above to access Products > Attributes.
- After creating an attribute by filling in the Name and optional Slug, click Add attribute.
- To add terms to the attribute, hover over the attribute name and click Configure terms.
- Enter a Name for the term, like “Red” for a Color attribute.
- You can also add a Slug and a Description.
- Click Add new (attribute name), like Add new Color, to finish creating the term.

Creating custom product attributes
Custom product attributes are specific to individual products and are not shared globally across the store.
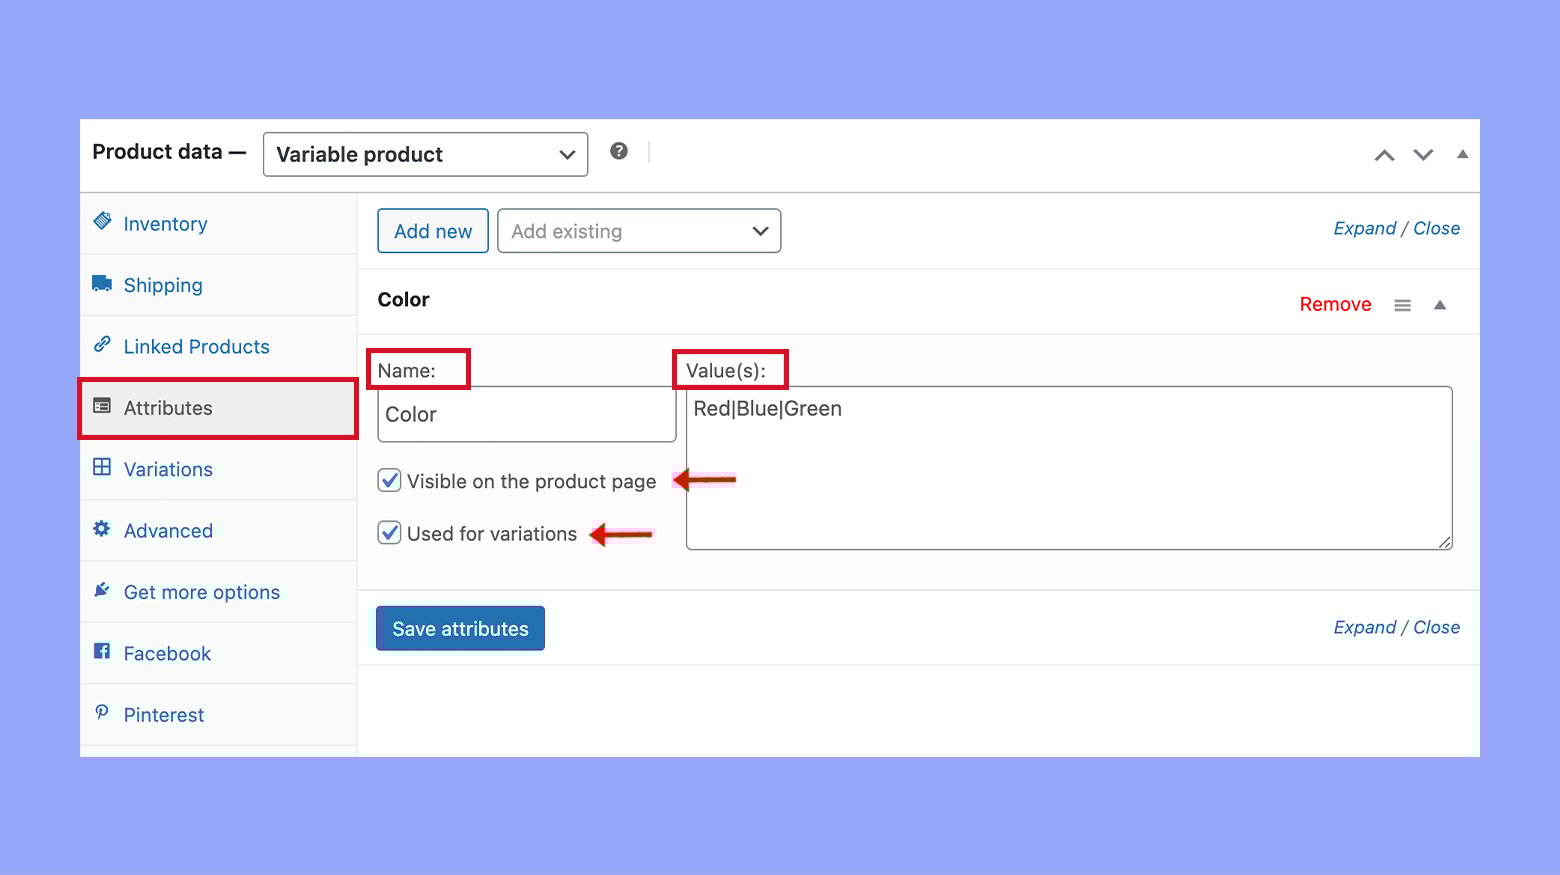
- Go to Products and select the individual product you want to edit or create.
- Scroll down to the Product data section and select the Attributes tab.
- To add a new attribute, click the Add new button.
- Fill in the Name and the Value(s); separate different values with a pipe (|), like “Red|Blue|Green”.
- If this is a variable product, you may want to select Visible on the product page and Used for variations checkboxes.
- Save your changes by clicking Save attributes.
By following these steps, you’ll be able to successfully create and manage both global and custom product attributes in your WooCommerce store, putting you in a strong position to provide your customers with all the information they need.
Step 2: Managing product variations for attributes
Understanding how to display product variations in WooCommerce is crucial for providing a diverse range of choices to your customers. Creating variations for attributes allows you to tailor your product offerings according to specific qualities and shopper preferences.
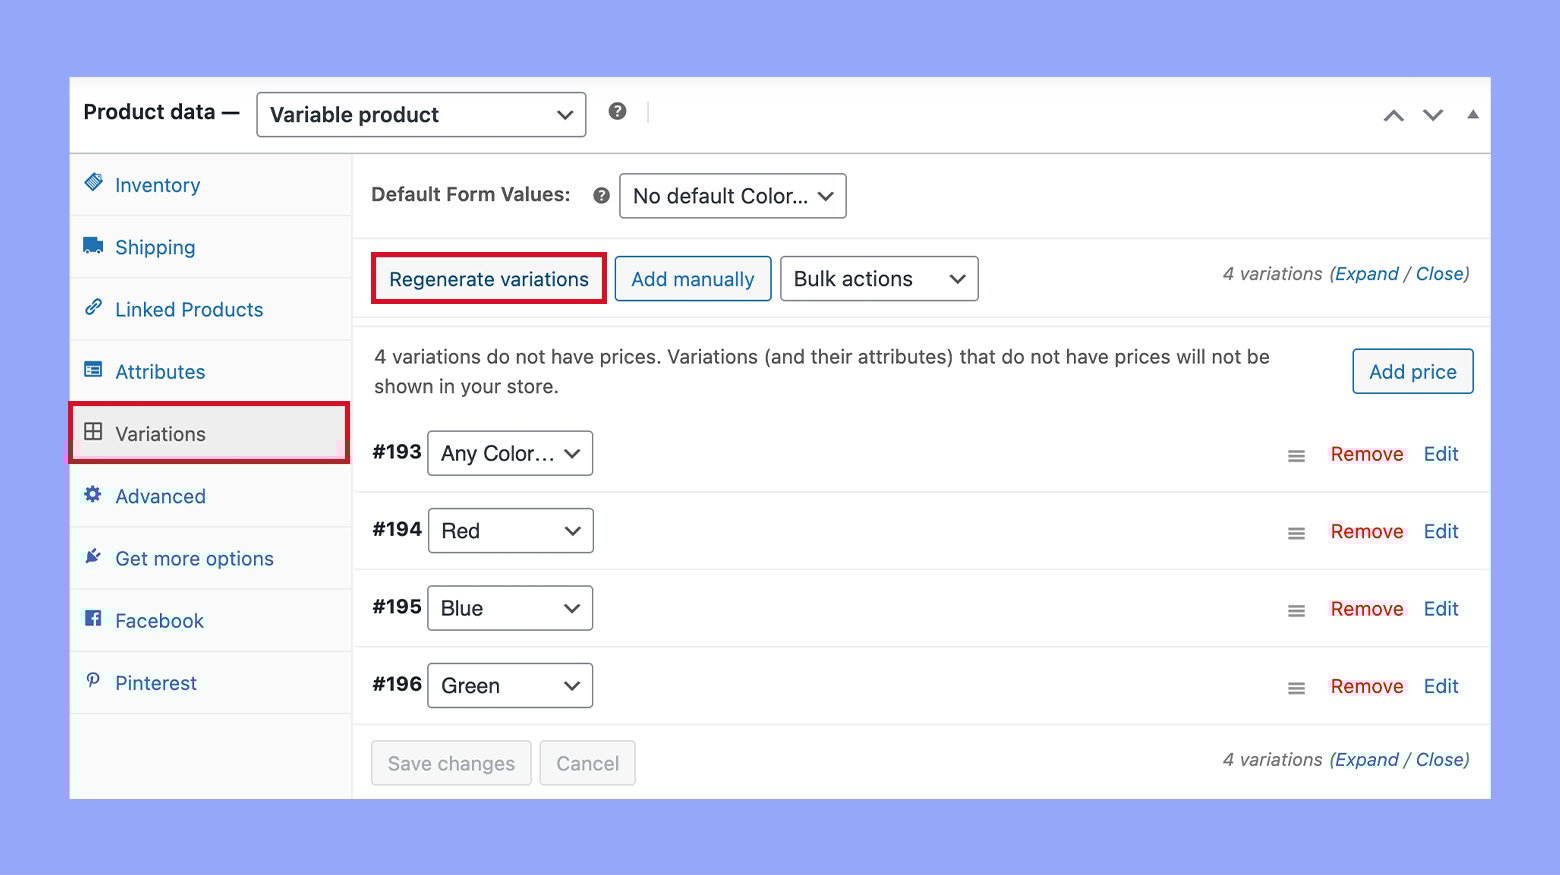
With your attributes set, you’re ready to generate variations:
- Switch to the Variations tab under the Product data.
- Click on the Generate variations to let WooCommerce automatically create variations for you.
- Alternatively, you can manually create each variation. After choosing Add manually, select the attributes for your variation from the dropdown menus.
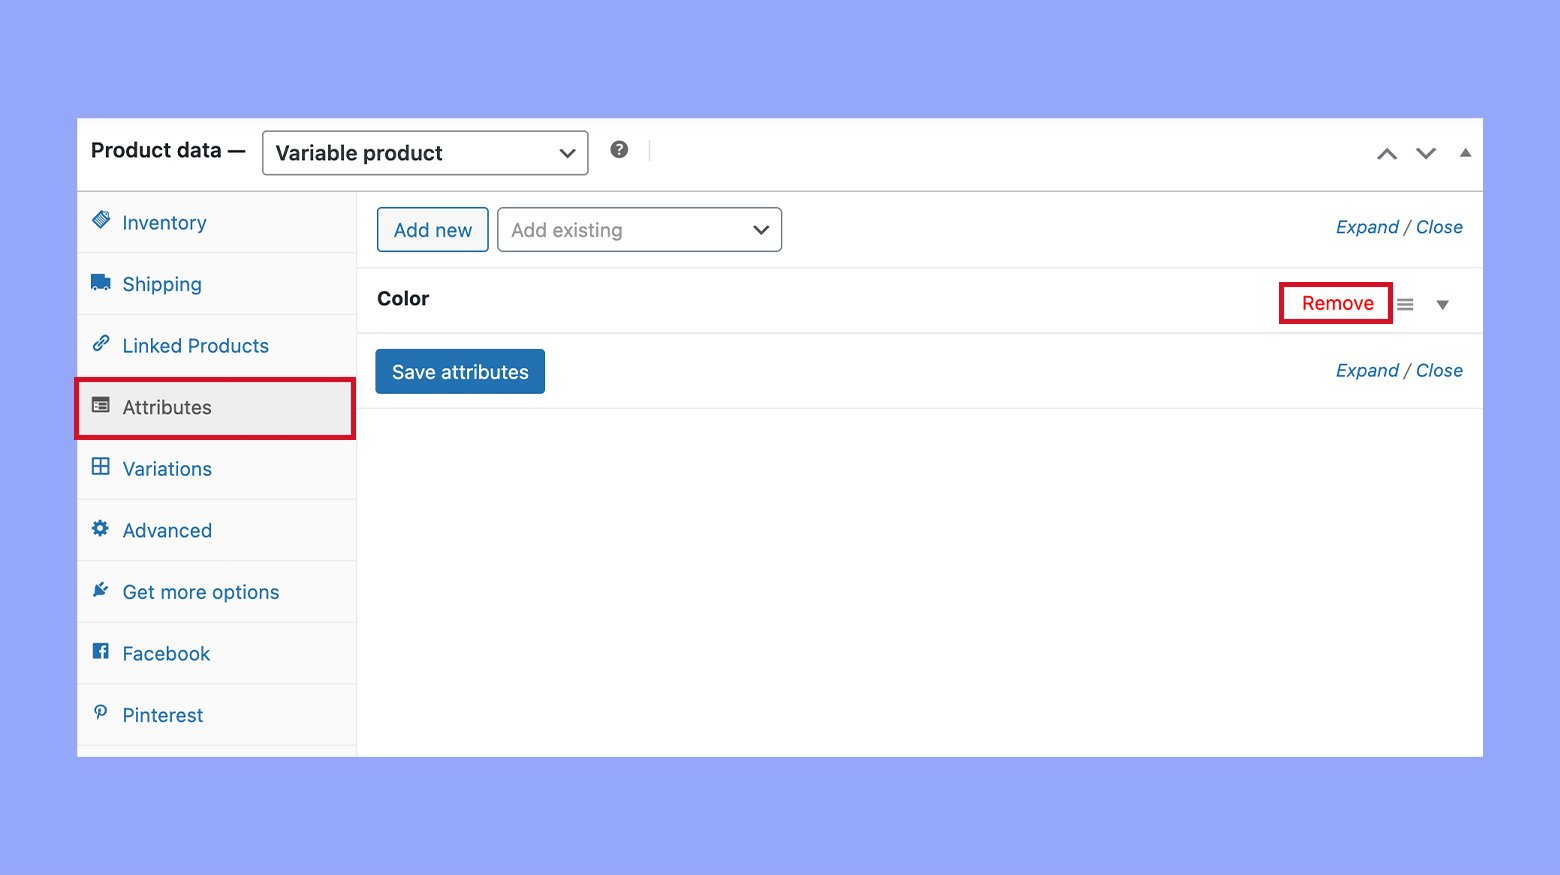
Managing attributes for variable products
To keep your offerings current and managing your products efficiently, follow these steps:
- Go to your product’s edit page and scroll to the Product data meta box.
- In the Attributes tab, you’ll see a list of existing attributes applied to the product. You can edit each by clicking on it.
- To remove an attribute or variation, use the Remove link next to it.
- Always click Save attributes before you leave the page to ensure your changes are applied.
Remember, managing attributes for variable products is not only about creating them but also keeping them updated. It involves adjusting pricing, stock, images, and other details for each variation to ensure your store reflects the correct information.
Step 3: Displaying product attributes on the product page
When you set up your online store with WooCommerce, knowing how to effectively display product attributes on your product page is essential. This enhances the shopping experience, making it easier for customers to evaluate and choose products based on their features.
Customizing the WooCommerce product page layout
You first need to access the Theme Editor to modify the layout of your WooCommerce product page. This allows you to adjust how the attributes are displayed directly in the theme’s template files.
- Log into your WordPress dashboard and click on Appearance.
- Select Theme file editor from the submenu.
- Find the template file for the single product page, often called single.php or single-product.php or similar.

The template should include a section called woocommerce_single_product_summary, which is where product details are typically displayed. You can add or rearrange the elements within this file to better showcase your product attributes.
Using shortcodes and hooks
Product attributes in WooCommerce can also be displayed using shortcodes and hooks, which are easier to handle if you prefer not to edit theme files directly.
- Use shortcodes to insert product attributes into posts or pages. WooCommerce comes with an assortment of shortcodes that you can use throughout your site to display products and their attributes.
- Hooks allow you to insert content into specific parts of your site. To add product attributes to the product data section, you can insert a custom function into your theme’s functions.php file that adds the desired attributes using a hook like woocommerce_single_product_summary.
Remember to always back up your site before modifying files and consider using a child theme to ensure that updates to the parent theme do not overwrite your customizations.
Step 4: Customizing product attribute display options
In WooCommerce, you have numerous ways to showcase your product attributes which can enhance the visual appeal of your products and improve user experience.
Adding color swatches and images
Enhancing your product attributes with Color Swatches and Images, including displaying product gallery images in WooCommerce, can make your products more tangible and visually engaging. Here’s how to display product gallery images in WooCommerce to make your product presentations stand out:
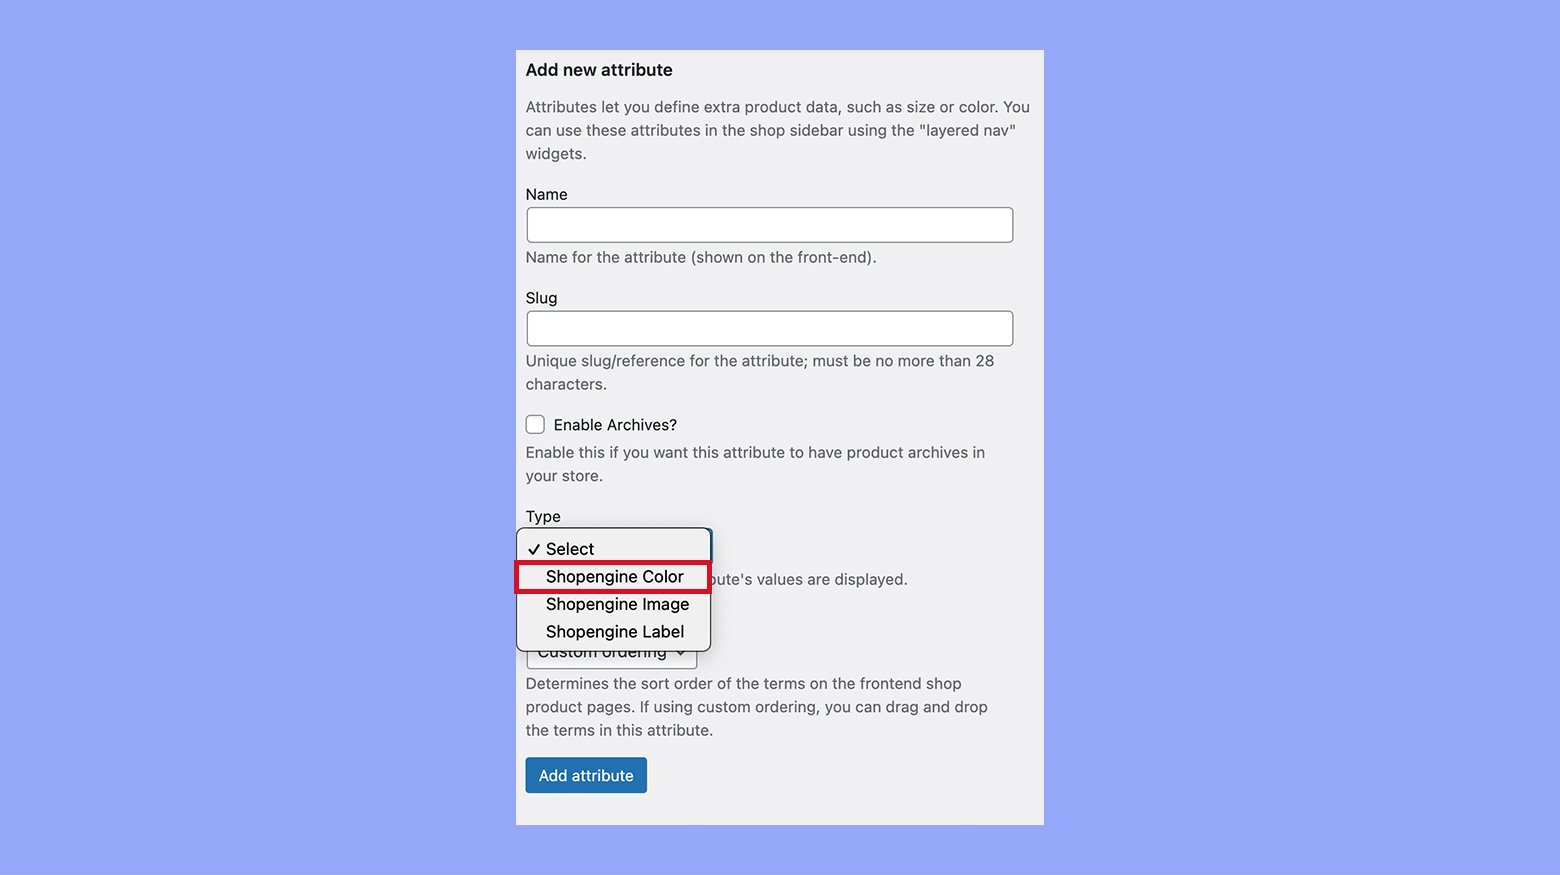
- Access Attributes and go to the relevant attribute’s configure page.
- Set the attribute type to Color and use the Color picker to associate colors with attribute terms for Color swatches.
- Set the attribute type to Image and click on the Upload/Add Image button next to the attribute term to add an image to the attribute.
- Click the Update or Save changes to apply the new settings.
Integrating color swatches to correspond with your product options allows customers to visualize what they’re selecting, while images can give a real-world impression of the variations offered. This addition not only beautifies your store but can also help reduce confusion and foster confident purchase decisions.
Step 5: Enhancing customer experience with attribute filters
By implementing attribute filters on your WooCommerce store, you help customers effortlessly find products they’re interested in, which can lead to increased satisfaction and sales.
Implementing filters on the shop page
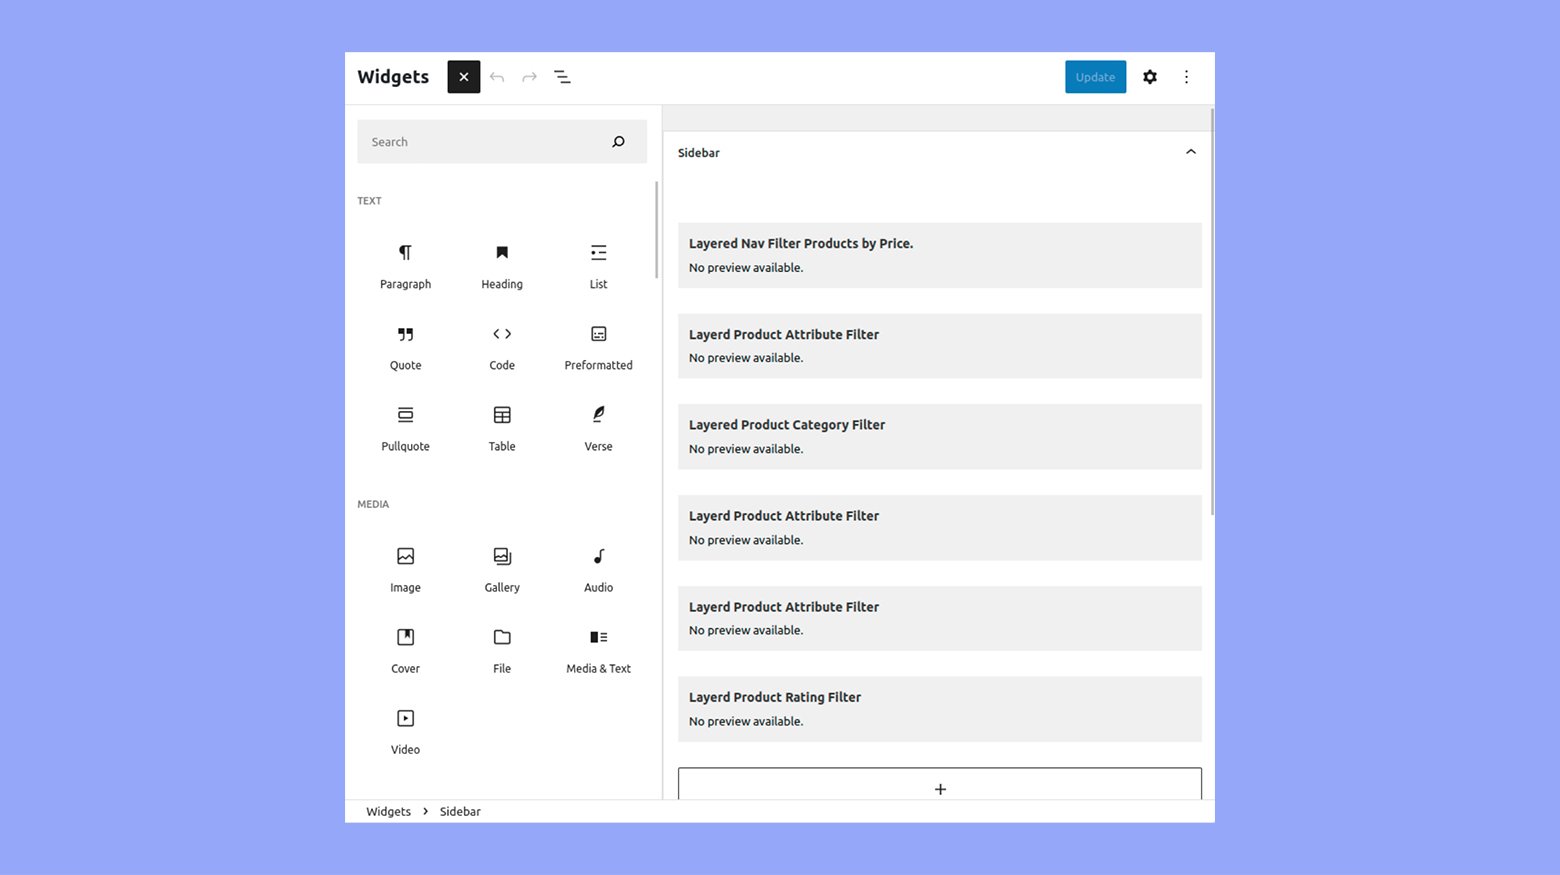
- Start by installing and activating a Layered navigation plugin.
- Navigate to the main Products tab.
- Here, you’ll see an option called Layered Nav filters. This allows you to add filters for customers to use on the shop page.
- Decide where you want your filters to appear on the shop page and drag the Filter Products by Attribute widget to that area.
- Customize your filtering options to display either as dropdown menus, links, or checkboxes.
Filtering products by attributes on the category page
- On the category page, identify where on the layout you would like the filters to be accessible.
- Similar to the shop page, use the Filter products by attribute widget to add filtering options to this page.
- You can allow customers to filter by one or multiple attributes depending on what’s most helpful for their search.
- Tailor the filters to match the look and feel of your category pages, ensuring it’s intuitive for the customer to use.
By setting up filters on both the shop and category pages, you give your customers the power to sort through your inventory using criteria like size, color, or any other custom attribute you set up. This streamlines their shopping experience, making it more likely they’ll find what they need, enjoy the process, and return for future purchases.
Step 6: Utilizing plugins for advanced attribute features
When enhancing your WooCommerce store, plugins can greatly simplify the process of displaying advanced product attributes. These tools contribute to a more dynamic and informative product table layout, offering a tailored shopping experience for your customers.
Exploring WooCommerce product table plugins
A WooCommerce product table plugin elevates your shop by creating an organized and efficient table layout for your products. Here’s how to start:
- Look for a plugin that provides a responsive product table feature.
- Ensure the plugin allows you to select which attributes to display as columns.
- Check if the plugin supports quick view, filters, and additional customization options.
- Install the plugin and activate it on your WooCommerce site.
By incorporating a WooCommerce product table plugin, your product attributes become more accessible, enhancing the shopping experience.
Configuring plugin settings for attributes
After the plugin installation, you’ll need to adjust the plugin settings to tailor the table layout:
- Navigate to the plugin settings page in your WordPress dashboard.
- Choose which attributes you want to display by selecting the appropriate columns.
- Configure additional options like sorting preferences and default display features.
- Save your changes to see an updated product table on the front end of your website.
Adjusting the plugin settings gives you control over how product attributes are presented, thereby allowing you to fine-tune the shopping experience on your site.
Best practices for attributes in WooCommerce stores
Utilizing product attributes effectively is key to organizing your WooCommerce store and improving the customer shopping experience. By managing these attributes well, you enhance product discovery, which can lead to increased purchases.
Effective product attribute management
Your ability to manage product attributes efficiently can determine the success of categorizing and displaying products in your WooCommerce store. Here’s how you start:
- Create relevant attributes: Think about the features of your products that customers care most about. This could include size, color, or material. The attribute labels should be clear and descriptive to aid in navigation.
- Configure terms: For each attribute, configure the terms that apply. For example, if you have an attribute for color, your terms might include red, blue, or green.
- Assign to products: Once your attributes and terms are established, assign them to your products. For each product, find the Attributes tab and select the ones that are applicable.
Improving product discovery and purchases
Leveraging attributes can significantly boost the discoverability of products in your store and streamline the shopping experience:
- Use attributes for filtering: Enable attributes in your store to serve as filters. This allows customers to easily narrow down their choices based on specific features.
- Display important information: Make sure essential attributes are visible on the product page to inform customer decisions, such as available sizes for clothing.
- Consistency is key: Keep your labeling consistent across similar products. If you’re using “Color” as an attribute for one product, don’t switch to “Hue” for another.
- Integrate with search: Attributes should work with the search function of your store, making it easier for customers to find products by typing in attribute-related keywords.
By following these best practices, you’re setting up your WooCommerce store for enhanced product management and providing a more efficient shopping experience for your customers.
Conclusion
Learning how to display product attributes in WooCommerce effectively can significantly enhance the shopping experience for your customers. By properly setting up and managing both global and custom attributes, you enable clearer communication of product details, which is crucial for customer decision-making. Remember to utilize the WooCommerce dashboard to its fullest by adding, customizing, and displaying attributes in a way that aligns with your brand and meets your customers’ needs. Create your online store in minutes with 10Web AI Ecommerce Website Builder.
Looking to sell online?
Create your online store in minutes


![]()