Learning how to edit WooCommerce My Account page is crucial for enhancing user experience and personalizing customer interactions on your ecommerce site. This guide will provide step-by-step instructions on customizing this essential page, covering everything from basic tweaks to advanced modifications. Whether you’re aiming to streamline navigation, add custom fields, or integrate unique user features, you’ll find the necessary tools and strategies here to make the My Account page a valuable asset to your online store.

Looking to sell online?
Create your custom online store in minutes with 10Web AI Ecommerce Website Builder and take your business online.
FAQ
How do I edit the My Account page in WooCommerce?
How do I change the default My Account page in WooCommerce?
How do I customize my WooCommerce page?
- WooCommerce templates: Override WooCommerce template files by copying them from the WooCommerce plugin directory to your theme’s directory.
- Plugins: Use plugins like Elementor, Beaver Builder, or WooCommerce Customizer for visual editing and additional functionality.
- Custom code: Add custom CSS or PHP snippets via your theme’s customizer or a child theme to alter layouts and styles.
How do I design My Account page in WordPress?
- Page builders: Use a WordPress page builder plugin such as Elementor, WPBakery, or Beaver Builder to design the page visually.
- Custom CSS/PHP: Customize the design by adding custom CSS or PHP through your theme or a child theme. This allows for detailed styling and functional tweaks.
- Shortcodes: Utilize WooCommerce and other plugin shortcodes to add specific functionalities to the “My Account” page.
Understanding the default My Account structure
Before diving into customization, understanding the default layout and components of WooCommerce’s My Account page is crucial. This knowledge ensures you can make informed decisions that enhance user experience without compromising functionality.
Exploring the standard components and layout
The default WooCommerce My Account page provides a dashboard-like experience where users can navigate through various endpoints. Endpoints are sections of the account page that display specific information or provide certain functionality. Commonly, users will encounter the following:
- Orders: Lists all past and current purchases, allowing users to view order details and statuses.
- Downloads: Available for shops that sell digital goods, enabling users to access their purchased files.
- Addresses: Users can manage billing and shipping addresses tied to their account here.
- Account details: This section allows users to edit account information such as name, email, and password.
Typically, this page uses a two-column layout with a navigation menu on the left and the content area on the right. To create a seamless integration with your shop’s aesthetic, you can modify the layout via the WooCommerce settings or by customizing your theme’s CSS.
The default endpoint is the section that users will see first when they log into their My Account page. It’s often set to display the Dashboard which gives a general overview and welcome message.
How it impacts user experience
The layout of the My Account page is a significant component of the user experience. A well-structured account page is essential because it:
- Provides a central hub for users to manage their interactions with your store.
- Offers clear navigation to quickly find information like order history and account settings.
- Enhances customer satisfaction by promoting autonomy and ease of use.
By understanding the default My Account structure, you can tailor the page to better fit the needs of your customers, potentially reducing support queries and improving their overall journey on your site. Remember, small tweaks in the layout or adding a personal touch to the default endpoints can significantly enhance the user experience.
Looking to sell online?
Create your custom online store in minutes with 10Web AI Ecommerce Website Builder and take your business online.
Preparing for customization
Before you dive into how to edit WooCommerce My Account page, it’s essential to prepare properly to ensure a smooth customization process. Here are the important steps you’ll need to take.
Backup and staging environment setup
Step 1: Backup your website
The first step is to back up your entire WooCommerce website. This ensures that you have a restore point in case something goes wrong during the customization.
- Access your WordPress admin dashboard.
- Navigate to a backup plugin if you have one installed.
- Click on Create Backup to make a full site backup.
Step 2: Create a staging environment
Once you have secured a backup, set up a staging environment, which is a clone of your live site where you can test changes without affecting your real store.
- Look for a staging feature in your hosting control panel.
- Select your website and click on Create Staging Site.
- Once the staging environment is ready, ensure that it’s inaccessible to search engines to avoid duplicate content issues.
Tools and access required for customization
To customize the My Account page, you’ll need access to certain tools and areas of your WordPress site.
Make sure you have Admin access to your WordPress site.
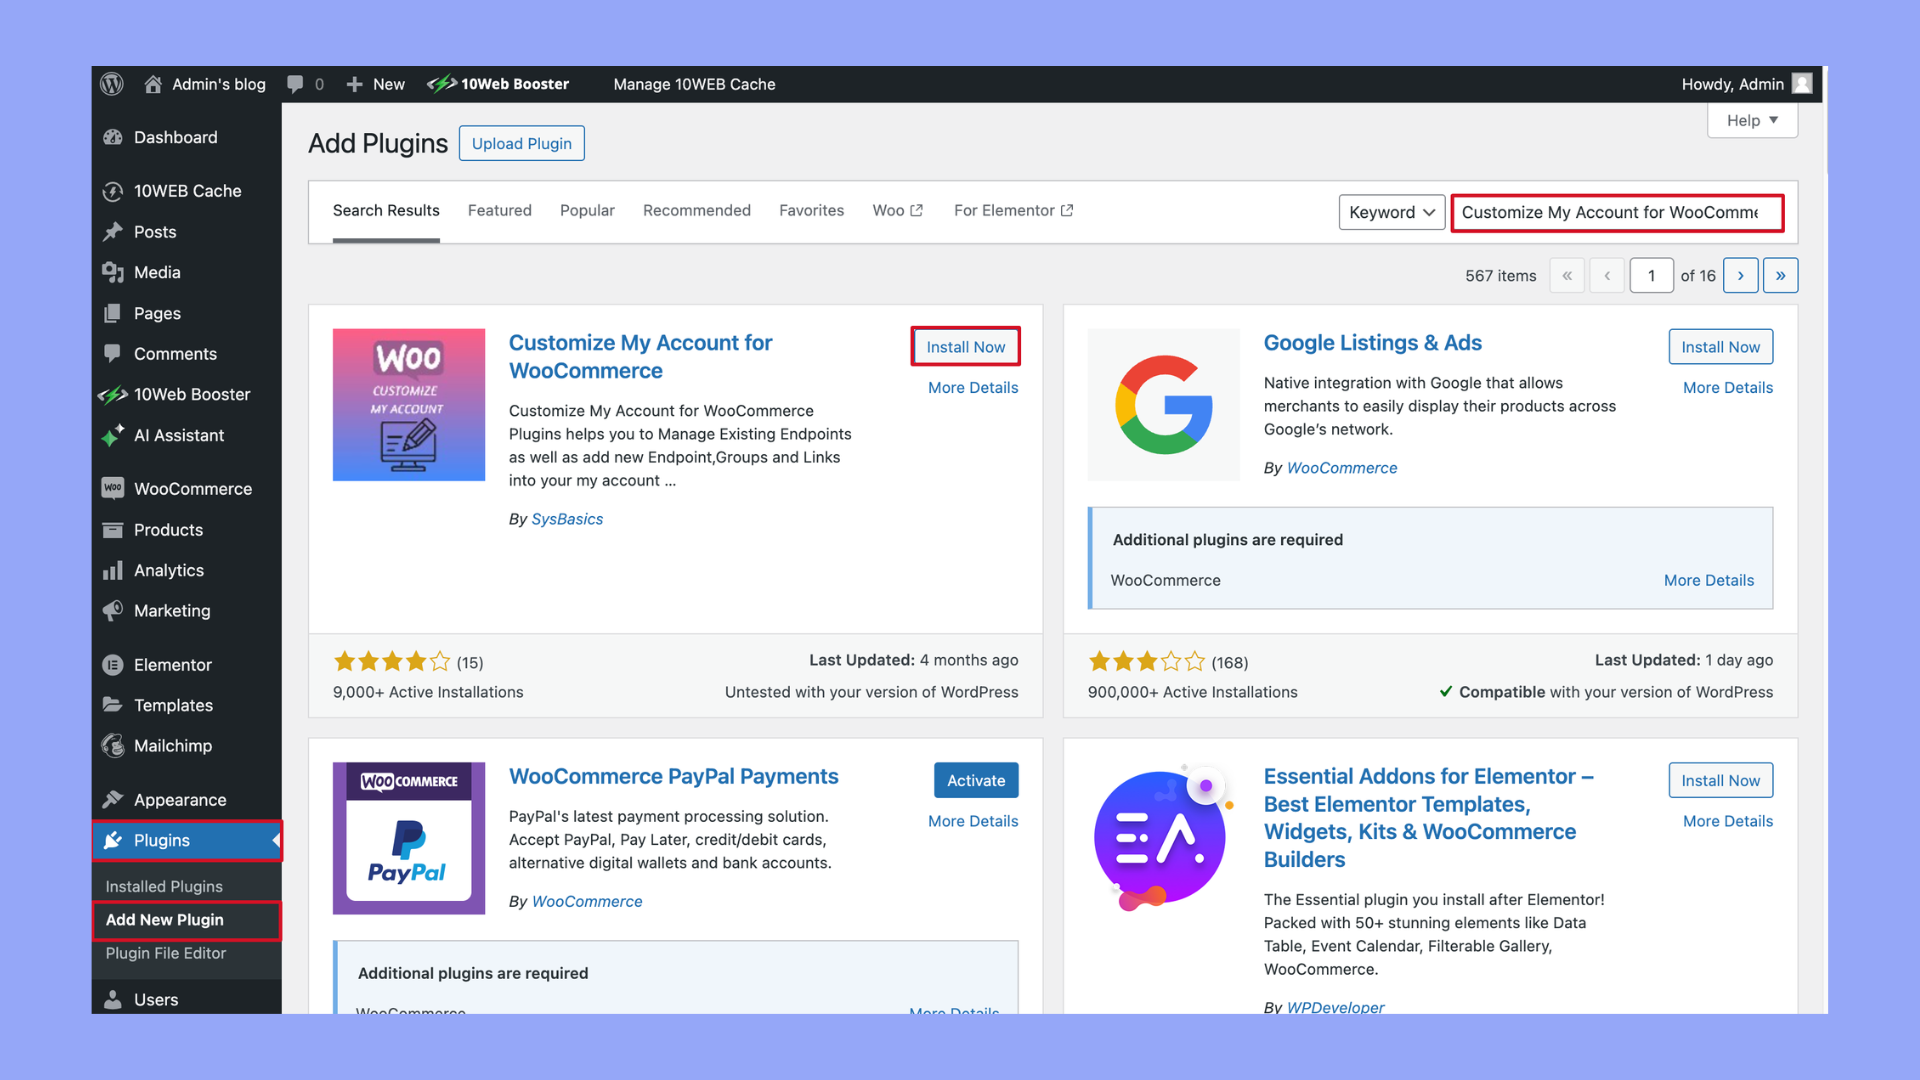
Install and activate a suitable plugin for editing the My Account page such as Customize My Account for WooCommerce by following these steps:
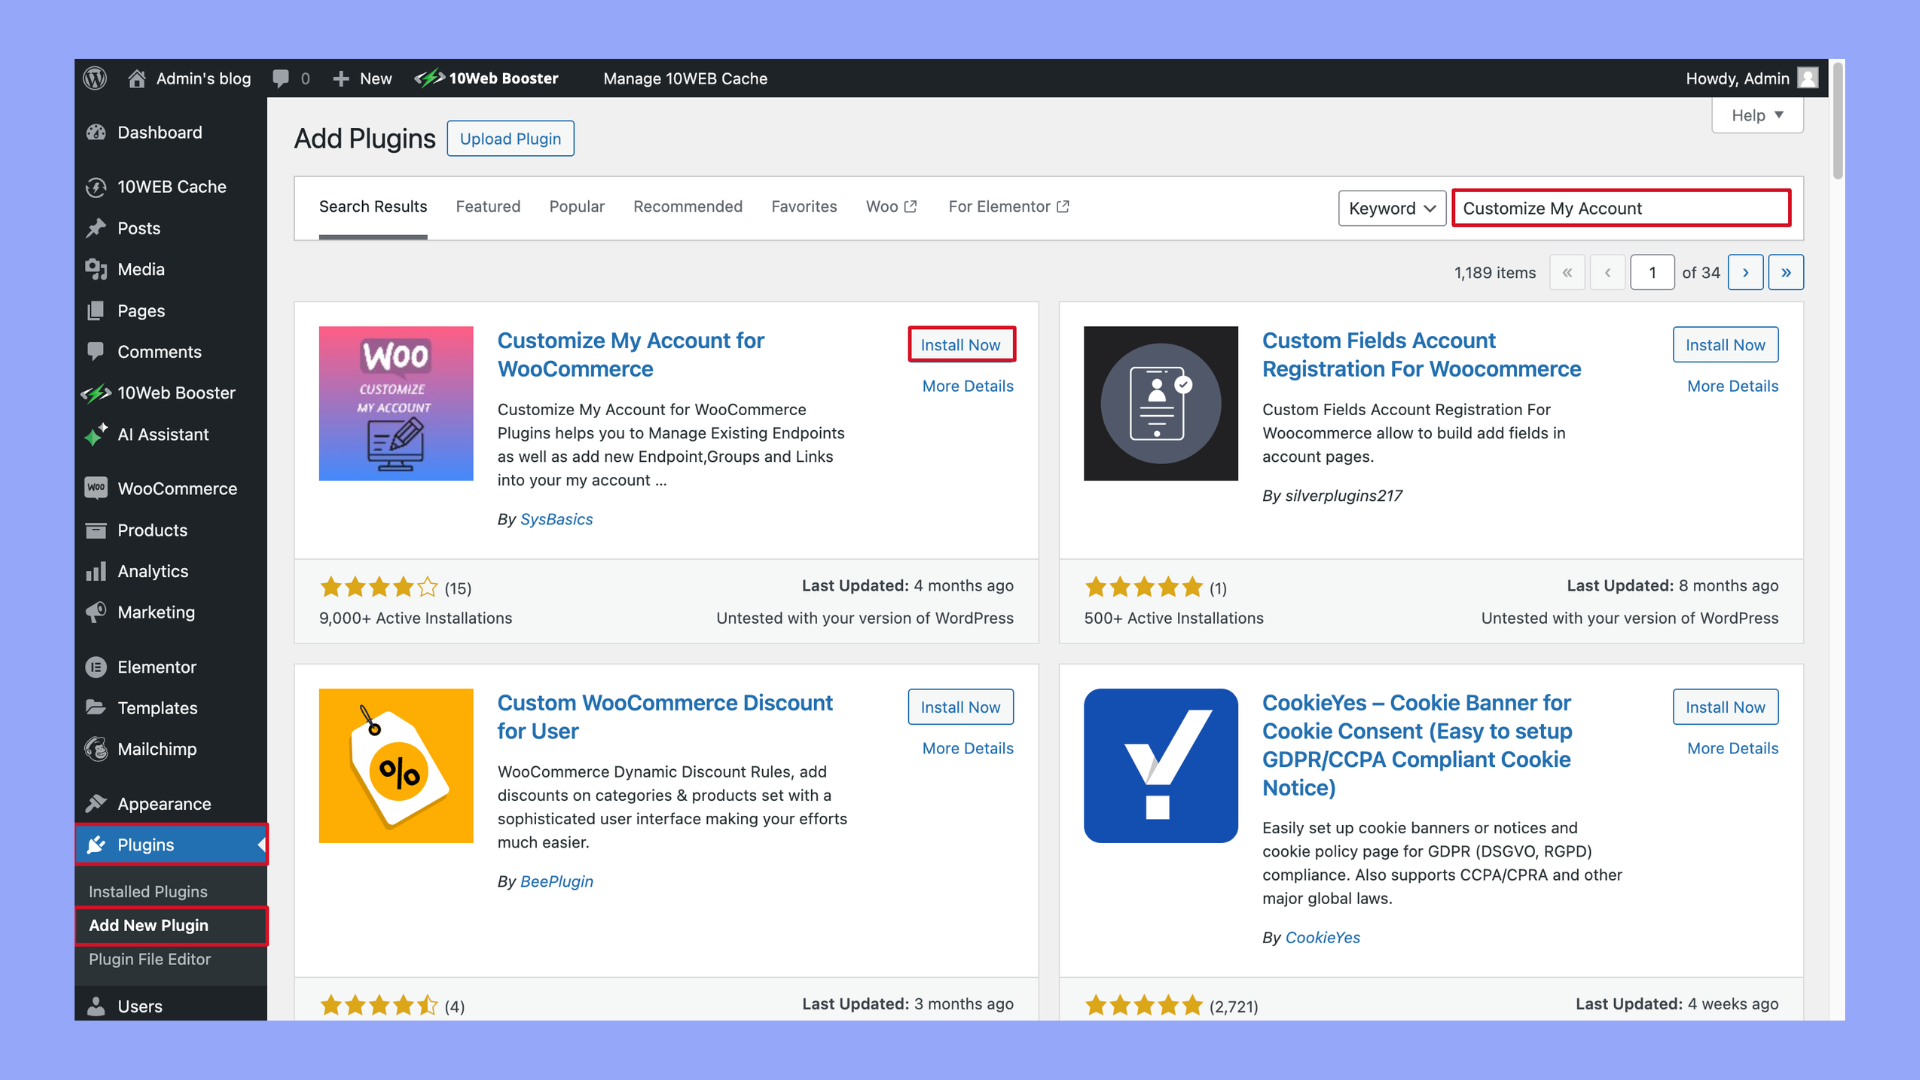
- In your WordPress admin, go to Plugins > Add New.
- Search for Customize My Account for WooCommerce.
- Click on Install Now for the plugin.

- Once it’s installed, click Activate.
Having a backup, a staging site, and the necessary tools and access are crucial steps in preparing to customize your My Account page. They provide a solid foundation from which you can make changes confidently.
3 methods to edit WooCommerce My Account page
When you want to personalize your online store, knowing how to edit WooCommerce My Account page is essential. The My Account page is the hub where your customers manage their information, view past orders, and more. Here are three methods to make it your own.
Method 1: Using plugins for customization
Managing and customizing the “My Account” page on your WooCommerce store can be easily achieved with the use of dedicated plugins. This section will guide you through selecting and utilizing plugins that aid in enhancing the user experience on the “My Account” page.
Overview of My Account Page Editor and similar plugins
Plugins like My Account Page Editor provide a user-friendly interface where you can modify the layout and elements of your My Account page without touching a single line of code. Notable options such as IconicWP and YITH offer similar functionalities, allowing you to add, remove, and rearrange tabs with ease.
Step-by-step guide to using plugins for customization
- Select a suitable plugin from the WordPress plugin repository or premium providers, such as My Account Page Editor by IconicWP or YITH WooCommerce Customize My Account Page.
- Install the plugin by navigating to Plugins > Add New within your WordPress dashboard.
- Upload the plugin file and then click on Install Now.
- After installation, Activate the plugin to enable its features.
- Access the plugin’s settings, which are usually located under WooCommerce > My Account, or a similarly named section on your dashboard.
- Use the provided settings to add or remove tabs and sections within your My Account page.
- Customize the tabs using options provided by the plugin which may include shortcodes or built-in widgets.
- Review your changes by visiting the My Account page on your storefront to ensure everything looks as intended.
Pros and cons of plugin-based customization
| Pros | Cons |
| Easy to use: Even without coding knowledge, you can easily alter the appearance and functionality of the account page. | Dependency: Your site becomes reliant on an external plugin, which requires regular updates and may conflict with other plugins or themes. |
| Time-saving: Quickly implement changes that would otherwise require extensive development time. | Limited control: While plugins offer convenience, they may not provide the detailed customization possible with coding. |
| Versatile: Many of these plugins offer a range of customization options, including the ability to use shortcodes for extended functionality. | Performance impact: Adding plugins can affect your site’s loading times and performance if not implemented properly. |
Method 2: Customizing through child themes
In this section, you’ll learn how to use a child theme to make advanced customizations to your WooCommerce My Account page.
Why use a child theme for WooCommerce customization?
Using a child theme is the safest way to apply custom changes to your WooCommerce store without affecting the main theme. It allows you to preserve your modifications when updating the parent theme. By using a child theme, you can apply custom CSS and modify functions.php for a tailored experience.
Creating and setting up a child theme
- Begin by accessing your hosting file manager or an FTP client like FileZilla.
- Navigate to wp-content/themes and create a new folder for your child theme.
- Create a stylesheet (style.css) within your child theme folder.
Theme Name: Your Child Theme Name

Template: parent-theme-folder-name

*/
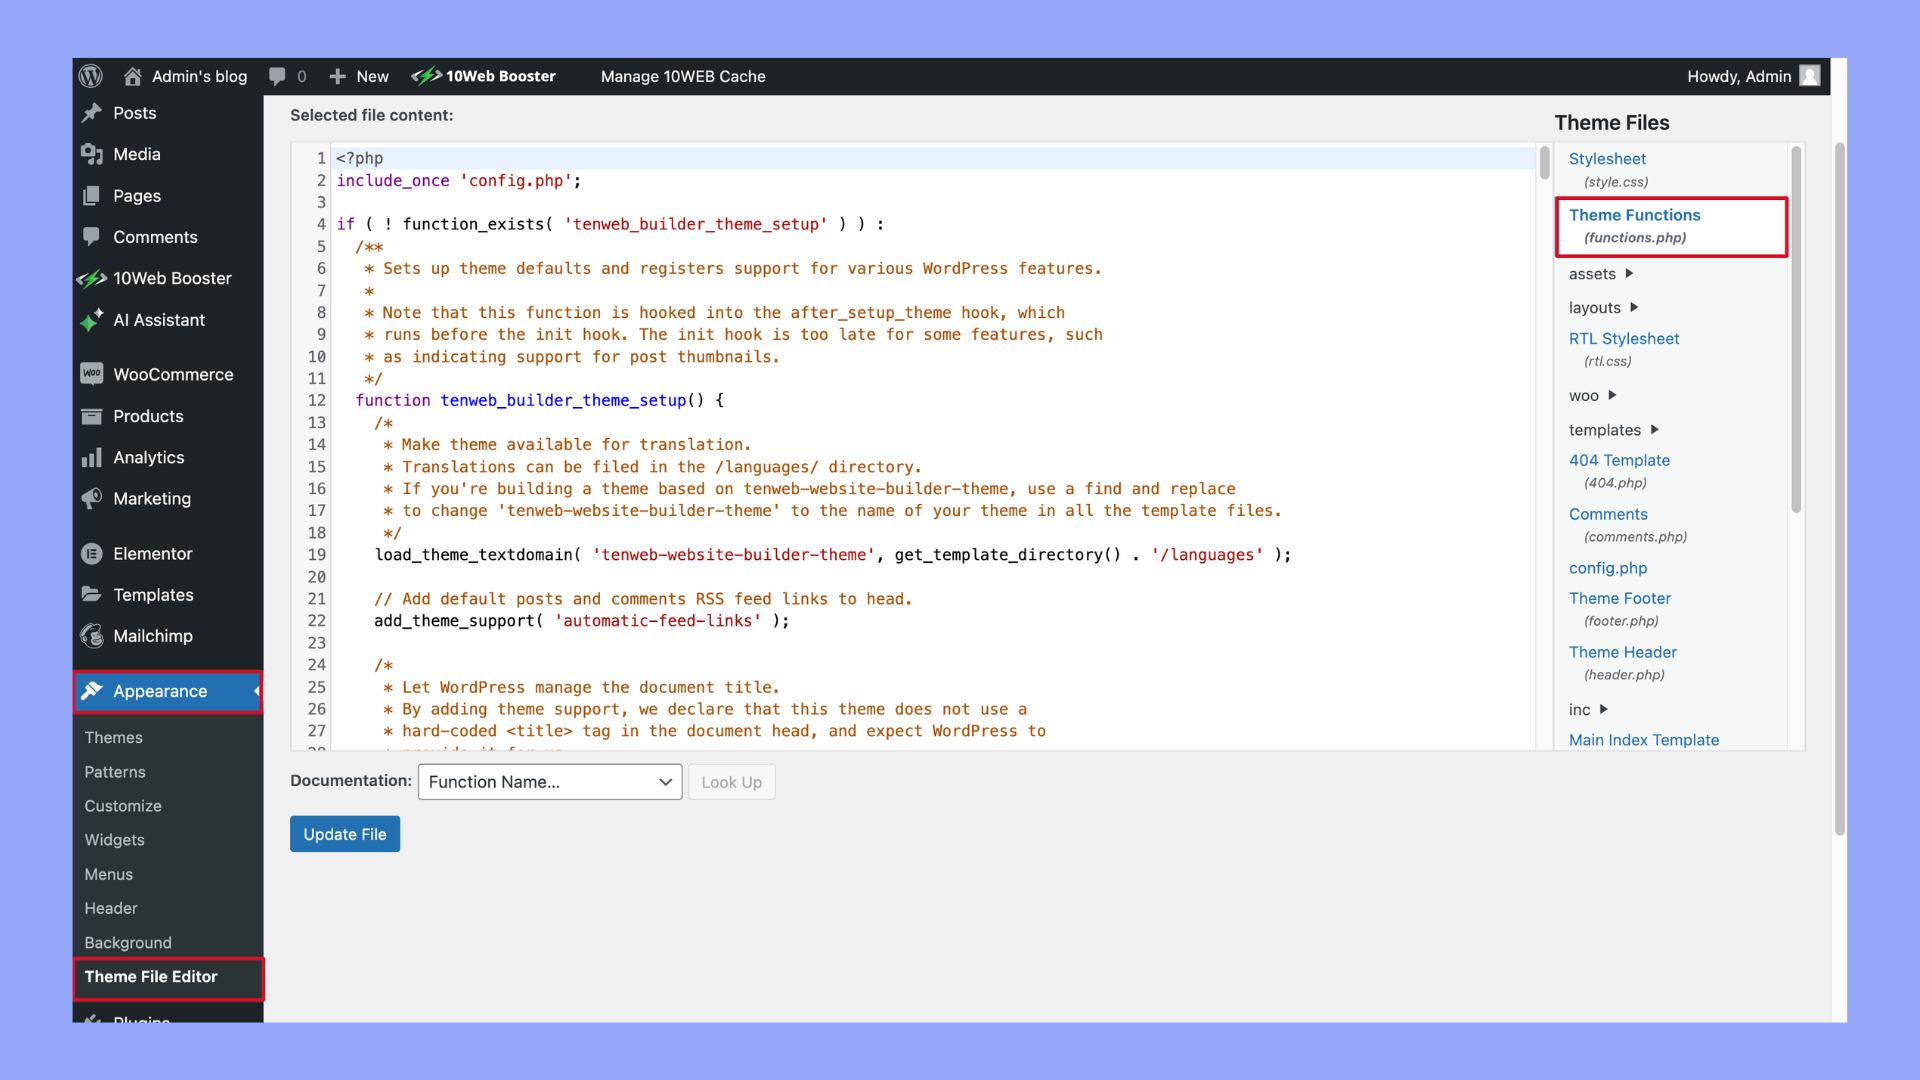
- Add a functions.php file to enqueue the parent theme’s stylesheets alongside any additional CSS
<?php
add_action( 'wp_enqueue_scripts', 'enqueue_parent_styles' );

function enqueue_parent_styles() {

   wp_enqueue_style( 'parent-style', get_template_directory_uri().'/style.css' );

}
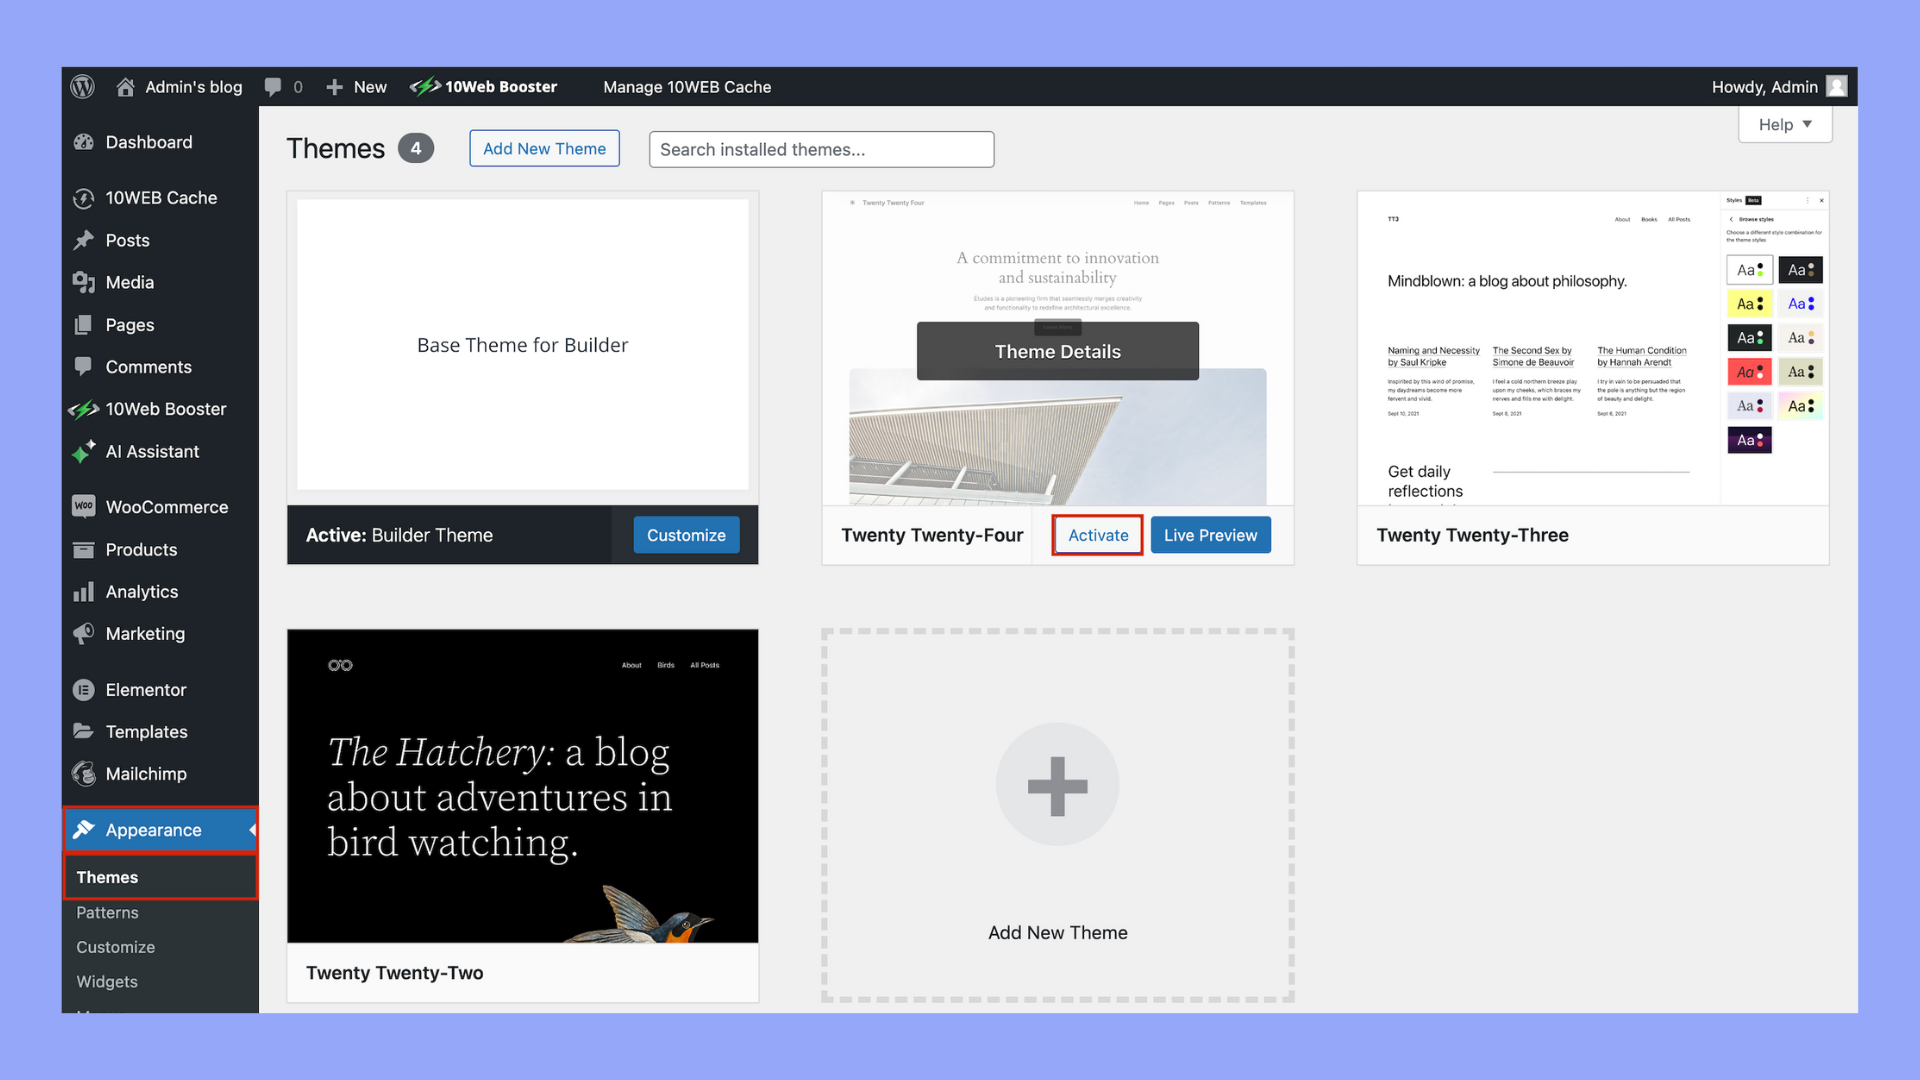
- Activate the child theme by going to Appearance > Themes in your WordPress dashboard and selecting your new child theme.
Pros and cons of this method
| Pros | Cons |
| Safe updates: Changes won’t be lost when the parent theme updates. | Complexity: Requires understanding of WordPress themes and PHP. |
| Full control: Modify everything from layout to functionality. | Time-consuming: Takes longer to set up than plugin solutions. |
By creating a child theme, you’ve taken a professional step on how to customize WooCommerce My Account page, providing a personalized shopping experience that can set your store apart from the competition.
Method 3: Manual customizations via code
When you’re ready to tailor the My Account page to fit your precise needs, manual customizations through code offer a level of flexibility that plugins can’t match. This method involves writing code to modify template files and adding custom functions using hooks and filters.
Introduction to modifying templates through theme overrides
To safely alter the My Account page, you can override WooCommerce template files in your theme. This way, your changes won’t be lost during a WooCommerce update.
- Locate the WooCommerce template you wish to customize. These are typically found in ‘woocommerce/templates’.
- Copy the template file into a directory within your theme named ‘woocommerce’ keeping the same file structure.
- Make your changes to this copied file. When WooCommerce renders the My Account page, it will use this file instead of the default template.
Utilizing hooks and filters to add custom functions
WordPress and WooCommerce come with a variety of hooks and filters that let you insert custom content and modify existing functionalities.
- Open your theme’s functions.php file or a site-specific plugin if you have one.
- Insert your code using the appropriate action or filter hook. For example, to add a new endpoint to the My Account page:
function add_custom_endpoint() {
    add_rewrite_endpoint('your-custom-endpoint', EP_ROOT | EP_PAGES);

}

add_action('init', 'add_custom_endpoint');
- Refresh your rewrite rules by navigating to Settings > Permalinks in your WordPress dashboard and clicking Save changes.
Pros and cons of manual customization via code
| Pros | Cons |
| Full control over customizations: Allows complete freedom to alter and enhance the site. | Requires a good amount of coding knowledge: Necessitates a solid understanding of coding principles to implement changes effectively. |
| Persistent changes: Modifications remain intact and won’t be overridden by plugin updates. | Higher risk of errors: More prone to mistakes and issues compared to using standardized plugin options. |
Remember, with great power comes great responsibility; always backup your site before making changes and test your customizations in a staging environment if possible.
Adding custom tabs and sections
When you look to enhance the customer experience on your WooCommerce store, adding custom tabs and sections to the My Account page is an effective way to provide users with a more personalized and organized interface.
How to add new tabs to the My Account page
Customizing your ‘My Account’ page involves a few clear steps. Here’s how you can start:
- Install and activate the Customize My Account for WooCommerce plugin.
- After activation, navigate to WooCommerce > Settings > Custom My Account.
- Here you’ll find options to Add New Endpoints – these endpoints are essentially the new tabs.
- Enter a unique name for your new tab in the Endpoint field.
- In the Label field, type the name as you want it to appear on the ‘My Account’ page.
- Select a page from the dropdown that you want to link to this tab. If you haven’t created a page yet, you’ll need to make a new page under the Pages section of WordPress.
- After configuring your endpoints, save your changes by clicking on the Save changes button.
Designing effective custom sections for user engagement
Crafting sections that catch the eye and serve the customer’s needs can elevate the entire shopping experience:
- Focus on the design of your new sections by making sure they match your brand’s look and feel. Consistency is key.
- Consider the layout and typography; use fonts and colors that are easy to read and navigate.
- If you are confident with code, you can add custom CSS to your child theme for more design control.
- Always have the customer in mind—each new section should make their experience on your site more intuitive and convenient.
By incorporating these methods, you will add valuable new tabs and customize sections that keep your customers engaged and make managing their accounts effortless.
Looking to sell online?
Create your custom online store in minutes with 10Web AI Ecommerce Website Builder and take your business online.
Enhancing navigation and accessibility
To ensure that your WooCommerce account pages are easy to navigate and accessible, you’ll want to focus on user-friendly layout designs and consider the diverse needs of all users. Let’s explore how to edit WooCommerce My Account page to achieve this.
Improving the layout for better usability
You can make your account pages more intuitive by arranging elements in a logical flow. Here’s how you can improve the layout:
- Assess your current layout: Take note of how elements are currently organized on your My Account page.
- Identify key sections: Determine which sections are most frequently accessed by users, such as order history or account details, and make these sections more prominent.
- Reorganize with purpose: Use a plugin that allows for drag-and-drop editing to easily rearrange sections to prioritize important features.
- Test changes: Ensure usability improvements by monitoring how changes affect user navigation through site analytics and feedback.
Accessibility considerations for a diverse audience
Accessibility is crucial for creating an inclusive shopping experience. Here are steps to ensure your account pages are accessible:
- Semantic HTML: Use proper HTML tags to structure content, aiding screen readers in understanding page hierarchy.
- Keyboard navigation: Ensure that all elements can be navigated using a keyboard alone.
- Contrast and font size: Choose colors with high contrast and opt for a legible font size to assist users with visual impairments.
- Alt text for images: Add descriptive alt text to all images to convey the context to users who rely on screen readers.
By enhancing the navigation and making your WooCommerce account pages more accessible, you create a more pleasant and inclusive environment for all your users.
Advanced customizations
When you’re ready to take your WooCommerce store to the next level, advanced customizations involving third-party services and integrations can significantly enhance your customers’ experience. By streamlining subscriptions and memberships, you can also ensure a seamless user journey right from the ‘My Account’ page.
Integrating third-party services and APIs
- Identify the third-party service or API you want to integrate with your WooCommerce store. Make sure it complements your store’s offerings and meets your business needs.
- Obtain the necessary API keys or authentication credentials from the third-party service. This is essential for establishing a secure connection between the platforms.
- Go to your WooCommerce admin dashboard and navigate to the Plugins section. Click on the Add New button to search for a connector plugin that supports the service you are integrating.
- Install and activate the connector plugin. Then, configure the plugin settings by entering your API keys or authentication credentials.
- Test the integration thoroughly to ensure that data is being synced correctly and that the user experience is smooth.
Customizing for subscriptions and memberships
- To handle subscriptions, start by installing a WooCommerce extension like WooCommerce Subscriptions. Navigate to Plugins and click on the Add New button to find and install the extension.
- Once activated, go to WooCommerce > Settings > Subscriptions to configure your subscription settings, including payment methods, renewal processes, and email notifications.
- For membership customizations, look for a plugin like WooCommerce Memberships. Install and activate it through the Plugins section.
- After activation, set up membership plans by going to WooCommerce > Memberships > Membership Plans, where you can create and manage different membership levels and associated benefits.
- Integrate these subscriptions and memberships into your ‘My Account’ page by using shortcodes or the respective plugin’s settings, ensuring they match the look and feel of your site.
By carefully implementing these advanced features, you can offer your customers a more personalized and engaging online shopping experience.
Looking to sell online?
Create your custom online store in minutes with 10Web AI Ecommerce Website Builder and take your business online.
Security considerations
When personalizing your WooCommerce My Account page, always prioritize security and user data privacy. These considerations ensure not only the safety of your ecommerce but also maintain the trust your users place in your website.
Ensuring security when customizing account pages
Your My Account page is a gateway to sensitive user data and therefore requires careful handling when undergoing any form of customization. Here’s how you can ensure security during the process:
- Use secure connections: Ensure all account pages are served over HTTPS to encrypt user data and protect against eavesdropping.
- Implement access controls: Restrict permissions within your site’s dashboard to prevent unauthorized changes to account pages.
- Keep software up to date: Regularly update your WordPress, WooCommerce, and any customization plugins to the latest versions to patch known vulnerabilities.
- Backup frequently: Maintain regular backups of your site, so you can restore your My Account page to a secure state if needed.
Best practices for maintaining user data privacy
The privacy of your users’ data is paramount, and here’s what you can practice:
- Collect only essential information: Limit the data requested from your users to what’s necessary for an effective service.
- Transparent policies: Clearly communicate your privacy policy and how you handle user data, providing your customers with peace of mind.
- Regular audits: Periodically review your site to ensure that it complies with the latest privacy laws and industry standards.
- Data encryption: Ensure data is encrypted not only in transit but also at rest, to prevent unauthorized access to personal information.
Best practices for customization
In tailoring the WooCommerce My Account page, it’s crucial to employ methods that ensure your customizations are maintained through updates and operate consistently across various platforms.
Keeping changes update-safe and reversible
- Use a child theme: Start by setting up a child theme to keep your changes separate from the original theme. This way, updates to the parent theme won’t overwrite your customizations.
- Utilize custom plugins: Create custom plugins for more extensive changes. Plugins remain intact despite theme updates, and you can disable them if needed without affecting the core functionalities.
- Implement hooks and filters: WooCommerce is built to be extendable, so take advantage of hooks and filters when adding or modifying functionality. This helps to avoid altering core files directly.
- Backup regularly: Ensure you have regular backups of your site. If an update causes issues, you can easily revert to a previous, functional state.
- Child theme or plugin updates: Politely remind users to check for and apply updates to custom child themes or plugins, keeping customizations secure and functional.
Testing customizations across different devices and browsers
- Conduct cross-browser testing: Verify your customizations work in various browsers like Chrome, Firefox, Safari, and Edge to ensure all your users have a consistent experience.
- Responsive design checks: Test on different screen sizes, including mobile, tablet, and desktop, to confirm responsive design principles are upheld and the layout adapts properly.
- User role testing: Check different user roles to see how changes display for each type of user, confirming access and functionality are as intended.
- Use developer tools: Leverage built-in developer tools in browsers for on-the-fly testing and debugging.
- Feedback loop: Gather feedback from actual users on different devices to identify any overlooked issues and refine the experience.
Employing these best practices will guide you through a customization process that is efficient, effective, and end-user oriented.
Conclusion
In conclusion, mastering how to edit WooCommerce My Account page allows you to significantly improve your ecommerce platform’s functionality and user engagement. By following the detailed steps provided in this guide, you can customize the page to better meet your business needs and enhance your customers’ shopping experience. Remember, the key to success lies in continually testing and refining these customizations to ensure they align with your users’ expectations and your brand’s objectives.
Looking to sell online?
Create your online store in minutes
Create your online store in minutes with 10Web AI Ecommerce Website Builder.