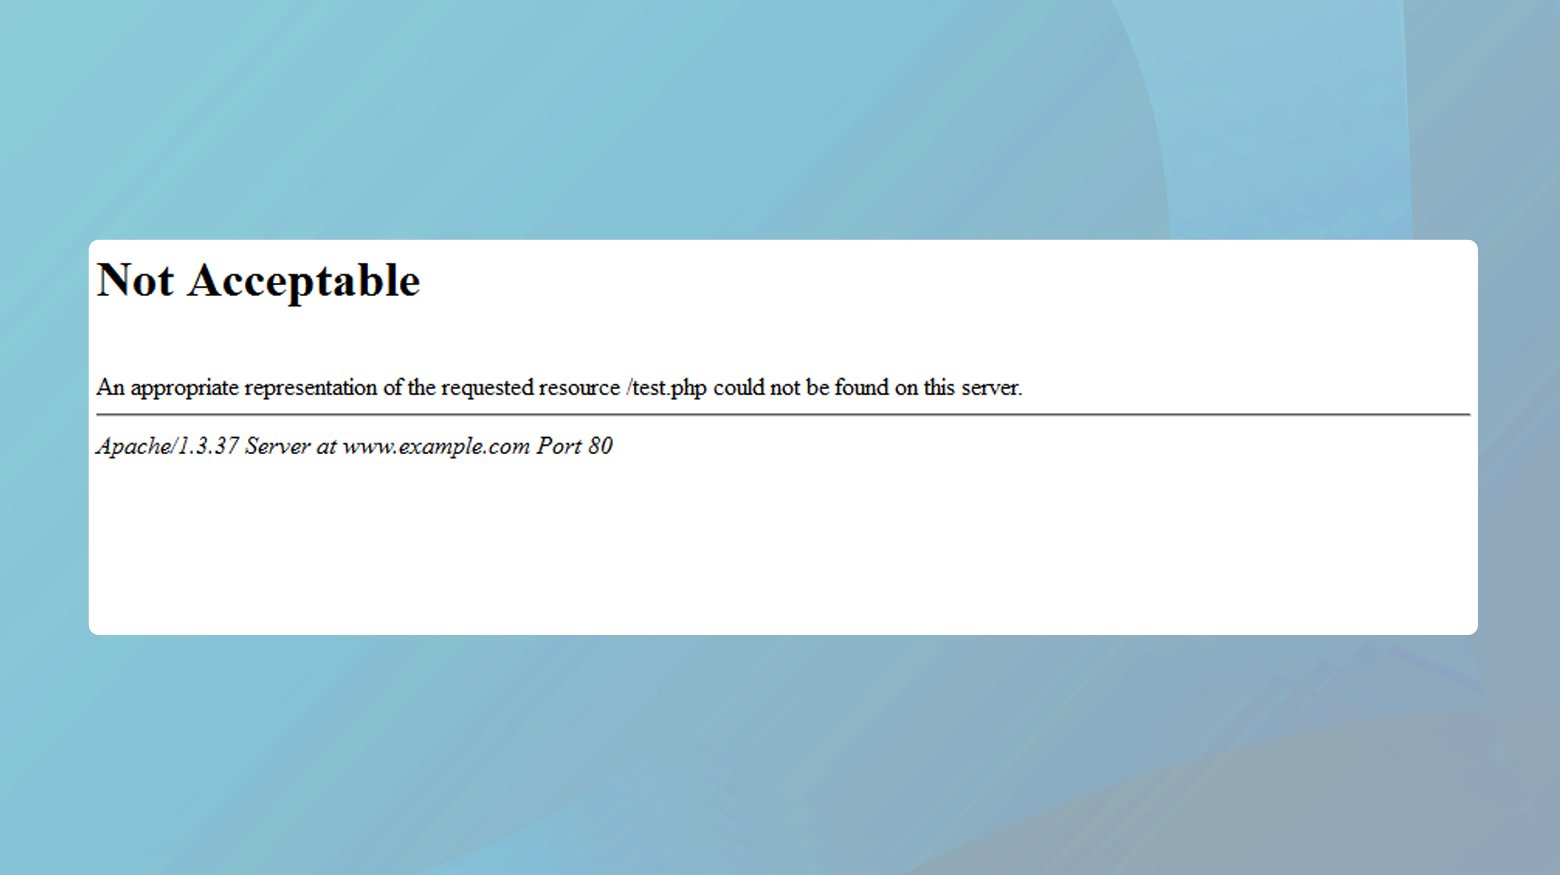
The 406 Not Acceptable error is a specific HTTP response code signaling a more intricate issue related to content negotiation between the client (such as a web browser) and the server. Understanding this error requires delving into the mechanics of HTTP headers and the nuanced interchange of server-client communication.
What is the 406 error
The “406 Not Acceptable” error revolves around the concept of content negotiation. Content negotiation is a process where the client and server exchange information about the types of content the client can process and what the server can provide. This exchange is facilitated through HTTP headers, with the ‘Accept’ headers playing a pivotal role. These headers allow the client to specify formats, languages, encodings, and character sets it prefers or can handle.
Understanding this error requires familiarity with HTTP request-response cycles. A client, typically a web browser, sends a request to the server specifying, through Accept- headers, the formats it is willing to receive. These headers can include Accept, Accept-Charset, Accept-Encoding, Accept-Language, and Accept-Ranges, detailing the client’s preferences for media types, character sets, content encodings, languages, and ranges of bytes it can process.
The 406 error occurs when the server’s response does not align with any of the media types listed in the Accept header or violates any constraints specified in other Accept- headers. The server essentially responds that it is incapable of delivering content in a format acceptable to the client based on the provided criteria.
Technical root causes of a 406 error can be multifaceted:
Accept-ranges: Security settings or server configurations that limit the size of content can trigger a 406 error if the response attempts to exceed these bounds.
Accept-encoding: This involves content encoding for efficient data transmission. A 406 error might arise if the server attempts to use an unsupported encoding format.
Accept-charset and accept-language: These relate to the encoding of characters and the language of the content. A mismatch in character sets or language preferences can lead to a 406 error.
MIME type violation: A 406 error can also occur when the server is unable to provide content in a MIME type that the client accepts. This is crucial for delivering the right content type, such as images or videos, in a format the client can handle.
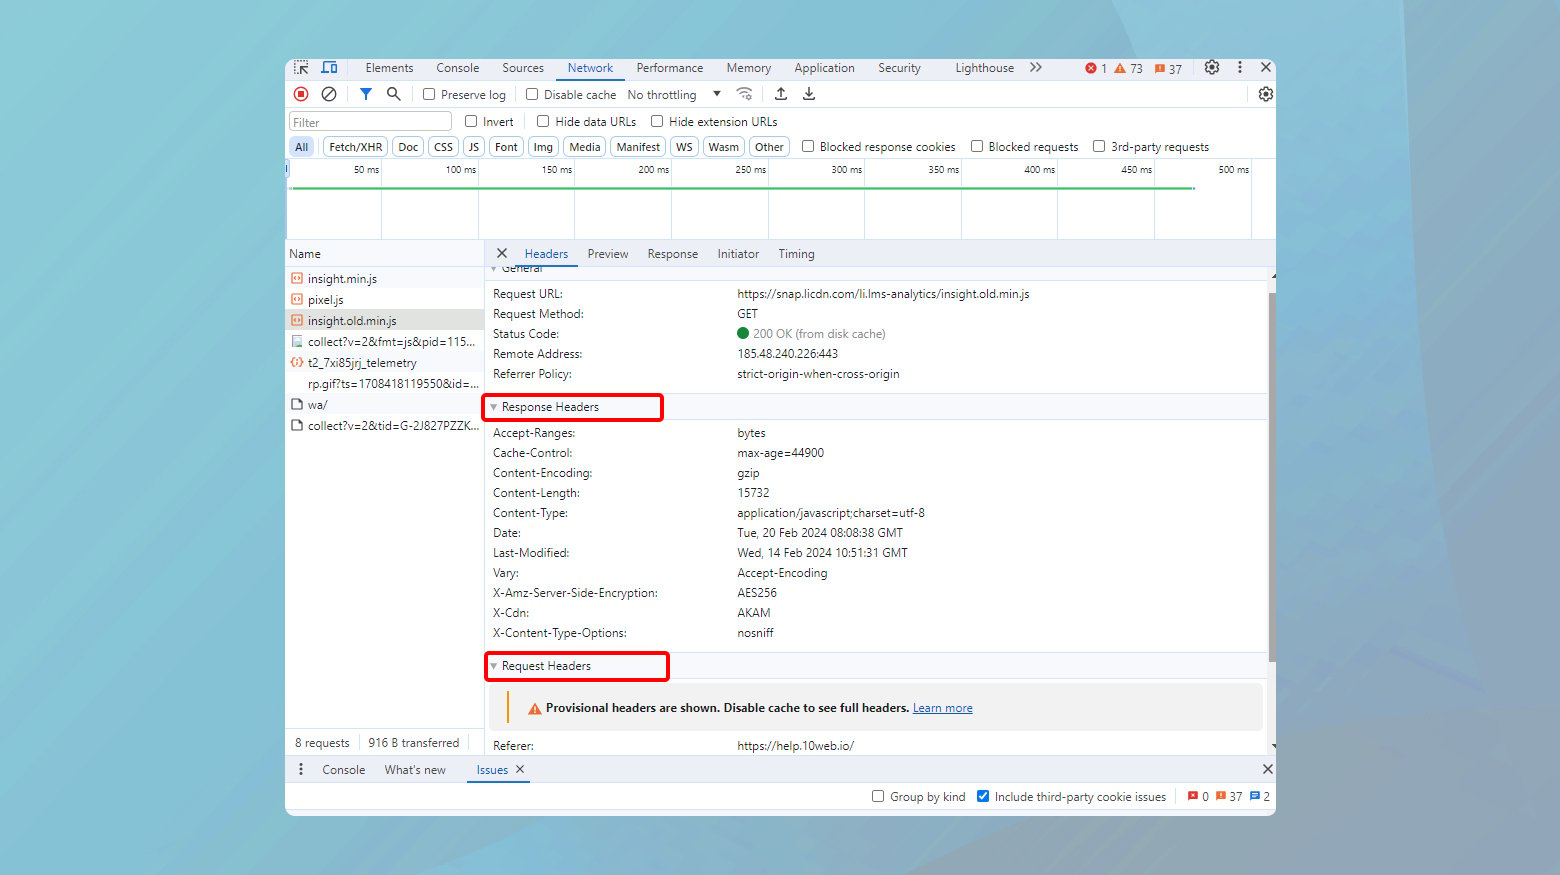
To diagnose and resolve a 406 error, engineers should inspect the HTTP Accept- headers sent by the client and the content types the server is capable of delivering. This involves analyzing the request and response headers, which can be accessed through browser developer tools under the Network and Headers tabs. This inspection helps identify discrepancies between what the client requests and what the server is attempting to deliver.
For web developers and engineers, understanding the nuances of 406 errors is essential for troubleshooting content negotiation issues between clients and servers. It necessitates a thorough understanding of HTTP headers and the ability to adjust server configurations or content delivery mechanisms to align with the client’s capabilities. Resolving such errors often involves reviewing and correcting the server’s response headers or modifying the resource’s representation to meet the client’s accept parameters.
Say goodbye to website errors
Achieve peace of mind with 99.99% uptime on 10Web Managed
WordPress Hosting, powered by Google Cloud.
Resolving the 406 error
Fixing this error involves a series of troubleshooting steps aimed at identifying and rectifying the mismatch between the client’s expectations and what the server can deliver.
Check if the URL is right
One of the simplest yet often overlooked causes of a 406 error is an incorrect URL. A URL that is mistyped, outdated, or improperly formatted can request resources that the server cannot correctly interpret or does not have, resulting in a 406 error. This step is crucial because it addresses the potential human error element in the equation, ensuring that the request itself is valid and correctly directed.
Correcting the URL ensures that the request is sent to the right resource location and in the proper format that the server can understand and process. It eliminates the possibility of a 406 error arising from a fundamental miscommunication between the client and server due to an incorrect resource identifier.
Restart your devices and internet
Restarting your devices and internet connection serves as a universal troubleshooting step that can resolve a broad spectrum of network-related issues, including a 406 Not Acceptable error. This step can be particularly effective if the error is a result of temporary networking glitches, DNS issues, or stale configurations on your device or network equipment.
Restarting your devices clears any temporary configurations and cached data that may be causing the error. It also refreshes your network connection, which can resolve DNS issues or connectivity problems that might be leading to the error. This step essentially resets the environment, potentially clearing the path for a successful request-response cycle without the 406 error.
To restart your computer or device:
- Shut down your device completely and then turn it back on.
- Unplug your modem and router from the power source, wait for at least 30 seconds, and then plug them back in. Wait for the devices to fully restart and connect to the internet.
- Once your modem and router are back online, reconnect your device to the network and try accessing the URL again.
More troubleshooting tips
Different web platforms will require different ways of troubleshooting this issue. Here are a few tips that cover a wider spectrum of troubleshooting.
- Go online to see if your platform’s server is working. The issue might be with the server of the service.
- Turn off and then turn on your computer, game console, streaming device, or any other gadgets.
- Unplug all your devices, wait a bit, then plug them back in and see if the problem is fixed.
- Make sure your app is up to date. Also, check if there are any updates for your devices’ software.
- Restart your home or office internet (the WiFi or connection from your router).
- If you’re still having issues, try using a cable connection instead of WiFi.
- If possible, try to see if the same problem happens on a different device connected to the same network. If the problem doesn’t happen again, there might be an issue with your network or the first device.
Revert recent changes to your content management system
Modifications to your content management system (CMS) such as WordPress, Joomla, or Drupal can inadvertently lead to a 406 Not Acceptable error. This can occur if the recent changes alter the way content is served or how requests are handled, possibly introducing configurations or content types that the server cannot accept.
Reverting recent changes undoes any modifications that may have conflicted with the server’s ability to respond to requests with acceptable content types. Since CMS platforms often involve complex interactions between various components, reverting to a previous state can help isolate the cause of the error and restore functionality.
It is important that before you revert changes, that you make a complete backup of your website.
To revert to an earlier version of WordPress:
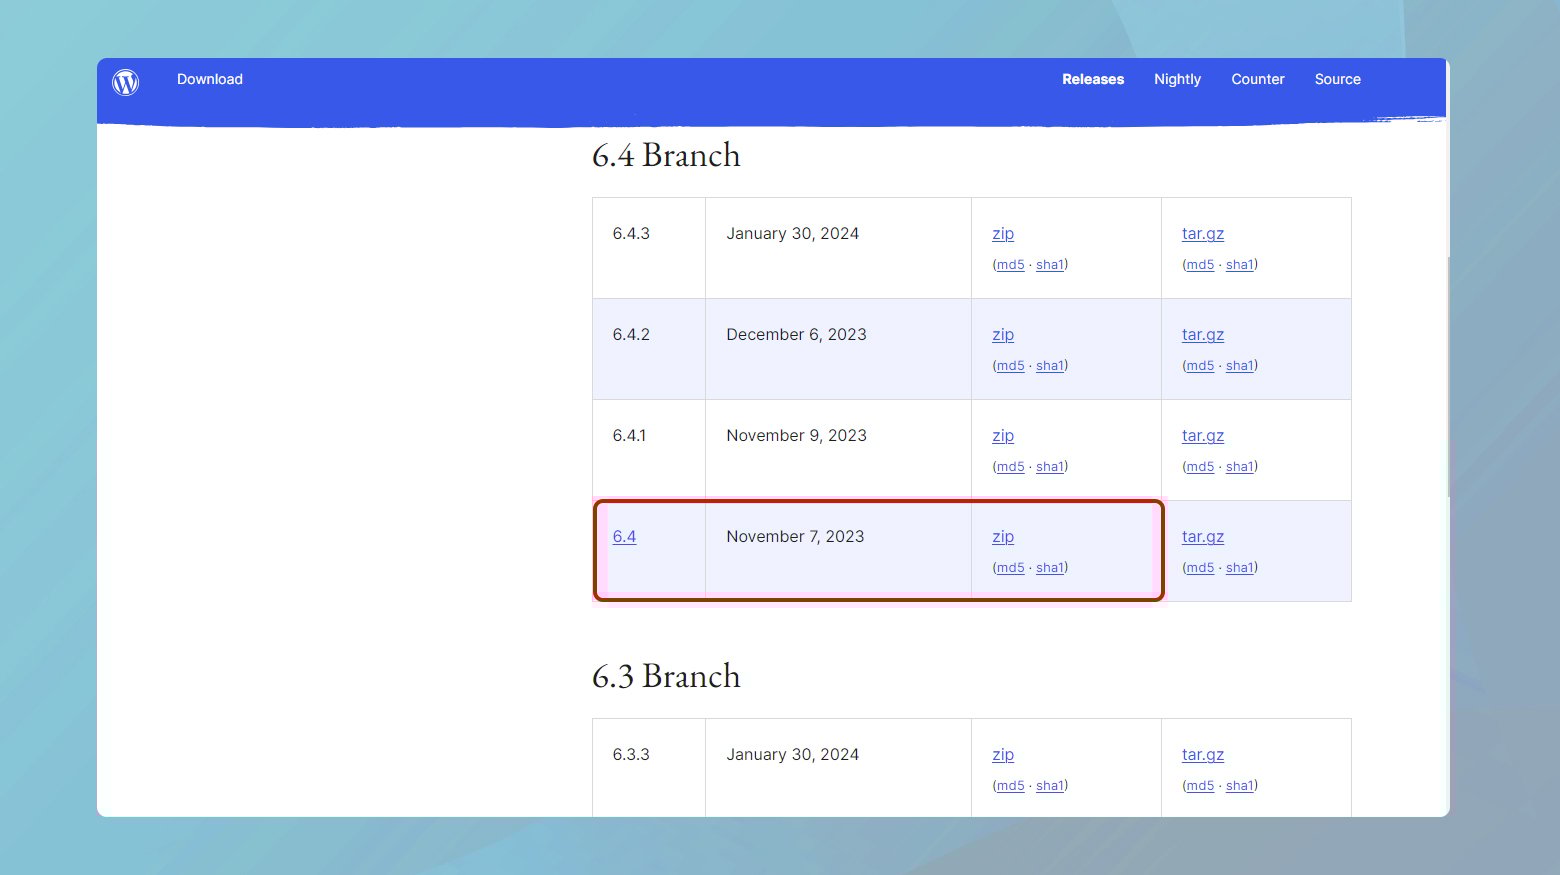
- Go to the WordPress Release Archive and download the zip file for the version you wish to downgrade to.
- Log into your WordPress dashboard, navigate to “Plugins” > “Installed Plugins,” select all plugins, choose “Deactivate” from the bulk actions dropdown menu, and click “Apply.”
- Connect to your website using an FTP client.
- In your root directory, delete the wp-includes and wp-admin directories. Do not delete the wp-content directory or any of the files in the root directory that are part of your specific installations, such as wp-config.php.
- Unzip the WordPress version you downloaded earlier and upload the wp-includes and wp-admin directories, along with all files from the root of the WordPress package (except wp-content) to your website’s root directory. Overwrite existing files when prompted.
After replacing the files, visit your WordPress admin area. WordPress might prompt you to update your database. If prompted, click the button to update the database.
Once the downgrade is complete and your website is functioning as expected, gradually reactivate your plugins.
Thoroughly test your website for functionality and performance to ensure that the downgrade process hasn’t introduced any new issue
Delete and reinstall website plugins, themes, and extensions
Plugins, themes, and extensions enhance the functionality and appearance of websites but can sometimes cause compatibility issues or conflicts, resulting in a 406 error. This is particularly true if they are outdated, corrupted, or not fully compatible with the server’s configuration.
Deleting and then reinstalling these components ensures that they are up to date and free from corruption. This step can eliminate conflicts that may be causing the server to respond with a 406 Not Acceptable error by ensuring all components are compatible with the server’s current configuration and with each other.
Deactivating and deleting plugins
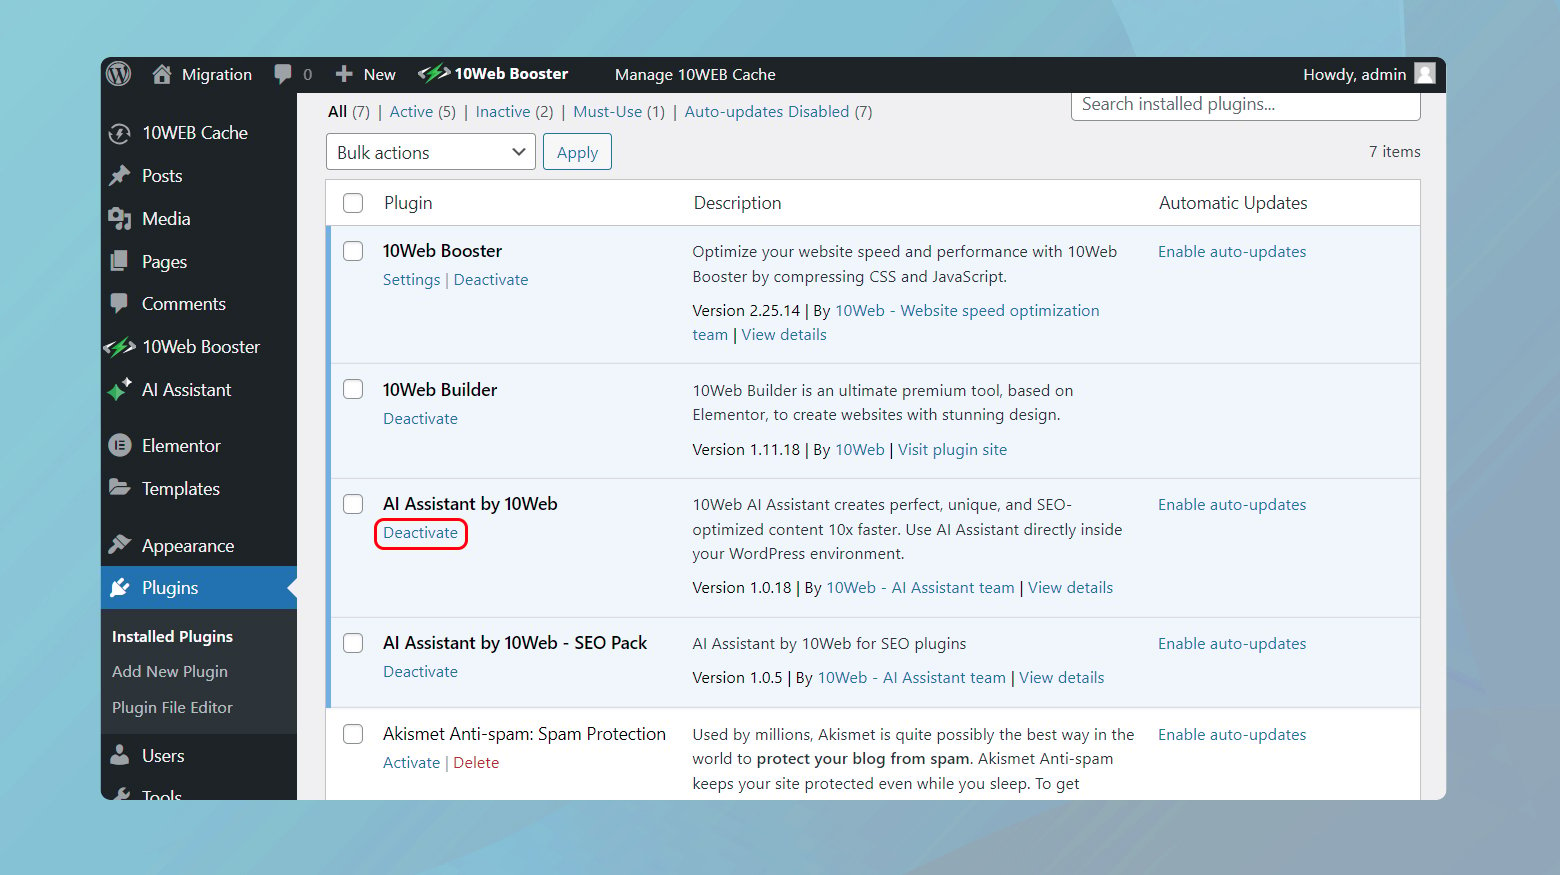
- Log in to your WordPress admin panel.
- On the dashboard, click on “Plugins” > “Installed Plugins” to view a list of all the plugins currently installed on your WordPress site.
- Before you can delete a plugin, you must first deactivate it. To do this, click the “Deactivate” link below the plugin name. If you suspect a specific plugin is causing issues, start with that one.
- After deactivating the plugin, a “Delete” link will appear below the plugin name. Click this link to remove the plugin from your WordPress site. You will be asked to confirm the deletion.
Reinstalling plugins
- To reinstall a plugin you’ve just deleted or to install a new one, go to “Plugins” > “Add New” in your WordPress dashboard.
- Use the search field to find the plugin you want to reinstall. You can search by the plugin’s name or functionality.
- Once you find the plugin, click “Install Now.” After the installation completes, click “Activate” to start using the plugin on your WordPress site.
Deleting themes
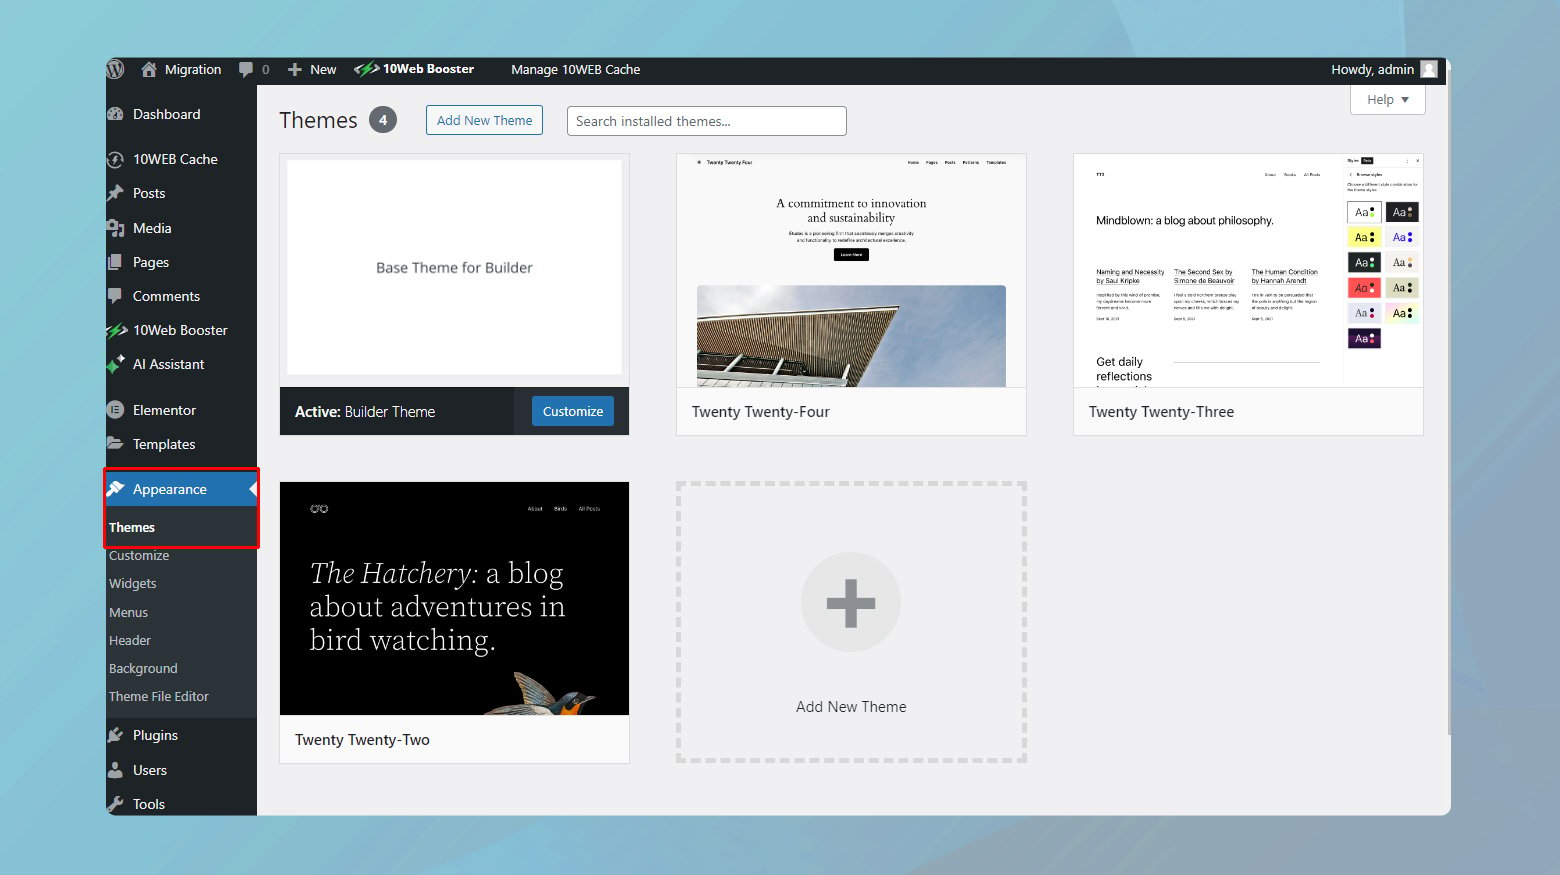
- In your WordPress dashboard, go to “Appearance” > “Themes.”
- Before you can delete a theme, you need to activate a different one. Hover over another theme and click “Activate.”
- Return to the Themes page, hover over the theme you want to delete, and click “Theme Details.” In the bottom right corner of the theme details window, you’ll find a “Delete” button. Click it and confirm the deletion.
Reinstalling themes
- To reinstall a theme or add a new one, go back to “Appearance” > “Themes” in your WordPress dashboard, then click “Add New” at the top.
- Use the search or filter options to find the theme you want to install. Once you’ve found it, hover over the theme and click “Install.”
- After the theme has been installed, click “Activate” to apply it to your WordPress site.
Extensions, often specific to plugins or themes, follow the same general process for deletion and reinstallation.
Look through your database for any changes or problems
Databases store critical information that websites rely on to function properly. Unauthorized changes or errors within the database can disrupt the normal operation of your website, potentially leading to a 406 error if the server cannot retrieve or process data correctly.
Inspecting the database for changes or problems allows you to identify and correct issues that may be affecting how content is delivered to users. By ensuring the integrity and proper configuration of your database, you help ensure that the server can accurately process requests and deliver acceptable content types.
You can get a database scanner and cleaner, like WP Optimize or Advanced Database Cleaner, to remove unnecessary and problematic data from your database. This process typically involves eliminating obsolete or unused items such as deleted posts, old revisions, and surplus metadata, making it an effective first step in decluttering your database and possibly resolving the 406 error. Furthermore, use the tool to analyze your database for any entries or tables that may have been altered by a malfunctioning plugin or appear irrelevant or misplaced.
To access your database:
- Use a database management tool like phpMyAdmin to access your website’s database.
- Look for any recent entries or modifications that could be causing issues. Pay special attention to changes in content types, encoding, or structure.
- If you find problematic changes, consider restoring your database from a backup made before the changes occurred.
- After making adjustments or restoring the database, check if the 406 error is resolved.
Look through your server logs
Server logs provide detailed insights into the operations and errors encountered by the server. By examining these logs, you can identify specific requests that led to the 406 Not Acceptable error and understand the context and reasons behind the server’s inability to fulfill those requests.
Analyzing server logs helps pinpoint the exact cause of the 406 errors by revealing detailed information about the requests and the server’s response. This step can uncover patterns or specific configurations that are leading to the error, guiding you towards the appropriate corrective measures.
- Use your hosting control panel or an FTP client to access your server’s logs.
- Look for entries around the time the 406 errors occurred. Pay attention to any mentions of failed content negotiation or unacceptable request headers.
- Determine if there’s a specific request or resource that’s consistently associated with the error.
- Based on your findings, make necessary changes to your server’s configuration or website code to address the issue.
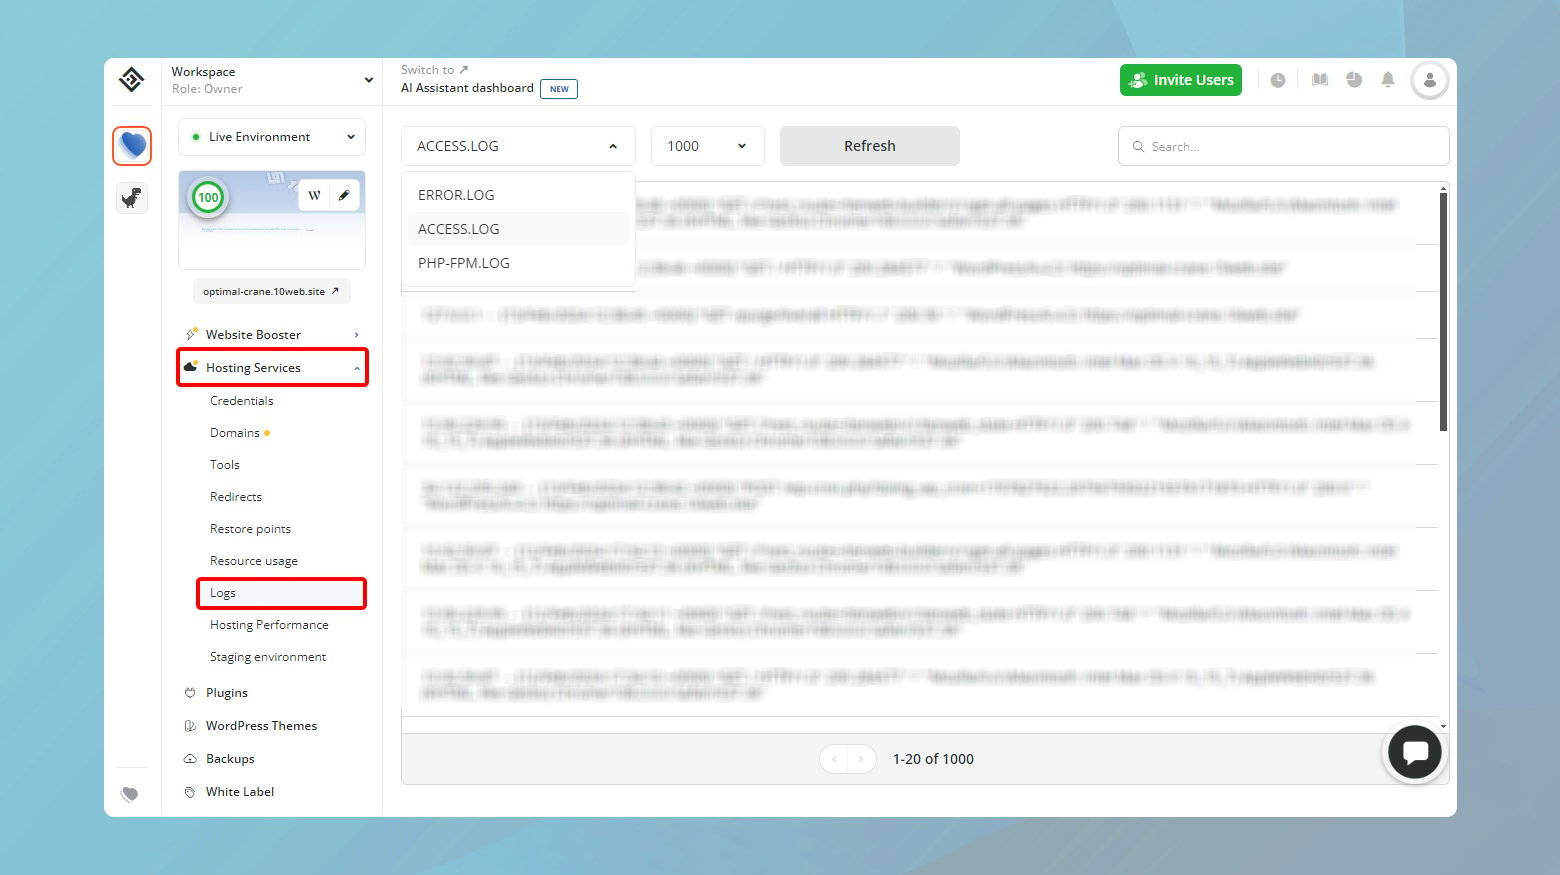
For 10Web users, you can access your logs via your 10Web dashboard. Simply log into your account and navigate to Logs under Hosting Services.
Troubleshoot your website app (like WordPress)
Debugging is the process of examining the application’s code to identify and remove small errors, often referred to as bugs. Website applications such as WordPress can experience issues due to plugin conflicts, theme problems, or core software bugs.
For a thorough analysis of WordPress or any web application, debugging the database and website files is highly recommended. Fortunately, debugging doesn’t require manually inspecting each line of code to find the bugs.
Debugging WordPress involves several steps that can help you identify and resolve issues within your WordPress site. Here are some effective methods to debug WordPress:
Enable WP_DEBUG
WordPress comes with a built-in debugging feature, which can be enabled by adding the following lines to your `wp-config.php` file:
 ```php
 define( 'WP_DEBUG', true );
 define( 'WP_DEBUG_LOG', true );
 define( 'WP_DEBUG_DISPLAY', false );
 @ini_set( 'display_errors', 0 );
 ```
This will activate the debug mode, log the errors to a file named `debug.log` within the `wp-content` directory, and prevent errors from being displayed to your site’s visitors.
Use debugging plugins
There are several plugins available that can help simplify the debugging process. Plugins like Query Monitor, Debug Bar, and Log Deprecated Notices offer insights into database queries, PHP errors, and the use of outdated functions, respectively.
Inspect browser console
Use your web browser’s developer tools to check for JavaScript errors or network issues. This can be particularly useful for debugging issues related to website layout, performance, or functionality that depends on JavaScript.
Conflict diagnosis
Often, issues are caused by a theme or plugin conflict. To diagnose these, deactivate all your plugins and switch to a default WordPress theme (like Twenty Twenty-One). If the problem goes away, reactivate each plugin one by one until the issue reappears. This process can help pinpoint the problematic plugin or theme.
Use a staging environment
Before making changes to your live site, replicate the issue in a staging environment—a complete but private copy of your site. This allows you to debug and test solutions without affecting your live site.
Tips for preventing the 406 Not Acceptable error
To make sure this error doesn’t happen on your website, here’s what you can do:
- Only use plugins, themes, and add-ons that you really need and that come from trusted sources. Try not to add too many.
- Don’t change the main WordPress files unless you really have to and know exactly what you’re doing.
- Clean your database and tidy up your site files regularly. Doing this every month is good, and it’s even better if you find a tool that does it for you automatically.
- Get into the habit of checking your server and website for errors.
- Set up your website or app to back up automatically. That way, if something goes wrong, you won’t worry too much because you can go back to an earlier version of your website and start over. For example, at 10Web you can schedule backups of your website at an interval that works for you.
- Always do a manual backup before you update WordPress or any plugins, even if you have automatic backups set up. It’s also smart to back up before you make any changes to your website or add new code. This is just to be extra safe.
Conclusion
Fixing a 406 Not Acceptable error involves a comprehensive approach that addresses potential issues from incorrect URLs to deeper problems within content management systems, plugins, themes, databases, and server configurations. Each step targets a specific area where mismatches between the client’s request headers and the server’s ability to provide an acceptable response may occur. By methodically working through these troubleshooting steps, you can identify and resolve the underlying cause of the error, ensuring that your website can once again deliver content successfully to its users.
Say goodbye to website errors
Achieve peace of mind with 99.99% uptime on 10Web Managed
WordPress Hosting, powered by Google Cloud.
Say goodbye to website errors
Fix all the website errors in one click
Migrate your website to the world's best Managed WordPress Hosting.